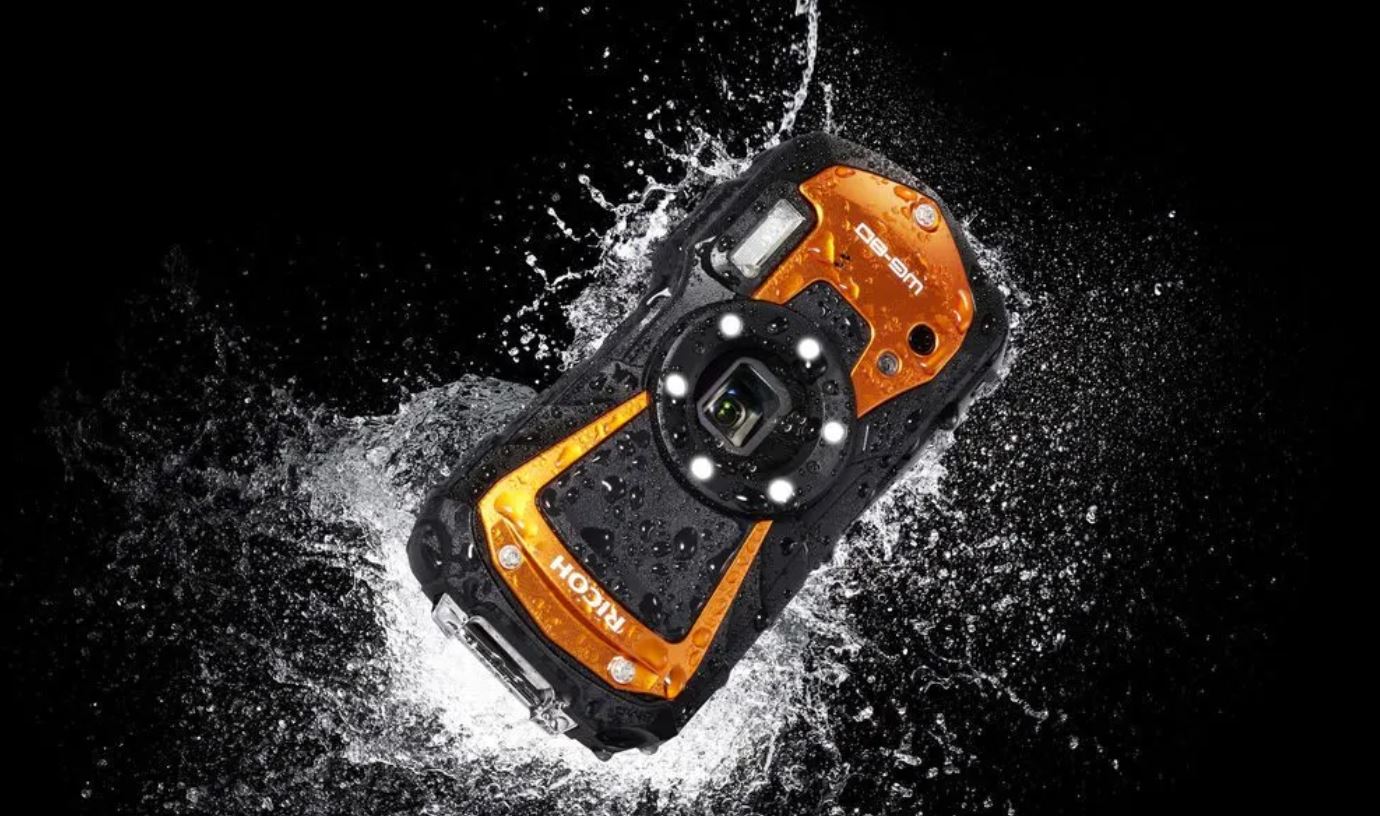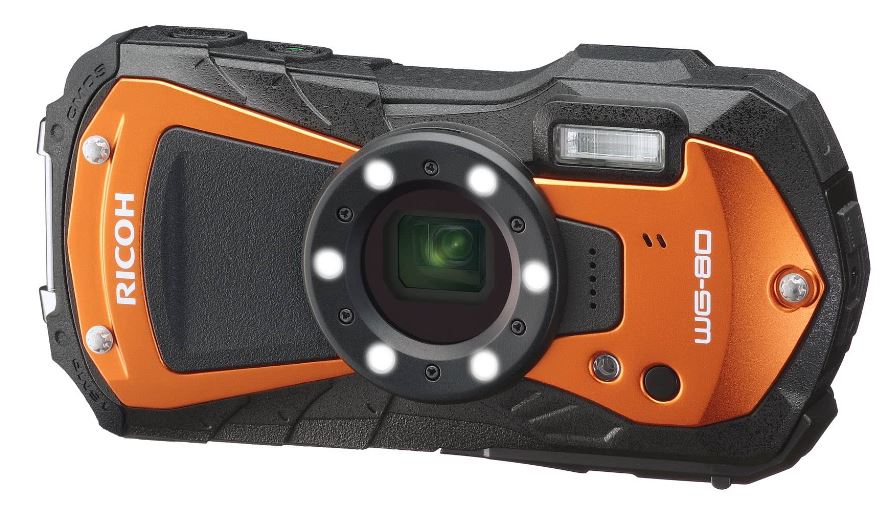
Ricoh WG-80 Orange Waterproof Digital Camera
About Ricoh
Ricoh Corporation, commonly known as Ricoh, is a multinational imaging and electronics company based in Tokyo, Japan. Founded in 1936, Ricoh has grown into a global technology provider known for its diverse range of products and services. The company’s primary focus areas are office equipment, imaging products, and industrial systems.
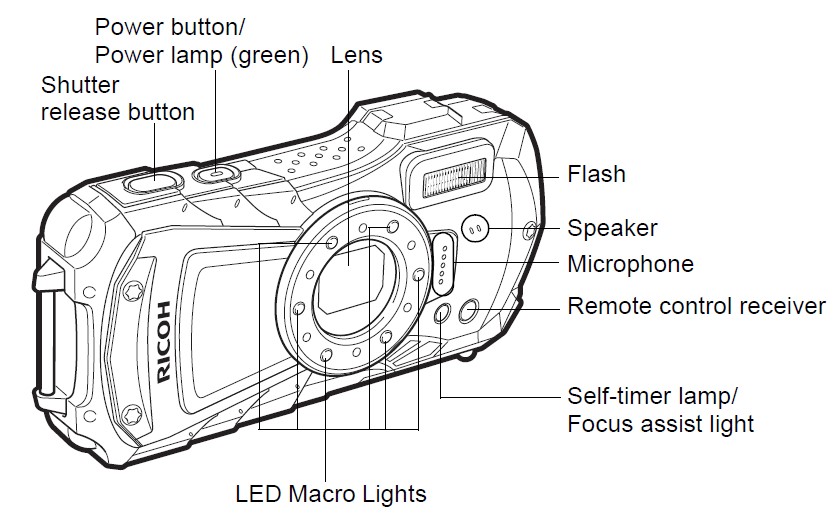
Names of Parts
Front
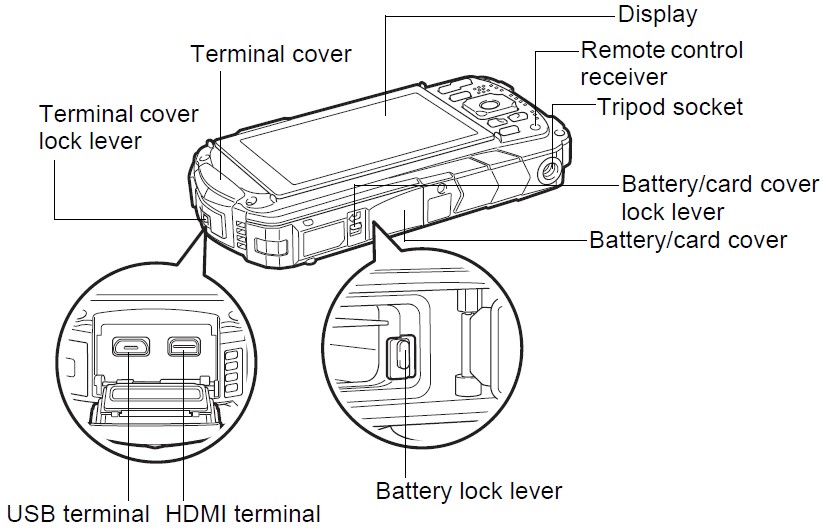
Back
Powering the Camera
Installing the Battery
Use the rechargeable lithium-ion battery D-LI92 that is provided with the camera.
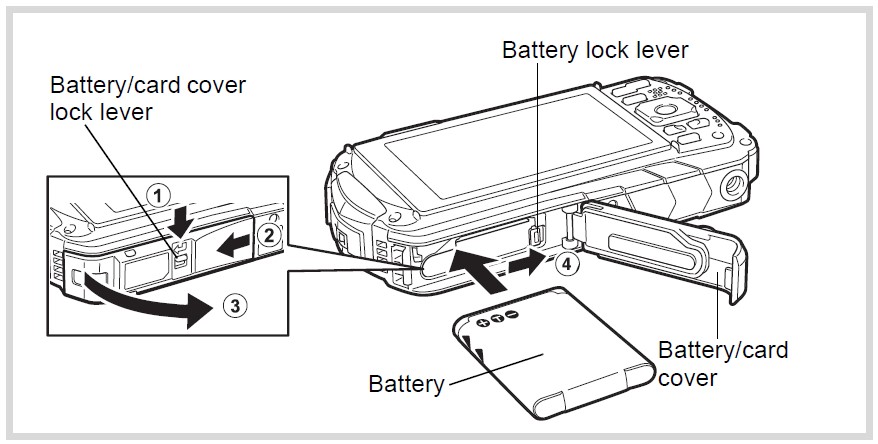
- Open the battery/card cover.
Press the battery/card cover lock lever in the direction shown 1, slide the cover towards and open it towards 3.
- Using the side of the battery to press the battery lock lever in the direction of ©, insert the battery with the PENTAX logo pointing toward the lens.
Push the battery in until it is locked in place. If the battery is incorrectly oriented, malfunction may result.
- Close the battery card cover.
Push down and slide the battery/card cover with steady but gentle force in the opposite direction indicated by (2). The battery/card cover may be difficult to close because the waterproof packing is very thick to prevent water from entering the camera.
To close the battery/card cover, push down on it toward the camera with your thumb where it says [PUSH]. Then slide it until the battery/card cover lock lever slides into place covering the yellow mark on the lock lever.

Removing the Battery
- Open the battery/card cover.
- Push the battery lock lever towards it.
- The battery will be ejected. Take care not to drop the battery when removing it. Caution
- Do not use excessive force when opening and closing the battery/card cover because the waterproof seal may peel off. If the seal is not in the correct position, the camera will not be waterproof.
- If the battery/card cover is not locked securely, water, sand, or dirt may get into the camera.
- This camera uses a rechargeable lithium-ion battery D-LI92. Use of any other type of battery may damage the camera and cause malfunction. Insert the battery correctly. If the battery is incorrectly oriented, malfunction may result.
- Do not remove the battery while the camera is turned on.
- When storing the battery for more than 6 months, charge the battery for 30 minutes using the USB power adapter and store the battery separately. Be sure to recharge the battery every 6 to 12 months. Storing the battery below room temperature is ideal. Avoid storing it in high temperatures.
- The date and time may be returned to the default settings if the camera is left without the battery for a long time.
- Be careful as the camera or the battery may become hot when the camera is used continuously for a long period.
- Allow the camera to dry completely before changing the battery. Avoid changing the battery where the camera is likely to get wet or dirty and make sure that your hands are dry.
For Customers in the USA and Canada Lithium-lon batteries are recyclable.
You can help preserve our environment by returning your used rechargeable batteries to the collection and recycling location nearest you.
For more information regarding recycling rechargeable batteries, call toll-free 1-800-822-8837, or visit http://www.call2recycle.org/
Charging the Battery
Connect the supplied USB power adapter to the camera and charge the battery before using it for the first time after a long period of non-use, or when the [Battery depleted] message appears.
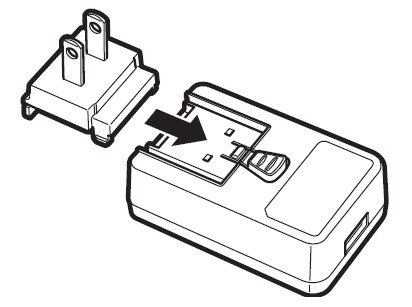
- Insert the power plug into the USB power adapter.
Insert it until it clicks into place.
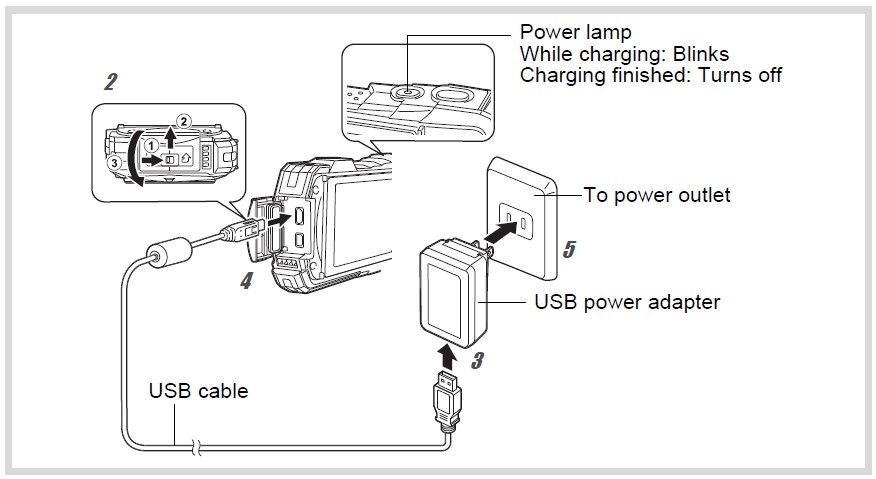
- Make sure that the camera is turned off and open the terminal cover.
Move the terminal cover lock lever in the direction shown by 1, slide the cover in the direction shown by 2, and open the cover in the direction shown by
- Connect the USB cable to the USB power adapter.
- Connect the USB cable to the camera.
- Plug the USB power adapter into the power outlet.
The power lamp blinks while charging. When charging is finished, the power lamp turns off.
The terminal cover will not close while charging. Leave the cover open when charging and do not attempt to close it.
- Unplug the USB power adapter from the power outlet when charging is finished.
- Remove the USB cable from the camera.
- Close the terminal cover.
Close the terminal cover in the opposite direction indicated by 3. While lightly pressing on the cover, slide it away from 2 until it clicks.
- Do not use the supplied USB power adapter for any other purpose than that of connecting to this camera and charging the designated battery. Doing otherwise may cause a connected device to be damaged or overheated.
- The battery has reached the end of its service life when it starts to run down soon after being charged. Replace it with a new battery.
- If the camera is connected to the power outlet but the charging indicator fails to light, the battery may be faulty. Replace it with a new battery.
- The time required to fully charge the battery is about 120 minutes (max.). (The charging time may vary depending on the ambient temperature and charging conditions.) The appropriate ambient temperature for charging the battery is 0°C to 40°C (32°F to 104°F).
- You cannot turn on the camera while it is charging.
Image Storage Capacity, Movie Recording Time, and Playback Time (at 23°C (73.4°F) with the display on and the battery fully charged)

*1 The image storage capacity shows the approximate number of shots recorded during CIPA-compliant testing (at 23°C (73.4°F) with the display on and flash used for 50% of the shots). Actual performance may vary according to operating conditions.
*2 According to the results of in-house testing.
- Battery performance may deteriorate as temperature decreases. When using the camera in cold regions, we recommend carrying a spare battery in your pocket to keep it warm. Battery performance will recover when the temperature returns to normal.
- Be sure to take a spare battery with you when traveling abroad or to a cold region, or if you intend to take a lot of pictures.
Battery Level Indicator
You can check the battery level by the indicator on the display.

Turning the Camera On and Off
Press the power button.
The camera turns on and both the power lamp and display turn on. If the [Language/ atE ] screen or [Date Adjustment] screen appears when you turn the camera on, follow the procedure on p.22 to set the display language and/ or current date and time.
Press the power button again.
The camera turns off and both the power lamp and display turn off.
Taking Still Pictures « p.30
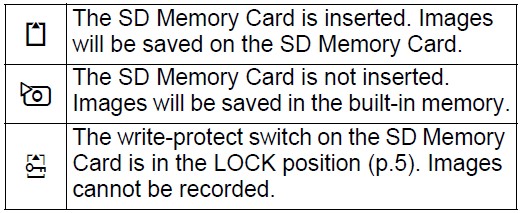
Checking the SD Memory Card
The SD Memory Card is checked when the camera turns on and the memory status is displayed.

Starting up in Playback Mode
Use this function when you want to play back images straight away without taking any pictures.
Press and hold down the D button.
The display turns on and the camera starts up in playback mode.
- To switch from playback mode to capture mode, press the L button or press the shutter release button halfway.
- To set the camera not to start up in playback mode, set [Playback Mode] to w (Off) from [Startup Shortcut] in the [° Setting] menu.
Playing Back Still Pictures as p.45
Initial Settings
The [Language/ al#] screen appears when the camera is turned on for the first time. Perform the operations in “Setting the Display Language” below to set the language, and in “Setting the Date and Time” (p.23) to set the current date and time.
Setting the Display Language
- Use the four-way controller ( A ) to choose the display language.
- Press the OK button.
The [Initial Setting] screen appears in the selected language. If the desired settings for [Hometown] and [DST] (Daylight Saving Time) appear, proceed to step
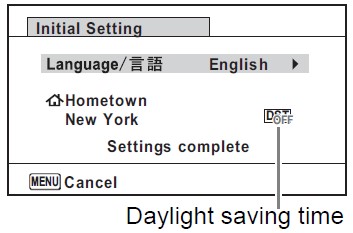
- Press the four-way controller.
The frame moves to [& Hometown].
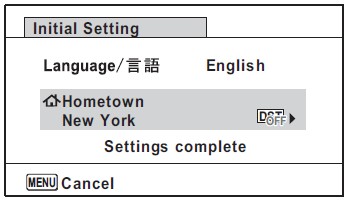
- Press the four-way controller.
The [& Hometown] screen appears.
- Use the four-way controller ( < ” ) to choose a city.
- Press the four-way controller (V).
The frame moves to [DST] (Daylight Saving Time).
- Use the four-way controller to select (On) or (Off).
- Press the OK button.
The [Initial Setting] screen reappears.
- Press the four-way controller (W) to select [Settings complete].
- Press the OK button.
The [Date Adjustment] screen appears. Next, set the date and time.
Setting the Date and Time
Set the current date and time and the display format.
- Press the four-way controller.
The frame moves to [mm/dd/yy].
- Use the four-way controller to choose the date and time display format.
Choose from [mm/dd/yy], [dd/mm/yy], or [yy/ mm/dd].

- Press the four-way controller.
The frame moves to [24h].
- Use the four-way controller to select [24h] (24-hour display) or [12h] (12-hour display).
- Press the four-way controller.
The frame returns to [Date Format].
- Press the four-way controller.
The frame moves to [Date].
- Press the four-way controller.
The frame moves to the month.
- Use the four-way controller (4 ) to change the month.
Change the day and year in the same manner. Next, change the time.
- Press the four-way controller ) to select [Settings complete].
- Press the OK button.
This confirms the date and time.
If you press the OK button in step 10, the camera clock is reset to 0 seconds. To set the exact time, press the OK button when the time signal (on the TV radio, etc.) reaches 0 seconds.
When the [Initial Setting] or [Date Adjustment] screen is displayed, you can cancel the setting operation and switch to capture mode by pressing the MENU button. In this case, the [Initial Setting] screen will appear the next time you turn the camera on.
Recording Movies
Recording Movies
This mode enables you to record movies. Sound is recorded at the same time.
- Use the four-way controller ( A V < ») to select & (Movie) from the Capture Mode Palette.
- Press the OK button.
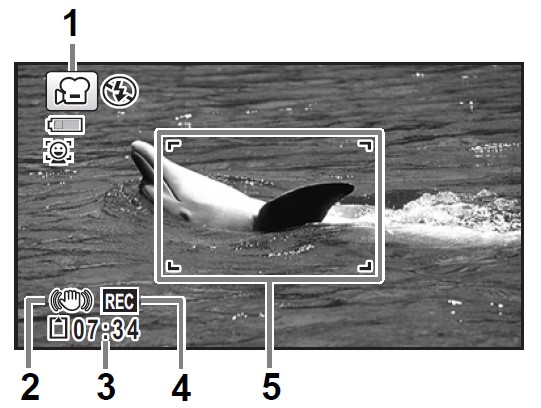
The a (Movie) mode is selected and the camera returns to capture mode. The following information appears on the display.
- Movie mode icon
- Movie Shake Reduction icon
- Remaining recordable time
- REC indicator (blinks during recording)
- Focus frame (does not appear during recording)
You can change the captured area by pressing the W/T button.
- Enlarges the subject.
- Widens the area that is captured by the camera.
- Press the shutter release button fully.
Recording starts. You can continue recording until the recorded movie time reaches 25 minutes.
- Press the shutter release button fully.
Recording stops.
Playing Back a Movie rap.45
- The focus mode can be changed before the recording starts.
- When the focus mode is set to MF (Manual Focus), you can adjust the focus before recording starts and during recording.
- When the shooting mode is set to a (Movie), Face Detection is automatically set to on. You can select Smile Capture or Face Detection Off before starting recording a movie. When the Smile Capture function is activated, movie recording starts automatically when the camera recognizes the subject’s smile. However, the Smile Capture function may not work depending on the condition of the recognized faces, and movie recording may not start automatically. If this happens, press the shutter release button to start the movie recording.
- When you use the SD Memory Card, use SD Speed Class 4 or higher cards.
- Movies recorded in & mode capture a different area than still pictures.
Keeping the Shutter Release Button Pressed
If you keep the shutter release button pressed for more than one second, the recording will continue as long as you keep the button pressed. Shooting stops when you take your finger off the shutter release button.
Recording a Movie Quickly Using the Movie Button
This camera starts/stops movie recording simply by pressing the Movie button, without selecting & (Movie) from the Capture Mode Palette. This is useful when you want to start recording quickly.
- Press the Movie button.
Recording starts. You can continue recording until the recorded movie time reaches 25 minutes.
- Press the Movie button again.
Recording stops.
- You cannot stop recording by pressing the shutter release button. To stop recording, press the Movie button.
- Movies are recorded with the default settings for the [a Movie] menu when recording movies with the Movie button (p.27).
Information on the Operating Manual
An Operating Manual (PDF) containing information on how to use this camera is available. Please download it from our website. Operating Manual Download: https://www.ricoh-imaging.com/manuals/

Regarding User Registration
To better serve you, we request that you complete the user registration, which can be found on our website. Thank you for your cooperation https://www.ricoh-imaging.com/registration/
FAQS About Ricoh WG-80 Orange Waterproof Digital Camera
The Ricoh WG-80 has WiFi, right?
There is no Wi-Fi available.
From whence is the Ricoh camera?
Tokyo
The Ricoh is water resistant.
up to 14 meters of water resistance
How do I link my phone to my Ricoh?
By simply scanning the QR code displayed on the multifunction product operation panel, the screen, or Interactive Whiteboard with your smart device
What Ricoh-related facts are noteworthy?
Ricoh was the first manufacturer in Japan to implement a belt-conveyor production system in 1953.
Are Ricoh cameras reliable?
A fantastic digital camera for photographers who frequently take wide-angle pictures.
How long is the Ricoh battery good for?
200 shots maximum per charge
Ricoh does it capture raw?
In this mode, RAW (DNG) and RAW (DNG) + JPEG are both options.
For more manuals by Ricoh, Visit Manualsdock
[embeddoc url=”https://manualsdock.com/wp-content/uploads/2023/09/Ricoh-WG-80-Orange-Waterproof-Digital-Camera-Start-Guide.pdf” download=”all”]

