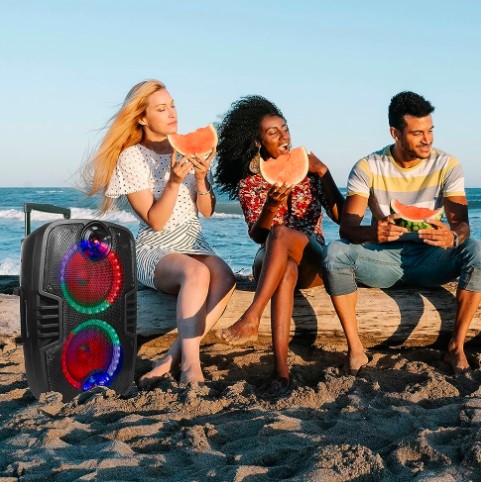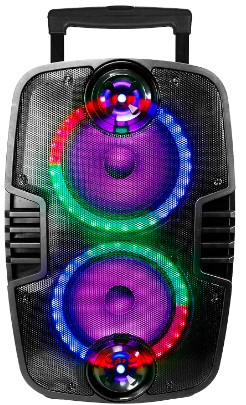
QFX PBX-311 Rechargeable Bluetooth TWS Speaker
STEP SETUP GUIDE
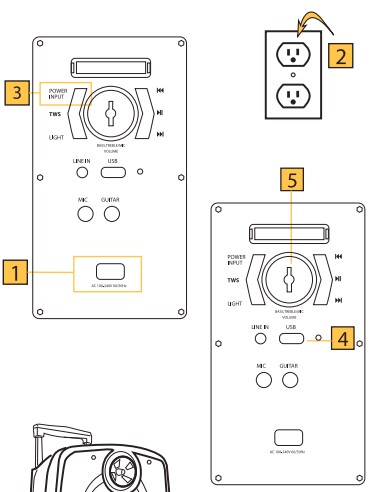
- Step
Find the AC power cord to the PBX-311 located on the back panel of the unit. - Step
Find a power outlet (AC 120V/60Hz) and connect the AC cord to the socket to supply the unit with power. - Step
Move to the top of part of the panel and press and hold the POWER INPUT button. The unit should turn on and begin charging. - Step
Insert a USB flash drive in the USB port located below the big knob. The PBX-311 will automatically begin playing the .mp3 content. - Step
Use the Big Knob to adjust the Master Volume to your taste. Press the Big Knob to enter sub-menus such as EQ, Mic Vol, Guitar VOL, Echo, etc. - Step
Press the Forward and Rewind keys to move to the next track or previous track. If in FM mode, these keys will change the radio station.
BLUETOOTH
Bluetooth Mode: Use the MODE button to enable Bluetooth on the PBX-311. Open the Bluetooth settings on
your mobile device and search for QFX PBX-311. Select the option to pair both devices together. You can
now sit back and enjoy the music from your favorite app. You won’t need to reconnect the Bluetooth again
when switching through modes.
FM RADIO:
FM Radio: Frequency-modulated stations operate in a frequency band extending from 87.8 MHz to 108 MHz.
Use the MODE button to select the FM mode. In FM mode, press the Play/Pause button to scan available
frequencies in the area. Extend the telescoping antenna to enhance reception.
TWS CONNECTION:
TWS Wireless Bluetooth Connection: Enable Bluetooth mode on both speakers. Press the TWS button for 3
seconds, on one of the speakers, to sync both units (they must be the same make and model to function). On
your mobile device under the Bluetooth menu, search for PBX-311 and connect. Open your favorite music
app and enjoy True Wireless Stereo. To Exit TWS press and hold the TWS button.
IMPORTANT SAFETY MEASURES
Before using this machine, please read all the safety and operating instructions. These safety and operating instructions should be kept in a condition of consultation.
- Electric Power Supply Line: Keep the power cord safe from being trampled on, pressed on by heavy objects, or pierced. Make sure that the cord has ample space to rest on the ground and is not stressed. DO NOT pull or drag the power supply line.
- Ventilation: This unit must be set in a ventilated space. DO NOT cover the vents on the back panel
for any reason. If placed alongside a wall, distance the unit a minimum of 10cm to allow airflow. DO NOT surface that might restrict good airflow. - Dismantling: DO NOT dismantle or open the unit. This is a high-powered unit that can cause
serious harm if tampered with. DO NOT Open. - Smoke: Please unplug the power supply cord from the wall outlet immediately if unusual smoke appears and contact customer support.
WARNING!
TO REDUCE THE RISK OF ELECTRIC SHOCK, DO NOT REMOVE THE COVER ON THIS SPEAKER. THERE ARE NO USER-SERVICEABLE PARTS INSIDE. REFER ALL SERVICING TO A QUALIFIED TECHNICIAN To prevent fire or electric shock, do not expose this equipment to rain or moisture. Do not store or operate this product near any liquids, or heat sources such as radiators, heat registers, or under extreme weather conditions. Clean only with a dry cloth. Users should exhibit extra safety when the WARNING or CAUTION symbol appears in this instruction manual and follow all precautions as they are stated.
REMOTE CONTROL & TWS

- Stand By: Enable standby mode.
- LED: Select light modes.
- Mute: Mute the Volume.
- EQ: Toggle through EQ presets (Pop, Jazz, Rock, Classical).
- Voice: Change Voice quality.
- Mic. PR: Microphone Priority over music playback.
- Input: Toggle through input modes, USB/LINE/BT/FM RADIO.
- Rewind: Select the previous track or FM channel.
- Forward: Select the next track or FM channel.
- Play/Pause: Play or Pause the current track.
- VOL +: Increase the master volume.
- VOL -: Decrease the master volume.
4-WAY TWS: BLUETOOTH, USB, AUX, FM RADIO
TWS CONNECTION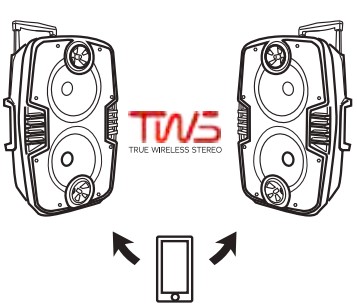
TWS connection: TWS Connection is only for two speakers of the same make and model.
- Enable Bluetooth mode on both speakers.
- Press the TWS button on one of the speakers to sync both units together (they must be the same make and model to function).
- On your mobile device under the Bluetooth menu, search for PBX-311 and connect.
- Open your favorite music app and enjoy True Wireless Stereo.
- To Exit TWS press and hold the TWS button.
BASIC OPERATION
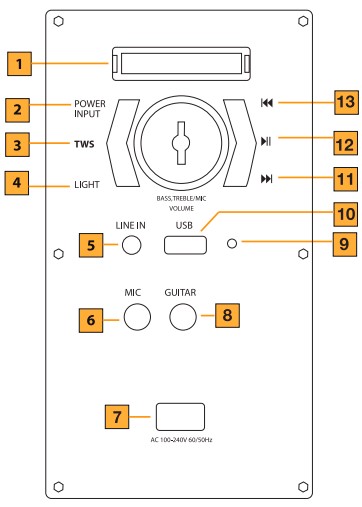
- Display: Mode Information displayed.
- POWER INPUT: Turn on the unit. Select the input mode.
- Tws: Press for TWS sync.
- Light: Select LED light modes
- LINE IN: Insert a 3.5mm (TRS) from an external audio device for playback.
- MIC: Insert a 6.35mm (TS or TRS) microphone cable.
- AC POWER: 100-240V, 60/50Hz
- GUITAR: Insert a 6.35 (TS) instrument cable
- Charge Status: Battery status.
- RED = Charging
- GREEN = Full
- USB: Insert a USB to playback .mp3 music.
- Forward: Next track or FM station.
- Play/Pause/TWS: Play or Pause the current track. Press and hold for TWS sync.
- Rewind: Previous track or FM station.
SPEAKER PRO APP
To control the device via your phone, please download and install the app ” Speaker Pro “. Open the App “Speaker Pro” on your phone and choose from the 7 settings page: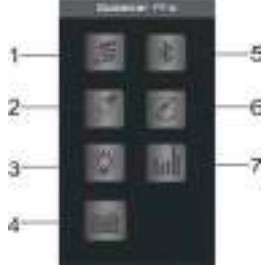
- Bluetooth Music Play: Music app playback
- USB: USB mp3 Playback
- Light: Adjust LED light settings
- FM Radio: Select Stations
- Bluetooth: Select the Bluetooth device
- Line: mute
- Sound: Equalize music
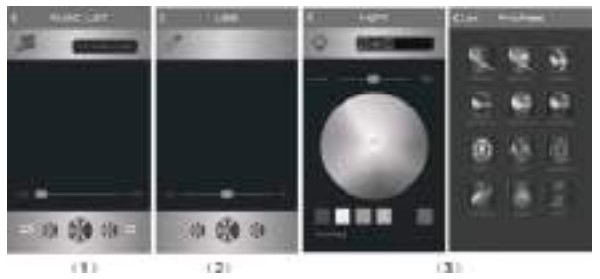
- Bluetooth Music Play
Press to enter into the Bluetooth Music Play page. Press “Pick songs to play” to choose the song you want to play from your music app. Press “Done” to return to the Bluetooth Music Play page. You can use the controllers on the app to navigate. - USB
When inserting a USB into the speaker, press to enter the USB Card play page. To choose a song and play music on the USB card, press “Play”. Use the bottom functions to operate pause, play, backward, forward & volume adjustments. Press “List” to return to the USB list page. Press “Back” to return to the main page. - Light control colors, brightness, and color change mode Press to enter into Light Control page. You can choose a color from the wheel or a color mode to custom-size your LED light. To go back to the main page, press “<” in the left corner.
- FM Radio:
Press to enter into FM radio mode. Press SCAN to automatically scan stations. Press 4 PM for the radio manual station scan, Top and bottom for Trimming. Turn the TUNER button to sweep through stations. Radio frequency between 87.5MHz~108.0MHz. - Bluetooth connection
Press to enter into the Bluetooth Control connection page, then click PBX-311 to connect to the speaker. - Line: – mute.
Press to enter the Line input page. Press to unmute the playback. Press “Back” to the main page. - Equalizer regulation
Press to enter the Sound page. Press MUSIC to adjust the volume, bass, and treble on the speaker. There are 4 pre-set EQ modes to choose from: Pop, Classical, Jazz or Rock. You can also press G-EQ to access the graphic equalizer to set up your preferred equalizer specification.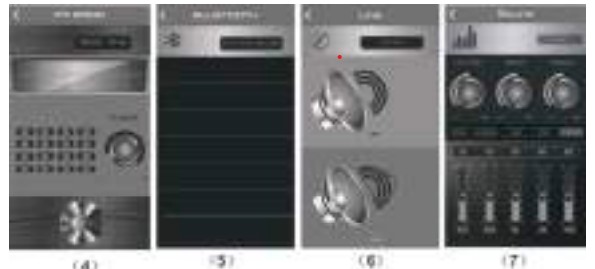
FM OPERATION
Press the Power/Input button to switch to FM mode, and Press the PLAY/PAUSE button to automatically scan the radio station. By pressing PREVIOUS or NEXT you can select a previous or next station. Press 0~9 from the remote to choose the FM stored station.
BLUETOOTH
Press the POWER/INPUT button on the back panel to select Bluetooth mode. Simultaneously open the Bluetooth setting on your phone, tablet, or mobile device and select PBX-311. The unit and device will then connect via Bluetooth. To control the device via your phone, tablet, etc. please download the App “Speaker Pro”. Once the unit and device are connected via Bluetooth, open the “Speaker Pro” App on your mobile device and press the Bluetooth button. This will enable you to control the following five modes: Music, Light, USB Card, Bluetooth, and Equalizer. To cancel the app, press the exit button.
SPECIFICATIONS
- Power: 40W
- Frequency Response: 55Hz-20KHz
- Power Supply: AC 100-240V 60/50Hz
LIMITED PRODUCT WARRANTY POLICY
Before returning your product for service under this Warranty, please (i) read the instruction manual carefully and visit our website at www.qfxusa.com for Product updates and extended support documentation (e.g., Common Troubleshooting Guides); (i) if you are still having trouble with your Product, please contact the QFX Customer Support Department. Subject to the terms and conditions herein, QFX, Inc. (hereinafter called “QFX”) warrants to the original purchaser of the Product (“Customer”) that for the applicable Warranty Period listed below, the Product will be free from defects in material or workmanship under normal, non-commercial use (“Defects”). Warranty Period encompasses, as listed below, separate “Coverage Periods” for Parts and Labor, each Coverage Period to begin from the original date of Customer purchase. If Customer returns a defective Product (or any component thereof) during the applicable Warranty Period, QFX will, at its option, during the specified Coverage Periods for Parts and Labor (as applicable either: (i) repair the Product (or, as applicable, any component thereof) or (il) replace the Product (or, as applicable, any component thereof) with a new or refurbished Product (or, as applicable, any component thereof), in either case free of charge to Customer for Parts and/or Labor (as applicable) during the specified Coverage Period only, and excluding applicable shipping charges (noted below), for which the Customer is responsible. The foregoing states the Customer’s exclusive remedy and OF sole liability for breach of the limited warranty contained herein.
This Warranty gives Customers specific rights, and Customers may also have other rights that vary from jurisdiction to jurisdiction. Warning: Some Products may contain components that are small enough to be swallowed. Please keep out of reach of children. In order for the return to be processed, you must send the Product PREPAID to the address below in the original packaging or reasonable substitute to prevent damage and include: (1) a dated sales receipt (which must have a purchase date that falls in the Warranty Period specified in the table below) that indicates the place of purchase, model number of Product, and amount paid, (2) a detailed description of Customer’s problem with Product, (3) Customer’s full name, phone number, and return address, (3) all of the accessories that came with the Product package must be sent along with the main Product, (4) a cashier’s check or money order payable to QFX, Inc., in the amount specified for the item in the product table below for return shipping and handling. If in the case you cannot provide a money order or cashier’s check, you can contact The QFX Customer Support Representative to arrange payment via credit card. No returned Product will be shipped back to a PO BOX. If a returned Product is found to have no problem and or does not include ALL of the requirements indicated above, it may be returned back to the customer and will not be processed.
QFX USA@, Inc. support@qfxusa.com
RMA Processing (800) 864-CLUB (2582) or (323) 864-6900
Customer Support Department qfxusa.com
2957 E. 46th Street | Vernon, CA 90058 Hours of Operation: Monday – Friday, 9 am – 5 pm PST
All prices and details below are for US Destinations excluding, Hawaii, Alaska, and Puerto Rico. For excluded destinations and NON-US destinations, please contact The QFX Customer Support Department directly for additional shipping fees and return instructions. If you do not find your Product below, your Product model conflicts with multiple categories, and/or are unsure of which category the Product you have purchased will fall under, please contact our Customer Support Department for further instruction. In order to determine the exact shipping cost that must be included with your product or paid for the product being returned, please refer to the table below. Please find the product you wish to return by category or model number prefix. QFX will not provide any return or refund to any customer for merchandise and will only honor the Limited Warranty restrictions mentioned in this document. Please make sure to follow all directions prior to shipping back your item. If you are not sure what the shipping cost for your item is, or if your item category conflicts with the table below, please feel free to contact the QFX Support Department for further assistance.
THE WARRANTY AND REMEDY PROVIDED ABOVE ARE EXCLUSIVE AND IN LIEU OF ALL OTHER EXPRESSED OR IMPLIED WARRANTIES INCLUDING, BUT NOT LIMITED TO, THE IMPLIED WARRANTIES OF MERCHANTABILITY, NON-INFRINGEMENT OR FITNESS FOR A PARTICULAR PURPOSE. SOME LAWS DO NOT ALLOW/ THE FXCIL ISION OF IMPIIFD WARRANTIFS IF THESF I AW/S APPIY THN AI FYPRESSFD OR IMPIIFD WARRANTIFS ARF IMITED TO THE WARRANTI ALLOW THE EXCLUSION OF IMPLIED WARRANTIES. IF THESE LAWS APPLY, THEN ALL EXPRESSED OR IMPLIED WARRANTIES ARE LIMITED TO THE WARRANTY PERIOD IDENTIFIED ABOVE. UNLESS STATED HEREIN, ANY STATEMENT OR REPRESENTATIONS MADE BY ANY OTHER PERSONS OR FIRM ARE VOID. EXCEPT AS PROVIDED IN THIS WRITTEN WARRANTY, QFX SHALL NOT BE LIABLE FOR ANY LOSS, INCONVENIENCE, OR DAMAGE, INCLUDING DIRECT, SPECIAL, INCIDENTAL, OR CONSEQUENTIAL DAMAGES, RESULTING FROM THE USE OR INABILITY TO USE THE QFX PRODUCT, WHETHER RESULTING FROM BREACH OF WARRANTY OR ANY OTHER LEGAL THEORY. Some jurisdictions do not allow limitations on how long an implied warranty lasts, and some jurisdictions do not allow the exclusion or limitation of incidental or consequential damages, so the above limitations and exclusions may not apply to you. This warranty gives you special legal rights and you may have other rights which vary from jurisdiction to jurisdiction.
What does the Bluetooth speaker’s TWS feature entail?
Without the use of cords or wires, the TWS function is a special Bluetooth feature that provides real stereo sound quality.
Can I simultaneously connect two Bluetooth speakers?
Go to the Bluetooth settings on your tablet or smartphone. You should see a setting to enable this feature if your device supports dual audio or multi-device connections. Dual Audio enables simultaneous audio playback over two Bluetooth speakers that are connected to the same device.
How do I simultaneously connect both speakers?
Go to Bluetooth, connections, and settings. Click the menu icon (three vertical dots) or advanced. On the Dual Audio switch, turn it on.
TWS has a two-device connection limit.
Any TWS can pair with a large number of devices—4 or even 5—but it cannot maintain an active connection.
Can my TWS be repaired?
If your TWS earphones are sufficiently old, they may not be repairable, in which case your battery may be dead. Currently, some manufacturers offer replacement batteries for their TWS earbuds, while others do not.
Why is the red blink on my TWS?
Your headphones’ red or amber flashing usually indicates that the battery is getting low.
In TWS mode, how many speakers can be connected?
Dual speakers Two earphones or two speakers can be wirelessly connected to play the same audio file simultaneously in TWS (true wireless stereo) mode.
How can I keep my TWS battery alive?
Your TWS earphones’ battery life will be severely reduced if you pair them with numerous devices at once.
Can the TWS battery be changed?
Although the batteries in Bluetooth headsets can be changed, most wireless earbuds cannot.
Why won’t my TWS charge?
Change your charging cable. Verify whether the charging port is faulty or loose. For a few hours, leave the headphones plugged into the charger. Ensure that they are placed correctly on the charging case or stand.
How do I determine whether my TWS is charging?
Adding Fees for Earbuds To begin charging, insert earbuds into the charging cases and shut the top.
For more manuals by QFX Manuals Dock
[embeddoc url=”https://manualsdock.com/wp-content/uploads/2023/08/QFX-PBX-311-Rechargable-Bluetooth-TWS-Speaker.pdf” download=”all”]

