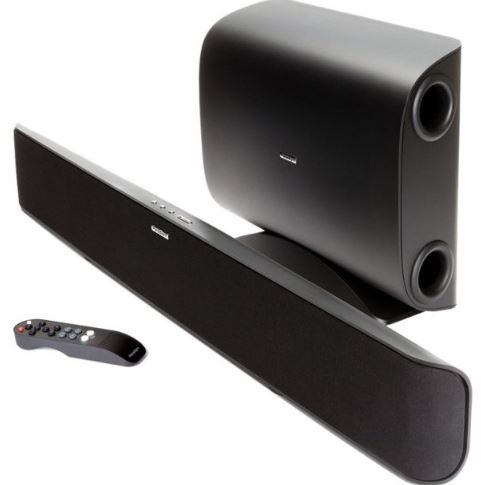
Paradigm Soundtrack 2 Soundbar with Subwoofer
ABOUT PARADIGM
Paradigm is a Canadian manufacturer of high-end audio equipment, including speakers, subwoofers, and headphones. Established in 1982, Paradigm is known for its commitment to innovation and engineering excellence, and has received numerous awards and accolades for the performance and build quality of its products. With a range of options available at various price points, Paradigm offers a range of audio solutions for different needs and budgets.
ABOUT YOUR SOUNDTRACK 2 SYSTEM
Your Soundtrack 2 System™ is a high-performance design loaded with Paradigm technology. In other words, it’s got loads of very cool stuff you won’t find in any other soundbar/subwoofer system. For those who salivate over technical details, we’ve included a Tech Specs section in the back of this manual to give you the skinny on why your Soundtrack™ 2 System sounds so good! The difference Soundtrack™ 2 System will make to your television, music , and movies can’t be put into words, but you’ll hear it and you’ll feel it. It’s an experience that takes you beyond a high-performance system to a place where you’re absolutely lost in the experience. It’s the Paradigm Difference. We guarantee you won’t be able to keep that difference a secret and we hope you don’t. Spread the word. Talk about your Paradigm Soundtrack™ 2 System. BRAG about it. Play it and let others listen. We’re all different and our sound should reflect that. Some of us like music, others love movies, others are gaming enthusiasts and others enjoy all of it. No matter who you are or where you live, what you like or what you do, we want to be The Official Sound of YOU™. Read this manual and follow all instructions. If you still have questions visit the Q&A page on our website at paradigm.com.
SAFEtY PRECAUtIONS
READ THIS SECTION CAREFULLY BEFORE PROCEEDING!
- WARNING:
TO REDUCE THE RISK OF ELECTRIC SHOCK, DO NOT REMOVE COVER (OR BACK). NO USER-SERVICEABLE PARTS INSIDE. REFER SERVICING TO QUALIFIED SERVICE PERSONNEL. - The lightning flash with the arrowhead symbol within an equilateral triangle is intended to alert the user to the presence of uninsulated “Dangerous voltage” within the product’s enclosure that may be of sufficient magnitude to constitute a risk of electric shock to persons.
- The exclamation point within an equilateral triangle is intended to alert the user to the presence of important operating and maintenance (Servicing) instructions in the literature accompanying the product.
- WARNING:
TO REDUCE THE RISK OF FIRE OR ELECTRIC SHOCK, DO NOT EXPOSE THIS APPARATUS TO RAIN OR MOISTURE, AND OBJECTS FILLED WITH LIQUIDS, SUCH AS VASES, SHOULD NOT BE PLACED ON THIS APPARATUS. - CAUTION:
TO PREVENT ELECTRIC SHOCK, MATCH WIDE BLADE OF THE PLUG TO THE WIDE SLOT, AND FULLY INSERT IT. - CAUTION:
FOR CONTINUED PROTECTION AGAINST RISK OF FIRE, REPLACE THE FUSE ONLY WITH THE SAME AMPERAGE AND VOLTAGE TYPE. REFER REPLACEMENT TO QUALIFIED SERVICE PERSONNEL. - WARNING:
UNIT MAY BECOME HOT. ALWAYS PROVIDE ADEQUATE VENTILATION TO ALLOW FOR COOLING. DO NOT PLACE NEAR A HEAT SOURCE, OR IN SPACES THAT CAN RESTRICT VENTILATION. WARNING!
IMPORTANT SAFETY INSTRUCTIONS
- Read these instructions.
- Keep these instructions.
- Heed all warnings.
- Follow all instructions.
- Do not use this apparatus near water.
- Clean only with dry a cloth.
- Do not block any ventilation openings. Install in accordance with the manufacturer’s instructions.
- Do not install near any heat sources such as radiators, heat registers, stoves, or other apparatus (including amplifiers) that produce heat.
- Do not defeat the safety purpose of the polarized or grounding-type plug. A polarized plug has two blades one wider than the other. A grounding-type plug has two blades and a third grounding prong. The wide blade or the third prong are provided for your safety. If the provided plug does not fit into your outlet, consult an electrician for the replacement of the obsolete outlet.
- Protect the power cord from being walked on or pinched, particularly at plugs, convenience receptacles, and the point where they exit from the apparatus.
- Only use attachments/accessories specified by the manufacturer.
- Use only with the cart, stand, tripod, bracket, or table specified by the manufacturer or sold with the apparatus. When a cart is used, use caution when moving the cart/ apparatus combination, to avoid injury from tip-over.
- Unplug this apparatus during lightning storms or when unused for long periods of time.
- Refer all servicing to qualified service personnel. Servicing is required when the apparatus has been damaged in any way, such as powersupply cord or plug is damaged, liquid has been spilled or objects have fallen into the apparatus, the apparatus has been exposed to rain or moisture, does not operate normally, or has been dropped.
- Use the mains plug to disconnect the apparatus from the mains or ”TO COMPLETELY DISCONNECT THIS APPARATUS FROM THE AC MAINS, DISCONNECT THE POWER SUPPLY CORD PLUG FROM THE AC RECEPTACLE.
- “WARNING – TO REDUCE THE RISK OF FIRE OR ELECTRIC SHOCK – DO NOT EXPOSE THIS APPARATUS TO RAIN OR MOISTURE”
- “DO NOT EXPOSE THIS EQUIPMENT TO DRIPPING OR SPLASHING AND ENSURE THAT NO OBJECTS FILLED WITH LIQUIDS, SUCH AS VASES, ARE PLACED ON THE EQUIPMENT.”
- “THE MAINS PLUG OF THE POWER SUPPLY CORD SHALL REMAIN READILY OPERABLE.”
BREAK-IN
Although your system will sound great ‘out of the carton’ it will sound even better when broken in. Allow it to operate for several hours before you listen critically.
CLEANING
Do not use strong or abrasive cleaners on your system. Gently wipe the cabinets with a damp soft cloth.
PLACEMENT


- Soundbar: On a credenza or shelf (Fig. 1a)
The soundbar must sit on a flat surface directly below your video display. Supplied stability feet must be attached. See the Setup Guide included for how to attach the feet. - Soundbar: On a wall (Fig. 1b)
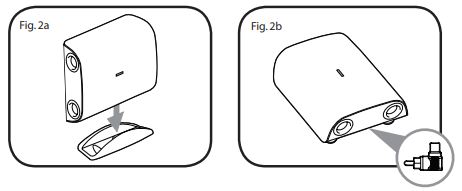
For more information, refer to the ‘Wall Mounting’ section. - Subwoofer: Positioned Vertically (Fig. 2a)
If using the subwoofer in the vertical position it must sit in the supplied cradle. - Subwoofer: Positioned Horizontally (Fig. 2b)
If using the subwoofer in the horizontal position the supplied feet must be attached to allow adequate clearance for heat dissipation. Refer to the Setup Guide included for how to attach feet.
IMPORTANT! WIRED SUBWOOFER CONNECTION ONLY
When positioning the subwoofer horizontally in a wired connection, use the supplied 90° RCA adapter (Fig. 2b) to allow easier cable hookup. The adaptor is not necessary in a wireless configuration.
WARNINGS
- Paradigm does not supply screws and anchor bolts to mount your soundbar to a wall. Although we do provide limited instructions for wall mounting, you must contact a Paradigm Dealer for more information. The subwoofer is NOT designed to be wall mounted.
- The instructions that follow assume the mounting surface is standard wood studs. Should you wish to mount to another type of surface you must consult a certified contractor.
Step-by-Step Instructions for Wall-Mounting the Soundbar
What’s Included
- 2 x Wall-Mounting Brackets.
- 1 x Wall-Mounting Template.
Recommended Tools (not included)
- 1 x Stud Finder.
- 1 x Level.
- 1 x Electric drill and appropriate drill bits.
- 1 x Phillips Screwdriver.
Recommended Hardware (not included)
- 4 x Wall anchors to suit the mounting surface and weight of the soundbar.
- 4 x Screws to suit the mounting surface and weight of the soundbar.
IMPORTANT! Weight of soundbar: 7.35 lb / 3.34
NOTE: Mounting instructions are per bracket.
- Step 1
Establish desired mounting location. - Step 2
Lightly tape the supplied Installation Template to the wall in the correct position, using a level for accuracy. Mark the locations of the two screws on the wall. (Fig. 3)
- Step 3
Using a stud finder, determine if there is a wall stud directly behind the chosen location. (Fig. 4) - Step 4
- a) If a wall stud is found, drill a pilot hole into the stud at each mark, then move to Step 5. OR
- b) If no stud is found, install wall anchors at each mark following the instructions for the type of wall anchor you are using. CAUTION: We strongly recommend contacting a professional contractor for this type of installation.
- a) If a wall stud is found, drill a pilot hole into the stud at each mark, then move to Step 5. OR
- Step 5
Using the screws, attach the first wall bracket to the wall. DO NOT completely tighten screws (Fig. 5).
- Step 6
Repeat the steps for the second bracket. Use a level to make sure the brackets are completely straight before tightening all screws. - Step 7
IMPORTANT: Attach audio cables BEFORE mounting the soundbar to wall brackets. See Set-Up Guide for how to attach cables.
Move the soundbar into place directly over the brackets and gently push it to the wall making direct contact with the brackets. You will hear a CLICK as each bracket makes contact with the soundbar. DO NOT release the soundbar from your grasp until you hear those two clicks.
CONTROL
Remote Control
The supplied remote includes 2 x AAA batteries. Follow the diagram on the back of the Remote for correct insertion:+ to + and – to –.

Soundbar Top-Panel Controls

IR Learning Codes
Your system is capable of learning certain codes from remote controls you already own, for example, the volume code from your TV’s remote. Each code must be programmed in separately. To program, follow the steps below:
- Press and hold for 3 seconds the button on the soundbar’s Top Panel Controls for the desired function to be programmed (eg. volume, mute, on/off ).
- The soundbar’s LED will start to flash indicating that the system is now in ‘IR learning’ mode.
- Aim the alternative remote control at the front of the soundbar and press its corresponding function button. The blue LED rapidly flashes 4 times to indicate that the IR code has been ‘learned’, it then returns to a solid blue.
- Repeat from Step 1 to program each function.
NOTE ABOUT MUTE:
To learn a MUTE command from a remote control you already own, press the Sync button on top panel of the soundbar for 3 seconds then move to Step 2 above.
NOTE ABOUT IR CODES:
Your existing cable/satellite box remote control or TV remote control may use a code that the system cannot learn. In these instances, you will have to use the remote control that came with your system or use a universal or learning remote control.
CONNECTION
For quick system setup and connection refer to the instructions in the Set-Up Guide included.
SETTING UP THE SOUNDBAR
Refer to the Set-Up Guide included for detailed instructions on all of the following.
- a) Setup
- b) LED functionality
- c) Establishing a Bluetooth Connection
SETTING UP THE SUBWOOFER

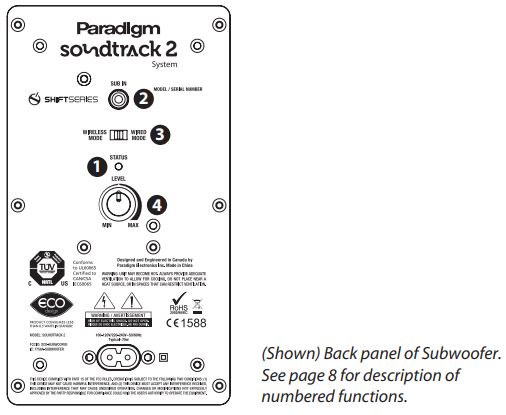
- Status LED.
Indicates connection status between the subwoofer and soundbar (e.g. Not Paired, Searching for Connection, Paired). For additional information refer to the Set-Up Guide included. - Line-Level Input (for use in a wired subwoofer connection only)
Allows connection from the wired Sub Out of the soundbar or Sub/LFE Out of an external A/V receiver, processor, or another suitable low-level source. IMPORTANT: Do not connect a cable to the Line-Level Input if you have already set up a wireless subwoofer connection. - Pair.
This feature initiates wireless pairing between the subwoofer and the transmitter inside the soundbar. - Subwoofer Level.
Balances the subwoofer’s output level to that of your soundbar. See the Set-Up Guide for more info in this area.
WIRELESS OPERATION
Transmitter Range
In a typical listening room, the built-in wireless transmitter in your soundbar has a maximum range of 50’ (15 m). Obstructions such as walls, large pieces of furniture, room dividers, etc., may reduce that range. Do not place the soundbar and subwoofer farther apart than the recommended range. The soundbar’s wireless transmitter features a 2.4 GHz uncompressed digital self-sensing design that will automatically adjust for the best wireless connection while monitoring the integrity of the data stream.
For wireless pairing instructions, refer to the Set-Up Guide included.
WIRED OPERATION

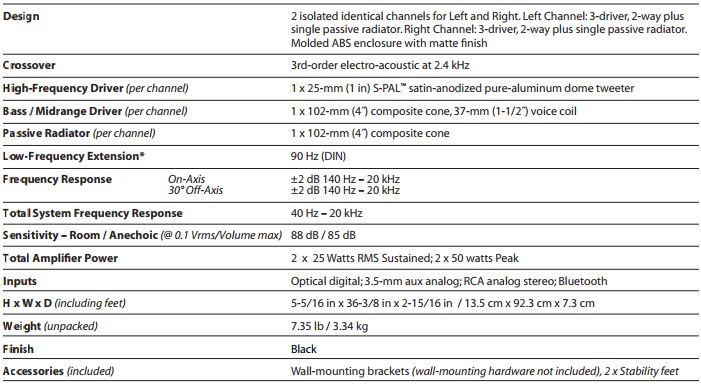
TECHNICAL SPECIFICATIONS
Soundbar

Subwoofer

LIMItED WARRANtY
Paradigm warrants this product against defects in materials and workmanship under normal use and operation for a period of one (1) year from the date of retail purchase by the original end-user purchaser. For warranty purposes, you must retain your sales receipt and this Owner’s Manual for the warranty to be valid. For additional product support, call Paradigm at 905-696-2868 or email service@paradigm.com.
FAQs for Paradigm Soundtrack 2 Soundbar with Subwoofer User Manual
Any Bluetooth subwoofer can be connected to a soundbar, right?
Most soundbars don’t allow the addition of a standalone subwoofer. The soundbar and subwoofer must be purchased together and have been built to naturally link to one another for this to be possible.
How do I Bluetooth-connect paradigm speakers?
Turn on Bluetooth on your phone or tablet and look for “Soundtrack 2” in your Bluetooth device list as the LED on the soundbar switches between RED and BLUE (). To establish a connection, choose “Soundtrack 2.” As soon as a connection is made, the LED turns solid blue ( ).
What does a subwoofer with a soundbar serve?
You might desire a soundbar with a dedicated subwoofer if you enjoy listening to or viewing bass-heavy music genres or watching action movies. You can feel the deep thump and rumble in bass-heavy entertainment with the help of a subwoofer, which can typically offer a deeper, more powerful bass than a single bar.
With a soundbar, where should a subwoofer go?
Subwoofers are often positioned in the front of the room, facing the space. Many rooms are best positioned at the front so that your subwoofer and front channel speakers sound in unison.
How should my paradigm speaker be connected?
Connect one speaker wire set from the two sets to each pair of input terminals. The other speaker wire ends should be connected to the appropriate amp terminal. The 2 negative ends should be combined with the negative terminal. The Positive terminal should be filled with the two Positive ends.
Why won’t my speaker pair?
If your Bluetooth devices aren’t connecting, they probably aren’t in pairing mode or are out of range. Try rebooting your devices or letting your phone or tablet “forget” the connection if you’re experiencing persistent Bluetooth connection issues.
How can I link my speakers to my wireless network?
When a beep is heard, press and hold the WPS button on the speaker’s back (for about 3 seconds). The green LINK indicator is flashing. For more than three seconds, press the wireless router’s WPS button. operate 90 seconds after hitting the speaker’s WPS button.
Do I need a subwoofer with a soundbar?
You don’t need one, thus the answer is obviously no. Although it won’t necessarily cost you much extra, choosing one of the best soundbars with a subwoofer (or a model that will let you attach one later) can give your TV a broader, more immersive audio.
How do I turn up the subwoofer’s volume?
Your subwoofer should be positioned facing outward into the rest of the room and within 8–12 inches of a wall for the best sound quality. Consider locating your subwoofer in the room’s corner for even greater output, since this placement can greatly improve the overall sound.
Is the subwoofer in a soundbar wireless?
Your subwoofer will arrive with a cord that you can use to attach it to the output on your soundbar if you have a manual or wired connection. If your subwoofer is wireless, all you need to do is connect it to your soundbar over Bluetooth.
Pdf – Paradigm Soundtrack 2 Soundbar with Subwoofer User Manual
For More Posts Visit: ManualsDock


