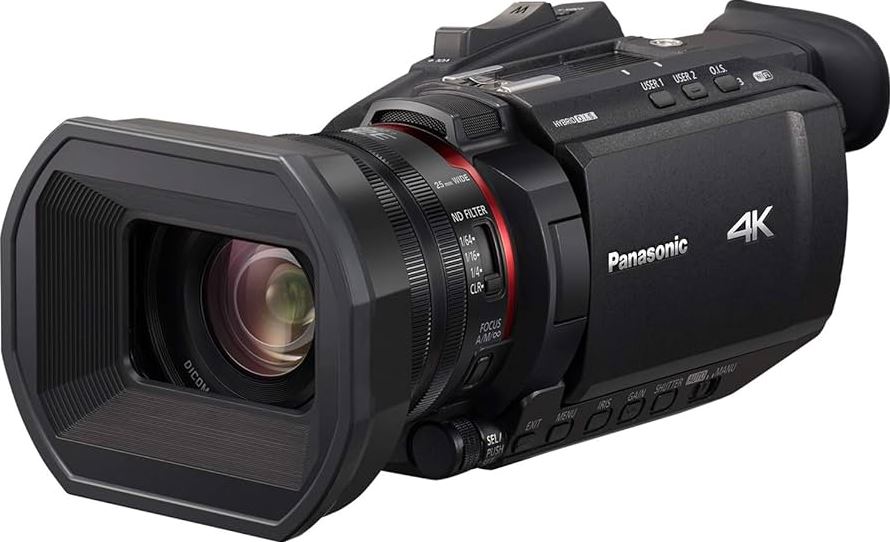
Panasonic X1500 Professional Camcorder
ABOUT Panasonic
Panasonic Corporation is a multinational electronics company headquartered in Osaka, Japan. It was founded in 1918 by Konosuke Matsushita and originally started as a vendor of duplex lamp sockets. Over the years, Panasonic has grown into one of the largest electronics manufacturers in the world, offering a wide range of products and services.
Panasonic‘s business operations span various sectors, including consumer electronics, home appliances, automotive, industrial solutions, and B2B solutions. The company is known for its innovation and has a strong focus on research and development.
Safety Precautions
Dear Customer, Thank you for choosing Panasonic! You have purchased one of the most sophisticated and reliable products on the market today. Used properly, we’re sure it will bring you and your family years I enjoyment. Please take time to fill in the information on the right. The serial number is on the tag located on the back of your camera. Be sure to retain this manual as your convenient camera information source.
WARNING
- To reduce the risk of fire, electric shock, or product damage,
- Do not expose this unit to rain, moisture, dripping, or splashing.
- Do not place objects filled with liquids, such as vases, on this unit.
- Use the recommended accessories.
- Do not remove covers
- Do not repair this unit by yourself. Refer servicing to qualified service personnel.
CAUTION!
To reduce the risk of fire, electric shock, or product damage
- Do not install or place this unit in a bookcase, built-in cabinet, or in another confined space. Ensure this unit is well-ventilated.
- Do not obstruct this unit’s ventilation openings with newspapers, tablecloths, curtains, and similar items
- Do not place sources of naked flames, such as lighted candles, on this unit.
Certification and Compliance
See Camera for the certification and compliance mark specific to that device.
- Press the <MENU> button.
- Select the [OTHERS] menu.
- Select the [APPROVED REGULATION] menu.
THE FOLLOWING APPLIES ONLY IN THE U.S.A
FCC Note: This equipment has been tested and found to comply with the limits for a Class B digital device, under Part 15 of the FCC Rules. These limits are designed to provide reasonable protection against harmful interference in a residential installation. This equipment generates, uses, and can radiate radio frequency energy and, if not installed and used by the instructions, may cause harmful interference to radio communications. However, there is no guarantee that interference will not occur in a particular installation. If this equipment does cause harmful interference to radio or television reception, which can be determined by turning the equipment off and on, the user is encouraged to try to correct the interference by one or more of the following measures:
- Reorient or relocate the receiving antenna.
- Increase the separation between the equipment and the receiver.
- Connect the equipment to an outlet on a circuit different from that to which the receiver is connected.
- Consult the dealer or an experienced radio/TV technician for help.
FCC Caution:
- Any unauthorized changes or modifications to this equipment would void the user’s authority to operate this device.
- To assure continued compliance, follow the attached installation instructions and use only shielded interface cables when connecting to computer or peripheral devices.
This device complies with Part 15 of the FCC Rules. Operation is subject to the following two conditions:
- This device may not cause harmful interference, and
- this device must accept any interference received, including interference that may cause undesired operation.
Supplier’s Declaration of Conformity
- Trade Name: Panasonic
- Model No.: HC-X1500/HC-X2000
- Responsible Party: Panasonic Corporation of North America Two Riverfront Plaza, Newark, NJ 07102-5490
- Support Contact: http://shop.panasonic.com/support
THE FOLLOWING APPLIES ONLY IN CANADA.
- Contains IC: 772C-LB1JS955
This device contains licence-exempt transmitter(s)/receivers) that comply with Innovation, Science, and Economic Development Canada’s license-exempt RSS(s). Operation is subject to the following two conditions:
- This device may not cause interference.
- This device must accept any interference, including interference that may cause undesired operation of the device
IMPORTANT SAFETY INSTRUCTIONS
Read these operating instructions carefully before using the unit. Follow the safety instructions on the unit and the applicable safety instructions listed below. Keep these operating instructions handy for future reference
- Read these instructions.
- Keep these instructions.
- Heed all warnings.
- Follow all instructions.
- Do not use this apparatus near water.
- Clean only with a dry cloth.
- Do not block any ventilation openings. Install by the manufacturer’s instructions.
- Do not install near any heat sources such as radiators, heat registers, stoves, or other apparatus (including amplifiers) that produce heat
- Do not defeat the safety purpose of the polarized or grounding-type plug. A polarized plug has two blades one wider than the other. A grounding-type plug has two blades and a third grounding prong. The wide blade or the third prong is provided for your safety. If the provided plug does not fit into your outlet, consult an electrician for the replacement of the obsolete outlet.
- Protect the power cord from being walked on or pinched particularly at plugs, convenience receptacles, and the point where they exit from the apparatus.
Battery pack (Lithium ion battery pack)
- Use the specified unit to recharge the battery pack.
- Do not use the battery pack with equipment other than the specified unit.
- Do not get dirt, sand, liquids, or other foreign matter on the terminals.
- Do not touch the plug terminals (+ and -) with metal objects.
- Do not disassemble, remodel, heat, or throw into fire. If any electrolyte should come into contact with your hands or clothes, wash it off thoroughly with water. If any electrolyte should come into contact with your eyes, never rub the eyes. Rinse eyes thoroughly with water, and then consult a doctor.
Cautions for use
Keep this unit as far away as possible from electromagnetic equipment (such as microwave ovens, TVs, video games, etc.).
- If you use this unit on top of or near a TV, the pictures and/or sound on this unit may be disrupted by electromagnetic wave radiation.
- Do not use this unit near cell phones because doing so may result in noise adversely affecting the pictures and/or sound.
- Recorded data may be damaged, or pictures may be distorted, by strong magnetic fields created by speakers or large motors.
- Electromagnetic wave radiation generated by microprocessors may adversely affect this unit, disturbing the pictures and/or sound.
- If this unit is adversely affected by electromagnetic equipment and stops functioning properly, turn this unit off and remove the battery or disconnect the AC adaptor. Then reinsert the battery or reconnect the AC adaptor and turn this unit on.
Do not use this unit near radio transmitters or high-voltage lines.
- If you record near radio transmitters or high-voltage lines, the recorded pictures and/or sound may be adversely affected.
Do not lift this unit by the handle with the tripod still attached
- When the tripod is attached, its weight will also affect the unit’s handle, possibly causing the handle to break and hurting the user.
- To carry the unit while the tripod is attached, take hold of the tripod.
Do not swing the unit around, shake it by, or allow it to hang from the handle
- Do not jar, swing, or shake the unit by its handle. Any strong jolt to the handle may damage the unit or result in personal injury.
Do not allow the cord to drag on the ground or pull a connected cord along the passage
- The cord will be damaged, causing fire or electrical shock, when the cord gets caught by the feet, excitement will also cause personal injury.
When this unit is turned on, do not use it in direct contact with the skin for a long period
- When using this unit for a long period, use a support such as a tripod. Low-temperature burns may result if any high-temperature part of this unit or hot air from the ventilation openings on the front side of the hand strap of this unit is in direct contact with the skin for a long period.
About connecting to a PC
- A USB 2.0 cable is not supplied with this unit. Use a commercially available generic USB cable conforming to USB2.0. If possible, we recommend using a cable with a length of 1.5 m (approx. 4.9 feet) or less
About connecting to a TV
- Use a commercially-available High Speed HDMI cable. If possible, we recommend using a cable with a length of 3 m (approx. 9.8 feet) or less
Before using the unit
Before using the unit, always check if the built-in battery is not consumed, and then set the date/time.
The date of the internal clock of the unit resets to January 1, 2020, if the built-in battery is exhausted. This may result in the metadata of the clip not being recorded correctly, and it may not display correctly on the thumbnail screen. Connect the AC adaptor to the main unit or attach a battery when recharging the built-in battery. The date/time set on the main unit is maintained for approximately 6 months when left in this state for approximately 24 hours. (Recharged even when the power is on.) For details about setting the time zone and date/time, refer to [TIME ZONE] (- 17) and [CLOCK SETTING] (+ 17).
- Do not use the unit in oily-smoky or dusty places.
Performance may be adversely affected if small particles or other foreign objects get inside the product. Take extra care in environments where a special effect such as theatrical smoke is used. - When using this product during rain or snow or when at the beach, be careful that water does not get inside the camera. Water causes damage to the camera and memory card. (Repair may be impossible)
- Take care so sand and/or dust do not get inside the camera when using it at the beach, etc. Sand and dust may damage the camera and memory card. (Be careful when inserting or removing the memory card)
AC adaptor and battery
- It may take more time to charge or may not be able to charge when the temperature of the battery is extremely high or extremely low.
- Noise may be generated in the radio when the unit is used close to a radio (especially when receiving AM). Keep a distance of 1 m (approx. 3.3 feet) or more when using
- Oscillating sound may be generated inside the AC adaptor during use, but this is not a malfunction.
- Always disconnect the power plug from the power outlet after use. (Power of approximately 0.1 W is consumed by the AC power itself if kept connected)
- Do not get the terminal section of the AC adaptor, or the battery dirty. Install the device close to the power outlet so the disconnection device (power plug) can be easily reached.
Charging lamp during charging
When the charging lamp is flashing. the following should be considered
Flashing with approx. 4-second period (on for approx. 2 seconds, off for approx. 2 seconds):
- When the battery is over-discharged or the temperature of the battery is too high or low. It can be charged, but it may take a few hours to complete the charging normally.
- Once normal charging starts, the charging lamp lights up green. However, depending on the conditions of use, even when normal charging is taking place, the charging lamp may keep flashing for approx. 4-second intervals until charging is completed.
Memory cards
- The surface of this unit or the memory card may get slightly hot when used for a long period, but this is not a malfunction.
- The amount of memory included on the label of the memory card is the total amount of memory below.
– Capacity to protect and manage copyright
– Capacity usable as the normal memory on the unit or a PC. - Do not give a strong impact to, bend, or drop the memory card.
- Memory card data may become destroyed or erased in the following cases.
– Electrical noise or static electricity – Malfunction of the unit or the memory card - Do not perform the following operations when accessing the memory card (the card 1 access lamp/card 2 access lamp is flashing in orange.
– Removing the memory card
– Disconnecting the battery or the AC adaptor without turning off the main unit
Take care not to drop the main unit when carrying the camera.
- A strong impact will damage the main unit, and it may not operate properly.
- Hold the handle or grip when carrying the camera, and handle it carefully. * The handle can be used when the handle unit ( (X2000 supplied, (X1500 optional) is attached.
Exemption of liability
Panasonic is not liable in any way regarding the following.
- Incidental, special, or consequential damages caused directly or indirectly by the unit
- Damages, breakage of the unit, etc., caused by misuse or carelessness of the customer
- When disassembly, repair, or modification of the unit is performed by the customer
- Inconveniences, damnification, or damages by not being able to record and/or display the video due to any reasons including failure or malfunction of the unit
- Inconveniences, damnification, or damages resulting from the malfunction of the system combined with any third-party equipment
- A liability claim or any claim for a privacy violation by an individual or a group that was the subject of the video that the customer has shot (including recording) that became public by any reason (including use with the network user authentication turned OFF)
- The registered information is lost due to any reason including initializing this unit because the authentication information such as user name or password is forgotten)
Cautions regarding network
Since this unit is connected to a network, the following mischief may occur.
- Leaking or divulging of information through the unit
- Fraudulent operation of the unit by a malicious third-party
- Obstruction and/or stopping of the unit by a malicious third party
Accessories/Optional accessories Accessories
Check the accessories before using this unit. Product numbers are correct as of January 2020. These may be subject to change.
- Battery pack (- 28) AG-VBR59

- AC adaptor -29) SAE0011A

- AC cable (= 29) For AC adaptor K2CA2YY00259

- Lens hood (+ 31) DVYE1189Z

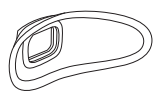
• Pre-attached to the main unit. - Eye cup (+ 32) DVZE1040Z
Handle unit (- 33) VW-HU1
- To purchase as a supplied accessory, use part number 1KC1VWHUPPK when ordering.

1AC2HCX2500Z Microphone holder (- 33)
- The microphone holder mounting screws are supplied with the microphone holder.

Microphone holder mounting screws (- 33) 1PP1HCX2500Z
- Length 12 mm (0.47″) (×2)

(For U.S.A. only) If accessories are lost, customers can visit us at http://shop.panasonic.com/support for further information about obtaining replacement parts
Optional accessories
Some optional accessories may not be available in some countries.
NOTE: Accessories and/or model numbers may vary by country. Please consult your local dealer. Product numbers are correct as of January 2020. These may be subject to change.
When turning on the power for the first time
The time zone, date, and time are not set when the unit is shipped. [TIME ZONE] is displayed on the LCD monitor when the power is turned on for the first time. Follow the guidance and make the settings in the order of [TIME ZONE] and then [CLOCK SETTING].
- You can do these operations either with the manual or by touching the LCD monitor.
[TIME ZONE]
Set the time difference from the Greenwich Mean Time.
A [TIME ZONE]
- Set the time difference.
- Select [SET].
Once the setting for [TIME ZONE] is completed, the [CLOCK SETTING] screen is displayed.
NOTE
- The setting for the date/time of the main unit changes together with the time zone settings.
- This can also be set with the OTHERS] menu -› (CLOCK -› [TIME ZONE!.
[CLOCK SETTING]
Set the year, month, date, and time.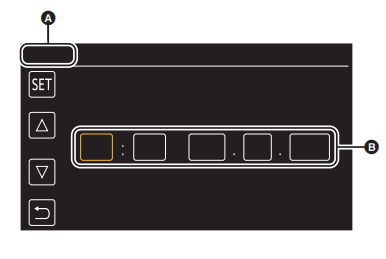
- A [CLOCK SETTING]
- B 0:0 JAN. 1. 2020
- Set the year, month, date, and time.
The year can be set between 2018 and 2037. - Select [SETJ.
Once the setting is complete, the camera image screen is displayed.
NOTE
- This can also be set with the [OTHERS] menu -> [CLOCK] -> [CLOCK SETTING].
What you can do with this unit
Recording to the memory card
Recording in the following types is possible.
- MOV recording (UHD and FHD recording)
- MP4 recording (UHD and FHD recording)
- AVCHD recording
- Simultaneous recording
- Relay recording
- Interval recording
- Background recording
Linking to external devices
Connecting to TV/monitor
Connect to a TV/monitor and output images.
- When using (X2000, use a BNC cable (<SDI OUT> terminal) to connect a TV/monitor.
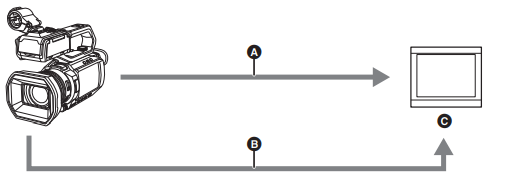
- A HDMI cable B
- B (For the (X2000])
BNC cable (<SDI OUT> terminal) - C TV/Monitor
- Use a commercially-available High Speed HDMI cable. If possible, we recommend using a cable with a length of 3 m (approx. 9.8 feet) or less.
- (For the (X2000)) Use a commercially available 5C-FB or equivalent double-shielded cable for the BC cable.
Card reader mode
Data (files) for performing nonlinear editing on a computer are transferred.
- The unit supports USB 2.0.

- A Memory card*1
- B USB2.0 cable*2
- C Computer
Connecting to the network
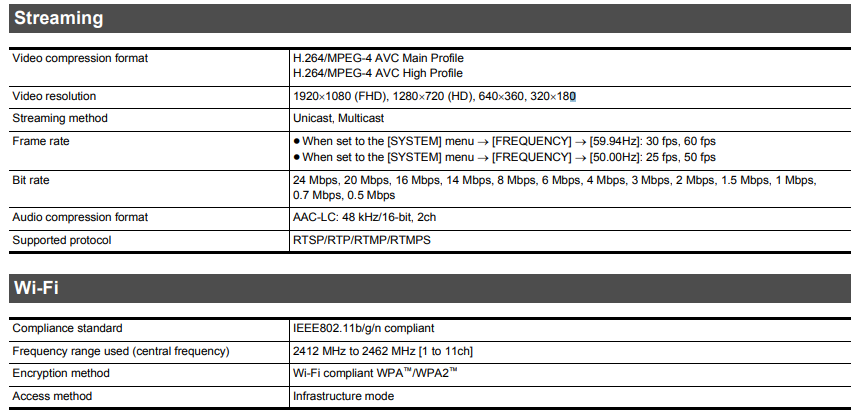
This unit is equipped with a wireless LAN. It can connect to wireless LAN devices via a network.
Available functions
When the unit is connected to a network, the following functions are available.
- Connecting to the HC ROP app
You can remotely control this unit with the HC ROP app by connecting this unit with an iPhone/iPad or Android terminal via wireless LAN.
- Checking camera status
- Camera remote control (focus, zoom, image quality settings, recording control such as start/end recording, and time code/user bits settings)
- Menu Operations
- Starting and stopping streaming (when the function is assigned to the USER button) The unit supports the multi-camera function, with which a camera selected from up to 8 cameras is remotely controlled from a single device. For details about the operation of the HC ROP app, refer to the online help for the app.
Streaming function
- You can perform streaming of audio and video currently shot with the unit over a network (wireless LAN).
Description of Parts
Main unit
The illustrations in this document show the handle unit ( (X2000 supplied, (X1500 optional) removed.
- Lens hood (+ 31)
- Lens cover switching lever (+ 32) Opens/closes the lens cover.
- Focus ring (+ 111) When the <FOCUS A/M/∞> button is pressed to set to manual focus mode ([MF]) you can focus manually.
- Rear ring (+ 108, 110, 118) You can manually perform zoom operations, adjust the iris (the lens stop), and adjust the AE level (exposure compensation).
• You can switch the function to be adjusted by setting it with the menu, pressing the USER button assigned to (REAR RING], or touching the USER button icon. - <ND FILTER> switch (+ 111) Selects the ND filter to suit the illumination of the subject. <1/64>: Reduces the amount of light entering the MOS sensor to 1/64. <1/16>: Reduces the amount of light entering the MOS sensor to 1/16. <1/4>: Reduces the amount of light entering the MOS sensor to 1/4. <CLR>: Does not use the ND filter.
- <FOCUS A/M/∞> button (+ 111) Select the focus function. [AF] and [IMF] switch each time you press the button. The focal point goes to infinity after you press and hold the button, and then the manual focus mode is engaged. [AF]: Changes to the autofocus mode. The auto-focus mode adjusts the focus automatically. [MF]: Changes to the manual focus mode. Control the focus ring manually to adjust the focus.
- Card slot 1 (- 41)
A slot for the memory card. - Card 1 access lamp (+ 41) Indicates the access status for recording and playback of the memory card inserted in card slot 1
- Card slot 2 (- 41) A slot for the memory card.
- Card 2 access lamp (+ 41) Indicates the access status for recording and playback of the memory card inserted in card slot 2.
- Built-in speaker Outputs audio during playback. Audio is not output from the built-in speaker when headphones are connected to the headphone terminal.
- <SLOT SEL> button Selects the card slot to record to or playback from.
- <USER1> button (+ 50, 141) Used as a USER button (USER1).
• [LEVEL GAUGE] is allocated at the time of purchase. Switches display/hide of level gauge. - <USER2> button (- 50, 109) Used as a USER button (USER2).
• [BACKLIGHT] is allocated at the time of purchase. Switches enable/disable the auto iris control function for backlight compensation. - <O.I.S.>/<USER3> button (- 50, 138) Switches enable/disable the optical image stabilizer function. This is also used as the USER button (USER3).
- <THUMBNAIL> button (- 146) Press the button to switch between the camera image screen and the thumbnail screen
- <DISP/MODE CHK> button (- 165) Switches display/hide information other than the time counter, time stamp, zebra pattern, and marker. Press and hold the button to display information about the settings of the various shooting functions and information such as a list of the functions assigned to the USER button. Each press of the button switches the information page in order.
- Diopter adjustment dial (- 54) Adjust the diopter scale so that the viewfinder screen can be viewed clearly.
- Eyepiece Do not leave the eyepiece pointed toward the sun. Doing so might damage the devices inside.
- Eye cup (+ 32)
- Power button (+ 37) Press the button to switch the power on/off.
- <WHITE BAL> button (- 114) Selects the method for adjustment of the white balance. Each time you press the button, the white balance switches in the order “Preset”, [Ach], [Bch]. “Preset”: Adjusts the white balance to the preset value. Each time you either press the USER button assigned to [AWB] or touch the USER button icon, the setting changes in the order [P 3200K], [P 5600K], “VAR” (screen display example: (V 3200K]).
- <AE LEVEL>/USER> button (- 50, 110) Switches enable/disable the A level function. Set the target value of the AE level in the [SCENE FILE] menu -› [AE LEVEL EFFECT. This is also used as the USER button (USER4).
- <AUTO/MANU> switch (- 104) Selects the method to adjust the focus, gain, iris, white balance, and shutter speed at shooting. <AUTO>: Adjusts automatically. (Auto mode) <MANU>: Adjusts manually. (Manual mode)
- <SHUTTER> button (- 112) Switches the shutter mode.
- <GAIN> button (- 109) Selects the method for adjusting screen brightness.
- <IRIS> button (- 108) Selects the method for adjustment of the lens stop.
- <MENU> button (= 60) Displays the menu. Pressing the <MENU> button while the menu is displayed closes the menu. Press the button while the thumbnail screen is displayed to display the operation screen of the thumbnail menu, and clips can be deleted.
- <EXIT> button Returns to one level higher when the menu is displayed. Pressing the <EXIT> button without confirming the setting value will not reflect the change in the setting.
- Multimedia (- 143) Moves, selects, and sets the menu while the menu is displayed. Use the multimedia to also operate thumbnails, select the multi-manual function, and select/set the various operation icons.
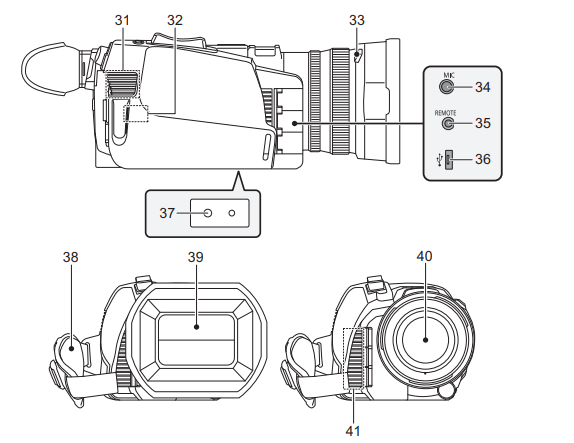
- Fan inlet for a cooling fan. Do not block this while the unit is being used.
- Wireless LAN Transmitter
- Lens hood release button (+ 31)
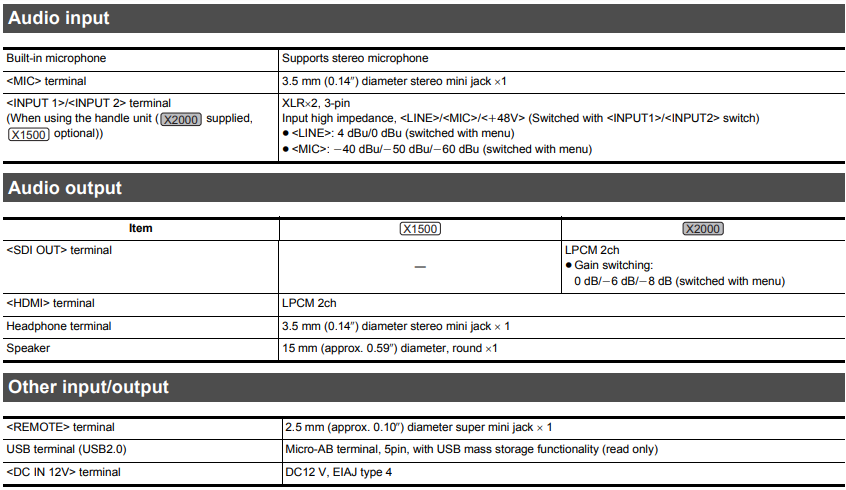
- <MIC> terminal (+ 36, 125) Connect an external microphone (stereo mini jack).
- <REMOTE> terminal Connects the remote control unit (commercially available) to control some functions remotely.
- USB terminal (+ 170) Connect to a computer with the USB 2.0 cable to transfer data.
- Tripod mounting holes (- 36) Attach the tripod. (bottom)
• Mounting hole size – 1/4-20 UNC (screw length 5.5 mm (0.22″) or shorter)
• Attaching a tripod with a screw length of 5.5 mm (0.22″) or more may damage the unit. - Grip belt (- 31)
- Lens cover (- 32)
- Lens
- Fan outlet for a cooling fan. Do not block this while the unit is being used.
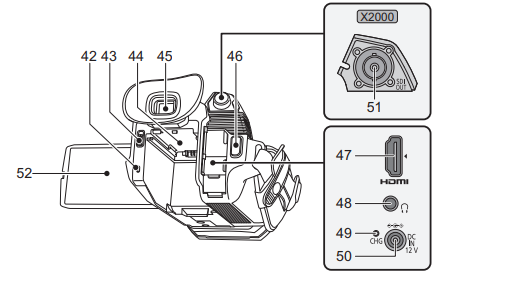
- Status indicator (- 37) Illuminates when power is on.
- Battery release lever (- 28) Used when removing the battery from the main unit.
- Battery mounting section (- 28) Attaches a battery.
- Viewfinder (- 54)
- REC button (on the grip) (= 104) Starts or stops the recording. It is possible to directly record from the thumbnail mode.
- <HDMI> terminal (- 169) A terminal to output video signal by connecting a monitor, etc.
- The headphones terminal Connects audio monitoring headphones.
- Charging lamp (- 29) Illuminates when the battery is charging.
- <DC IN 12V> terminal (- 29) Connects the supplied AC adaptor and supplies an external power.
- (For the X2000)) <SDI OUT> terminal (- 169) A terminal to output an SDI signal by connecting a monitor, etc.
- LCD monitor (- 53)

- Built-in microphone (- 125) This is the built-in stereo microphone <L>/<R>.
- Accessory shoe (on the main unit) Attach a video light, etc.
- Zoom lever (on the grip) (+ 118, 153) Adjusts the zoom of an image. <T>: Zooms in the image. <W>: Zooms out the image.
• Adjust the volume when playing back clips. - Handle unit mounting section (+ 33)
- <USER5> button (+ 50, 105) Used as a USER button (USER5).
• [REC CHECK] is set at the time of purchase. Automatically plays back the last approximately 3 seconds of the previously shot clip.
Power supply
A battery or the supplied AC adaptor can be used as the power supply for the unit.
- The unit is compatible with the following batteries. (As of January 2020)
– AG-VBR59 (supplied/optional, supports quick charging)
– VW-VBD58 (optional) - AG-VBR59 supports quick charging. Use a battery charger (AG-BRD50: optional) to perform quick charging.
Attaching and removing the battery
- Press the power button to turn off the unit. (+ 37)
Attaching the battery
- Push the battery against the battery mounting section on the main unit and slide forward to attach. Press in the battery until it clicks and gets locked.
A Battery mounting section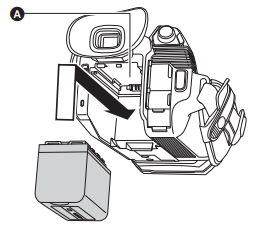
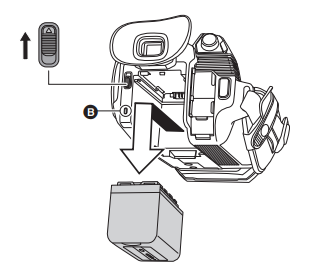
Removing the battery
Be sure to hold down the power button until the status indicator goes off. Then remove the battery while supporting the unit to prevent it from dropping.
- B Status indicator
Charging the battery
The battery is not charged at the time of purchase. Use only after charging sufficiently. It is recommended that you have one extra battery.
- It is recommended to perform charging of the battery in a location with an ambient temperature of 10 °C to 30 °C (50 °F to 86 °F) (same for the battery temperature).
- Use the supplied AC adaptor. Do not use the AC adaptor of another device.
- The supplied AC cable is dedicated to this unit. Do not use it with any other device. Also, do not use AC cable from another device on this unit.
- The battery is not charged when the power is on.

- Connect the AC cable to the AC adaptor and the AC outlet.
- Insert the plugs as far as they will go.
- Connect the AC adaptor to the ‹DC IN 12V> terminal.
- As the charging lamp lights up green, charging starts. It will turn off when the charging is completed.
- If the charging lamp flashes, refer to page 12.
- The DC plug of the AC adaptor, depending on its angle, may block your view of the charging lamp. To check the charging lamp status, adjust the angle of the DC plug.
Connecting to the AC outlet
It is possible to use this unit with power supplied from the AC outlet by turning on the unit with the AC adaptor connected. Even when you use the AC adaptor for recording images, keep the battery connected. This allows you to continue the recording even if a power failure occurs or the AC adaptor is unplugged from the AC outlet by accident.
- The AC adaptor is in the standby condition when the mains plug is connected. The primary circuit is always “live” as long as the AC adaptor is connected to an electrical outlet
NOTE
- Do not use any other AC adaptors except the supplied one.
- We recommend using Panasonic batteries (28).
- If you use other batteries, we cannot guarantee the quality of this product.
- Do not heat or expose to flame.
- Do not leave the battery(ies) in a car exposed to direct sunlight for a long period with doors and windows closed.
- Do not be exposed to low air pressure at high altitudes.
- Do not be exposed to extremely low air pressure, as this may result in explosions or leakage of flammable liquids and gases.
Adjusting the grip belt
- Adjust the grip belt so that it fits the size of your hand
- If the buckle is difficult to tighten, move the pad backward and tighten the buckle again.

- A Button
- B Buckle
- C Pad
- Undo the button of the grip belt.
- Open the buckle section.
- Pull the end of the belt.
- Do up the button of the grip belt.
Attaching the lens hood
Removing
- A Lens hood release button
- While pressing the lens hood release button, turn the lens hood in the direction of the arrow to remove it.
Attaching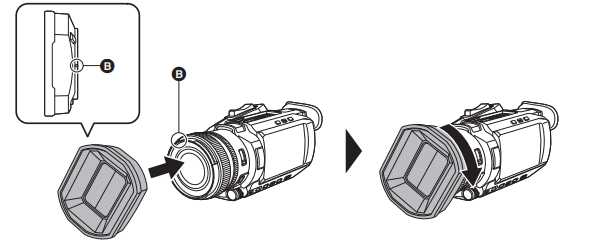
- B Mounting mark
- Insert the lens hood into the unit.
- Align the mounting marks on the lens hood and unit.
- Turn the lens hood clockwise.
- Turn until the lens clicks and locks into place.
Opening and closing the lens cover
Use the lens cover switching lever to open and close the lens cover. Open the lens cover when shooting. When not using the unit, close the lens cover to protect the lens.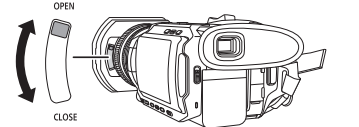
Attaching the eye cup
- Attach the eye cup by aligning the groove on the mounting part of the eye cup with the inner ridge of the eye cup. The illustration below is an example of attaching the eye cup to use it with your right eye. If you rotate the eye cup to the left by 180° before attaching it, you can use it with your left eye.

A Groove
B Ridge
Attaching a tripod
The tripod mounting holes accept 1/4-20 UNC screws.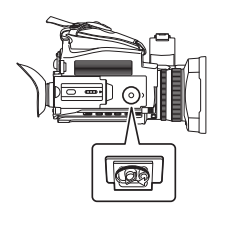
Turning on/off the power
Turning the unit on and off with the power button
- Open the LCD monitor and press the power button to turn on the unit.

- To turn off the unit Hold down the power button until the status indicator goes off.
Turning the unit on and off with the LCD monitor/viewfinder
Opening the LCD monitor or extending the viewfinder turns on the unit. Closing the LCD monitor/viewfinder turns off the unit. During normal use, you may find it convenient to turn the unit on/off using the LCD monitor or viewfinder.
- The unit will not turn off unless the LCD monitor is closed and the viewfinder is retracted.
- The unit will not turn off during recording or while connected to a network even if the LCD monitor is closed and the viewfinder is retracted.
- In the following cases, opening the LCD monitor or extending the viewfinder does not turn on the unit. Press the power button to turn on the unit.
– When the unit was originally purchased
– When you have turned off the unit using the power button
Preparing the memory card
- Operation is not guaranteed for any memory cards other than the above.
- Panasonic memory cards are recommended.
- The following memory cards cannot be used because they do not comply with the SD standards.
– A memory card with 4 GB or more without the SDHC logo
– A memory card with 48 GB or more without the SDXC logo - This unit supports the following memory cards:
– SDHC/SDXC memory cards that conform with the UHS-I UHS Speed Class 3 standard - Keep the memory card out of reach of children to prevent swallowing.
Inserting/removing the memory card
Inserting the memory card The memory card to use with the unit should always be formatted on the unit. (+ 41)
- Formatting the memory card will erase all of the recorded data which cannot be restored.

- A Card slot cover
- B Label side
- C Card slot 1
- D Card 1 access lamp
- E-Card slot 2
- F Card 2 access lamp
- 1 Open the card slot cover.
- Insert the memory card into the card slot.
-
- Card slot 1 and card slot 2 can each insert one memory card.
- With the label facing in the direction indicated in the diagram, push in until there is a click. Do not force or apply excess force when inserting the memory card.
-
- Close the card slot cover.
Removing the memory card
- Open the card slot cover.
- Confirm that the card access lamp is not flashing in orange.
- Data is being written/loaded when the card access lamp is flashing in orange, so do not remove the memory card.
- Press the memory card further into the main unit and let go.
- Pull the memory card straight out when it is released from the card slot.
- Close the card slot cover.
Formatting the memory card
Before recording with a memory card that is to be used for the first time in this unit, format it. All data will be deleted when the card is formatted. Save any important data to a computer, etc. (- 170)
- When using 2 memory cards, you must format both of the memory cards.
- Select the (RECORDING] menu -› (FORMAT MEDIA] – [SLOT1J/[SLOT2].
- When the confirmation message is displayed, select (SET].
- When the completion message is displayed, select [ 51.
Updating the unit’s firmware
Confirm the firmware version of the unit in the [OTHERS] menu -> [INFORMATION] – [VERSION], access the most current information regarding firmware on the website described in NOTE, and download the firmware as necessary.
NOTE
- The update is completed by loading the downloaded file to the unit via the memory card. Insert the memory card that stores the update file into card slot 1, and select the [OTHERS] menu -> [INFORMATION] -› (UPDATE]. For the latest updated information, check the support website below. (As of January 2020) https://panasonic.jp/support/global/cs/e_cam (This website is in English only.)
- When updating the firmware, use the AC adaptor or sufficiently charged battery.
- Do not turn off the power while updating the firmware. Rewriting of the firmware may fail and the unit may not be activated.
Cleaning and storing
Cleaning the main unit
- Remove the battery or disconnect the AC cable from the power outlet before cleaning.
- Do not use benzene or thinner to clean the unit. Using benzine or thinner may cause deformation or peeling off of the paint of the main unit.
- Wipe the main unit with a soft and clean cloth. For heavy dirt, wipe with a cloth soaked in kitchen detergent diluted with water, and then with a dry cloth.
- When using a chemical dust cloth, follow the instructions that came with the cloth.
Cautions for storage
Remove the battery from the main unit when storing. Store them in a place where humidity is low and temperature is relatively constant. When storing the unit, it is recommended that you place a desiccant (silica gel) in with it.
- Recommended temperature: 15 °C to 25 °C (59 °F to 77 °F)
- Recommended relative humidity: 40% to 60%
Dimensions
Main unit
When the handle unit is attached ( (X2000) supplied, (X1500) optional)
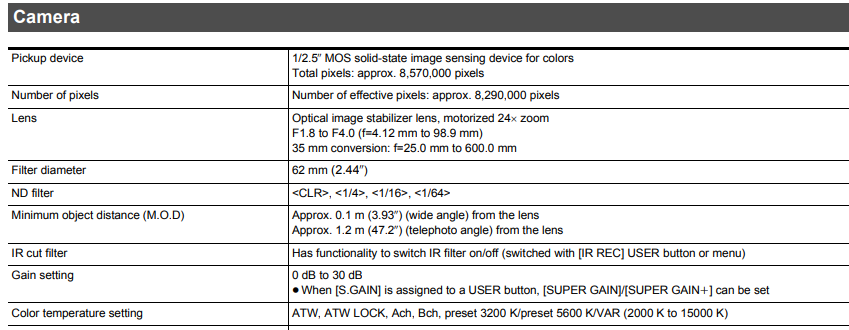
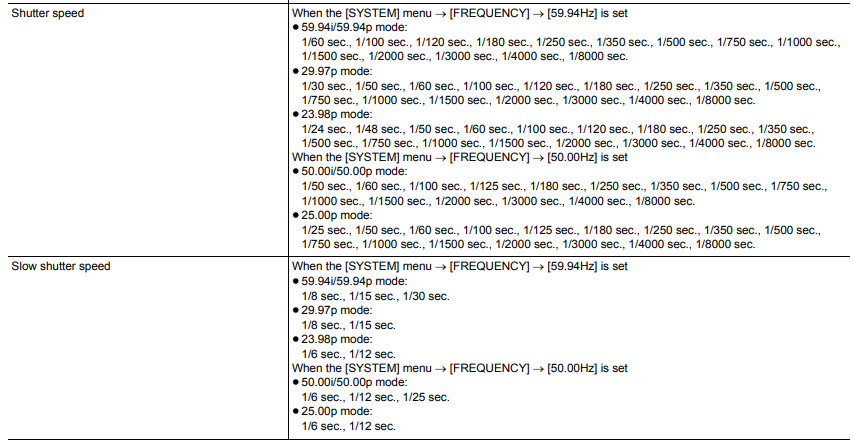
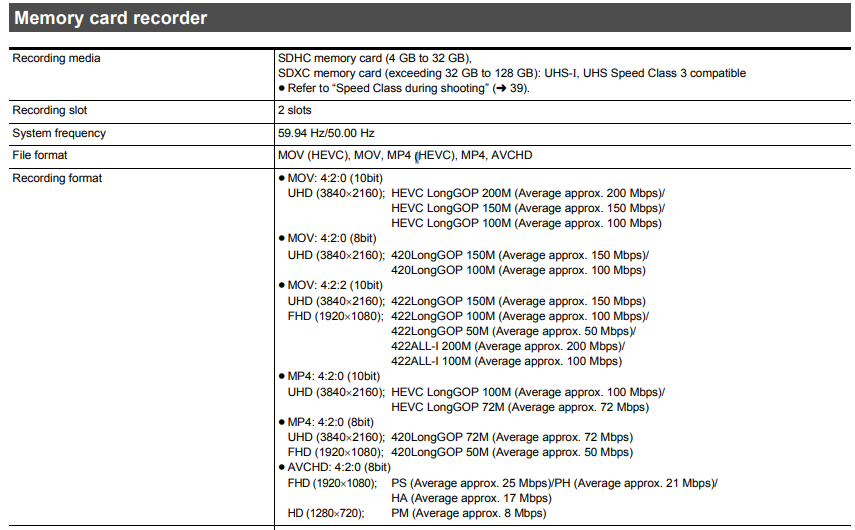
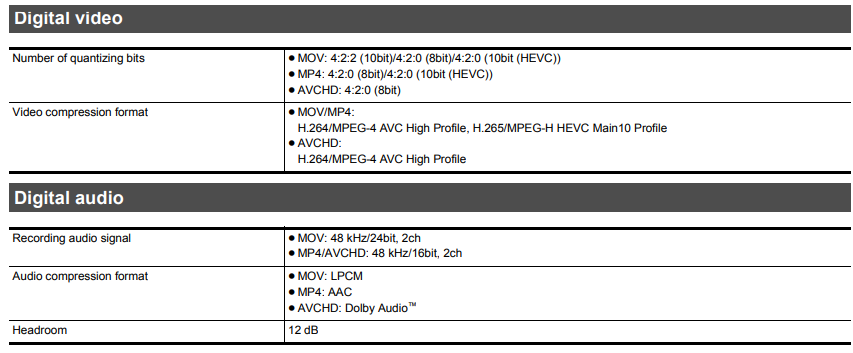
Specification
FAQS About Panasonic X1500 Professional Camcorder
What recording formats can the Panasonic X1500 handle?
The camera has HEVC compression and records in the. mp4,. mov, and AVCHD codecs.
What is the Panasonic X1500’s bitrate?
The HC-X1500 offers 10-bit Full HD recording at 59.94p/50p (100 Mbps) and 4-bit 4K recording at 29.97p/25p (200 Mbps), allowing you to record additional color information in 4:2:2 10-bit.
What is the Panasonic HC-X1500’s output?
HDMI or 3G-SDI outputs.
How can I get my Panasonic camcorder’s videos onto my computer?
Remove the SD card and insert it directly into your computer.
Has Panasonic eliminated its recording cap?
For all formats, the Panasonic has no video recording restrictions.
What is the Panasonic camcorder’s frame rate?
120 fps.
What is a Panasonic video’s resolution?
Full High Definition (FHD) and 4K.
Is Panasonic an excellent video camera?
Both audio and visual choices are great.
Are Panasonic’s camcorders of high quality?
For sports and action videos, the Panasonic camcorders are a fantastic choice.
Which video resolution is superior?
In comparison to HD standards, quad HD or 2K resolution offers additional clarity and detail.
For more manuals by Panasonic, Visit Manualsdock
[embeddoc url=”https://manualsdock.com/wp-content/uploads/2023/09/Panasonic-X1500-Professional-Camcorder-Owner-Manual.pdf” download=”all”]


