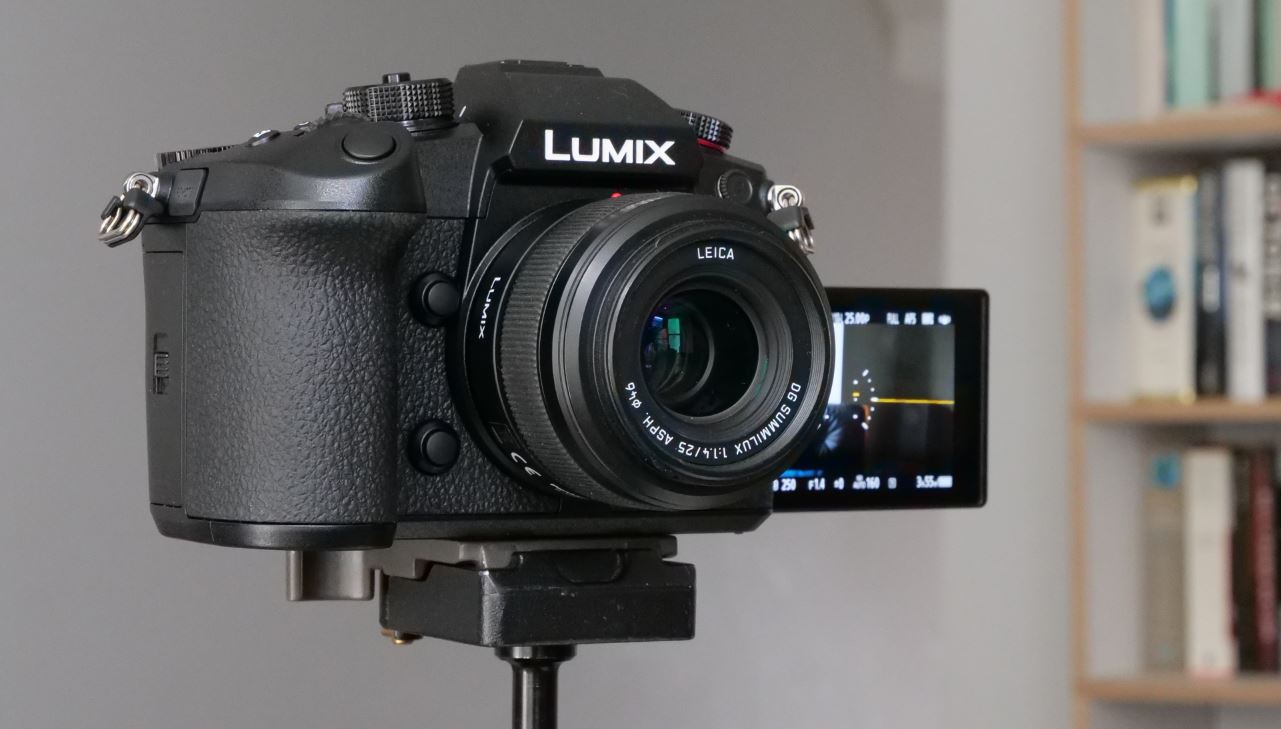
Panasonic LUMIX GH6 Mirrorless Camera
ABOUT Panasonic
Panasonic Corporation is a multinational electronics company headquartered in Osaka, Japan. It was founded in 1918 by Konosuke Matsushita and originally started as a vendor of duplex lamp sockets. Over the years, Panasonic has grown into one of the largest electronics manufacturers in the world, offering a wide range of products and services.
Panasonic‘s business operations span various sectors, including consumer electronics, home appliances, automotive, industrial solutions, and B2B solutions. The company is known for its innovation and has a strong focus on research and development.
Information for Your Safety
WARNING:
- To reduce the risk of fire, electric shock, or product damage,
- Do not expose this unit to rain, moisture, dripping, or splashing.
- Use only the recommended accessories.
- Do not remove covers.
- Do not repair this unit by yourself. Refer servicing to qualified service personnel.
THE FOLLOWING APPLIES ONLY IN THE USA
FCC Note: This equipment has been tested and found to comply with the limits for a Class B digital device, under Part 15 of the FCC Rules These limits are designed to provide reasonable protection against harmful interference in a residential installation. This equipment generates, uses, and can radiate radio frequency energy and, if not installed and used by the instructions, may cause harmful interference to radio communications. However, there is no guarantee that interference will not occur in a particular installation. If this equipment does cause harmful interference to radio or television reception, which can be determined by turning the equipment off and on, the user is encouraged to try to correct the interference by one or more of the following measures:
- Reorient or relocate in receiving antenna
- Increase the separation between the equipment and the receiver.
- Connect the equipment to an outlet on a circuit different from that to which the receivers connect
- Consult the dealer or an experienced radio/TV technician for help
FCC Caution:
- Any unauthorized changes or modifications to this equipment would void the user’s authority to operate this device.
- To assure continued compliance, follow the attached installation instructions and use only shielded interface cables with ferrite core when connecting to computer or Neriphera devices This device complies with Part 15 of the FCC Rules. Operation is subject to the following two conditions:
- This device may not cause harmful interference, and
- this device must accept any interference received, including interference that may
Supplier’s Declaration of Conformity
- Trade Name: Panasonic
- Model No.: DC-GH6
- Responsible Party: Panasonic Corporation of North America Two Riverfront Plaza, Newark, NJ 07102-5490
- Support Contact: http://shop.panasonic.com/support
About the battery pack
CAUTION
Battery pack (Lithium-ion battery pack
- Use the specified unit to recharge the battery pack.
- Do not use the battery pack with equipment other than the specified unit.
- Do not get dirt, sand, liquids, or other foreign matter on the terminals.
- Do not touch the plug terminals (+ and -) with metal objects.
- Do not disassemble, remodel, heat, or throw into fire.
- If any electrolyte should come into contact with your hands or clothes, wash it off thoroughly with water.
- If any electrolyte should come into contact with your eyes, never rub the eyes. Rinse eyes thoroughly with water, and then consult a doctor.
CAUTION
- The a danger of explosion if the battery is incorrectly replaced. Replace only with the type recommended by the manufacturer.
- When disposing of the batteries, please contact your local authorities or dealer and ask for the correct method of disposal.
- Do not heat or expose to flame.
- Do not leave the battery(jes) in a car exposed to direct sunlight for a long period with doors and windows closed.
- Do not be exposed to low air pressure at high altitudes.
- Do not be exposed to extremely low air pressure, as this may result in explosions or leakage of flammable liquids and gases.
Warning
Risk of fire, explosion, and burns. Do not disassemble, heat above 60 °C (140 °F), or incinerate.
About the AC adaptor (supplied)
CAUTION!
To reduce the risk of fire, electric shock, or product damage,
- Do not install or place this unit in a bookcase, built-in cabinet, or in another confined space. Ensure this unit is well-ventilated.
- The AC adaptor is in the standby condition when the mains plug is connected. The primary circuit is always “live” as long as the main plug is connected to an electrical outlet.
AC adaptor
This AC adaptor operates on AC between 110 V and 240 V. But
- In the U.S.A. and Canada, the AC adaptor must be connected to a 120 V AC power supply only.
- When connecting to an AC supply outside of the U.S.A. or Canada, use a plug adaptor to suit the AC outlet configuration.
- Do not use any other USB connection cables except the one supplied with the camera or the Battery Charger (DMW-BTC15: optional).
- Always use a genuine Panasonic Shutter Remote Control (DMW-RS2: optional).
- Always use a genuine Panasonic Tripod Grip (DMW-SHGR1: optional).
- Use a Premium High-Speed HDMI cable (Type A-Type A plug, up to 1.5 m (4.9 feet) long). Do not use headphone cables with a length of 3 m (9.8 feet) or more.
- Do not use stereo microphone cables with a length of 3 m (9.8 feet) or more
Firmware of Your Camera/Lens
Firmware updates may be provided to improve camera capabilities or to add functionality. Make sure that the firmware of the camera/lens you purchased is the latest version. We recommend using the latest firmware version • To check the firmware version of the cameramen. attach the lens to the camera and select Firmware Version in the Setup (Others menu. You can also update the firmware in Firmware Version
Handling of the Camera
When using the camera, don’t drop it, bump it, or apply undue force. These may cause malfunction or damage to the camera and lens If sand, dust, or liquid gets on the monitor, wipe it off with a dry soft cloth. – louch operations may be incorrectly recognized
Standard Accessories
- Digital camera body
(This is referred to as a camera in this document.)
- Battery pack
(This is referred to as battery pack or batter in this document Charge the battery before use.
- Battery charger (This is referred to as battery charger or charger in this comment

- AC adaptor This is used for charging and power supply.
- USB connection cable

- BC conversion cable (for TC IN/ OUT)

- Cable holder

- Shoulder strap

- Body cap

- Eye cup

- Hot shoe cover’

- Flash synchro socket can”

Items Supplied with DC-GH6L (Lens Kit Product)
- The interchangeable lens 213 ‘
LEICA DG VARIO-ELMARIT 12-60mm/F2.8-4.0 ASPH./POWER O.IS.’
- Lens hood

- Lens cap
- Lens rear cap°*

- This is attached to the camera at the time of purchase.
- Dust and splash-resistant
- The recommended operating temperature is from -10 °C to 40 °C (14 °F to 104 °F)
- This is attached to the lens at the time of purchase.
The memory card is optional.
- If accessories are lost, customers can visit us at http://shop.panasonic.com/support for further information about obtaining replacement parts.
- To order optional accessories please visit http://shop.panasonic.com or your local Photo Specialty Dealer.
Names of Important Parts
- Stereo microphone
• Do not block the microphone with a finger. Audio will be - Drive mode dial
- Hot shoe (hot shoe cover)
• Keep the hot shoe cover out of reach of children to prevent swallowing - [LVF] button
- Front dial
- [WBJ (White balance) button
- (ISO] (ISO sensitivity) button
- [ EZ I (Exposure compensation) button
- Power indicator
- [-O-] (Recording distance reference mar
- Charging light/ Network connection light
- [Mil (Audio information) button
- Video rec. button
- Camera on/off switch
- Mode dial lock button
- Mode dial
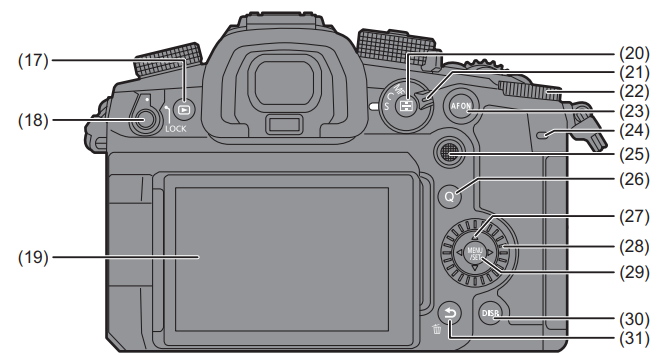
- [C] (Playback) button
- Operation lock lever
- Monitor/Touch screen
- I IF 1 (AF mode) button
- Focus mode lever
- Rear dial
- [AF ON] button
- Rear tally lamp
- Joystick/Fn buttons
Center: Fn9, A: Fn10, D: Fn11, V: Fn12, 4: Fn13 - [Q] (Quick menu) button
- Cursor buttons/Fn buttons
A: Fn14, D: Fn15, V: Fn16, 4: Fn17 - Control dial
- [MENU/SET] button
- (DISP.] button
- [$] (Cancel) button/
[Tul (Delete) button/
Fn button (Fn1)
- Diopter adjustment dial
- Eye cup
• Keep the eye cup out of reach of children to prevent swallowing. - Viewfinder
- Eye sensor
- Speaker
- Eve cup lock lever
- Fan inlet
• The fan inlet for the cooling fan.
• Do not obstruct this unit’s ventilation openings with newspapers, tablecloths, curtains, and smartens - Tripod mount
• If you attempt to attach a tripod with a screw length of 5.5 mm (0.22 inches) or more, you may not be able to securely fix it in place or it may damage the - [REMOTE] socket
- Card access light 1
- Card slot 1
- Card slot 2
- Card access light 2
- Card door lock lever
- Card door
- Battery door release lever
- Battery door
- DC coupler cover
• When using an AC adaptor, ensure that the Panasonic DC Coupler (DMW-DCC17: optional) and AC Adaptor (DMW-AC10PP: optional) are used.
• Always use a genuine Panasonic AC Adaptor (DMW-AC10PP: optional).
• When using an AC Adaptor (optional), use the AC cable supplied with the AC Adaptor (optional).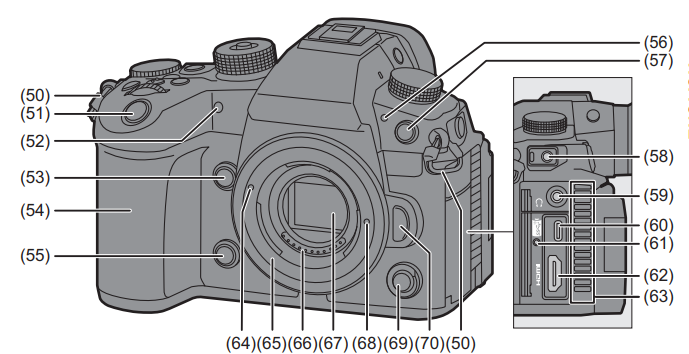
- Shoulder strap eyelet
- Shutter button
- Self-timer light/ AF assist light
- Enlarged live display (video) button/ Fn button (Fn2)
- Grip
- Preview button/Fn button (Fn3)
- Front tally lamp
- Flash synchro socket (flash synchro socket cap)
• Use a flash with a synchronization voltage of 250 V or less.
• Connect the supplied BNC conversion cable (for TC IN/ OUT) when synchronizing the time code with an external device. • Keep the flash synchro socket cap out of reach of children to prevent swallowing. - [MICI socket
- Headphone socket
• Excessive sound pressure from earphones and headphones can cause hearing loss. - USB port
- Cable holder mount
- HDMI socket
- Fan outlet
• The fan outlet for the cooling fan.
• Do not obstruct this unit’s ventilation openings with newspapers, tablecloths, curtains, and similar items. - Lens fitting mark
- Mount
- Contact points
- Sensor
- Lens lock pin
- Sub video rec. button
- Lens release button
Supplied Lens
- H-ES12060
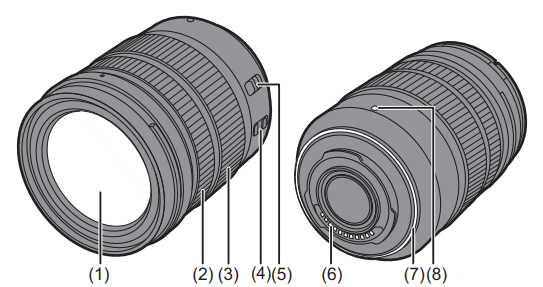
- Lens surface
- Focus ring
- Zoom ring
- O.I.S. switch
- [AF/MF] switch
• You can switch between AF and MF. If [MFI is set on either the lens or camera, the operation will be with MF. - Contact points
- Lens mount rubber
- Lens fitting mark
Viewfinder/Monitor Displays
At the time of purchase, the viewfinder/monitor displays the following icons.
- For information about the icons other than those described here, refer to “Owner’s Manual <Complete Guide>”.
Viewfinder 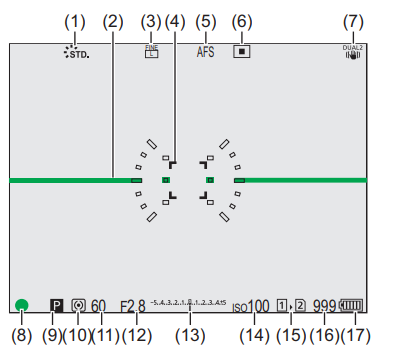
- Photo Style
- Level gauge
- Picture quality/Picture size
- AF area
- Focus mode
- AF mode
- Image stabilizer
- Focus (green)/ Recording state (red)
- Recording mode
- Metering mode
- Shutter speed
- Aperture Value
- Exposure Compensation Value/ Manual Exposure Assist
- ISO sensitivity
- Card slot/ Double card slot function
- Number of pictures that can be taken/ Number of pictures that can be taken continuously
- Battery indication
Monitor
Getting Started/Basic Operations
- When preparing, make sure the camera on/off switch is [OFF].
Attaching a Shoulder Strap
Attach a shoulder strap to the camera with the following procedure to prevent it from dropping.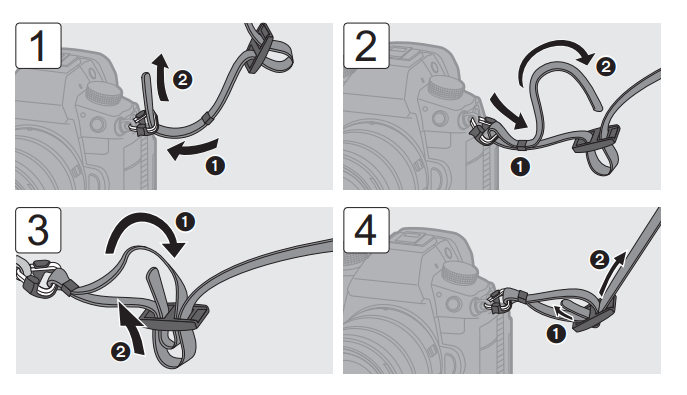
- Pull the shoulder strap and check that it will not come out.
- Attach the opposite end of the shoulder strap with the same procedure.
- Use the shoulder strap around your shoulder.
- – Do not wrap the strap around your neck. It may result in injury or accident.
- Do not leave the shoulder strap where an infant can reach it.
- – It may result in an accident by mistakenly wrapping around the neck.
Charging the Battery
You can charge the battery either using the supplied charger or in the camera body. You can also use the Battery Charger (DMW-BTC15: optional)
- The battery that can be used with the camera is DMW-BLK22. (As of January 2022)
Optional battery DMW-BLF19PP
You can also use DMW-BLF19PP (optional), but there are the following limitations:
- The following functions cannot be used:
– [Rec Quality] exceeding a resolution of C4K
– [Rec Quality] with a high frame rate video exceeding a recording frame rate of 60.00p
– [Variable Frame Rate exceeding a frame rate of 60 fps - The battery capacity is low, so this reduces the number of pictures that can be taken and the available recording time.
- There will be 4 remaining battery charge indicators. We recommend using DMW-BLK22 (supplied/optional).
Charging with the Charger
- Charging time Approx. 230 min
- Use the supplied charger and AC adaptor.

- Connect the charger and the AC adaptor with the USB connection cable.
• Check the direction of the terminals and plug in/out straight holding onto the plug. (Inserting these at an angle may cause deformation or malfunction) - Connect the AC adaptor to an electrical outlet.
- Insert the battery.
• The charging lights ((CHARGE]) (A) blink and charging begins.
Charging Lights Indications
- If the [50%] light is blinking quickly, then charging is not occurring.
- When the battery is inserted while the charger is not connected to the power source, the charging lights turn on for a certain period to allow you to confirm the battery level.
Battery Insertion
- Always use genuine Panasonic batteries (DMW-BLK22).
– You can also use DMW-BLF19PP (optional), but there are limitations. (- 23) - If you use other batteries, we cannot guarantee the quality of this product.

- Check that the lever (E) is holding the battery in place
- When removing the battery, press down on lever (E).
Inserting a Battery into the Camera for Charging
- Charging time Approx. 220 min
- Using the camera body and the supplied AC adaptor.

- Using the camera body and the supplied AC adaptor.
- Set the camera on/off switch to [OFF]
- Insert the battery into the camera.
- Connect the camera USB port and the AC adaptor using the USB connection cable.
• Check the direction of the terminals and plug in/out straight holding onto the plug. (Inserting these at an angle may cause deformation or malfunction) - Connect the AC adaptor to an electrical outlet.
• The charging light (F) turns red and charging begins.
Charging Light Indications
Charging light (red)
- On: Charging.
- Off: Charging has been completed.
- Blinking: Charging error.
 The battery is not charged at the time of purchase. Charge the battery before use.
- For charging, use this camera or the Battery Charger (DMW-BTC15: optional and the items supplied with them.
- Do not use any other USB connection cables except the one supplied with the camera or the Battery Charger (DMW-BTC15: optional).
- Do not use any other AC adaptors except the one supplied with the camera or the Battery Charger (DMW-BTC15: optional).
- Even when the camera on/off switch is set to [OFF] thus turning the camera off, it consumes power. When the camera will not be used for a long time, remove the power plug from the electrical outlet to save power.
Power Supply
When the battery is inserted into the camera for charging and the camera is turned on, you can record while the camera is being supplied with power.
- [ hm] is displayed on the screen while power is being supplied.
- Refer to “Owner’s Manual <Complete Guide>” for details about supplying power and charging the battery while power is being supplied.
- Turn off the camera before connecting or disconnecting the AC adaptor.
Attaching a Lens
Lenses That Can Be Used
The camera can use dedicated lenses that comply with the Micro Four Thirds ™ system lens mount MICRO specification (Micro Four Thirds mount). You can also use the Leica M Mount interchangeable lens by attaching the M Mount Adaptor (DMW-MA2M: optional).
- Refer to catalogs/websites for information regarding supported lenses. https://panasonic.jp/support/global/cs/dsc/connect/index.html (English only)

(A) Lens fitting marks
When removing the lens, rotate while pressing the lens release button (B).
Adjusting the Monitor Direction and Angle
Tilt Put your finger on (A) and push the monitor up in the direction of the arrow.
- The monitor of this camera can be tilted in two stages.
- The monitor can still be opened when tilted to 28°.

- The angles of adjustment are guides only.
- Take care not to trap a finger in the monitor.
- Do not apply excessive force to the monitor. This may cause damage or malfunction.
- When not using the camera, close the monitor with the monitor surface facing in.
Troubleshooting
First, try out the following procedures (- 34 to 36).
If the problem is not resolved, it may be improved by selecting [Reset] (- 32) on the [Setup] ([Setting]) menu.
- Please also refer to the “Owner’s Manual <Complete Guide>”, which describes more detailed information.
The battery becomes flat too quickly.
- When connected to Wi-Fi, the battery drains quickly. Turn the camera off frequently such as by using [Power Save Mode].
The recording stops before finishing. Cannot record. Cannot use some functions.
- The temperature of the camera or card rises more readily in the following circumstances: when the ambient temperature is high; and during continuous use such as when recording high-definition video, taking burst pictures at high speed, or outputting via HDMI. When the temperature of the camera or card rises, [a] appears blinking on the screen. If you continue to use the camera, a message indicating that the camera or card cannot be used is displayed on the screen, and recording and HDMI output will be stopped. Wait for the camera or card to cool down and for the message indicating that they can be used again. When the message indicating that they can be used again is displayed, turn the camera off and then on again.
- When recording with the camera mounted on a tripod, etc., you can set the temperature at which recording is stopped to a higher temperature. Refer to the “Owner’s Manual <Complete Guide>” for details.
The recorded image looks rough. Noise appears in the picture.
- When the camera is used continuously, the temperature inside the camera may rise and this may cause lower image quality. We recommend turning off the camera whenever you are not recording.
Striping or flicker may appear under lighting such as fluorescent or LED lighting.
- This is characteristic of MOS sensors which serve as the camera’s pickup sensors. This is not a malfunction.
- When using the electronic shutter, lowering the shutter speed may reduce the effect of the horizontal stripes.
- If flicker or horizontal stripes are noticeable when recording video, this can be mitigated by fixing the shutter speed. Either set [Flicker Decrease (Video)] or fix the shutter speed with the [SM] mode.
The brightness or coloring of the recorded image is different from the actual scene.
- When recording under lighting such as fluorescent or LED lighting, increasing the shutter speed may introduce slight changes to brightness or coloring. These are a result of the characteristics of the light source and do not indicate a malfunction.
- When recording subjects in extremely bright locations or recording under lightings such as fluorescent, LED, mercury, or sodium lighting, the coloring or screen brightness may change or horizontal striping may appear on the screen.
The flash does not fire.
The flash does not fire when using the following functions:
- – Video recording
- – [ELEC. /Silent Mode]
- – High-Resolution mode
- – [Filter Settings]
[E] is displayed on the screen.
- The fan has stopped. Turn off and on the camera. If the fan does not work after turning the camera off and then on again, consult the dealer.
- The temperature of the camera will rise if you continue to use the camera with the fan stopped. Do not use it over long periods.
An alarm sounds when the car door is opened.
- An alarm may sound when a door is opened while writing to a card. Wait until the writing finishes, then turn the camera off and remove the card.
When the camera is shaken, a rattling sound is heard from the camera.
- The sound is caused by the in-body stabilizer. This is not a malfunction.
There is a rattling noise from the lens when the camera is turned on or off, or when the camera is swung. There is a sound from the lens when recording.
- This is the sound of the lens moving and aperture operation. It is not a malfunction
Specifications
- Please also refer to the “Owner’s Manual <Complete Guide>”, which lists more items.
- The specifications are subject to change for performance enhancement.
Digital camera body (DC-GH6): Information for your safety
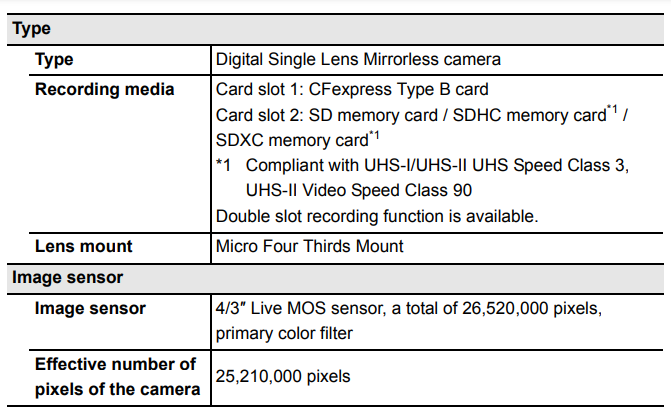
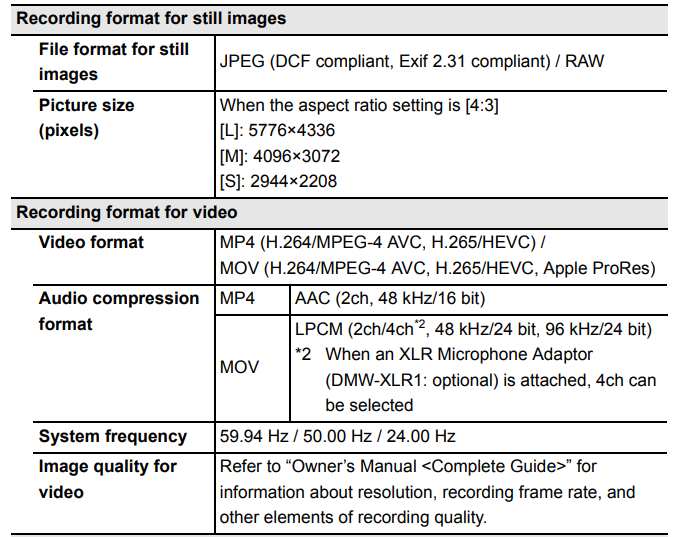


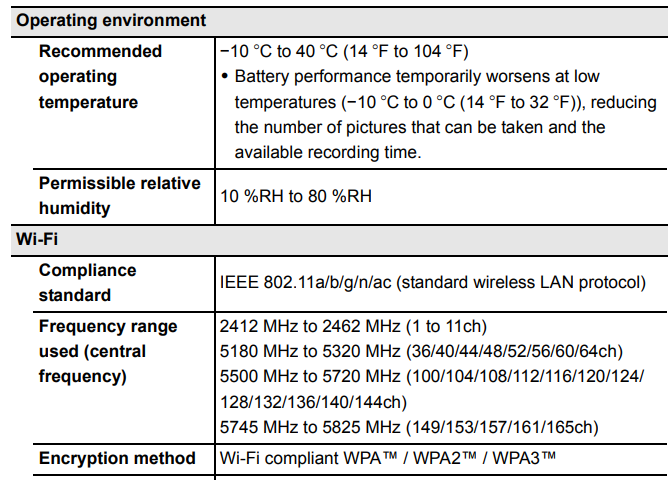


AC adaptor (Panasonic VSK0815F): Information for your safety

Battery pack (lithium-ion) (Panasonic DMW-BLK22): Information for your safety
![]()
The symbols on this product (including the accessories) represent the following:
Interchangeable Lens: H-ES12060 “LEICA DG VARIO-ELMARIT 12-60mm/F2.8-4.0 ASPH./ POWER O.I.S.”


Limited Warranty (ONLY FOR U.S.A.)
Panasonic Products Limited Warranty
Limited Warranty Coverage (For USA Only)
If your product does not work properly because of a defect in materials or workmanship, Panasonic Corporation of North America (referred to as “the warrantor”) will, for the length of the period indicated on the chart below, which starts with the date of original purchase (“warranty period”), at its option either (a) repair your product with new or refurbished parts, (b) replace it with a new or a refurbished equivalent value product, or (c) refund your purchase price. The decision to repair, replace or refund will be made by the warrantor
During the “Labor” warranty period there will be no charge for labor. During the “Parts” warranty period, there will be no charge for parts. This Limited Warranty excludes both parts and labor for non-rechargeable batteries, antennas, and cosmetic parts (cabinet). This warranty only applies to products purchased and serviced in the United States. This warranty is extended only to the original purchaser of a new product that was not sold “as is”.
Mail-In Service–Online Repair Request
Online Repair Request
To submit a new repair request and for quick repair status visit our Web Site at http://shop.panasonic.com/support. When shipping the unit, carefully pack, include all supplied accessories listed in the Owner’s Manual, and send it prepaid, adequately insured, and packed well in a carton box. When shipping Lithium Ion batteries please visit our Web Site at http://shop.panasonic.com/support as Panasonic is committed to providing the most up-to-date information. Include a letter detailing the complaint, a return address and provide a daytime phone number where you can be reached. A valid registered receipt is required under the Limited Warranty.
This warranty ONLY COVERS failures due to defects in materials or workmanship and DOES NOT COVER normal wear and tear or cosmetic damage. The warranty ALSO DOES NOT COVER damages which occurred in shipment, or failures which are caused by products not supplied by the warrantor, or failures which result from accidents, misuse, abuse, neglect, mishandling, misapplication, alteration, faulty installation, set-up adjustments, misadjustment of consumer controls, improper maintenance, power line surge, lightning damage, modification, introduction of sand, humidity or liquids, commercial use such as hotel, office, restaurant, or other business or rental use of the product, or service by anyone other than a Factory Service Center or other Authorized Servicer, or damage that is attributable to acts of God.
Some states do not allow the exclusion or limitation of incidental or consequential damages, or limitations on how long an implied warranty lasts, so the exclusions may not apply to you.
This warranty gives you specific legal rights and you may also have other rights which vary from state to state. If a problem with this product develops during or after the warranty period, you may contact your dealer or Service Center. If the problem is not handled to your satisfaction, then write to:
Customer Services Directory
F or Product Information, Operating Assistance, Parts, Owner’s Manuals, Dealer and Service info go to http://shop.panasonic.com/support For the hearing or speech impaired TTY: 1- 877-833-8855
FAQS About Panasonic LUMIX GH6 Mirrorless Camera
Is there picture stabilization on the GH6?
Additional optional features like as Power OIS and in-body image stabilization are provided.
The GH6 is weatherproof.
Still weather-sealed is the GH6.
What resolution can the GH6 record at?
The LUMIX GH6 has integrated 4:2:2 10-bit Cinema 4K 60p recording capabilities.
What is the GH6’s shutter life?
The GH6 shutter has a 200k actuation rating.
Can the GH6 record raw video?
The GH6 offers HDMI out for new RAW video output.
Has the GH6 got autofocus?
Even a small portion of a person or animal that enters the AF region will instantly be recognized and focussed.
Which battery does the GH6 employ?
The GH6 uses a DMW-BLK22 lithium-ion battery and can take about 360 pictures on a single charge.
Is the GH6 a good camera?
The GH6 performs admirably as a stills camera.
How long does the battery on a Panasonic GH6 last?
between 330 and 750 photos
Lumix GH6: Is it full frame?
In terms of size, the GH6 is comparable to a full-frame. LUMIX S-series camera from Panasonic
For more manuals by Panasonic, Visit Manualsdock
[embeddoc url=”https://manualsdock.com/wp-content/uploads/2023/09/Panasonic-LUMIX-GH6-Mirrorless-Camera-Owner-Manual.pdf” download=”all”]

