
Panasonic LUMIX G9 4K Digital Camera
ABOUT Panasonic
Panasonic Corporation is a multinational electronics company headquartered in Osaka, Japan. It was founded in 1918 by Konosuke Matsushita and originally started as a vendor of duplex lamp sockets. Over the years, Panasonic has grown into one of the largest electronics manufacturers in the world, offering a wide range of products and services.
Panasonic‘s business operations span various sectors, including consumer electronics, home appliances, automotive, industrial solutions, and B2B solutions. The company is known for its innovation and has a strong focus on research and development.
Standard Accessories
Check that all the accessories are supplied before using the camera. Product numbers are correct as of November 2017. These may be subject to change.
Digital Camera Body
(This is referred to as the camera body in this owner’s manual.)
- Interchangeable Lens*1,2
- Lens Hood
- Lens Cap*3
- Lens Rear Cap*3
- Body Cap*4
- Battery Pack
- Battery Charger*5
- AC Adaptor
- USB Connection Cable (for exclusive use with the Battery Charger)
- USB Connection Cable
- Shoulder Strap
- Hot shoe cover*4
- Eye Cup*4
- Flash synchro socket cap*4
- Cover for the battery grip connector*4
*1 This is referred to as a lens in this owner’s manual.
*2 The interchangeable lens (H-ES12060) included in DC-G9L is dust- and splash-proof.
*3 This is attached to the interchangeable lens at the time of purchase.
*4 This is attached to the camera body at the time of purchase.
*5 Order part number A to purchase only a battery charger.
- SD Memory Card, SDHC Memory Card, and SDXC Memory Card are indicated as cards in the text.
- The card is optional.
- The description in this owner’s manual is based on the interchangeable lens (H-ES12060).
- If accessories are lost, customers can visit us at http://shop.panasonic.com/support for further information about obtaining replacement parts.
About cards that can be used with this unit
Recording of motion pictures/6K photos/4K photos and speed class ratings Use a card that meets the following ratings of the SD Speed Class or UHS Speed Class.
- SD Speed Class and UHS Speed Class are the speed standards regarding continuous writing. To check the class, see the labeled side, etc. of the card.
- Please confirm the latest information on the following website http://panasonic.jp/support/global/cs/dsc/ (This Site is English only.)
- Keep the memory card out of reach of children to prevent swallowing.
About the Lens
This unit can use the dedicated lenses compatible with the Micro Four ThirdsTM System lens mount specification (Micro Four Thirds mount).
You can also use a lens of any of the following standards by attaching a mount adaptor.
About the firmware of your interchangeable lens
For smoother recording, we recommend updating the firmware of the interchangeable lens to the latest version.
- To view the latest information on the firmware or to download the firmware, visit the support site below: http://panasonic.jp/support/global/cs/dsc/ (This Site is English only.)
- To check the firmware version of the interchangeable lens, attach it to the camera body and select [Version Disp.] in the [Setup] menu.
Names and Functions of Components
Camera body
- Charging lamp (P18)/WIRELESS connection lamp
- Motion picture button
- Focus distance reference mark
- [
 ] (Exposure Compensation) button
 - [ISO](ISO sensitivity) button
- [WB] (White Balance) button
- Front dial
- Shutter button
- Camera ON/OFF switch/Status LCD backlight dial
- Self-timer indicator/AF Assist Lamp
- Function button (Fn4)
- Preview button/Function button (Fn5)
- Rear dial
- Status LCD
- Stereo microphone
- Hot shoe (Hot shoe cover)
- Mode dial
- Mode dial lock button
- Drive mode dial
- Flash synchro socket (Flash synchro socket cap)
- [V.MODE] button
- Shoulder strap eyelet
- Diopter adjustment dial
- [MIC] socket
- Headphone socket
- [HDMI] socket
- [USB/CHARGE] socket
- Lens release button
- Function lever
- Lens lock pin
- Mount
- Sensor
- Lens fitting mark
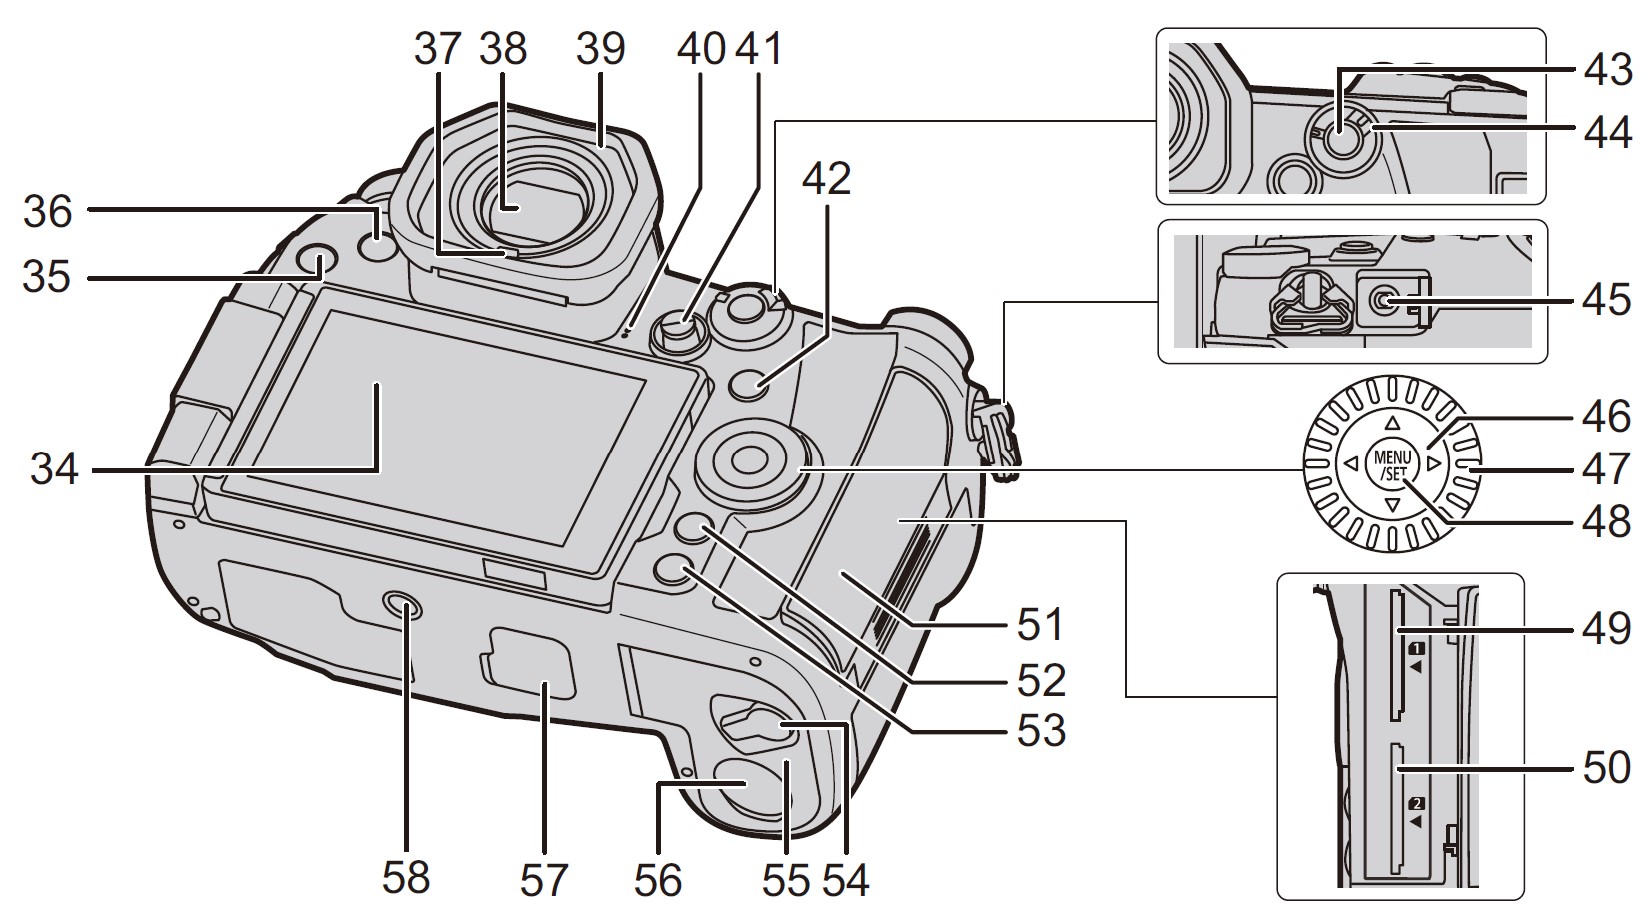
- Touch screen/monitor
- [
 ] (Playback) button
 - [LVF] button/[Fn3] button
- Eye sensor
- Viewfinder
- Eye cup
- Speaker
- Joystick/Function button
Center (Fn11)/ (Fn12)/
 (Fn13)/
 (Fn14)/
 (Fn15)
 - [
 ] (Auto Focus Mode) button/[Fn1] button
 - [AF/AE LOCK] button
- Focus mode lever
- [REMOTE] socket
- Cursor buttons/Function button
 (Fn16)/
 (Fn17)/
 (Fn18)/
 (Fn19)
 - Control dial
- [MENU/SET] button
- Card slot 1
- Card slot 2
- Card door
- [Q.MENU] button/[Fn2] button (P32)/ [
 ] (Delete) button/[
 ] (Cancel) button
 - [DISP.] button
- Release lever
- Battery door
- DC coupler cover
- Cover for the battery grip connector
- Tripod mount
Function buttons ([Fn6] to [Fn10]) are touch icons.
Touch the [![]() ] tab on the recording screen to display them.
] tab on the recording screen to display them.
Lens
H-ES12060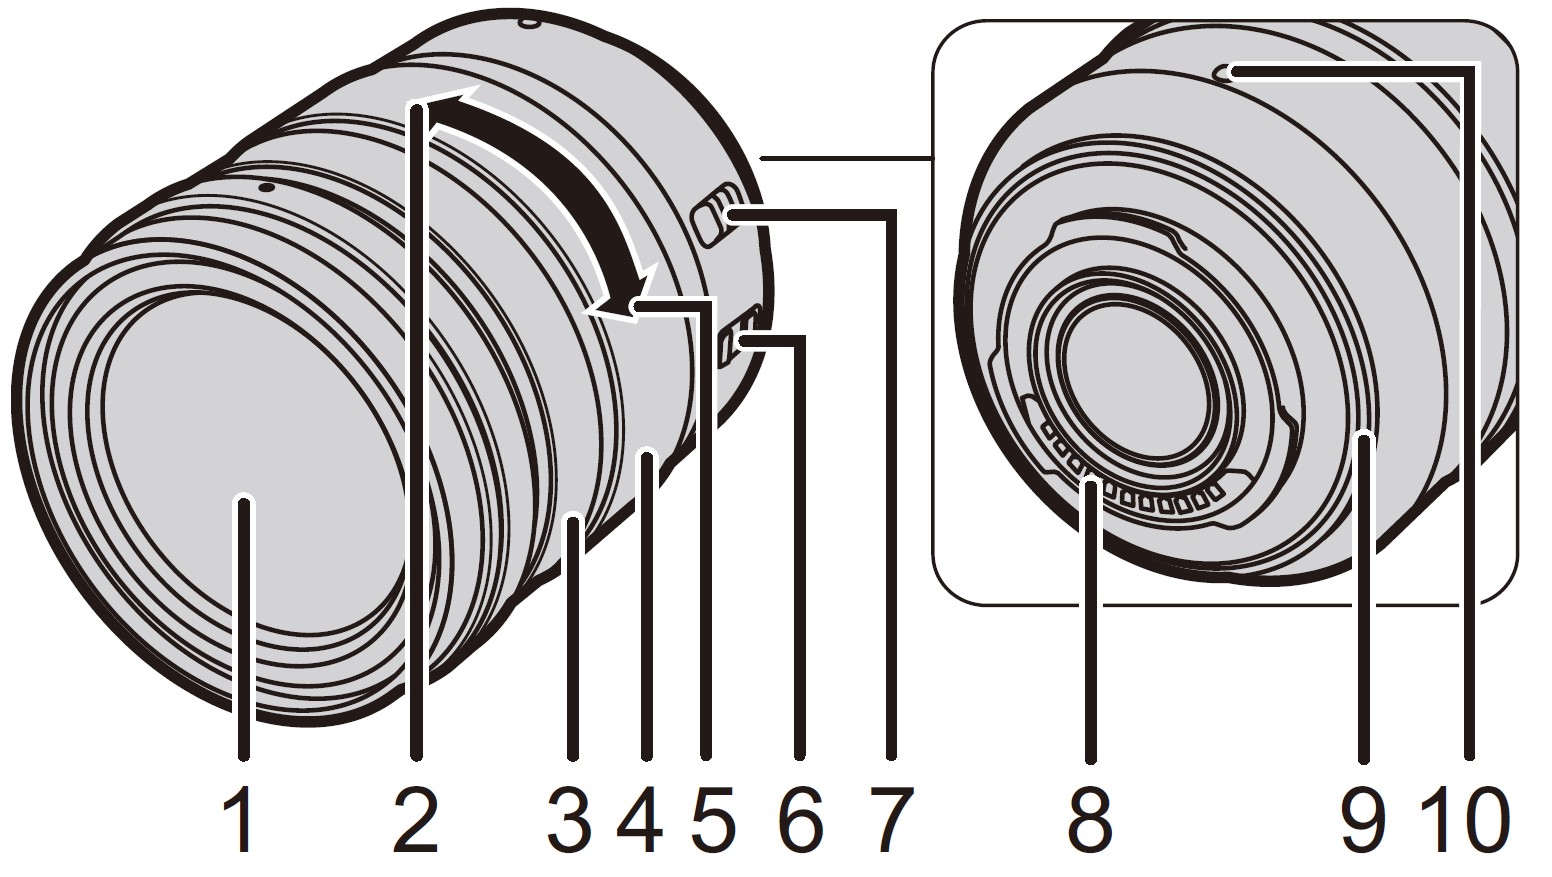
- Lens surface
- Tele
- Focus ring
- Zoom ring
- Wide
- O.I.S. switch
- [AF/MF] switch
- Contact point
- Lens mount rubber
- Lens fitting mark
Quick Start Guide
Check that the camera is turned off.
Attaching the Shoulder Strap
We recommend attaching the shoulder strap when using the camera to prevent it from dropping.
- Perform steps 1 to 8 and then attach the other side of the shoulder strap.
- Use the shoulder strap around your shoulder.
- Do not wrap the strap around your neck. It may result in injury or accident.
- Do not leave the shoulder strap where an infant can reach it.
- It may result in an accident by mistakenly wrapping around the neck.
Charging the Battery
The battery that can be used with this unit is DMW-BLF19PP.
Charge the battery using the battery charger
Use the charger, AC adaptor (supplied), USB connection cable (for charger), and battery that are designed for exclusive use with the camera.
- Connect the battery charger and the AC adaptor (supplied) with the USB connection cable (for charger).
- Insert the AC adaptor (supplied) into the power outlet.

- A: Charger (for exclusive use with the camera)
- B: USB connection cable (for charger)
- C: AC adaptor (supplied) D To power outletAttach the battery paying attention to the direction of the battery.
- The [CHARGE] indicator E lights up and charging begins.
- Do not use any other USB connection cables except the supplied one.
- Do not use any other AC adaptors except the supplied one.

About the [CHARGE] indicator
On: Charging.
Off: Charging has been completed.
(After charging is complete, disconnect the AC adaptor (supplied) from the power outlet and remove the battery.)
- When the [CHARGE] indicator flashes
- The battery temperature is too high or too low. It is recommended to charge the battery again at an ambient temperature of between 10 degrees C and 30 degrees C (50 degrees F and 86 degrees F).
- The terminals of the charger or the battery are dirty. In this case, wipe them with a dry cloth.
Charging time
When the charger (supplied) is used
Charging time: Approx. 190 min
- The indicated charging time is for when the battery has been discharged completely. The charging time may vary depending on how the battery has been used.
The charging time for the battery in hot/cold environments or a battery that has not been used for a long time may be longer than normal.
Inserting the Battery
- Always use genuine Panasonic batteries (DMW-BLF19PP).
- If you use other batteries, we cannot guarantee the quality of this product.

- Being careful about the battery orientation, insert all the way until you hear a locking sound, and then check that it is locked by lever A.
When removing the battery, push the lever A toward the arrow and pull out the battery.
Charge the battery using the camera
- Use the dedicated AC adaptor (supplied), USB connection cable (supplied), and battery.

Insert the battery into this unit. Check that this unit is turned off.
- A: Connect the USB connection cable (supplied) to the [USB/CHARGE] socket.
- B: Charging lamp
- C: AC adaptor (supplied)
- D: To power outlet
- E: PC (Turned on)
- F: USB connection cable (supplied)
Caution:
- Do not use any other USB connection cables except the supplied one.
- Do not use any other AC adaptors except the supplied one.
- The AC adaptor (supplied) and USB connection cable (supplied) are for this camera only. Do not use them with other devices.
Charging from the power outlet
Connect the AC adaptor (supplied) and this camera with the USB connection cable (supplied), and insert the AC adaptor (supplied) into the power outlet.
- The camera consumes a small amount of power even after it is turned off by setting the camera on/off switch to [OFF]. When leaving the product unused for a long time, disconnect the AC adaptor (supplied) from the power outlet for power saving.
Charging from a computer
Connect the computer and this camera with the USB connection cable (supplied).
About the charging lamp
Lit red: Charging.
Off: Charging has been completed.
(When charging is complete, disconnect the camera from the power outlet or computer.)
- When the charging lamp flashes
- Reconnect the USB connection cable (supplied) in a location where the ambient temperature (and the temperature of the battery) is in a 10 degrees C to 30 degrees C (50 degrees F to 86 degrees F) range, and try charging again.
- If your PC is not capable of supplying sufficient power, charging is not possible.
Charging time
When using the AC adaptor (supplied)
Charging time: Approx. 230 min
- The indicated charging time is for when the battery has been discharged completely. The charging time may vary depending on how the battery has been used.
The charging time for the battery in hot/cold environments or a battery that has not been used for a long time may be longer than normal. - When power is supplied from a computer, the power supply capacity of the computer determines the charging time.
About the power supply
If you connect the camera to a power outlet or PC while the camera is turned on, power can be supplied via the USB connection cable (supplied).
- Insert the battery into the camera.
- In certain situations where the camera is used, such as during recording, the battery may drain. The camera will turn off when the battery power runs out.
- Power may not be supplied depending on the power supply capacity of the PC.
- Before connecting or disconnecting the AC adaptor (supplied), turn the camera off.
- If the ambient temperature is high or power is supplied continuously, after [ ] is displayed, the supply of power may stop. Wait until the camera cools down.
Inserting the Card (Optional)
Check that the camera is turned off.
- Push it securely all the way until you hear a click while being careful about the direction in which you insert it.
To remove the card, push the card until it clicks, then pull the card out upright.
Card access indicators
Access indication
Lights up red while an image is being recorded on the card.
- During access (image writing, reading and deleting, formatting, etc.), do not turn this unit off, remove the battery, or card, or disconnect the AC
adaptor. Furthermore, do not subject the camera to vibration, impact, or static electricity.
Attaching/Removing the Lens
Change lenses where there is not a lot of dirt or dust.
Do not press the lens release button A when you attach a lens.
Detaching the lens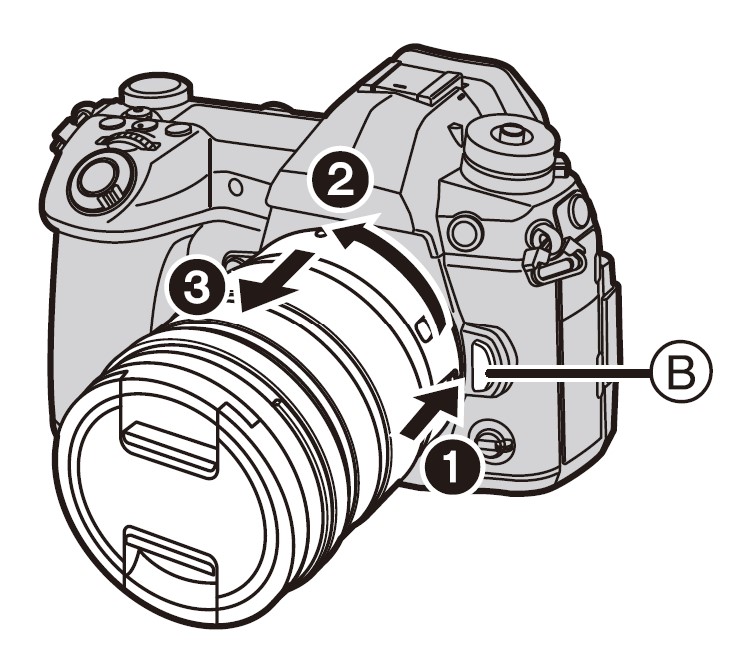
- Attach the lens cap.
- While pressing on the lens release button B, rotate the lens toward the arrow until it stops, and then remove it.
Opening the Monitor
At the time when this camera is purchased, the monitor is stowed in the camera body. Bring out the monitor as shown below.
- Open the monitor. (Maximum 180 degrees)
- It can be rotated 180 degrees forward.
- Return the monitor to its original position.
- When rotating the monitor, be careful not to apply too much force. Doing so may cause damage.
- When not using the monitor it is recommended that you close it with the screen facing inward to prevent dirt and scratches.
Setting Date/Time (Clock Set)
The clock is not set when the camera is shipped.
- Turn the camera on.
- Press [MENU/SET].
- Press
 /
/ to select the language, and press [MENU/ SET].
 - Press [MENU/SET].
- Press
 /
/ to select the items (year, month, day, hour, minute), and press
  /
/ to set.
 - Press [MENU/SET] to set.
- When [The clock setting has been completed.] is displayed, press [MENU/SET].
- When [Please set the home area] is displayed, press [MENU/SET].
- Press
 /
/ to select the home area, and then press [MENU/SET].
Diopter adjustment
Rotate the diopter adjustment dial.
Adjust until you can see the characters displayed in the viewfinder clearly.
Formatting the card (initialization)
Format the card before recording a picture with this unit.
Since data cannot be recovered after formatting, make sure to back up necessary data in advance.
Menu –> ![]() [Setup] –> [Format] –> [Slot 1]/[Slot 2]
[Setup] –> [Format] –> [Slot 1]/[Slot 2]
Set the mode dial to [P]
Set the mode dial to [P].
The dial is locked if the mode dial lock button is depressed. Each press locks/unlocks the dial.
Taking pictures
- Hold the camera gently with both hands, keep your arms still at your side, and stand with your feet slightly apart.
-
Do not cover the AF Assist lamp A, or microphone B with your fingers or other objects.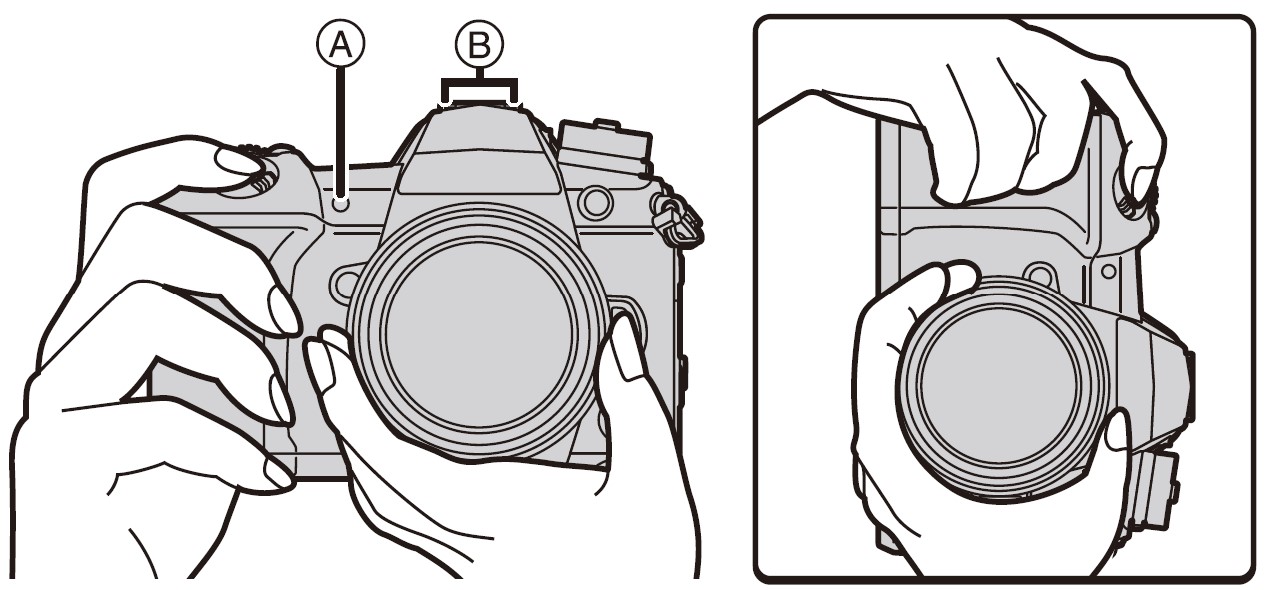
- Make sure your footing is stable and there is no danger of colliding with another person or object in the vicinity while taking pictures.
-
- Press the shutter button halfway to focus.

A: Aperture value
B: Shutter speed
C: Focus indication- Aperture value and shutter speed are displayed. (It will flash in red if the correct exposure is not achieved, except when set to flash.)
- Once the subject is in focus, the focus indication is displayed. (When the subject is not in focus, the indication flashes.)
- Press the shutter button fully (push it in further), and take the picture.
- Be careful not to move the camera when you press the shutter button.
- Pictures cannot be taken until focus is achieved when [Focus/Release Priority] is set to [FOCUS].
Free angle shooting
The monitor can be rotated to suit your needs. This is convenient as it allows you to take pictures from various angles by adjusting the monitor.
- Taking pictures at a high angle
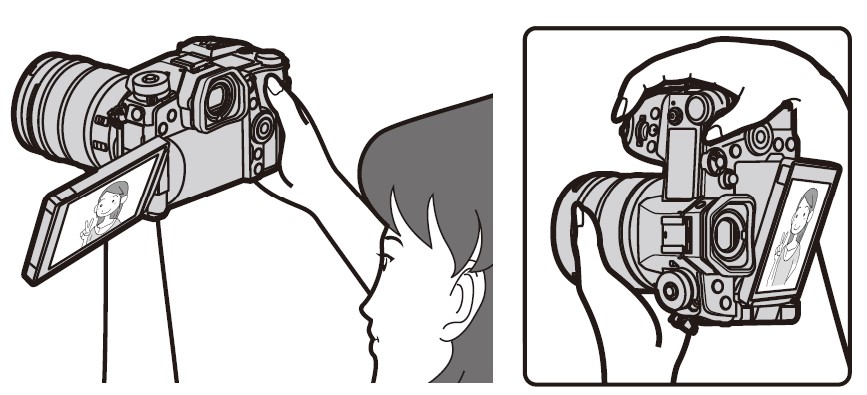
- Taking pictures at a low angle

Check the picture you have taken
To display the picture in Playback Mode, press [![]() ].
].
Basic Operations
Turn on the status LCD backlight
Set the camera ON/OFF switch to [![]() ].
].
- When the camera ON/OFF switch is released, it returns to the [ON] position. The status LCD backlight turns off after approx. 5 seconds.
- To turn off the status LCD backlight immediately, set the camera ON/OFF switch to [
 ] again.
 - If you start recording while the status LCD backlight is turned on, it will turn off.
- The status LCD backlight cannot be turned on when recording motion pictures or using [6K/4K Pre-Burst] or [Pre-Burst Recording] in [6K/4K PHOTO].
Cursor buttons/[MENU/SET] button
Pressing the cursor button: Selection of items or setting of values etc., is performed.
Pressing [MENU/SET]: Confirmation of setting contents, etc., is performed.
This owner’s manual expresses the up, down, left, and right of the cursor button as ![]() /
/![]() /
/![]() /
/![]() .
.
Control Dial
Rotating: Selection of items or setting of values etc., is performed.
- The operation of rotating the control dial is illustrated below in this owner’s manual.
Front Dial/Rear Dial
Rotating: Selection of items or setting of values is performed during the various settings.
- This owner’s manual describes the operations of the front dial/rear dial as follows:

Allows you to set the aperture, shutter speed, and other settings when in [P/A/S/M] modes.
Joystick
The joystick can be operated in two ways: it can be moved up, down, left, or right, or it can be pressed. The joystick provides the same functions as the cursor buttons/[MENU/SET] button.
Moving: Selection of items or setting of values etc., is performed.
Pressing: Confirmation of setting contents, etc., is performed.
In this owner’s manual, the up, down, left and right of the joystick are expressed as ![]() /
/![]() /
/![]() /
/![]() .
.
Function lever
You can switch to the camera setting that enables the assigned function.
You can set the items to be assigned to the function lever in [Fn Lever Setting] in the [Custom] ([Operation]) menu.
Change the function lever position.
Mode dial (Selecting a Recording Mode)
- Press the mode dial lock button 1 to release the lock.
The dial is locked if the mode dial lock button is depressed. Each press locks/unlocks the dial.
- Rotate the mode dial 2 and adjust the recording mode.
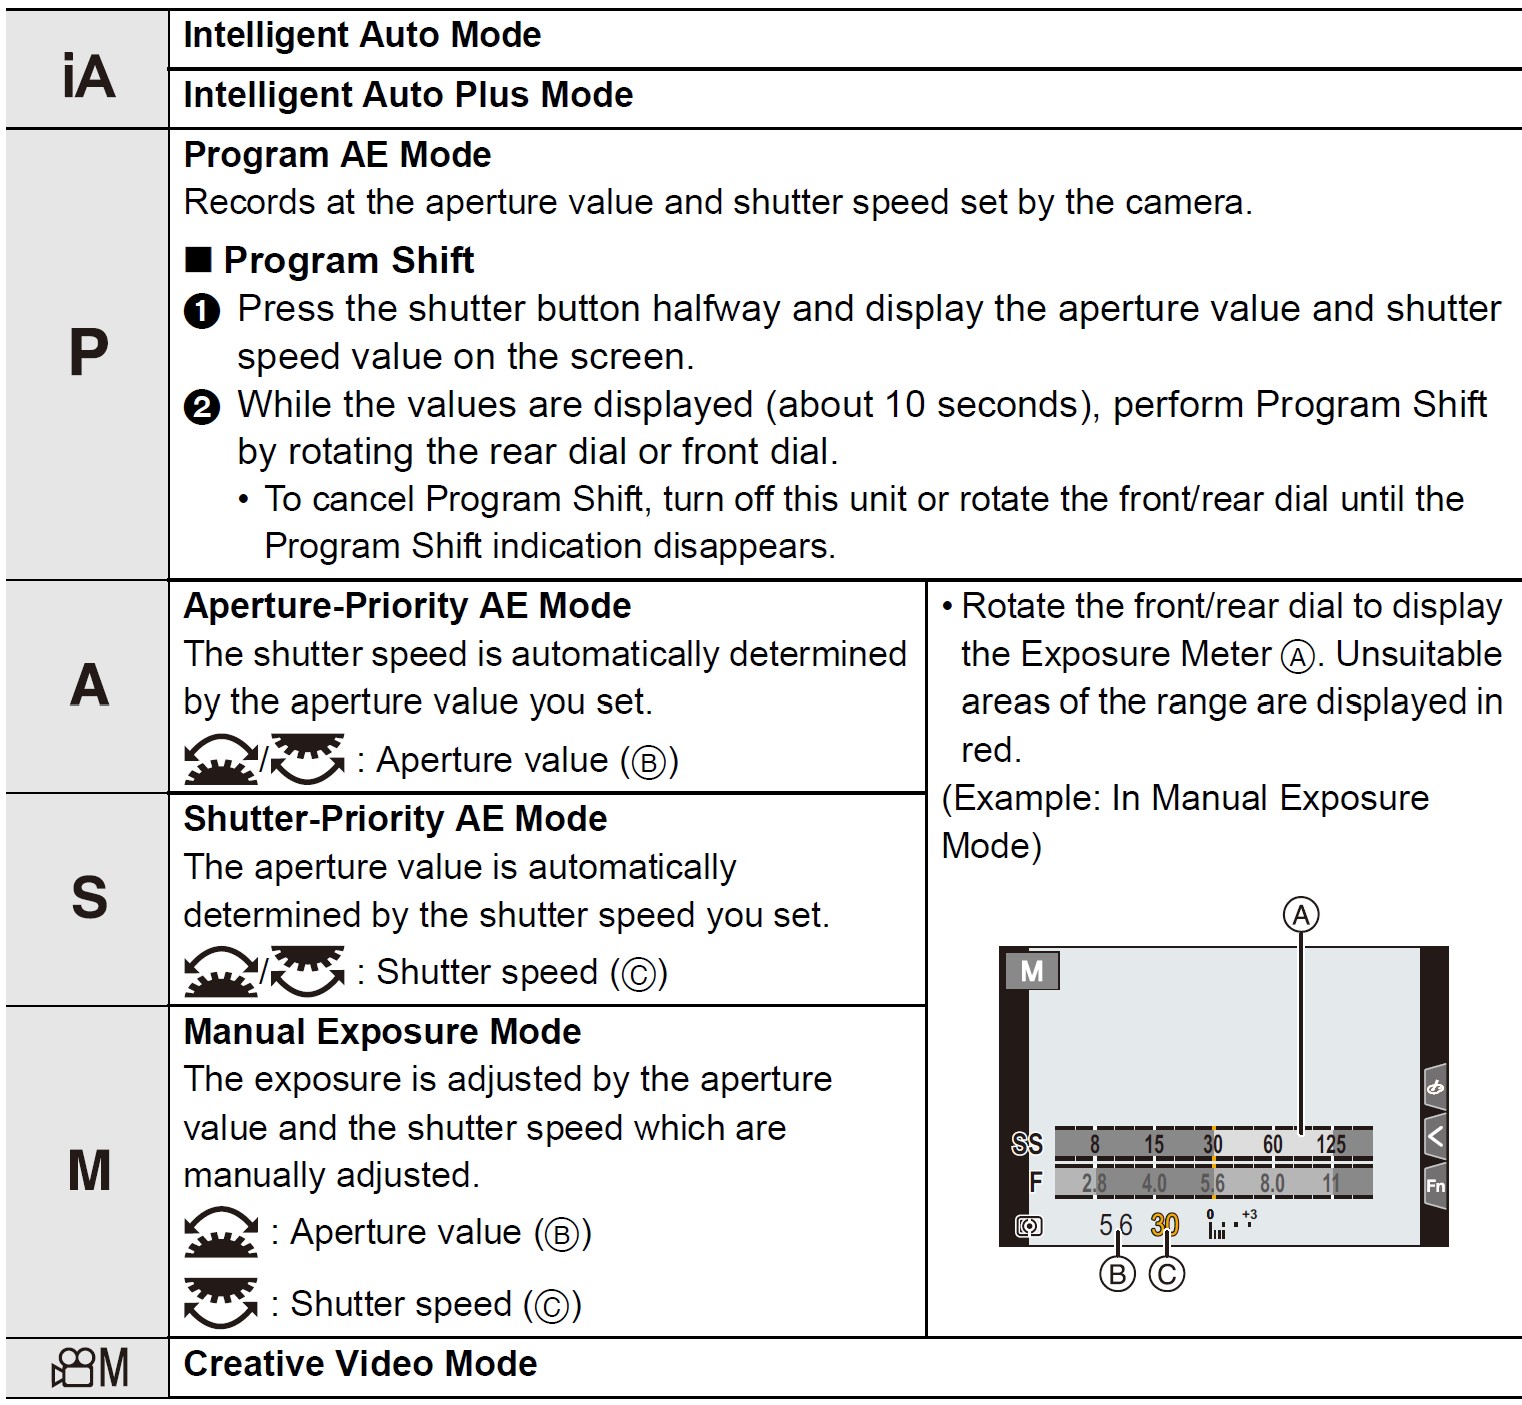
 Confirm the Effects of Aperture and Shutter Speed (Preview Mode) Switch to the confirmation screen by pressing the preview
button.
- Normal recording screen
- Aperture effect preview screen
- Shutter speed effect preview screen
[LVF] button (Switching the Monitor/Viewfinder)
Press [LVF].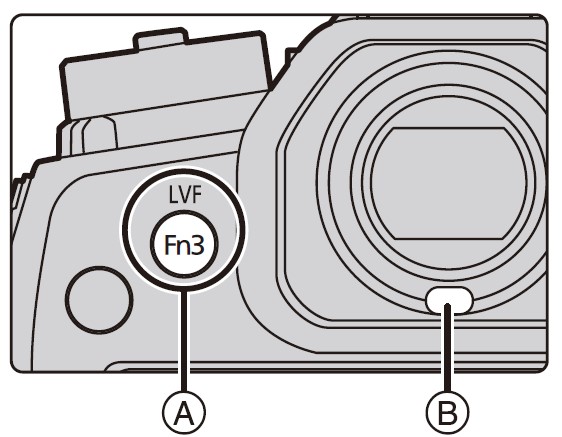
A: [LVF] button
B: Eye sensor
- The monitor/viewfinder will switch as follows:
- Automatic viewfinder/monitor switching*
- Viewfinder display*
- Monitor display
* If [Eye Sensor AF] in the [Custom] ([Focus / Release Shutter]) menu is set to [ON], the camera automatically adjusts the focus as the eye sensor is activated. The camera does not beep when focus is achieved with [Eye Sensor AF].
[DISP.] button (Switching the displayed information)
Press [DISP.].
Touch screen (Touch operations)
Touch
To touch and release the touch screen.
Drag
A movement without releasing the touch screen.
Pinch (enlarge/reduce)
Pinch the touch screen apart (enlarge) or together (reduce) with two fingers.
Taking Pictures Using the Touch Function
- Touch [
 ].
]. - Touch icon.

To cancel the function, touch [![]() or
or ![]() ]
]
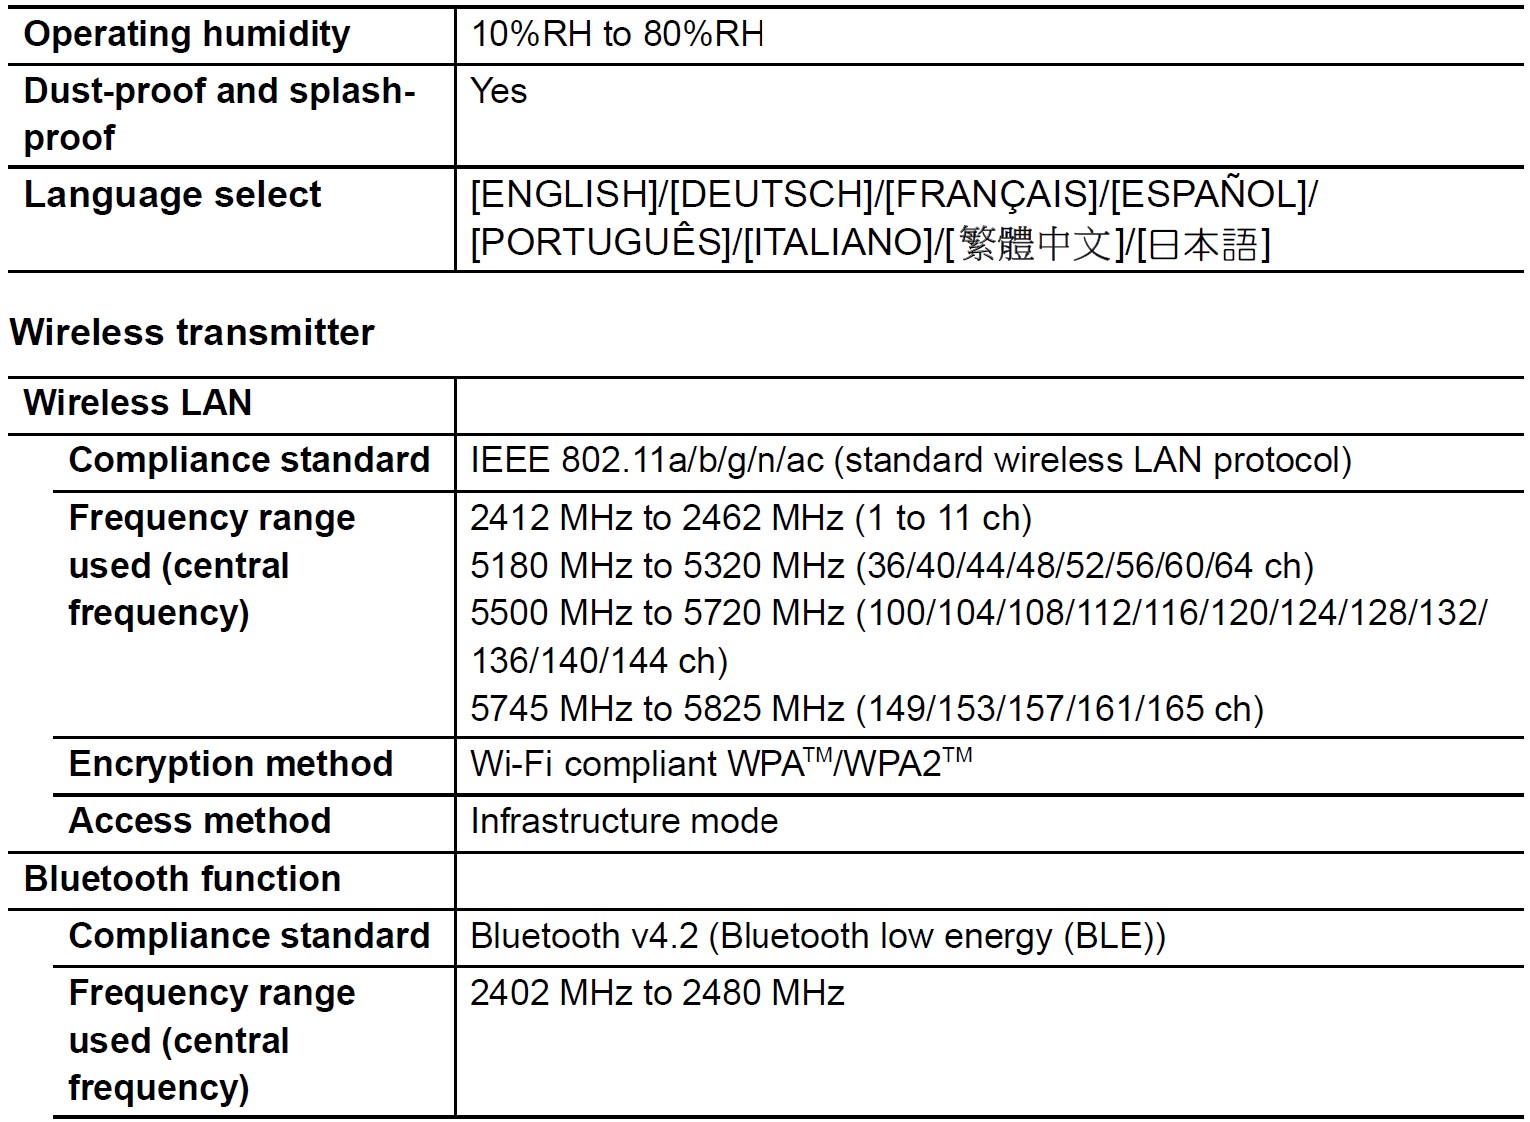
Specifications
Specifications are subject to change without notice.
Digital Camera Body (DC-G9): Information for your safety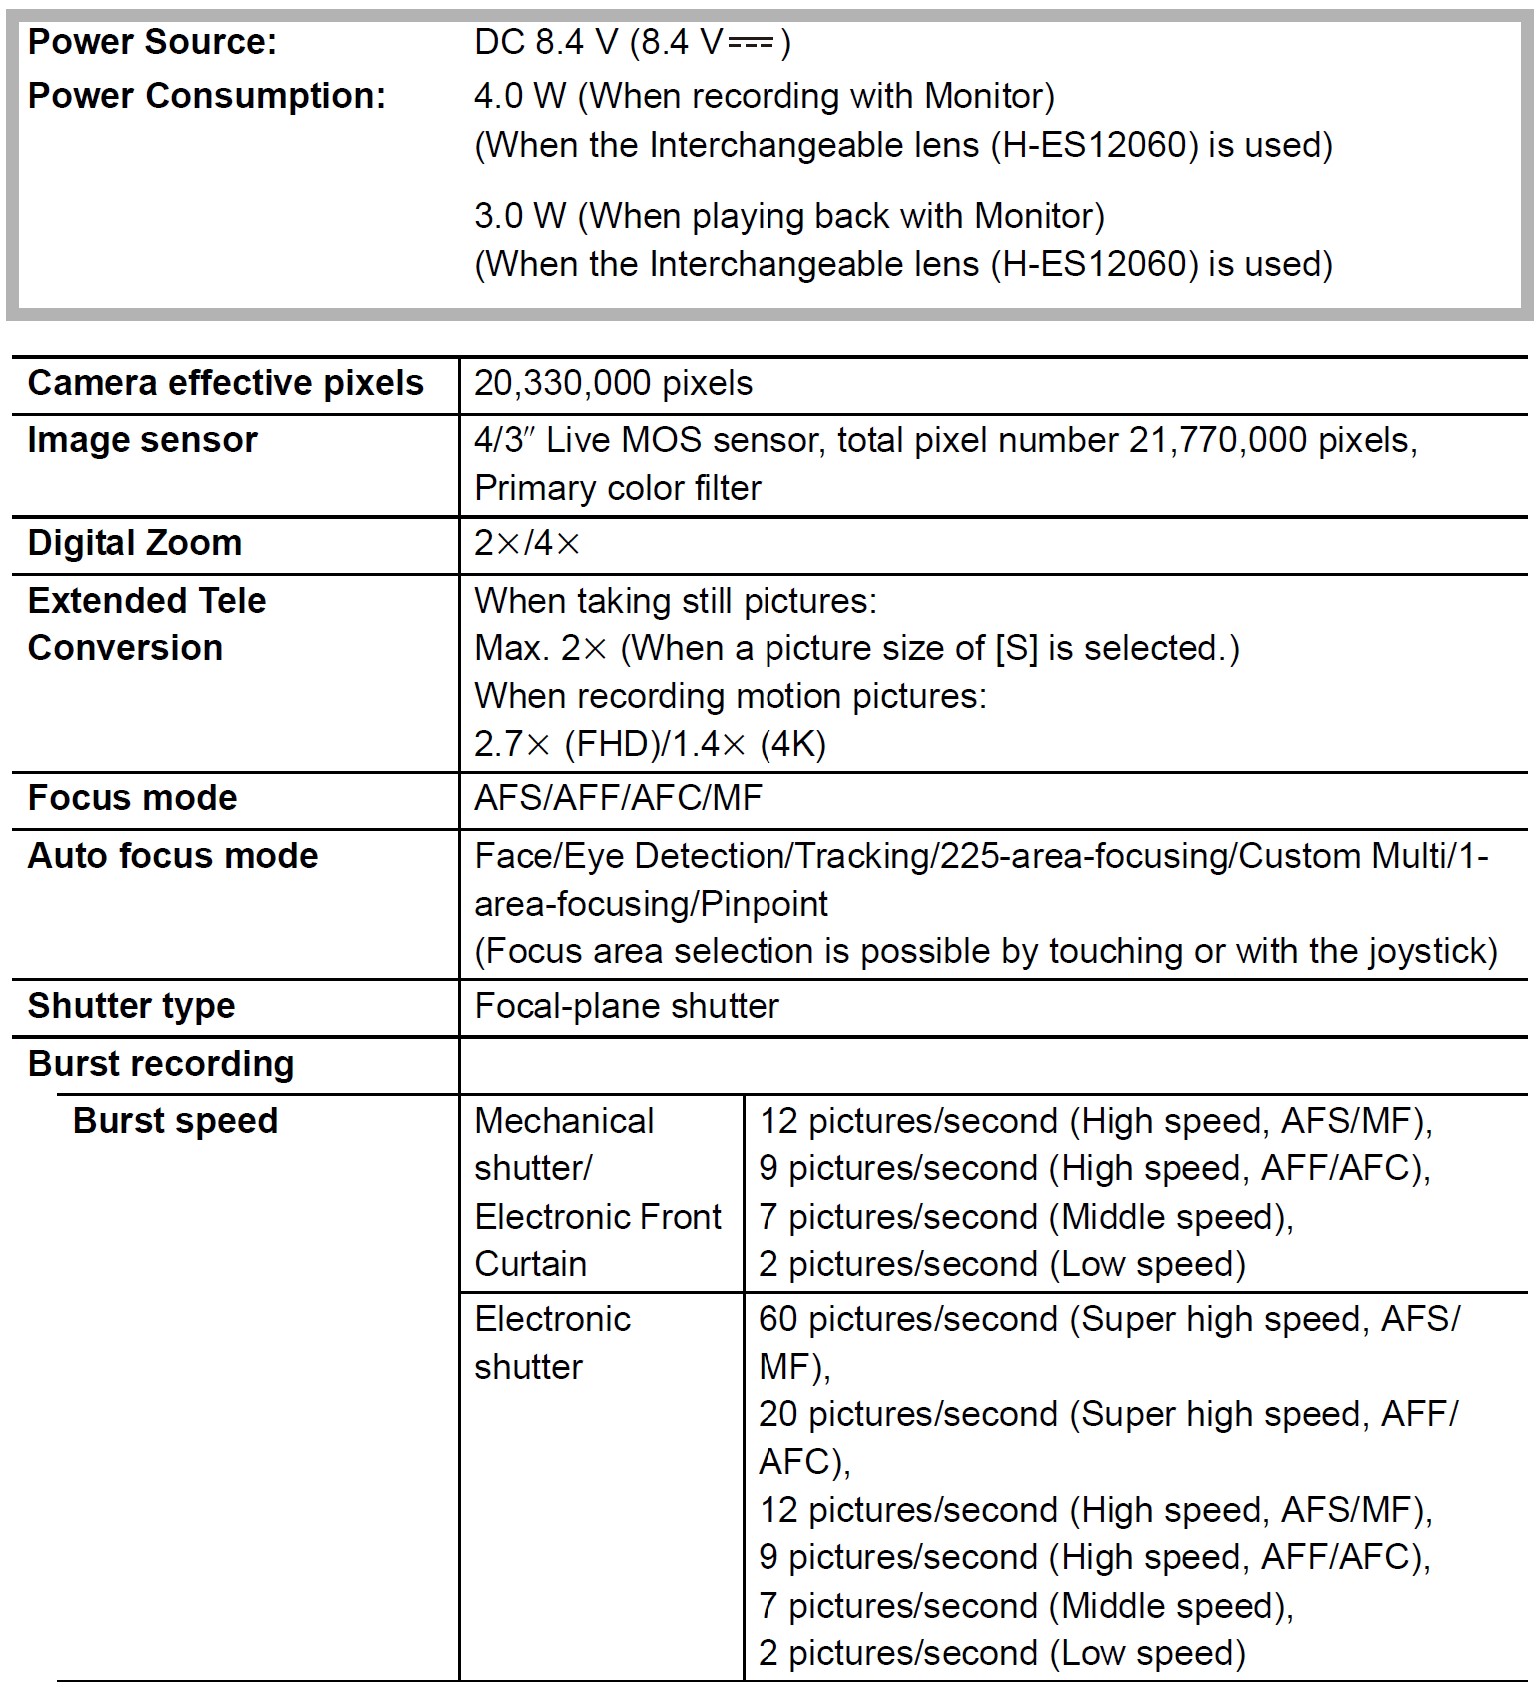


Battery Charger (Panasonic DMW-BTC13): Information for your safety
AC adaptor (Panasonic VSK0815F): Information for your safety
Battery Pack (lithium-ion) (Panasonic DMW-BLF19PP): Information for your safety![]()

LEICA is a registered trademark of Leica Microsystems IR GmbH. ELMARIT is a registered trademark of Leica Camera AG. The LEICA DG lenses are manufactured using measurement instruments and quality assurance systems that have been certified by Leica Camera AG based on the company’s quality standards.
Limited Warranty
(ONLY FOR U.S.A.)
Limited Warranty Coverage (For USA Only)
If your product does not work properly because of a defect in materials or workmanship, Panasonic Corporation of North America (referred to as “the warrantor”) will, for the length of the period indicated on the chart below, which starts with the date of original purchase (“warranty period”), at its option either (a) repair your product with new or refurbished parts, (b) replace it with a new or a refurbished equivalent value product, or (c) refund your purchase price. The decision to repair, replace or refund will be made by the warrantor.
During the “Labor” warranty period there will be no charge for labor. During the “Parts” warranty period, there will be no charge for parts. This Limited Warranty excludes both parts and labor for non-rechargeable batteries, antennas, and cosmetic parts (cabinet). This warranty only applies to products purchased and serviced in the United States. This warranty is extended only to the original purchaser of a new product that was not sold “as is”.
Mail-In Service–Online Repair Request
Online Repair Request
To submit a new repair request and for quick repair status visit our Web Site at http://shop.panasonic.com/support.
When shipping the unit, carefully pack, include all supplied accessories listed in the Owner’s Manual, and send it prepaid, adequately insured, and packed well in a carton box. When shipping Lithium Ion batteries please visit our Web Site at http://shop.panasonic.com/support as Panasonic is committed to providing the most up-to-date information. Include a letter detailing the complaint, a return address and provide a daytime phone number where you can be reached. A valid registered receipt is required under the Limited Warranty.
IF REPAIR IS NEEDED DURING THE WARRANTY PERIOD, THE PURCHASER WILL BE REQUIRED TO FURNISH A SALES RECEIPT/PROOF OF PURCHASE INDICATING THE DATE OF PURCHASE, AMOUNT PAID, AND PLACE OF PURCHASE. CUSTOMERS WILL BE CHARGED FOR THE REPAIR OF ANY UNIT RECEIVED WITHOUT SUCH PROOF OF PURCHASE.
Limited Warranty Limits and Exclusions
This warranty ONLY COVERS failures due to defects in materials or workmanship and DOES NOT COVER normal wear and tear or cosmetic damage.
The warranty ALSO DOES NOT COVER damages which occurred in shipment, or failures which are caused by products not supplied by the warrantor, or failures which result from accidents, misuse, abuse, neglect, mishandling, misapplication, alteration, faulty installation, set-up adjustments, misadjustment of consumer controls, improper maintenance, power line surge, lightning damage, modification, introduction of sand, humidity or liquids, commercial use such as hotel, office, restaurant, or other business or rental use of the product, or service by anyone other than a Factory Service Center or other Authorized Servicer, or damage that is attributable to acts of God.
THERE ARE NO EXPRESS WARRANTIES EXCEPT AS LISTED UNDER “LIMITED WARRANTY COVERAGE”.
THE WARRANTOR IS NOT LIABLE FOR INCIDENTAL OR CONSEQUENTIAL DAMAGES RESULTING FROM THE USE OF THIS PRODUCT, OR ARISING OUT OF ANY BREACH OF THIS WARRANTY.
(As examples, this excludes damages for lost time, travel to and from the servicer, and loss of or damage to media or images, data, or other memory or recorded content. The items listed are not exclusive, but for illustration only.)
ALL EXPRESS AND IMPLIED WARRANTIES, INCLUDING THE WARRANTY OF MERCHANTABILITY, ARE LIMITED TO THE PERIOD OF THE LIMITED WARRANTY.
Some states do not allow the exclusion or limitation of incidental or consequential damages, or limitations on how long an implied warranty lasts, so the exclusions may not apply to you.
This warranty gives you specific legal rights and you may also have other rights which vary from state to state. If a problem with this product develops during or after the warranty period, you may contact your dealer or Service Center. If the problem is not handled to your satisfaction, then write to: The Consumer Affairs Department Panasonic Corporation of North America 661 Independence Pkwy Chesapeake, VA 23320
PARTS AND SERVICES, THAT ARE NOT COVERED BY THIS LIMITED WARRANTY, ARE YOUR RESPONSIBILITY.
FAQS About Panasonic LUMIX G9 4K Digital Camera
What distinguishing qualities does the Panasonic G9 offer?
dust-, splash-, and freeze-proof
Does the Panasonic G9 have a storage cap for recordings?
Yes, all modes have a 30-minute time limit.
The Lumix G9 can be used for work.
Needed by pro photographers.
The Lumix G9 is water resistant.
For watertight operation, a suitable lens port is needed (available separately).
The Lumix G9’s battery life is how long?
380 / 400 shots
Which mount style does the Lumix G9 use?
Four Thirds camera
What is the Lumix G9’s shutter life?
20 000 cycles
Can the Lumix G9 detect eyes?
By pressing the joystick in [Face/Eye/Body/Animal Detect], you can change the object that the camera is focused on.
Where is the Lumix G9 produced?
China
For more manuals by Panasonic, Visit Manualsdock
[embeddoc url=”https://manualsdock.com/wp-content/uploads/2023/09/Panasonic-LUMIX-G9-4K-Digital-Camera-Owner-Manual.pdf” download=”all”]


