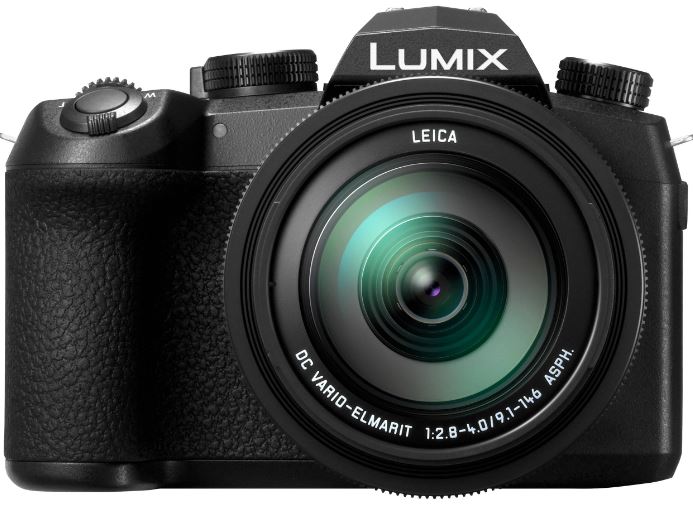
Panasonic LUMIX FZ1000 II Digital Camera
ABOUT Panasonic
Panasonic Corporation is a multinational electronics company headquartered in Osaka, Japan. It was founded in 1918 by Konosuke Matsushita and originally started as a vendor of duplex lamp sockets. Over the years, Panasonic has grown into one of the largest electronics manufacturers in the world, offering a wide range of products and services.
Panasonic‘s business operations span various sectors, including consumer electronics, home appliances, automotive, industrial solutions, and B2B solutions. The company is known for its innovation and has a strong focus on research and development.
Before use
Camera handling
Keep the camera away from excessive vibration, force, or pressure.
- Avoid using the camera under the following conditions, which may damage the lens, monitor, viewfinder, or camera body. This may also cause the camera to malfunction or prevent recording.
- Dropping or hitting the camera against a hard surface
- Pushing with excessive force on the lens or monitor
The camera is not dust-resistant, splash resistant, or waterproof.
Avoid using the camera in places with excessive dust or sand, or where water can come into contact with the camera.
If sand, dust, or liquids such as water droplets adhere to the monitor, wipe them off with a dry soft cloth.
- Not doing so may cause the monitor to respond incorrectly to touch operations.
Condensation (When the lens, the monitor, or the viewfinder, is fogged up)
- Condensation may occur when the camera is exposed to sudden changes in temperature or humidity. Avoid these conditions, which may make the lens, monitor, or viewfinder dirty, cause mold, or damage the camera.
- If condensation does occur, turn off the camera and wait about two hours before using it. Once the camera adjusts to the surrounding temperature, the fogging will clear naturally.
When in use
Do not keep objects such as credit cards that may be influenced magnetically close to this unit. The data on these objects may become corrupted and unusable.
Standard accessories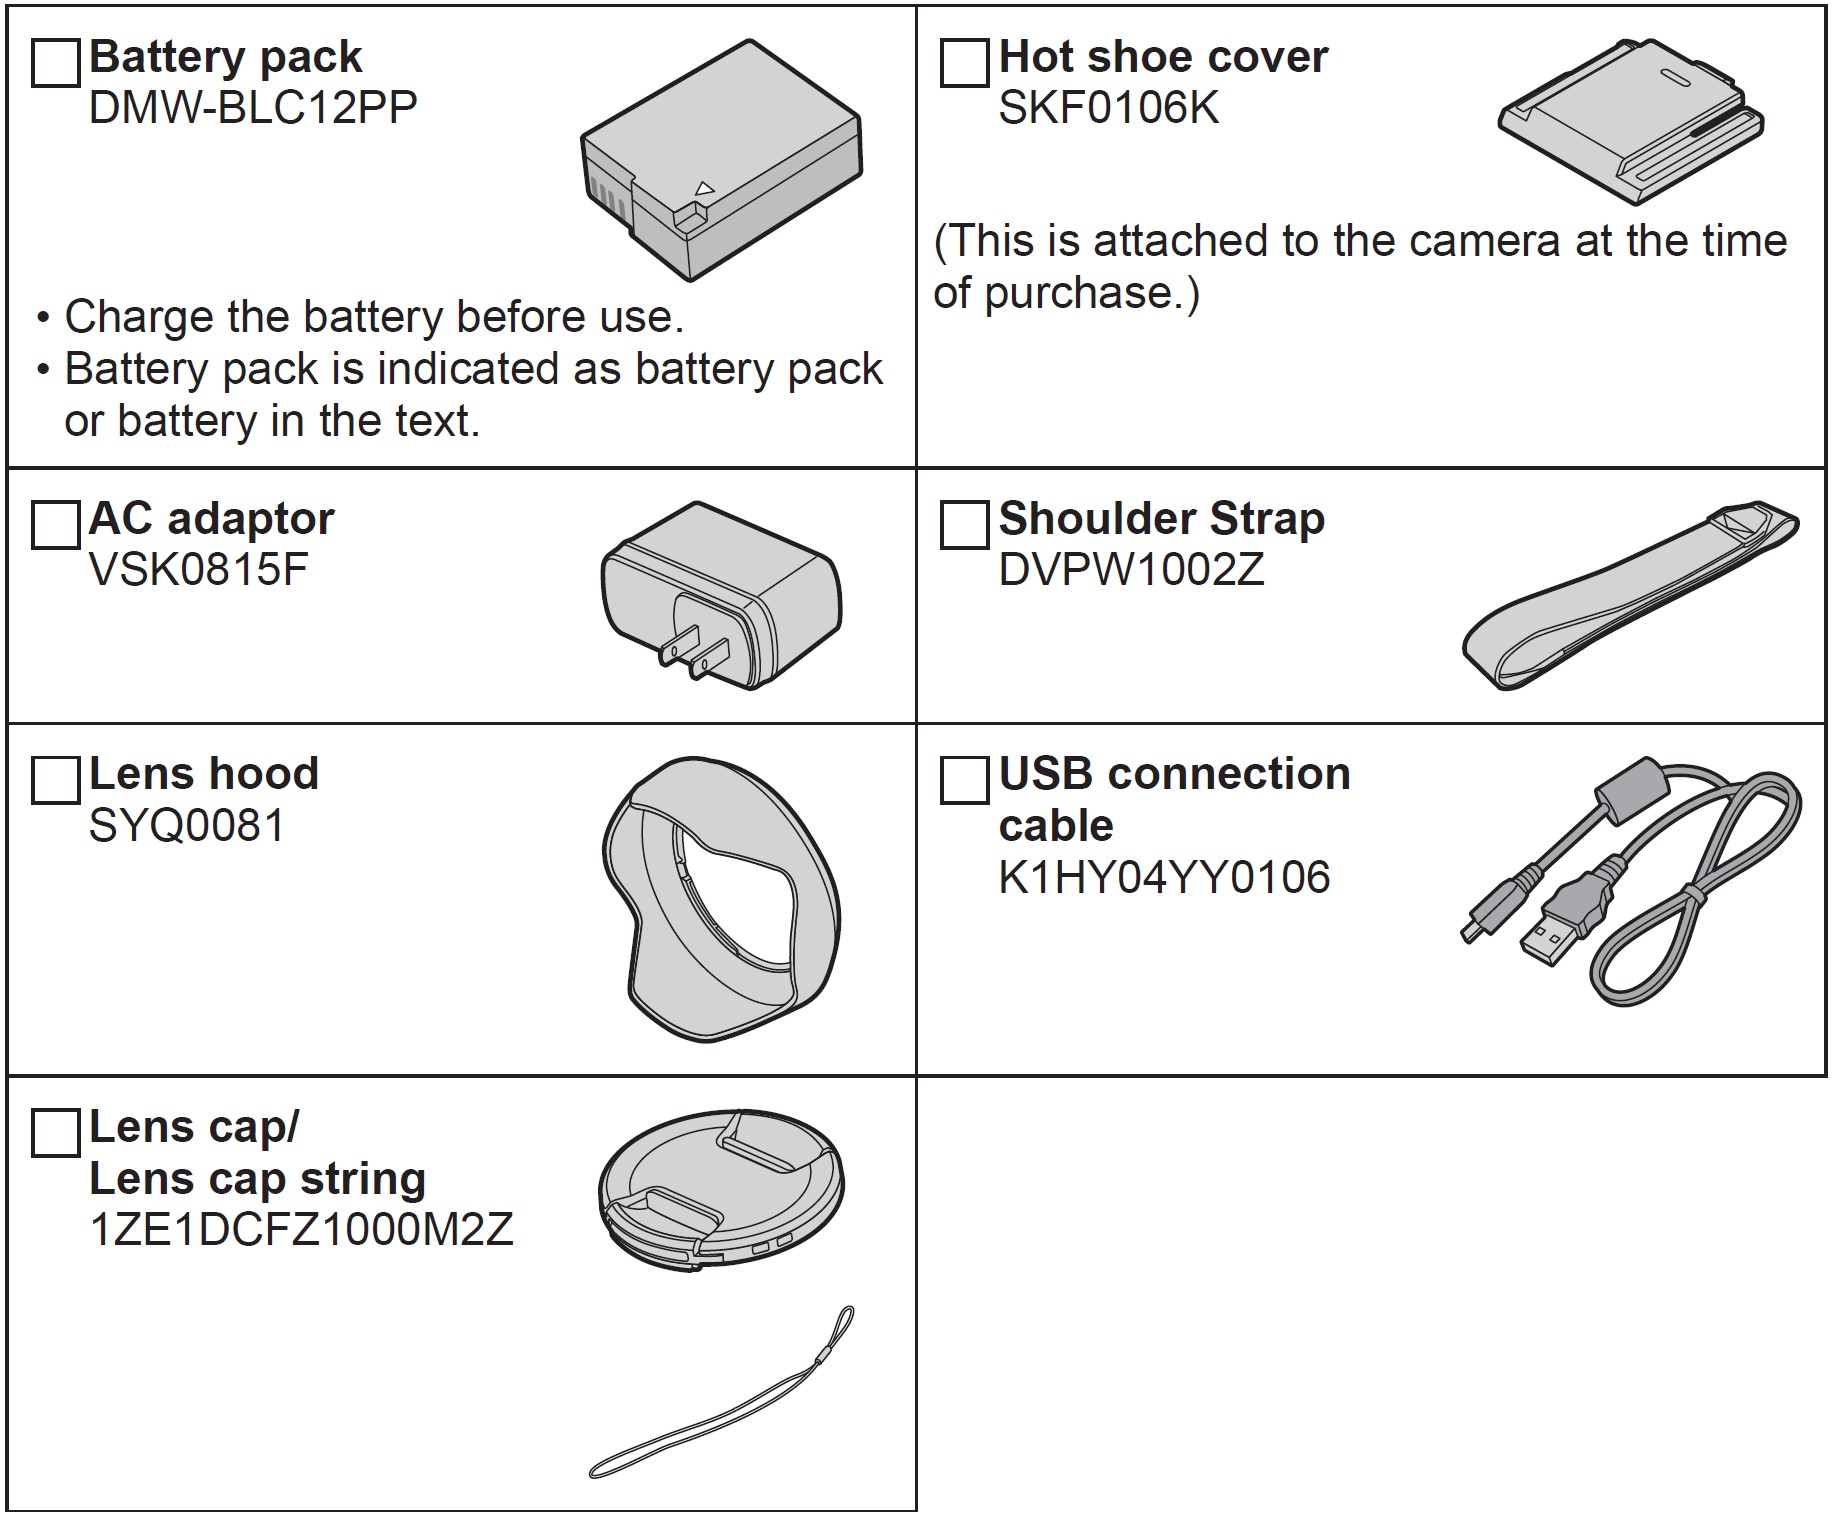
Check that all the accessories are supplied before using the camera. Part numbers are as of February 2019. These may be subject to change.
- Cards are optional. (SD Memory Card, SDHC Memory Card, and SDXC Memory Card are indicated as cards in the text.)
- (For U.S.A. only): If accessories are lost, customers can visit us at http://shop.panasonic.com/support for further information about obtaining replacement parts.
- (For Canada only): If any accessories are lost, customers in Canada should visit our support page at www.panasonic.ca/english/support for further information about obtaining replacement parts.
- Please dispose of all packaging appropriately.
- The illustrations and screens in this manual may differ from the actual product.
Digital Camera Accessory System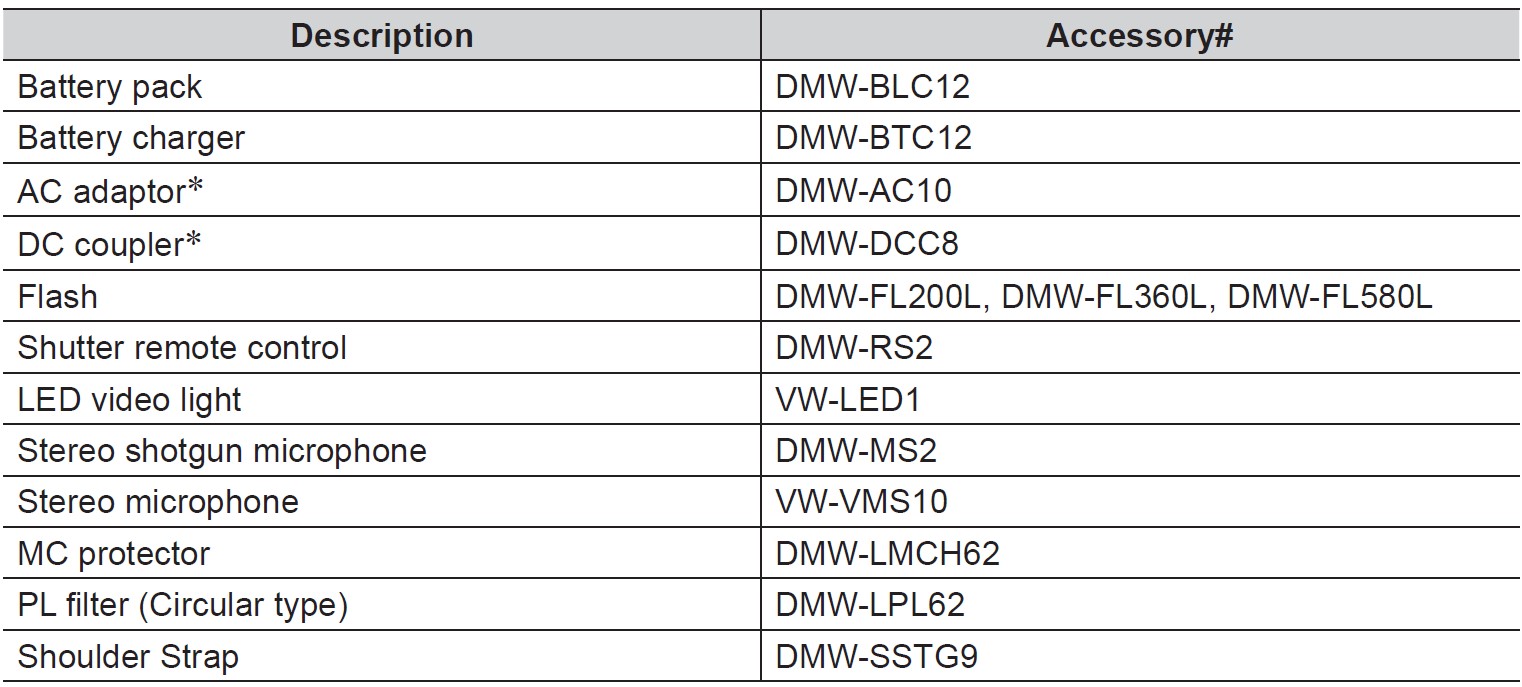
*The AC adaptor (optional) can only be used with the designated Panasonic DC coupler (optional). The AC adaptor (optional) cannot be used by itself. When using an AC adaptor (optional), use the AC cable supplied with the AC adaptor.
- Part numbers are as of February 2019. These may be subject to change.
- Some optional accessories may not be available in some countries.
- (For U.S.A. only)
To order optional accessories please visit http://shop.panasonic.com or your local Photo Specialty Dealer.
Removing the Hot Shoe Cover Remove the hot shoe cover by pulling it in the direction indicated by the arrow while pressing it in the direction indicated by the arrow 1.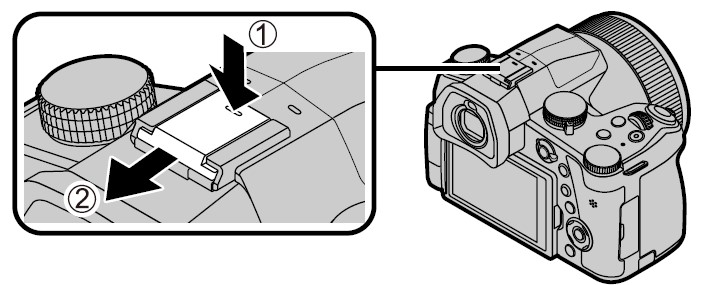
Names and Functions of Main Parts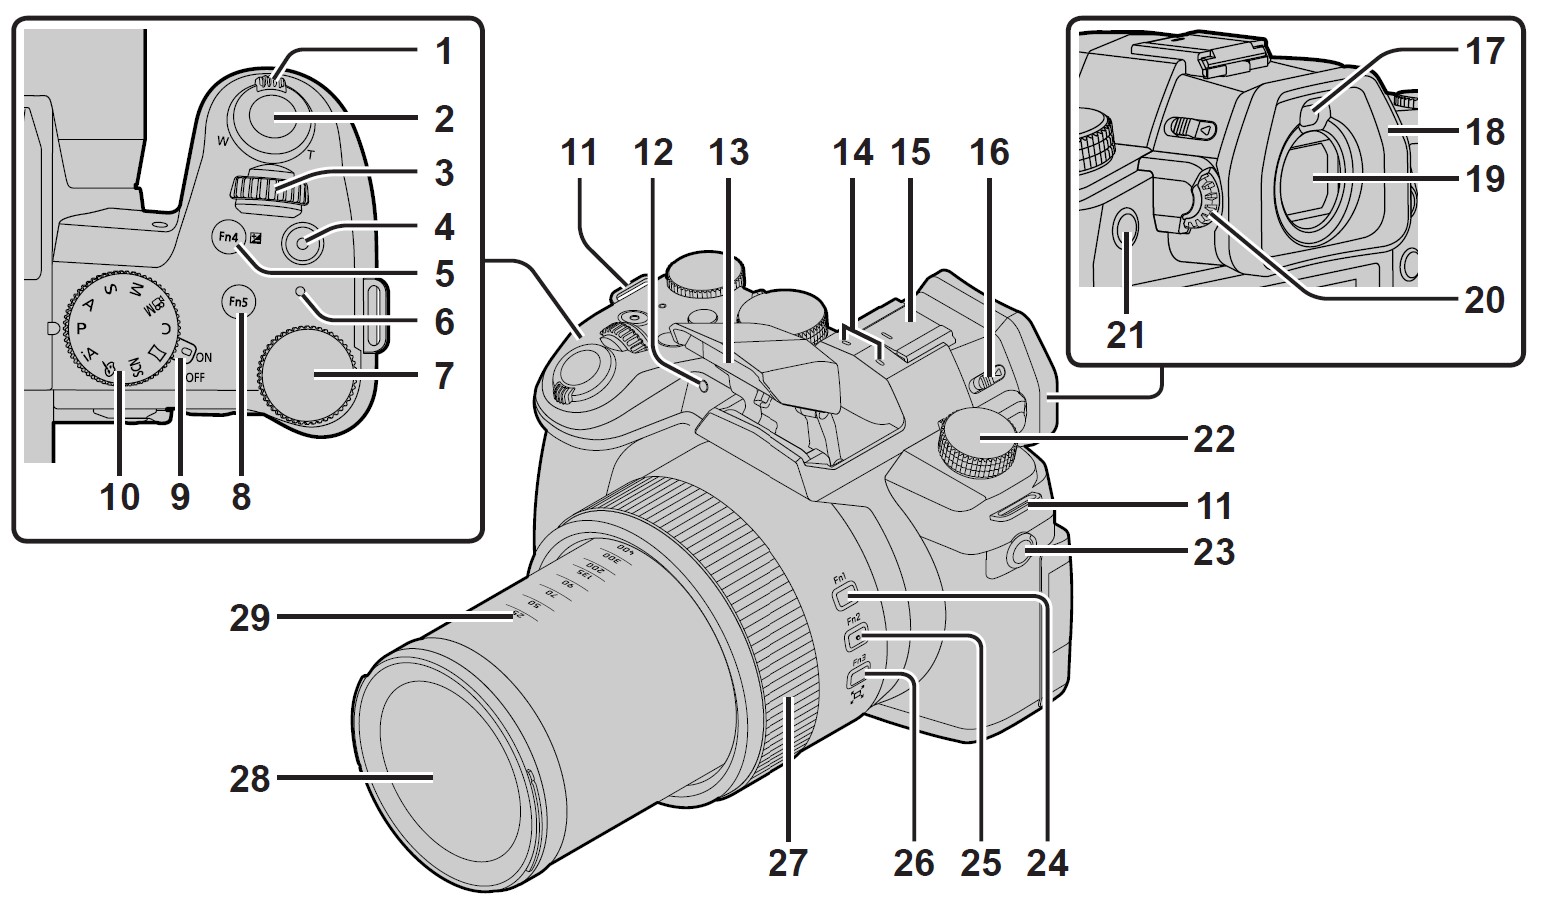
- Zoom lever
- Shutter button
- Front dial
- Motion picture button
- [Fn4] button/[
 ] (Exposure Compensation) button
 - Charging lamp/ WIRELESS connection lamp
- Rear dial
- [Fn5] button
- Camera [ON/OFF] switch
- Mode dial
- Shoulder strap eyelet
- Self-timer indicator / AF Assist Lamp
- Flash
- Stereo microphone
- Hot shoe (Hot shoe cover)
- Flash open lever
- Eye sensor
- Eyecup
- Viewfinder
- Diopter adjustment dial
- [Fn8] button/ [LVF] button
- Drive mode dial
- [MIC] socket
- [Fn1] button
- [Fn2] button
- [Fn3] button/[
 ] ([Zoom Compose Assist]) button
 - Control ring
- Lens
- Focal distance indication (as with a 35 mm film camera)
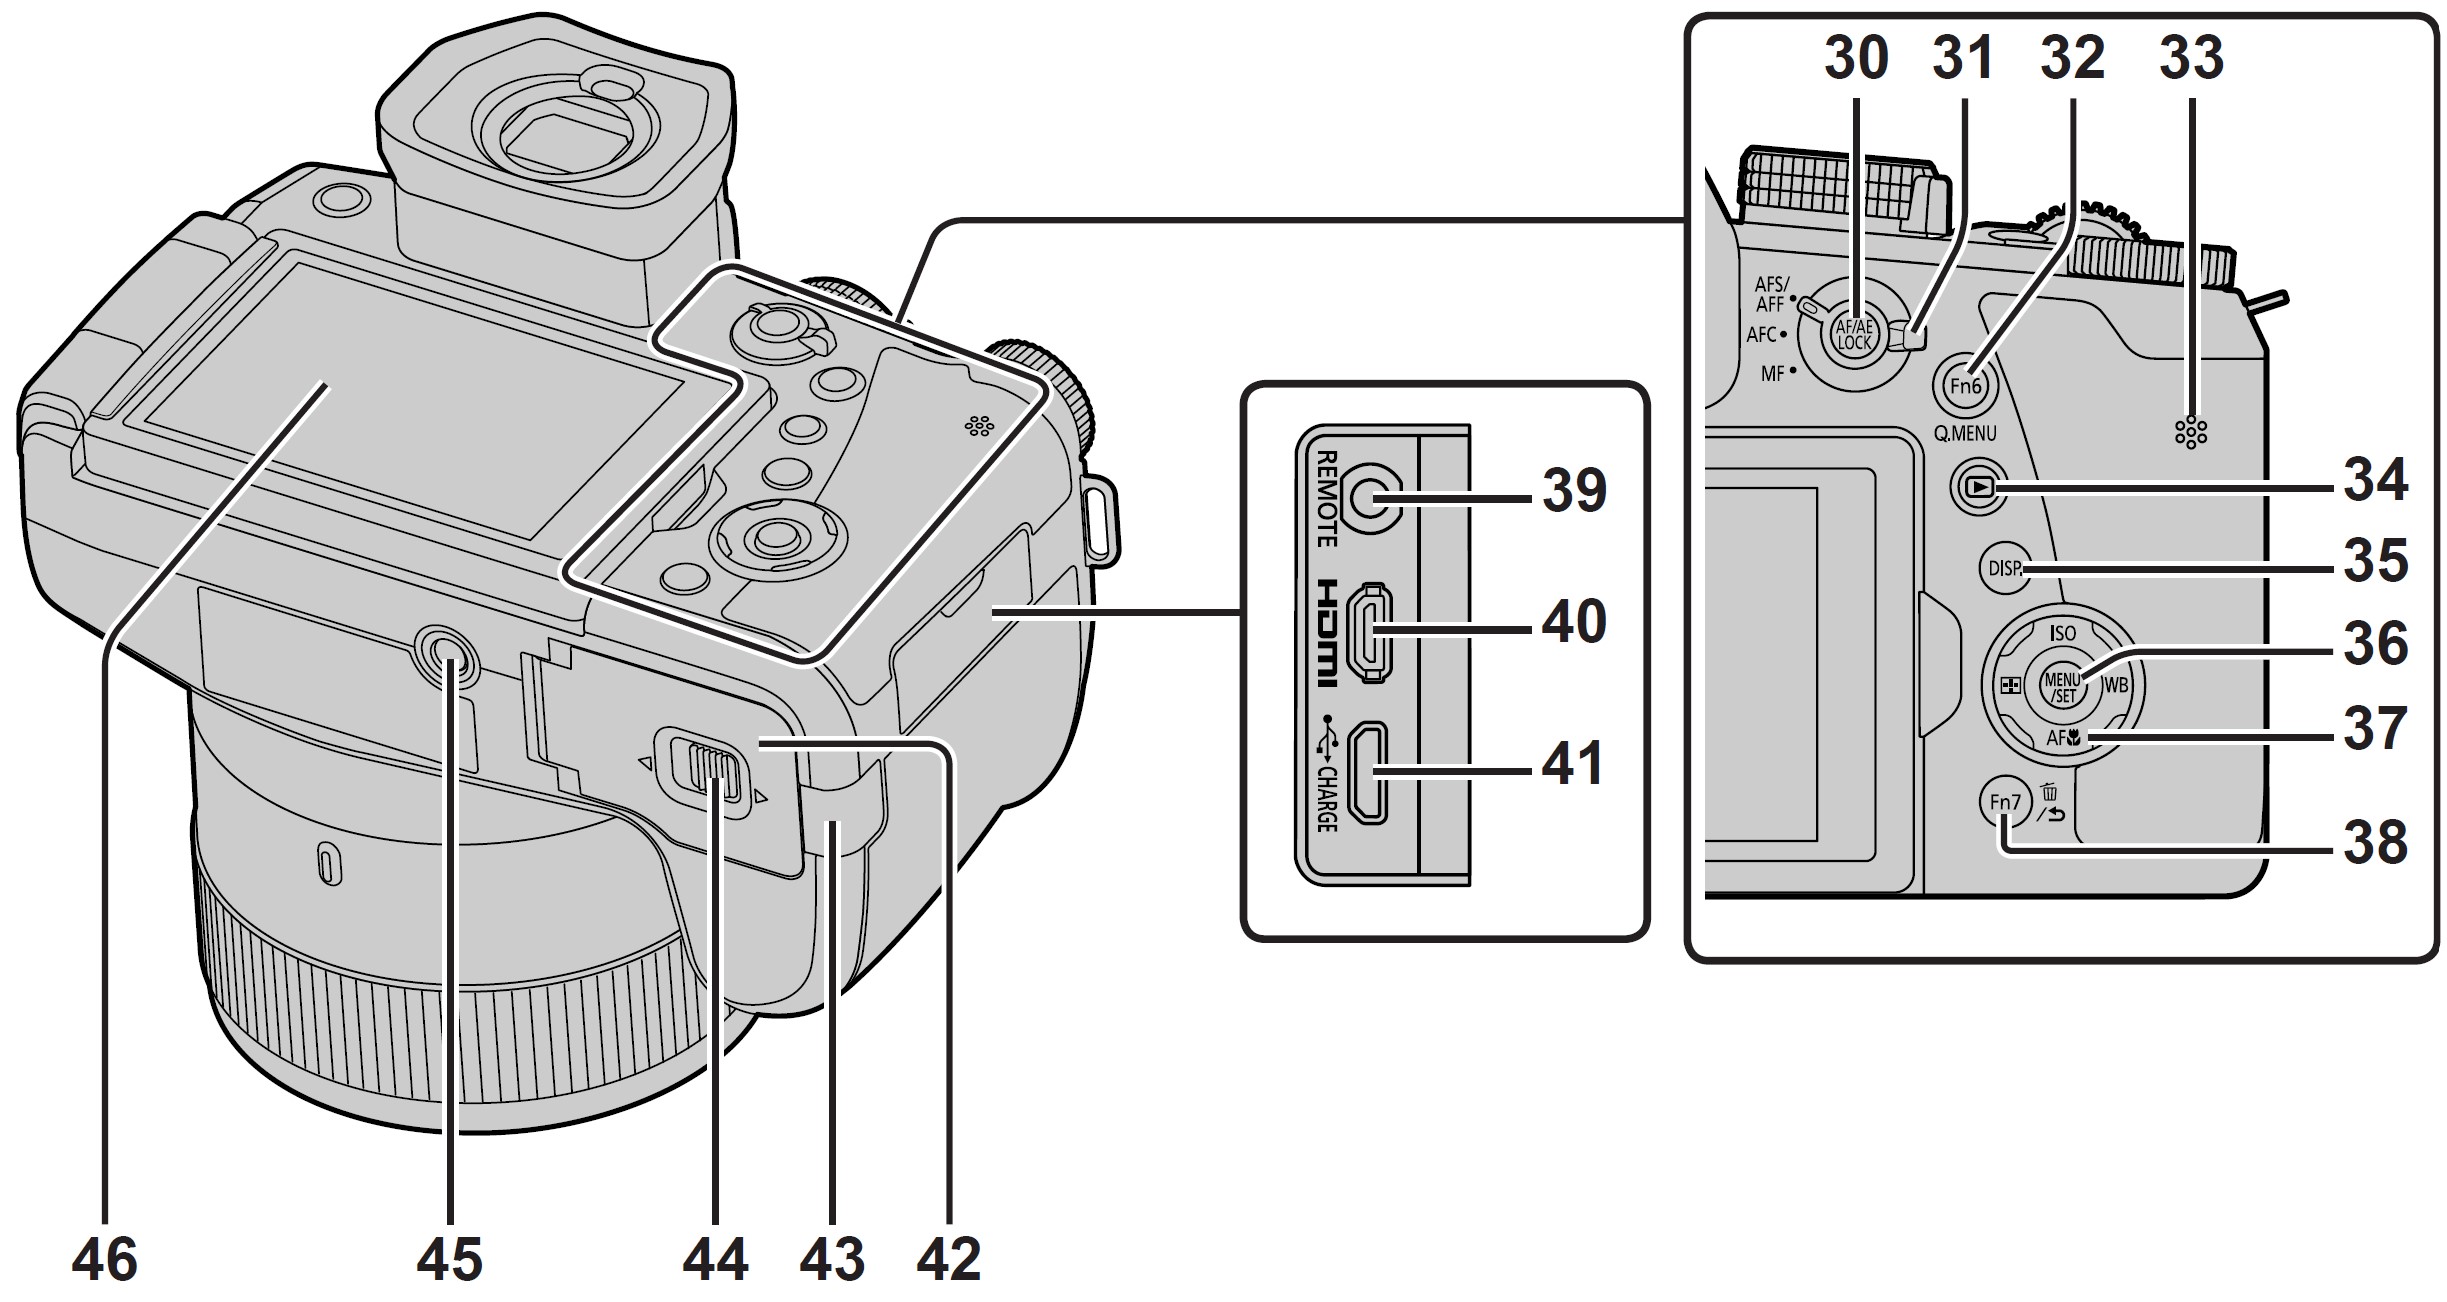
- [AF/AE LOCK] button
- Focus mode lever
- [Fn6] button/[Q.MENU] button
- Speaker
- [
 ] (Playback) button
 - [DISP.] button
- [MENU/SET] button
- Cursor button
- [ISO] (ISO sensitivity) (
 )
) - [WB] (White balance) (
 )
) - [
 ] (Macro Mode) (
 )
) - [
 ] (AF Mode) (
 )
)
- [ISO] (ISO sensitivity) (
- [Fn7] button /[
 ] (Delete) button / [
 ] (Cancel) button
 - [REMOTE] socket
- [HDMI] socket
- [USB/CHARGE] socket
- Card/Battery door
- DC coupler cover
- Release lever
- Tripod mount
- Touch screen/ monitor
Function buttons [Fn9] to [Fn13] are touch icons.
They can be displayed by touching the [![]() ] tab on the recording screen.
] tab on the recording screen.
About the Card
The following SD standard-based cards can be used.
About motion picture/4K photo recording and speed class ratings
Use a card that meets the following ratings of the SD Speed Class or UHS Speed Class.
- SD Speed Class and UHS Speed Class are the speed standards regarding continuous writing. Confirm the SD speed by checking the card label or other card-related materials.
 Latest information: https://panasonic.jp/support/global/cs/dsc/(This site is available in English only.)
- Keep the memory card out of reach of children to prevent swallowing. Formatting the card (initialization)
Format the card before recording a picture with this unit.
Since data cannot be recovered after formatting, make sure to back up necessary data in advance.
Quick Start Guide
Attaching the Lens Cap
Cover the lens with the lens cap to protect it when you are not taking pictures.
- Do not hang or swing around the camera with the lens cap string.
- Make sure to detach the lens cap when turning this unit on.
- Be careful that the lens cap string does not become entangled with the shoulder strap.
- Use the lens cap string (supplied) to attach the lens cap to the camera

- Attach the lens cap

- A: Pinch here to attach or detach the cap.
Keep the lens cap string out of reach of children to prevent swallowing.
Attaching the Shoulder Strap
We recommend attaching the shoulder strap when using the camera to prevent it from dropping.
- Perform steps 1 to 6 and then attach the other side of the shoulder strap.
- Use the shoulder strap around your shoulder.
- Do not wrap the strap around your neck. It may result in injury or accident.
- Do not leave the shoulder strap where an infant can reach it.
- It may result in an accident by mistakenly wrapping around the neck.
Attaching the Lens Hood
- Do not hold the lens hood in such a way that it will be bent.
- Make sure that the camera is turned off.
- Be sure to close the flash beforehand.
- Align the mounting mark on the lens hood a little above the mounting mark on the tip of the lens
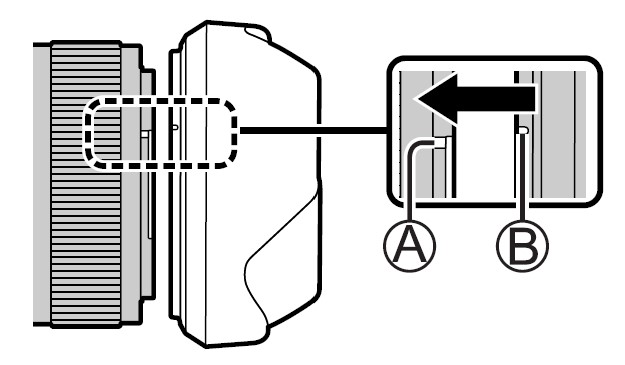
- A: Mounting mark on the tip of the lens
- B: Mounting mark on the lens hood
- Turn the lens hood in the direction of the arrow to secure it
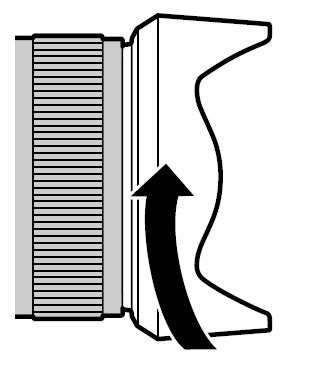
- Continue to rotate the lens hood until you hear a “click” even if you feel some stiffness, and then align the mark on the bottom of the camera
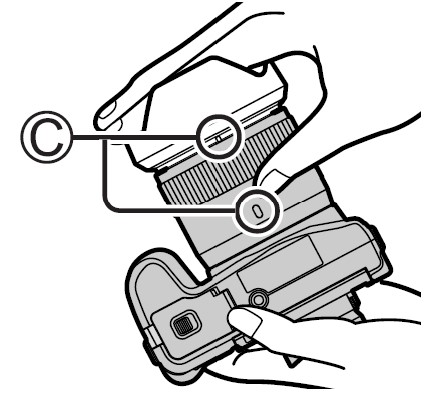
- Make sure the lens hood is secured properly and its reflection does not fall on images.
- C: Rotate until the marks are aligned
- If you attach the lens hood while using the flash, the flashlight would be blocked by the lens hood causing the bottom part of images to be darkened (vignetting) and also making it impossible to modulate the light. It is recommended to remove the lens hood before using the flash.
- Temporarily Storing the Lens Hood

Inserting the battery and/or SD memory card (optional)
Make sure that the camera is turned off.
- Slide the release lever to the [OPEN] position and open the card/battery door
- Insert the battery and card, making sure that their orientation is correct
- Battery: Insert the battery all the way firmly and check that it is locked by lever.
- Card: Insert the card all the way firmly until it clicks. Do not touch the terminal.
- Close the door
- Slide the release lever to the [LOCK] position.
To remove
- To remove battery: Move lever (B) in the direction of the arrow.
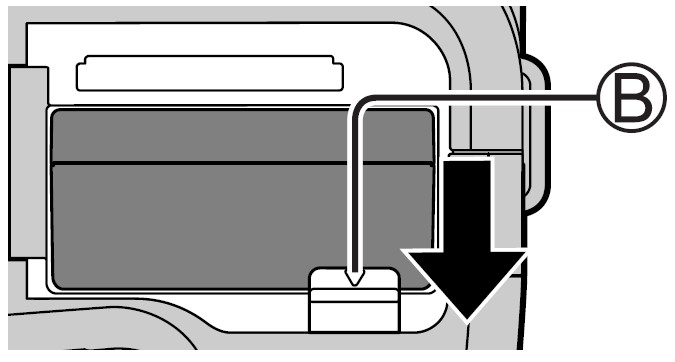
- To remove card: Press the center of the card.

Note:
- Always use genuine Panasonic batteries (DMW-BLC12PP).
- If you use other batteries, we cannot guarantee the quality of this product.
- Turn the camera off and wait for the “LUMIX” display on the monitor to clear before removing the card or battery.
Charging the battery
- The battery that can be used with this unit is DMW-BLC12PP.
- We recommend charging in a location where the ambient temperature is between 10 °C and 30 °C (50 °F to 86 °F) (same for the battery temperature).
Insert the battery into the camera.
Make sure that the camera is turned off.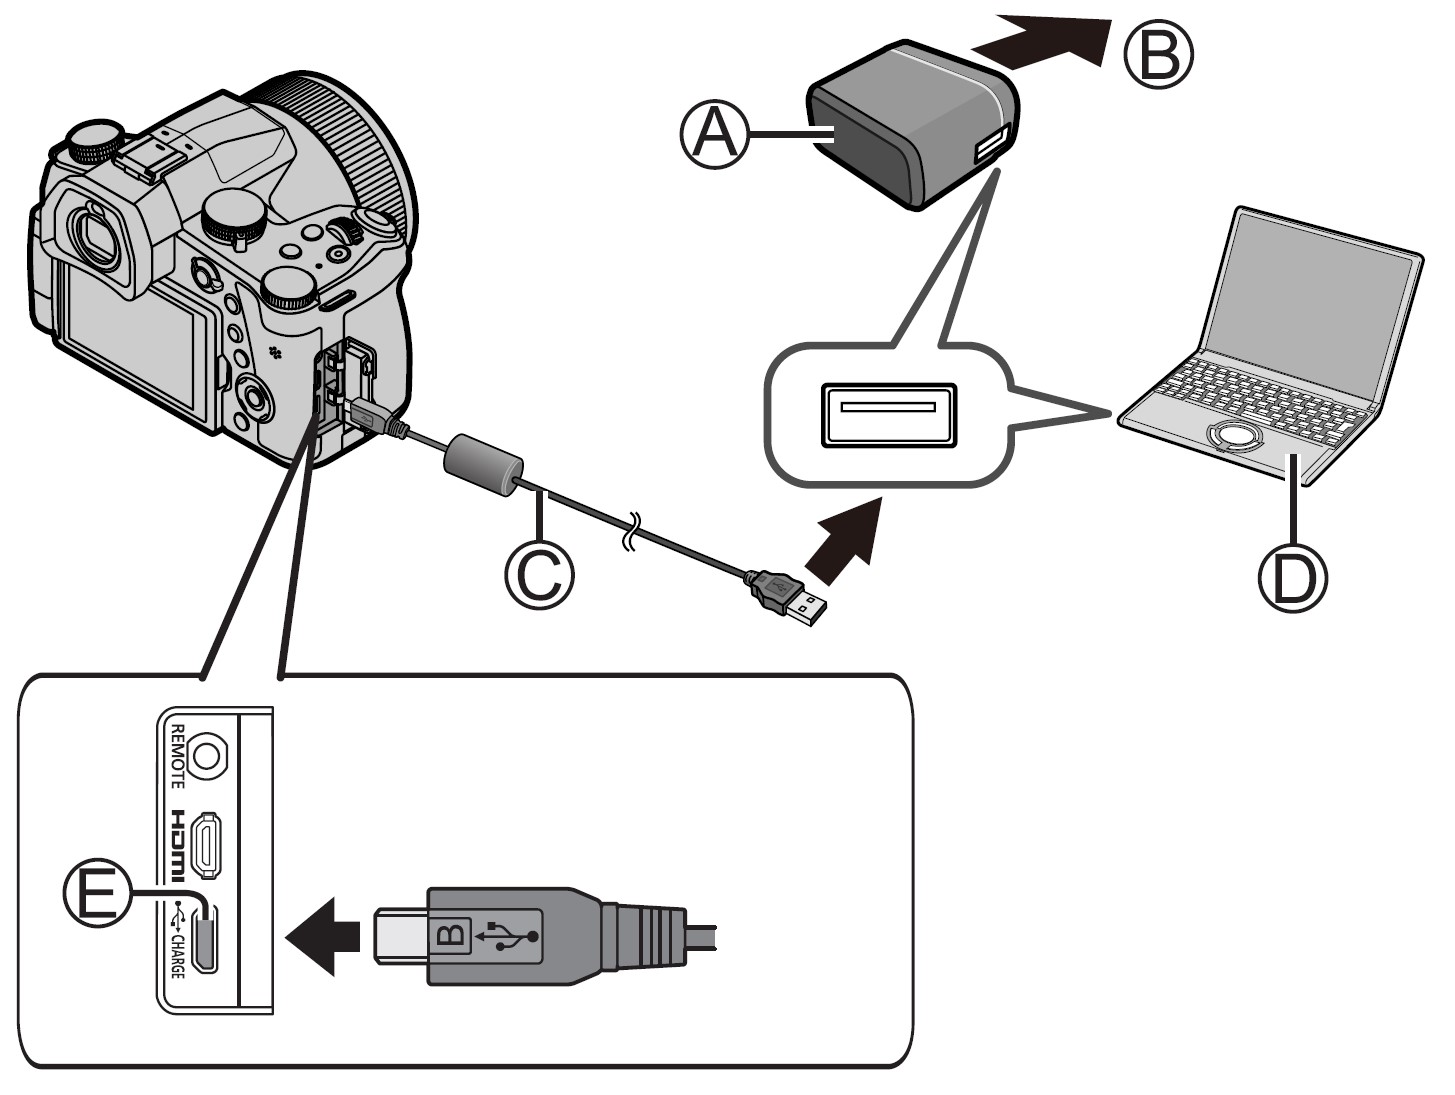
- A: AC adaptor (supplied)
- B: To the electrical outlet
- C: USB connection cable (supplied) Computer
- D: Turn on the computer.
- E: [USB/CHARGE] socket This terminal is located at the bottom when the camera is in an upright position.
Caution: Always check the direction of the socket, and hold the plug straight to insert or remove it. (If the cable is inserted in the wrong direction, the socket could become deformed and cause faulty operation.) Also, do not insert it into the wrong socket. Doing so may cause damage to this unit.
Opening the Monitor
- Place your finger in the cleft on the right side of the monitor and open the monitor toward the left side (maximum 180°)
- It can be rotated 180° to the direction of the lens
- Return the monitor to its original position
Caution:
- Only rotate the monitor after opening it wide enough, and be careful not to use excessive force. Doing so may cause damage to this unit.
- When not using the monitor it is recommended that you close it with the screen facing inward to prevent dirt and scratches.
Setting the clock
The clock is not set when the camera is shipped.
- Turn the camera on
- Press [MENU/SET]
- Press

 to select the language and press [MENU/SET]
- The [Please set the clock] message appears.
- Press [MENU/SET]
- Press

 to select the items (year, month, day, hour, minute), and press
 to set
 - Press [MENU/SET]
- When [The clock setting has been completed.] is displayed, press [MENU/SET]
- When [Please set the home area] is displayed, press [MENU/SET]
- Press

 to set your home area and press [MENU/SET]
[LVF] button (Recording pictures using the viewfinder)
Automatic switching between viewfinder and monitor
The eye sensor (B) automatically switches the display to the viewfinder when your eye or an object moves close to the viewfinder. When the eye or object moves away from the viewfinder, the camera returns to the monitor display.
About diopter adjustment
Rotate the diopter adjustment dial to adjust until you are able to clearly see the characters displayed in the viewfinder.
- If [LVF Display Speed] is set to [ECO 30fps] when the viewfinder is used, the camera can be operated for a longer period since battery drainage is reduced.
Holding the camera
- Do not block the flash, AF Assist Lamp, microphone, or speaker with your fingers or other objects.
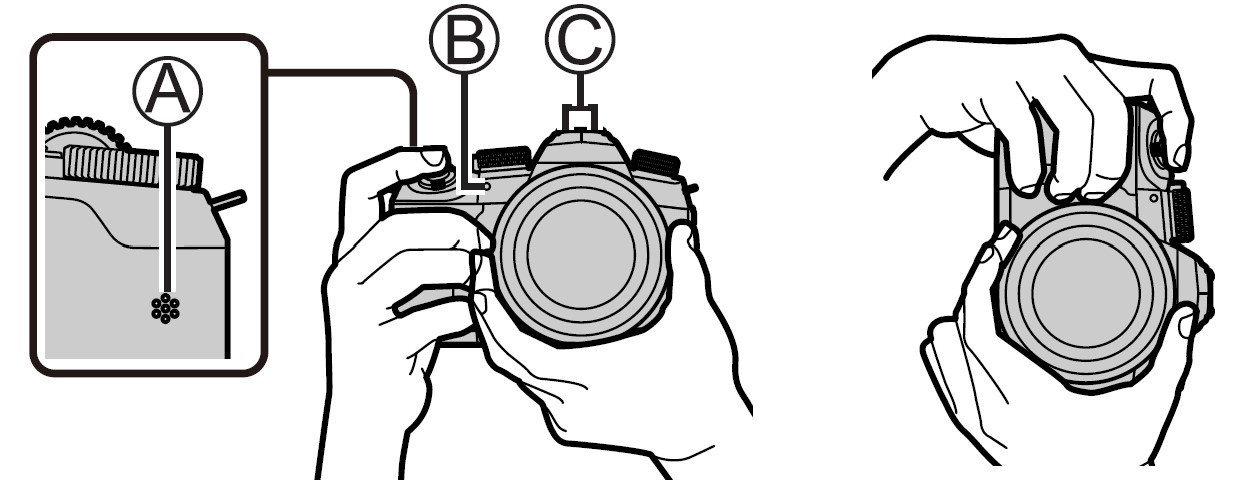
- A: Speaker
- B: AF Assist Lamp
- C: Microphone
- Do not hold the lens barrel as you take pictures. There is a risk that your finger will be trapped as the lens retracts.

Free angle shooting
The monitor can be rotated to suit your needs. This is convenient as it allows you to take pictures from various angles by adjusting the monitor.
Shutter button (Taking pictures)
- Set the mode dial to [iA]
- The camera automatically optimizes the main settings.
- Press the shutter button halfway (press lightly) to focus on the subject

- Shutter speed
- Aperture Value
- Focus display (Green)
( When focus is aligned: illuminated
- Press the shutter button fully (push the button all the way), and take the picture
Pictures can be taken only when the image is correctly focused as long as the [Focus/Release Priority] is set to [FOCUS].
Basic operations
Zoom lever (Use Zoom)
Optical Zoom:
You can zoom in without degrading the picture quality.
Maximum magnification: 16x
Extended optical zoom:
This function works when picture sizes with [![]() ] have been selected in [Picture Size]. Extended optical zoom allows you to zoom in using a higher zoom ratio than optical zoom, without degrading the picture quality.
] have been selected in [Picture Size]. Extended optical zoom allows you to zoom in using a higher zoom ratio than optical zoom, without degrading the picture quality.
Maximum magnification: 32x*1
*1 Including the optical zoom ratio. The maximum zoom ratio varies depending on the picture size.
[i.Zoom]:
Set the [i. Zoom] in the [Rec]/[Motion Picture] menu to [ON].
You can use the camera’s intelligent resolution technology to increase the zoom ratio up to 2x*2 higher than the original zoom ratio with limited deterioration of picture quality.
*2 Up to 1.5x the original zoom ratio when [Picture Size] is set to [S]
[Digital Zoom]:
Set the [Digital Zoom] in the [Rec]/[Motion Picture] menu to [ON].
You can zoom in up to 4x the original zoom magnification. When [Digital Zoom] is used simultaneously with [i. Zoom], you can increase the combined zoom ratio up to 4x. Note that, with Digital Zoom, enlarging will decrease picture quality.
- When [Monitor Display Speed] is set to [ECO 30fps], Digital Zoom is not available (setting at the time of purchase).
- When [LVF Display Speed] is set to [ECO 30fps], Digital Zoom is not available.
[Zoom Compose Assist] button (Using the Zoom Compose Assist function)
If you lose the subject while zoomed in:
- Press and hold [ ] ([Zoom Compose Assist]) button
- A frame indicating the original zoom magnification (angle of view) will appear.
- When you find the subject:
- Align the frame with the subject and release your finger from the button
Mode dial (Select the recording mode)
Set to the desired recording mode
- Rotate the mode dial slowly to select the desired mode.
 Control ring
You can use the control ring to change the settings for recording.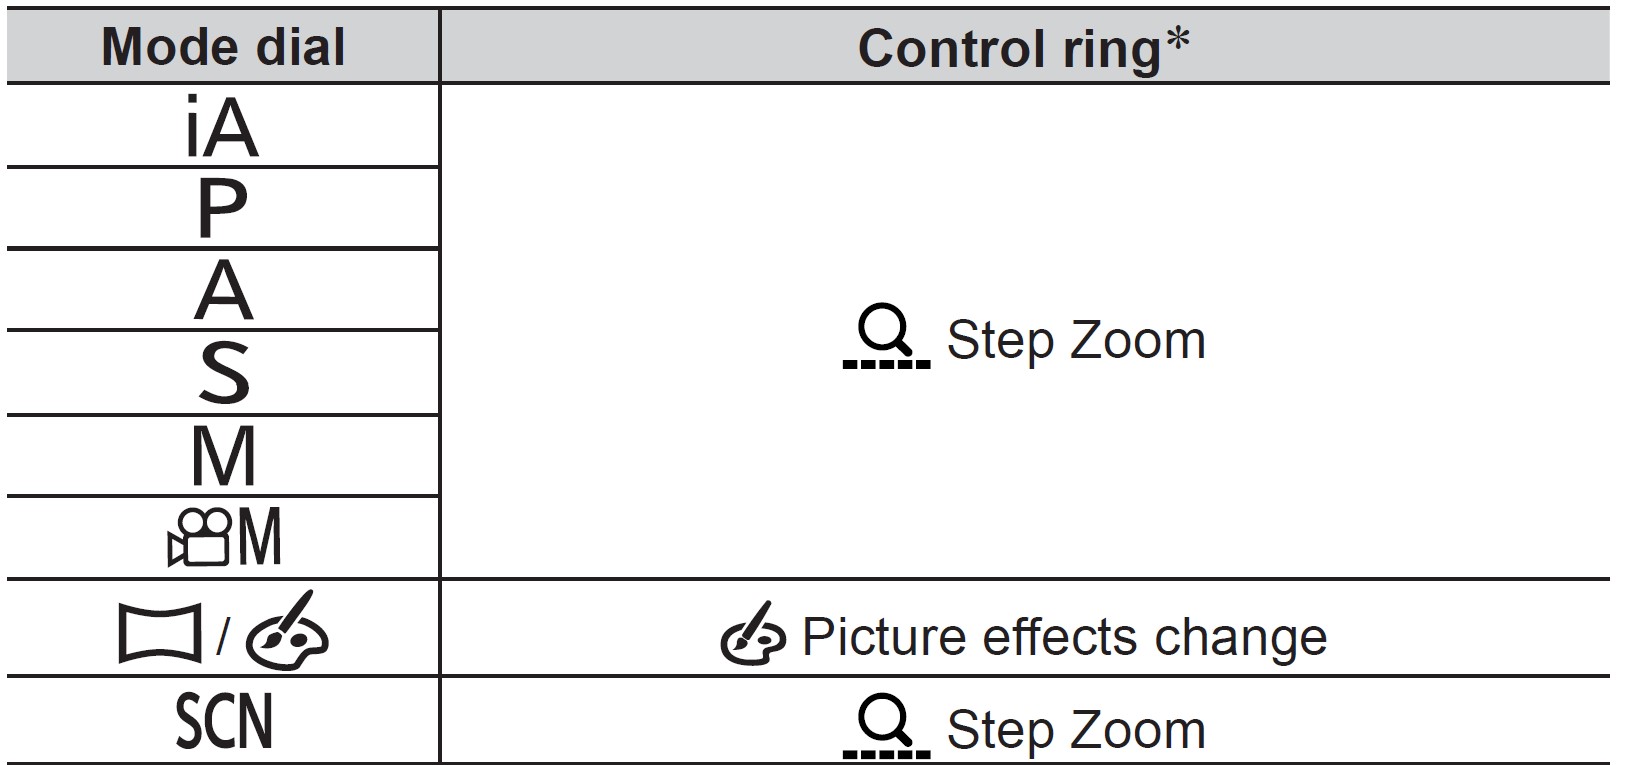
*When Manual Focus is set, the control ring is assigned to focus adjustment.
Note: You can change your preferred settings using [Control Ring] from the [Custom] ([Operation]) menu.
Front dial/Rear dial
Rotating:
The selection of items or setting of values is performed during the various settings.
- A: Front dial
- B: Rear dial
Allows you to set the aperture, shutter speed, and other settings when in [P]/[A]/[S]/[M] modes.
Cursor button / [MENU/SET] button (Selecting/setting items)
Pressing the cursor button:
Selection of items or setting of values etc., is performed.
Pressing [MENU/SET]:
Confirmation of setting contents, etc., is performed.
[DISP.] button (Switching the display information)
Press the [DISP.] button to switch the display
Touch screen (Touch operations)
Touch
To touch and release the touch screen.
Drag
To touch and slide your finger across the touch screen.
Pinch (spread/pinch)
On the touch screen, spread (pinch out) your 2 fingers to zoom in, and pinch (pinch in) your 2 fingers to zoom out.
Taking Pictures Using the Touch Function
- Touch [
 ]
] - Touch an icon
Setting the menu
- Press [MENU/SET] to bring up the menu
- Switch the menu type
- Press

- Press

 to select a tab such as [
 ]
]
- You can also select the menu toggle icons by rotating the front dial.
- Press [MENU/SET]
- Menu types
- [Rec]
- [Setup]
- [Motion Picture]
- [My Menu]
- [Custom]
- [Playback]
- Menus to be displayed in each recording mode
- Menu types
- Press
- Press

 to select the menu item and press [MENU/SET]
- The menu item can also be selected by rotating the rear dial.
- You can also switch to the next page by rotating the zoom lever.
- Press

 to select the setting and press[MENU/SET]
- The setting can also be selected by rotating the rear dial.
- The setting methods vary depending on the menu item.
- Press [
 ] button repeatedly until the recording or playback screen reappears
- The menu screen can also be exited by pressing the shutter button halfway.
Note:
- You can display an explanation on the menu by pressing the [DISP.] button while you select a menu item or setting.
- The menu items that cannot be set are grayed out. In some setting conditions, the reason the setting is disabled is displayed when you press [MENU/SET] if you select a grayed-out menu item.
Calling frequently-used menus instantly (Quick Menu)
You can easily call some of the menu items and set them during recording.
- Press [Q.MENU] button
- Rotate the front dial to select a menu item
- Rotate the rear dial to select the setting
- Press [Q.MENU] button to close the Quick menu
Specifications
Digital Camera: Information for your safety

Wireless transmitter
Wireless LAN
Bluetooth function
AC adaptor
(Panasonic VSK0815F): Information for your safety
Battery pack (lithium-ion)
(Panasonic DMW-BLC12PP): Information for your safety![]()
The symbols on this product (including the accessories) represent the following:
Specifications are subject to change without notice.
Limited Warranty
(ONLY FOR U.S.A.)
Limited Warranty Coverage (For USA Only)
If your product does not work properly because of a defect in materials or workmanship, Panasonic Corporation of North America (referred to as “the warrantor”) will, for the length of the period indicated on the chart below, which starts with the date of original purchase (“warranty period”), at its option either (a) repair your product with new or refurbished parts, (b) replace it with a new or a refurbished equivalent value product, or (c) refund your purchase price. The decision to repair, replace or refund will be made by the warrantor.
During the “Labor” warranty period there will be no charge for labor. During the “Parts” warranty period, there will be no charge for parts. This Limited Warranty excludes both parts and labor for non-rechargeable batteries, antennas, and cosmetic parts (cabinet). This warranty only applies to products purchased and serviced in the United States. This warranty is extended only to the original purchaser of a new product that was not sold “as is”.
Mail-In Service–Online Repair Request
Online Repair Request
To submit a new repair request and for quick repair status visit our Web Site at http://shop.panasonic.com/support.
When shipping the unit, carefully pack, include all supplied accessories listed in the Owner’s Manual, and send it prepaid, adequately insured, and packed well in a carton box. When shipping Lithium Ion batteries please visit our Web Site at http://shop.panasonic.com/support as Panasonic is committed to providing the most up-to-date information. Include a letter detailing the complaint, a return address and provide a daytime phone number where you can be reached. A valid registered receipt is required under the Limited Warranty.
IF REPAIR IS NEEDED DURING THE WARRANTY PERIOD, THE PURCHASER WILL BE REQUIRED TO FURNISH A SALES RECEIPT/PROOF OF PURCHASE INDICATING THE DATE OF PURCHASE, AMOUNT PAID, AND PLACE OF PURCHASE. CUSTOMERS WILL BE CHARGED FOR THE REPAIR OF ANY UNIT RECEIVED WITHOUT SUCH PROOF OF PURCHASE.
Limited Warranty Limits and Exclusions
This warranty ONLY COVERS failures due to defects in materials or workmanship and DOES NOT COVER normal wear and tear or cosmetic damage.
The warranty ALSO DOES NOT COVER damages which occurred in shipment, or failures which are caused by products not supplied by the warrantor, or failures which result from accidents, misuse, abuse, neglect, mishandling, misapplication, alteration, faulty installation, set-up adjustments, misadjustment of consumer controls, improper maintenance, power line surge, lightning damage, modification, introduction of sand, humidity or liquids, commercial use such as hotel, office, restaurant, or other business or rental use of the product, or service by anyone other than a Factory Service Center or other Authorized Servicer, or damage that is attributable to acts of God.
THERE ARE NO EXPRESS WARRANTIES EXCEPT AS LISTED UNDER “LIMITED WARRANTY COVERAGE”.
THE WARRANTOR IS NOT LIABLE FOR INCIDENTAL OR CONSEQUENTIAL DAMAGES RESULTING FROM THE USE OF THIS PRODUCT, OR ARISING OUT OF ANY BREACH OF THIS WARRANTY.
(As examples, this excludes damages for lost time, travel to and from the servicer, loss of or damage to media or images, data, or other memory or recorded content. The items listed are not exclusive, but for illustration only.)
ALL EXPRESS AND IMPLIED WARRANTIES, INCLUDING THE WARRANTY OF MERCHANTABILITY, ARE LIMITED TO THE PERIOD OF THE LIMITED WARRANTY.
Some states do not allow the exclusion or limitation of incidental or consequential damages, or limitations on how long an implied warranty lasts, so the exclusions may not apply to you.
This warranty gives you specific legal rights and you may also have other rights which vary from state to state. If a problem with this product develops during or after the warranty period, you may contact your dealer or Service Center. If the problem is not handled to your satisfaction, then write to: Consumer Affairs Department Panasonic Corporation of North America 661 Independence Pkwy Chesapeake, VA 23320
PARTS AND SERVICES, THAT ARE NOT COVERED BY THIS LIMITED WARRANTY, ARE YOUR RESPONSIBILITY.
ONLY FOR CANADA
Panasonic Canada Inc.
5770 Ambler Drive, Mississauga, Ontario L4W 2T3
PANASONIC PRODUCT – LIMITED WARRANTY
Panasonic Canada Inc. warrants this product to be free from defects in material and workmanship under normal use and for a period as stated below from the date of original purchase agrees to, at its option either (a) repair your product with new or refurbished parts, (b) replace it with a new or a refurbished equivalent value product, or (c) refund your purchase price. The decision to repair, replace or refund will be made by Panasonic Canada Inc.
This warranty is given only to the original purchaser, or the person for whom it was purchased as a gift, of a Panasonic brand product mentioned above sold by an authorized Panasonic dealer in Canada and purchased and used in Canada, which product was not sold “as is”, and which product was delivered to you in new condition in the original packaging.
IN ORDER TO BE ELIGIBLE TO RECEIVE WARRANTY SERVICE HEREUNDER, A PURCHASE RECEIPT OR OTHER PROOF OF DATE OF ORIGINAL PURCHASE, SHOWING THE AMOUNT PAID AND PLACE OF PURCHASE IS REQUIRED
LIMITATIONS AND EXCLUSIONS
This warranty ONLY COVERS failures due to defects in materials or workmanship and DOES NOT COVER normal wear and tear or cosmetic damage.
The warranty ALSO DOES NOT COVER damages which occurred in shipment, or failures which are caused by products not supplied by Panasonic Canada Inc., or failures which result from accidents, misuse, abuse, neglect, mishandling, misapplication, alteration, faulty installation, set-up adjustments, misadjustment of consumer controls, improper maintenance, improper batteries, power line surge, lightning damage, modification, the introduction of sand, humidity or liquids, commercial use such as hotel, office, restaurant, or other business or rental use of the product, or service by anyone other than an Authorized Servicer, or damage that is attributable to acts of God.
Dry cell batteries, printer ink cartridges, and paper are also excluded from coverage under this warranty. Rechargeable batteries are warranted for ninety (90) days from the date of original purchase.
THIS EXPRESS, LIMITED WARRANTY IS IN LIEU OF ALL OTHER WARRANTIES, EXPRESS OR IMPLIED, INCLUDING ANY IMPLIED WARRANTIES OF MERCHANTABILITY AND FITNESS FOR A PARTICULAR PURPOSE. IN NO EVENT WILL PANASONIC CANADA INC. BE LIABLE FOR ANY SPECIAL, INDIRECT OR CONSEQUENTIAL DAMAGES RESULTING FROM THE USE OF THIS PRODUCT OR ARISING OUT OF ANY BREACH OF ANY EXPRESS OR IMPLIED WARRANTY.
(As examples, this warranty excludes damages for lost time, travel to and from the Authorized Servicer, and loss of or damage to media or images, data, or other memory or recorded content. This list of items is not exhaustive, but for illustration only.)
In certain instances, some jurisdictions do not allow the exclusion or limitation of incidental or consequential damages, or the exclusion of implied warranties, so the above limitations and exclusions may not be applicable. This warranty gives you specific legal rights and you may have other rights which vary depending on your province or territory.
WARRANTY SERVICE
For product operation, repairs, and information assistance, please visit our Support page : www.panasonic.ca/english/support
- SDXC Logo is a trademark of SD-3C, LLC.
- The terms HDMI and HDMI High-Definition Multimedia Interface, and the HDMI Logo are trademarks or registered trademarks of HDMI Licensing Administrator, Inc. in the United States and other countries.
- HDAVI Control™ is a trademark of Panasonic Corporation.
- “AVCHD”, “AVCHD Progressive” and the “AVCHD Progressive” logo are trademarks of Panasonic Corporation and Sony Corporation.
- Dolby, Dolby Audio, and the double-D symbol are trademarks of Dolby Laboratories.
- Adobe is a trademark or registered trademark of Adobe Systems Incorporated in the United States and/or other countries.
- Pentium is a trademark of Intel Corporation in the U.S. and/or other countries.
- Windows is either a registered trademark or trademark of Microsoft Corporation in the United States and/or other countries.
- iMovie, Mac, OS X, and macOS are trademarks of Apple Inc., registered in the U.S. and other countries.
- iPad, iPhone, iPod, and iPod touch are trademarks of Apple Inc., registered in the U.S. and other countries.
- App Store is a service mark of Apple Inc.
- Google, Android, and Google Play are trademarks of Google LLC.
- The Bluetooth® word mark and logos are registered trademarks owned by Bluetooth SIG, Inc. and any use of such marks by Panasonic Corporation is under license. Other trademarks and trade names are those of their respective owners.
- The Wi-Fi CERTIFIED™ Logo is a certification mark of Wi-Fi Alliance®.
- The Wi-Fi Protected Setup™ Logo is a certification mark of Wi-Fi Alliance®.
- “Wi-Fi®” is a registered trademark of Wi-Fi Alliance®.
- “Wi-Fi Protected Setup™”, “WPA™”, and “WPA2™” are trademarks of Wi-Fi Alliance®.
- QR Code is a registered trademark of DENSO WAVE INCORPORATED.
- This product uses “DynaFont” from DynaComware Corporation. DynaFont is a registered trademark of DynaComware Taiwan Inc.
- Other names, company names, and product names mentioned in these instructions are trademarks or registered trademarks of the companies concerned.
Support
- Panasonic Corporation of North America
Two Riverfront Plaza, Newark, NJ 07102-5490
http://shop.panasonic.com - Panasonic Canada Inc.
5770 Ambler Drive
Mississauga, Ontario
L4W 2T3
www.panasonic.com
FAQS About Panasonic LUMIX FZ1000 II Digital Camera
The Panasonic Lumix FZ1000 is weatherproof.
There are no weather-sealing claims made for the FZ1000 II.
What is the FZ1000 II’s zoom range?
25-400 mm
How long does the Panasonic Lumix FZ1000 II last on a charge?
440 shots
What is the FZ1000’s shutter speed?
Electronic shutter: 1/16000 s to 60 s
The Panasonic Lumix FZ1000’s sensor size.
13.2mm x 8.8mm
How big should my filter be for my Panasonic FZ1000 II?
62.0mm
What kind of camera is the FZ1000?
When compared to the majority of other high-end bridge cameras, the Panasonic Lumix DMC-FZ1000 definitely outperforms the opposition.
The Panasonic FZ1000 II was released when?
March 2019
What are the FZ1000’s modes?
fast, medium, low, and extremely fast speeds.
What is the FZ1000 II lens’ diameter?
25-400mm F2. 8-4 lens comparable.
What’s the weight of a Panasonic fz1000?
831 g (1.83 lb / 29.31 oz)
For more manuals by Panasonic, Visit Manualsdock
[embeddoc url=”https://manualsdock.com/wp-content/uploads/2023/09/Panasonic-LUMIX-FZ1000-II-Digital-Camera-Owner-Manual.pdf” download=”all”]


