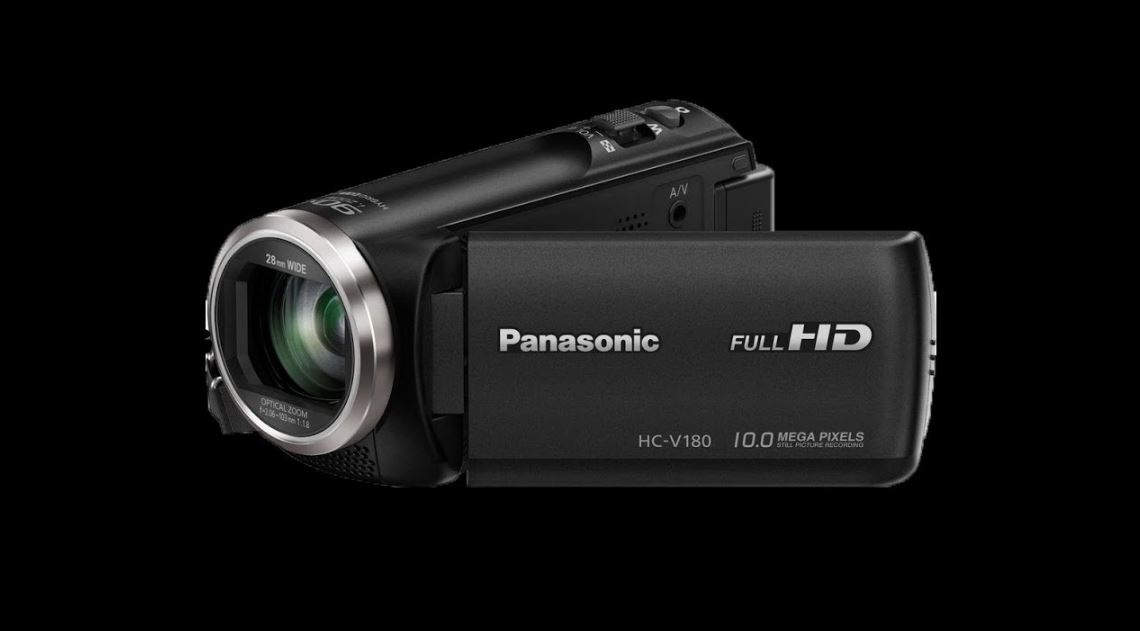
Panasonic HC-V180 Full HD Video Camera Camcorder
ABOUT Panasonic
Panasonic Corporation is a multinational electronics company headquartered in Osaka, Japan. It was founded in 1918 by Konosuke Matsushita and originally started as a vendor of duplex lamp sockets. Over the years, Panasonic has grown into one of the largest electronics manufacturers in the world, offering a wide range of products and services.
Panasonic‘s business operations span various sectors, including consumer electronics, home appliances, automotive, industrial solutions, and B2B solutions. The company is known for its innovation and has a strong focus on research and development.
Names and Functions of Main Parts
- Speaker
- A/V connector
- Recording/playback button [
 ]
] - Level Shot Function button
- Battery release lever [BATT]
- Power button [
 ]
] - HDMI mini connector [HDMI]
- USB terminal [
 ]
] - Lens cover opening/closing switch
When not using the unit, close the lens cover to protect the lens.
- Slide the opening/closing switch to open/ close the cover.
- Lens cover
- Lens
- Internal stereo microphones
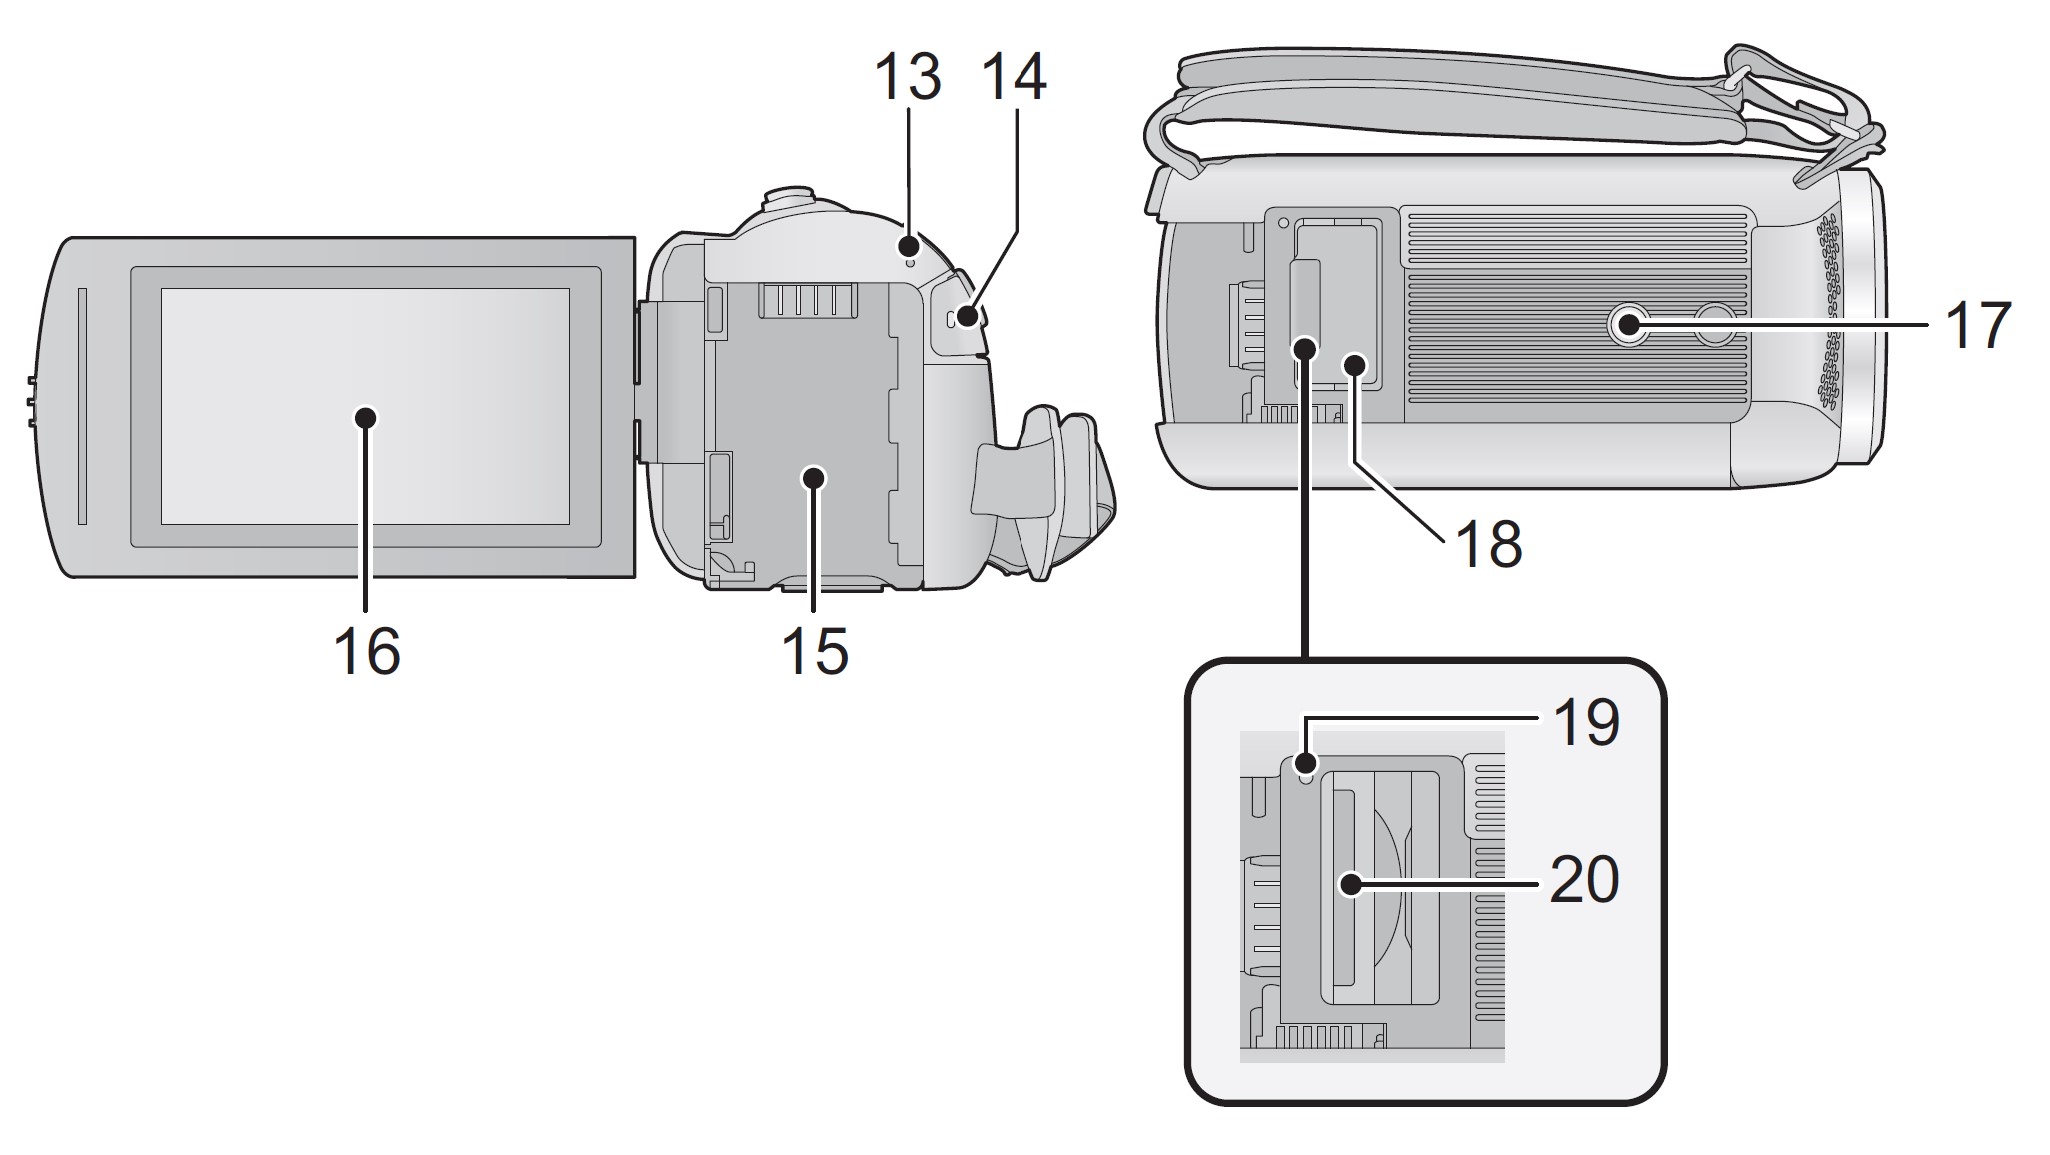
- Status indicator
- Recording start/stop button
- Battery holder
- LCD monitor (Touch screen)
 It can open up to 90 degrees.
 It can rotate up to 180 degrees A towards the lens or 90 degrees B towards the opposite direction.
- Tripod receptacle
- Attaching a tripod with a screw length of 5.5 mm (0.22 q) or more may damage the unit.
- SD card cover
- Access lamp [ACCESS]
- Card slot
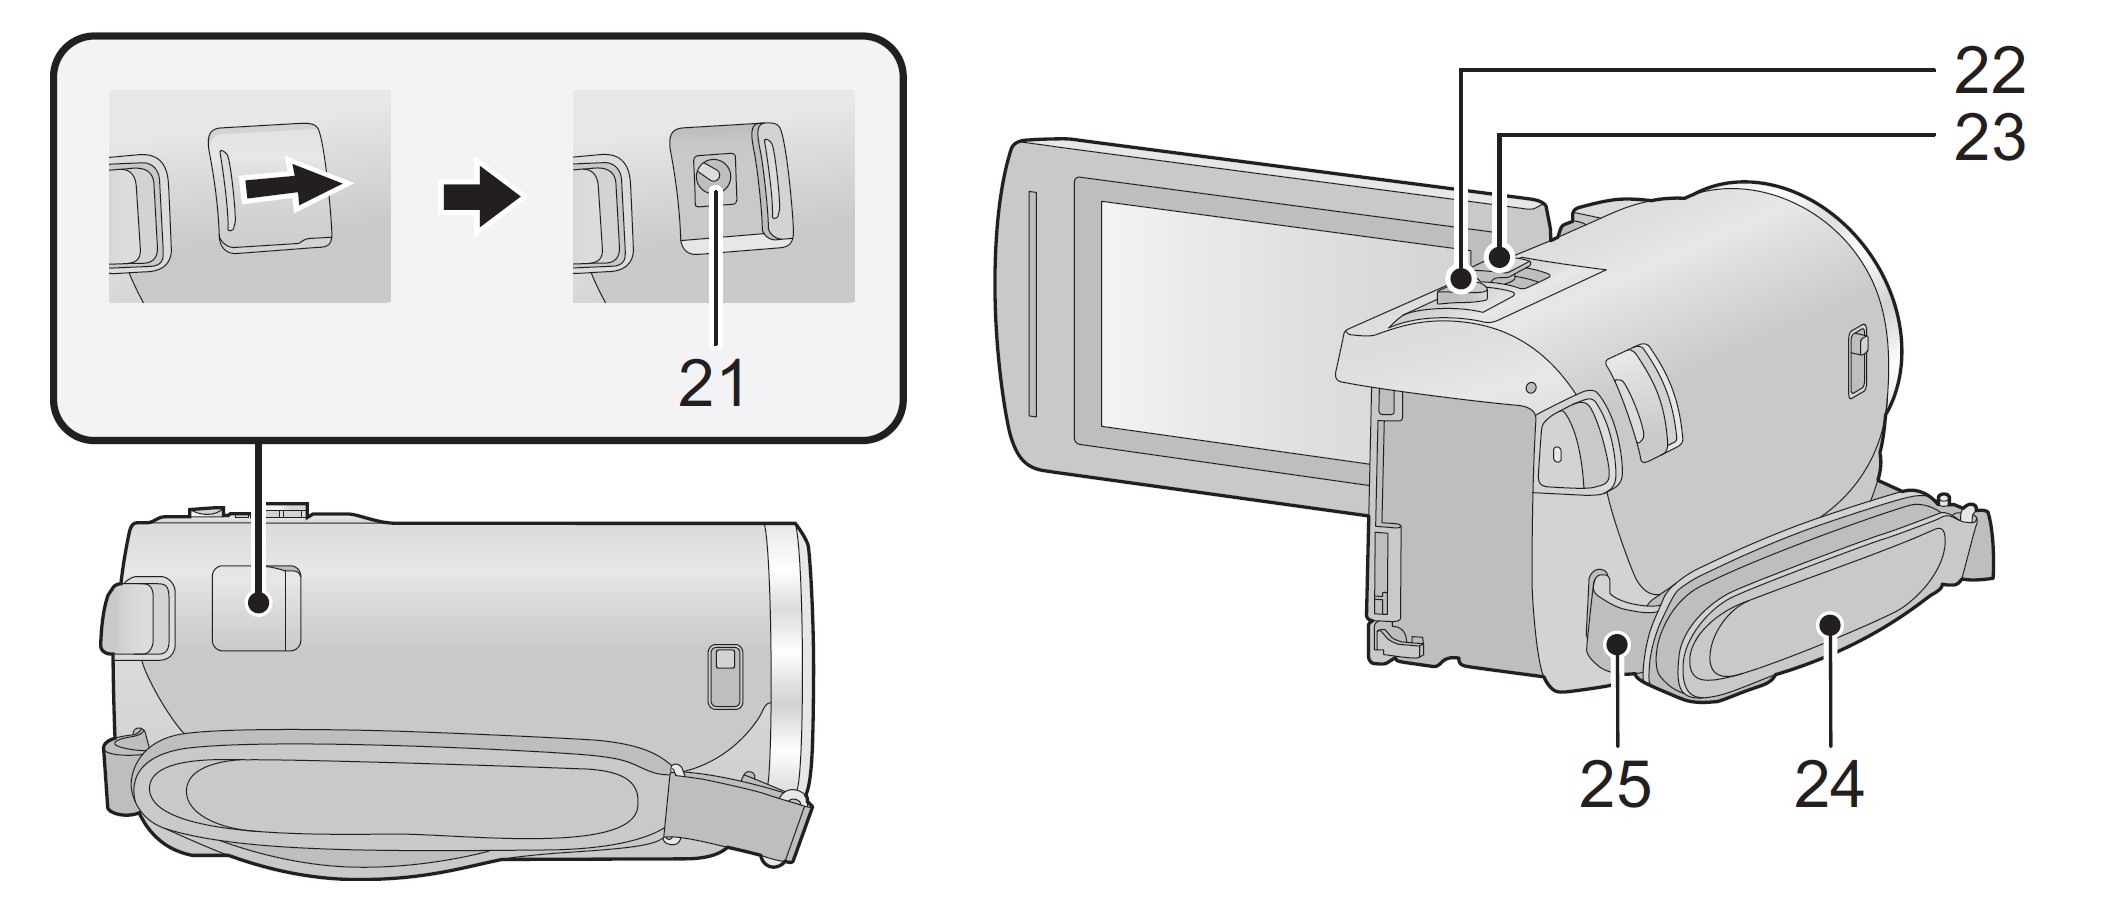
- DC input terminal [DC IN]
- Do not use any other AC adaptors except the supplied one.
- Photoshoot button [
 ]
] - Zoom lever [W/T] (In Motion Picture Recording Mode or Still Picture Recording Mode)/Thumbnail display switch [
 ] / Volume lever [sVOLr] (In Playback Mode)
 - Grip belt
Adjust the length of the grip belt so that it fits your hand.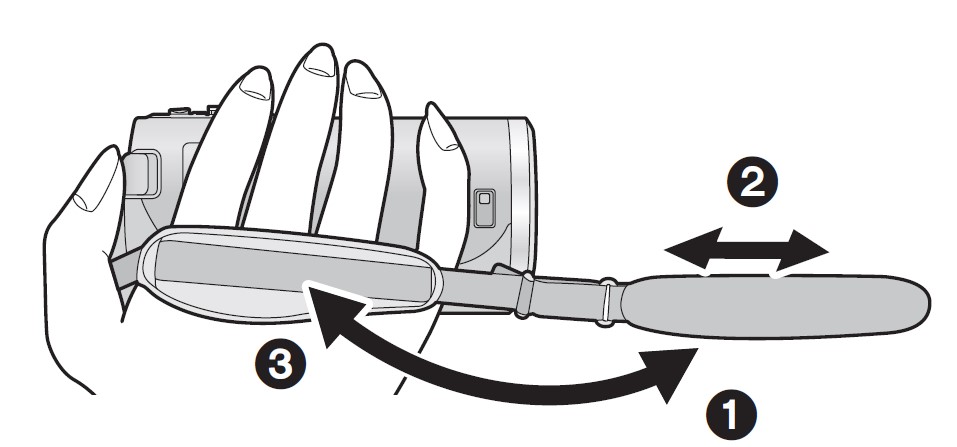
- Flip the belt.
- Adjust the length.
- Replace the belt.
- Shoulder strap fixture
Power supply
About batteries that you can use with this unit
The battery that can be used with this unit is VW-VBT190/VW-VBT380.
- The unit has a function for distinguishing batteries that can be used safely. The dedicated battery (VW-VBT190/VW-VBT380) supports this function. The only batteries suitable for use with this unit are genuine Panasonic products and batteries manufactured by other companies and certified by Panasonic.
- Panasonic cannot in any way guarantee the quality, performance, or safety of batteries that have been manufactured by other companies and are not genuine Panasonic products.
It has been found that counterfeit battery packs which look very similar to the genuine product are made available to purchase in some markets. Some of these battery packs are not adequately protected with internal protection to meet the requirements of appropriate safety standards. There is a possibility that these battery packs may lead to fire or explosion.
Please be advised that we are not liable for any accident or failure occurring as a result of the use of a counterfeit battery pack. To ensure that safe products are used we would recommend that a genuine Panasonic battery pack is used.
Inserting/removing the battery
- Press the power button to turn off the unit.
Install the battery by inserting it in the direction shown in the figure.
- Insert the battery until it clicks and locks.
Removing the battery
Be sure to hold down the power button until the status indicator goes off. Then remove the battery while supporting the unit to prevent it from dropping.
Move the battery release lever in the direction indicated by the arrow and remove the battery when unlocked.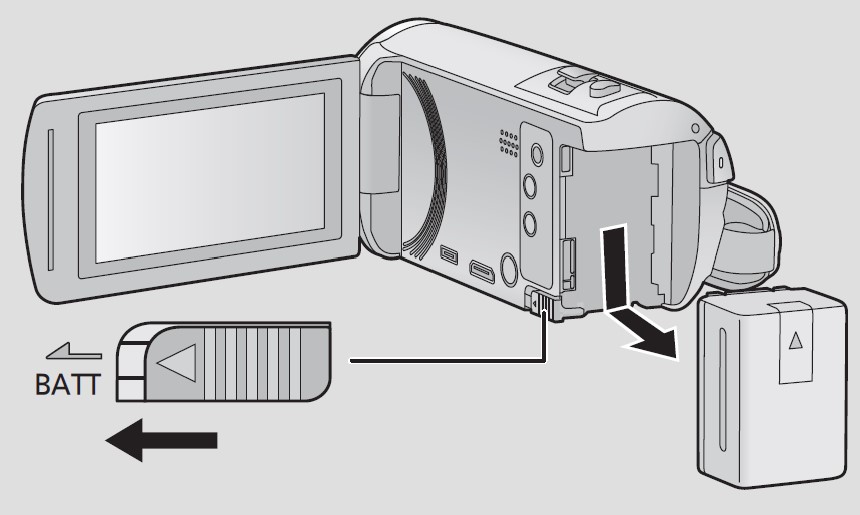
Caution: When this unit is purchased, the battery is not charged. Charge the battery fully before using this unit for the first time.
The unit is in the standby condition when the AC adaptor is connected. The primary circuit is always “live” as long as the AC adaptor is connected to an electrical outlet.
Important:
- Do not use the AC adaptor/DC cable with any other equipment as it is designed only for this unit. Also, do not use the AC adaptor/DC cable from other equipment with this unit.
- The battery will not be charged if the unit is turned on.
- It is recommended to charge the battery at a temperature between 10 degrees C and 30 degrees C (50 oF and 86 oF). (The battery temperature should also be the same.)
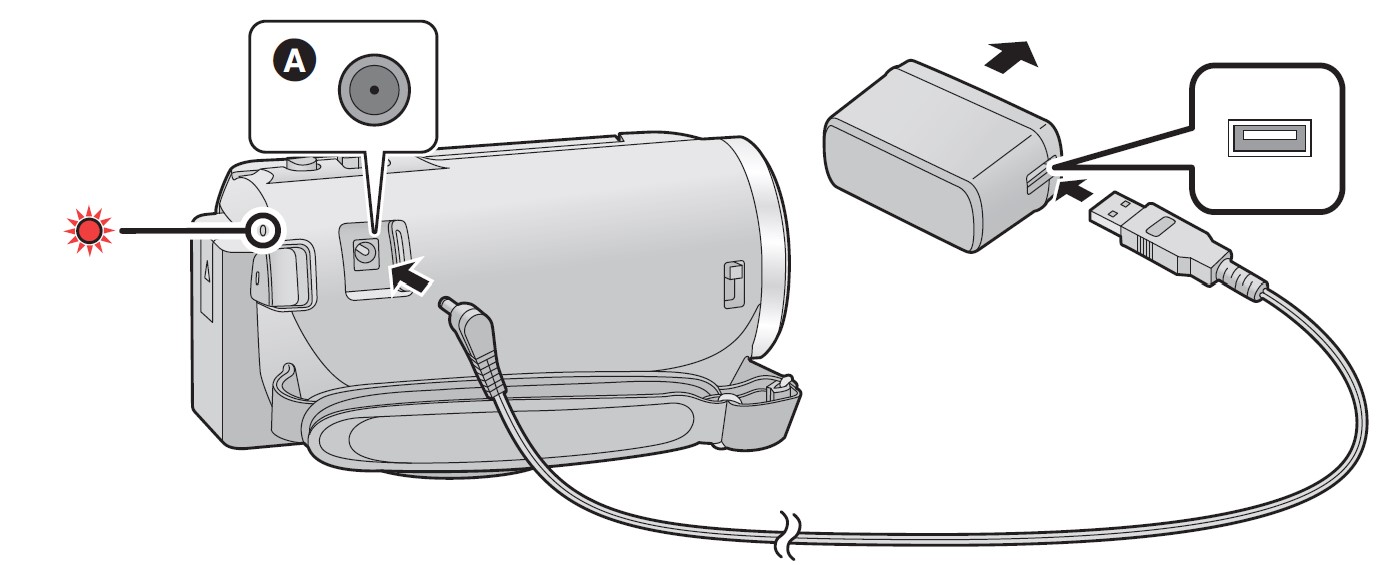 A: DC input terminal
- Connect the DC cable to the AC adaptor and to the DC input terminal of this unit.
- Insert the plugs as far as they will go.
- Insert the AC adaptor into an AC outlet.
- The status indicator will flash red at an interval of approximately 2 seconds (approximately 1 second on, approximately 1 second off), indicating that charging has begun. It will turn off when the charging is completed.
Connecting to the AC outlet
It is possible to use this unit with power supplied from the AC outlet by turning on the unit with the AC adaptor connected.
Even when you use the AC adaptor for recording images, keep the battery connected.
This allows you to continue the recording even if a power failure occurs or the AC adaptor is unplugged from the AC outlet by accident.
To charge by connecting to other device
It is possible to charge by connecting to another device with the USB cable (supplied).
Charging/Recording time
- Temperature: 25 degrees C (77 degrees F)/Humidity: 60%RH
- Charging times in parentheses are when charging from the USB terminal.

- “h” is an abbreviation for an hour, “min” for a minute, and “s” for a second.
- These times are approximations.
- The indicated charging time is for when the battery has been discharged completely.
Charging time and recordable time vary depending on the usage conditions such as high/low temperature. - The actual recordable time refers to the recordable time when repeatedly starting/stopping recording, turning the unit on/off, moving the zoom lever, etc.
- The batteries heat up after use or charging. This is not a malfunction.
Recording to a card
The unit can record still pictures or motion pictures to an SD card. To record to an SD card, read the following.
Cards that you can use with this unit
Use SD cards conforming to Class 4 or higher of the SD Speed Class Rating* for motion picture recording.
* SD Speed Class Rating is the speed standard regarding continuous writing. Check via the label on the card, etc.
- Please check the latest information on the support website below. http://panasonic.jp/support/global/cs/e_cam (This website is in English only.)
- When using an SDHC Memory Card/SDXC Memory Card with other equipment, check the equipment is compatible with these Memory Cards.
- An Eye-Fi X2 series SD card is required to use functions related to Eye-Fi.
- We do not guarantee the operation of SD cards other than the ones above. Further, SD cards with a capacity of less than 32 MB cannot be used for motion picture recording.
- 4 GB or more Memory Cards that do not have the SDHC logo or 48 GB or more Memory Cards that do not have the SDXC logo are not based on SD Memory Card Specifications.
- When the write-protect switch A on the SD card is locked, no recording, deletion, or editing will be possible on the card.

- Keep the Memory Card out of reach of children to prevent swallowing.
Inserting/removing an SD card
When using an SD card not from Panasonic, or one previously used on other equipment, for the first time on this unit, format the SD card.
When the SD card is formatted, all of the recorded data is deleted. Once the data is deleted, it cannot be restored.
Caution: Check that the access lamp has gone off.
Access lamp [ACCESS] A
When this unit is accessing the SD card, the access lamp lights up.
- Open the SD card cover and insert (remove) the SD card into (from) the card slot B.
- Face the terminal side C in the direction shown in the illustration and press it straight in as far as it will go.
- Press the center of the SD card and then pull it straight out.
- Securely close the SD card cover.
- Securely close it until it clicks.
Turning the unit on/off
You can turn the unit on and off using the power button or by opening and closing the LCD monitor.
Turning the unit on and off with the power button
Open the LCD monitor and press the power button to turn on the unit.
To turn off the unit
Hold down the power button until the status indicator goes off.
A: The status indicator lights on.
Turning the unit on and off with the LCD monitor
The unit is turned on when the LCD monitor is opened, and the unit is turned off when it is closed.
During normal use, opening and closing of the LCD monitor can be conveniently used to turn the unit on/off.
- The unit will not turn off while recording motion pictures even if the LCD monitor is closed.
- In the following cases, opening the LCD monitor does not turn on the unit. Press the power button to turn on the unit.
- When the unit was originally purchased
- When you have turned off the unit using the power button
Selecting a mode
You can switch this unit between Recording Mode (Motion Picture Recording Mode/Still Picture Recording Mode) and Playback Mode by pressing the recording/playback button.
If you touch the recording mode switching icon in Recording Mode, this unit can be switched between Motion Picture Recording Mode and Still Picture Recording Mode.
Switching this unit between Recording Mode and Playback Mode
Recording/playback button
Press the button to switch this unit between Recording Mode and Playback Mode.
- When you turn on this unit, it starts up in Recording Mode.
Switching this unit between Motion Picture Recording Mode and Still Picture Recording Mode
Touch the recording mode switching icon displayed on the LCD monitor (touch screen) to switch this unit between Motion Picture Recording Mode and Still Picture Recording Mode.
- Press the recording/playback button to switch this unit to Recording Mode.


- The recording mode switching icon A is displayed on the screen.
- Touch the recording mode switching icon.
To display the recording mode switching icon
The display of the recording mode switching icon will disappear when no touch operation is performed for a specific period of time. To display it again, touch the screen.
How to use the touchscreen
You can operate by directly touching the LCD monitor (touch screen) with your finger.
Touch
Touch and release the touch screen to select an icon or picture.
- Touch the center of the icon.
- Touching the touch screen will not operate while you are touching another part of the touch screen.
Slide while touching
Move your finger while pressing on the touch screen.
About the operation icons
![]() /
/![]() /
/![]() /
/![]() :
:
Touch when changing a page or performing settings.![]() :
:
Touch to return to the previous screen.
Setting date and time
The clock is not set at the time of purchase. Make sure to set the clock.
- When you turn on this unit, the message “Set home region and date/time.” may be displayed. Select [YES], and follow the steps below to make these settings:
- Step 3 of [SET WORLD TIME]
- Steps 2–3 of “Setting date and time”
- Select the menu.
MENU –> [SETUP] –> [CLOCK SET] - Touch the date or time to be set, then set the desired value using
 /
/ .
.
A: Displaying the World Time setting: [HOME]/
 [DESTINATION]
- The year can be set between 2000 and 2039.
- Touch [ENTER].
- Touch [EXIT] to complete the setting.
Note:
- The date and time function is driven by a built-in lithium battery.
- If the time display becomes [- -], the built-in lithium battery needs to be charged. To recharge the built-in lithium battery, connect the AC adaptor or attach the battery to this unit. The battery is still being recharged even if the unit is off. Leave the unit as it is for approx. 24 hours and the battery will maintain the date and time for approx. 4 months.
Before recording
Basic camera positioning
- Hold the unit with both hands.
- Put your hand through the grip belt.
- It is convenient to use the Recording button icon A when holding the unit at waist level.
- When recording, make sure your footing is stable and there is no danger of colliding with another person or object.
- When you are outdoors, record pictures with the sunlight behind you. If the subject is backlit, it will become dark in the recording.
- Keep your arms near your body and separate your legs for better balance.
- Do not cover the microphones with your hand etc.
Basic motion picture recording
- The unit should normally be held steady when recording.
- If you move the unit when recording, do so slowly, maintaining a constant speed.
- The zoom operation is useful for recording subjects you cannot get close to, but overuse of zoom in and zoom out can make the resulting motion picture less enjoyable to watch.
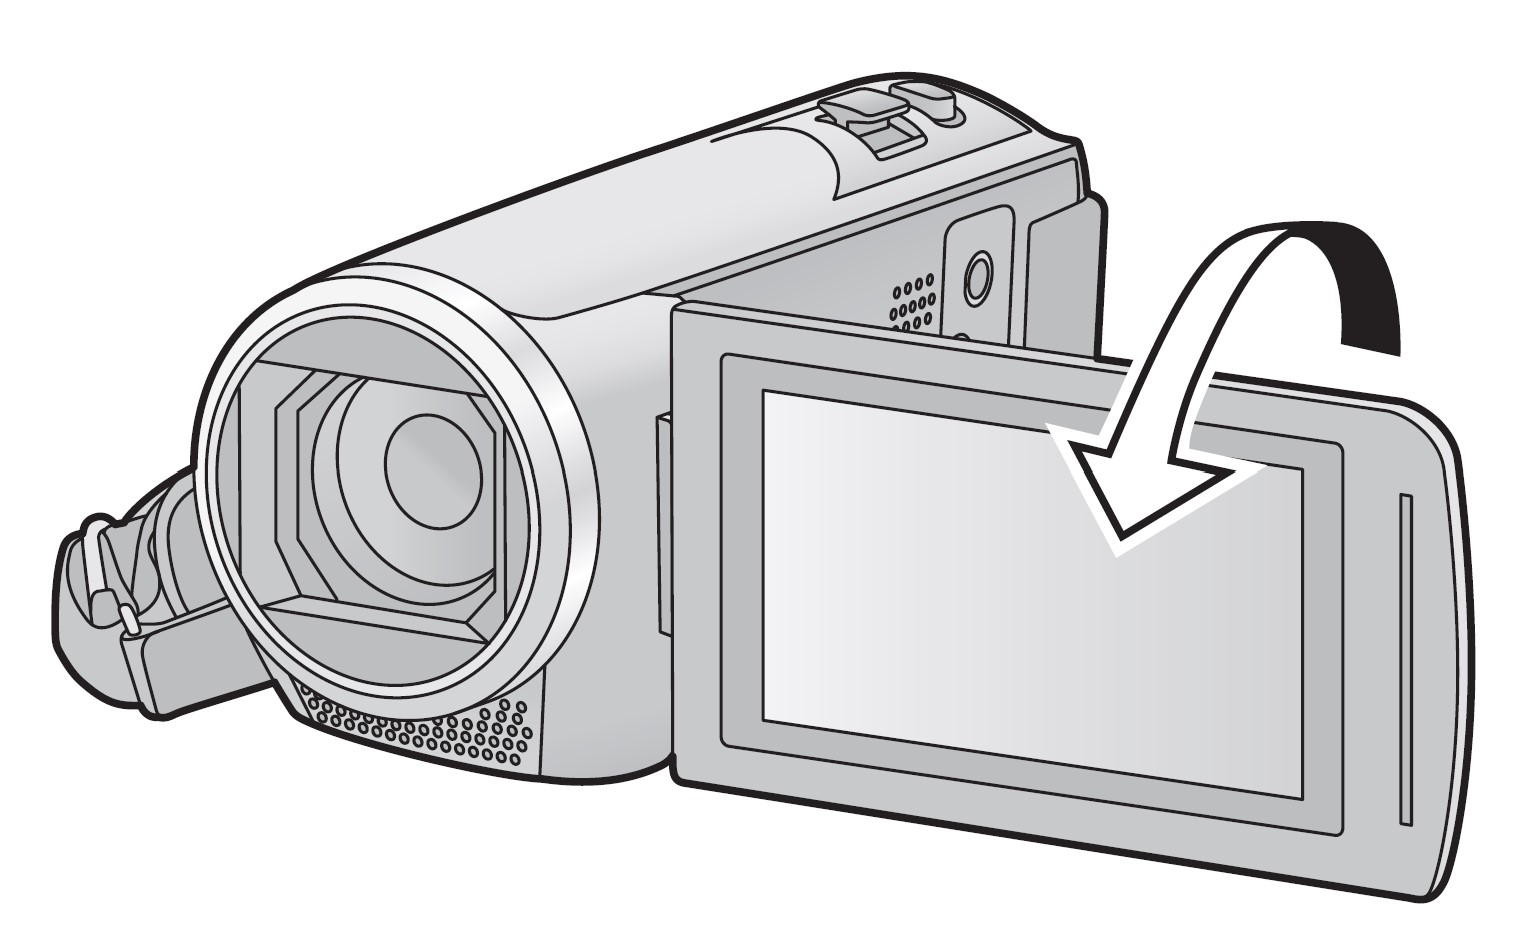
Recording Yourself
Rotate the LCD monitor towards the lens side.
- The image is horizontally flipped as if you see a mirror image.
(However, the image recorded is the same as a normal recording.) - Only some indications will appear on the screen. When
 appears, return the direction of the LCD monitor to the normal position and check the warning/alarm indication.
Recording motion pictures
Open the lens cover before turning on the unit.
- Open the LCD monitor, and set this unit to Motion Picture Recording Mode.
- Press the recording start/stop button to start recording.

- Press the recording start/stop button again to pause the recording.
- Recording can also be started/stopped by touching the recording button icon.
Screen indications in the Motion Picture Recording Mode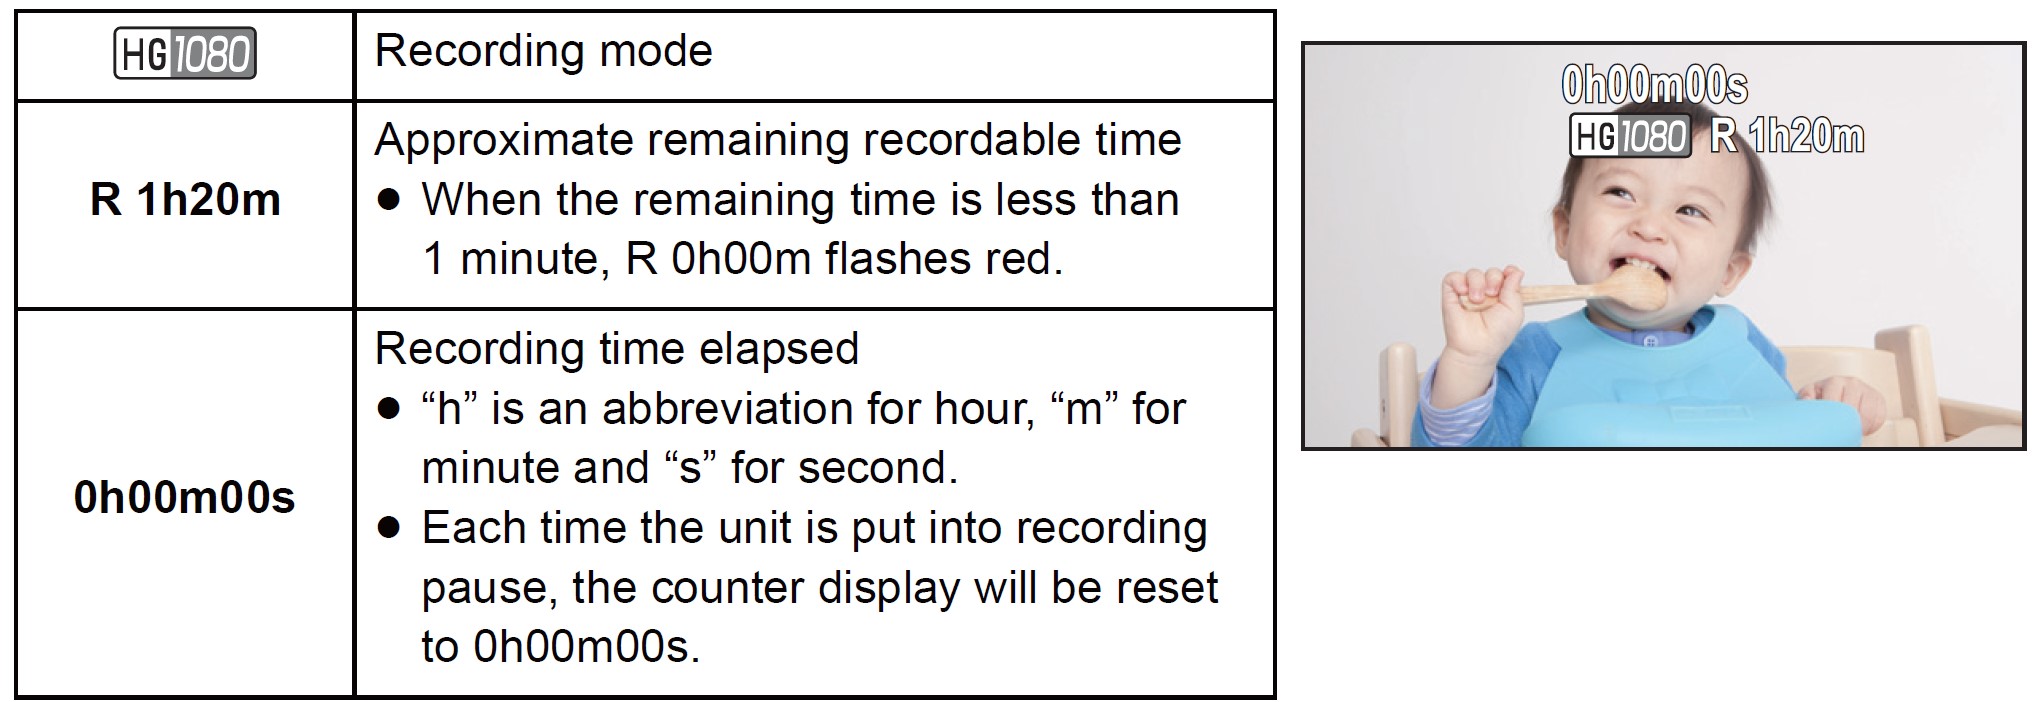
- The screen display will disappear when no touch operation is performed for a specific period of time.
To display it again, touch the screen. - It will be constantly displayed when the remaining recordable time becomes less than 30 minutes.
Note:
- If the recording/playback button is pressed during motion picture recording, the recording will stop and this unit will be switched to Playback Mode.
- To change the recording format, change the [REC FORMAT] or [REC MODE].
- The Still pictures can be recorded while recording the motion picture.
- The images recorded between pressing the recording start/stop button to start recording and pressing it again to pause recording become one scene.
When you record with the [REC FORMAT] set to [MP4/iFrame], the scenes longer than approximately 20 minutes will be automatically divided. (Recording will continue.) - (Maximum recordable scenes of a single SD card)

- A maximum number of recordable scenes and a maximum number of different dates will be less than the above table when there are both MP4/iFrame scenes and still pictures recorded on an SD card.
- While recording is in progress, the recording will not stop even if the LCD monitor is closed.
- Please refer to page 133 for details about approximate recordable time.
- The maximum remaining recordable time that can be displayed for motion picture recording is 99 hours and 59 minutes. Any remaining recordable time exceeding 99 hours and 59 minutes will be displayed as “R99h59m+”. This display remains unchanged until the remaining recordable time drops to 99 hours and 59 minutes or less.
Recording still pictures
Open the lens cover before turning on the unit.
- Open the LCD monitor, and set this unit to Still Picture Recording Mode.
- Press
 the button halfway. (For Auto Focus only)
Focus indication:
- A Focus indication:
- (The white lamp flashes.): Focusing
- (The green lamp lights up.): When in focus No mark: When focusing is unsuccessful.
- B Focus area (area inside brackets)
- A Focus indication:
- Press the
 button fully.
- If you set the Optical Image Stabilizer function to
 ([MODE1]), then the Image Stabilizer function will be more effective. (
 (MEGA Optical Image Stabilizer) will be displayed when the
  button is pressed halfway.)
 - Using a tripod is recommended when recording still pictures in dark places because the shutter speed becomes slow.
- You can also take a picture just by touching the subject to focus.
- The still picture recording time may be long depending on the picture size
- The focus indication and the focus area may not be displayed depending on the recording conditions or the menu settings.
About the screen indications in Still Picture Recording Mode
- The screen display will disappear when no touch operation is performed for a specific period of time. To display it again, touch the screen.
- It will be constantly displayed when the remaining number of still pictures that can be recorded becomes 200 or less.
About the focus area
When there is a contrasting object ahead or behind the subject in the focus area, the subject may not be focused. If so, move the contrasting object out of the focus area.
Troubleshooting
It is not a malfunction in the following cases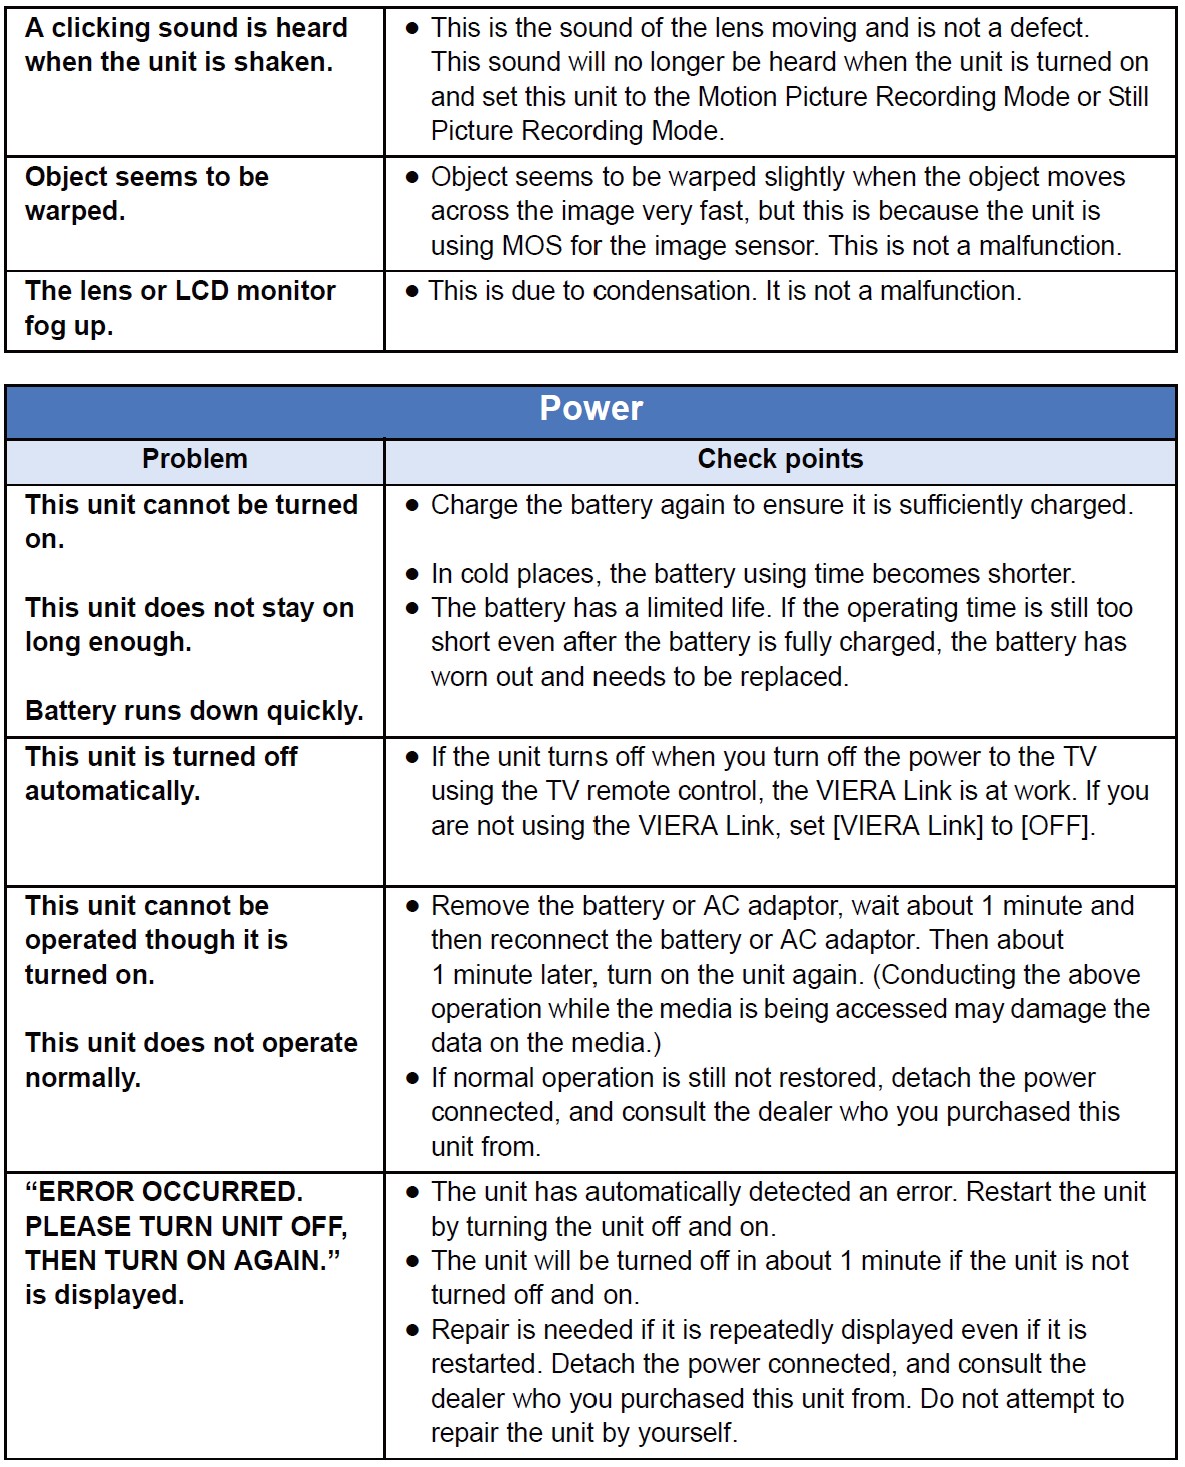


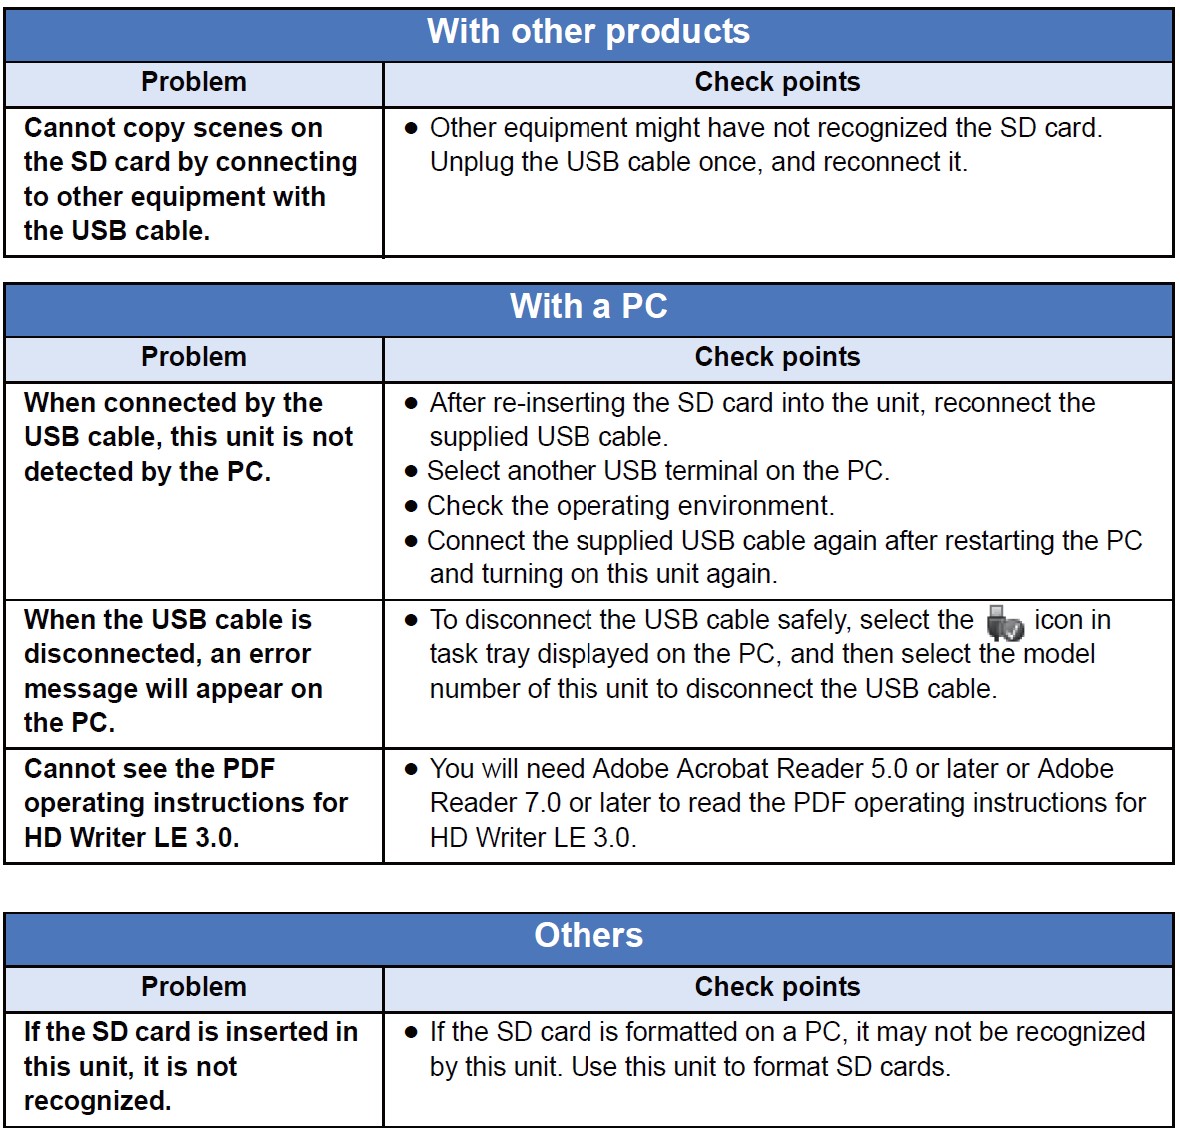
If AVCHD scenes do not change smoothly when played back on another device
The images may be still for several seconds at the joins between the scenes if the following operations are performed when multiple scenes have been continuously played back using another unit.
- Just how smoothly the scenes will be played back depends on the playback unit. Depending on the unit used, the images may stop moving and become still for a moment even when none of the following conditions are applicable.
- A continuous recording of motion picture data that exceeds 4 GB may momentarily stop at every 4 GB of data when played back with another device.
- It may not play back smoothly when the editing of scenes is done with the HD Writer LE 3.0, but it will play back smoothly if you set the seamless settings in the HD Writer LE 3.0. Refer to the operating instructions for the HD Writer LE 3.0.
Support:
Panasonic Corporation
Web site: http://www.panasonic.com
FAQS About Panasonic HC-V180 Full HD Video Camera Camcorder
The Panasonic HC-V180 has what size of a sensor?
1/5.8-inch
Are there any microphones on the Panasonic HC-V180?
This has a Zoom Microphone and a Stereo Microphone.
Can the Panasonic HC-V180 see at night?
Improved low light performance with a backlit (BIS) sensor night vision camcorder.
Is the HDMI on the Panasonic HC V180K clean?
You can indeed get a clear HDMI output.
How much does an HD Panasonic video camera cost?
Black HC-V180 Panasonic Camcorder camera Rs. 21,998
What is the night vision setting?
Utilize this option in low-light situations to pull features out of the shadows and take photographs that are colorful and have more accurate color.
Has the Panasonic HC V180 WiFi?
The absence of WiFi
Panasonic produces their own sensors, right?
As a result, Panasonic is selling its semiconductor business to Taiwan’s Nuvoton Technology after 57 years in the sensor industry. Nuvoton Technology is a foundry that creates integrated circuits such microcontrollers, controllers, solid state amplifiers, and bespoke ARM processors.
What recording settings are available on a Panasonic camcorder?
Maximum Quality, 1 hour each disc with XP. SP: 2 hours on each disc, good quality. EP: Low Quality, 8 hours or less per disc.
What is the best way to transfer data from my Panasonic camera?
There are two ways to get your data off the Panasonic camera. Either remove the SD card and connect it directly to your PC.
For more manuals by Panasonic, Visit Manualsdock
[embeddoc url=”https://manualsdock.com/wp-content/uploads/2023/09/Panasonic-HC-V180-Full-HD-Video-Camera-Camcorder-Owner-Manual.pdf” download=”all”]

