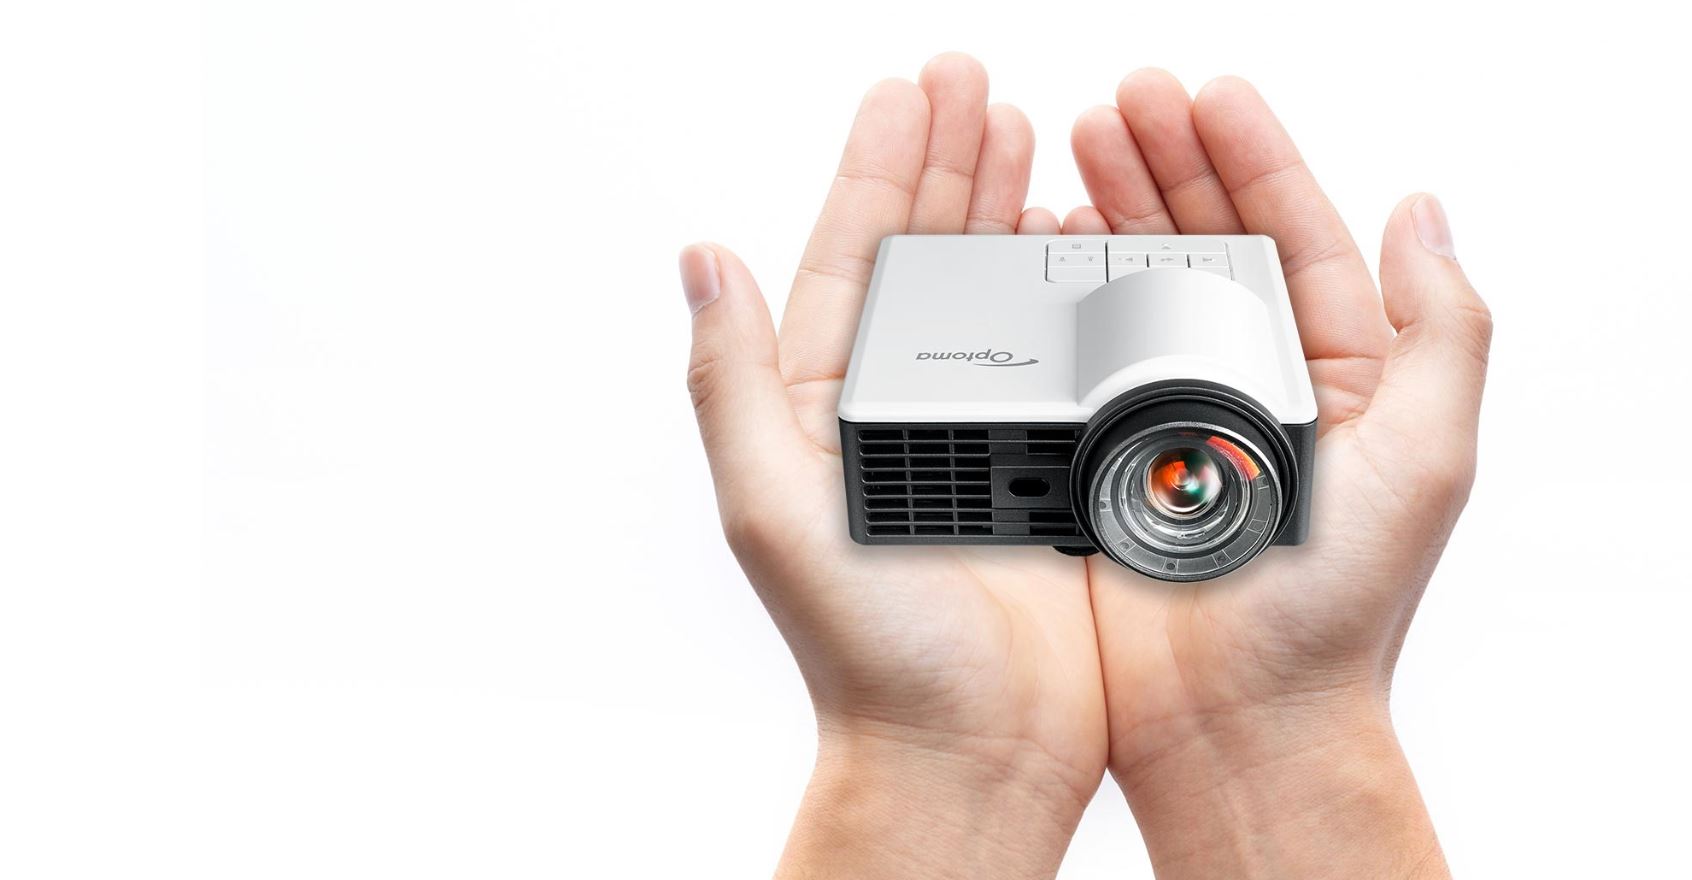
Optoma ML1050ST Portable LED Projector
About Optoma
Optoma is a well-known manufacturer of audiovisual and projection equipment, primarily focusing on projectors and related products. The company, officially known as Optoma Corporation, was founded in 2002 and is headquartered in Taiwan. Over the years, Optoma has established a strong presence in the global projector market and is recognized for its diverse range of projectors, from home entertainment and business projectors to professional and installation-grade models.
Safety Instructions
WARNING: TO REDUCE THE RISK OF FIRE OR ELECTRIC SHOCK, DO NOT EXPOSE THIS APPLIANCE TO RAIN OR MOISTURE. DANGEROUS HIGH VOLTAGES ARE PRESENT INSIDE THE ENCLOSURE. DO NOT OPEN THE CABINET. REFER SERVICING TO QUALIFIED PERSONNEL ONLY.
Class B emissions limits
This Class B digital apparatus meets all requirements of the Canadian Interference-Causing Equipment Regulations.
Important Safety Instruction
- Do not block any ventilation openings. To ensure the reliable operation of the projector and to protect it from overheating, it is recommended to install the projector in a location that does not block ventilation. As an example, do not place the projector on a crowded coffee table, sofa, bed, etc. Do not put the projector in an enclosure such as a bookcase or a cabinet that restricts airflow.
- Do not use the projector near water or moisture. To reduce the risk of fire and/or electric shock, do not expose the projector to rain or moisture.
- Do not install near heat sources such as radiators, heaters, stoves, or any other apparatus such as amplifiers that emit heat.
- Clean only with a dry cloth.
- Only use attachments/accessories specified by the manufacturer.
- Do not use the unit if it has been physically damaged or abused.
Physical damage/abuse would be (but not limited to):
- The unit has been dropped.
- The power supply cord or plug has been damaged.
- Liquid has been spilled onto the projector.
- The projector has been exposed to rain or moisture.
- Something has fallen in the projector or something is loose inside.
Do not attempt to service the unit yourself. Opening or removing covers may expose you to dangerous voltages or other hazards. Please call Optoma before you send the unit for repair.
- Do not let objects or liquids enter the projector. They may touch dangerous voltage points and short out parts that could result in fire or electric shock.
- See projector enclosure for safety-related markings.
- The unit should only be repaired by appropriate service personnel.
Intended Use Statement
Operation temperature:
- For 0 – 2500 ft, 5 °C ~ 40 °C
- For 2500 – 5000 ft, 5 °C ~ 35 °C
- For 5000 – 10000 ft, 5 °C ~ 30 °C
Maximum Humidity:
- Operating: 10%~80%RH (Max.), Non-condensing
- Storage: 5%~95% RH, Non-condensing
The ambient operating environment should be free of airborne smoke, grease, oil, and other contaminants that can affect the operation or performance of the projector. Use of this product in adverse conditions will void the product warranty.
Safety Information
Please read, understand, and follow all safety information contained in these instructions before the use of this projector. Retain these instructions for future reference.
Warning
To reduce the risk associated with hazardous voltage: y Do not modify this product in any way. Do not attempt to service this projector.
- There are no user-serviceable parts. Service is to be performed only by an Optoma-authorized service provider using Optoma-approved system components. Do not use the wall power supply in a wet environment.
- Do not use with a damaged wall power supply. Replace damaged part before use.
To reduce the risk associated with fire and explosion:
- Do not immerse the projector in any liquid or allow either to get wet.
- Use only Optoma-approved power supply.
To reduce the risks associated with choking:
- Keep all small parts like the remote control battery away from young children and pets.
To reduce the risk associated with hazardous voltage, impact, tripping, and intense visible light:
- Do not use this projector around unsupervised children
To reduce the risk associated with environmental contamination:
- Dispose of all system components by applicable government regulations.
To reduce the risks associated with LED bright light:
- Do not stare directly into the projector lens.
To reduce the risks associated with tripping and falling:
- Position the charging cord and data cables so that they are not a tripping hazard.
Important Note: Do not expose the projector to direct sunlight in a closed space such as a vehicle.
SAVE THESE INSTRUCTIONS
Safety Labels
- Remote Control
- Model No. IR28012
Regulatory Notices
FCC STATEMENT – CLASS B
This equipment generates, uses, and can radiate radio frequency energy, and if not installed and used by the instruction manual may cause interference to radio communications. It has been tested and found to comply with the limits for a Class “B” computing device under Subpart B of Part 15 of the FCC Rules, which are designed to provide reasonable protection against such interference when operated in a residential installation. However, there is no guarantee that interference will not occur in a particular installation. If this equipment does cause harmful interference to radio or television reception, which can be determined by turning the equipment off and on, the user is encouraged to try to correct the interference by one or more of the following measures:
- Reorient or relocate the receiving antenna.
- Increase the separation between the equipment and the receiver.
- Connect the equipment to an outlet on a circuit different from that to which the receiver is connected.
- Consult the dealer or an experienced radio/TV technician for help.
NOTICE: This Class B digital apparatus complies with Canadian ICES-003.
Industry Canada regulatory information
Operation is subject to the following two conditions:
- this device may not cause interference, and
- this device must accept any interference, including interference that may cause undesired operation of the device.
The user is cautioned that this device should be used only as specified within this manual to meet RF exposure requirements. Use of this device in a manner inconsistent with this manual could lead to excessive RF exposure conditions.
INSTRUCTIONS TO USERS: This equipment complies with the requirements of FCC equipment provided that the following conditions are met. If the cables include an EMI ferrite core, attach the ferrite core end of the cable to the projector. Use the cables which are included with the projector or specified.
Introduction
Package Contents
Your projector comes with all the items shown below. Ensure that you have all the items, and contact your local reseller or service center if anything is missing.
- Projector
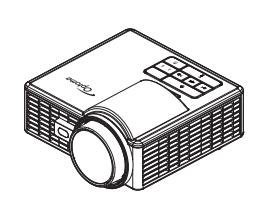
- Lens cap

- Power cable
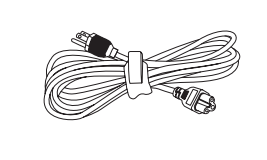
- AC adapter

- Universal 24-pin to VGA cable

- Basic user manual and documentation

- Carrying case

- Remote control
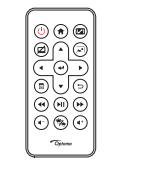
Note: The remote control is shipped with a battery.
About Your Projector
Main Unit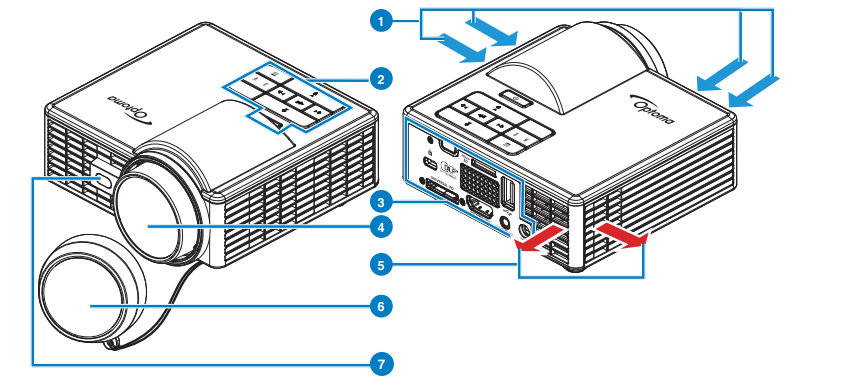

Note:
- Do not block the projector intake and exhaust vents.
- When operating the projector in an enclosed space, allow at least 15cm clearance around the intake and exhaust vents.
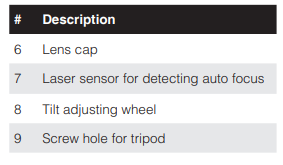
Input / Output Connections
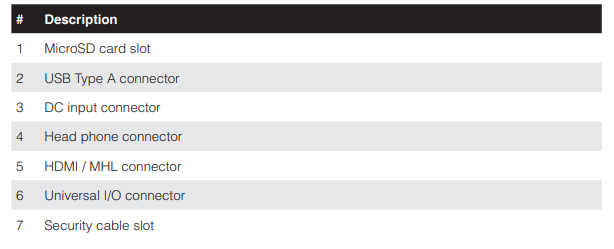
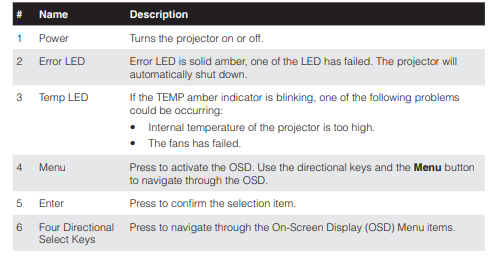
Control Panel
Remote Control

Installing the Remote Control Battery
- Remove the battery holder by holding down the side release firmly and pulling out the battery holder.

- Insert a CR2025 coin cell battery and align the polarity correctly according to the marking in the battery holder.

Note: When you use the remote control for the first time, there is a plastic sheet between the battery and its contact. Remove the sheet before use.
- Replace the battery holder.

Operating Range with Remote Control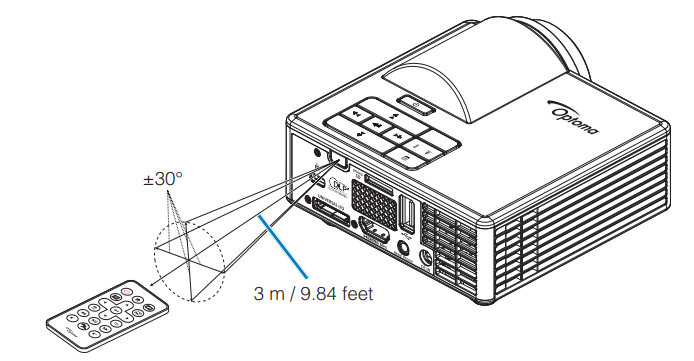
Note: The actual operating range may slightly differ from the diagram. Additionally, a weak battery reduces or eliminates the operating range of the remote control.
Installation
Connecting to a Computer
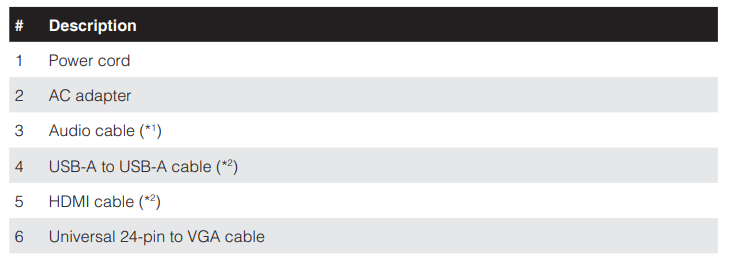
- (*1)The projector supports only TRS-type audio cables (without microphone function); with some headsets, due to the impedance difference, you might notice a slight difference in the volume levels (lower volume).
- (*2)The accessory is not shipped with your projector.
Connecting to a DVD Player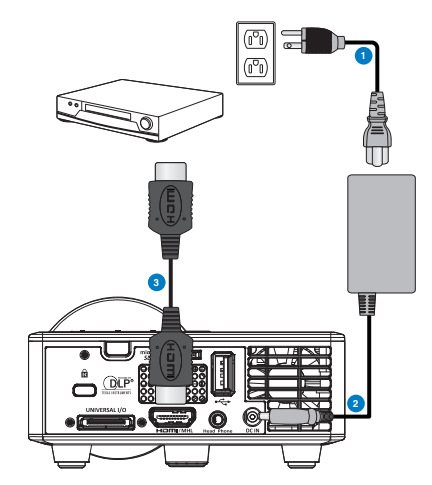

Note: (*2)The accessory is not shipped with your projector.
Connecting to Multi-Media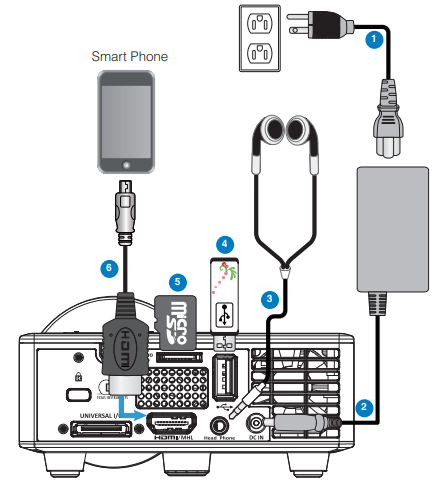
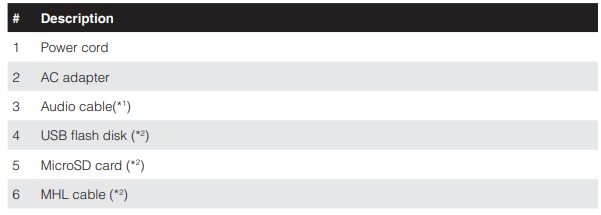
Note:
- (*1)The projector supports only TRS-type audio cables (without microphone function); with some headsets, due to the impedance difference, you might notice a slight difference in the volume levels (lower volume).
- (*2)The accessory is not shipped with your projector.
Turning On/Off the Projector
Turning Your Projector On
Note: Turn on the projector before you turn on the source (computer, DVD player, etc.). The Power button light blinks amber until pressed.
- Connect the power cord with the AC adapter and appropriate signal cables to the projector.
- Remove the lens cap.
- Press the Power
- Turn on your source (computer, DVD player, etc.).
- Connect your source to the projector using the appropriate cable.
- The input source is determined by the last connected input source. (By default, the input source of the projector is set to Multimedia). Change the input source of the projector if necessary.
Turning Your Projector Off
Note: The “Press Power Button to Turn Off Projector” message will appear on the screen. The message disappears after 5 seconds or you can press the Menu button to clear it.
- Press the Power Follow the instructions displayed on the screen to properly turn off the projector.
- Press the Power button again. The cooling fans continue to operate for 3~5 seconds.
- Disconnect the power cord and AC adapter from the electrical outlet and the projector.
User Controls
Using the On-Screen Display
- The projector has a multi-language On-Screen Display (OSD) Menu that can be displayed with or without an input source.
- Press the Menu button on the control panel or the remote control to enter the Main Menu.
- To select an option, press the buttons on your projector’s control panel or remote control.
- Use the buttons on the control panel or remote control to adjust the settings.
- To exit the OSD, press the Menu button directly on the control panel or the remote control.
How to set up File Type for Multi-Media with USB
Note:
- A USB flash disk must be plugged into the projector if you want to use the multimedia USB function.
- Please don’t connect the USB port for the camera since it would be exist compatibility problem.
Follow these steps to playback the Photo, Video, or Music files on your projector:
- Connect the power cable with the AC adapter and turn on the projector by pressing the Power button.

- Plug in a USB flash disk to your projector.
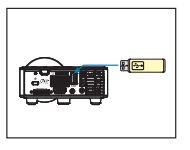
The Multi-Media menu opens
Note: To open the Main Menu, press the Menu button on the remote control or long press for 1 second the Menu button on the control panel of the projector. - Select the HD Media menu. The HD Media menu opens.

- Access the USB menu and select the multimedia files: Photo, Video, or Music. Or select the Settings option to change settings for Photo, Video, or Music.
- Select the file you want to open.
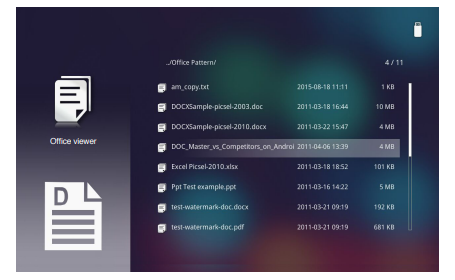
Note: The maximum allowed file name length is 28 characters.
Note: The maximum allowed file name length is 28 characters.
How to set up File Type for Multi-Media with MicroSD
Note: A microSD card must be plugged into the projector if you want to use the multimedia microSD function.
Follow these steps to playback the Photo, Video, or Music files on your projector:
- Connect the power cable with the AC adapter and turn on the projector by pressing the Power button.

- Plug in a MicroSD card to your projector.
 The Multi-Media menu opens.
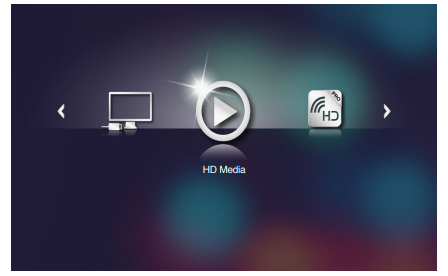
Note: To open the Main Menu, press the Menu button on the remote control or long press for 1 second the Menu button on the control panel of the projector. - Select the HD Media menu. The HD Media menu opens

- Access the SD Card menu and select the multimedia files: Photo, Video, or Music. Or select the Settings option to change settings for Photo, Video, or Music.
- Select the file you want to open.
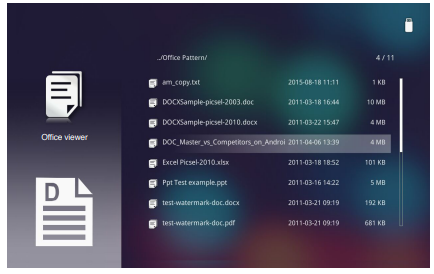
Note: The maximum allowed file name length is 28 characters
How to set up File Type for Multi-Media with Internal Memory
Note: A microSD card must be plugged into the projector if you want to use the multimedia microSD function.
Follow these steps to playback the Photo, Video, or Music files on your projector:
- Connect the power cable with the AC adapter and turn on the projector by pressing the Power button.

The Multi-Media menu opens. NOTE To open the Main Menu, press the Menu button on the remote control or long press for 1 second the Menu button on the control panel of the projector.
 - Select the HD Media menu. The HD Media menu opens
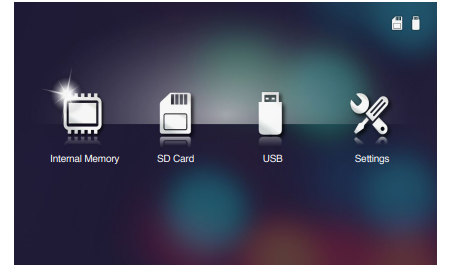
- Access the Internal Memory menu and select the multimedia files: Photo, Video, or Music. Or select the Settings option to change settings for Photo, Video, or Music.
- Select the file you want to open.
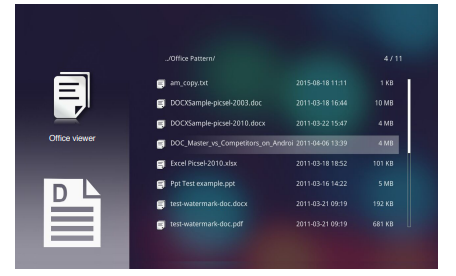
Troubleshooting
If you experience problems with your projector, see the following troubleshooting tips. If the problem persists, contact your local reseller or service center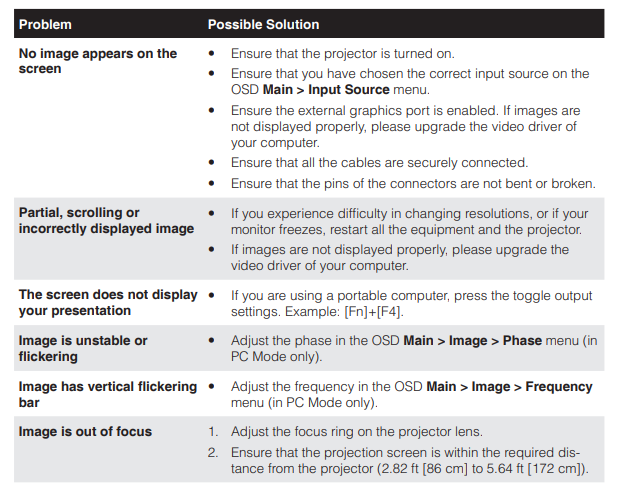

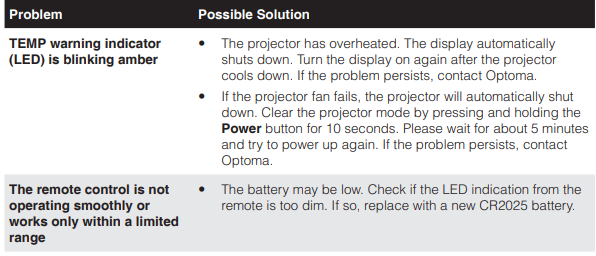

Note: If there is a fan failure, the TEMP LED will blink amber (2 sec on / 0.5 sec off). -If the projector fan fails, the projector will automatically shut down. Reset the projector mode by pressing and holding the Power button for 10 seconds. Please wait for about 5 minutes and try to power up again.
Compatibility Modes (HDMI/VGA)
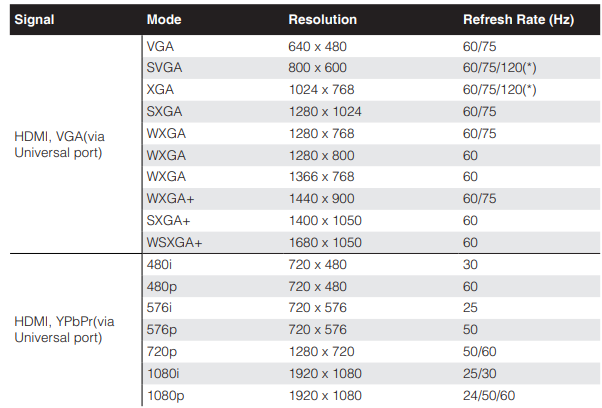
Note: (*)3D timing for TI DLP 3D.
Tripod Mount the Projector
Screw a standard tripod into the screw hole on the projector.
Note: Please note that damage resulting from incorrect installation will void the warranty.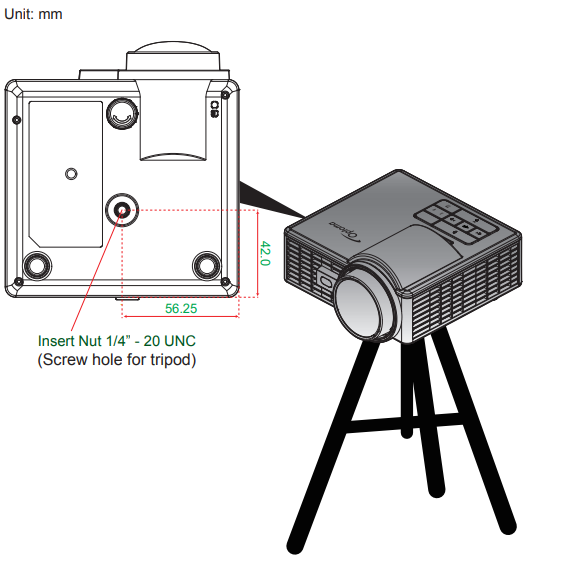
Specification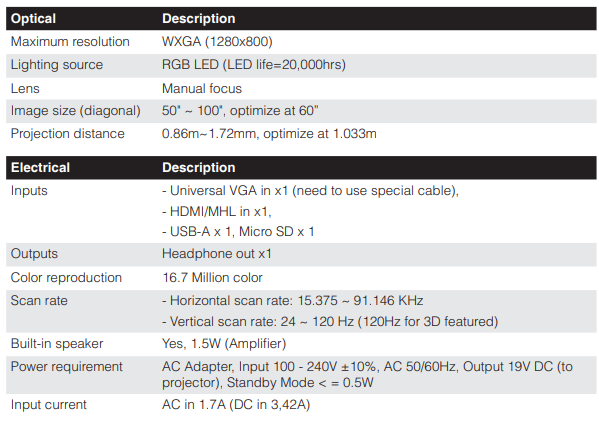
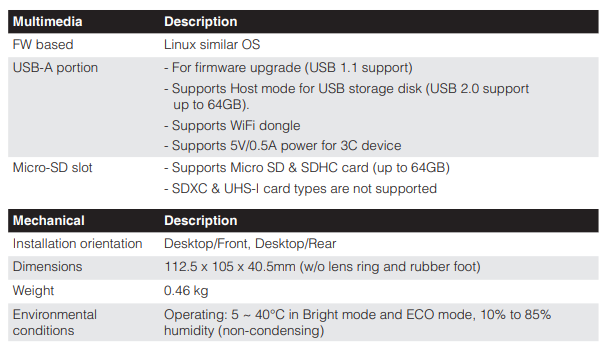
Note: All specifications are subject to change without notice.
FAQS About Optoma ML1050ST Portable LED Projector
My Optoma projector won’t turn on; why?
Make that the projector is connected to a functioning outlet properly.
Do Optoma projectors perform well?
It is bright and boasts the second-best DLP projector contrast ratio that we have examined.
Which Optoma projector model do I own?
On the casing of every Optoma projector is a serial number.
What is the Optoma projector’s wattage?
240 Watt
How long does a projector bulb from Optoma last?
4,000/10,000/15,000 hours
Why doesn’t my projector produce light?
Look to see if the lamp is broken, burned out, or improperly fitted.
Has the Optoma projector sound?
To send sound to the projector, you must choose the Optoma speaker on your laptop.
Which nation’s trademark is Optoma?
Taiwan
What is the Optoma projector’s resolution?
4K UHD
What is the largest screen that an Optoma projector can produce?
You may produce a sizable image of up to 300″*.
For more manuals by Optoma, Visit Manualsdock
[embeddoc url=”https://manualsdock.com/wp-content/uploads/2023/09/Optoma-ML1050ST-Portable-LED-Projector-User-manual.pdf” download=”all”]

