
Optoma EH200ST Full 3D 1080p 3000 Lumen DLP Short Projector
About Optoma
Optoma is a well-known manufacturer of audiovisual and projection equipment, primarily focusing on projectors and related products. The company, officially known as Optoma Corporation, was founded in 2002 and is headquartered in Taiwan. Over the years, Optoma has established a strong presence in the global projector market and is recognized for its diverse range of projectors, from home entertainment and business projectors to professional and installation-grade models.
Package Overview
Unpack and inspect the box contents to ensure all parts listed below are in the box. If something is missing, please contact Optoma customer service.
Standard Accessories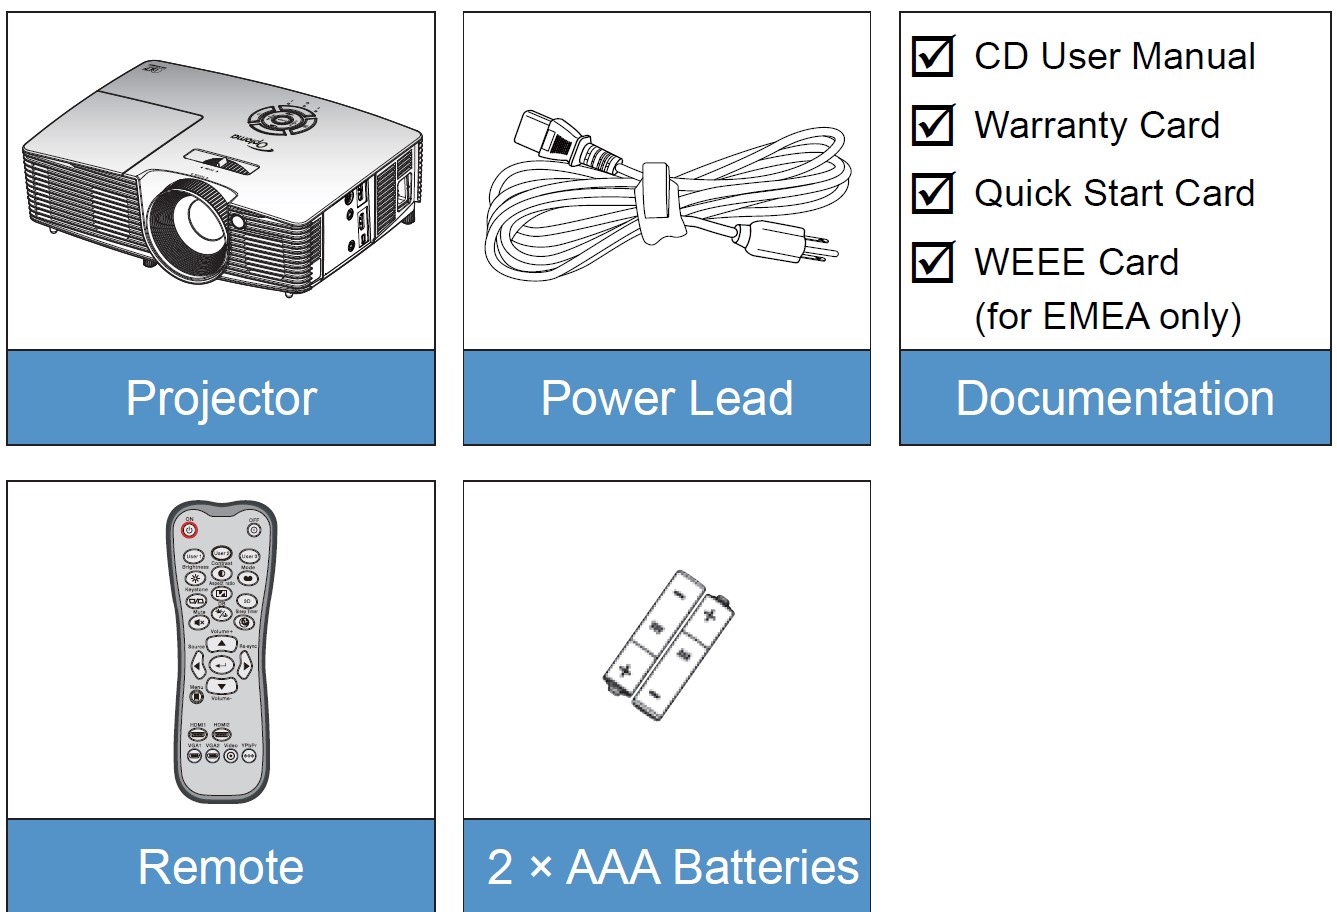
Optional Accessories
Product Overview
Main Unit
- Lens
- IR Receiver
- Keypad
- Input / Output Connections
- Power Socket
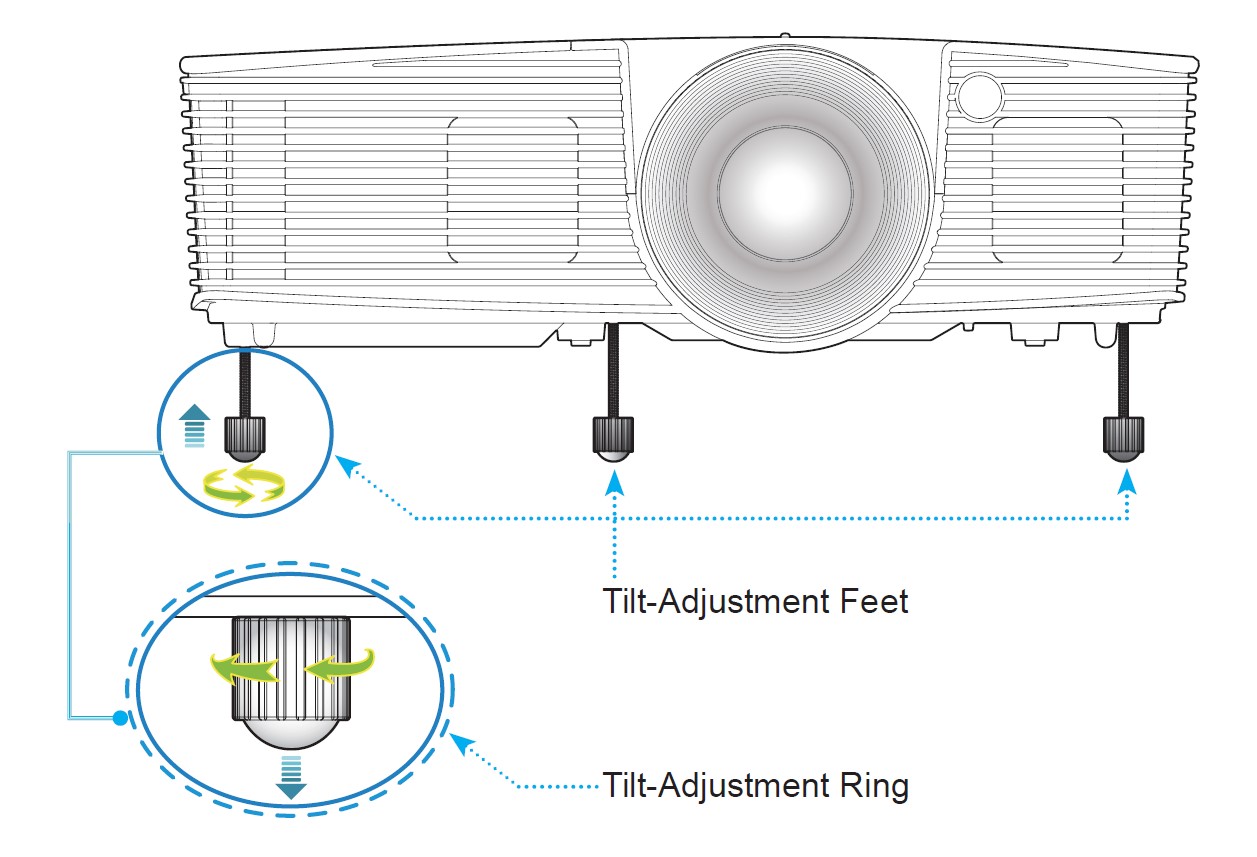
- Tilt-Adjustment Feet
- Lens Cap (*)
- Speaker
- Zoom Lever
- Focus Ring
- Lamp Cover
- Ventilation (inlet)
- Ventilation (outlet)
- KensingtonTM Lock Port
Keypad
- Source
- Enter
- Keystone Correction
- Re-Sync
- Menu
- Help
- Lamp LED
- On/Standby LED
- Power
- Temp LED
- Four Directional Select Keys
Input/Output Connections
- 12V Trigger Relay (12V, 250mA, 3.5mm mini jack)
- 3D Sync Out (5V) connector
- HDMI 1/ MHL connector
- Security Bar
- Audio Out connector (3.5mm mini jack)
- HDMI 2 connector
- USB-B mini connector (Firmware upgrade)
- Power Socket
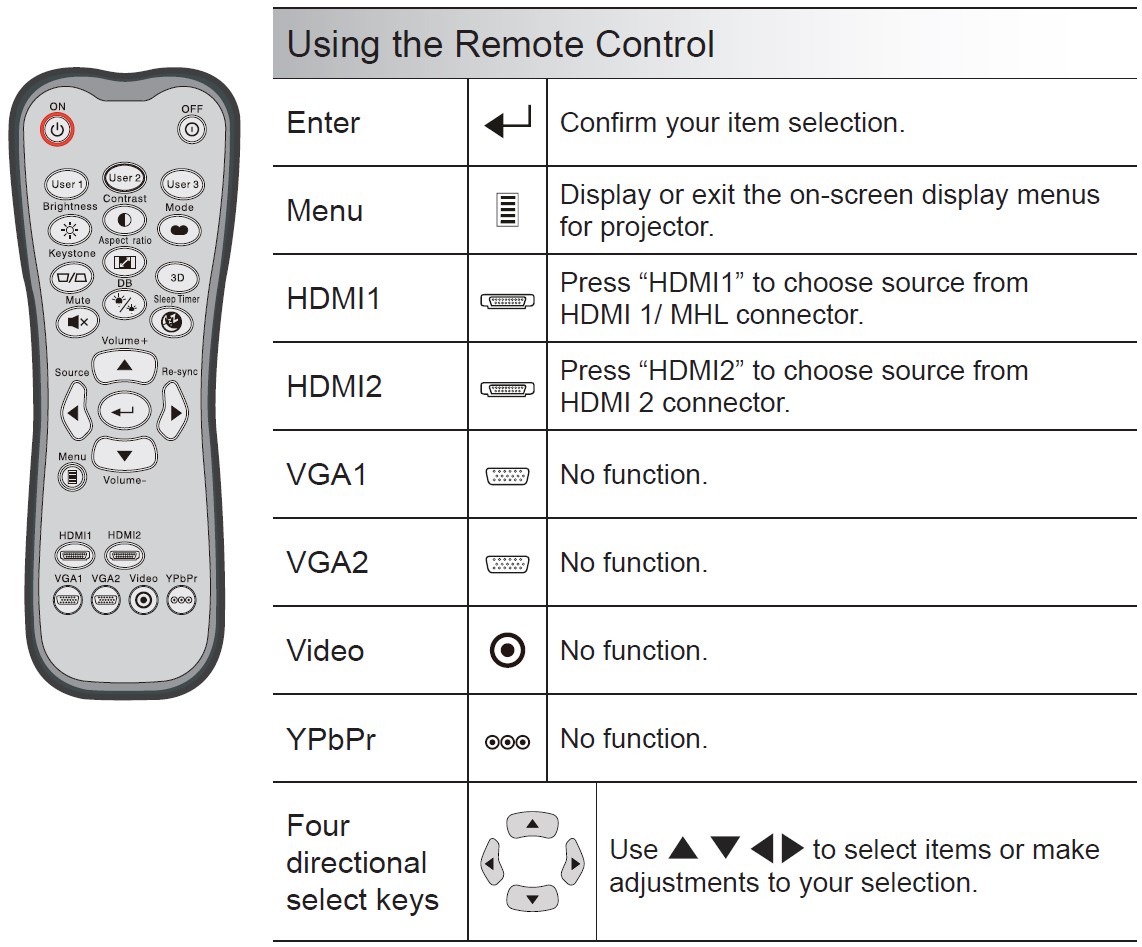
Remote Control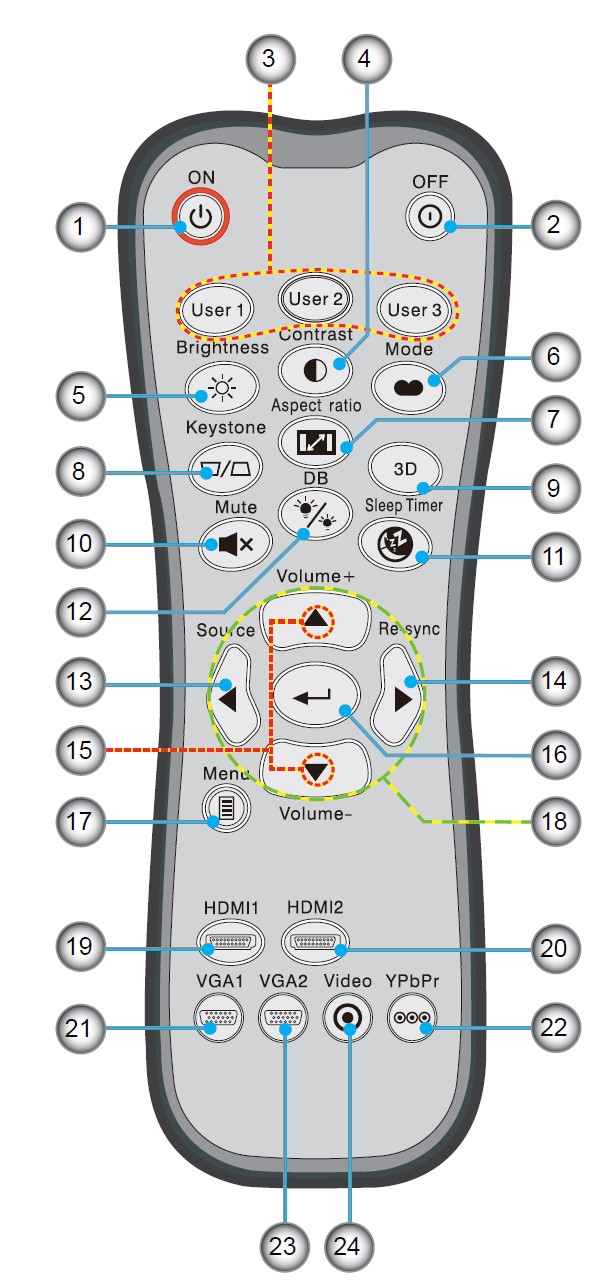
- Power On
- Power Off
- User 1/User 2/User 3
- Contrast
- Brightness
- Display mode
- Aspect ratio
- Keystone
- 3D
- Mute
- Sleep timer
- Dynamic black
- Source
- Re-sync
- Volume+/-
- Enter
- Menu
- Four directional select keys
- HDMI1
- HDMI2
- VGA1
- YPbPr
- VGA2
- Video
Connecting to the Projector
Connecting a Computer/Notebook
- *12V DC plug
- *3D emitter cable
- *HDMI cable
- Power cord
- *Audio out cable
- *USB cable
Connecting a Video source
DVD player, Blu-ray player, Set-top box, HDTV receiver, Games console
- *12V DC plug
- *3D emitter cable
- *MHL cable (MicroUSB to HDMI)
- Power cord
- *Audio out cable
- *HDMI cable
Connect to 3D Video Devices
Once you have connected your devices together with HDMI cables, as shown in the diagram, you are ready to begin. Power ON your 3D video source and your 3D projector.
PlayStation® 3 Games
- Make sure that you have updated your console to the latest software version.
- Go to the “Settings menu -> Display settings -> Video output -> HDMI”. Select “Automatic” and follow the on-screen instructions.
- Insert your 3D game disc. Alternatively, you can download games (and 3D updates) via the PlayStation® network.
- Launch the game. In the in-game menu, select “Play in 3D”.
Blu-ray 3D™ Player
- Make sure that your player can support 3D Blu-ray™ discs and that 3D output is enabled.
- Insert the 3D Blu-ray™ disc into the player, and press “Play”.
3D TV (e.g. SKY 3D, DirecTV)
- Contact your TV service provider to enable any 3D channels on your channel package.
- Once enabled, switch to the 3D channel.
- You should see two images side-by-side.
- Switch to the “SBS Mode” of the 3D projector. The option is located in the “Display” section of the projector OSD menu.
3D Device (e.g. 3D DV/DC) with 2D 1080i side by side signal output
- Connect your 3D device and switch to out 3D content with 2D side-by-side output to 3D Projector.
- You should see two images side-by-side.
- Switch to the “SBS Mode” of the 3D projector. The option is located in the “Display” section of the projector OSD menu.
If watching 3D content from an HDMI 1.4a source (e.g. 3D Blu-ray) your 3D glasses should always be in sync. If watching 3D content from an HDMI 1.3 source (e.g. 3D broadcast using SBS mode) it may be necessary to use the projector’s 3D Sync-Invert option to optimize your 3D experience. The option is located in the “Display ->3D” section of the projector OSD menu.
Using the 3D glasses
- To turn ON 3D glasses.
- Verify that 3D content is being sent to the projector and that the signal is compatible with projector specifications.
- Turn on the “3D Mode” (Off/DLP-Link/VESA 3D – depending on which type of glasses you are using) of the 3D projector. The option is located in the “Display” section of the projector OSD menu.
- Turn on 3D glasses and verify image appears in 3D without eyestrain.
- If the image does not appear in 3D, please check 3D device is set up correctly to send out a 3D image or not. Or “SBS Mode” should turn on when the input signal is 2D 1080i side-by-side and repeat previous steps 1 ~ 4.
- It may be necessary to use the projector’s “3D Sync-Invert” option to optimize your 3D experience. The option is located in the “Display” section of the projector OSD menu. To turn OFF 3D glasses: Press the “Power” button and hold until the LED switches off.
- For more detailed information, please refer to the 3D glasses user’s guide, or manufacturer’s Website.
Powering On/Off the Projector
Powering On the Projector
- Remove the lens cap. 1
- Securely connect the power cord and signal cable. When connected, the On/Standby LED will turn Amber.
- Turn on the lamp by pressing the
 button either on the top of the projector or on the remote. The On/Standby LED will now turn Green. 2
The startup screen will display in approximately 10 seconds. The first time you use the projector, you will be asked to select the preferred language and power-saving mode. - Turn on and connect the source that you want to display on the screen (computer, notebook, video player, etc.). The projector will detect the source automatically. If not, push the menu button and go to “OPTIONS”.
Make sure that the “Source Lock” has been set to “Off”.
If you connect multiple sources at the same time, press the “SOURCE” button on the Keypad or direct source keys on the remote control to switch between inputs.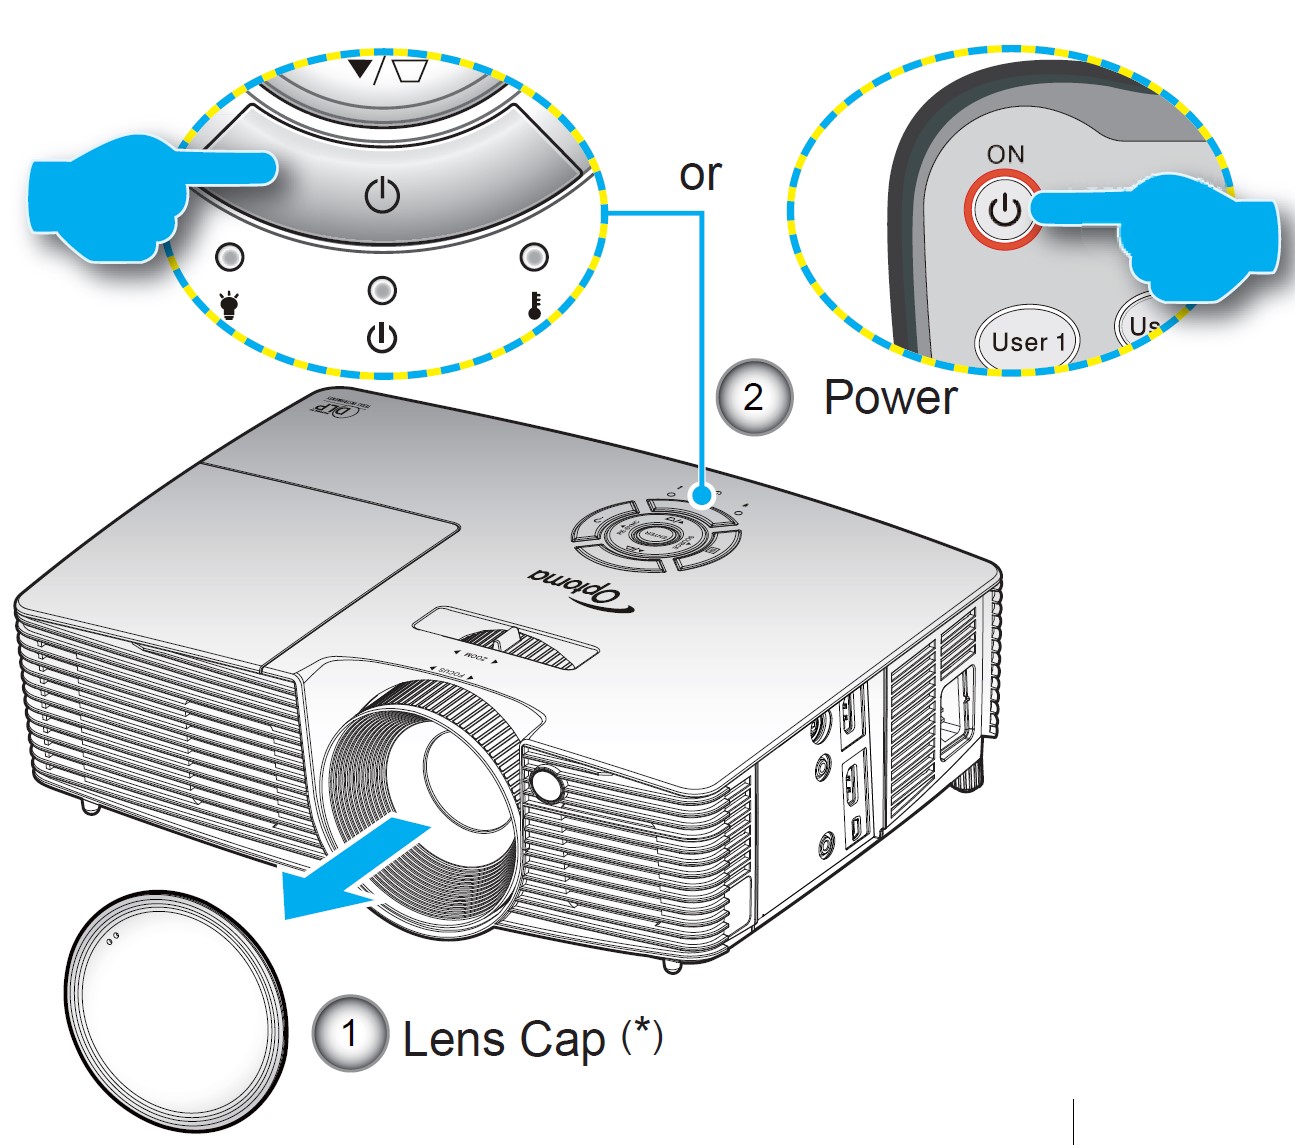
Powering Off the Projector
- Press the
 button on the remote control or “
 ” Keypad to turn off the projector. The following message will be displayed on the screen.
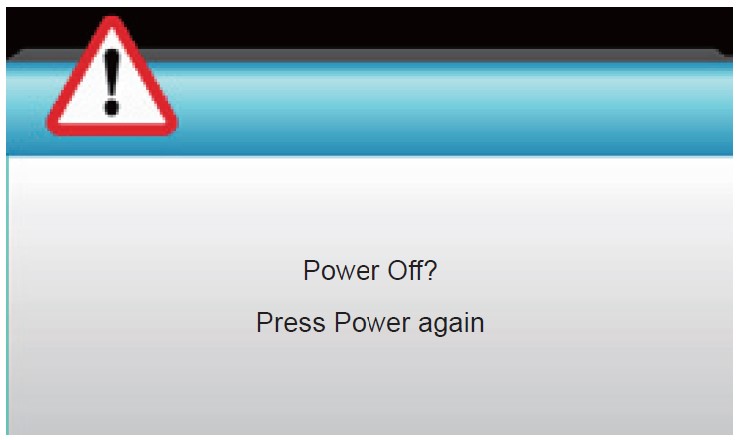
Press the “ ” button again to confirm otherwise the message will disappear after 15 seconds. When you press the “
 ” button for the second time, the projector will display a countdown timer and will shut down.
 - The cooling fans continue to operate for about 10 seconds for the cooling cycle and the On/Standby LED will Flash Green. When the On/Standby LED lights solid Amber, the projector has entered standby mode.
If you wish to turn the projector back on, you must wait until the projector has completed the cooling cycle and has entered standby mode. Once in standby mode, simply press the “ ” button to restart the projector.
 - Disconnect the power cord from the electrical outlet and the projector.
- Do not turn on the projector immediately following a power-off procedure.
Warning Indicator
When the warning indicators (see below) come on, the projector will automatically shutdown:
- The “LAMP” LED indicator is lit red and if “On/Standby” indicator flashes amber.
- The “TEMP” LED indicator is lit red and if “On/Standby” indicator flashes amber. This indicates the projector has overheated. Under normal conditions, the projector can be switched back on.
- The “TEMP” LED indicator flashes red and the “On/Standby” indicator flashes amber.
Unplug the power cord from the projector, wait for 30 seconds, and try again. If the warning indicator lights up again, please contact your nearest service center for assistance.
Adjusting the Projected Image
Adjusting the Projector’s Height
The projector is equipped with elevator feet for adjusting the image height.
- Locate the adjustable foot you wish to modify on the underside of the projector.
- Rotate the adjustable ring clockwise to raise the projector or counterclockwise to lower it. Repeat with the remaining feet as needed.
 Adjusting the Projector’s Zoom / Focus
You may turn the zoom ring to zoom in or out. To focus the image, rotate the focus ring until the image is clear.
- Standard throw series: The projector will focus at distances from 3.53 to 33.00 feet (1.08 to 10.06 meters).
- Short throw series: The projector will focus at distances from 1.09 to 11.13 feet (0.33 to 3.39 meters).
 Adjusting Projection Image Size
- Projection Image Size from 30.0” to 307.0” (0.76 to 7.80 meters).
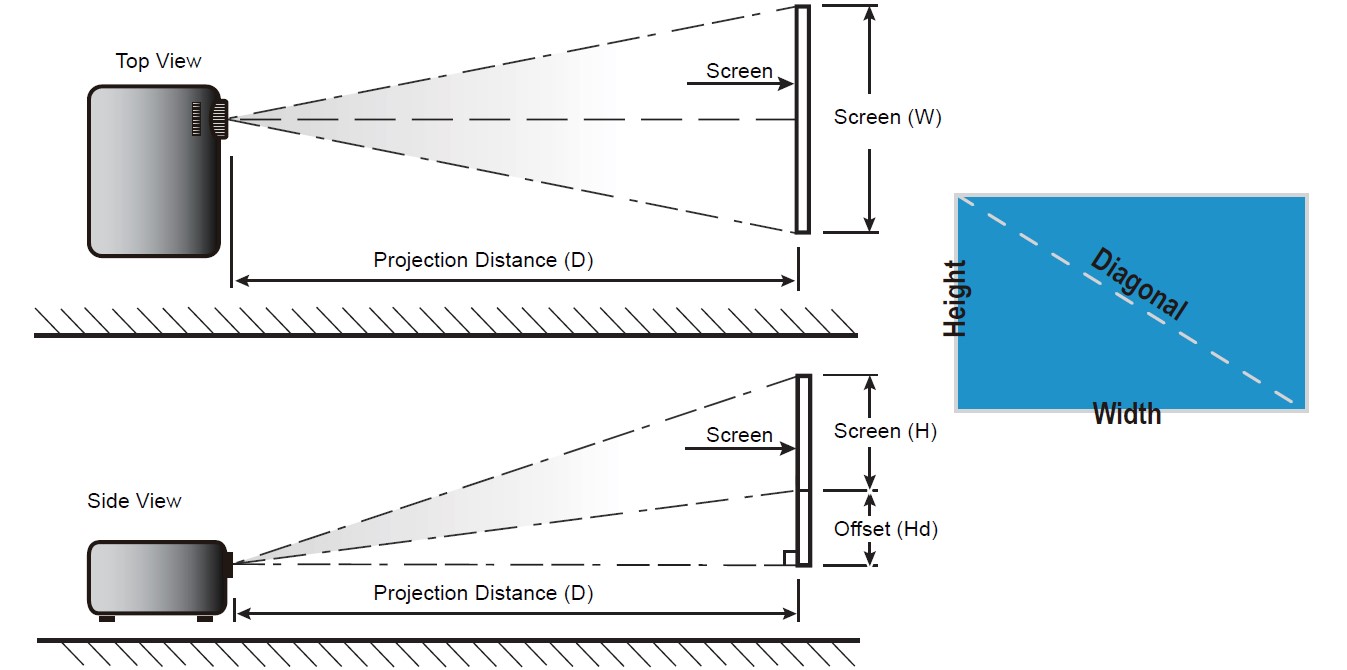

This table is for the user’s reference only.
Short throw
This table is for the user’s reference only.
Keypad & Remote Control
Keypad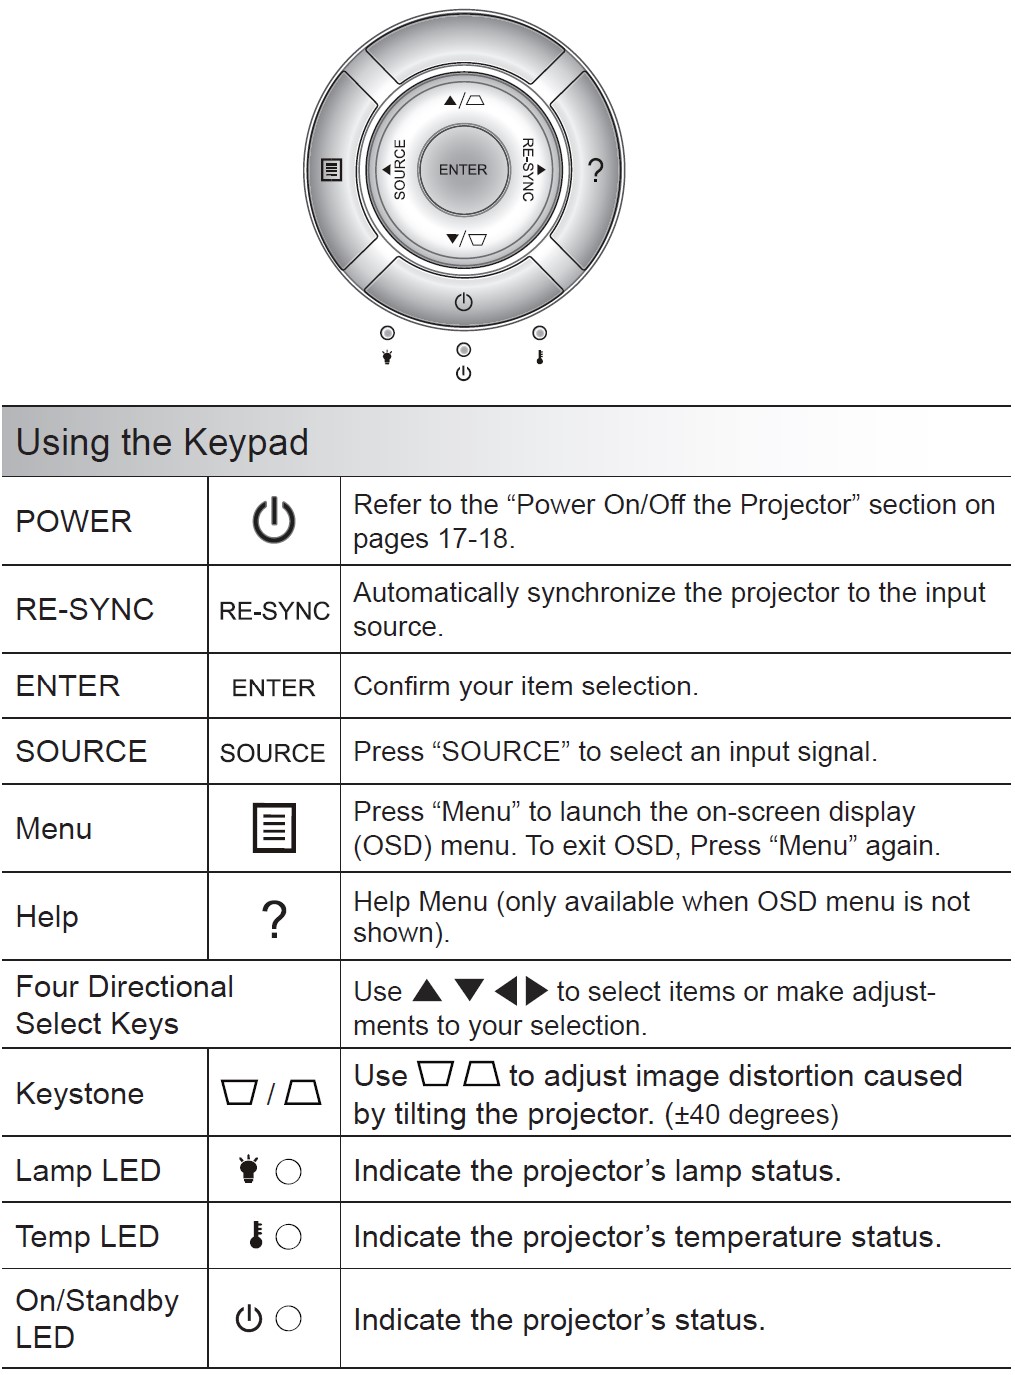
Remote Control

Troubleshooting
If you experience a problem with your projector, please refer to the following information. If a problem persists, please contact your local reseller or service center.
Image Problems
No image appears on-screen
- Ensure all the cables and power connections are correctly and securely connected as described in the “Installation” section.
- Ensure the pins of connectors are not crooked or broken.
- Check if the projection lamp has been securely installed. Please refer to the “Replacing the Lamp” section.
- Make sure you have removed the lens cap and the projector is switched on.
- Ensure that the “AV Mute” feature is not turned on.
The image is out of focus
- Make sure the Lens cap is removed.
- Adjust the Focus Ring on the projector lens.
- Make sure the projection screen is between the required distance from the projector. (refer to pages 21-22)
The image is stretched when displaying the 16:9 DVD title
- When you play an anamorphic DVD or 16:9 DVD, the projector will show the best image in 16: 9 format on the projector side.
- If you play the LBX format DVD title, please change the format to LBX in the projector OSD.
- If you play a 4:3 format DVD title, please change the format to 4:3 in projector OSD.
- If the image is still stretched, you will also need to adjust the aspect ratio by referring to the following:
- Please set up the display format as a 16:9 (wide) aspect ratio type on your DVD player.
Image is too small or too large
- Adjust the zoom lever on the top of the projector.
- Move the projector closer to or further from the screen. Press “Menu” on the projector panel, and go to “Display–>Format”. Try the different settings.
Image has slanted sides:
- If possible, reposition the projector so that it is centered on the screen and below the bottom of the screen.
- Use “Display–>V Keystone” from the OSD to make an adjustment.
Image is reversed
- Select “Setup–>Projection” from the OSD and adjust the projection direction.
Blurry double image
- Press the “3D Format” button and switch to “Off” to avoid the normal 2D image being a blurry double image.
Two images, side-by-side format
- Press the “3D Format” button and switch to “SBS” for input signal is HDMI 1.3 2D 1080i side-by-side.
The image does not display in 3D
- Check if the battery of 3D glasses is drained.
- Check if the 3D glasses are turned on.
- When the input signal is HDMI 1.3 2D (1080i side-by-side half), press the “3D Format” button and switch to “SBS”.
Other Problems
The projector stops responding to all controls
- If possible, turn off the projector, unplug the power cord, and wait at least 20 seconds before reconnecting power.
The lamp burns out or makes a popping sound
- When the lamp reaches its end of life, it will burn out and may make a loud popping sound. If this happens, the projector will not turn on until the lamp module has been replaced. To replace the lamp, follow the procedures in the “Replacing the Lamp” section.
Remote Control Problems
If the remote control does not work
- Check the operating angle of the remote control is within ±15° both horizontally and vertically of one of the IR receivers on the projector.
- Make sure there are not any obstructions between the remote control and the projector. Move to within 6 m (20 ft) of the projector.
- Make sure batteries are inserted correctly.
- Replace batteries if they are exhausted.
FAQS About Optoma EH200ST Full 3D 1080p 3000 Lumen DLP Short Projector
What is the Optoma EH200ST’s throw ratio?
ratio of throws:0.50
What is the Optoma projector’s resolution?
4K UHD
Do Optoma projectors perform well?
It is bright and boasts the second-best DLP projector contrast ratio that we have examined.
Describe the Optoma projector.
A worldwide corporation called Optoma focuses on the promotion and selling of large-format display products and services.
What is a projector’s throw distance?
The throw distance of a projector measures how far the projected picture is “thrown” from the projector to the screen.
What is the largest screen that an Optoma projector can produce?
A large image of up to 300″ can be produced.
How long is the lifespan of an Optoma projector?
15000 Hours on Average
What is the Optoma projector’s wattage?
240 Watt
What is the finest projector technology?
Display projectors
What distinguishes DLP from a projector?
DMD chips, a technology comprised of millions of microscopic mirrors, are used in DLP projectors to project video. The color accuracy of LCD projectors, in contrast to DLP projectors, is superior since they use liquid crystal display technology.
For more manuals by Optoma, Visit Manualsdock
[embeddoc url=”https://manualsdock.com/wp-content/uploads/2023/09/Optoma-EH200ST-Full-3D-1080p-3000-Lumen-DLP-Short-Projector-Manual.pdf” download=”all”]


