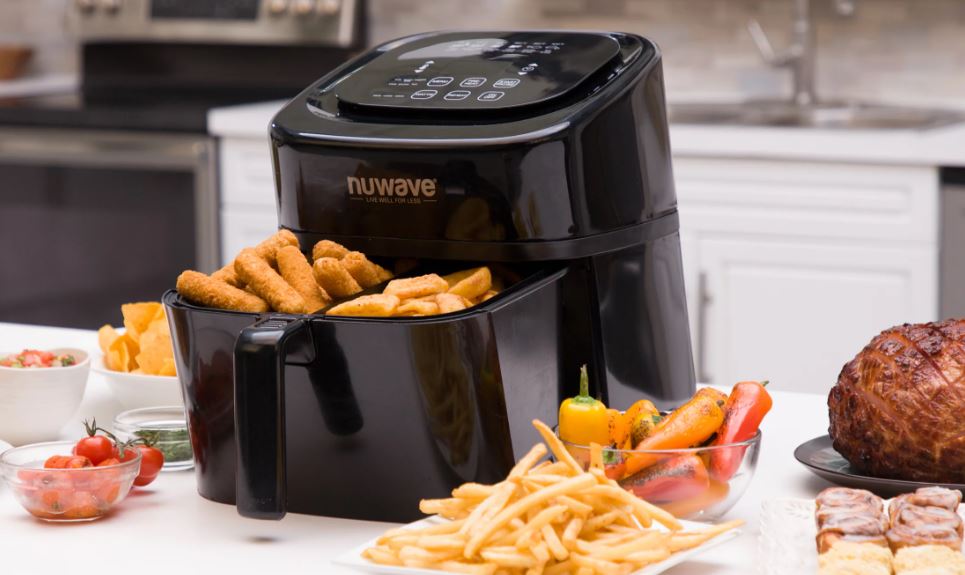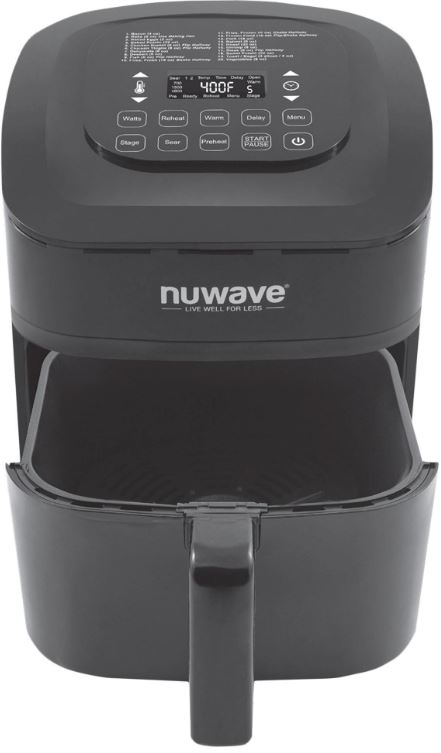
NuWave Brio 8-Qt Air Fryer
ABOUT Nuwave
NuWave is a brand that offers a range of kitchen appliances and products designed to make cooking easier and more efficient. The company is known for its innovative approach to cooking technology and its emphasis on healthier cooking options.
One of the flagship products of NuWave is the NuWave Oven, which is a countertop appliance that combines infrared, convection, and conduction heating technologies to cook food quickly and evenly. It claims to reduce cooking time, save energy, and retain more nutrients in the food compared to traditional cooking methods.
NuWave also offers other cooking appliances such as induction cooktops, air fryers, pressure cookers, grills, and blenders. These appliances are designed to provide convenient cooking solutions for various needs and preferences.
The brand promotes healthy cooking by focusing on reducing the use of oil and fat while maintaining flavor and taste. Their appliances often feature non-stick surfaces and temperature control options to help users cook with minimal added oil or butter.
In addition to its appliances, NuWave provides recipe books, cooking guides, NuWave multi cooker manual, NuWave Air Fryer Manuals and online resources to help users make the most of their products and explore new culinary possibilities. The company also offers customer support and warranty services for their appliances.
IMPORTANT SAFEGUARDS
HOUSEHOLD USE ONLY • READ ALL INSTRUCTIONS BEFORE USE
ALWAYS KEEP THIS MANUAL HANDY FOR FUTURE REFERENCE.
WARNING:
When using the Brio, basic safety precautions should always be followed:
- ALWAYS use great caution when operating the Brio or any appliance. Use the handles or knobs to avoid touching hot surfaces.
- NEVER immerse the cord, plug, or the Brio in water or other liquids.
- NEVER use the Brio if the unit, cord, or plug are damaged in any way, or after the appliance malfunctions.Return the appliance to the nearest authorized service facility for examination, repair, or adjustment.
- ALWAYS supervise children; people with reduced physical, sensory, or mental capabilities; and those lacking experience and knowledge, to ensure they use the Brio safely.
- NEVER use accessories that are not intended for, or are not approved to be used with, the Brio as doing so may damage the Brio and may lead to accidents.
- NEVER USE OUTDOORS. FOR HOUSEHOLD USE ONLY. Note:
This appliance is not intended to be used in the staff kitchens of shops, offices, farms, or other work environments; nor is it intended to be used by guests in hotels, motels, bed and breakfasts, and any other non-residential environments. - ALWAYS set up the Brio on a horizontal, even, and stable surface.
- NEVER allow the cord to hand down from tables or counters or allow it to touch hot surfaces.
- NEVER place or use the Brio on or near hot gas or electric burners, in a heated oven, close to flammable materials, space heaters or in any wet environment.
- ALWAYS use extreme caution when moving the Brio. NEVER move or handle the unit while it is running or before it has cooled.
- ALWAYS turn the Brio off before unplugging the unit from the wall outlet.
- ALWAYS keep hands and face away from the steam and hot air released from the air outlet vent during normal operation and from the Base Tray when opening the unit to remove or adjust the food.
- ALWAYS unplug the Brio and contact NuWave Customer Service* if an excess amount of smoke escapes the unit during operation.
Note: A small amount of smoke is normal when using the Brio for the first time. - NEVER put the Brio against the wall or other appliances or allow anything to block the air vents. ALWAYS keep at least 3 inches of free space around the Brio.
- NEVER place anything on top of the Brio.16. ALWAYS unplug the Brio from the wall outlet when it is not in use and before cleaning.
- ALWAYS ensure that the Brio is clean prior to use.
- NEVER operate the Brio with an external timer or separate remote-control system.
- ALWAYS allow the Brio to cool before cleaning the unit or attaching or removing parts and accessories.
- NEVER disassemble the Brio or replace any parts without the prior written consent of the manufacturer. Note: If any trouble arises during operation, any service MUST be done by NuWave LLC.
- NEVER use metal utensils with the coated Base Tray and Reversible Rack as doing so can damage the surface.
*Customer Service: 1-877-689-2838 or help@nuwavenow.com (Mon-Fri 7:30am-7:00pm and Saturday 9:00am-5:00pm CST)
NOTICE:
THE FAILURE TO FOLLOW ANY OF THE IMPORTANT SAFEGUARDS, ADDITIONAL SAFEGUARDS, OR THE INSTRUCTIONS FOR SAFE USE IS A MISUSE OF YOUR BRIO THAT CAN VOID YOUR WARRANTY AND CREATE THE RISK OF SERIOUS INJURY.
Electrical Information
A short power-supply cord (or detachable power-supply cord) is provided to reduce the risk of becoming entangled in or tripping over a longer cord. Longer detachable power-supply cords or extension cords are available and may be used if care is exercised in their use. If a longer detachable power-supply cord or extension cord is used:
- The marked electrical rating of the extension cord should be at least as great as the electrical rating of the appliance.
- The longer cord should be arranged so that it will not drape over the countertop or tabletop where it could be pulled on or tripped over.
- The appliance has a polarized plug (one blade is wider than the other). To reduce the risk of electric shock, this plug is intended to fit into a polarized outlet only one way. If the plug does not fit fully into the outlet, reverse the plug. If it still does not fit, contact a qualified electrician. Do not attempt to modify the plug in any way. If the appliance is of the grounded type, the cord set or extension cord should be a grounding-type 3-wire cord.
PARTS & ACCESSORIES
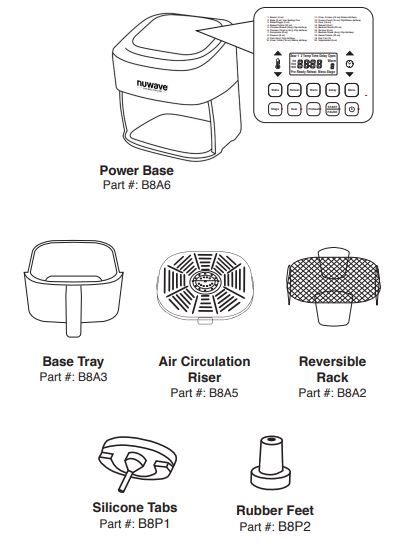
ASSEMBLY GUIDE
Assembling the Brio
CAUTION:
DO NOT use the Brio without the Base Tray. DO NOT touch the inside of the Base Tray, the Reversible Rack, or the Riser immediately after cooking. These parts will be hot. ONLY hold the Base Tray by the handle.
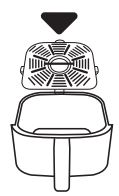
Removing the Base Tray, Reversible Rack & Air Circulation Riser
- Using the handle, pull the Base Tray straight out.
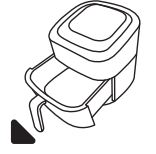
- Allow the Base Tray to cool. Grasp the Circulation Riser by the central handle and pull it straight up to remove it from the Base Tray.
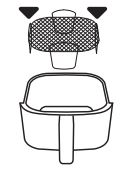
- When using the Reversible Rack, allow it to cool and then remove it with the handles.
QUICK START
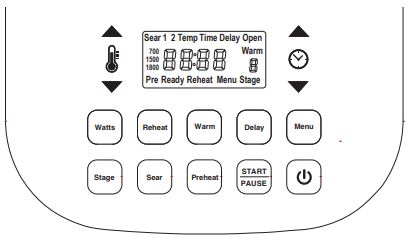
Button Functions
- POWER BUTTON: The Power button turns the Brio on and off.
- Up & Down Arrows: The arrow buttons adjust the cooking temperatures and times, as well as select different cooking presets.
- Preheat: The Brio will automatically preheat before any function to the set cooking temperature. Press Preheat during the preheat cycle to temporarily turn it off.
- Auto Preheat: The Brio will preheat automatically by default. To cancel the Auto Preheat, press Menu + Preheat.
- Menu: The Brio offers 100 programmed presets and an additional 50 memory slots allowing you to add your own unique recipes. Use the Menu function to recall and save the programmed recipes. Refer to the Quick Start Guide or NuWave air fryer manual for the list of 100 presets.
- Warm: Keep your food warm after cooking until you are ready to eat. Press Warm and use the Up and Down arrows to adjust the warming temperature and time. Press Warm to cancel the warm cycle. To use Warm as an independent function, press and hold Warm for 1 second and adjust as necessary.
- Delay: Delay is used to delay your cooking start time. Press Delay and use the Up or Down arrows to adjust the Delay time. The time is adjustable up to 24 hours. Press Delay at any time to cancel the Delay function.
- Reheat: Quickly warm through your favorite leftovers. Press Reheat for 1 second and the Brio will automatically begin reheating, defaulting to 350F for 4 minutes are the defaults. The Reheat temperature and time can be adjusted at any time with the Up and Down arrows.
- Sear: Sear is used to cook at high temperatures for a short period of time, directly before and/or after the regular cooking cycle. Use the Up and Down arrows to adjust the temperature and time (up to 30 minutes) before or during the searing cycle.
- Stage: Use the Stage function to program up to 5 different cooking steps, each with its own cooking temperatures and times that are adjustable with the Up and Down arrows.
- Watts: The Brio offers 3 wattage levels (700, 1500 & 1800). Press Watts to change the running wattage the Brio will use. When the Brio is turned off and/or unplugged, the Brio will run at the wattage previously set.
The maximum selectable cooking time differs depending on the selected cooking temperature.

GENERAL USE
Getting Started
Plug the power cord into an electrical outlet.
- Press the Power button to turn the Brio on and off and to cancel any cooking function.
- Adjust the temperature and time by pressing the Up and Down arrows.
- The default cooking time and temperature is 15 minutes at 350F.
- Press START/PAUSE to begin cooking.
- The Brio will begin preheating at the set cooking temperature.
Note:
The Brio will beep 3 times halfway through the cooking cycle to alert you to remove the Base Tray and shake the food (or flip foods like chicken, steak, or fish) to ensure even cooking. Reinsert the Base Tray to continue cooking.
START/PAUSE
Press START/PAUSE to begin cooking. To pause cooking, press START/PAUSE or remove the Base Tray.
- The screen will display “Open” when the Base Tray is removed. It will continue to cook once it is closed.
Up and Down Arrows
- To adjust the cooking temperature, use the Up and Down arrows above and below the temperature icon. It is adjustable in 5-degree increments between 50F and 400F.
- Hold down the Up or Down arrows to adjust the temperature quickly.
Note: The cooking temperature can be adjusted at any time before or during the cooking process. The current set temperature will be displayed.
- Hold down the Up or Down arrows to adjust the temperature quickly.
- To adjust the cooking time, use the Up and Down arrows above and below the time icon. It is adjustable in 1-minute increments.
- Hold down the Up or Down arrows to adjust the cooking time quickly.
Note: The cooking time can be adjusted at any time before or during the cooking process.
- Hold down the Up or Down arrows to adjust the cooking time quickly.
- Use either set of the Up and Down arrows to select different Menu presets.
Preheat
Preheat the Brio to set the cooking temperature before cooking your food for crispier results. The Brio will automatically preheat before all functions. The default cooking temperature is 350F and the range is 50F-400F.
- Press START/PAUSE to begin preheating.
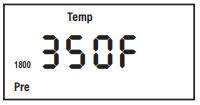
- The cooking temperature can be adjusted before or during the Preheat cycle.
- The Preheat cycle can be canceled anytime by pressing Preheat.
- While the Brio is preheating, the LED display will flash the preheat temperature.
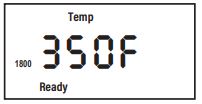
- Once preheated, the Brio will beep twice, display “Ready”, the countdown to 10 seconds and then beep once more.
- During the countdown, place your food into the Base Tray and slide it into the Brio.
- The Brio will begin cooking with the set temperature and time.
- When the Brio is finished cooking, it will beep 3 times and the LED display will show “End”.
Auto preheat
The Brio, by default, will automatically preheat for all cooking functions and certain programmed presets. If at any time you want to turn off the automatic preheat function, press Menu + Preheat. This will deactivate automatic preheating before any cooking. Press Menu + Preheat again to activate it. If at any time you want to turn off preheat temporarily for the individual cooking cycle, press Preheat.
GENERAL USE
Menu
Use the Menu function to choose from 100 presets (See the Quick Start Guide for the full list). Slots 101~150 are for your own unique programs (See Advanced Settings for more information).
- Press Menu.
- Use the Up and Down arrows to scroll through the preset numbers until you find the desired presets.
- Once a preset number is chosen, press START/PAUSE to begin cooking. You can make temperature and time adjustments if desired.
- Before cooking, some of the presets are programmed to preheat.
- You can view the current cooking preset number while the program is running by pressing Menu.
View the cooking settings
You can view all cooking functions associated with a preset before or during the cooking process.
View the cooking settings before cooking
- Press Menu and find the preset number to review using the Up and Down arrows.
- Once the preset number is displayed, press Stage to review each cooking step.
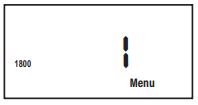
- Adjustments to the temperature and time can be made for each function at this time.
View the cooking settings during cooking
- Press Stage to review each cooking step.
- Continue to press Stage to scroll through all of the programmed functions for that preset number.
- Adjustments to the temperature and time can be made for each function at this time, but it will not be saved.
Warm
Keeps your food warm until you are ready to serve, defaulting to 140F.
- Adjust the cooking temperature and time.
- Press Warm.
- Adjust the Warm temperature and time, if desired.
- Press START/PAUSE to start cooking.
- The Brio will start cooking with the set cooking temperature and time. After that, it will warm at the set Warm temperature.
- Press Warm again to cancel the Warm function at any time.
- During the Warm function, the LED display will flash “Warm”.
Delay
The Delay function is used to delay your cooking start time.
- Press Delay.
- Use the Up and Down arrows to adjust the Delay time.
- The Delay time can be adjusted up to 24 hours.
- During Delay, the (:) will flash, indicating that the Delay time countdown started.
- To stop the Delay function at any time, press Delay.
- The Brio will automatically move on to the next cooking function.
- Once the Delay function is complete, it will automatically start cooking.
Reheat
Quickly warms through your favorite leftovers, defaulting to 350F for 4 minutes.
- Press Reheat.
- Adjust the temperature and time, if desired.
- Press START/PAUSE to start reheating.
Sear
Use the Sear function to sear foods directly before and/or after the regular cooking cycle, for up to 30 minutes. The default temperature is 400F for 5 minutes.
- Press Sear.
- Adjust the sear temperature and time, if desired.
- Press START/PAUSE to begin cooking.
Note:
You can adjust the Sear temperature and time at any time before or during the Sear function.
ADVANCED SETTINGS
Using Warm independently
Keeps your food warm until you are ready to serve.
- Press and hold Warm for 1 second.
- The Brio will automatically begin to warm your food at the default temperature of 140F.
- Press Warm again to cancel the Warm function at any time.
- You can adjust the cooking temperature and time using the Up and Down arrows.
- When the Brio has finished warming, it will beep 3 times and the LED display will show “End”.
Note: The maximum Warm temperature is 200F. The maximum time is 3 hours.
Using Warm with Menu
Select your preset and have the Brio warm your food.
- Press Menu.
- Select your desired preset (1-100).
- Press Warm.
- Adjust the Warm temperature and time by pressing Stage and using the Up and Down arrows.
- Press START/PAUSE to begin cooking.
- You can adjust the Warm temperature and time at any time.
- Press WARM at any time to cancel.
Stage
The Stage function gives you the ability to cook your food at different temperatures throughout the cooking process. You can define up to five 5 different cooking stages. The default for Stage 1 is 350°F for 15 minutes, and 350°F for 0 minutes for all subsequent stages.
Example:
You can set your food at 400F for 10 minutes, have it switch to 350F for 20 minutes, and then have the Brio cook at a lower temperature for the remainder of the cooking process.
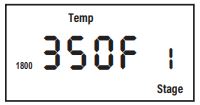
- Press Stage. This is Stage 1.
- Adjust the cooking temperature and time.
- Press Stage again to add Stage 2.
- Adjust the cooking temperature and time.
- Repeat until you have programmed all the stages you need (up to 5 stages).
- Press START/PAUSE to begin cooking with your set cooking stages.
- You can see and adjust the upcoming cooking stage(s) by pressing Stage.
Menu
Store your own cooking preset
- Adjust the cooking temperature and time.
- Press START/PAUSE to begin cooking.
- Press and hold Menu for 1 second. The LED display will show “Menu” and “101”.
- Use the Up and Down arrows to save your settings in a memory slot between 101-150.
- Press and hold Menu for 1 second to save the new preset. This preset is now available for future recall.
Note:
You can also store a preset AFTER the cooking process. Once the cooking process has finished, hold Menu for 1 second. The display will show “Menu” and “101”. Select the slot number for and press Menu again to store.
Editing a stored preset
You can edit a stored preset you created before or during the cooking process and save any changes.
Edit before Cooking
- Press Menu and find the preset number to edit.
- Scroll through and locate the stored settings you want to edit by continuously pressing Stage.
- Using the Up and Down arrows, edit the temperature and time as desired.
- Once all of your edits are made, press and hold the Menu button for 1 second. The LED display will show “Menu” and “101.”
- Use the Up and Down arrows to select the slot number for your edited preset.
- Press the Menu button again to save the edits.
Edit while cooking
- While cooking, press Stage until the function you would like to edit shows in the LED display.
- Adjust the cooking temperature and time.
- If there are more cooking presets that you would like to edit, press Stage until you reach the preset you would like to edit as described above.
- The Brio will continue cooking with the edits that you have made.
- When the Brio has finished cooking, the Brio will beep 3 times and the LED display will show “End”.
- To save your edits, press and hold Menu for 1 second and “101” will be displayed. Select the preset number (101-150) that you would like to save your edits to and hold Menu again for 1 second.
Note: Once saved, the edited preset will be available for recall. If the cooking process has finished, the preset is no longer editable.
If you saved a preset to a filled memory slot, the new preset will override the previous one. Any edits to a preset program (1~100) can only be saved and stored into program numbers 101~150. You cannot save an adjusted preset to its original preset number.
Sear
Sear 1 is ONLY available at the beginning of the cooking process. Sear 2 is ONLY available at the end of the cooking process.
Sear 1 & 2 can be used together to sear your food before and after the cooking process.
Sear 1
The default temperature and time is 400F for 5 minutes.
- Adjust your cooking temperature and time.
- Press Sear to engage the Sear 1 function.
- Adjust the Sear temperature and time up to a maximum of 400F and 30 minutes.
- Press START/PAUSE to begin. The Brio will start preheating. Once preheated, “Sear 1” and “:” will be flashing.
- Once the Sear 1 cycle is finished, the Brio will automatically go into the regular cooking temperature and time set on step 1.
- When the Brio has finished cooking, it will beep 3 times and the LED display will show “End”.
Sear 1 & 2
- Adjust your cooking temperature and time.
- Press Sear to engage the Sear 1 function. Adjust the Sear 1 temperature and time, if desired.
- Press Sear again to add the Sear 2 function. Adjust the Sear 2 temperature and time, if desired.
- Press START/PAUSE to begin. The Brio will start preheating. Once preheated, “Sear 1” and “:” will be flashing.
- Once Sear 1 is finished, the Brio will beep once and will begin the regular cooking temperature and time set on step 1. After, the Brio will beep once again and will then go into Sear 2.
- When the Brio has finished cooking, it will beep 3 times and the LED display will show “End”.
Sear 2
The default temperature and time is 400F for 5 minutes.
- Adjust your cooking temperature and time.
- Press Sear 3 times to engage Sear 2.
- Adjust your cooking temperature and time up to a maximum of 400F and 30 minutes.
- Press START/PAUSE to begin. The Brio will start preheating.
- Once the main cooking cycle has finished, the Brio will beep once and go into Sear 2 cooking. “Sear 2”, and “:” will be flashing.
- When the Brio is finished cooking, it will beep 3 times and the LED display will show “End”.
Note:
The Sear temperature and time can be adjusted at any time.
Mute and Unmute the Beep Sounds
To mute the beep sounds, press and hold the Sear + Stage buttons for 1 second. The Brio will remain mute until it is unmuted. Press Sear + Stage for 1 second again to unmute.
Switching from Fahrenheit to Celsius
To go from Fahrenheit to Celsius, press Sear + temperature Up or Down arrow. Repeat to change it back.
CLEANING & MAINTENANCE
Cleaning
Clean the Brio after every use or in between batches. The Base Tray and Air Circulation Riser have a non-stick coating. Do not use metal utensils or harsh abrasives when cleaning as these can damage the coating.
- Unplug the appliance and make sure it cools completely.
- Use a damp cloth to wipe the outside of the appliance.
- Clean the Base Tray and inside components with a non-abrasive sponge, hot water, and mild detergent.
Note:
Remove the Base Tray and place it on a heat-resistant surface to help cool the appliance faster. If using the dishwasher for the Base Tray, Air Circulation Riser, and Reversible Rack, use the top rack only.
Tip:
If there is residual food on the Base Tray, Air Circulation Riser, and Reversible Rack, add some hot water and let them soak separately for about 10 minutes. Then, use a soft cleaning brush to remove any lingering food.
Storage
- Unplug the Brio and let it cool down completely.
- Make sure that all parts are clean and dry.
IMPORTANT – Do not immerse the Brio in water or attempt to clean the appliance in the dishwasher.
Cleaning Silicone Tabs
The Circulation Riser comes with 4 Silicone Tabs.
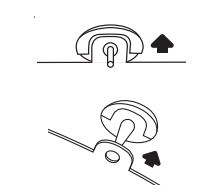 Let the Circulation Riser cool completely.
- Grasp the Circulation Riser by the central handle and pull it straight up to remove it from the Base Tray.
- Carefully pull the Silicone Tabs up to slide them off the metal tabs, then pull each of them out.
Note:
Wash the Circulation Riser and Silicone Tabs with warm, soapy water and sponge. The Circulation Riser can be washed in a dishwasher, top rack only. Do not wash the Silicone Tabs in the dishwasher.
WARNING
In case of problems, immediately unplug the Brio and contact Customer Service at: 1-877-689-2838 or help@nuwavenow.com
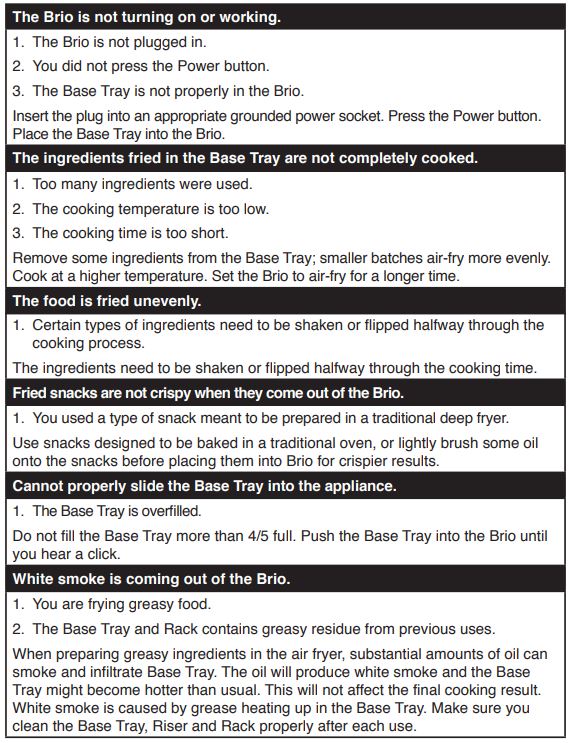
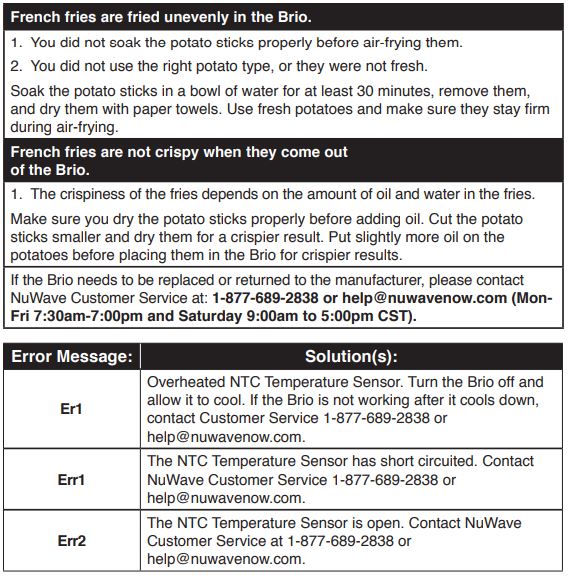
TROUBLESHOOTING GUIDE
LIMITED WARRANTY
The NuWave Brio® 8Q Digital Air Fryer THE MANUFACTURER WARRANTS
The Brio, including the Base Tray, Air Circulation Riser, and Reversible Rack, are to be free from manufacturer defects.
All electrical components are warrantied for 1 year from the date of purchase, under normal household use, and when operated in accordance with the Manufacturer’s written instructions. The Manufacturer will provide the necessary parts and labor to repair any part of the Brio at NuWave LLC Service Department. After the expiration of the warranty, the cost of the labor and parts will be the responsibility of the owner.
MANUFACTURER’S OBLIGATION
The Manufacturer’s obligation under this Limited Warranty is limited, to the extent allowable by law, to repairing or replacing any part covered by this Limited Warranty which upon examination is found to be defective under normal use. The Limited Warranty is applicable only within the continental United States and only to the original purchaser of the manufacturer’s authorized channels of distribution.
THE LIMITED WARRANTY MAY NOT BE ALTERED, VARIED OR EXTENDED EXCEPT BY A WRITTEN INSTRUMENT EXECUTED BY THE MANUFACTURER. THE REMEDY OF REPAIR OR REPLACEMENT AS PROVIDED UNDER THIS LIMITED WARRANTY IS EXCLUSIVE. IN NO EVENT SHALL THE MANUFACTURER BE LIABLE FOR ANY CONSEQUENTIAL OR INCIDENTAL DAMAGES TO ANY PERSON, WHETHER OR NOT OCCASIONED BY NEGLIGENCE OF THE MANUFACTURER, INCLUDING WITHOUT LIMITATION, DAMAGES FOR LOSS OF USE, COSTS OF SUBSTITUTION, PROPERTY DAMAGE, OR OTHER MONEY LOSS.
Some states do not allow the exclusion or limitation of incidental or consequential damages, so the above limitation exclusions may not apply. This Limited Warranty gives specific legal rights, and there may also be other rights that vary from state to state.
EXCEPT AS OTHERWISE EXPRESSLY PROVIDED ABOVE, THE MANUFACTURER MAKES NO WARRANTIES EXPRESSED OR IMPLIED ARISING BY LAW OR OTHERWISE, INCLUDING WITHOUT LIMITATION, THE IMPLIED WARRANTIES OF MERCHANTABILITY AND FITNESS FOR A PARTICULAR PURPOSE TO ANY OTHER PERSON. READ YOUR OWNER’S MANUAL. IF YOU STILL HAVE ANY QUESTIONS ABOUT THE OPERATION OR WARRANTY OF THE PRODUCT, PLEASE CONTACT NUWAVE LLC.
DISPUTE RESOLUTION PROCEDURE.
For disputes relating to use of the website or use or purchase of a NuWave product or service (collectively “Disputes”), you agree to first contact NuWave LLC at (877) 689-2838 (phone), (847) 367-5486 (facsimile), or legal@nuwavenow.com (email). If we cannot resolve your dispute informally, any and all disputes shall be submitted to final and binding arbitration. You may start the arbitration process by submitting in writing a demand to the American Arbitration Association (“AAA”) and sending a copy to NuWave. NuWave will pay all filing costs.
A single arbitrator of the AAA will conduct the arbitration in a location convenient to you or by phone. The arbitrator’s award will be binding and may be entered as a judgment in a court of competent jurisdiction. The arbitration will be conducted in accordance with the provisions of AAA’s Commercial Arbitration Rules and Mediation Procedures in effect at the time of submission of your demand for arbitration.
See https://www.adr.org/sites/default/files/CommercialRules_ Web.pdf. Except as may be required by law as determined by an arbitrator, no party or arbitrator may disclose the existence, content, or results of any arbitration hereunder without prior written consent of both parties.
- A. WAIVER OF RIGHT TO SUE. By agreeing to arbitration you understand that, to the maximum extent permitted by law, you are agreeing to waive your right to file suit in any court, to a court hearing, judge trial, and jury trial.
- B. CLASS ACTION WAIVER. To the maximum extent permitted by law you expressly agree to refrain from bringing or joining any claims in any representative or class-wide capacity, including but not limited to, bringing or joining any claims in any class action or class-wide arbitration.
- C. OPT-OUT PROCEDURE. To opt out of arbitration you must contact NuWave. To request to opt out of arbitration contact us at legal@nuwavenow.com (email), NuWave LLC, 560 Bunker Ct., Vernon HIlls, IL 60061, U.S.A., (847) 367-5486 (fax), or (877) 689-2838 or (224) 206-3019 (phone). You will have thirty (30) days from the date of product delivery to opt out of arbitration with respect to any dispute arising out of or relating to use or purchase of any NuWave product. If more than 30 days have passed you are not eligible to opt out of arbitration and will have waived your right to sue or participate in a class action with respect to the dispute arising out of your purchase or use of a NuWave product.
- For any dispute arising out of your use of NuWave’s website, you have thirty (30) days from the date you provided information to the website to opt out of arbitration. If more than 30 days have passed you are not eligible to opt out of arbitration and you will have waived your right to sue and participate in a class action with respect to the dispute arising out of your use of NuWave’s website.
- D. SOME MATTERS ARE NOT SUBJECT TO ARBITRATION. Notwithstanding the foregoing, the following shall not be subject to arbitration and may be adjudicated only in the state and federal courts of Illinois:
- (i) any dispute, controversy, or claim relating to or contesting the validity of our intellectual property rights and proprietary rights, including without limitation, patents, trademarks, service marks, copyrights, or trade secrets;
- (ii) an action by a party for temporary, preliminary, or permanent injunctive relief, whether prohibitive or mandatory, or other provisional relief; or
- (iii) interactions with governmental and regulatory authorities.
- (i) any dispute, controversy, or claim relating to or contesting the validity of our intellectual property rights and proprietary rights, including without limitation, patents, trademarks, service marks, copyrights, or trade secrets;
- (ii) action by a party for temporary, preliminary, or permanent injunctive relief, whether prohibitive or mandatory, or other provisional relief; or
- (iii) interactions with governmental and regulatory authorities. You expressly agree to refrain from bringing or joining any claims in any representative or class-wide capacity, including but not limited to, bringing or joining any claims in any class action or any class-wide arbitration.
READ YOUR OWNER’S MANUAL
If you still have any questions about operation or warranty of the product, please contact NuWave LLC at: 1-877-689-2838 or email help@nuwavenow.com (Mon-Fri 7:30 am to 7:00 pm and Saturday 9:00 am to 5:00 pm CST).
FAQS – NuWave Brio 8-Qt Air Fryer Owners Manual
Q: What is the NuWave Brio 8-Qt Air Fryer?
A: The NuWave Brio 8-Qt Air Fryer is a kitchen appliance designed to cook food using hot air circulation. It uses a technology called rapid air circulation to fry, roast, grill, or bake food with little to no oil, resulting in healthier and crispy meals.
Q: What can I cook with the NuWave Brio 8-Qt Air Fryer?
A: The NuWave Brio 8-Qt Air Fryer can cook a wide variety of foods, including fries, chicken wings, chicken breasts, fish fillets, vegetables, baked goods, and more. It can be used to fry, roast, grill, bake, or reheat different types of food items.
Q: Does the NuWave Brio 8-Qt Air Fryer require oil for cooking?
A: While the NuWave Brio 8-Qt Air Fryer can cook with little to no oil, adding a small amount of oil can enhance the taste and texture of certain foods. It allows you to achieve a crispy exterior similar to deep frying while using significantly less oil.
Q: Is the NuWave Brio 8-Qt Air Fryer easy to clean?
A: Yes, the NuWave Brio 8-Qt Air Fryer is designed to be easy to clean. The frying basket and drawer are non-stick, which makes them simple to wipe clean or wash with warm soapy water. Additionally, some parts may be dishwasher-safe, but it’s always best to consult the user manual for specific cleaning instructions.
Q: Can I adjust the cooking time and temperature on the NuWave Brio 8-Qt Air Fryer?
A: Yes, the NuWave Brio 8-Qt Air Fryer typically features digital controls that allow you to adjust the cooking time and temperature settings. This flexibility allows you to customize the cooking process according to your preferences and the specific requirements of the food you’re preparing.
Q: Does the NuWave Brio 8-Qt Air Fryer come with any accessories?
A: The NuWave Brio 8-Qt Air Fryer usually comes with a frying basket and a removable drawer. Some models may also include additional accessories such as a baking pan, grill rack, or skewers. The availability of accessories may vary depending on the specific model or package.
Q: Can I find recipes specifically designed for the NuWave Brio 8-Qt Air Fryer?
A: Yes, there are various sources where you can find recipes specifically tailored for air fryers, including theNuWave Brio 8-Qt Air Fryer. You can find recipe books, websites, cooking blogs, and even social media groups dedicated to sharing air fryer recipes. Additionally, NuWave may provide recipe suggestions and cooking guides on their official website or in the product’s user manual.
Pdf – NuWave Brio 8-Qt Air Fryer Owners Manual
[embeddoc url=”https://manualsdock.com/wp-content/uploads/2023/07/NuWave-Brio-8-Qt-Air-Fryer-Owners-Manual.pdf” download=”all”]
For More Manuals Visit: ManualsDock

