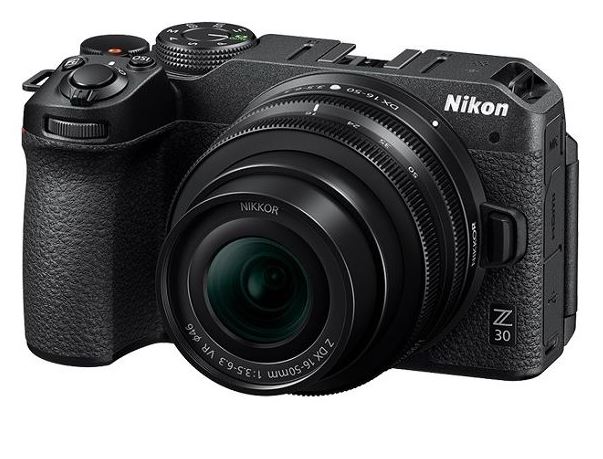
Nikon Z 30 with Wide-Angle Zoom Lens
About Nikon
Nikon Corporation is a multinational corporation based in Tokyo, Japan, and is known for its expertise in imaging and optics. The company was founded on July 25, 1917, as Nippon Kōgaku Kōgyō Kabushikigaisha (Japan Optical Industries Corporation). It later changed its name to Nikon Corporation in 1988.
Nikon is renowned for its high-quality cameras, camera lenses, and other imaging products. The company’s cameras are widely used by amateur and professional photographers alike and are well-regarded for their exceptional image quality and reliability. Nikon’s camera lineup includes DSLRs (digital single-lens reflex), mirrorless cameras, and compact digital cameras.
Package contents
Be sure all items listed here were included with your camera.
- Camera
- Strap
- BF-N1 body cap
- Warranty (see left)
- EN-EL25 rechargeable Li-ion battery
- User’s Manual (this sheet)
- UC-E24 USB cable
- Memory cards are sold separately.
- Purchasers of the lens kit option should confirm that the package also includes a lens.
- This camera uses SD, SDHC, and SDXC memory cards, referred to throughout this document as “memory cards”.
Parts of the camera
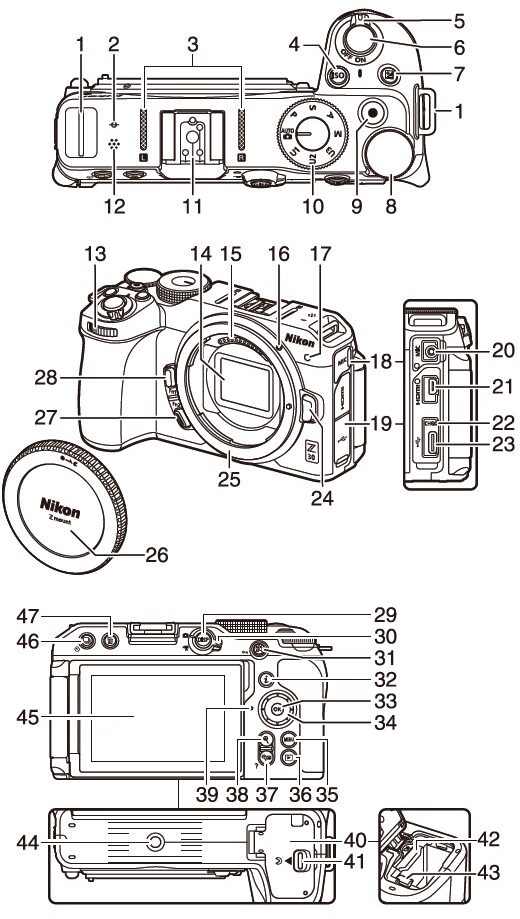

• Throughout this document, the display in the camera monitor during shooting is referred to as the “shooting display”.
First steps
Attaching the strap
To attach a strap (whether the supplied strap or one that has been purchased separately):

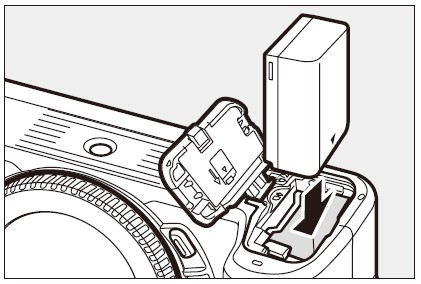
Inserting the battery and a memory card
Turn the camera off before inserting or removing the battery and memory card.
Using the battery to keep the orange battery latch pressed to one side, slide the battery into the battery chamber until the latch locks it in place.
Holding the memory card in the orientation shown, slide it straight into the slot until it clicks into place.

Charging the battery
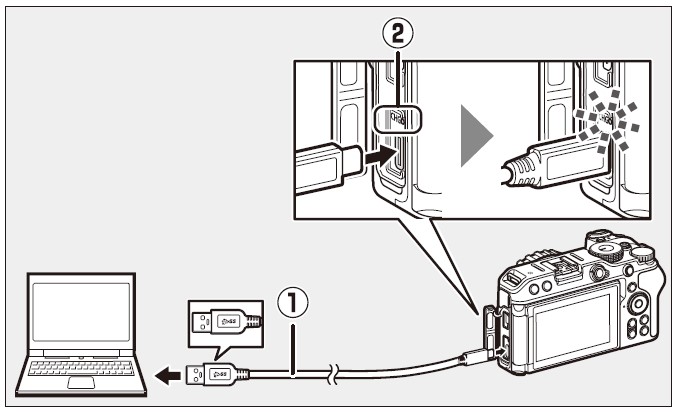
Fully charge the supplied EN-EL25 battery before use. With the battery inserted in the camera, connect the camera to a computer using the supplied USB cable to charge.
Battery care
Read and follow the warnings and cautions in “For your safety” (overleaf) and “Caring for the camera and battery: Cautions” (overleaf).
- Insert the EN-EL25 into the camera.
- After confirming that the camera is off, connect the supplied USB cable (1) to the camera, and then connect it to a computer.
Do not use force or attempt to insert the connectors at an angle.
- Turn on the computer before charging.
- The camera charge lamp (C) lights amber while charging is in progress. The lamp turns off when charging is complete. A battery will fully charge in about 7 hours and 40 minutes (when charging an exhausted battery at an input of 5 V/500 mA). Depending on the standard and type of USB connector on the computer, the charging time may be shorter.
- When charging is complete, disconnect the USB cable. Be sure to keep the connectors straight when disconnecting them.
- Computers will also supply current to power the battery when connected via a UC-E25 USB cable (available separately).
Notes when charging using the supplied USB cable
- If the battery cannot be charged using the supplied USB cable to connect the camera and computer, for example, because the battery is not compatible or the temperature of the camera is elevated, the charge lamp will flash rapidly for about 30 seconds and then turn off. If the charge lamp is off and you did not observe the battery charging, turn the camera on and check the battery level.
- Do not use the connectors of a USB hub or keyboard when charging. Connect the camera and computer directly.
- If the computer goes into hibernation (sleep mode) while charging, the camera stops. To continue charging, wake up the computer from hibernation (sleep mode).
- Depending on the model and product specifications, some computers will not supply current to charge the camera.
Using the supplied USB cable or a separately sold UC-E25 USB cable to supply power
- If [Enable] is selected for [USB power delivery] in the setup menu, the camera will be supplied with power when it is turned on.
- The battery will not charge while the camera is powered by an outside source.
- If you use the supplied USB cable to supply power from a computer, the camera battery will be consumed even while power is being supplied. If you use the separately sold UC-E25 USB cable, the camera battery will not be consumed (the camera battery may be consumed depending on your computer model and specifications).
Charging or supplying power from a household outlet
When charging or supplying power from a household outlet, use the separately sold EH-7P Charging AC Adapter.
Attaching a lens
- The camera can be used with Z-mount lenses. The lens generally used in this document for illustrative purposes is a NIKKOR Z DX 16-50mm f/3.5-6.3 VR.
- Be careful to prevent dust from entering the camera.
- Confirm that the camera is off before attaching the lens.
- Remove the camera body cap (, (3) and rear lens cap (3, 4).
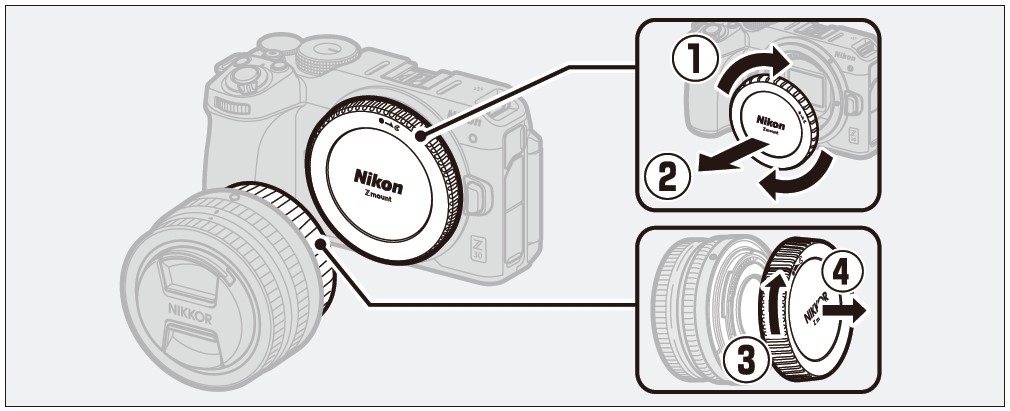
- Align the mounting marks on the camera (5) and lens (6). Do not touch the image sensor or lens contacts.

- Rotate the lens as shown until it clicks into place (D).

Remove the front lens cap before taking pictures.
F mount lenses
- Be sure to attach the FTZ I/FTZ mount adapter (available separately) before using F mount lenses.
- Attempting to attach F-mount lenses directly to the camera could damage the lens or image sensor.
Detaching lenses
- After turning the camera off, press and hold the lens release button while turning the lens in the direction opposite that of the attachment to detach the lens.
- After removing the lens, replace the lens caps and camera body cap.
Opening the monitor
Slowly rotate the monitor without using excessive force.

Turning on the camera
When the camera is turned on for the first time, the language selection screen is displayed. Choose a language and then set the camera clock (no other operations can be performed until the clock is set).
Turn the camera on.

- The [Language] selection screen will be displayed.

Select a language.
- Press or W to highlight the desired language and press @ (the languages available vary with the country or region in which the camera was originally purchased).
- The [Time zone] screen will be displayed.
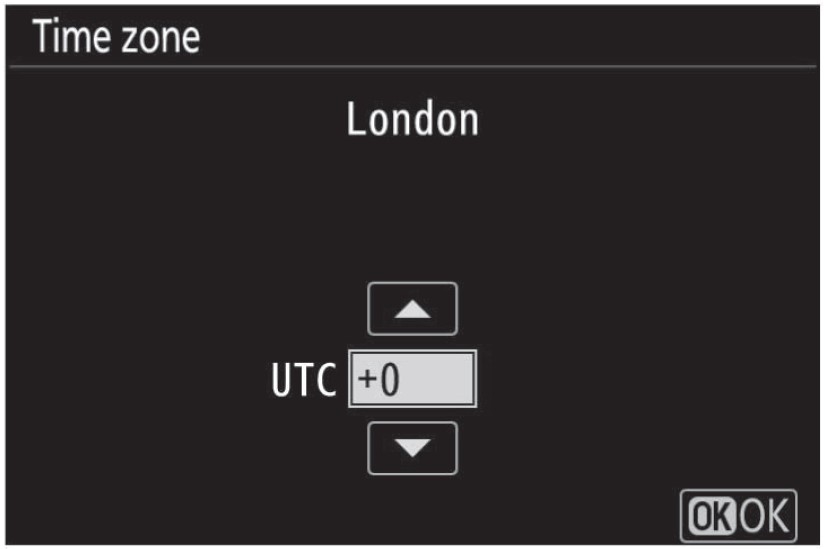
Choose a time zone.
- Press to choose a time zone and press OK.
- The display shows the selected cities in the chosen zone and the difference between the time in the chosen zone and UTC.
- The [Date format] screen will be displayed.
Choose a date format.
- Highlight the desired date (year, month, and day) display the order, and press OK)
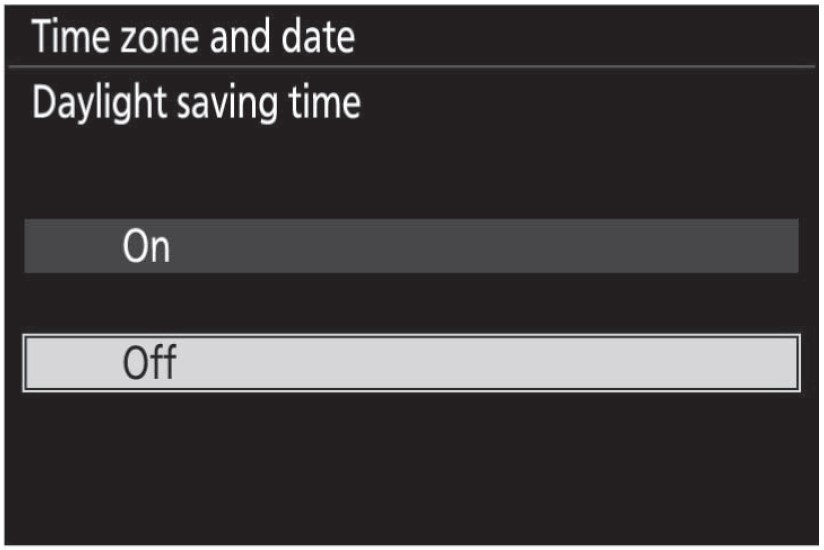
- The [Daylight saving time] screen will be displayed.

Turn daylight saving time on or off.
- Highlight [On] (daylight saving time on) or [Off] (daylight saving time off) and press OK.
- Selecting [On] advances the clock one hour; to undo the effect, select [Off].
- The [Date and time] screen will be displayed.
Set the clock.
- Press @ or C to highlight date and time items and press & or @ to change them.
- Press @ to confirm the date and time setting.
- The message [Done.] will be displayed and the camera will switch to shooting mode.

Taking photographs easily ( auto)
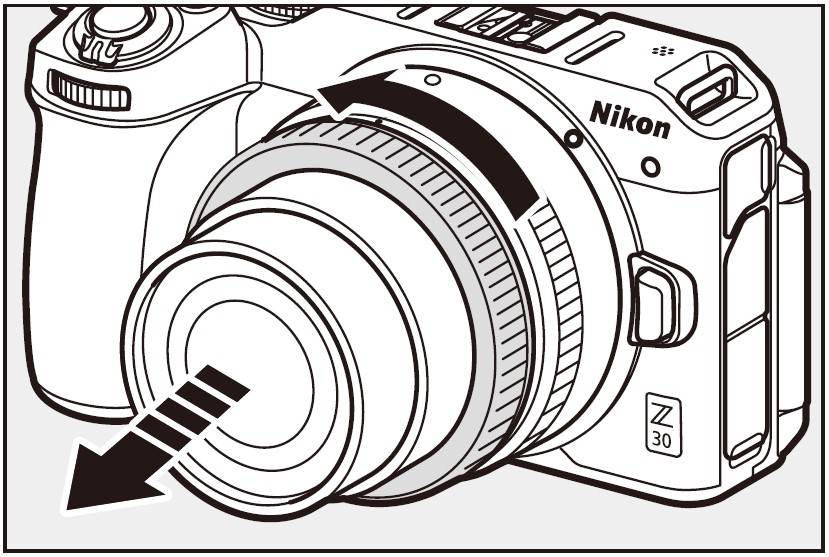
Lenses with retractable barrels Lenses with retractable barrels must be extended before use. Rotate the zoom ring as shown until the lens clicks into the extended position.
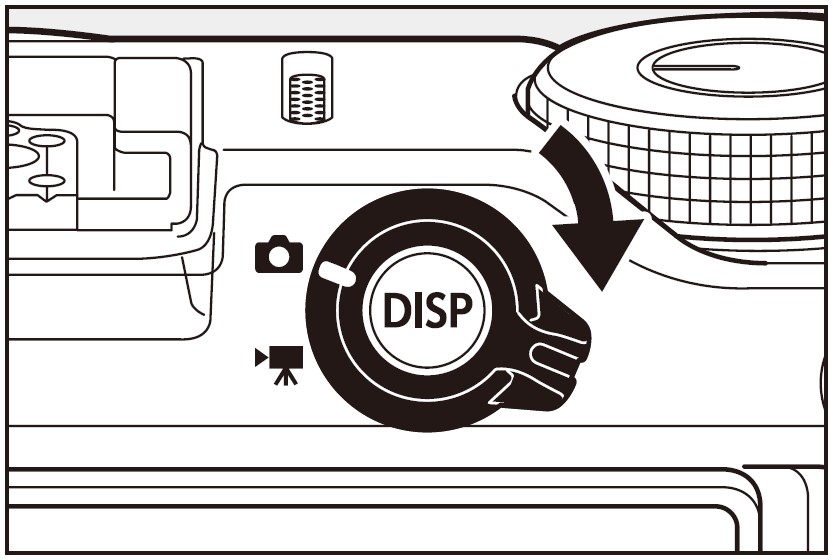
Select photo mode by rotating the photo/video selector.
Rotate the mode dial to AUTO.

Ready the camera.

Frame the photograph.

Press the shutter-release button halfway to focus.
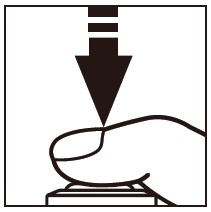
Smoothly press the shutter-release button the rest of the way down to take the photograph.

Recording videos easily (auto)
Select video mode by rotating the photo/video selector.

Rotate the mode dial.
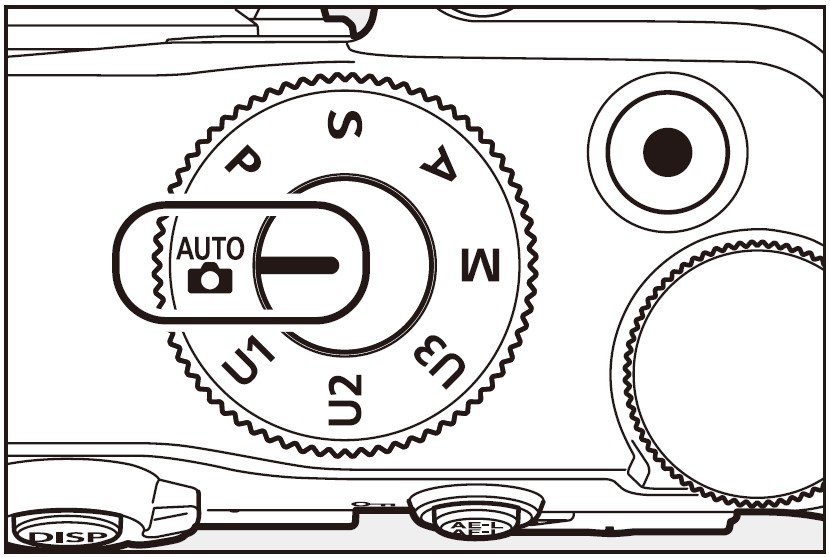
Press the video-record button to start recording.

- The REC lamp will light and a recording indicator (O) will be displayed on the monitor. The monitor also shows the time remaining, or in other words the approximate amount of new footage that can be recorded to the memory card (2))

Press the video-record button again to end the recording.

Viewing photos
Press the button to view photos and videos recorded with the camera on the monitor.
- Press D or C, or flick left or right on the monitor to view other images.
- Videos are indicated by a * icon at the upper left of the monitor. Press the @ button, or tap the icon in the monitor to play back videos.
- To end playback and return to shooting mode, press the shutter-release button halfway.

Caring for the camera
Storage
When the camera will not be used for an extended period, remove the battery. Before removing the battery, confirm that the camera is off. Do not store the camera in locations that:
- are poorly ventilated or subject to humidities of over 60%
- are next to equipment that produces strong electromagnetic fields, such as televisions or radios
- are exposed to temperatures above 50 °C (122 °F) or below -10 °C (14 °F)
Troubleshooting
You may be able to resolve any issues with the camera by following the steps below. Check this list before consulting your retailer or Nikon-authorized service representative.
STEP 1 Check the list of common problems.
Common problems and solutions are listed in the troubleshooting section of the Reference Guide.
STEP 2 Turn the camera off and remove the battery, then wait about a minute, re-insert the battery, and turn the camera on.
The camera may continue to write data to the memory card after shooting. Wait at least a minute before removing the battery.
STEP 3 Search Nikon websites.
- For support information and answers to frequently asked questions, visit the website for your country or region (see “Nikon user support” at the top left corner of this page).
- To download the latest firmware for your camera, visit: https://downloadcenter.nikonimalib.com/
STEP 4 Consult a Nikon-authorized service representative.
Caring for the camera and battery: Cautions
Camera care
- Do not drop
Please do not drop the camera or lens or subject them to blows. The product may malfunction if subjected to strong shocks or vibration.
- Keep dry
Keep the camera dry. Rusting of the internal mechanism caused by water inside the camera can not only be expensive to repair but can in fact cause irreparable damage.
- Avoid sudden changes in temperature
If you bring the camera from a cold place to a warm place, or from a warm place to a cold place, water droplets may form inside and outside the camera and cause damage. When you bring the camera to a place with a temperature difference, place the camera in a carrying case or plastic bag and seal it beforehand. When the camera has adapted to the ambient temperature, take it out from the bag and use it.
- Keep away from strong magnetic fields
Static charges or the magnetic fields produced by equipment such as radio transmitters could interfere with the monitor, corrupt data stored on the memory card, or affect the product’s internal circuitry.
- Do not leave the lens pointed at the sun
Do not leave the lens pointed at the sun or other strong light source for extended periods. Intense light may damage the image sensor or cause fading or “burn in” Photographs taken with the camera may exhibit a white blur effect.
- Lasers and other bright light sources
Do not direct lasers or other extremely bright light sources toward the lens, as this could damage the camera’s image sensor.
- Cleaning
When cleaning the camera body, use a blower to gently remove dust and lint, then wipe gently with a soft, dry cloth. After using the camera at the beach or seaside, wipe off any sand or salt using a cloth lightly dampened in fresh water and then dry the camera thoroughly.
- Cleaning the lens
This glass element is easily damaged: remove dust and lint with a blower. If using an aerosol blower, keep the can vertical to prevent the discharge of liquid that could damage glass elements. To remove fingerprints and other stains from the lens, apply a small amount of lens cleaner to a soft cloth and wipe the lens carefully.
- Do not touch the image sensor
Under no circumstances should you exert pressure on the image sensor, poke it with cleaning tools, or subject it to powerful air currents from a blower. These actions could scratch or otherwise damage the sensor.
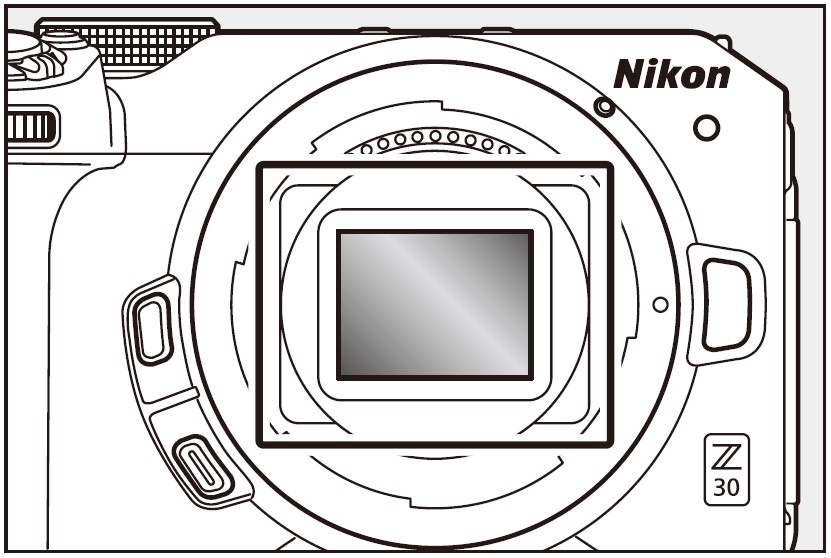
- The lens contacts
Keep the lens contacts clean. Avoid touching them with your fingers.
- Store in a well-ventilated area
To prevent mold or mildew, store the camera in a dry, well-ventilated area. Do not store the camera with naphtha or camphor moth balls, next to equipment that produces strong electromagnetic, or where it will be exposed to extremely high temperatures, for example near a heater or in an enclosed vehicle on a hot day. Failure to observe these precautions could result in product malfunction.
- Long-term storage
To prevent damage caused by, for example, leaking battery fluid, remove the battery if the product will not be used for an extended period. Store the camera in a plastic bag containing a desiccant. Do not, however, store the leather camera case in a plastic bag, as this may cause the material to deteriorate. Store the battery in a cool, dry place. Note that desiccant gradually loses its capacity to absorb moisture and should be replaced at regular intervals. To prevent mold or mildew, take the camera out of storage at least once a month, insert the battery, and release the shutter a few times.
- Turn the product off before removing the battery
Removing the battery while the camera is on could damage the product. Particular care should be taken not to remove or disconnect the power source while images are being recorded or deleted.
- Notes on the monitor
- The monitor is constructed with extremely high precision; at least 99.99% of pixels are effective, with no more than 0.01% being missing or defective. Hence while the monitor may contain pixels that are always lit (white, red, blue, or green) or always off (black), this is not a malfunction. Images recorded with the device are unaffected. Your understanding is requested.
- Images in the monitor may be difficult to see in a bright light.
- Do not apply pressure to the monitor. The monitor could malfunction or suffer damage. Dust or lint on the monitor can be removed with a blower. Stains can be removed by wiping the monitor lightly with a soft cloth or chamois leather. Should the monitor break, care should be taken to avoid injury from broken glass. Be careful that liquid crystal from the monitor does not touch the skin or enter the eyes or mouth.
- The display may rapidly flicker on and off during burst photography. Watching the flickering display could cause you to feel unwell. Discontinue use until your condition improves.
- Bright lights and back-lit subjects
Noise in the form of lines may in rare cases appear in pictures that include bright lights or back-lit subjects.
Bluetooth and Wi-Fi (wireless LAN)
This product is controlled by the United States Export Administration Regulations (EAR). The permission of the United States government is not required for export to countries other than the following, which as of this writing are subject to embargo or special controls: Cuba, Iran, North Korea, Sudan, and Syria (list subject to change). The use of wireless devices may be prohibited in some countries or regions. Familiarize yourself with and obey all applicable local regulations. The Bluetooth transmitter in this device operates in the 2.4 GHz band.
Notice for customers in Europe and countries complying with the Radio Equipment Directive
Hereby, Nikon Corporation declares that the radio equipment type Z30 complies with Directive 2014/53/EU. The full text of the EU Declaration of Conformity is available at the following internet address: https://imaging.nikon.com/support/pdf/DoCN2121pdf
Wi-Fi
- Operating frequency:
- 2412-2462 MHz (channel 11; Africa, Asia, Bolivia, Europe, and Oceania)
- 2412-2462 MHz (channel 11), 5180-5825 MHz (5180-5580 MHz, 5660-5700 MHz, and 5745-5825 MHz) (U.S.A., Canada, Mexico)
- 2412-2462 MHz (channel 11), 5180-5805 MHz (5180-5320 MHz and 5745-5805 MHz) (other countries in the Americas)
- Maximum output power (EIRP):
- 2.4 GHz band: 4.5 dBm
- 5 GHz band: 6.8 dBm (countries in the Americas)
Bluetooth
- Operating frequency:
- Bluetooth: 2402-2480 MHz
- Bluetooth Low Energy: 2402-2480 MHz
- Maximum output power (EIRP):
- Bluetooth: -1.0 dBm
- Bluetooth Low Energy: -2.5 dBm
FAQS About Nikon Z 30 with Wide-Angle Zoom Lens
What is the Nikon Z30’s record capacity?
Roll the Z 30 for as long as 125 minutes.
How long does the Nikon Z30’s battery last?
roughly 330 shots
What kind of lens gives you a wider field of vision?
an elongated lens
Is there picture stabilization on the Nikon Z30?
Even though the Z30 uses the complete sensor width when shooting, employing the electronic image stabilization (1.23x crop)
On the Nikon Z30, are lenses exchangeable?
Each NIKKOR Z lens is usable.
The Z30 has a full-frame sensor.
The full-frame Nikon Z series’ lenses are also used by the Z 30.
What advantages does the Nikon Z30 offer?
The Z30 is a very capable stills camera but also meets the demands of video creation.
Is the Nikon Z30 a good camera?
The primary use of this camera will be for photography, not video.
How much does the Nikon Z30 cost in Pakistan?
The cost of the Nikon Z30 in Pakistan is Rs185,000.
The Nikon Z30 can it withstand water?
It has weather sealing, in fact.
The Nikon Z30 has a 4K camera.
With no crop, the Nikon Z30 can capture 4k video at up to 30 frames per second.
For more manuals by Nikon, Visit Manualsdock
[embeddoc url=”https://manualsdock.com/wp-content/uploads/2023/09/Nikon-Z-30-with-Wide-Angle-Zoom-Lens-User-Manual.pdf” download=”all”]


