
Nikon D610 CMOS FX-Format Digital SLR Camera
About Nikon
Nikon Corporation is a multinational corporation based in Tokyo, Japan, known for its imaging and optics expertise. The company was founded on July 25, 1917, as Nippon Kōgaku Kōgyō Kabushikigaisha (Japan Optical Industries Corporation). It later changed its name to Nikon Corporation in 1988.
Nikon is renowned for its high-quality cameras, camera lenses, and other imaging products. The company’s cameras are widely used by amateur and professional photographers and are well-regarded for their exceptional image quality and reliability. Nikon’s camera lineup includes DSLRs (digital single-lens reflex), mirrorless, and compact digital cameras.
For Your Safety
To prevent damage to your Nikon product or injury to yourself or others, read the following safety precautions before using this equipment. Keep these safety instructions where all those who use the product will read them. The consequences that could result from failure to observe the precautions listed in this section are indicated by the following symbol:
WARNINGS
- Keep the sun out of the frame
Keep the sun well out of the frame when shooting backlit subjects. sunlight focused on the frame could cause a fire - Do not look at the sun through the viewfinder
Viewing the sun or other strong light sources through the viewfinder could cause permanent visual impairment - Using the viewfinder diopter adjustment control
When operating the viewfinder diopter adjustment control with your eye to the viewfinder care should be taken not to put your finger in your even accidentally - Turn it off immediately in the event of a malfunction
Should you notice smoke or an unusual smell coming from the equipment or AC adapter (available separately), unplug the AC adapter and remove the battery immediately. we are taking care to avoid burns. continued operation could result in injury. After removing the battery. take the equipment to a Nikon-authorized service center for inspection - Do not use in the presence of flammable gas
Do not use electronic equipment in the presence of flammable gas, as this could result in an explosion or fire - Do not place the strap around the neck of an infant or child
Placing the camera strap around the neck of an infant or child could result in strangulation - Observe caution when using the flash
- Using the camera with the flash in close contact with the skin or other objects could cause bums
- Using the flash close to the subject’s eyes could cause temporary visual impairment The flash should be no less than one meter (3 ft 4 in.) from the subject. Particular care should be observed when photographing
- Observe proper precautions when handling batteries
Batteries may leak or explode if improperly handled. Observe the following precautions when handling batteries for use in this product:- Use only batteries approved for use in this equipment
- Do not short or disassemble the battery.
- Be sure the product is off before replacing the battery. If you are using an AC adapter, be sure it is unplugged.
- Do not attempt to insert the battery mode down or backward.
- Do not expose the battery to flame or excessive ness
- Donoummerse in or expose to water
- Replace the terminal cover when transporting the battery.
- Do not transport or store the battery with metal objects such as necklaces or hairpins.
- Do not carry tripods with a lens or camera attached
You could trip or accidentally strike others, resulting in injury. - Follow the instructions of airline and hospital personnel
This camera transmits radio frequencies that could interfere with medical equipment or aircraft navigation. Disable the wireless network feature remove all wireless accessories from the camera before boarding an aircraft, and turn the camera off during take-off and landing. In medical facilities, follow staff instructions regarding the use of wireless devices.
Notices
- No part of the manuals included with this product may be reproduced, transmitted, transcribed, stored in a retrieval system, or translated into any language in any form, by any means, without Nikon’s prior written permission.
- Nikon reserves the right to change the specifications of the hardware and software described in these manuals at any time and without prior notice.
- Nikon will not be held liable for any damages resulting from using this product.
- While every effort has been made to ensure that the information in these manuals is accurate and complete, we would appreciate it were you to bring any errors or omissions to the attention of the Nikon representative in your area (address provided separately).
Notices for Customers in Canada
- CAN ICES-3 B / NMB-3 B
Federal Communications Commission (FCC) Radio Frequency Interference Statement
This equipment has been tested and found to comply with the limits for a Class B digital device, under Part 15 of the FCC rules. These limits are designed to provide reasonable protection against harmful interference in a residential installation. This equipment generates, uses, and can radiate radio frequency energy and, if not installed and used by the instructions, may cause harmful interference to radio communications. However, there is no guarantee that interference will not occur in a particular installation. If this equipment does cause harmful interference to radio or television reception, which can be determined by turning the equipment off and on, the user is encouraged to try to correct the interference by one or more of the following measures:
- Reorient or relocate the receiving antenna
- Increase the separation between the equipment and the receiver.
- Connect the equipment to an outlet on a circuit different from that to which the receiver is connected.
- Consult the dealer or an experienced radio/television technician for help.
Disposing of Data Storage Devices
Please note that deleting images or formatting memory cards or other data storage devices does not completely erase the original image data. Deleted files can sometimes be recovered from discarded storage devices using commercially available software, potentially resulting in malicious use or personal image damage. insuring the privacy of such data is the user the malicious use of personal image data. Ensuring the privacy of such data is the user’s responsibility. Before discarding a data storage device or transferring ownership to another person, erase all data using commercial deletion software, or format the device and then completely refill it with images containing no private information (for example, pictures of empty sky). Be sure also to replace any pictures selected for the preset manual. Care should be taken to avoid injury when physically destroying data storage devices.
Package Contents
Be sure all items listed here were included with your camera.
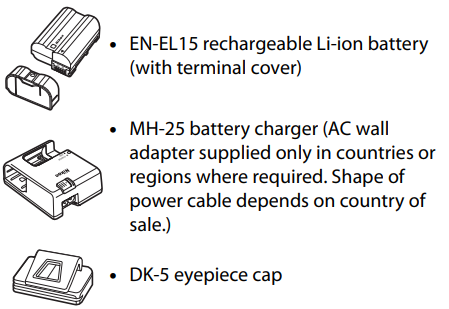
- AN-DC10 strap
- UC-E15 USB cable
- ViewNX 2 CD
- User’s Manual (this guide) Warranty Memory cards are sold separately.
The Camera Strap
Attach the strap securely to the two eyelets on the camera body as shown below.

Introduction
Getting to Know the Camera
Take a few moments to familiarize yourself with camera controls and displays. You may find it helpful to bookmark this section and refer to it as you read through the rest of the manual.
The Camera Body
- Release mode dial
- Mode dial
- Mode dial lock release
- Eyelet for a camera strap
- Release mode dial lock release
- Accessory shoe (for the optional flash unit)
- PT Accessory shoe cover
- Power switch
- Shutter-release button
- button
- Exposure compensation
- Two-button reset
- Movie-record button
- button
- Metering
- Formatting memory cards
- Focal plane mark
- Control panel.
The Power Switch
Rotate the power switch as shown to turn the camera on.
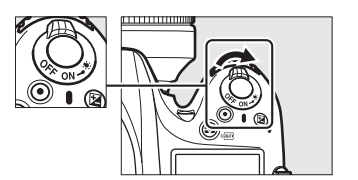
Rotate the power switch as shown to turn the camera off.

- Built-in flash
- Mirror.
- Meter coupling lever
- Lens mounting mark
- button
- Flash mode
- Flash compensation
- BKT button Bracketing
- Infrared receiver (front)
- Built-in microphone
- Audio connector cover
- HDMI/USB connector cover
- Cover for accessory terminal
- Lens release button
- AF-mode button
- Focus-mode selector
- Headphone connector
- Connector for external microphone
- USB connector
- Connecting to a computer
- Connecting to a printer
- HDMI mini-pin connector
- Accessory terminal

- AF-assist illuminator
- Self-timer lamp
- Red-eye reduction lamp
- Sub-command dial
- Depth-of-field preview button
- Fn (function) button
- Battery-chamber cover
- Battery-chamber cover latch
- Contact cover for optional MB-D14 battery pack
- Power connector cover
- CPU contacts
- Lens mount
- AF coupling
- Tripod socket
- Body cap
The Microphone and Speaker
Do not place the microphone or speaker near magnetic devices. Failure to observe this precaution could affect the data recorded on the magnetic devices.

- Viewfinder eyepiece
- Rubber eyecup
- T/roan button
- Delete
- Formatting memory cards
- button
- Playback
- Monitor
- Viewing settings
- Live view
- Viewing pictures
- Full-frame playback
- MENU button
- Menu
- button
- Retouch
- Picture Control
- WB button
- Help
- Protect
- White balance
- QUAL button
- Playback zoom in
- Image quality/size
- OB/ISO button
- Playback zoom-out/thumbnails
- ISO sensitivity
- Auto ISO sensitivity control
- Two-button reset
- Diopter adjustment control
- button
- Using the AE/AF lock button
- Main command dial
- Multi selector
- (OK) button
- Focus selector lock
- Memory card slot cover
- Ambient brightness sensor for automatic
- monitor brightness control
- Live view selector
- Live view photography
- Movie live view
- Lv button
- Infrared receiver (rear)
- Memory card access lamp
- Speaker
- Ent (info) button
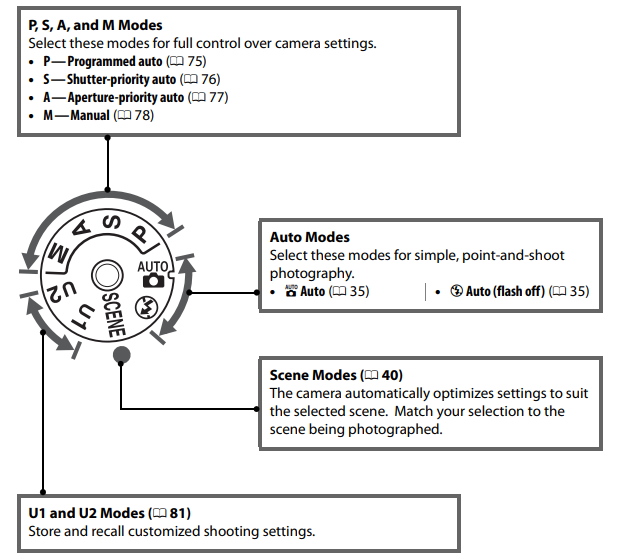
The Mode Dial
The camera offers the modes listed below. To choose a mode, press the mode dial lock release and rotate the mode dial.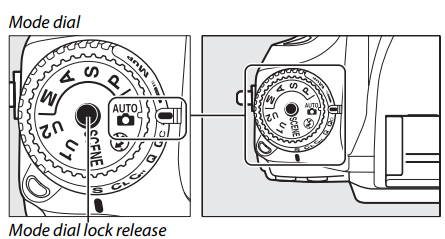
The Viewfinder
- Framing grid (displayed when On is selected for Custom Setting d2)
- Focus points
- AF-area mode
- AF area brackets
- Focus indicator
- Metering
- Autoexposure (AE) lock
- Shutter speed
- Autofocus mode
- Aperture (f-number)
- Aperture (number of stops)
- Flash compensation indicator
- Exposure compensation indicator
- ISO sensitivity indicator
- ISO sensitivity
- Active D-Lighting amount
- Ar-area mode
- Flash-ready indicator
- FV lock indicator
- Flash sync indicator
- Aperture stop indicator
- Exposure indicator
- Exposure compensation display
- Roll indicator
- Low battery warning
- Exposure and flash bracketing indicator
- WB bracketing indicator
- ADL bracketing indicator
- Auto ISO sensitivity indicator
- Number of exposures remaining
- Number of shots remaining before memory buffer fills
- Preset white balance recording indicator
- Exposure compensation value
- Flash compensation value
- “K” (appears when memory remains for over 1000 exposures)
- No Battery
When the battery is exhausted or no battery is inserted, the display in the viewfinder will dim. This is normal and does not indicate a malfunction. The viewfinder display will return to normal when a fully charged battery is inserted. - The Control Panel and Viewfinder Displays
The brightness of the control panel and viewfinder displays varies with temperature, and the response times of the displays may drop at low temperatures. This is normal and does not indicate a malfunction.
The BM-14 Monitor Cover
A clear plastic cover is provided with the camera to keep the monitor clean and protect it when the camera is not in use. To attach the cover, insert the projection on the top of the cover into the matching indentation above the camera monitor (1) and press the bottom until it clicks into place (2). 
- To remove the cover, hold the camera firmly and pull the bottom of the cover gently outwards as shown on the right
Using Camera Menus
The multi-selector and @ buttons are used to navigate the camera menus.
Follow the steps below to navigate the menus.
- Display the menus. Press the MENU button to display the menus.
- Highlight the icon for the current menu. Press to highlight the icon for the current menu.
- Select a menu. Press A or W to select the desired menu.
- Position the cursor in the selected menu. Press to position the cursor in the selected menu.
- Highlight a menu item. Press A or V to highlight a menu item.
- Display options. Press to display options for the selected menu item.
- Highlight an option. Press A or V to highlight an option.
- Select the highlighted item. Press @ to select the highlighted item. To exit without making a selection, press the MENU button
Charge the Battery
The camera is powered by an EN-EL15 rechargeable Li-ion battery (supplied). To maximize shooting time, charge the battery in the supplied MH-25 battery charger before use. About 2 hours and 35 minutes are required to fully recharge the battery when no charge remains.
- Connect the AC power cable.
Connect the power cable. The AC adapter plug should be in the position shown at right; do not rotate.
- Remove the terminal cover.
Remove the terminal cover from the battery. - Insert the battery.
Place the battery in the battery bay as shown in the illustration on the charger.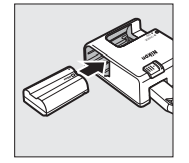
- Plug the charger in.
The CHARGE lamp will flash slowly while the battery charges.
Charging the Battery Charge the battery indoors at ambient temperatures between 5°C-35°C (41°F-95°F). The battery will not charge if its temperature is below 0°C (32°F) or above 60°C (140°F). Battery Charging is complete
- Remove the battery when charging is complete.
Charging is complete when the CHARGE lamp stops flashing. Unplug the charger and remove the battery.
- The AC Wall Adapter
Depending on the country or region of purchase, an AC wall adapter may also be supplied with the charger. To use the adapter, insert it into the charger AC inlet (1). Slide the AC wall adapter latch in the direction shown ( and rotate the adapter 90 ° to fix it in the position shown (3). Reverse these steps to remove the adapter.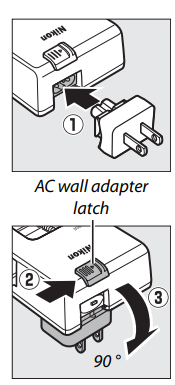
Insert the Battery
Before inserting the battery, rotate the power switch to OFF.
- Inserting and Removing Batteries Always turn the camera off before inserting or removing batteries.
- Open the battery chamber cover.
Unlatch (1) and open ((2) the battery-chamber cover.
- Insert the battery.
Insert the battery in the orientation shown (V), using the battery to keep the orange battery latch pressed to one side. The latch locks the battery in place when the battery is fully inserted (2).
- Close the battery-chamber cover.
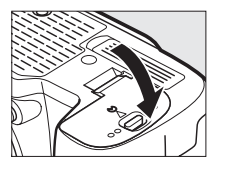
- Removing the Battery
Turn the camera off and open the battery-chamber cover. Press the battery latch in the direction shown by the arrow to release the battery and then remove the battery by hand.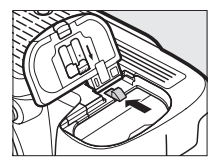
Attach a Lens
Care should be taken to prevent dust from entering the camera when the lens is removed. The lens generally used in this manual for illustrative purposes is an AF-S NIKKOR 24-120mm f/4G ED VR.

- Turn the camera off.
- Remove the rear lens cap and the camera body cap.

- Attach the lens. Keeping the mounting index on the lens aligned with the mounting index on the camera body, position the lens in the camera’s bayonet mount (1). Being careful not to press the lens-release button, rotate the lens counter-clockwise until it clicks into place ((2).

Detaching the Lens
Be sure the camera is off when removing or exchanging lenses. To remove the lens, press and hold the lens release button (1) while turning the lens clockwise (2). After removing the lens, replace the lens caps and camera body cap.
Basic Setup
A language-selection dialog will be displayed the first time the camera is turned on. Choose a language and set the time and date. Photographs can not be taken until you have set the time and date.
- Turn the camera on.
A language-selection dialog will be displayed. - Select a language.
Press A or V to highlight the desired language and press @.
- Choose a time zone.
A time-zone selection dialog will be displayed. Press or highlight the local time zone (the UTC field shows the difference between the selected time zone and Coordinated Universal Time, or UTC, in hours) and press OK.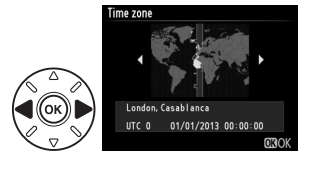
- Choose a date format.
Press A or V to choose the order in which the year, month, and day will be displayed. Press (K) to proceed to the next step.
- Turn daylight saving time on or off.
Daylight-saving time options will be displayed. Daylight saving time is off by default; if daylight saving time is in effect in the local time zone, press A to highlight On and press @.
- Set the date and time.
The dialog shown at right will be displayed. Press or l to select an item, and A or V to change. Press @ to set the clock and exit to shooting mode.
Insert a Memory Card
The camera stores pictures on Secure Digital (SD) memory cards (available separately: a 334). The camera has two memory card slots (Slot 1 and Slot 2); if you will be using only one memory card, insert it in Slot 1 (CO 30).
- Turn the camera off.
Inserting and Removing Memory Cards Always turn the camera off before inserting or removing memory cards. - Open the card slot cover.
Slide the card slot cover out (1) and open the card slot (2).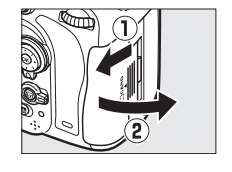
- Insert the memory card.
Holding the memory card as shown at right, slide it in until it clicks into place. The memory card access lamp will light for a few seconds.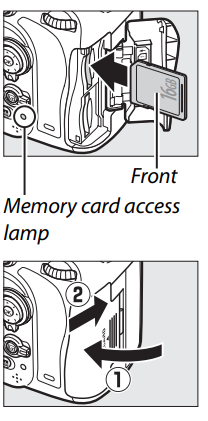
- Inserting Memory Cards
Inserting memory cards upside down or backward could damage the camera or the card. Check to be sure the card is in the correct orientation. The card slot cover will not close if the card is not correctly inserted. Close the memory card slot cover. If this is the first time the memory card will be used in the camera or the card has been formatted in another device, format the card as described on page 31.
- Inserting Memory Cards
- Removing Memory Cards
After confirming that the memory card access lamp is off, turn the camera off, open the memory card slot cover, and press the card in to eject it (1). The card can then be removed by hand (2).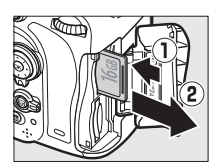
Memory Cards
- Memory cards may be hot after use. Observe due caution when removing memory cards from the camera.
- Turn the power off before inserting or removing memory cards.
- Do not remove memory cards from the camera, turn the camera off, or remove or disconnect the power source during formatting or while data are being recorded, deleted, or copied to a computer. Failure to observe these precautions could result in loss of data or damage to the camera or card.
- Do not touch the card terminals with your fingers or metal objects.
- Do not bend, drop, or be subject to strong physical shocks.
- Do not apply force to the card casing. Failure to observe this precaution could damage the card.
- Do not expose to water, heat, high levels of humidity, or direct sunlight.
- Do not format memory cards in a computer.
Format the Memory Card
Memory cards must be formatted before first use or after being used or formatted in other devices.
- Turn the camera on.
- Press the ® (a) and 8 (a) buttons.
Hold the § (SAR) and & (a) buttons down simultaneously until a flashing F o ~ (format) appears in the shutter-speed displays in the control panel and viewfinder. If two memory cards are inserted, the card in Slot 1 (L 30) will be selected; you can choose the card in Slot 2 by rotating the main command dial. To exit without formatting the memory card, wait until For stops flashing (about six seconds) or press any button other than the § (pus) and buttons.
- Press the © (wan) and % (ka) buttons again.
Press the ™ (sung) and * (ru) buttons together a second time while For is flashing to format the memory card. Do not remove the memory card or remove or disconnect the power source during formatting. When formatting is complete, the control panel and viewfinder will show the number of photographs that can be recorded at current settings.
Adjust Viewfinder Focus
The camera is equipped with diopter adjustment to accommodate individual differences in vision. Check that the display in the viewfinder is in focus before framing pictures in the viewfinder.
- Turn the camera on.
Remove the lens cap and turn the camera on. - Focus on the viewfinder.
Rotate the diopter adjustment control until the AF area brackets are in sharp focus. When operating the diopter adjustment control with your eye on the viewfinder, be careful not to put your fingers or fingernails in your eye.
Menu Guide
The Playback Menu: Managing Images

The playback menu contains the following options:
Other Accessories

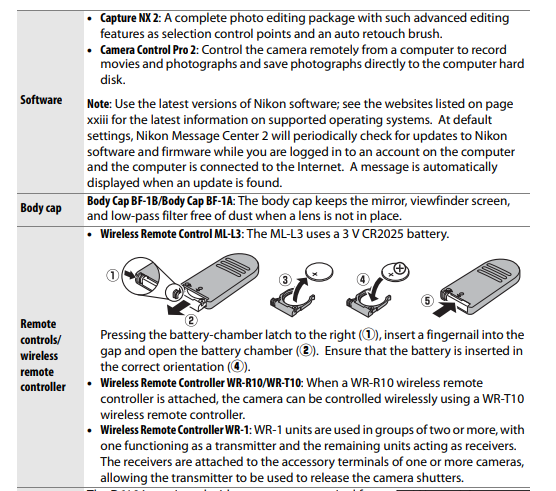

Caring for the Camera
Storage
When the camera will not be used for an extended period, replace the monitor cover, remove the battery, and store the battery in a cool, dry area with the terminal cover in place. To prevent mold or mildew, store the camera in a dry, well-ventilated area. Do not store your camera with naphtha or camphor moth balls or in locations that:
- are poorly ventilated or subject to humidities of over 60%
- are next to equipment that produces strong electromagnetic fields, such as televisions or radios
- are exposed to temperatures above 50 °C (122 °F) or below -10 °C (14 °F)
CLEANING
Troubleshooting
If the camera fails to function as expected, check the list of common problems below before consulting your retailer or Nikon-authorized service representative.
Battery/Display
- The camera is on but does not respond: Wait for the recording to end. If the problem persists, turn the camera off. If the camera does not turn off, remove and reinsert the battery or, if you are using an AC adapter, disconnect and reconnect the AC adapter. Note that although any data currently being recorded will be lost, data that have already been recorded will not be affected by removing or disconnecting the power source.
- Viewfinder is out of focus: Adjust viewfinder focus or use optional eyepiece correction lenses (a0 33, 297). Viewfinder is dark: Insert a fully-charged battery (I 21, 35).
- Displays turn off without warning: Choose longer delays for Custom Setting c2 (Standby timer) or c4 (Monitor off delay) (© 227, 228).
- Control panel and viewfinder displays are unresponsive and dim: The response times and brightness of these displays vary with temperature.
- Fine lines are visible around the active focus points or the display turns red when the focus point is highlighted: These phenomena are normal for this type of viewfinder and do not indicate a malfunction.
Shooting (All Modes)
- The camera takes time to turn on: Delete files or folders.
- Shutter-release disabled:
- Memory card is locked, full, or not inserted (00 29, 31).
- Release locked is selected for Custom Setting f7 (Slot empty release lock; a 246) and no memory card is inserted (00 32).
- Built-in flash is charging (CO 39).
- The camera is not in focus (CO 38).
- CPU lens with aperture ring attached but aperture not locked at highest f-number. If FEE is displayed in the control panel, select Aperture ring for Custom Setting f5 (Customize command dials) > Aperture setting to use lens aperture ring to adjust aperture (00 245).
- Non-CPU lens is attached but the camera is not in mode A or M (CO 288).
- The camera is slow to respond to the shutter-release button: Select Off for Custom Setting d10 (Exposure delay mode: 0 231′
- •No photo taken when remote control shutter-release button is pressed:
- Replace the battery in the remote control (∞ 298).
- Choose remote control release mode (M 85).
- Flash is charging (C 87).
- The time selected for Custom Setting c5 (Remote on duration, ™ 228) has elapsed: press the camera shutter-release button halfway.
- Bright light is interfering with the remote.
- Photos are out of focus:
- Rotate the focus-mode selector to AF (L 97).
- Camera unable to focus using autofocus: use manual focus or focus lock (5 102, 103).
- Focus does not lock when the shutter-release button is pressed halfway: Use the AFt AE-L/AF-L button to lock focus when AF-C is selected for focus mode or when photographing moving subjects in AF-A mode.
- Can not select focus point:
- Unlock focus selector lock (C 101)
- Auto-area AF or face-priority AF selected for AF-area mode: choose another mode.
- The camera is in playback mode (ON 177) or menus are in use (CO 207).
- Press the shutter-release button halfway to turn the monitor off or start the standby timer (L 39).
- Can not select AF-area mode: Manual focus selected (0 55, 103).
- Only one shot is taken each time the shutter-release button is pressed in continuous release mode: Continuous shooting is not available if built-in flash fires (0 145).
- Image size can not be changed: Image quality set to NEF (RAW) (D 93).
- The camera is slow to record photos: Turn long exposure noise reduction off (C 218).
- Sound is not recorded with movies: Microphone off is selected for Movie settings > Microphone.
- The brightness of the image in the monitor differs from the exposure of photographs taken in live view: •
- Center-weighted or spot metering is selected (M 109).
- The camera is in mode M.
- The subject is too bright or too dark.
- Active D-Lighting is in effect (L 137).
- The photograph is a long time-exposure (M 79).
- The flash is used (Q 143).
- Flicker or banding appears during live view or movie recording: Choose an option for Flicker reduction that matches the frequency of the local AC power supply (© 252).
- Bright bands appear during live view or movie recording: A flashing sign, flash, or other light source with a brief duration was used during live view or movie recording.
- Menu items can not be selected: Some options are not available in all modes.
Playback
- NEF (RAW) image is not played back: The photo was taken at the image quality of NEF + JPEG (0 93).
- Can not view pictures recorded with other cameras: Pictures recorded with other makes of the camera may not be displayed correctly.
- The message is displayed stating that no images are available for playback: Select All for Playback folder (D 207).
- “Tall” (portrait) orientation photos are displayed in “wide” (landscape) orientation:
- Select On for Rotate Tall (Q 212).
- The photo was taken with Off selected for Auto-image rotation (1 254).
- The camera was pointed up or down when the photo was taken (CO 254).
- The photo is displayed in the image review (© 212).
- Can not delete picture:
- Picture is protected: remove protection (L 188).
- The memory card is locked (D 32).
- Can not retouch picture: Photo can not be further edited with this camera (L 262).
- Can not change print order:
- Memory card is full: delete pictures (0 36, 189).
- Memory card is locked IM 32
- The picture is not displayed on TV:
- Choose the correct video mode (M 65) or output resolution (∞ 205).
- HDMI (∞ 204) cable is not correctly connected.
- Camera does not respond to remote control for HDMI-CEC television:
- Select On for HDMI > Device control in the setup menu (C 205).
- Adjust HDMI-CEC settings for the television as described in the documentation provided with the device.
- Can not transfer photos to computer: OS not compatible with camera or transfer software. Use a card reader to copy photos to the computer (~ 193).
- Photos are not displayed in Capture NX 2: Update to the latest version (M 298).
Miscellaneous
- The date of recording is not correct: Set camera clock (0 27, 253).
- A menu item can not be selected: Some options are not available at certain combinations of settings or when no memory card is inserted. Note that the Battery info option is not available when the camera is powered by an optional EP-5B power connector and EH-5b AC adapter (M 255).
Specifications
Nikon D610 Digital Camera


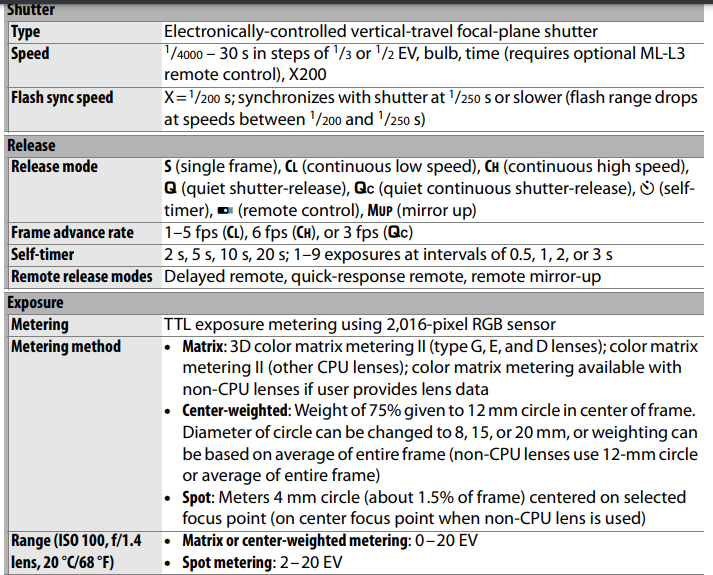

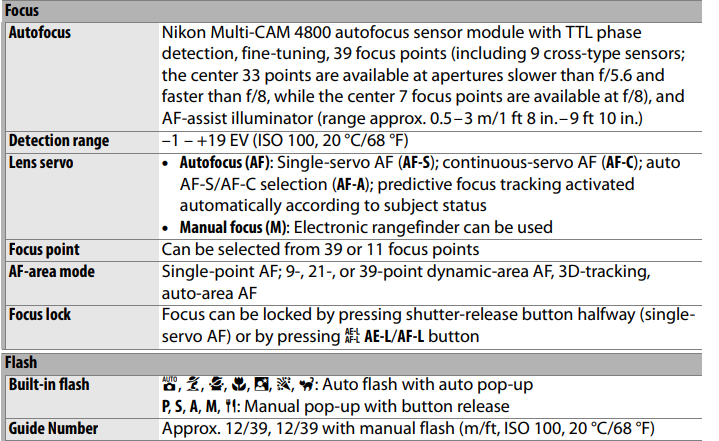


- Unless otherwise stated, all figures are for a camera with a fully-charged battery operating at the temperature specified by the Camera and Imaging Products Association (CIPA): 23 #3 °C (73.4 ‡5.4 °F).
- Nikon reserves the right to change the specifications of the hardware and software described in this manual at any time and without prior notice. Nikon will not be held liable for damages that may result from any mistakes that this manual may contain.
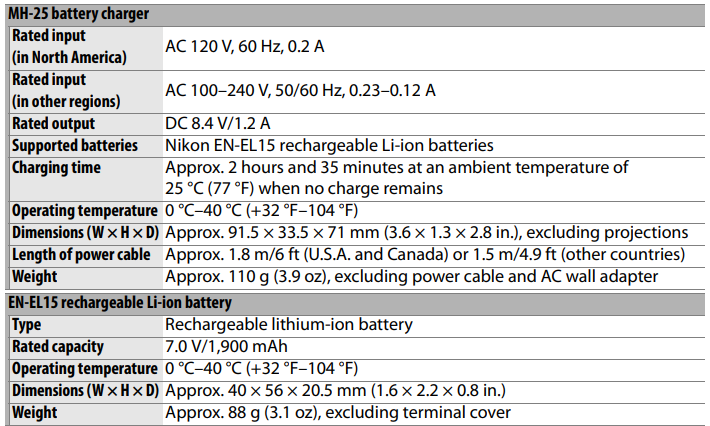
- Nikon reserves the right to change the specifications of the hardware and software described in this manual at any time and without prior notice. Nikon will not be held liable for damages that may result from any mistakes that this manual may contain.

Supported Standards
- DCF Version 2.0: The Design Rule for Camera File Systems (DCF) is a standard widely used in the digital camera industry to ensure compatibility among different makes of cameras.
- DPOF: Digital Print Order Format (DPOF) is an industry-wide standard that allows pictures to be printed from print orders stored on the memory card.
- Exif version 2.3: The camera supports Exif (Exchangeable Image File Format for Digital Still Cameras) version 2.3, a standard in which information stored with photographs is used for optimal color reproduction when the images are output on Exif-compliant printers.
- PictBridge: A standard developed through cooperation with the digital camera and printer industries, allowing photographs to be output directly to a printer without first transferring them to a computer.
- HDMI: High-Definition Multimedia Interface is a standard for multimedia interfaces used in consumer electronics and AV devices capable of transmitting audiovisual data and control signals to HDMI-compliant devices via a single cable connection.
Battery Life
The number of shots that can be taken with fully-charged batteries varies with the condition of the battery, temperature, and how the camera is used. In the case of AA batteries, capacity also varies with make and storage conditions; some batteries can not be used. Sample figures for the camera and optional MB-D14 multi-power battery pack are given below.
- Measured at 23 °C/73.4 °F (‡2 °C/3.6 °F) with an AF-S NIKKOR 24-85mm f/3.5-4.5G ED VR lens under the following test conditions: lens cycled from infinity to minimum range and one photograph taken at default settings once every 30 s; flash fired once every other shot. Live view not used.
- Measured at 20 °C/68 °F with an AF-S NIKKOR 24-85mm f/3.5-4.5G ED VR lens under the following test conditions: image quality set to JPEG basic, image size set to M (medium), shutter speed /250 s, shutter- release button pressed halfway for three seconds and focus cycled from infinity to minimum range three times; six shots are then taken in succession and monitor turned on for five seconds and then turned off; cycle repeated once standby timer expires.
- Measured at 23 °C/73.4 °F (#3 °C/5.4 °F) with the camera at default settings and an AF-S NIKKOR 24- 85mm f/3.5-4.5G ED VR lens under conditions specified by the Camera and Imaging Products Association (CIA). Individual movies can be up to 20 minutes (1080/30p and 1080/25p) in length or 4 GB in size: recording may end before these limits are reached if the camera temperature rises.
The following can reduce battery life:
- Using the monitor
- Keeping the shutter-release button pressed halfway
- Repeated autofocus operations
- Taking NEF (RAW) photographs
- Slow shutter speeds
- Using a GP-1/GP-1A GPS unit
- Using an Eye-Fi card
- Using a WU-1b wireless mobile adapter
- Using VR (vibration reduction) mode with VR lenses
To ensure that you get the most from rechargeable Nikon EN-EL15 batteries:
- Keep the battery contacts clean. Soiled contacts can reduce battery performance.
- Use batteries immediately after charging. Batteries will lose their charge if left unused.
FAQS About Nikon D610 CMOS FX-Format Digital SLR Camera
Is the Nikon D610 a crop or full-frame model?
full-frame
How is the Nikon D610 mounted?
An F lens mount is present on the Nikon D610.
What is the Nikon D610’s shutter life?
1.5 million actuations
What video format is used by the Nikon D610?
MOV (H.264 Codec)
Crop mode D610 has what resolution?
6,016 x 4,016 (L, 24MP), 4,512 x 3,008 (M, 13.5 MP), or 3,008 x 2,008 (S, 6 MP) are the FX (24 x 35.9mm) resolutions.
What is the Nikon D610’s maximum frame rate?
The D610’s continuous shooting speed and buffer capacity at 6 frames per second are more than adequate for the majority of circumstances (see below for tests).
Is the Nikon D610 effective in low light?
very nice outcomes under dim lighting
The Nikon D610 has what size of a frame?
5.6 x 4.4 x 3.2 in
What is the Nikon D610’s maximum shutter speed?
One fourth of a second
Is a D610 a qualified camera?
A professional camera with many outstanding features is the Nikon D610.
For more manuals by Nikon, Visit Manualsdock
[embeddoc url=”https://manualsdock.com/wp-content/uploads/2023/09/Nikon-D610-CMOS-FX-Format-Digital-SLR-Camera-User-Manual.pdf” download=”all”]


