
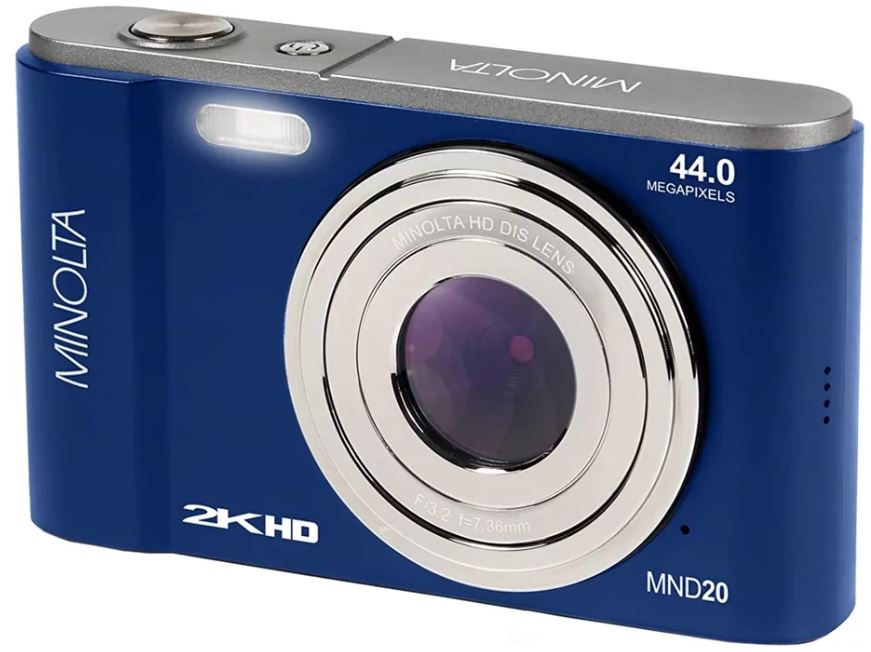
Minolta MND20 44 MP Ultra HD Digital Camera
About Minolta
Minolta Corporation was a Japanese manufacturer of cameras, camera accessories, photocopiers, and other optical and imaging equipment. The company has a rich history dating back to its founding in 1928 by Kazuo Tashima under the name “Nichidoku Shashinki Shōten” (Japan-Germany Camera Store). It later adopted the name Minolta, derived from “Mechanism, Instruments, Optics, and Lenses by Tashima.”
Camera Interface


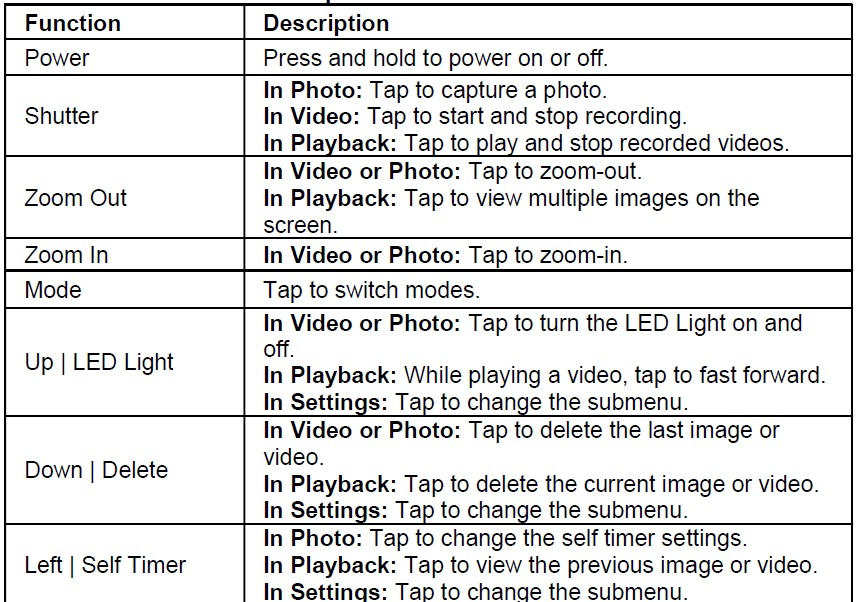
- Power
- Shutter
- Zoom In/Out
- Mode
- Up/Down/Left/Right
- OK
- Menu
- Carry Strap Slot
- USB Port
- Battery and Memory
- Card Door
- Tripod Mount
- LED Light
- Microphone
- LED Status Light
Button Function Description

First Use
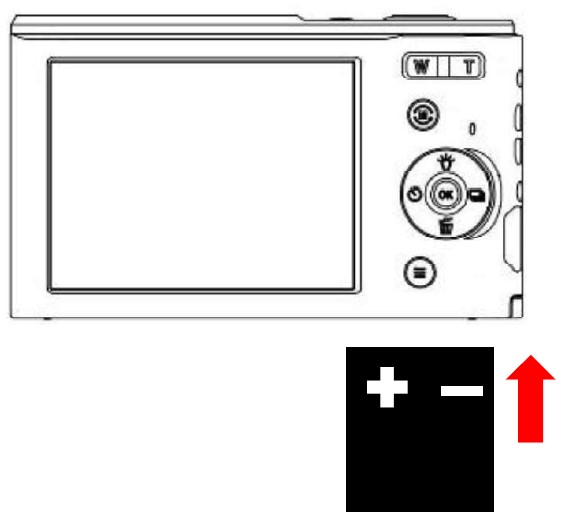
To Open the Battery Door
Unlock the battery door by sliding the battery door away from the center of the camera. The battery door will then flip open.

Installing the Battery
Insert the lithium-ion battery into the battery compartment with the metal contacts facing the inside of the camera. The battery can only be inserted one way.
Installing the Memory Card
Insert the included SD memory card to record and store your videos and photos. When the battery is low, media stored on the memory card will not be erased. Please insert the SD memory card by following the steps below:
- Open the battery door by following the diagram above.
- Insert the memory card. Ensure that the metal contacts are inserted first. Push the memory card down until you hear an audible click. The memory card can only be inserted in one way. Do not force the card in if it will not go in smoothly.
- Close the battery door by pushing it down and sliding the lock back into place.
- To remove the memory card, simply push in and the card will eject back out.

NOTE:
- Please format the memory card before using the camera (Caution, this will erase all data on the card).
- Do not remove or insert the memory card when recording. It may damage the card or cause data loss.
- Memory card rating must be Class 6 or above.
Charging the Battery
Connect your camera to the included AC adaptor with the USB cable provided for charging. Insert the small end of the USB plug into the camera sport under the battery door, and the larger end into the included AC adaptor. While charging the LED indicator light will light up solid red, when finished charging the light will turn off.

Powering the Camera On/Off
Press and hold the POWER button for 3 seconds to power the camera on. To power the camera off, press and hold the POWER button for 3 seconds again. If the camera’s battery is low, a “Low Battery” message will display on the screen and it will automatically shut down within a few seconds to prevent memory corruption or loss.
Switching Modes
Press the MODE button to cycle between Photo, Video, Playback, and Setup Modes. The corresponding mode will be displayed in the top left corner of the screen.
Connecting to a Computer
Your camera can connect to a computer to transfer photo and video files for viewing and editing, you can also use the camera as a webcam. Once connected and powered on the camera’s screen will show “MSDC and “PC Camera”. Use the UP or DOWN buttons to select your desired mode. Press the OK to select your desired mode.
Using the Zoom Function
Your camera has a digital zoom function. To operate the zoom function, press the ZOOM IN button to zoom in closer to the subject. and press the ZOOM OUT button to zoom away from the subject.
LED Light
Your camera is equipped with a white LED light to help illuminate dark environments. To activate the LED light, press the UP button in Photo or Video mode. Press the UP button again to turn off the light.
Photo Mode
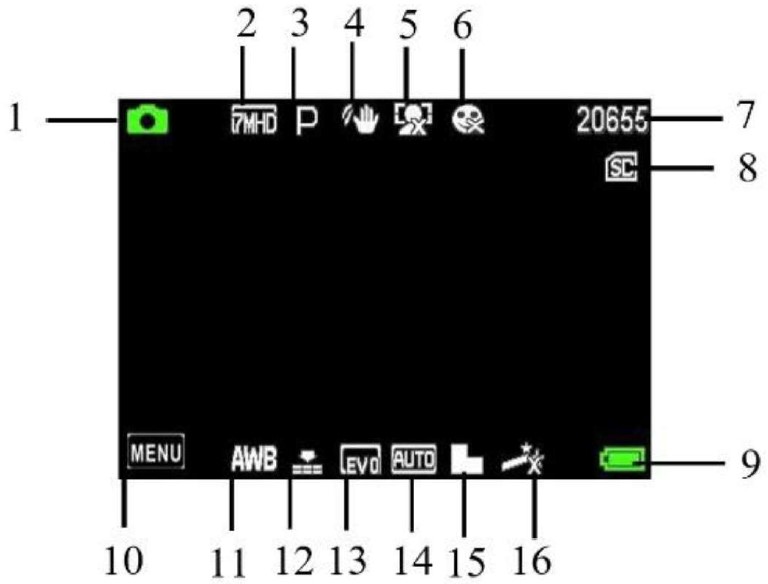
Press the MODE button to switch to Photo Mode. The meaning of each icon within Photo Mode is explained in the table below:
- Photo Mode
- Image Size (Resolution)
- Scene
- Anti-Shake
- Face Detection
- Smile Capture
- Pictures Remaining
- Memory Card Inserted
- Battery Level
- Menu
- White Balance
- Image Quality
- Exposure
- ISO
- Image Sharpness
- Color Effect
Video Mode
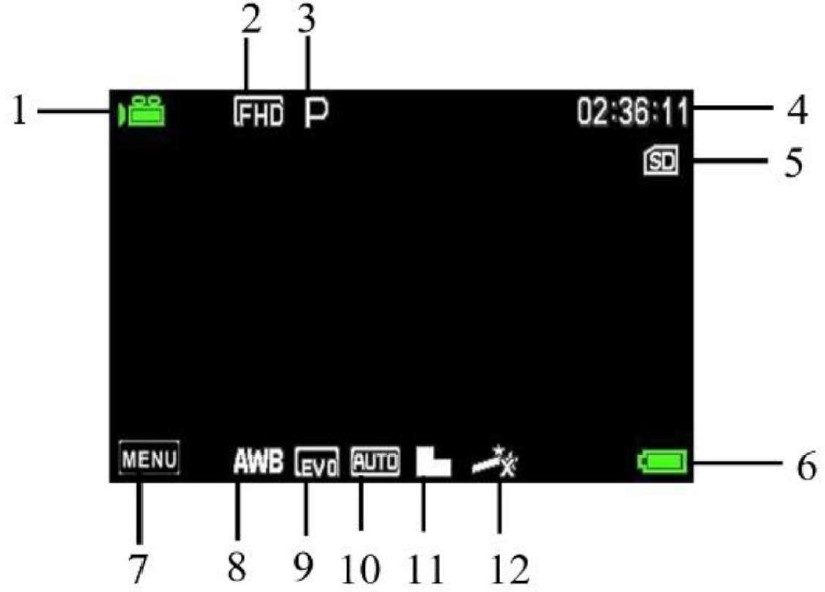
Press the MODE button to switch to Video Mode. The meaning of each icon within Video Mode is explained in the table below:
- Video Mode
- Video Size (Resolution)
- Scene
- Video Time Remaining
- Memory Card Inserted
- Battery Level
- Menu
- White Balance
- Exposure
- ISO
- Video Sharpness
- Color Effect
Using the Camera
Photo Shooting
Power the camera on and it will be ready to take pictures right away. You may press the MODE button to switch to another mode.
- Line up your shot by looking at the LCD screen to see what is in the shot.
- Hold the camera steady and press the SHUTTER button to capture a photo.
- The number of photos that can be captured at a particular resolution will be displayed in the top right corner of the screen.
- A “MEMORY FULL” message will be displayed on the screen if there is no SD card inserted in the camera’s memory card slot. A “MEMORY FULL” message will be shown on the screen when the SD card is full.
- The number of remaining photos is determined by the selected photo resolution. The higher the photo resolution, the lower the number of photos you can save to the memory card. Before capturing any photos, you can select a preferred photo resolution.
Image Size (Resolution)
This function sets the photo resolution. The higher the resolution, the greater the photo quality and the larger the file size of the photo.
- In Photo Mode press the MENU button.
- Select Image Size using the LEFT or RIGHT buttons and press the OK button to enter the ‘Image Size’ submenu.
- Press the LEFT or RIGHT buttons to navigate the menu, and press the OK button to confirm your selected resolution (44MP, 36MP, 24MP, 20MP, 16MP, 12MP, 10MP, 7MP-Wide, 5MP, 3MP, 2MP-Wide).
- Press the MENU button to exit the settings menu without making a selection.
Beauty Filter
This feature applies a filter effect on the people in the scene.
- In Photo Mode press the MENU button.
- Select ‘Beauty Filter using the LEFT or RIGHT buttons and press the OK button to enter the ‘Beauty Filter’ submenu.
- Press the LEFT or RIGHT buttons to navigate the menu, and press the OK button to confirm your selected option (On, Off).
- Press the MENU button to exit the settings menu without making a selection.
Capture Mode
This function allows to you capture 3 consecutive photos with one click of the SHUTTER button.
- In Photo Mode press the MENU button.
- Select ‘Capture Mode’ using the LEFT or RIGHT buttons and press the OK button to enter the ‘Capture Mode’ submenu.
- Press the LEFT or RIGHT buttons to navigate the menu, and press the OK button to confirm your selected option (Single, 3-Photo Burst).
- Press the MENU button to exit the settings menu without making a selection.
Self Timer
This function determines the time delay before a photograph is captured. This setting can be used by photographers to take photographs of themselves.
- In Photo Mode press the MENU button.
- Select ‘Self Timer using the LEFT or RIGHT buttons and press the OK button to enter the ‘Self Timer’ submenu.
- Press the LEFT or RIGHT buttons to navigate the menu, and press the OK button to confirm your selected option (Off, 2 Seconds, 5 Seconds, 10 Seconds).
- Press the MENU button to exit the settings menu without making a selection.
Image Quality
The Photo Quality function determines the level of compression the camera uses when saving photos to a memory card.
- In Photo Mode press the MENU button.
- Select ‘Quality’ using the LEFT or RIGHT buttons and press the OK button to enter the ‘Quality’ submenu.
- Press the LEFT or RIGHT buttons to navigate the menu, and press the OK button to confirm your required quality option (Super Fine, Fine, Normal), Super Fine uses the least amount of compression for saving, and as a result, produces a higher photo quality.
- Press the MENU button to exit the settings menu without making a selection.
Color Effect
This function sets the color filter effect of a photograph.
- In Photo Mode press the MENU button.
- Select ‘Color Effect using the LEFT or RIGHT buttons and press the OK button to enter the ‘Color Effect’ submenu.
- Press the LEFT or RIGHT buttons to navigate the menu, and press the OK button to confirm your selected option (Normal, B & W (Black and White), Sepia, Red, Green, Blue, Sunset, Warm, Cool, Over Exposure, IR, Binary, Vivid, Undertone, Dog Eye, Aibao, Gothic, Japan Style, LOMO, Negative).
- Press the MENU button to exit the settings menu without making a selection.
Anti-Shake
This function enables photo capture in high speed and low light by electronically minimizing motion blur and reducing camera shake.
- In Photo Mode press the MENU button
- Select ‘Anti-Shake’ using the LEFT or RIGHT buttons and press the OK button to enter the ‘Anti-Shake’ submenu.
- Press the LEFT or RIGHT buttons to navigate the menu, and press the OK button to confirm your selected option (On, Off).
- Press the MENU button to exit the settings menu without making a selection.
Video Recording
Power the camera on and press the MODE button to switch to Video mode. A camcorder icon will appear in the top left-hand corner of the screen when you are in Video mode.
- Line up your shot by looking at the LCD screen to see what is in view.
- Hold the camera steady and press the SHUTTER button to begin recording.
- When recording begins, a rolling timer will display in red in the top right-hand corner of the screen. This indicates the recorded video time elapsed.
- While recording, you can pause the recording by pressing an OK button, and press the OK button again to resume the recording.
- Press the SHUTTER button to stop recording.
- The recorded video files will automatically save onto the inserted memory card.
Movie Size (Resolution)
This function sets the video resolution. The higher the resolution, the greater the video quality and the larger the file size of the video.
- In Video Mode press the MENU button.
- Select ‘Movie Size using the LEFT or RIGHT buttons and press the OK button to enter the ‘Movie Size’ submenu.
- Press the LEFT or RIGHT buttons to navigate the menu, and press the OK button to confirm your selected resolution (2.7K, 1080p, 720p, 480p).
- Press the MENU button to exit the settings menu without making a selection.
Recording Mode
This feature allows you to select the type of video the camera will record.
- In Video Mode press the MENU button.
- Select ‘Recording Mode using the LEFT or RIGHT buttons and press the OK button to enter the ‘Recording Mode’ submenu.
- Press the LEFT or RIGHT buttons to navigate the menu, and press the OK button to confirm your selected option (Normal, Motion Detection, Video Time Lapse, Photo Time Lapse, Slow Motion).
- Normal – You can record standard videos in this mode.
- Motion Detection – After pressing the SHUTTER button, the camera will automatically start recording when it detects motion.
- Video Time Lapse – The camera will take a single picture at a set interval for a set length of time (follow the directions in section 3.2.5 to set the interval and video length) and combine the images into a single video.
- Photo Time Lapse – The camera will take a single picture at a set interval for a set length of time (follow the directions in section 3.2.5 to set the interval and video length) and save them as individual files.
- Slow Motion – The camera will record at a much higher frame rate so the video is slowed down.
- Press the MENU button to exit the settings menu without making a selection.
Exposure
This function adjusts the frame brightness in your photograph.
- In Video Mode press the MENU button.
- Select Exposure’ using the LEFT or RIGHT buttons and press the OK button to enter the ‘Exposure’ submenu.
- Press the LEFT or RIGHT buttons to navigate the menu, and press the OK button to confirm your selected option (+3, +2, +1, 0, -1, -2, -3).
- Press the MENU button to exit the settings menu without making a selection.
White Balance
White Balance changes the color of light in your pictures, making it seem warmer or cooler depending on how the light you’re shooting in affects the frame.
- In Video Mode press the MENU button.
- Select ‘White Balance’ using the LEFT or RIGHT buttons and press the OK button to enter the ‘White Balance’ submenu.
- Press the LEFT or RIGHT buttons to navigate the menu, and press the OK button to confirm your selected option (Auto, Daylight, Cloudy, Florescent, Tungsten).
- Press the MENU button to exit the settings menu without making a selection.
Sharpness
This function adjusts the visible detail of a photograph.
- In Video Mode press the MENU button.
- Select ‘Sharpness’ using the LEFT or RIGHT buttons and press the OK button to enter the ‘Sharpness’ submenu.
- Press the LEFT or RIGHT buttons to navigate the menu, and press the OK button to confirm your selected option (Sharp, Normal, Soft).
- Press the MENU button to exit the settings menu without making a selection.
Color Effect
This function sets the color filter effect of a video.
- In Video Mode press the MENU button.
- Select ‘Color Effect using the LEFT or RIGHT buttons and press the OK button to enter the ‘Color Effect’ submenu.
- Press the LEFT or RIGHT buttons to navigate the menu, and press the OK button to confirm your selected option (Normal, B & W (Black and White), Sepia, Red, Green, Blue, Sunset, Warm, Cool, Over Exposure, IR, Binary, Vivid, Undertone, Dog Eye, Aibao, Gothic, Japan Style, LOMO, Negative).
- Press the MENU button to exit the settings menu without making a selection.
Playback Mode
Videos and photos captured on your camera can be easily played back.
- Press the MODE button to enter Playback mode, and a play icon will display in the top left corner of the screen.
- Press the LEFT or RIGHT buttons to cycle through the captured videos and photos stored on the memory card.
- When viewing a photo press and hold the ZOOM IN button to zoom in on the picture on the screen, and press and hold the ZOOM OUT button to view the entire image. While zoomed in, use the UP, DOWN, LEFT, or RIGHT buttons to move the image on the screen.
- Push the ZOOM OUT button to see 9 images on the screen at once. Use the UP or DOWN buttons to change the page. Press the OK button to view the selected media.
- While viewing a recorded video, press the SHUTTER button to start the video, press the OK button to pause the video, and again to continue playing the video. Press the SHUTTER button to stop the video.
Power the camera on and press the MODE button to switch to Playback Mode. In Playback Mode the following options are available:
Delete
This function is used to delete photos and videos. Photos and videos can be deleted singly or all at once.
- In Playback Mode press the MENU button.
- Select ‘Delete using the LEFT or RIGHT buttons and press the OK button to enter the ‘Delete’ submenu.
- Press the LEFT or RIGHT buttons to navigate the menu, and press the OK button to confirm your selected option (This Image/Video, All).
- Press the MENU button to exit the settings menu without making a selection.
Protect
This function protects the photo/video file. The file will be protected from being deleted accidentally. Files must be unprotected to be deleted.
- In Playback Mode press the MENU button.
- Select ‘Protect using the LEFT or RIGHT buttons and press the OK button to enter the ‘Protect’ submenu.
- Press the LEFT or RIGHT buttons to navigate the menu, and press the OK button to confirm your selected option (Lock This, Unlock This, Lock All, Unlock All).
- Press the MENU button to exit the settings menu without making a selection.
Restore Default Settings
Factory default settings can be restored in this menu. This function will not delete the media stored on the memory card, and will only restore all of the menu’s settings back to factory default settings.
- In Setup Mode select ‘Restore Default Settings’ using the LEFT or RIGHT buttons and press the OK button to enter the ‘Restore Default Settings’ submenu.
- Press the LEFT or RIGHT buttons to navigate the menu, and press the OK button to confirm your selected option (Yes, No).
- Press the MENU button to exit the settings menu without making a selection.
Appendix
Technical Specifications

Minolta is a registered trademark of JMM Lee Properties, LLC, and is used in the United States by Elite Brands Inc. under license. 40 Wall Street, 61st Floor, New York, NY 10005 USA Tel: 800-441-1100
Copyright © 2022 Elite Brands Inc.
If you’re having difficulties with your camera or would like further assistance, please call our toll-free technical support hotline at 800-441-1100. Please be sure to have your camera handy when calling.
FAQS About Minolta MND20 44 MP Ultra HD Digital Camera
How come Minolta stopped producing cameras?
Later, as the cameras did not sell as anticipated, APS proved to be a technological dead end.
Is Minolta a reliable camera brand?
Use of Minolta cameras is wonderful.
Who now manufactures Minolta cameras?
Premium Brands
Is there a digital camera made by Minolta?
Digital cameras from Minolta range in resolution from entry-level 16MP devices to 48MP versions.
Can a Minolta camera be used without a battery?
Without a battery, you won’t be able to shoot in automatic.
What is a trademark of Minolta?
Digital and film cameras, camera accessories, photocopiers, fax machines, laser printers, industrial radiometric instruments, planetarium projection equipment, some of the first 3D scanners on the market, and other optical instruments and gadgets have all been produced by Minolta, which is well-known throughout the world.
Which kind of battery does Minolta use?
1.5 V lithium LR44 batteries
How is the Minolta camera mounted?
SR-mount
What nation is Minolta from?
Japanese
Can a Minolta camera record?
Create 4K Ultra HD videos to capture every moment in stunning clarity.
For more manuals by Minolta, Visit Manualsdock
[embeddoc url=”https://manualsdock.com/wp-content/uploads/2023/09/Minolta-MND20-44-MP-Ultra-HD-Digital-Camera-User-Manual.pdf” download=”all”]


I cannot find out how to download pictures from the MND20 to my PC. I have the camera connected to my computer but no icon appears when I click on “My PC” that would allow me to download.
1. Power on the camera and connect it to your computer using a USB cable. 2. On the camera’s screen, select “MSDC” or “PC Camera” mode by using the UP or DOWN buttons and pressing OK.