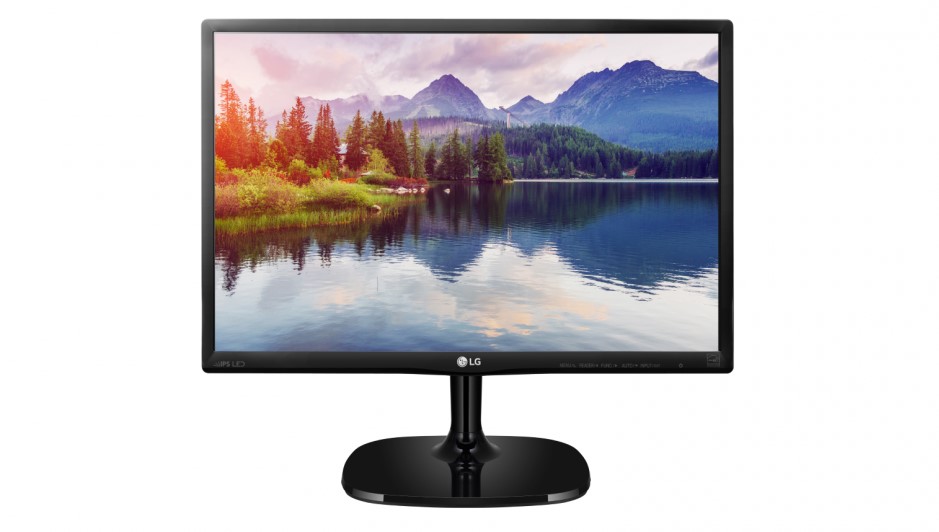
LG 22MB35PY IPS FHD Monitor
ABOUT LG Electronics
Globally, LG Electronics concentrated on creating new breakthroughs. We are dedicated to offering customers electronic products that improve their quality of life. In order to enable this, we want to keep enhancing consumers’ lives. We provide a comprehensive selection of goods in a number of categories, such as TV & Home Entertainment, Kitchen, Laundry, Computers, Air Conditioning, & Solar. Learn more about LG right now. For additional information, speak with the LG salesperson in your area.
ASSEMBLING AND PREPARING
Unpacking Check your product box for the following items. If there are any missing accessories, contact the local dealer where you purchased your product. The illustrations in this manual may differ from the actual product and accessories.

CAUTION
- Do not use any unapproved accessories to ensure the safety and product life span.
- Any damages or injuries by using unapproved accessories are not covered by the warranty.
NOTE
- The accessories supplied with your product may vary depending on the model.
- Product specifications or contents in this manual may be changed without prior notice due to an upgrade of product functions
Parts and buttons

Attaching the Stand Base
- Place the Monitor set with the screen side down on a flat and cushioned surface.
CAUTION To protect the screen from scratches, cover the surface with a soft cloth. - Check the position (at the front and rear) of the stand body, then mount the stand base on the stand body as shown in the figure.

- Using a coin, turn the screw clockwise to secure the stand base.

Detaching the stand base
- Place the monitor’s screen face down. To protect the screen from scratches, cover the surface with a soft cloth.
- Using a coin, turn the screw in the stand base counterclockwise. Detach the stand base from the stand body.

CAUTION
- The components appearing in the illustrations may look different from the actual product.
- Do not carry the monitor upside-down as this may cause it to fall off its stand, resulting in damage or injury.
- To avoid damaging the screen when lifting or moving the monitor, only hold the stand or the plastic cover. This avoids putting unnecessary pressure on the screen.
- Only remove the tape and the locking pin when the monitor is mounted on the stand base and is in an upright position. Otherwise, the stand body may protrude, which may lead to injury.
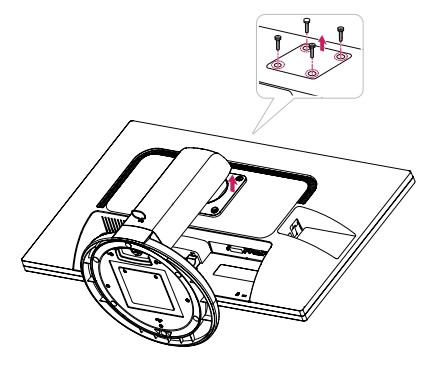
Detaching the stand body
- Place the monitor’s screen face down. To protect the screen from scratches, cover the surface with a soft cloth.
- Using a screwdriver, remove the four screws and detach the stand from the monitor.
Mounting on a table
- Lift the monitor and place it on the table in an upright position. Install at least 10 cm away from the wall to ensure sufficient ventilation.

- Connect the Power cord to the monitor, then plug the power cord into the wall outlet.

- Press the (Power) button on the front of the monitor to turn it on the monitor.
CAUTION Unplug the power cord prior to moving or installing the monitor. There is a risk of electric shock.
Adjusting the angle
- Place the monitor mounted on the stand base in an upright position.
- Adjust the angle of the screen. The angle of the screen can be adjusted up to 5° forwards and 20° backward for a comfortable viewing experience.

WARNING
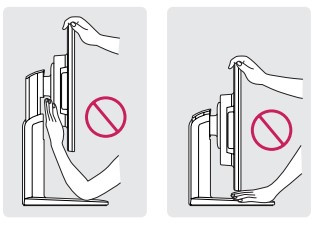
- To avoid injury to the fingers when adjusting the screen, do not hold the lower part of the monitor’s frame as illustrated below.
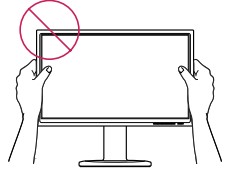
- Be careful not to touch or press the screen area when adjusting the angle of the monitor.
Adjusting the stand height
- Place the monitor mounted on the stand base in an upright position.
- Remove the tape attached at the bottom rear of the stand body, then pull out the locking pin.

- The height can be adjusted up to 110 mm.

CAUTION Once the pin is removed, it is not necessary to re-insert it to adjust the height.
WARNING

Do not put your finger between the screen and the base (chassis) when adjusting the screen’s height.
Using the Kensington locking device
The connector for the Kensington lock is located on the rear of the monitor. For more information on installation and usage, refer to the Kensington lock user manual or visit the website at http://www.kensington.com. Connect the monitor to the table with the Kensington lock cable.
NOTE Using the Kensington lock is optional. The accessories can be purchased at your local electronics store.
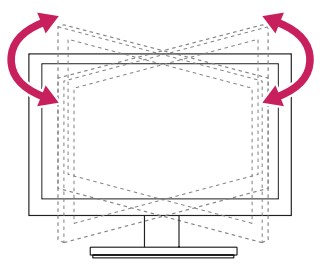
Swivel stand
The image shown may differ from your Monitor set.
- Swivel 355 degrees and adjust the angle of the Monitor set to suit your view.
Using the Pivot function
The pivot function allows you to rotate the screen 90 degrees clockwise.
- Lift the monitor to its highest height to utilize the Pivot function.
- Landscape & Portrait: You can rotate the panel 90° clockwise. Please be cautious and avoid contact between the monitor head and the Stand Base when rotating the screen to access the Pivot function. If the monitor head touches the Stand Base, then the Stand Base could crack.

- Be careful with the cables when rotating the screen.

Mounting on a wall
For proper ventilation, allow a clearance of 10 cm on each side and from the wall. Detailed instructions are available from your dealer, see the optional Tilt Wall Mounting Bracket Installation and Setup Guide.

If you intend to mount the Monitor set to a wall, attach Wall mounting interface (optional parts) to the back of the set. When you install the Monitor set using a wall mounting interface (optional parts), attach it carefully so it will not drop.
- Please, Use the screw and wall mount interface in accordance with VESA Standards.
- If you use screws longer than standard, the monitor might be damaged internally.
- If you use an improper screw, the product might be damaged and drop from the mounted position. In this case, LG Electronics is not responsible for it.
- VESA compatible.
- Please use the VESA standard as below.
- 784.8 mm (30.9 inches) and under
- Wall Mount Pad Thickness: 2.6 mm
- Screw: Φ 4.0 mm x Pitch 0.7 mm x
- Length 10 mm y 787.4 mm (31.0 inches) and above
- Please use VESA standard wall mount pad and screws.
Model 22MB35PY 23MB35PY
- VESA (A x B) 100 x 100
- Standard screw M4
- Number of screws 4
CAUTION
- Disconnect the power cord first, and then move or install the Monitor set. Otherwise, an electric shock may occur.
- If you install the Monitor set on a ceiling or slanted wall, it may fall and result in severe injury.
- Use only an authorized LG wall mount and contact the local dealer or qualified personnel.
- Do not over-tighten the screws as this may cause damage to the Monitor set and void your warranty.
- Use only screws and wall mounts that meet the VESA standard. Any damages or injuries by misuse or using an improper accessory are not covered by the warranty.
NOTE
- y Use the screws that are listed on the VESA standard screw specifications.
- The wall mount kit will include an installation manual and necessary parts.
- The wall mount bracket is optional. You can obtain additional accessories from your local dealer.
- The length of the screws may differ depending on the wall mount. Be sure to use the proper length.
- For more information, refer to the instructions supplied with the wall mount.
FAQs About LG 22MB35PY IPS FHD Monitor Easy Setup
What is the LG 22MB35PY IPS FHD Monitor?
The LG 22MB35PY is a 22-inch Full HD (1920×1080) IPS monitor with a 16:9 aspect ratio. It features a wide viewing angle, high color accuracy, and a variety of connectivity options.
What is IPS technology?
IPS (In-Plane Switching) technology is a type of LCD (Liquid Crystal Display) technology that offers wider viewing angles, more accurate colors, and better contrast compared to other LCD technologies.
What are the dimensions of the LG 22MB35PY IPS FHD Monitor?
The dimensions of the LG 22MB35PY monitor are 50.9 x 20.7 x 38.9 cm (with a stand) and 50.9 x 6.3 x 30.2 cm (without a stand).
What is the response time of the LG 22MB35PY IPS FHD Monitor?
The LG 22MB35PY monitor has a response time of 5ms (gray-to-gray).
Can the LG 22MB35PY monitor be mounted on a wall?
Yes, the LG 22MB35PY monitor can be mounted on a VESA-compatible wall mount or arm.
What is the contrast ratio of the LG 22MB35PY IPS FHD Monitor?
The LG 22MB35PY monitor has a contrast ratio of 1000:1 (typical) and 5,000,000:1 (dynamic).
What is the brightness level of the LG 22MB35PY IPS FHD Monitor?
The LG 22MB35PY monitor has a brightness level of 250 cd/m².
Does the LG 22MB35PY IPS FHD Monitor have built-in speakers?
No, the LG 22MB35PY monitor does not have built-in speakers.
Is the LG 22MB35PY IPS FHD Monitor compatible with Macs?
Yes, the LG 22MB35PY monitor is compatible with Macs. It comes with a VGA cable and a DVI cable, which can be used with Macs that have a VGA or DVI port.
Can the height of the LG 22MB35PY IPS FHD Monitor be adjusted?
Yes, the height of the LG 22MB35PY monitor can be adjusted using the height-adjustable stand.
What is the power consumption of the LG 22MB35PY IPS FHD Monitor?
The power consumption of the LG 22MB35PY monitor is 25W (typical) and less than 0.5W (standby).
Does the LG 22MB35PY IPS FHD Monitor come with a warranty?
Yes, the LG 22MB35PY monitor comes with a standard warranty of three years.
What is the viewing angle of the LG 22MB35PY IPS FHD Monitor?
The LG 22MB35PY monitor has a viewing angle of 178 degrees (horizontal and vertical).
Can the LG 22MB35PY IPS FHD Monitor be used for gaming?
While the LG 22MB35PY monitor is not designed specifically for gaming, it can be used for gaming. However, its 5ms response time and 60Hz refresh rate may not be sufficient for serious gamers who demand higher performance.
What is the weight of the LG 22MB35PY monitor?
The weight of the LG 22MB35PY monitor is 3.2 kg (with a stand) and 2.8 kg (without a stand).
Can the LG 22MB35PY monitor be used in a multi-monitor setup?
Yes, the LG 22MB35PY monitor can be used in a multi-monitor setup. It has a thin bezel design that minimizes the gap between monitors, allowing for a seamless multi-monitor display.
For more manuals by LG, Visit Manualsdock
[embeddoc url=”https://manualsdock.com/wp-content/uploads/2023/04/LG-IPS-FHD-Monitor-Easy-Setup.pdf” download=”all”]

