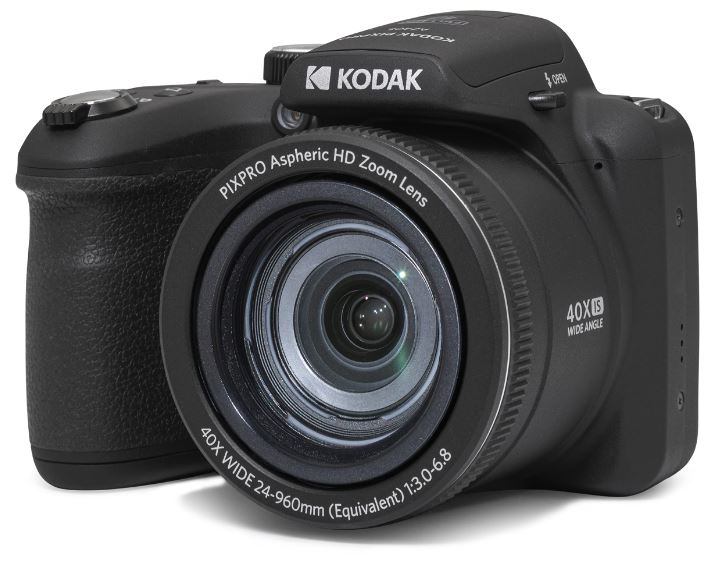
Kodak PIXPRO AZ405-BK 20MP Digital Camera
About Kodak
Kodak, officially known as Eastman Kodak Company, is an American multinational corporation that has historically been closely associated with photography and imaging. Founded by George Eastman in 1888, Kodak played a significant role in popularizing photography and making it more accessible to the general public.
GETTING STARTED
Accessories Included
Your camera box should contain the camera model you purchased along with the following accessories. If anything is missing or appears to be damaged, please contact your retailer first or our customer service center.

*The AA Alkaline ‘Starter’ batteries are intended to allow you to test and set up your new camera. We highly recommend purchasing name-brand, top-tier AA batteries for the best performance and to keep extra batteries on hand to swap out when needed.
Installing Lens Cap and Neck Strap

Part Names

- LCD
- Fast Video Recording Button
- Indicator Lamp
- Micro USB Port
- Menu Button
- Button
- AF Button / Arrow Button (Up)
- SET SET Button
- Flash Button / Arrow Button (Right)
- Delete Button / Self-Timer Button / Arrow Button (Down)
- Macro Button / Arrow Button (Left)
- Playback Button
- Display Button
- Battery Cover Lock
- Battery Door Cover
- Tripod Socket
- Zoom Lever
- Shutter Button
- Exposure Compensation Button
- Continuous Shot Button
- Strap Eyelet
- Power Switch
- AF Assist Beam / Self-Timer Lamp
- Mode Dial
- Flash Lamp
- Flash Button
- Microphone
- Speaker
- Lens
Installing AA Batteries and Memory Card
- Open the battery cover door.
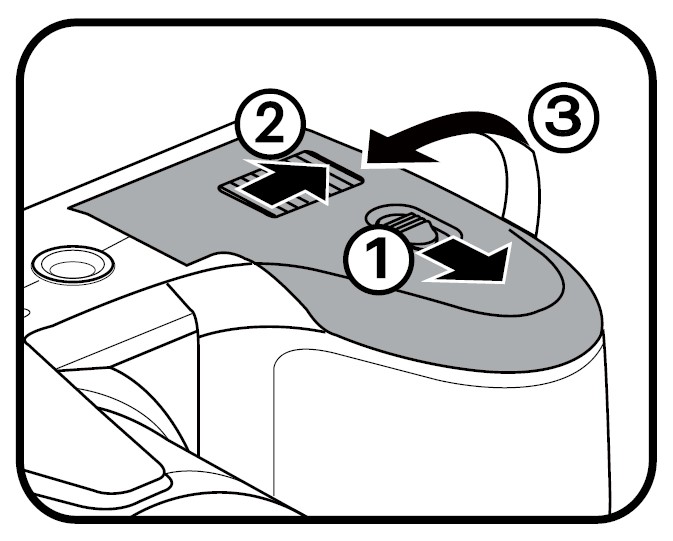
- Insert 4 AA batteries into the battery slot in the correct direction as shown in the following diagram:
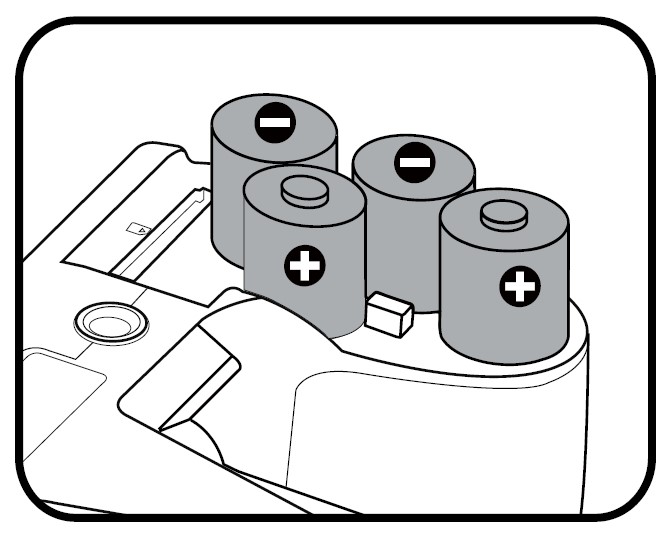
- Please use brand name batteries (such as Energizer®, Duracell®, or equivalent) for optimal performance. Do not mix new and old batteries or use different brands of batteries. When replacing batteries, please replace all 4 batteries at the same time.
- The performance and life expectancy of alkaline batteries will vary depending on the brand.
- Do not mix alkaline, standard (carbon-zinc), or rechargeable (ni-cad, i-mh, etc.) batteries.
- Insert the memory card into the memory card slot as shown in the diagram below:

- Close the battery cover door.

- A memory card (SD / SDHC / SDXC) is necessary to store photos and videos and is not included in all camera packaging. It needs to be purchased separately. Please use a memory card that is Class 10 or higher and has a capacity of 4GB to 512 GB.
- To remove your memory card, open the battery cover door, gently press the memory card to eject it, and remove it carefully.
Turning the Camera On and Off
Slide the Power Switch to turn the camera on/off.
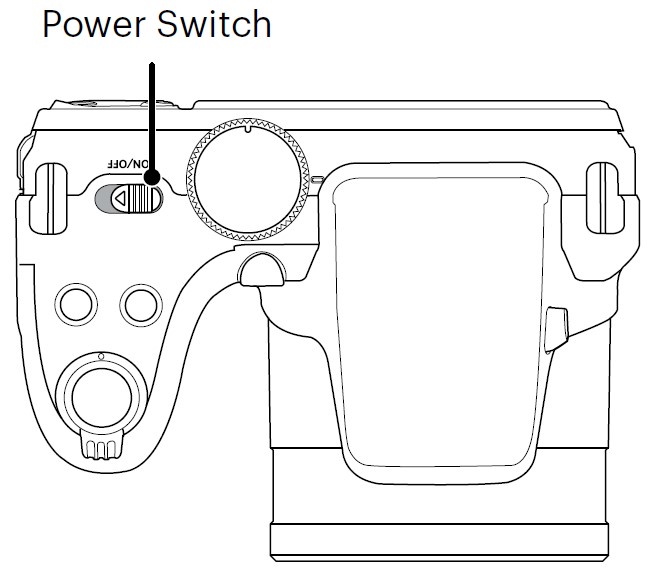
When the power is off, press and hold the Playback Button to power on and enter Playback Mode.
How to Take Pictures
- Hold the camera with both hands, being careful to not block the flash and lens with your fingers.
- Point the Lens toward the object you want to take a picture of, then frame it with the LCD.
- Use the Zoom Lever to select Tele or Wide positions to zoom in or out on your subject.
- Press the Shutter Button halfway down to focus on the subject. When the focus frame turns green, press the Shutter Button all the way down completely to take the picture.
BASIC OPERATION
Using the Zoom Function
Your camera is equipped with two types of zoom functions: Optical Zoom and Digital Zoom. Toggle the Zoom Lever of the camera to zoom in or out of the subject while taking pictures.

When the Optical Zoom reaches the threshold of Digital Zoom, release and turn the Zoom Lever to T to switch between Optical Zoom and Digital Zoom.
Focus Setting
This setting allows you to select different modes for optimum focus.
- Press the button to enter the Focus Menu.

- Press the buttons to select the following 3 modes:
- Single-AF
The focus frame appears on the center of the LCD to help you focus on the subject. - Multi-AF
The camera automatically focuses the subject in a wider area to find the focal point. - Object Tracking
Smart tracking of the object in motion under the focusing shooting.
- Press the button to confirm the settings and exit the menu.
- When is enabled, the Object Tracking function is not available.
Macro Mode
The Macro Setting is ideal for shooting small objects or close-up photos. This mode allows you to focus on subjects very close to the camera and will provide very detailed photos.
- Press the button to enter the Macro Menu.

- Press the buttons to select the following 2 modes:
- Macro Off
Select this option to disable Macro. - Macro On
Select this option to focus on subjects 1.6 cm from the lens.
- Press the button to confirm the settings and exit the menu.
ISO
The ISO Function allows you to set the sensitivity of the camera’s light sensor based on the brightness of the scene. To improve the camera’s sensor performance in darker environments, a higher ISO value is required. A lower ISO value is needed when shooting in brighter conditions.
Pictures taken at higher ISO settings will generally have more noise than those taken at lower ISO settings. The camera’s ISO settings include Auto, 100, 200, 400, 800, 1600, and 3200.
Shutter Adjustment
For shutter speed, the camera may automatically set the aperture value corresponding to the manually set shutter speed to obtain the most suitable exposure value. The movement of objects may be shown by adjusting the shutter speed. High shutter values can help you more clearly capture fast-moving objects, while low shutter values can better show the movement of objects.
Aperture Adjustment
You can adjust the aperture size value. Selecting a large aperture opening will emphasize the point of focus and show a blurry background and foreground. A small aperture opening will keep both the background and main object in clear
focus.
PLAYBACK
Viewing Photos and Videos
To view captured photos and video clips on the LCD:
- After pressing the button, the last photo or video clip taken will be displayed on the LCD.
- Use the buttons to scroll through the photos or video clips stored on the built-in memory or the Memory Card in the camera.
- To play a selected video clip, press the button to enter the Movie Playback Mode.
An operation guide appears on the screen when playing back a video. Press the appropriate buttons to enable the corresponding functions.

- Increase Volume
- Pause
- Fast Forward
- Rewind
- Decrease Volume
- Return to the Beginning of the Video
- Play
- Frame Forward
- Frame Backward
- Cancel Playback
Thumbnail View
When in Playback Mode, rotate the Zoom Lever counterclockwise to the position to display thumbnail images of the photos and videos on the LCD screen.

- For Normal Mode
- Slide the Zoom Lever to switch between 3 x 3 and 4 x 4 thumbnails.
- When a 3 x 3 or 4 x 4 thumbnail is displayed, press the buttons to select the picture or video clip to view. Press the button to restore it to its original size.

Using Zoom Playback (for still pictures only)
When playing back photos, you can also use the Zoom Lever to zoom in on the photos, 2 to 8 times their original magnification.

- Press the [ ] / [ ] buttons to select the picture on which to use the zoom feature.
- Rotate the Zoom Lever to zoom in.
- The bottom right corner of the screen will display the amount zoomed in as well as the area of the photo shown.
- Press the arrow buttons to navigate and select the desired portion of the photo to be zoomed in on.
- Press the button to return the image to its original scale.

- Movie images cannot be magnified.
- Please note: This camera’s LCD is only capable of displaying a fraction of the detail and resolution of the actual photo or video file. Once photos/videos are downloaded to your computer, you will see the full resolution of the photo/video file captured.
Slideshow
This setting allows you to view all the stored pictures as a slideshow.
- Press the button to enter the playback screen.
- Press the button to enter the slide option.
- Press the buttons to select slideshow playing or [Cancel] to return to the playback screen.
- Press the button to confirm the setting.

- Play Slide Show Effect 1 Fade in and out
- Play Slide Show Effect 2 Left and right interlaced
- Play Slide Show Effect 3 Animated photo tile effect
Animation Panorama Playback
The panoramic animation will be played back as a full-size image by the shooting direction.
- Press the button to enter the playback screen.
- Press the button to select the animated panoramic photos.
- Press the buttons to playback in the selected shooting direction.
- During playback, press the button to pause playback, and then press the button to resume playback. Press the button to select, it will stop playback and return to the static image of the panoramic image.
- After playback, it will automatically return to the static image of the panoramic image.

- Rotation is not performed during animation panorama playback or pause.
Photo and Video Deletion
In Playback Mode, press the [ ] button to select your desired photos and videos.
To delete photos or videos:
- Press the button to switch to Playback Mode.
- Press the buttons to select the photos and videos to be deleted.
- Press the button and the deletion screen is displayed.
- Press the buttons to select [Delete One] or [Exit] and press the button to confirm.

- Erased photos/video clips cannot be recovered.
- Please refer to Page 70 for instructions on deleting more than one image at a time.
USING THE MENUS
Connecting to a Computer
You can use a USB cable to connect the camera and copy (transmit) photos to a computer (PC or Mac), printer, or other device.
Transferring Files to Your Computer
The computer will automatically detect the camera as a removable drive. Double-click the “My Computer” icon on the desktop to locate the removable drive and to copy folders and files in the drive to a directory on your computer as you would copy any typical folder or file.
Follow the steps below to connect the camera to a computer:
- Make sure both the camera and computer are turned on.
- Connect one end of the supplied USB cable to the USB port on your camera.
- Connect the other end of the cable to an available USB port on your computer.
- After the transmission is complete, disconnect the USB cable according to your computer manufacturer’s instructions specifying how to safely remove USB devices.

APPENDICES
Specifications
- Design and specifications are subject to change without notice.
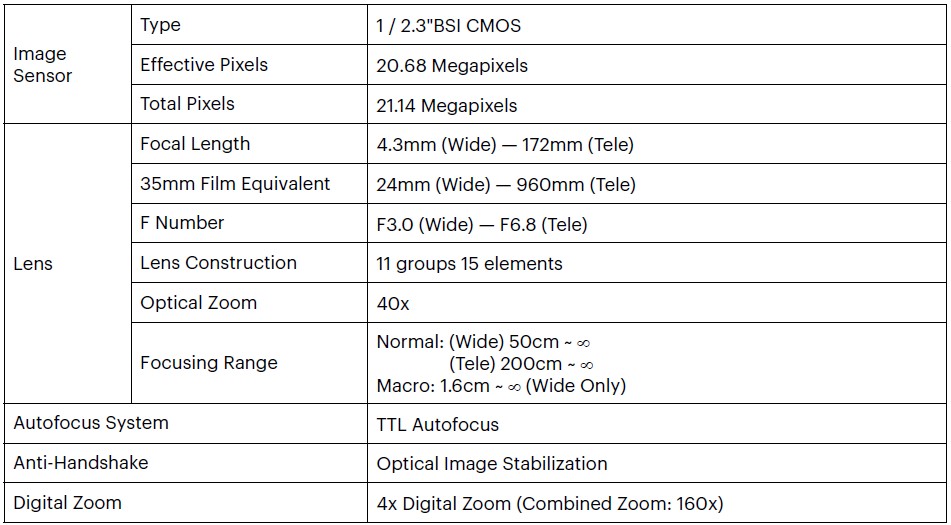


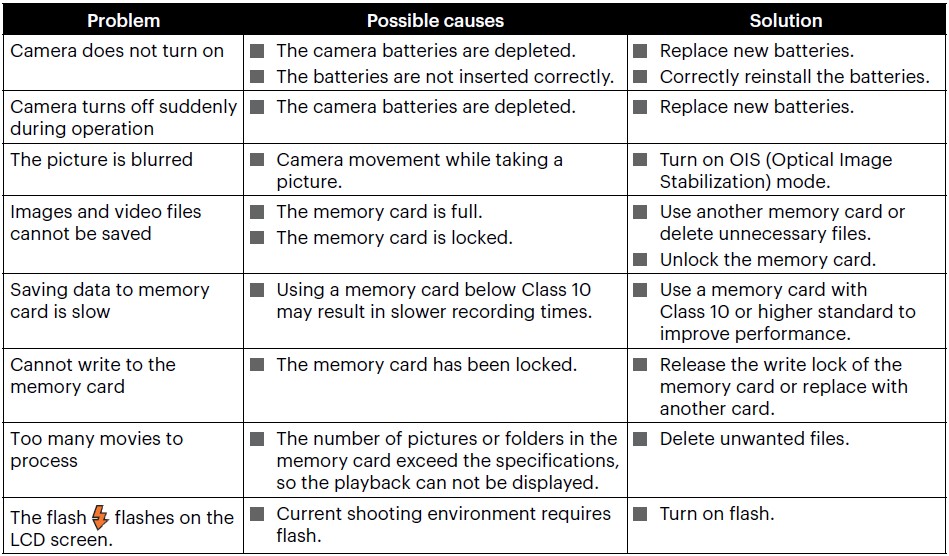
Troubleshooting
Declaration of Conformity
- Responsible Party: JK Imaging Ltd.
- Address: JK Imaging Ltd., 17239 So. Main Street, Gardena, CA 90248 USA
- Company website: kodakpixpro.com
For Customers in the USA
Tested to Comply with FCC Standards FOR HOME OR OFFICE USE
This device complies with part 15 of the FCC Rules. Operation is subject to the following two conditions:
- This device may not cause harmful interference and
- This device must accept any interference received, including interference that may cause undesired camera operation.
JK Imaging Ltd., 17239 So. Main Street, Gardena, CA 90248 USA
Made in Myanmar (Burma)
FAQS About Kodak PIXPRO AZ405-BK 20MP Digital Camera
Kodak Pixpro AZ405 video is of what quality?
Absolutely no problem; the AZ405 has your back. Full HD video with a 1080p resolution will provide the quality you require.
Is Kodak’s AZ405 camera a decent one?
For the money, this camera offers excellent value.
Is the Pixpro 405 a true 20MP camera?
Our KODAK PIXPRO AZ405 digital camera from the Astro Zoom Collection combines passion and performance. 20 megapixel images with a 40X ultra long zoom lens and optical picture stabilization are sharp and clean.
What about KODAK PIXPRO cameras?
excellent camera with user-friendly features.
Does a KODAK PIXPRO make a decent starter camera?
Another well-liked camera for beginners is the Kodak PIXPRO AZ252 Astro Zoom Digital Camera.
Why did the Kodak camera fail to take off?
Kodak’s downfall ultimately stemmed from its inability to adjust to shifting market circumstances.
What does a camera with 20 MP mean?
20,000,000 pixels
Is a digital camera with 20 MP good?
For practically everything the majority of people use their cameras for, resolutions between 20 and 30 megapixels are sufficient.
What benefits do Kodak cameras offer?
Kodak cameras are reputable and have user-friendly layouts.
Kodak Pixpro—is it suitable for vlogging?
An good entry-level vlogging camera is the Kodak PIXPRO Friendly Zoom.
For more manuals by Kodak, Visit Manualsdock
[embeddoc url=”https://manualsdock.com/wp-content/uploads/2023/09/Kodak-PIXPRO-AZ405-BK-20MP-Digital-Camera-User-Manual.pdf” download=”all”]


