Kodak PIXPRO Astro Zoom AZ528-BK 16 MP Digital Camera
About Kodak
Kodak, officially known as Eastman Kodak Company, is an American multinational corporation that has historically been closely associated with photography and imaging. Founded by George Eastman in 1888, Kodak played a significant role in popularizing photography and making it more accessible to the general public.
SAFETY NOTES
Safety notes for this camera
- Do not drop the camera or allow it to hit solid objects.
- Do not attempt to disassemble or repair the camera.
- Do not use or store the camera in dusty places or on a beach to prevent dust or sand from entering the camera, causing possible damage.
- Do not use or store the camera in a hot environment or in direct sunlight.
- Do not use or store the camera near a powerful magnetic field, such as a magnet or transformer.
- Avoid touching the lens of the camera.
- Do not expose the camera to direct sunlight for a long period of time.
- To prevent the camera from being damaged by moisture, do not use or store the camera in very humid environments, such as in rain or near bodies of water.
- If water accidentally comes in contact with the camera, turn the camera off, remove the battery and the memory card, and dry it completely within 24 hours.
- When you take the camera from a cold environment to a warmer environment, condensation may occur. Please wait for a reasonable period of time before you turn the camera on.
- Before you remove the battery and memory card, the camera should be turned off. When you clean the body of the camera, do not use abrasive, alcohol-based or organic cleansers or solvents.
- Use a professional lens cleaning cloth and appropriate cleaner to wipe and clean the lens. Download your photos and remove the memory card when you are going to store the camera for a long period of time.
- If this camera is not in use for a long period of time, please keep it in a dry and clean storage location.
- Our company will not pay compensation for any failure of playback including: pictures or videos damaged or unrecoverable by improper operation.
Safety notes for battery
- Please use a battery that is the same type as the one included.
- Please use the attached charger to charge the battery.
- If battery fluid leaks inside the camera, contact our customer service department immediately. If battery fluid leaks onto your skin, rinse your skin with clean water and seek immediate medical attention.
- Disposal of used batteries should be carried out in accordance with the local (national or regional) regulations.
- To prevent the battery from being damaged, do not drop the battery or allow it to hit solid objects or to be scratched by foreign objects.
- Do not let the battery come in contact with metal objects (including coins) to avoid short circuiting, discharging, excessive heat, or possible leakage.
- Do not attempt to disassemble the battery.
- Do not expose the battery to water. Always keep the battery contacts dry. Do not heat the battery or throw it into a fire to avoid a possible explosion. Do not store the battery in a hot environment or in direct sunlight.
- If the battery overheats during charging or use, stop charging or stop use immediately. Turn off the product, remove the battery carefully, and wait until it cools down.
- When the camera is stored for a long period of time, remove the battery and keep it in a dry place that is not accessible to infants and children.
- In a colder environment, the performance of the battery could be noticeably reduced.
- When you install the battery, align the battery markings according to the positive and negative markings inside the battery compartment. Never force the battery into the battery compartment.
Safety notes for memory card
- We suggest buying only well-known, name brand memory cards to ensure peak performance and reliability.
- Format the memory card using the camera before you use it or insert a new one.
- Do not drop the memory card or allow it to hit solid objects to avoid damaging it.
- Do not attempt to disassemble or repair the memory card.
- Do not expose the memory card to water. Always keep it dry.
- Do not remove the memory card when the camera is turned on. Otherwise, the memory card and photo/video files could be permanently damaged.
- Do not directly edit the data on the memory card. Copy the data to your computer before you edit them.
- When the camera is stored for a long period of time, be sure to download your photos and remove the memory card. Store the memory card in a dry environment.
- Do not modify the name of the files or folders of the memory card using your computer. Modifying the file names may cause the files to not be recognized on the camera or a possible permanent error may occur.
- A photo taken with the camera will be stored in the folder that is automatically generated on the memory card. Do not store photos that are not taken using this camera in these folders as the pictures cannot be recognized during the playback.
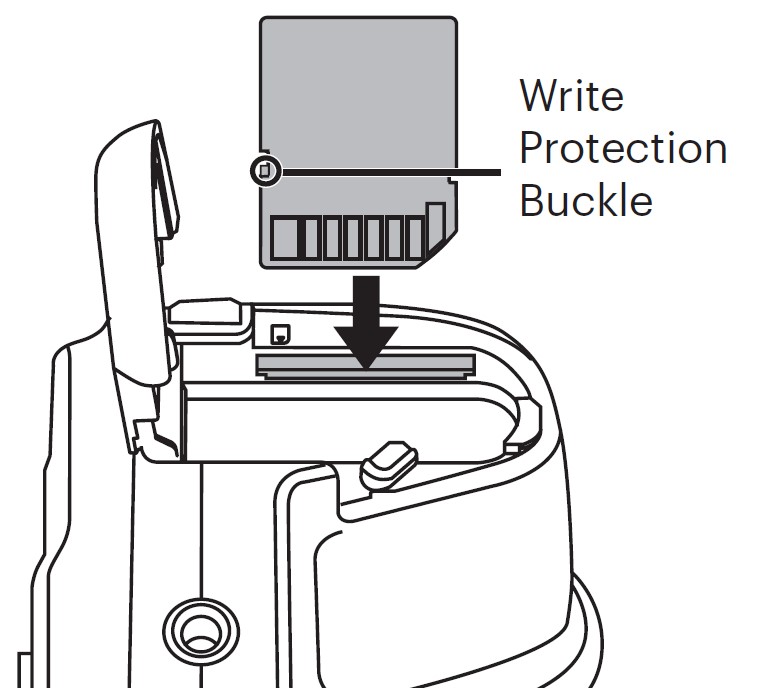
- When you insert the memory card, make sure the notch of the card matches the markings on the top of the camera card slot.
Other Safety Notes
- Do not disconnect the power or turn the camera off during the update process. Doing so may cause incorrect data to be written and the camera may not power on later.
- Do not hang the neck strap of the camera around the neck of a child.
- When using your camera on an airplane, observe the relevant rules specified by the airline and FAA regulations.
- Due to the limitations of manufacturing technology, the LCD may have a few dead or bright pixels. These pixels do no effect the quality or performance of the camera, photos or video.
- Do not expose the camera’s LCD to water. In a humid environment, only wipe it with a soft and dry cleaning cloth.
- If the LCD screen is damaged, pay particular attention to the liquid crystal in the screen.
- If any of the following situations arise, immediately take the steps listed below:
- f liquid crystal comes in contact with your skin, please wipe with a dry cloth, wash thoroughly with soap, and rinse with plenty of clean water.
- If liquid crystal gets into your eye, flush the eye immediately with plenty of clean water for at least 15 minutes and then seek medical assistance.
- If liquid crystal is swallowed, immediately rinse your mouth thoroughly with clean water and induce vomiting. Seek medical assistance.
WARNING
- Altering, tampering or modifying the any parts of AZ528 camera are unauthorized and will void the manufacturer’s warranty and “could” void Federal and/or State Compli-ance.
GETTING READY
Accessories Included
Your camera box should contain the camera model you purchased along with the follow-ing accessories. If anything is missing or appears to be damaged, please contact your retailer first or our customer service center. (The battery chargers may be a little different in shape due to the different countries or regions this camera is sold to. The illustration may not match the actual product.)
Install Lens Cap and Neck Strap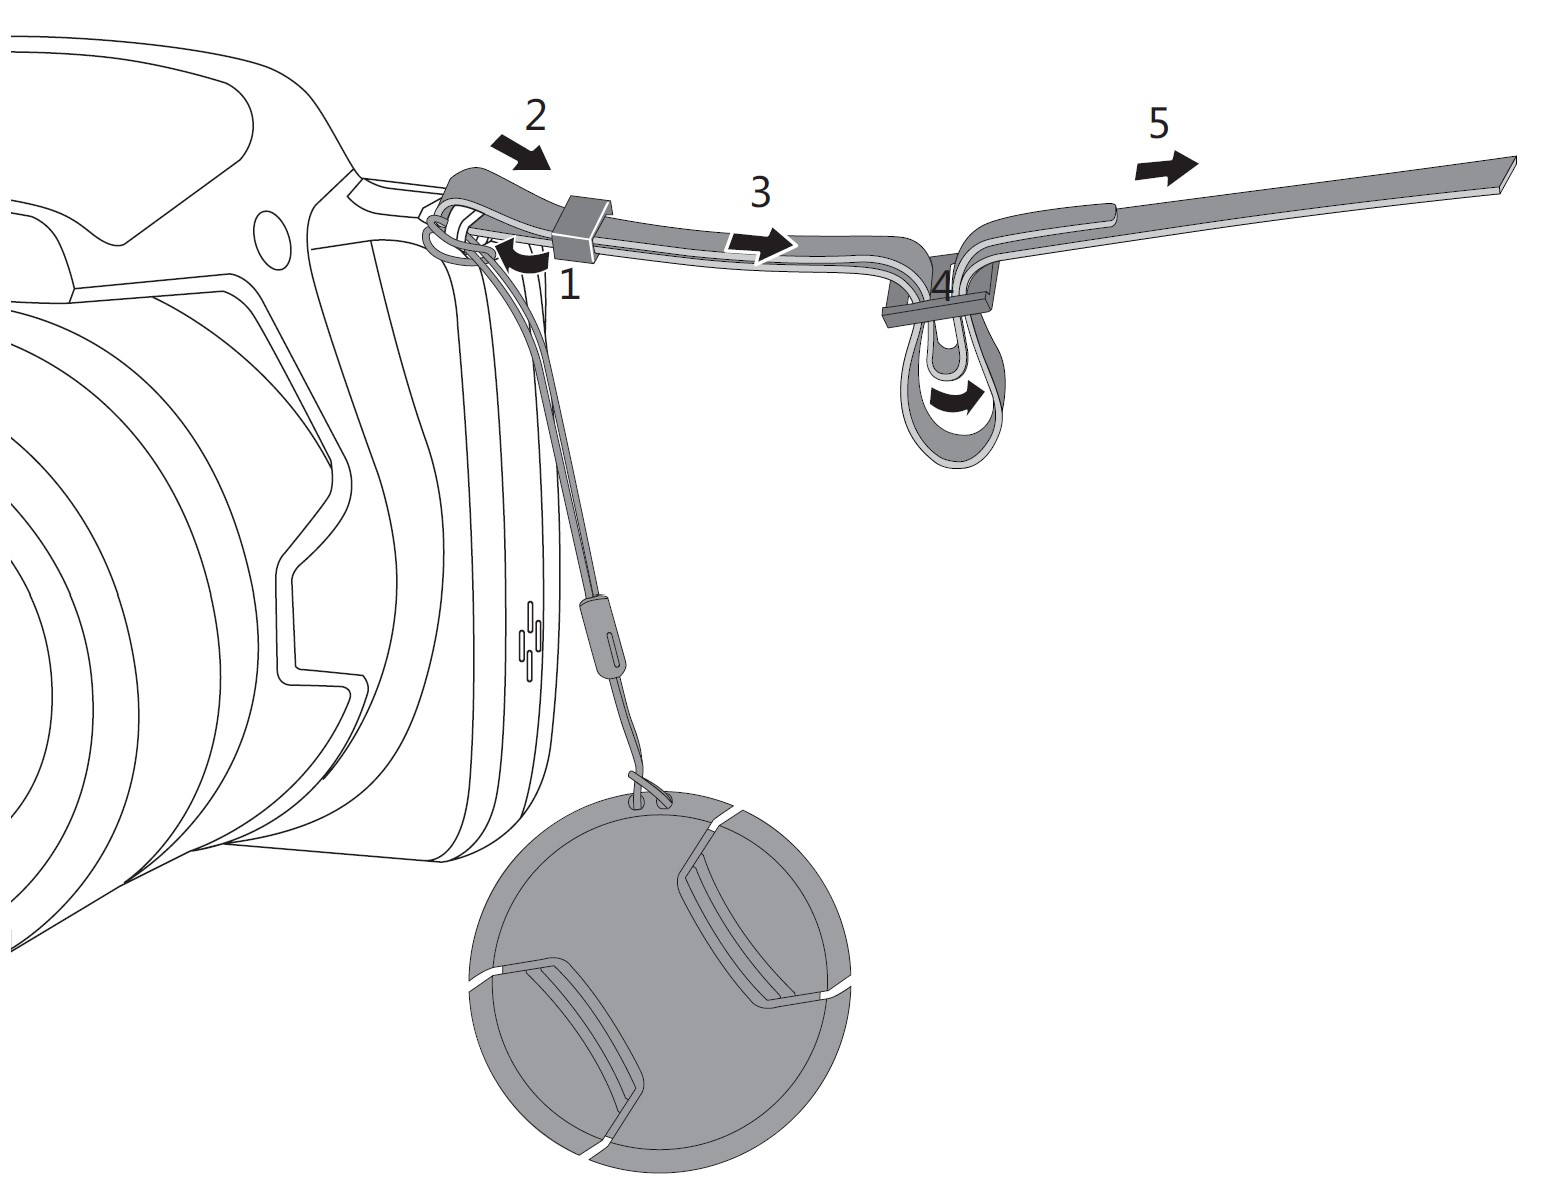
Part Names
- Micro USB/AV Port
- Zoom Lever
- Shutter Button
- Strap Eyelet
 Exposure Compensation Button
 Continuous Shot Button
- Power Button
- AF Assist Beam/Self-Timer Lamp
- Flash Lamp
- Lens
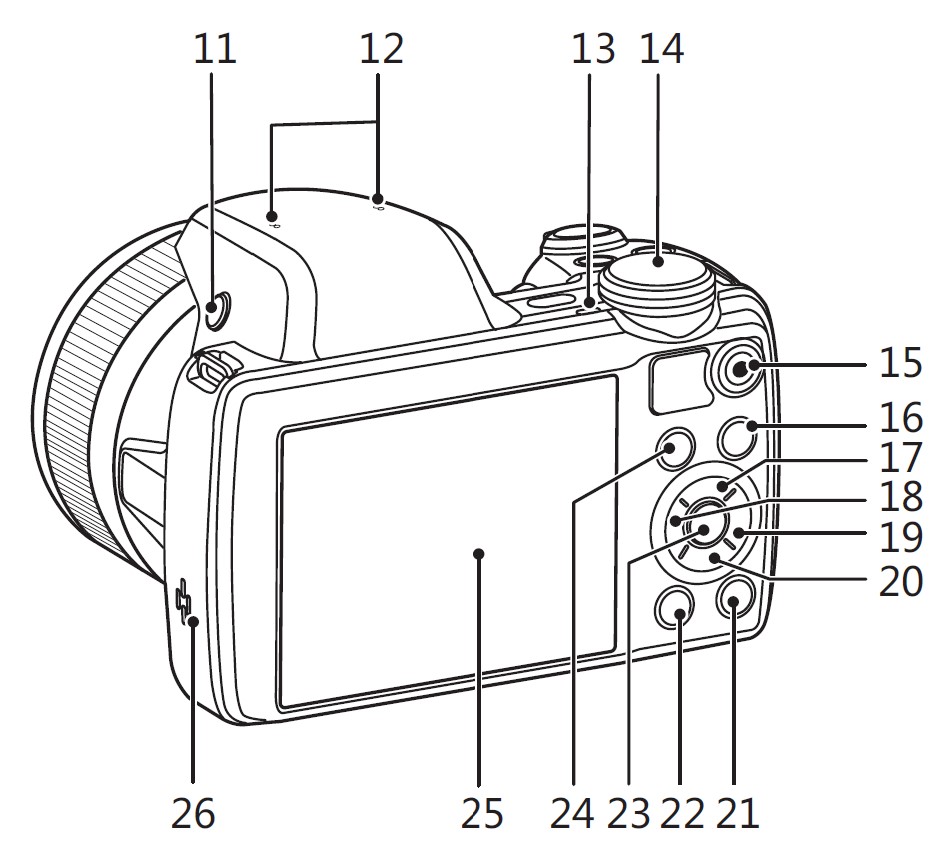
- Flash Button
- Microphones
- Indicator Lamp
- Mode Dial
 Fast Video Recording Button
 Menu Button
 AF Button/Up Button
 Macro Button/Left Button
 Flash Button/Right Button
 Delete Button/Self-Timer Button/Down Button
  Display Button
 Playback Button
 SET Button
- i Button
- LCD
- Speaker

- Battery Cover Door
- Tripod Socket (1/4” Standard)
Installing Battery and Memory Card
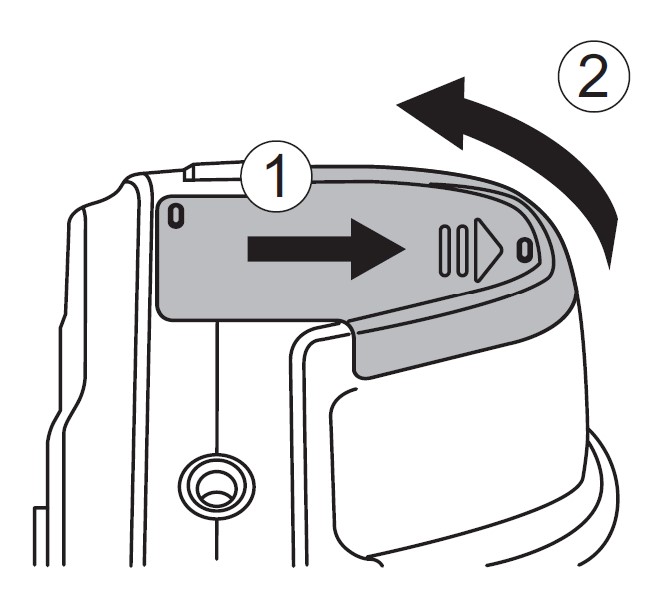
- Open the battery cover according to the direction of arrow.
- Insert the battery into the battery compartment according to the negative and positive directions as illustrated in the picture. Push the battery down until it locks in place.

- Insert the memory card into the memory card slot as shown in the diagram.
- Close the battery cover.

A standard SD memory card is not included in the camera packaging and needs to be purchased separately. This camera takes a standard (SD/SDHC) memory card. We recommend using a name brand memory card that is Class 4 or higher and has a capacity of 4GB to 32GB. The camera is not compatible with Micro SD, Ultra, Ultra Plus, Extreme, or adapters for any of these other memory cards.
To remove your memory card, open the battery cover, gently press the memory card to eject it and remove it carefully.
Charging Battery
Before you charge the battery, ensure that the battery is inserted properly and the camera is off.
- Connect the camera and the power charger using the supplied Micro USB cable.
- Insert the plug of the power charger into the power outlet to charge the battery.
 Note:
Note:
- After the battery is stored for a long period of time, use the supplied power charger to charge the battery prior to use.
- To have maximum battery life, charge the battery for at least 4 hours the first time.
Charging indicator:
Steady orange: Charging
The indicator will go out once charging is finished.
- When the camera is turned off, you can also connect the camera to your PC using a USB cable to charge the battery.
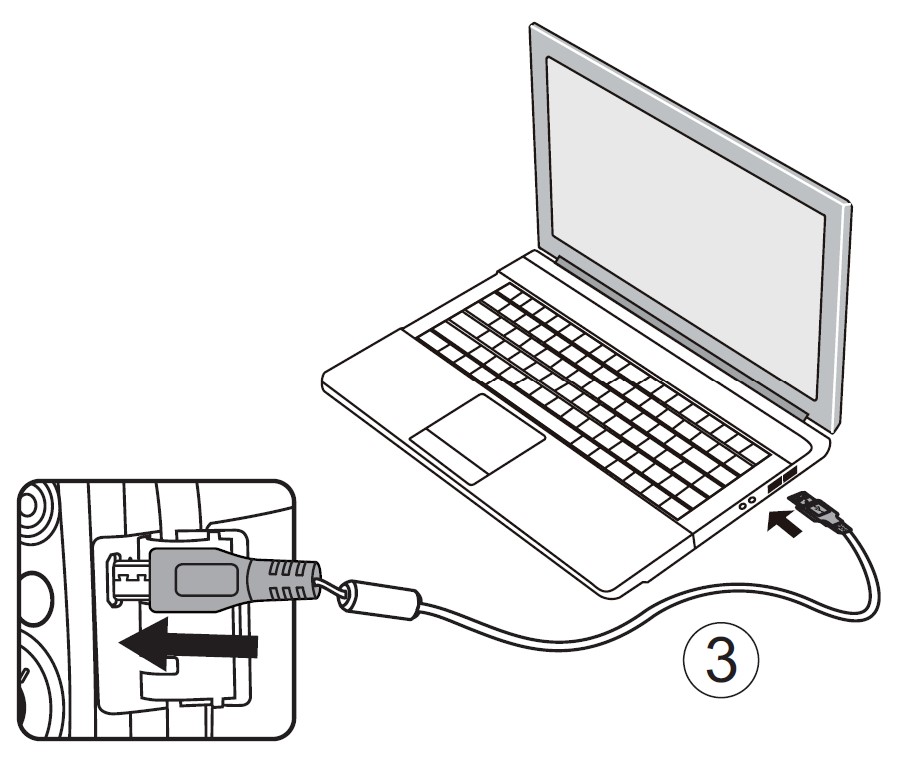
Note: Please charge the battery indoors between 0°C and 40°C (32°F and 104°F).
Turning Camera On and Off
Press the power button to turn the camera on. To turn the camera off, press the power button again.
Note: When the power is off, press and hold the button to power on and enter playback mode.
Set your Language, Date/Time
Set your Language, Date/Time after the First Power-On
- When you turn the camera on for the first time, the language selection screen will appear.
- Press the
 /
/ /
/ /
/ buttons to select your desired language.
 - After you press the SET button to confirm the selection, the Date/Time settings screen appears.
- Press the
 /
/ button to select the Date/Time to be adjusted: Time is displayed in YYYY.MM.DD HH:MM.
 - Press the
 /
/ button to adjust the value for the selected Date/Time.
 - Press the SET button to confirm the time settings and the shooting screen will appear.
Resetting your Language
After you set your language for the first time, follow the instructions below to reset your desired language.
- Press the
 button, press the
  /
/ button to select
  , and press the SET button to enter the menu.
 - Press the
 /
/ button to select
  , and press the
  /
/ button to enter the menu.
 - Press the
 /
/ button to select 「Language」and press the
  /
/ button to enter the menu.
 - Press the
 /
/ /
/ /
/ buttons to select your desired language and press SET the button to confirm.
 - Press the button
 and the shooting screen appears.
Resetting Date/Time
After you set your Date/Time for the first time, follow the instructions below to reset date and time.
- Press the
 button, press the
 /
/ button to select
  , and press the SET button to enter the menu.
 - Press the
 /
/ /
/ /
/ button to select
  , and press the
  /
/ button to enter the menu.
 - Press the
 /
/ button to select 「Date & Time」and press the
  /
/ button to enter the menu.
 - Press the
 /
/ button to select the Date/Time to be adjusted: Time is displayed in YYYY.MM.DD HH:MM.
 - Press the
 /
/ button to press the value for your selected block. After you finish your settings, press the button to confirm.
 - Press the
 button and the shooting screen appears.
MODE OVERVIEW
Display Setting
Press the button to display the settings: Classic, Full, Off.
Classic: Displays the camera parameters on screen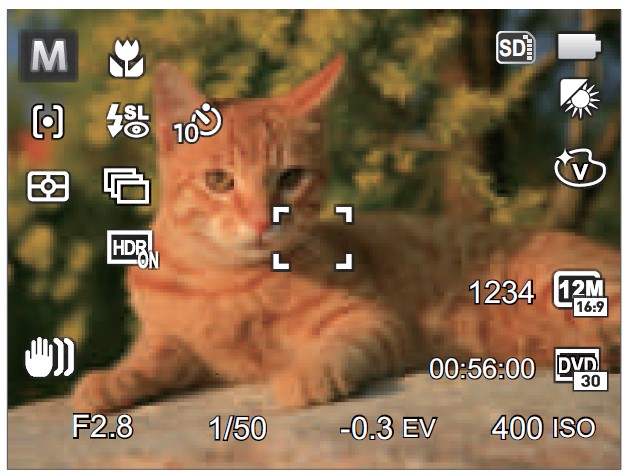
Full: Camera parameters with Grid and Histogram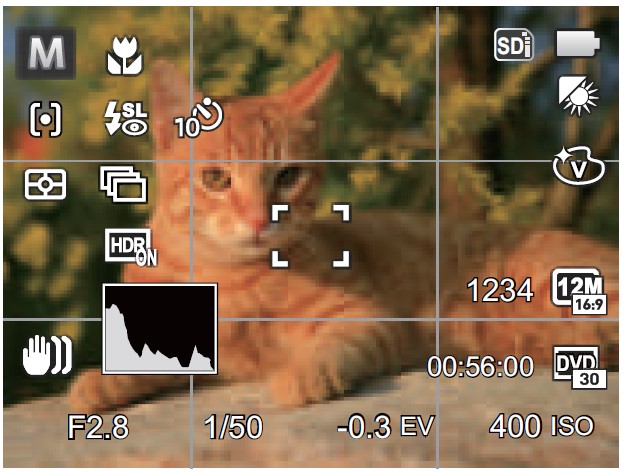
Off: Does not display any additional icons on screen
LCD Display
Overview of the screen icons in photo shooting mode
- Shooting Mode
- Macro Mode
- Self-Timer
- Zoom Display (By turning the Zoom Lever)
- Focus Frame
- SD Memory Card/Built-in Memory
- Battery Status
- White Balance
- Color Effect
- Number of Remaining Shots
- Image Size
- Video Quality
- ISO Value
- Remaining Recording Time
- Exposure Compensation
- Shutter Speed
- Histogram
- Aperture Value
- OIS (Optical Image Stabilization)
- HDR
- Expo Metering
- Continuous Shot
- AF Mode
- Flash Mode
Overview of the screen icons in movie mode
- Movie Mode
- Macro Mode
- Self-Timer
- Zoom Display (By turning the Zoom Lever)
- SD Memory Card/Built-in Memory
- Battery Status
- Color Effect
- Video Quality
- Remaining Recording Time
- Exposure Compensation
- OIS (Optical Image Stabilization)
- Focus Frame
- Expo Metering
- AF Mode
Note:
- For optimal video shooting, it is recommended that an SDHC memory card be used.
- Optical Zoom and Digital Zoom can be adjusted (208X in total). Digital Zoom can be adjusted to 4X.
Overview of the screen icons in playback mode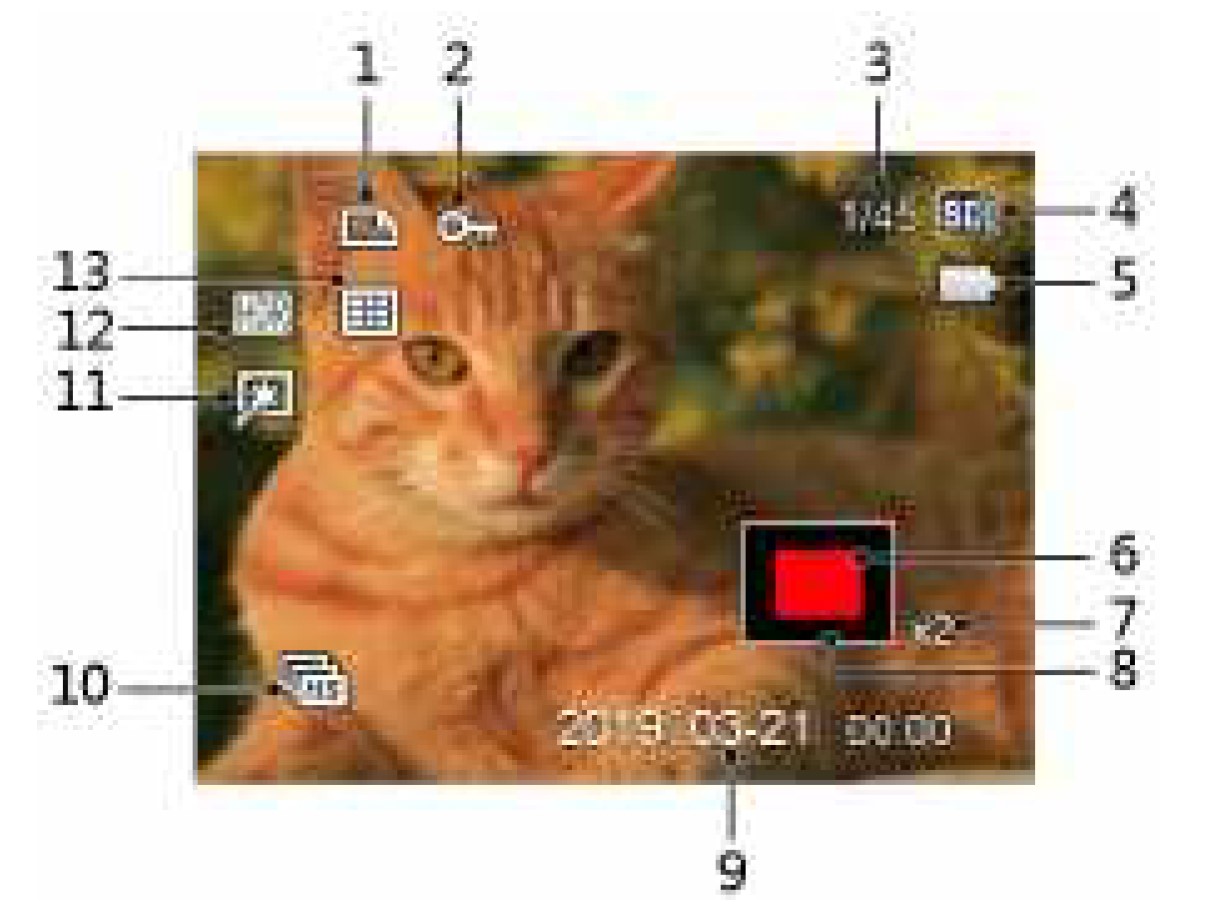
- DPOF File
- File Protection
- Memory Space (indicating the current number of photos and total number of photos)
- SD Memory Card/Built-in Memory
- Battery Status
- Zoom Magnification Area
- Image Zoom Ratios
- Image Zone
- Shooting Date
- Continuous Capture Group Playback
- Touch-up
- HDR
- Date Folder
How to Take Pictures
- Hold the camera securely with both hands, being careful not to block the flash and lens with fingers.
- Point the lens toward the object you want to take a picture of.
- Use the zoom lever to select Tele or Wide position to zoom in or out on your subject.
- Press the shutter button down half-way to allow the camera to focus on your subject.
- When the frame around your subject turns green and the LCD is focused to your liking, push the shutter button down completely to take the picture.
Using the Mode Dial
This camera provides a convenient mode dial that allows you to manually switch between different modes with ease. The available modes are listed below: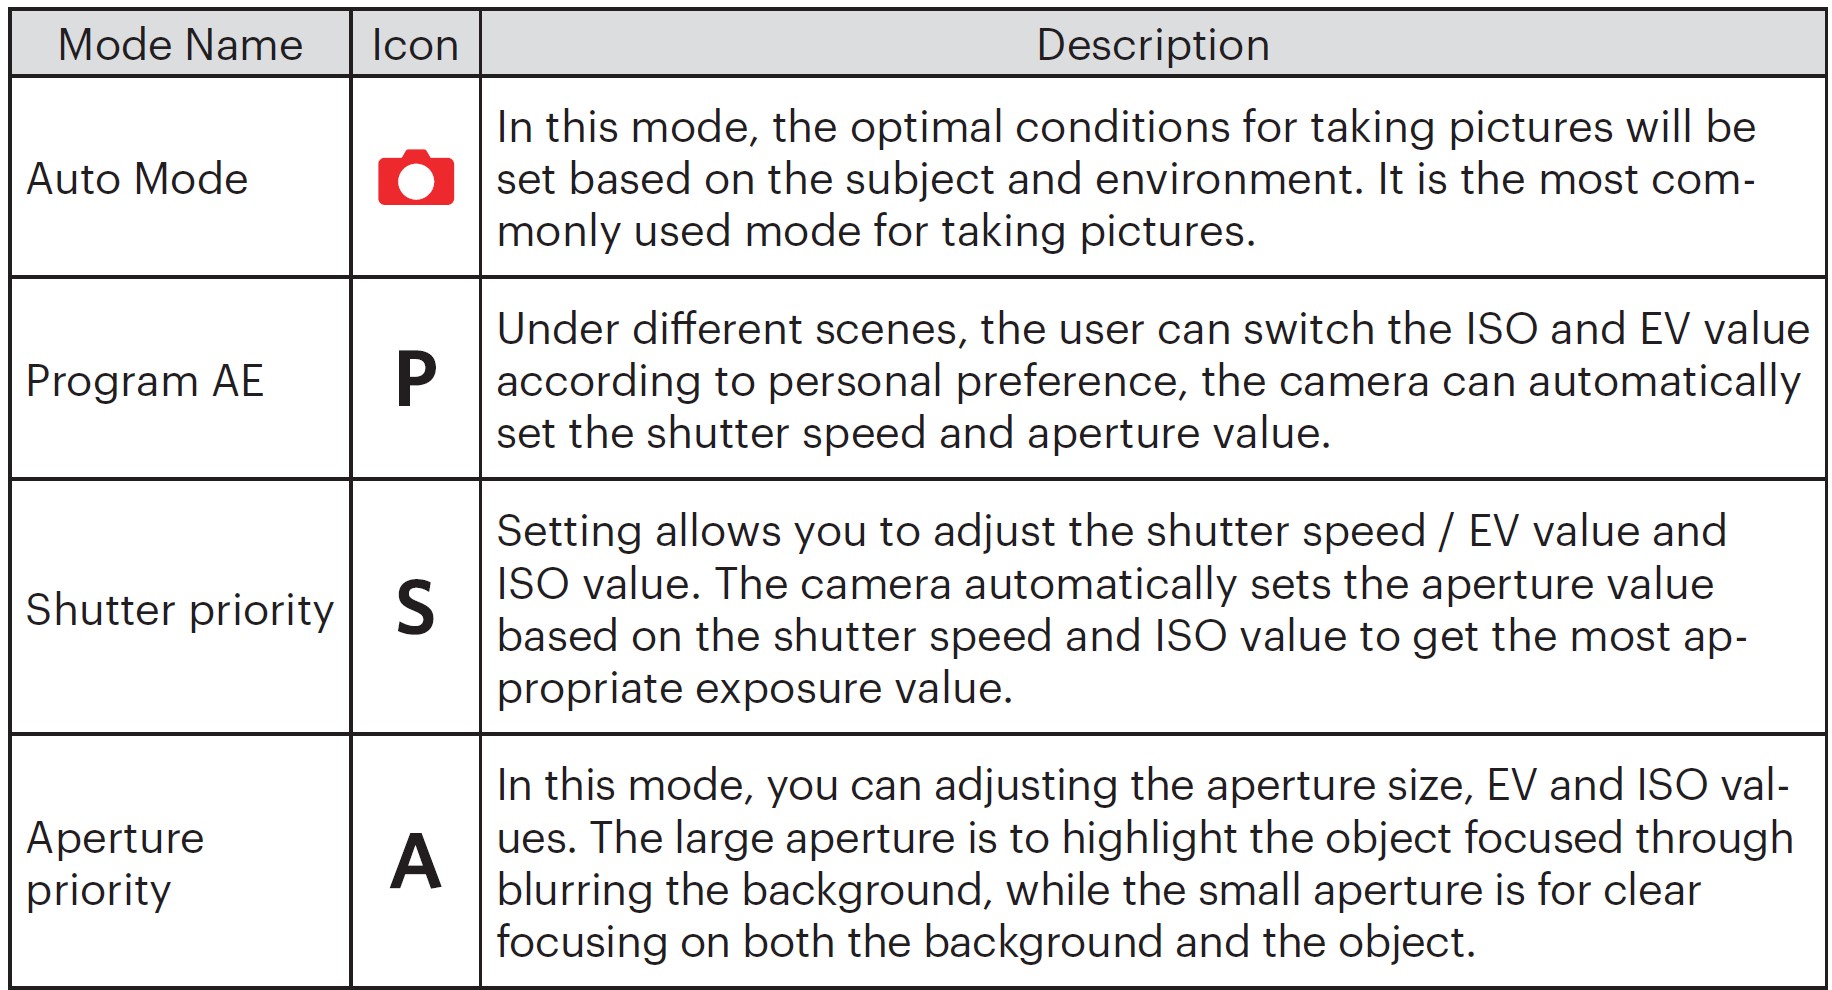
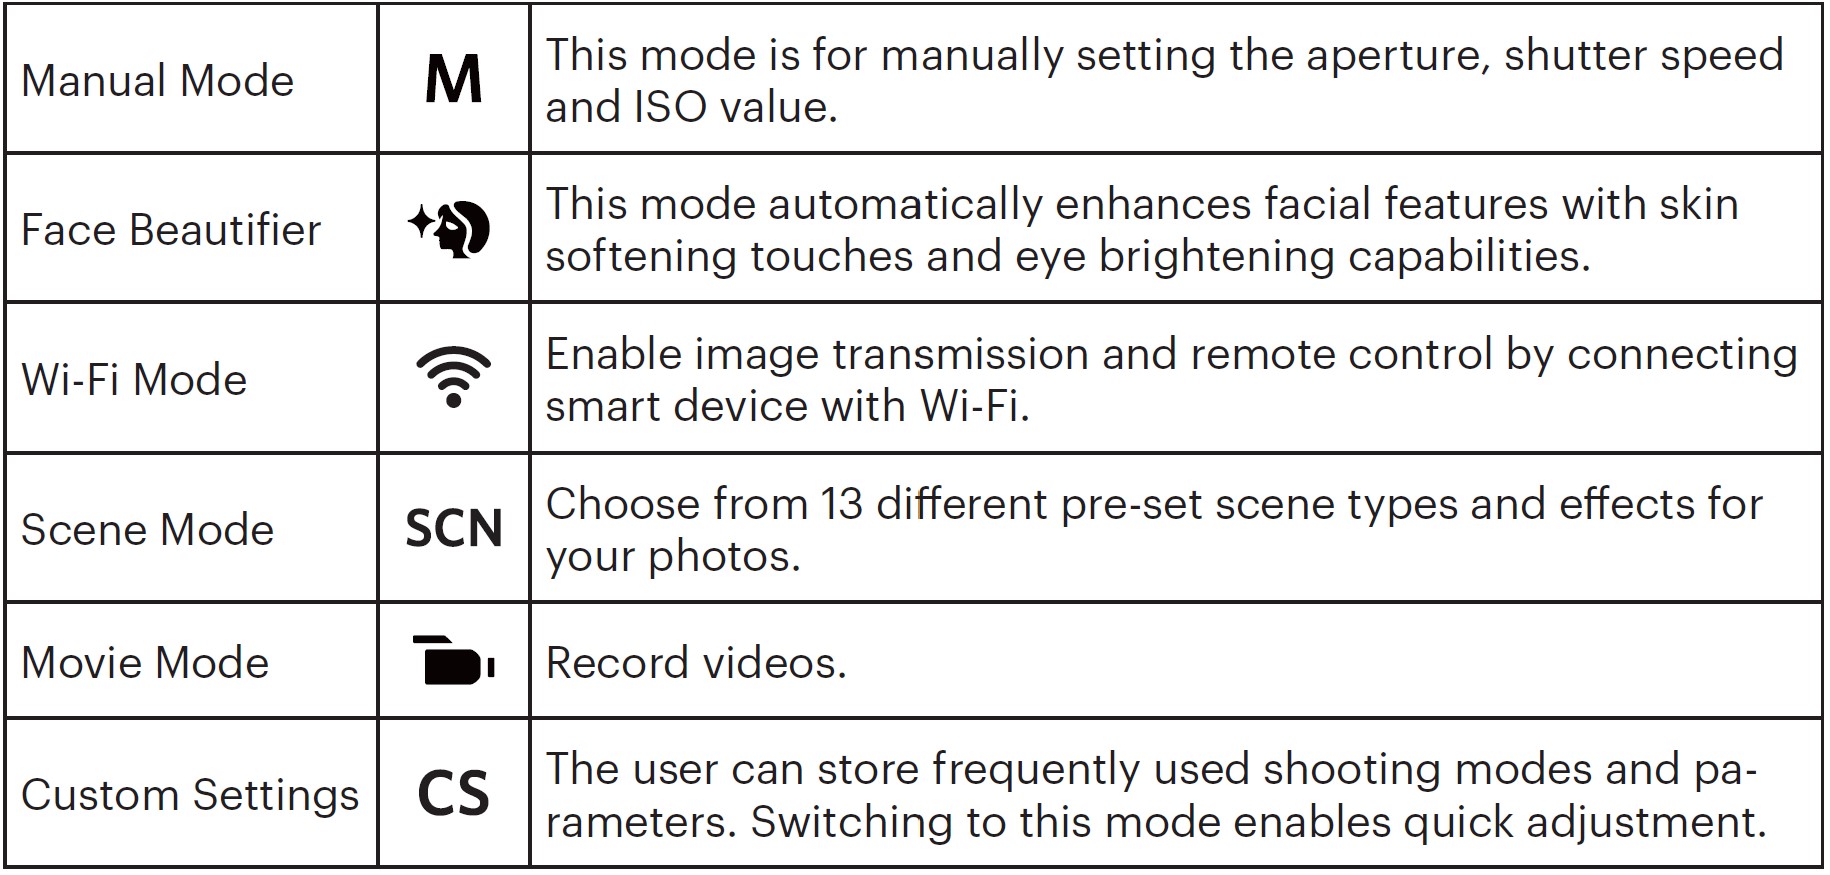
Mode: P S A M
Follow the steps below to adjust the parameters:
- Rotate the mode dial to select a mode you want, press the
 button to configure settings.
 - Press the
 /
/ button to select an adjustment setting.
 - Press the
 /
/ button to adjust the parameters.
 - Press the SET button to confirm the settings and enter the shooting screen.
Please refer to the table below for any nonadjustable options in PSAM mode: (O: Available X: Not Available)
Note: Please note that even if an option is not able to be adjusted in a particular mode, its value will still be displayed on the shooting screen.
Auto Mode
The camera will automatically detect the most suitable scene to capture the best pictures.
Auto Mode
The camera automatically adjusts the exposure and focus to ensure the best possible pictures.
Landscape Mode
For landscapes, automatically adjusts the exposure to match the background.
Portrait Mode
Most suitable for capturing people with focus on their faces.
Night Portrait
When you take portraits at night or in low light conditions, automatically adjust the expo-sure for people and night scenes.
Backlit Portrait
When the sun or any other light source is behind you, automatically adjusts the fore-ground exposure to produce the best pictures possible.
Night Mode
For night scenes, automatically increases the ISO value to compensate for low light.
Macro Mode
To produce more detailed close-ups, will automatically engage the camera’s Macro Mode and automatically focus the lens.
Face Beautifier
The camera is set to automatically adjust camera exposure for realistic portrayal of skin tones.
- Turn the mode dial to select face beautifier mode
- Press the
 button and press the
  /
/ button to select effect 1.
 - Press the
 /
/ button to select an option and press the SET button to confirm and return to photo shooting mode.
- Effect 1: Skin Soften
- Effect 2: Skin Soften+Eye Brightening
- Effect 3: Skin Soften+Eye Brightening+Eye Enlargement
Wi-Fi® Mode
Enable image transmission and remote control by connecting smart device with Wi-Fi®. Before utilizing Wi-Fi® Mode, please review the following:
- Your smart device operating system version needs to be iOS 14 or higher, or Android 8.0 or higher. If not, please upgrade your smart device before using the App.
- Please do not use in places having high intensity magnetic field, electrostatic and electric wave interference (for example near a microwave oven), which may cause failure in receiving signals.
- To maintain a connection, please keep the camera within 10 meters (32.8 feet) without signal shielding interference.
- Please do not use Wi-Fi® connection functionality on a plane.
- The camera and the smart device can only be connected one to one.
Scene Mode
The user can select an appropriate mode from the 13 scene modes according to the type of environment you are shooting in. The camera then configures the most appropriate settings for the best possible photos.
- Rotate the mode dial to select SCN
- Press the
 /
/ /
/ /
/ buttons to select a scene, and press the SET button to confirm.
 - To change to a different scene, please press the
 button and then the SET button and finally the
  /
/ /
/ /
/ buttons to reselect the scene.
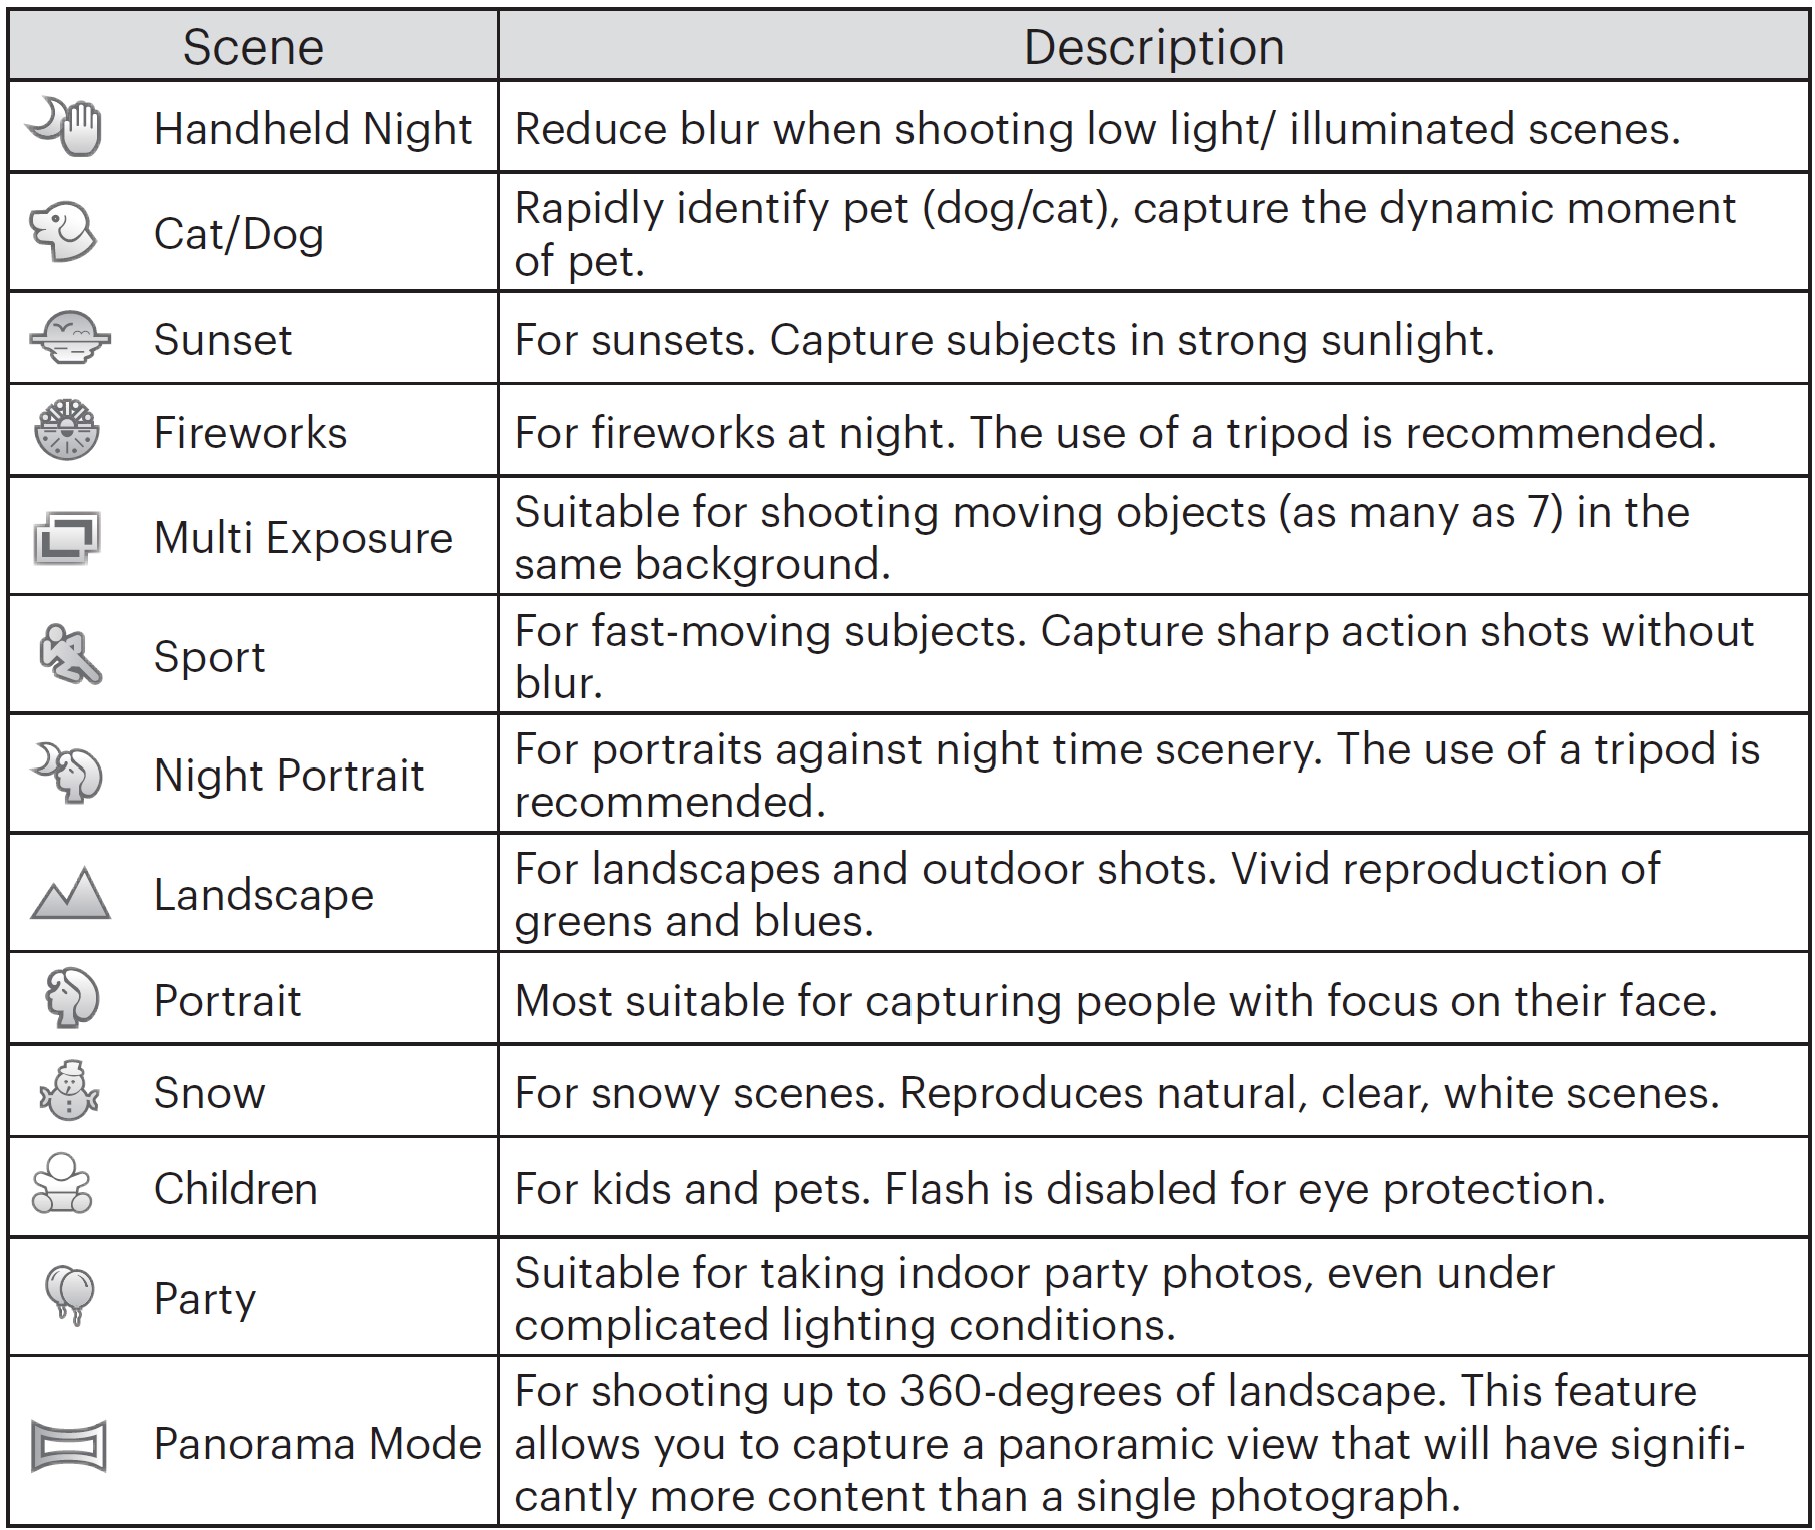 Handheld Night
Quickly take 4 photos below 8M (including 8M) and then overlap as a clear night image.
Pet Mode
When a cat /dog face is detected, a white focus frame appears. The camera will take a picture and save it regardless of whether the focus is successful (if successful, there appears a green focus frame; if not, there is an orange frame).
At most, 10 dog/cat faces can be detected at one time.
Multi Exposure
Keep camera steady before shooting. Press and hold the Shutter button to take 7 photos continuously when it will stop automatically. To stop shooting, release the Shutter button in the midway.
Objects shall be moved only from left to the right in order to be recorded. Objects moving from other directions would not be recorded.
Shooting effect will be influenced if object is moving too fast or too close.
Panorama Mode
Follow the arrow while keeping the camera steady to seamlessly shoot an ultra-wide scene of up to 360 degrees.
Follow the steps below:
- Select the Panorama Mode and then press the SET button to confirm.
- Press the
 /
/ /
/ /
/ button to select a shooting direction. (Should you not select the direction, the default shooting direction is “right”). 2 seconds later, the camera is ready to take pictures. You can also press the SET button or press the Shutter button halfway down to be ready to take pictures.
 - Compose your shot on the LCD and half press the shutter button to focus on thesubject. After focusing, fully press the down shutter button to take the first picture. At this time, the process dialog of panorama mode stitching appears on the screen.
- Move the camera according to the set direction. When the range of motion does not exceed the range that the camera can detect, the progress dialog along the indication arrow partially turns red. When it completely turns red, panorama mode shooting is finished.
Note:
- Panoramic image can be played back by the method of flash playing. Please see the animation panoramic playback on page 70.
- During shooting, the flash, self-timer, macro modes and exposure compensation are not available. Focus adjustment is also not available at this time.
- During panorama mode shooting, press the SET button to interrupt shooting and save the current pictures taken. Press the
 button to cancel shooting and not to save the previously taken pictures.
 - During panorama mode shooting, when the moving direction of the camera is wrong or the angle deviates from the internal settings, the LCD shows a warning message「Improper alignment. Please try again.」and the current pictures taken are saved.
Movie Mode
Switch to this mode to record videos. Follow the steps below:
- Rotate the mode dial to select
 , and it will enter the movie screen.
 - Press the
 button or the Shutter button to start recording.
 - Press the
 button or the Shutter button again to stop recording, save it automatically and then the camera will return to the movie screen.
Note: In the recording process, you can rotate the zoom lever to zoom in or out on the subject.
BASIC OPERATION
Using the Zoom Function
Your camera is equipped with two types of zoom functions: Optical Zoom and Digital Zoom. Toggle the Zoom Lever of the camera to zoom in or out on the subject while taking pictures.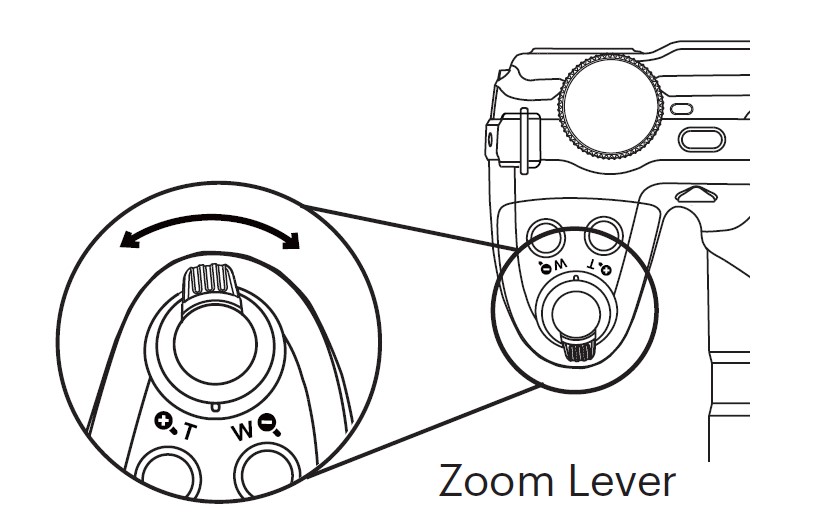
When the Optical Zoom reaches the threshold as Digital Zoom, release and turn the Zoom Lever to T to switch between the Optical Zoom and Digital Zoom.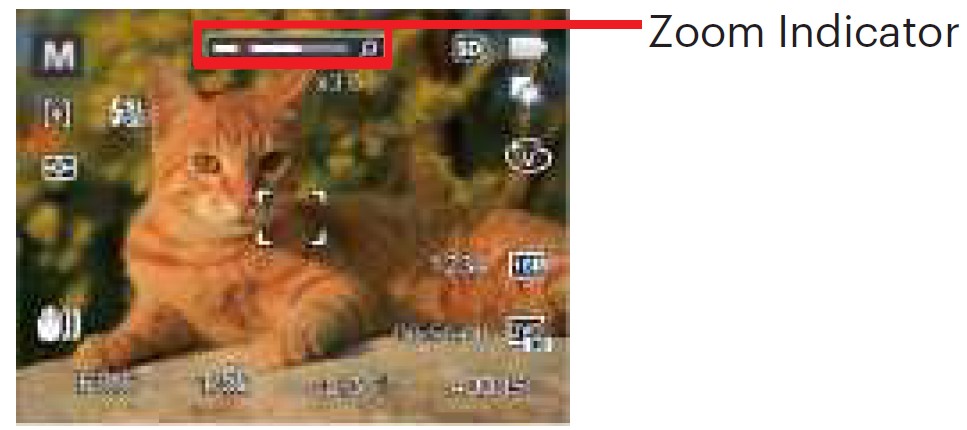
Focus Setting
This function can be adjusted in P S A M mode, please follow the steps below to configure the settings:
- Press the
 button to enter the Focus menu.
 - Press the
 /
/ button to select the following 3 modes:
 -
- Single-AF
The focus frame appears on the center of the LCD to focus on the subject. - Multi-AF
The camera automatically focuses the subject in a wide area to find the focus point. - Object Tracking
Smart tracking of the object in motion under the focusing shooting.
- Single-AF
- Press the SET button to confirm the settings and exit the menu.
Note: Once enabled, Object Tracking will only work when lens is focused on the object.
Macro Mode
The Macro Setting is ideal for shooting small objects or close-up photos. This mode allows you to focus on subjects very close to the camera.
It can be adjusted in P S A M mode. Please follow the steps below to configure the settings:
- Press the
 button to enter the Macro menu.
 - Press the
 /
/ button to select the following 2 modes:
 -
- Macro Off
Select this option to disable Macro. - Macro On
Select this option to make focusing on the object closer to the lens. (At the W side, the shooting distance should be more than 1 cm).
- Macro Off
- Press the SET button to confirm the settings and exit the menu.
Self-Timer Setting
Use this function to take pictures at pre-set intervals. The camera can be set to shoot after 2 seconds, 10 seconds after pressing the shutter or when a smile is detected.
It can be adjusted in![]() P S A M
P S A M ![]()
![]() mode. Please follow the steps below to configure the settings:
mode. Please follow the steps below to configure the settings:
- Press the
 button to enter the Self-Timer menu.
 - Press the
 /
/ button to select the following 4 modes:
 -
- Self-Timer Off
Disables the Self-Timer. - Self-Timer 2 sec
A single picture is shot 2 seconds after the Shutter Button is pressed. - Self-Timer 10 sec
A single picture is shot 10 seconds after the Shutter Button is pressed. - Self-Timer Smile
Press the Shutter Button and a picture will be taken immediately after a smile is detected.
- Self-Timer Off
- Press the SET button to confirm the settings and exit the menu.
Note:
- When enabling the Self-Timer, pressing the Shutter Button or the
 button will select the highlighted Self-Timer option and return to the shooting screen, and keep the Self-Timer setting.
 - When enabling the smile detection, pressing the Shutter Button or the
button will select the Self-Timer smile option (if highlighted) and return to the shooting screen, and keeping the Self-Timer smile setting.
Flash Mode
The flash provides supplemental light for a scene. The flash is usually used when shoot-ing against the light to highlight the object. It is also suitable for metering and shooting in darker scenes to improve the exposure. Please follow the steps below to configure the settings:
- Press the Flash Button to pop up the flash.

- Press the
 button to enter the Flash Settings Menu.
 - Press the
 /
/ button to select the following 6 modes:
 -
- Force Off
Flash is turned off. - Flash Auto
Camera flash goes off automatically based on existing light conditions. - Fill Flash
The flash goes off when a picture is taken, supplementing the existing light in a scene and helping to eliminate shadows. - Slow Sync.
This allows you to take pictures of people at night that clearly show both your subjects and the night time backdrop. The use of a tripod is recommended when shooting with this setting. - Slow Sync. + Red-Eye
Use this mode for slow synchro shots with red-eye reduction. - Red-Eye Reduction
The camera emits a brief pre-flash before the picture is taken to reduce red-eye effects.
- Force Off
- Press the SET button to confirm thesettings and enter the shooting screen.
White Balance Setting
The white balance function allows adjustment of the color temperature for different light sources.
It can be adjusted inP S A M mode. Please follow the steps below to configure the settings:
- Press the SET button to enter the White Balance menu.
- Press the
 /
/ button to select the following 8 modes:
 -
- AWB
- Daylight
- Cloudy
- Fluorescent Fluorescent CWF
- Incandescent
- Manual WB
(Fully press the Shutter button to detect the white balance value) - Color Temp. (1900K~10000K)Press the
 /
/ button to “Adjust the K value”; Press the
  button to exit the K value.
- Press the button to confirm thesettings and exit the menu.
Continuous Shot
This function can be adjusted in P S A Mmode. Please follow the steps below to configure the settings:
- Press the
 button to enter theContinuous Shot menu.
 - Press the
 /
/ button to select the following 5 modes:
 -
- Single
Capture a single shot only. - Continuous Shot
Take several pictures at a time. - Cont.Shot-High Speed (VGA) For continuous shot with VGA pixel.
- Cont.Shot-Fast (4M)
For continuous shot with 4M pixels. - Time-Lapse
Take pictures based on the preset interval (30sec/ 1min/ 5min/ 10min).
- Single
- Press the SET button to confirm the settings and exit the menu.
- Press the Shutter button to start continuous shooting.
Note: In Continuous Shot mode, the flash is automatically set to Force Off in order to achieve quick succession of shots.
EV Settings
The EV function menu of the camera includes functions, such as EV (Exposure Value) Adjustment, ISO, Shutter Adjust-ment, Aperture Adjustment, etc. Using the appropriate function settings can improve your pictures.
Please follow the steps below to set:
- Press the
 button to display the settings screen.
 - Press the
 /
/ button to select the setting options.
 - Press the
 /
/ button to adjust the option values.
 - Press the SET button to complete the setting and enter shooting mode.
EV Adjustment
Set up to adjust the picture brightness. In the case of a very high contrast between the photographed object and the background, the brightness of the picture can be appropriately adjusted.
The adjustable range of exposure value is from EV -3.0 to EV+3.0.
ISO Adjustment
ISO allows you to set the sensitivity of the camera sensor. Please use a higher ISO value in darker places and a lower value in brighter conditions.
Options for ISO value: Auto, 100, 200, 400, 800, 1600 and 3200.
Shutter Adjustment
For shutter speed, the camera may automatically set the aperture value corresponding to the manually set shutter speed so as to obtain a most suitable exposure value. The movement of object may be shown by adjusting the shutter speed. High shutter value can help you more clearly capture fast moving objects while low shutter value can better show the movement of objects.
Aperture Adjustment
You can adjust the aperture size value. Selecting a large aperture opening will emphasize the point of focus and show a blurry background and foreground. A small aperture opening will keep both the background and main object in clear focus.
Using Quick Recording
In shooting mode, press the button to begin recording video.
After recording, press the button again or press the Shutter Button to stop recording. The camera will save the video and return to the shooting screen.
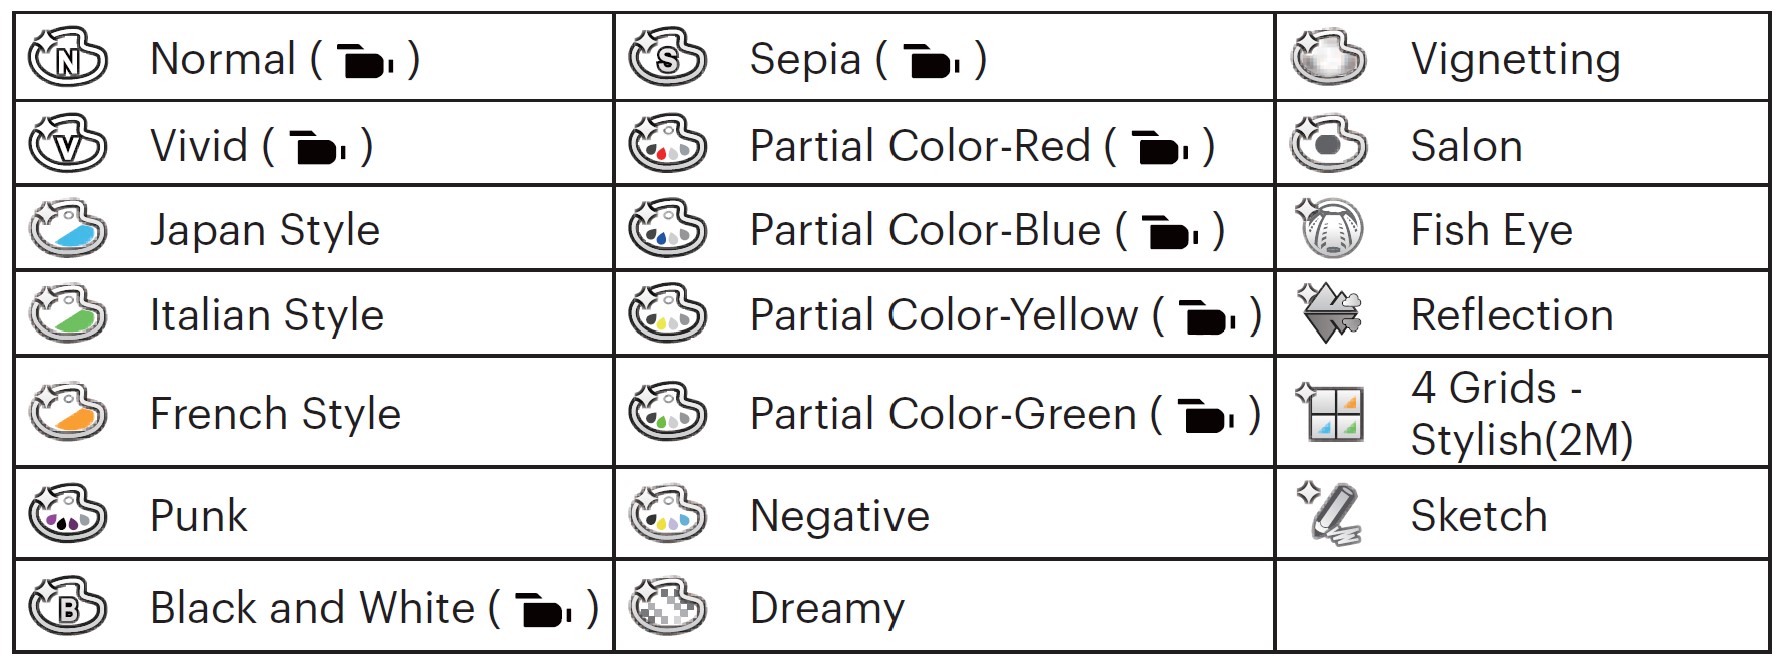
i Button Function Menu
The Image Color Setting allows you to select different color effects. Please follow the steps below to configure the settings:
- Press the
 button to select the Image Color Setting Menu.
 - Press the
 /
/ button to select the Image Color Setting options.
 APPENDICES
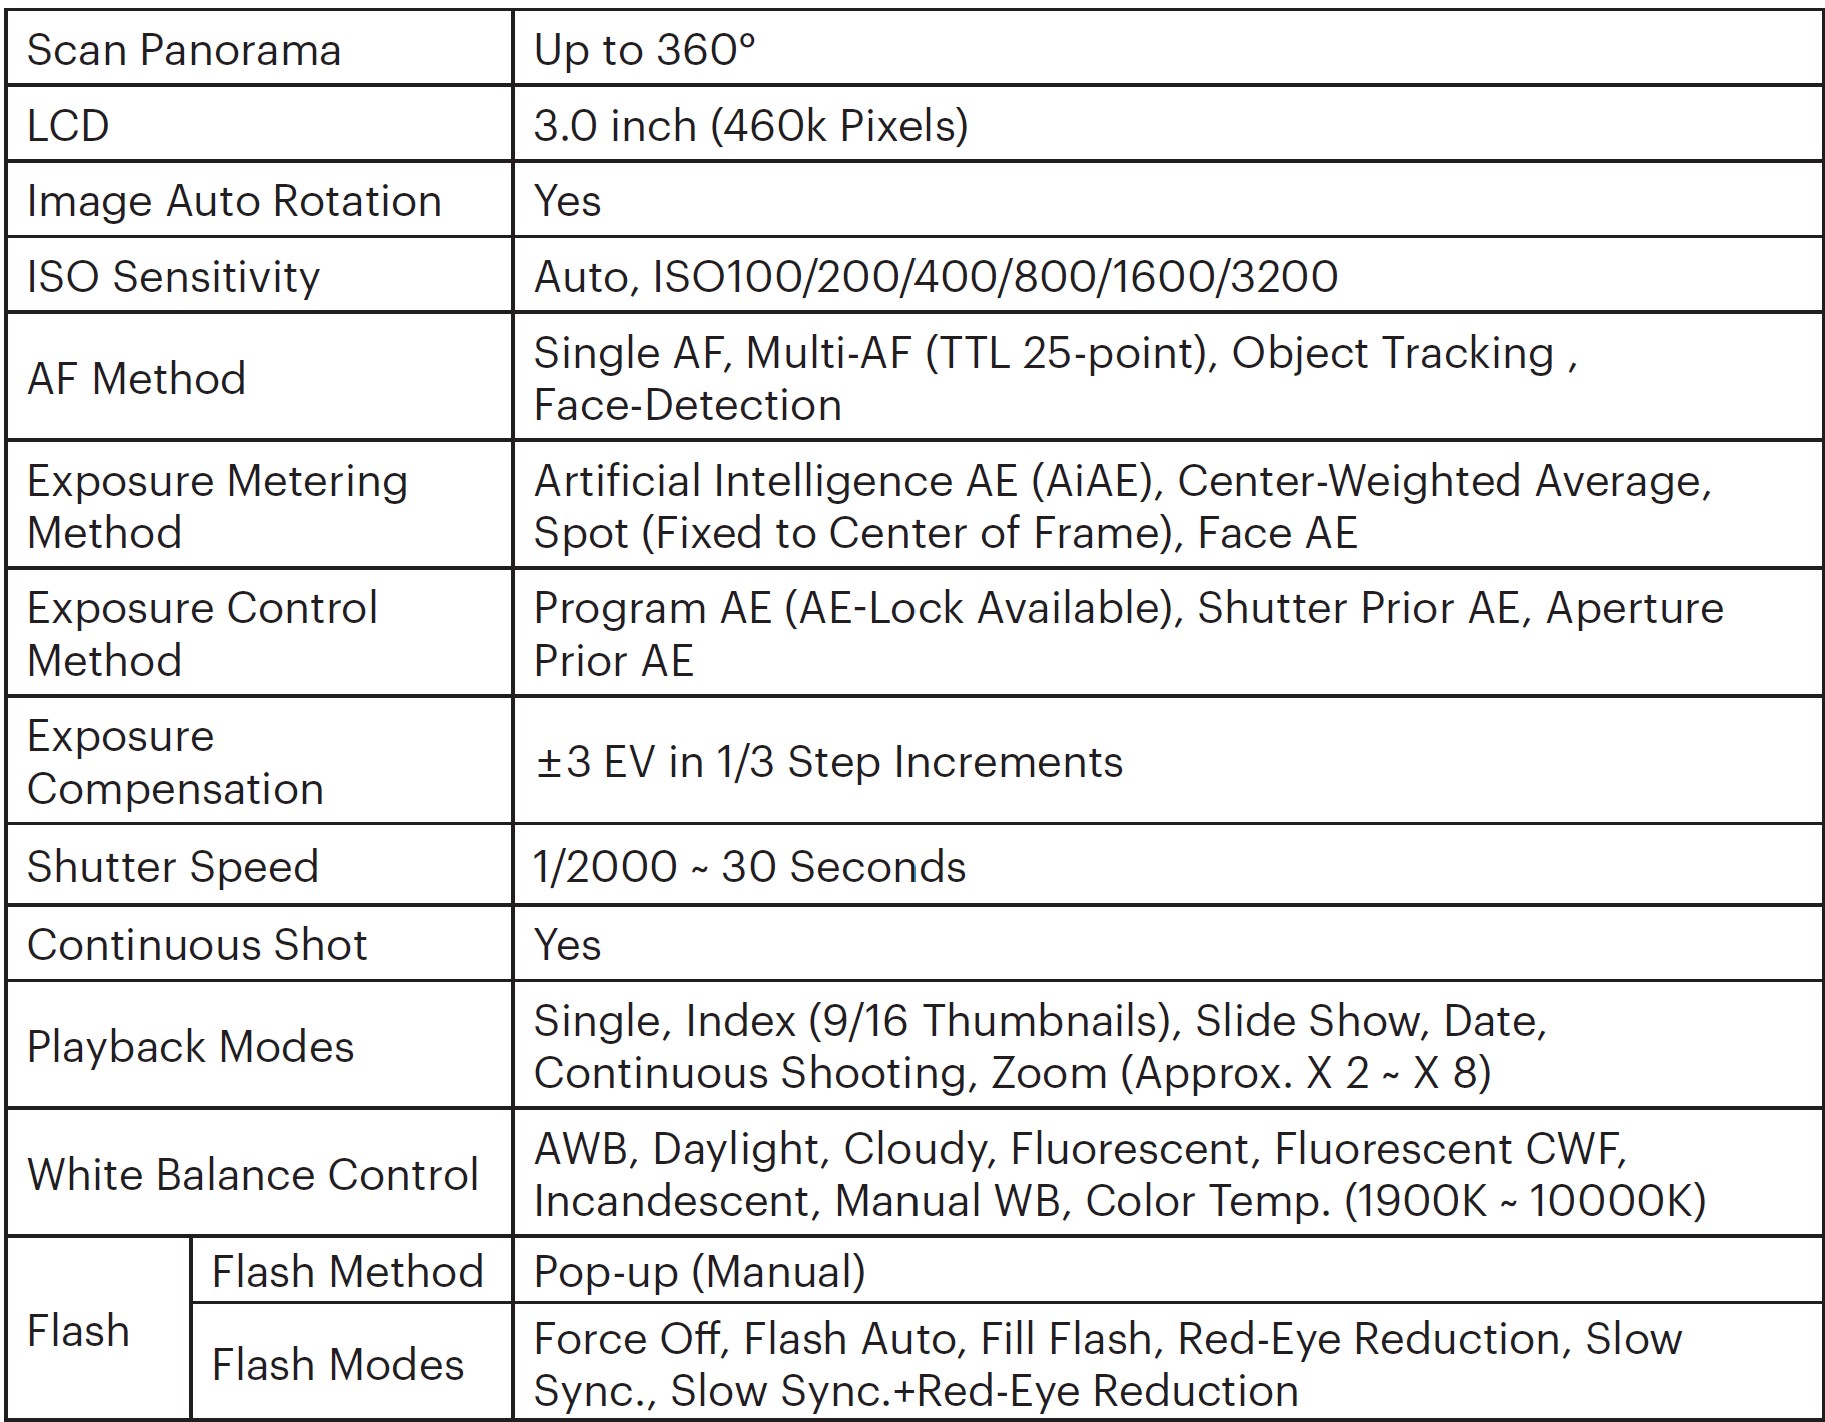
Product Specifications
Design and specifications are subject to change without notice.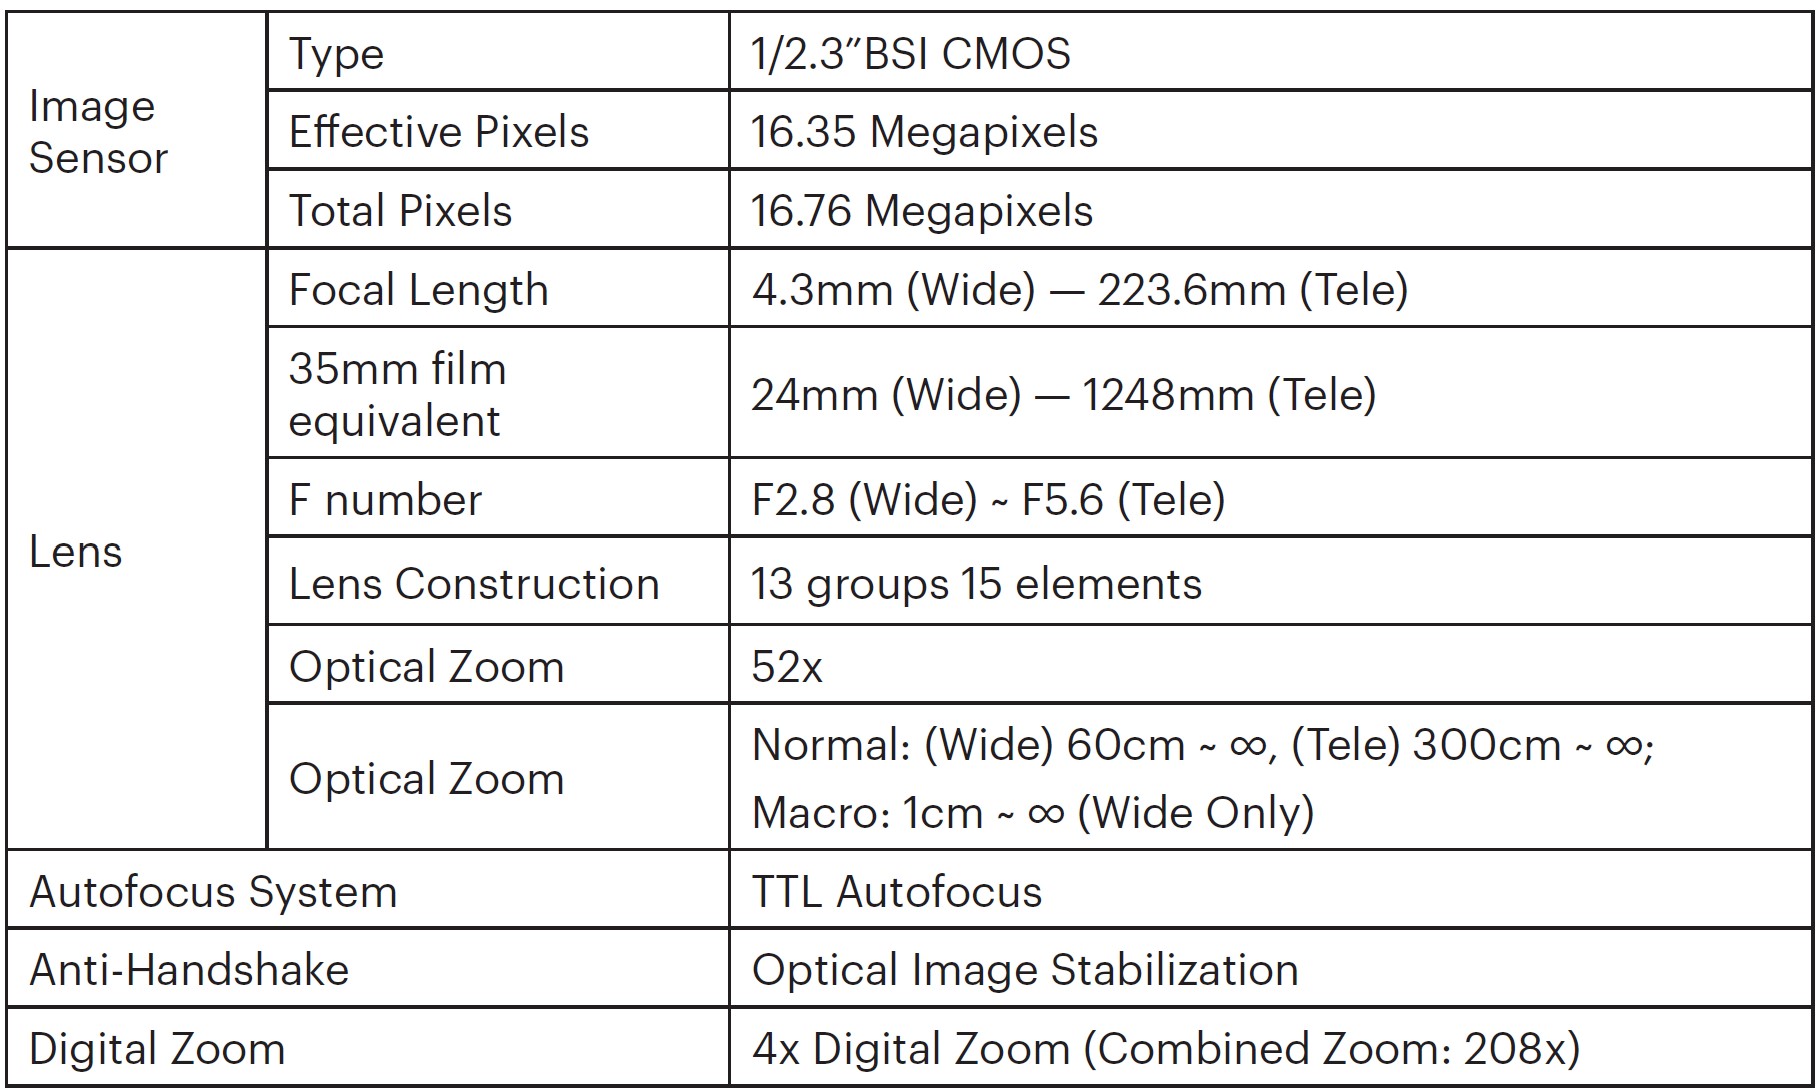


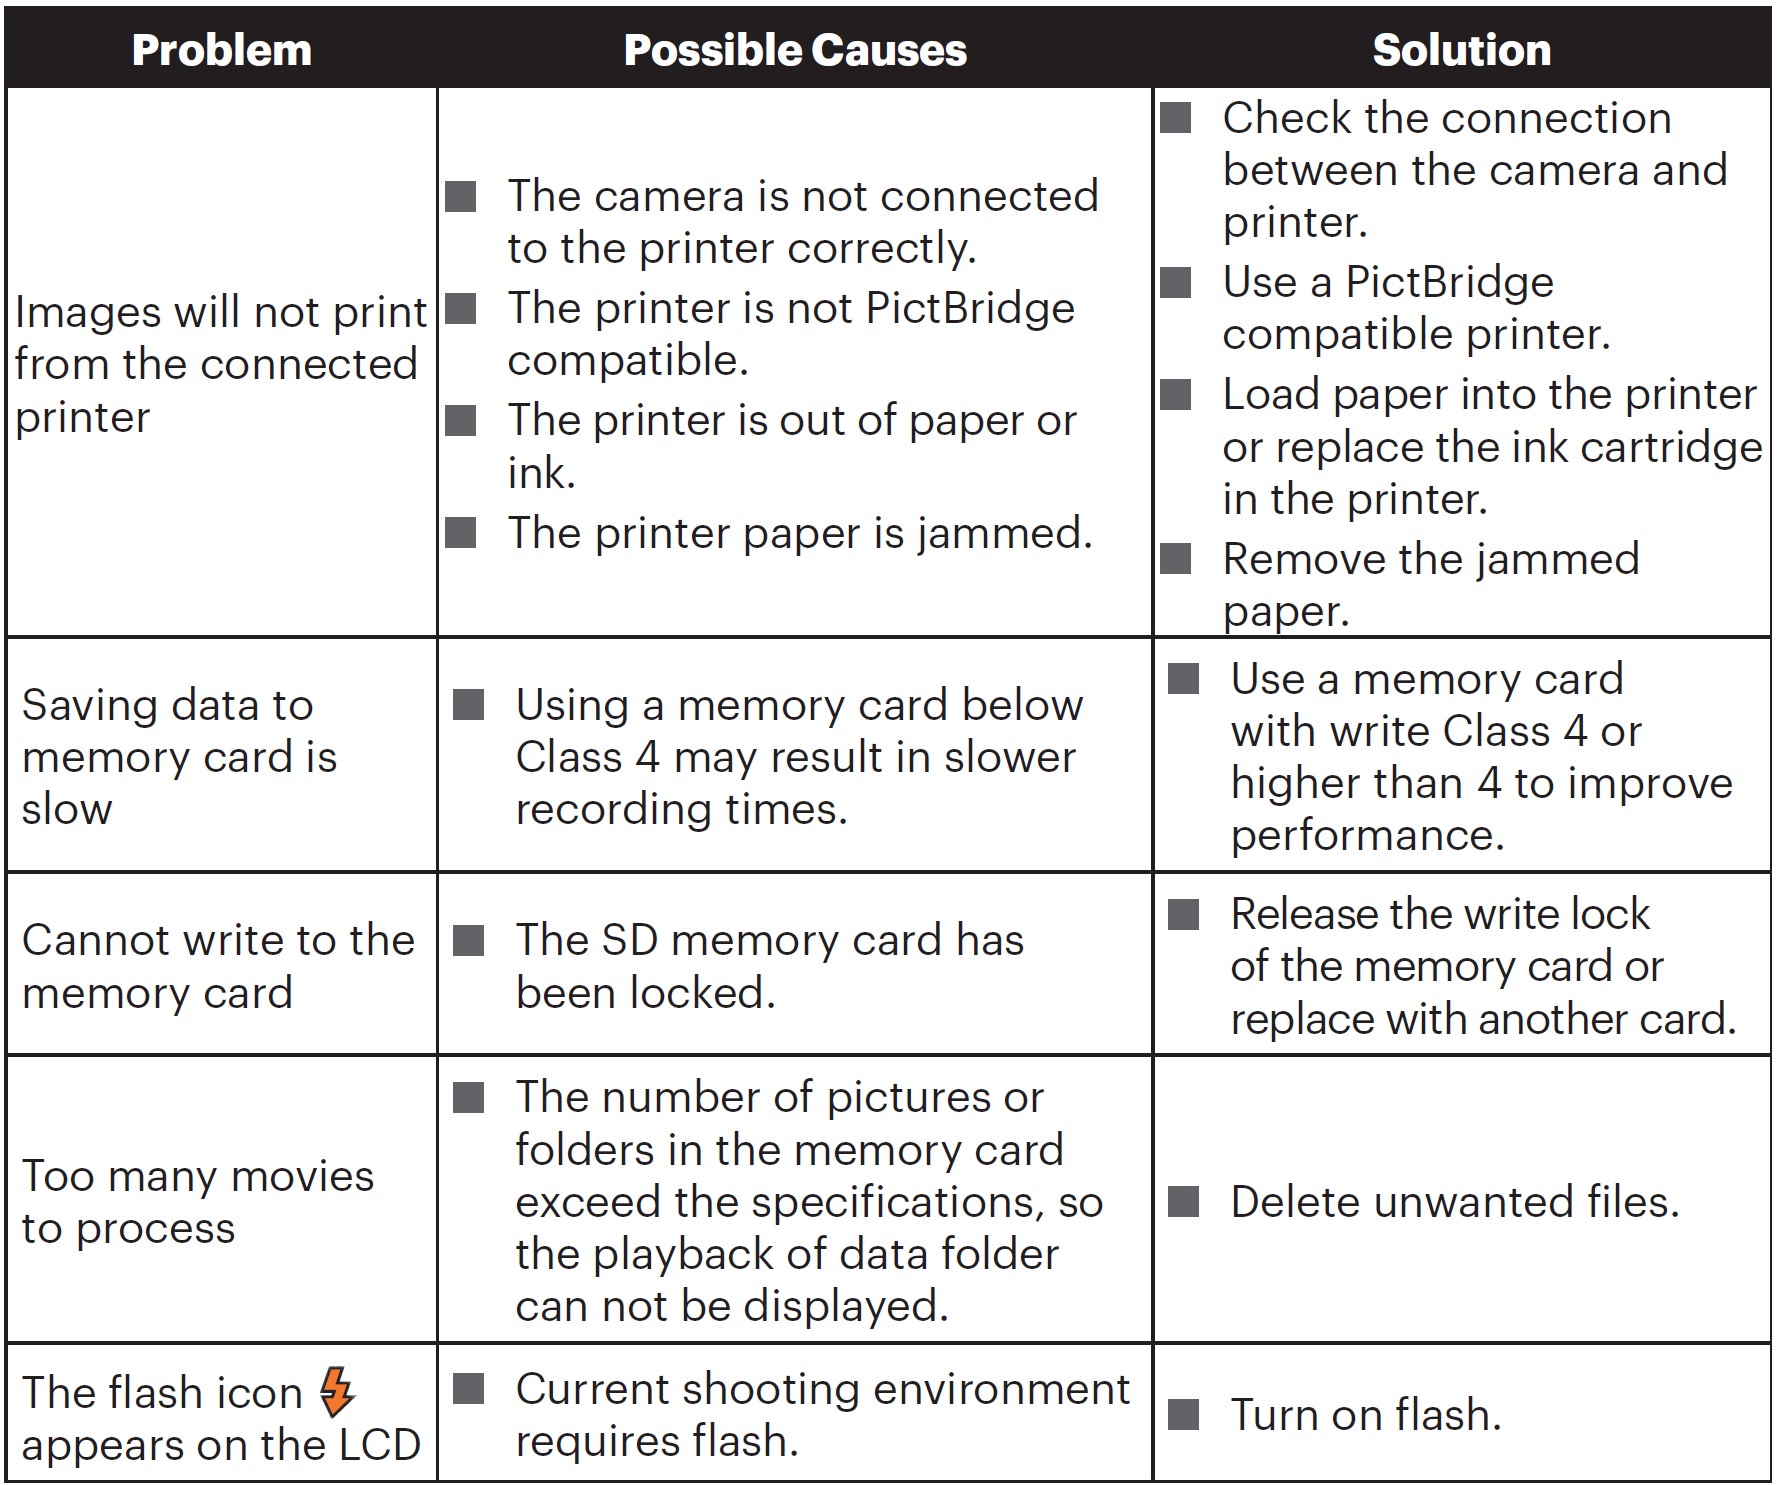
Troubleshooting
When shooting with stacked filters attached, the corners of the photo may turn dark (Vignetting effect) because the filter holder blocks light from reaching the camera image sensor; especially, at wide angle zoom control settings. Please take test shots and review the results when using stacked filters.
If you choose to change the factory assigned, random Wi-Fi® password on your AZ528 camera, please be sure to update and enter the new randomly assigned password on your smart device. Some smart devices will automatically remember and save any previously entered Wi-Fi® password. Be sure to clear the old password on your smart device manually before attempting to connect the AZ528’s Wi-Fi® to your device. (Depending upon your smart device make and model, operation may vary, so please refer to your smart device user manual and instructions.
Memory Card Compatibility
Refer to the chart below for compatible types of SD cards (√: Compatible X: Not Compatible)
It indicates that the writing speed class will be displayed on the memory card.
Use a memory card with the appropriate writing speed for the video recording mode to be recorded. (O: Recommended X: Not recommended)
FAQS About Kodak PIXPRO Astro Zoom AZ528-BK 16 MP Digital Camera
Has Kodak Pixpro AZ528 image stabilization been implemented?
Image stabilization using optics
Is video captured by the Kodak Pixpro AZ528?
Full HD video in 1080p
Does a KODAK PIXPRO make a decent starter camera?
Another well-liked camera for beginners is the Kodak PIXPRO AZ258 Astro Zoom Digital Camera.
Has Wi-Fi been added to the Kodak Pixpro AZ528?
3″ LCD. HD video at 1080p. Connection through Wi-FiTM. Utilize your iOSTM or AndroidTM smart device to wirelessly control.
Does the Kodak Pixpro AZ528 video record?
6-fps shooting speed and 30-fps Full HD 1080p video recording
Rechargeable Kodak Pixpro AZ528?
Digital camera, together with: Li-ion rechargeable battery
Has Bluetooth been installed on the Kodak Pixpro AZ258?
No, the KODAK PIXPRO AZ258 lacks Bluetooth or Wi-Fi.
Is Kodak Pixpro AZ528 a suitable camera for sporting events?
It’s possible that a staggering 52x zoom could be useful for both aspiring wildlife photographers and casual sports photography enthusiasts.
Can a Kodak Pixpro be used to record?
The camera can only save a maximum of one 60-minute movie at a time.
Has Kodak Pixpro a mobile app?
Application program “PIXPRO SP1”
For more manuals by Kodak, Visit Manualsdock
[embeddoc url=”https://manualsdock.com/wp-content/uploads/2023/09/Kodak-PIXPRO-Astro-Zoom-AZ528-BK-16-MP-Digital-Camera-User-Manual.pdf” download=”all”]


