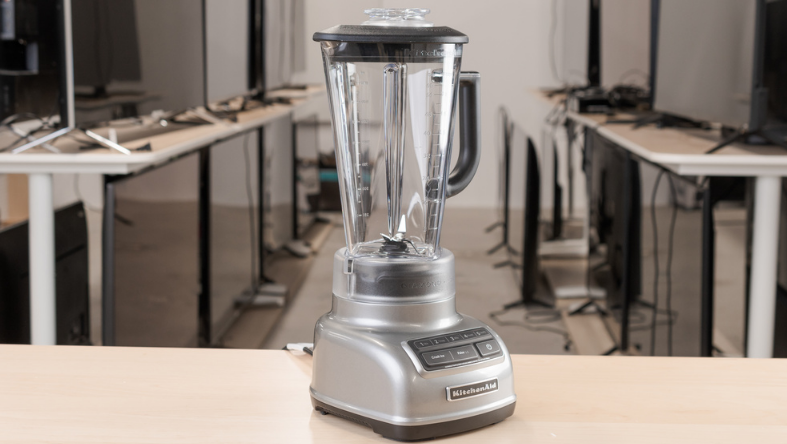
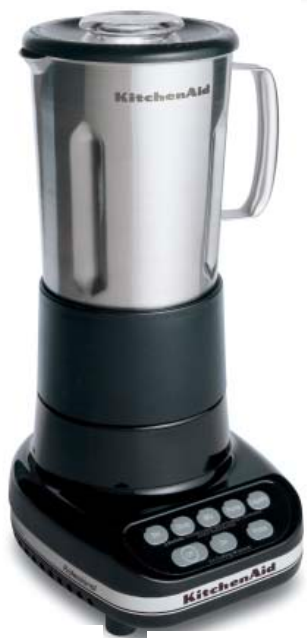
KitchenAid 5 Speed Professional Blender
IMPORTANT SAFEGUARDS
When using electrical appliances, basic safety precautions should always be followed to reduce the risk of fire, electric shock, and/or injury to persons including the following:
- Read all instructions.
- To protect against the risk of electrical shock, do not put the blender in water or other liquid.
- Close supervision is necessary when any appliance is used by or near children.
- Unplug from the outlet when not in use, before putting on or taking off parts, and before cleaning.
- Avoid contact with moving parts.
- Do not operate the blender with a damaged cord or plug or after appliance malfunctions, or is dropped or damaged in any manner. Return the appliance to the nearest Authorized Service Center for examination, repair, or electrical or mechanical adjustment.
- Do not use outdoors.
- Do not let the cord hang over the edge of the table or counter.
- Keep hands and utensils out of the container while blending to reduce the risk of severe injury to persons or damage to the blender. A scraper may be used but must be used only when the blender is not running.
- Blades are sharp. Handle carefully.
- To reduce the risk of injury, never place the cutter-assembly blades on the base without the jar properly attached.
- Always operate the blender with the cover in place.
- The use of attachments, including canning jars, not recommended by KitchenAid may cause a risk of injury to persons.
- When blending hot liquids, remove the centerpiece of the two-piece cover.
- This product is designed for household use only.
Electrical Requirements
- Volts: 120 A.C. only.
- Hertz: 60
Grounding, 3-prong system. 15-amp branch circuit.
NOTE: Your blender has a 3-prong grounded plug. To reduce the risk of electrical shock, this plug will fit in an outlet only one way. If the plug does not fit in the outlet, contact a qualified electrician. Do not modify the plug in any way. A short power-supply cord is provided to reduce risks resulting from becoming entangled in or tripping over a longer cord.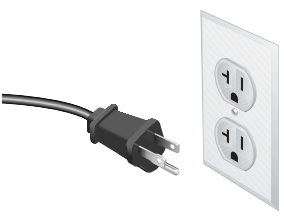
Blender Features
This blender was built and tested to KitchenAid quality standards for optimum performance and long, trouble-free life.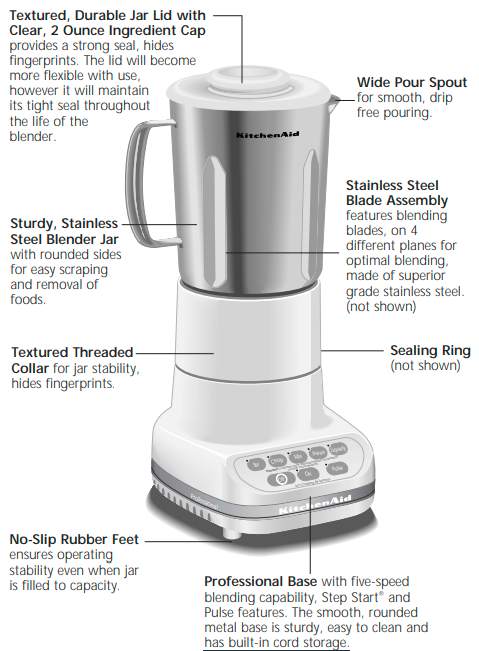
Assembling Your Blender
- Before assembling your blender wipe the blender base with a warm sudsy cloth, then wipe clean with a damp cloth. Dry with a soft cloth. Wash blender jar, lid, collar, and blades in warm, sudsy water. To help prevent scratching, clean the stainless steel jar using a soft cloth or sponge (do not use steel wool). Rinse and wipe parts dry.
- Turn the blender jar upside down. Place the small sealing ring on the blade assembly.
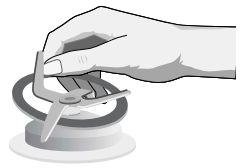
- Place the blade assembly with the sealing ring in the bottom opening of the jar.
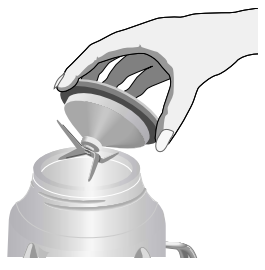
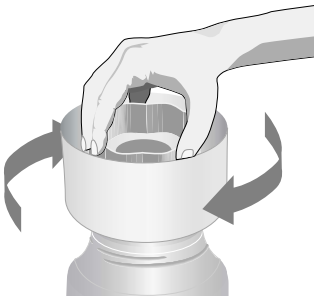
- Twist the collar onto the jar. Be sure to engage threads properly and securely. Turn the assembled jar right side up.
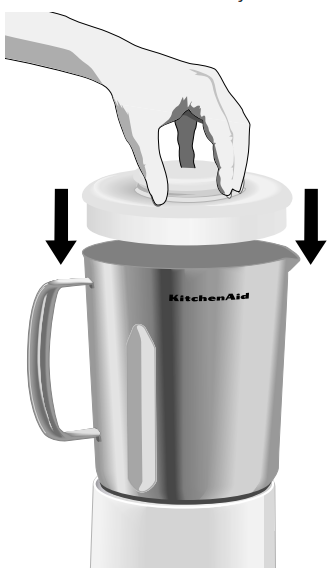
- Place the lid onto the blender jar.
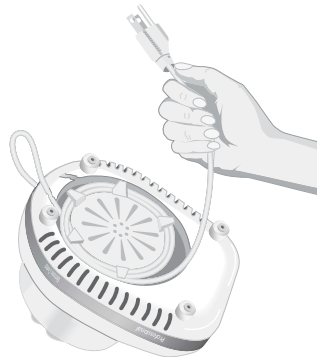
- Coil the power cord into the storage area on the bottom of the power base to shorten it.
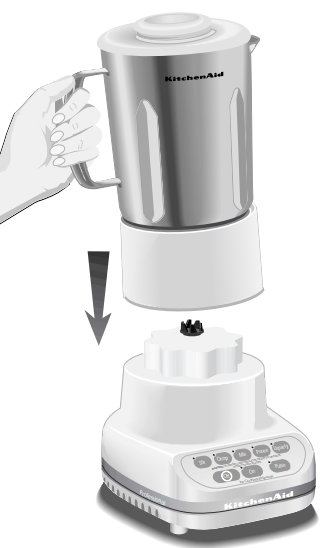
- Place the jar on the power base.
- Plug into a grounded 3-prong outlet. The blender is now ready to use.
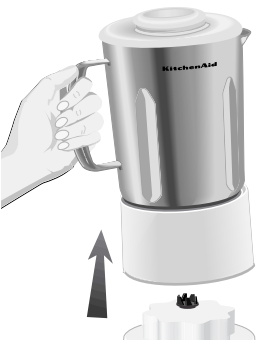
- Before removing the jar from the base after use, always push the OFF pad and make sure the blinking red light is off, then unplug. Lift the jar straight up, with the collar attached, do not twist. Do not unscrew the stainless steel jar from the collar until you are ready to remove the blade assembly. Loosening the collar with liquids inside the jar will cause them to leak out.
To Operate Your Blender
- With red light flashing, an accidental touching of a speed pad, or other circumstances may result in turning on the blender.
- If the blender runs when the ON light is flashing, do not use it. Take the unit to an Authorized Service Center. (However, a slight flicker is normal.)
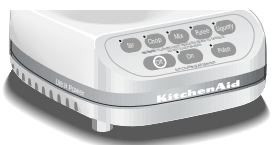
- This unit should operate only when a speed pad is pressed. Immediately press the OFF pad if the unit runs at any other time. If this occurs, do not use it; it takes the unit to an Authorized Service Center. The KitchenAid® Professional blender has five speeds: Stir, Chop, Mix, Puree and Liquefy.
- Before operating the blender, make sure the blender jar is properly assembled (see page 7) and in place on the blender base. Put ingredients in a jar and firmly attach the lid.
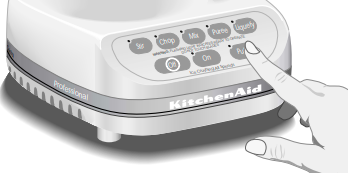
- Press the ON pad. The red indicator light should blink on and off indicating the speed pads are activated.
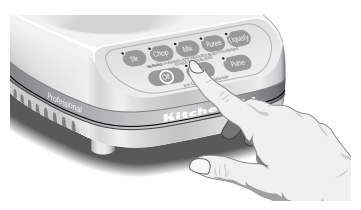
Ingredient Cap Remove the cap and add ingredients at STIR or MIX speeds. When operating at higher speeds, with a full jar or with hot contents, stop the blender and add ingredients.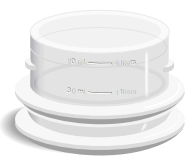
Pulse Feature Your KitchenAid® blender has a “Pulse At Any Speed” feature.
- Before operating the blender, make sure the jar is properly assembled (see page 7) and in place on the blender base. Put ingredients into a blender jar and attach the lid firmly.
- Press the ON pad. The red indicator light should be blinking, showing that the blender is activated.
- Press the PULSE pad. The indicator light above the pad will glow, indicating that all the speed pads are in the Pulse mode.
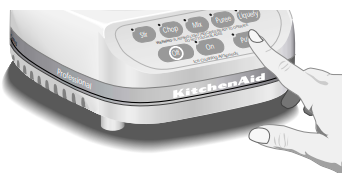
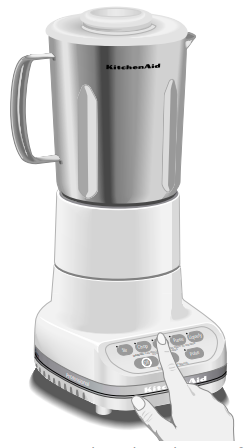
- Select a speed pad and press for the desired length of time (a short delay reaching the selected speed is normal due to the Step Start® feature).
- To turn the Pulse feature off, just press the PULSE pad again. The blender is now ready for continuous operation. Before removing the blender jar, deactivate the blender by pressing the OFF pad and unplugging the power cord.
NOTE: Use a rubber spatula to mix ingredients ONLY when the blender is OFF and unplugged. Never use any utensil, including spatulas, in the blender jar while the motor is running.
Care and Cleaning
NOTE: Do not immerse the base in water.
- Disassemble blender container parts and wash in warm, sudsy water. To help prevent scratching, clean the stainless steel jar using a soft cloth or sponge (do not use steel wool). Rinse all parts and wipe dry. Or, wash in an automatic dishwasher.
- For complete cleaning, remove the basket from the lade assembly, and wand ash in warm, soapy water.
- Wipe the cord with a warm, sudsy cloth; wipe clean with a damp cloth, then dry with a soft cloth. The cord can be coiled into the storage area on the bottom of the power base for neat and convenient storage.
NOTE: Always correctly assemble clean blender parts before storing them on the blender base.
Blender Tips
Quick Tips
- Use the pulse feature when making beverages that include ice cubes to produce a smoother texture.
- Blend at LIQUEFY if you’re making a large amount of beverage using lots of ice. For smaller quantities, use CHOP.
- Smaller ice cubes can be chopped or crushed faster than large ones.
- Add food to this blender jar in larger quantities than you would with other blenders – you can add 2 to 3 cups at a time versus 1-cup portions.
- For many ingredient mixtures, start the blending process at STIR to combine the ingredients thoroughly. Then increase to a higher speed, if necessary.
- Be sure to keep the cover on the blender jar while blending.
How To…
- Chop fruits and vegetables: Put 2 cups of fruit or vegetable chunks in a blender jar. Cover and blend at STIR, pulsing a few times, about 2 to 3 seconds each time, until desired consistency is reached.
- Puree fruits: Place 2 cups of canned or cooked fruit in a blender jar. Add 2 to 4 tablespoons of fruit juice or water per cup of fruit. Cover and blend at PUREE for about 5 to 10 seconds.
- Puree vegetables: Place 2 cups of canned or cooked vegetables in a blender jar. Add 2 to 4 tablespoons of broth, water, or milk per cup of vegetables. Cover and blend at PUREE for about 10 to 20 seconds.
- Make baby food from adult food: Place prepared adult food in a blender jar. Cover and blend at STIR for about 10 seconds. Then blend at PUREE for about 10 to 30 seconds.
- Rinse your blender jar: Fill the blender jar one-third to one-half full with warm water. Add a few drops of liquid dish detergent. Cover and blend at STIR until sides are clean, about 5 to 10 seconds. Rinse and dry. For complete cleaning, wash all gaskets separately.
Hassle-Free Replacement Warranty
We’re so confident the quality of our products meets the exacting standards of KitchenAid that, if your blender should fail within the first year of ownership, KitchenAid will arrange to deliver an identical or comparable replacement to your door free of charge and arrange to have your “failed” blender returned to us. Your replacement unit will also be covered by our one-year full warranty.
Please follow these instructions to receive this quality service. If you reside in the 50 United States and your KitchenAid® blender should fail within the first year of ownership, simply call our toll-free Customer Satisfaction Center at 1-800-541-6390, 8 a.m. to 8 p.m., Monday through Friday, 10 a.m. to 5 p.m., Saturday, Eastern Time. Give the consultant your complete shipping address. (No P.O. Box Numbers, please.)
Proof of Purchase & Product Registration Always keep a copy of the sales receipt showing the date of purchase of your blender. Proof of purchase will assure you of in-warranty service. Before you use your blender, please fill out and mail your product registration card packed with the unit. This card will enable us to contact you in the unlikely event of a product safety notification and assist us in complying with the provisions of the Consumer Product Safety Act. This card does not verify your warranty. Please complete the following for your records:
- Model Number
- Serial Number
- Date Purchased
- Store Name
KitchenAid® Blender Warranty for Puerto Rico A limited one-year warranty extends to the purchaser and any succeeding owner of blenders operated in Puerto Rico. During the warranty period, all service must be handled by an Authorized KitchenAid Service Center. Please bring the blender, or ship it prepaid and insured, to the nearest Authorized Service Center. Call toll-free 1-800-541-6390 to learn the location of a Service Center near you. Your repaired blender will be returned to you prepaid and insured.
Arranging for Service after the Warranty Expires For service information, call toll-free 1-800-541-6390 or write to Customer Satisfaction Center, KitchenAid Portable Appliances, P.O. Box 218, St. Joseph, MI 49085-0218.
Ordering Accessories and Replacement Parts To order accessories or replacement parts for your blender, call toll-free 1-800-541-6390 or write to: Customer Satisfaction Center, KitchenAid Portable Appliances, P.O. Box 218, St. Joseph, MI 49085-0218. ® Registered Trademark/™Trademark of KitchenAid, U.S.A.
FAQs About KitchenAid 5 Speed Professional Blender
What is a blender’s purpose?
Ice is mostly crushed or pureed in a blender. If the ultimate result is anything you can drink, such as a protein shake, mocktail, drizzle, or dip, use a blender. A food processor can also be used to slice, grate, shred, dice, and more in addition to pureeing.
What is the KitchenAid blender’s wattage?
With the 16-ounce personal blending jar included with the KitchenAid K400 stand blender, you can quickly prepare your favorite smoothies and drinks. With its powerful 1200 watts and Intelli-Speed Motor Control, it quickly chops through ice, fruits, vegetables, and other materials.
My KitchenAid blender won’t blend; why?
Occasionally, an air pocket may form around the blade of the blender, causing the contents to miss it.
Is it possible to prepare food in a blender?
In the kitchen, the blender is a near relative of a food processor and works well as a food processor substitute for some jobs. For tasks like pureeing and emulsifying, these two countertop appliances can occasionally be used interchangeably; but, a blender can more completely process food to provide extremely smooth results.
What advantages does a blender offer?
Smooth and consistent textures are simple to generate with the speed and efficiency of blenders and food processors.
How much energy is required by a blender?
Although options range from 300 to as high as 1,500 watts, most household models are between 500 and 750 watts. It may seem that a higher price means a better blender because high-wattage blenders are sometimes more expensive than their low-watt equivalents.
What is the power consumption of a KitchenAid?
About 11 kWh are used annually by a KitchenAid mixer. For making great cakes and breads, a powerful KitchenAid mixer is fantastic. Your beloved mixer uses about 200 watts of electricity, so if it is used for an hour a week, it uses roughly 11 kWh of electricity yearly.
What is the best watt blender?
Between 500 and 600 Watts: Do smoothies fit into your morning routine? If so, 500–600-watt blenders can usually handle the task. 700 Watts or Higher: Select a high-wattage appliance if you want to grind things finely, like coffee, or if you want to use it more vigorously and robustly.
My KitchenAid mixer stops mixing; why?
This may occur if a hard object, such as a measuring spoon, the lid of the attachment hub, or hard materials, is dropped into the bowl while mixing. Most likely, one of the mixer motor’s gears has stripped or been damaged, necessitating repair or replacement.
What is the typical blender issue?
Liquid leakage from the jar is the most frequent issue. Tightening the base is the answer. Examine the gasket and replace it if needed if this doesn’t resolve the issue. Examine the assembly socket that the drive stud fits into if the drive stud is turning but the blade assembly is not.
For more manuals by KitchenAid ManualsDock

