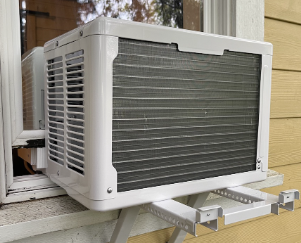
Insignia NS-AC8WU3 8,000 BTU Window Air Conditioner
Introduction
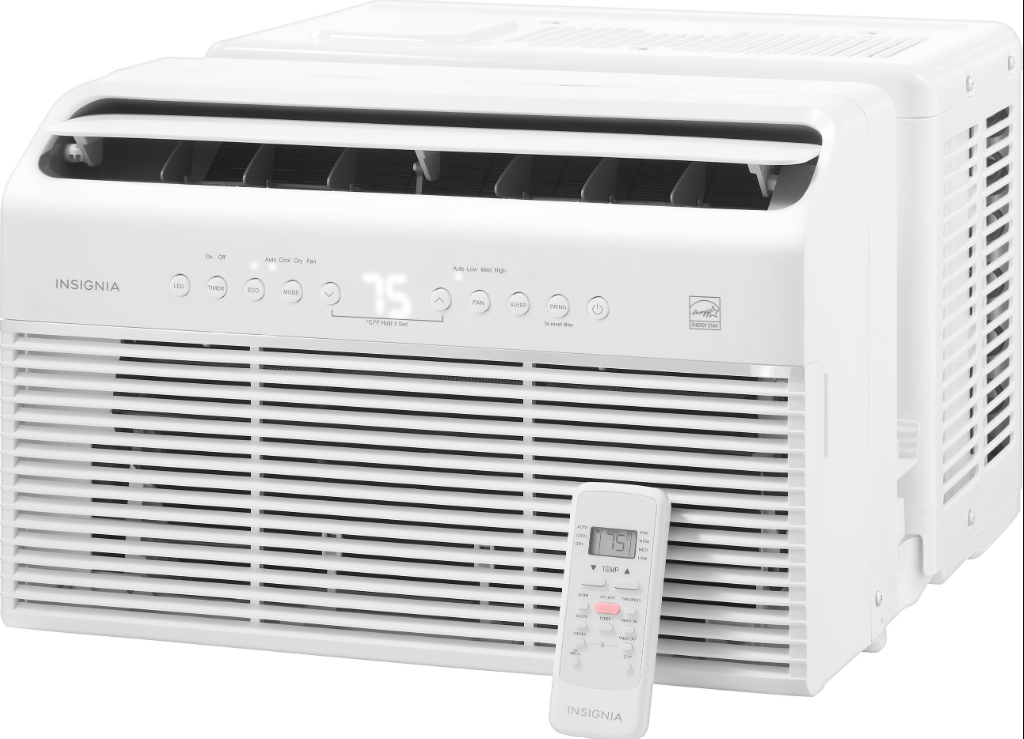
Congratulations on your purchase of a high-quality Insignia product. Your NS-AC8WU3 represents the state-of-the-art air conditioner design and is designed for reliable and trouble-free performance.
IMPORTANT SAFEGUARDS
Read this manual carefully before installing or operating your new air conditioning unit. Make sure that you save this manual for future reference. To prevent injury to the user or other people and property damage, the following instructions must be followed. Incorrect operation due to ignoring instructions may cause harm or damage. The seriousness is classified by the following indications.
WARNING
- Plug in the power plug properly. Otherwise, it may cause electric shock or fire due to excess heat generation.
- Always use a circuit breaker and a dedicated power circuit. Incorrect installation may cause fire and electric shock.
- Always ensure effective grounding. Incorrect grounding may cause electric shock.
- Unplug the unit if strange sounds, smells, or smoke come from it. It may cause fire and electric shock.
- Keep firearms away. It may cause a fire.
- Ventilate the room before operating your air conditioner if there is a gas leakage from another appliance. It may cause explosion, fire, and burns.
- Do not operate or stop the unit by inserting or pulling out the power plug. It may cause electric shock or fire due to heat generation.
- Do not operate with wet hands or in a damp environment. It may cause electric shock.
- Do not allow water to run into electric parts. It may cause the failure of the machine or an electric shock.
- Do not use the socket if it is loose or damaged. It may cause fire and electric shock.
- Do not use the power cord close to the heating appliances. It may cause fire and electric shock.
- Do not damage or use an unspecified power cord. It may cause electric shock or fire. If the power cord is damaged, it must be replaced by the manufacturer an authorized service center or a similarly qualified person in order to avoid a hazard.
- Do not direct airflow at room occupants only. This could damage your health.
- Do not modify power cord length or share the outlet with other appliances. It may cause electric shock or fire due to heat generation.
- Do not open the unit during operation. It may cause electric shock.
- Do not use the power cord near flammable gas or combustibles, such as gasoline, benzene, thinner, etc. It may cause an explosion or fire.
- Do not disassemble or modify the unit. It may cause failure and electric shock.
CAUTION
- When your air filter is to be removed, do not touch the metal parts of the unit. It may cause an injury.
- Do not use strong detergent such as wax or thinner but use a soft cloth. Appearance may be deteriorated due to a change in product color or scratching of its surface.
- Stop operation and close the window in a storm or hurricane. Operation with windows opened may cause wetting of indoor and soaking of household furniture.
- Always insert the filters securely. Clean the filter once every two weeks. Operation without filters may cause failure.
- Do not place obstacles around air-inlets or inside of air-outlets. It may cause the failure of an appliance or an accident.
- Use caution when unpacking and installing. Sharp edges could cause injury.
- Do not put a pet or house plant where it will be exposed to direct airflow. This could injure the pet or plant.
- Do not clean your air conditioner with water. Water may enter the unit and degrade the insulation. It may cause an electric shock.
- When the unit is to be cleaned, switch off, and turn off the circuit breaker. Do not clean the nit when power is on as it may cause fire and electric shock. It may cause an injury.
- Hold the plug by the head of the power plug when taking it out. It may cause electric shock and damage.
- Do not place heavy objects on the power cord and ensure that the cord is not compressed. There is a danger of fire or electric shock.
- Ventilate the room well when used together with a stove, etc. An oxygen shortage may occur.
- Do not use it for special purposes. Do not use this air conditioner to preserve precision devices, food, pets, plants, and art objects. It may cause deterioration of quality, etc.
- Ensure that the installation bracket of the outdoor appliance is not damaged due to prolonged exposure. If the bracket is damaged, there is a concern of damage due to the falling of the unit.
- Turn off the main power switch when not using the unit for a long time. It may cause failure of the product or fire.
- Do not drink water drained from the air conditioner. It contains contaminants and could make you sick.
- If water enters the unit, turn the unit off at the power outlet and switch off the circuit breaker. Isolate from the electrical supply by taking the power plug out and contacting a qualified service technician.
- This appliance is not intended for use by persons (including children) with reduced physical, sensory, or mental capabilities or lack of experience and knowledge unless they have been given supervision or instruction concerning the use of the appliance by a person responsible for their safety.
- Children should be supervised to ensure that they do not play with the appliance.
- If the supply cord is damaged, it must be replaced by the manufacturer, its service agent, or similarly qualified persons to avoid a hazard.
- The appliance shall be installed according to national wiring regulations.
- Do not operate your air conditioner in a wet room such as a bathroom or laundry room.
- Contact an authorized service technician for repair or maintenance of this unit.
- Contact an authorized installer for the installation of this unit.
IMPORTANT SAFETY INSTRUCTIONS
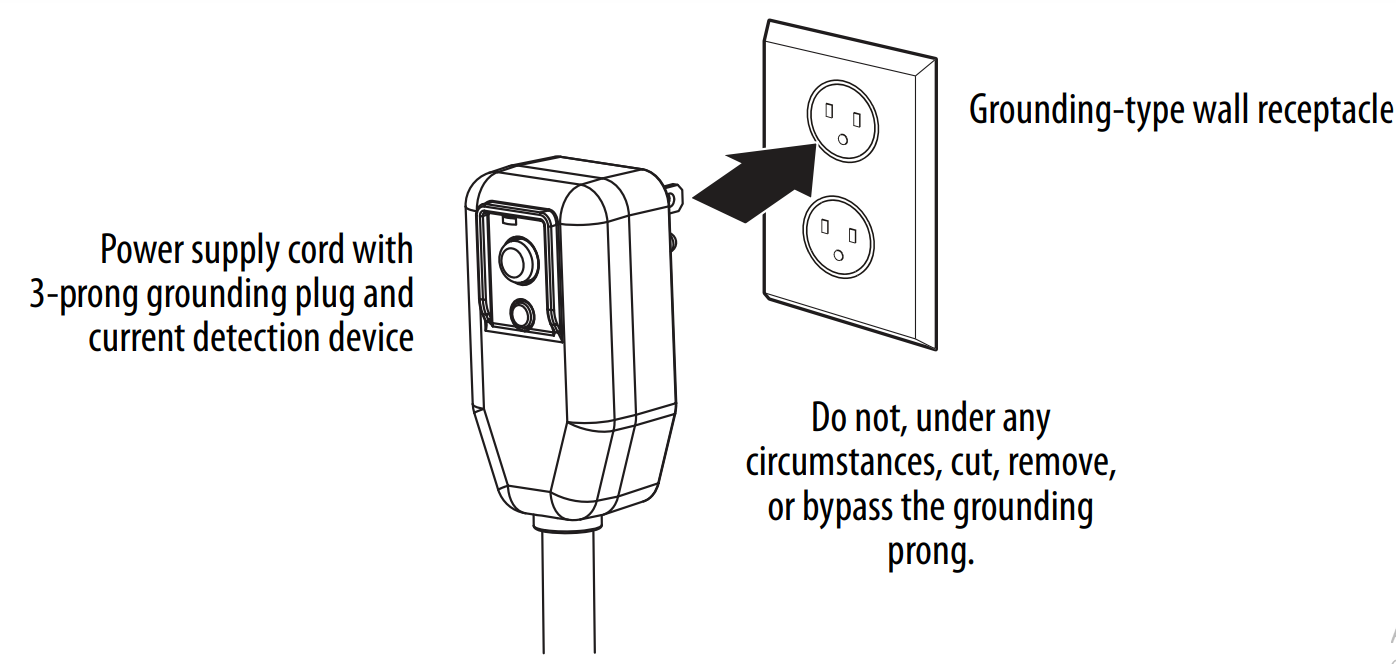
- NOTE: The power supply cord with this air conditioner contains a current detection device designed to reduce the risk of fire. Please refer to Operation of Current Device on page 6 for details. If the power supply cord is damaged, it cannot be repaired. It must be replaced with a cord from the product manufacturer.
- WARNING: Avoid fire hazards or electric shock. Do not use an extension cord or an adapter plug. Do not remove any prong from the power cord.
- WARNING: For your safety, do not store or use gasoline or other flammable vapors and liquids in the vicinity of this or any other appliance.
- Do not use this device to turn the unit on or off.
- Always make sure the RESET button is pushed in for correct operation.
- The power supply must be replaced if it fails to reset when either the TEST button is pushed, or it cannot be reset. A new one can be obtained from the product manufacturer. If the power supply cord is damaged, it cannot be repaired. It MUST be replaced by one obtained from the product manufacturer.
- This air conditioner is designed to be operated under conditions as follows:

- Explanation of the symbols displayed on the unit (uses R290/R32 refrigerant only).
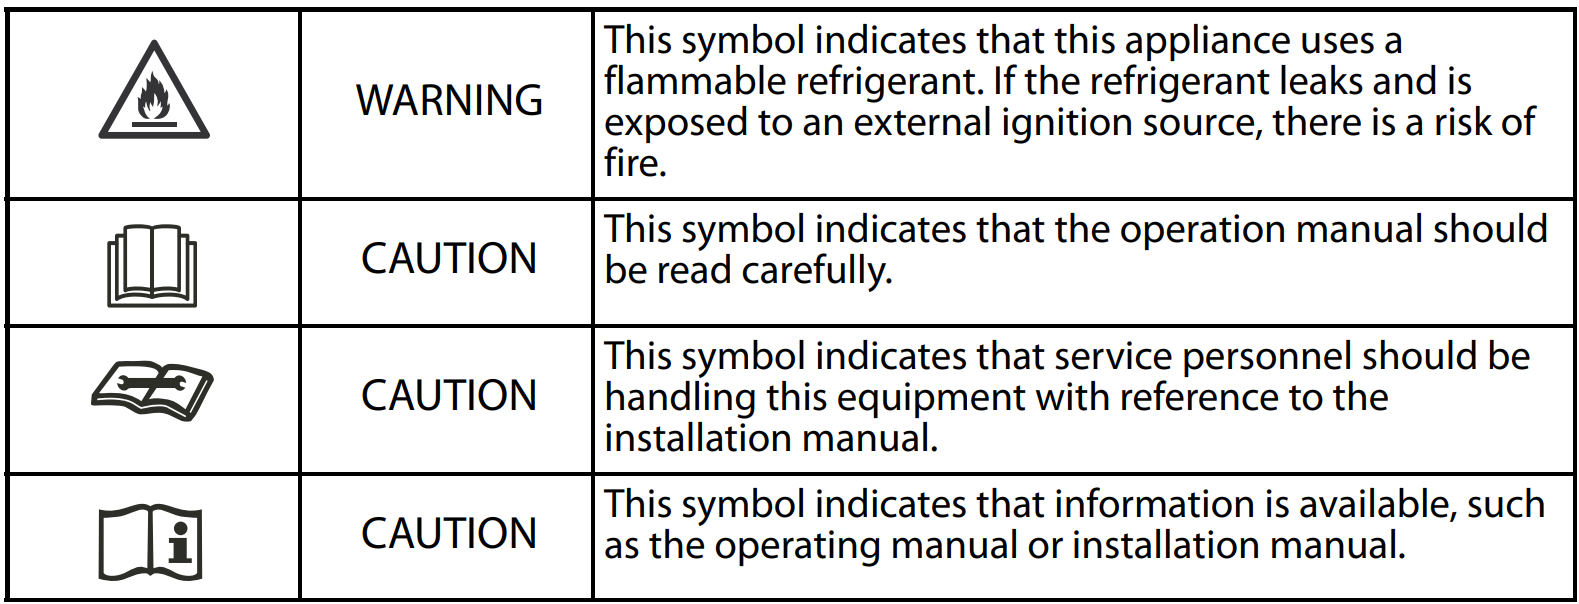
- WARNING: (for using R290/R32 refrigerant only)
- Do not use heat as a means to accelerate the defrosting process or to clean, other than those recommended by the manufacturer.
- The appliance shall be stored in a room without continuously operating ignition sources (for example: open flames, an operating gas appliance) and ignition sources or (for example, an operating electric heater) close to the appliance. The appliance shall be stored in a room without continuously operating ignition sources (for example: open flames, an operating gas appliance, or an operating electric heater).
- Do not pierce or burn.
- Be aware that the refrigerants may not contain an odor.
- Compliance with national gas regulations shall be observed.
- Keep ventilation openings clear of obstruction.
- The appliance shall be stored to prevent mechanical damage from occurring.
- A warning that the appliance shall be stored in a well-ventilated area where the room size corresponds to the room area as specified for operation.
- Any person who is involved with working on or breaking into a refrigerant circuit should hold a current valid certificate from an industry-accredited assessment authority, which authorizes their competence to handle refrigerants safely by an industry-recognized assessment specification.
- Servicing shall only be performed as recommended by the equipment manufacturer. Maintenance and repair requiring the assistance of other skilled personnel shall be carried out under the supervision of the person competent in the use of flammable refrigerants.
- DO NOT modify the length of the power cord or use an extension cord to power the unit. DO NOT share a single outlet with other electrical appliances. Improper power supply can cause fire or electrical shock.
- Please follow the instructions carefully to handle, install, clear, and service your air conditioner to avoid any damage or hazard. Flammable Refrigerant R32 is used within the air conditioner. When maintaining or disposing of the air conditioner, the refrigerant (R32 or R290) shall be recovered properly and shall not discharge to air directly.
- No open fire or device-like switch that may generate spark/arcing shall be around your air conditioner to avoid causing ignition of the flammable refrigerant used. Please follow the instructions carefully to store or maintain your air conditioner to prevent mechanical damage from occurring.
- Flammable refrigerant R32 is used in air conditioners. Please follow the instructions carefully to avoid any hazards.
Features
- 8,000 BTU is ideal for rooms up to 350 sq. ft. (32.5 sq. m) of living space
- Three unique fan speeds and a temperature range of 60° F-86° F(16° C-30° C) keep you cool and comfortable
- Specially designed to fit vertical sliding windows
- Digital controls make it quick and easy to adjust your settings
- An oscillating fan lets you manually adjust side-to-side motion
- Included remote control works from up to 26.2 ft. (8 m) away
- The auto restart function restores your previous settings, in the event of a power outage
- 4.9 ft. (1.5 m) power cord easily reaches nearby outlets
- The simple white color looks modern and matches any décor
Package contents
- Window air conditioner
- Mounting hardware
- Remote control
- AAA batteries (2)
- User Guide
Tools required

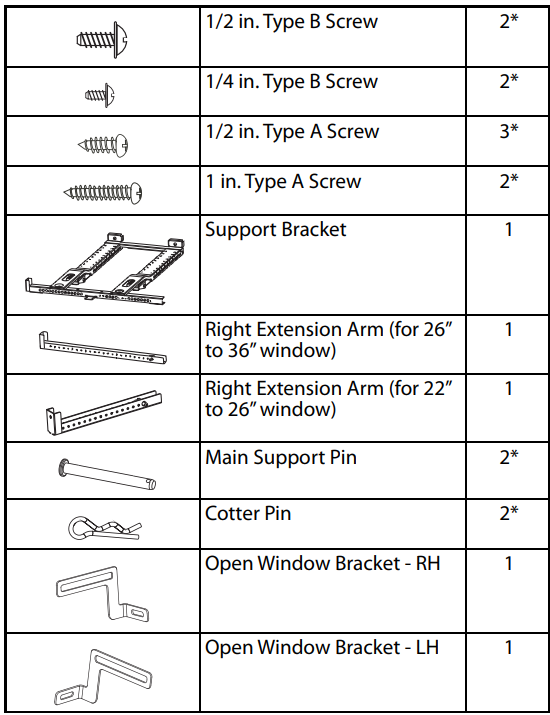
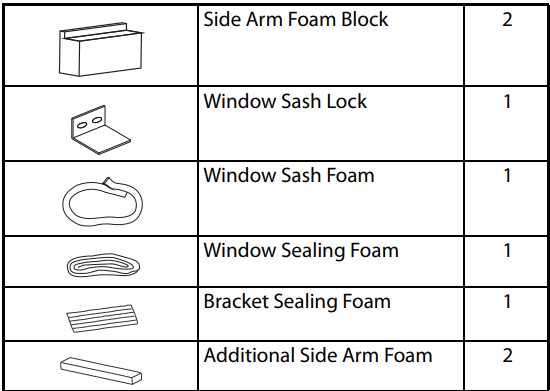
Installation hardware
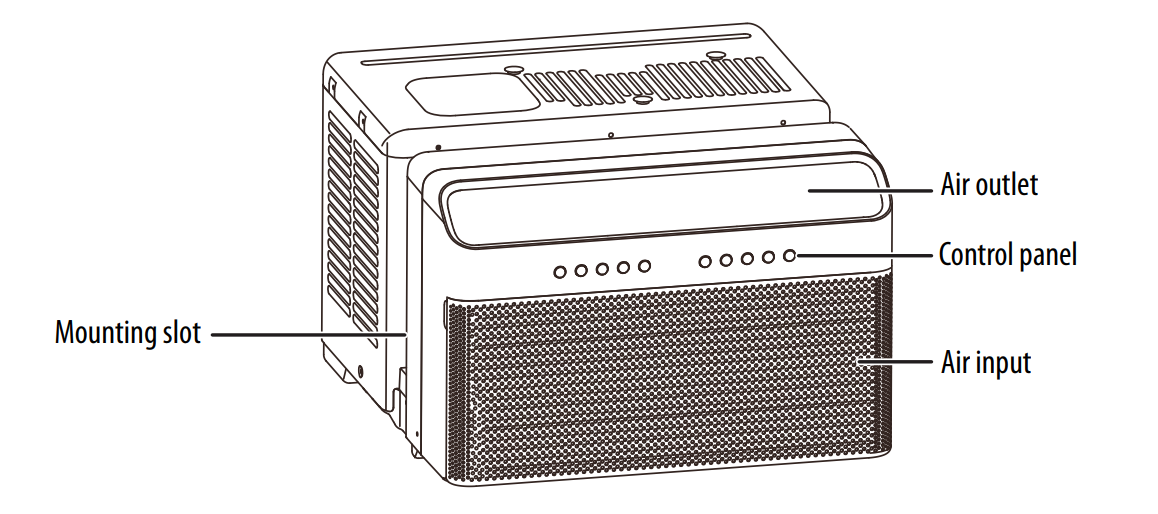
Air conditioner
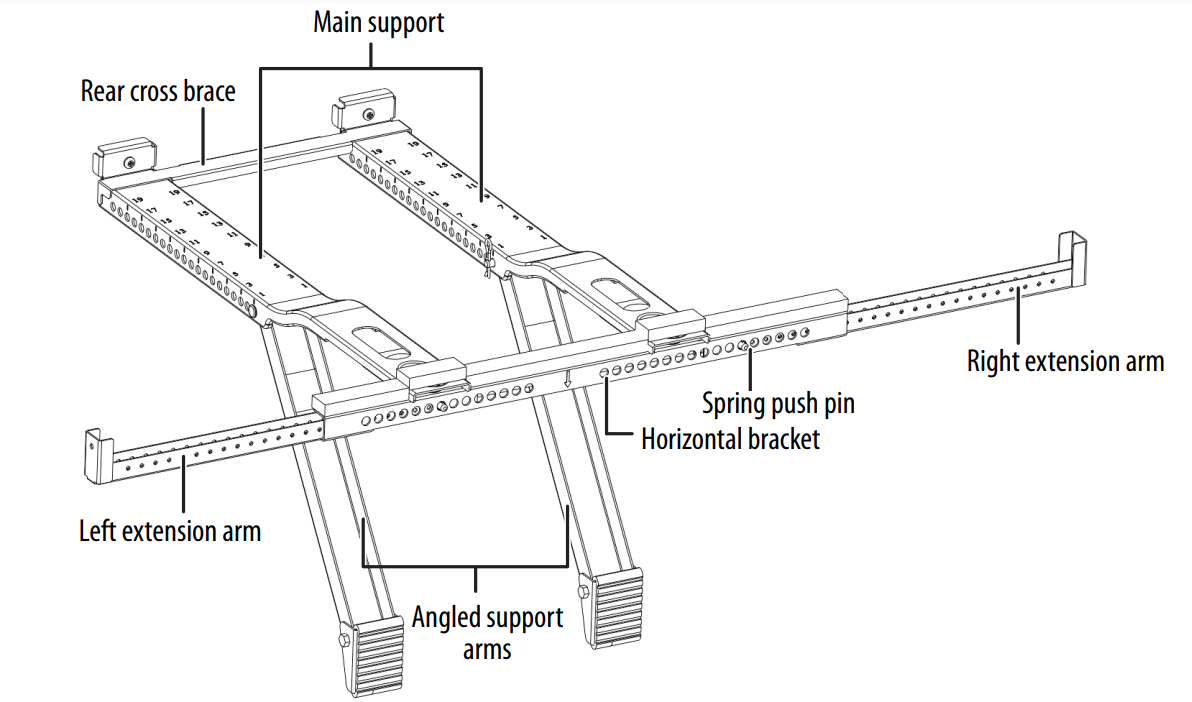
Air conditioner support bracket
Control panel



Remote control
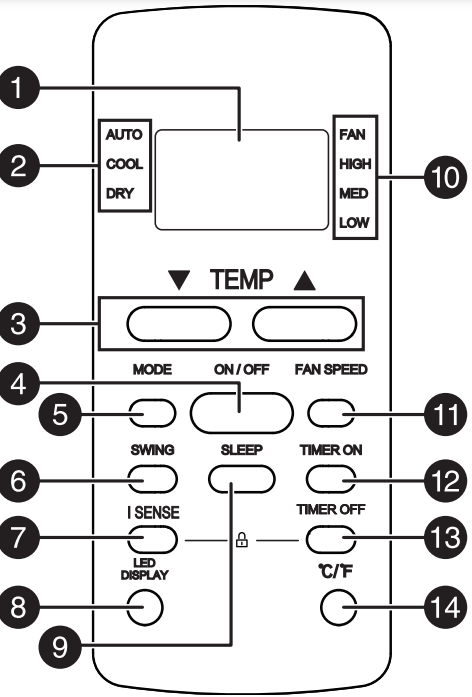
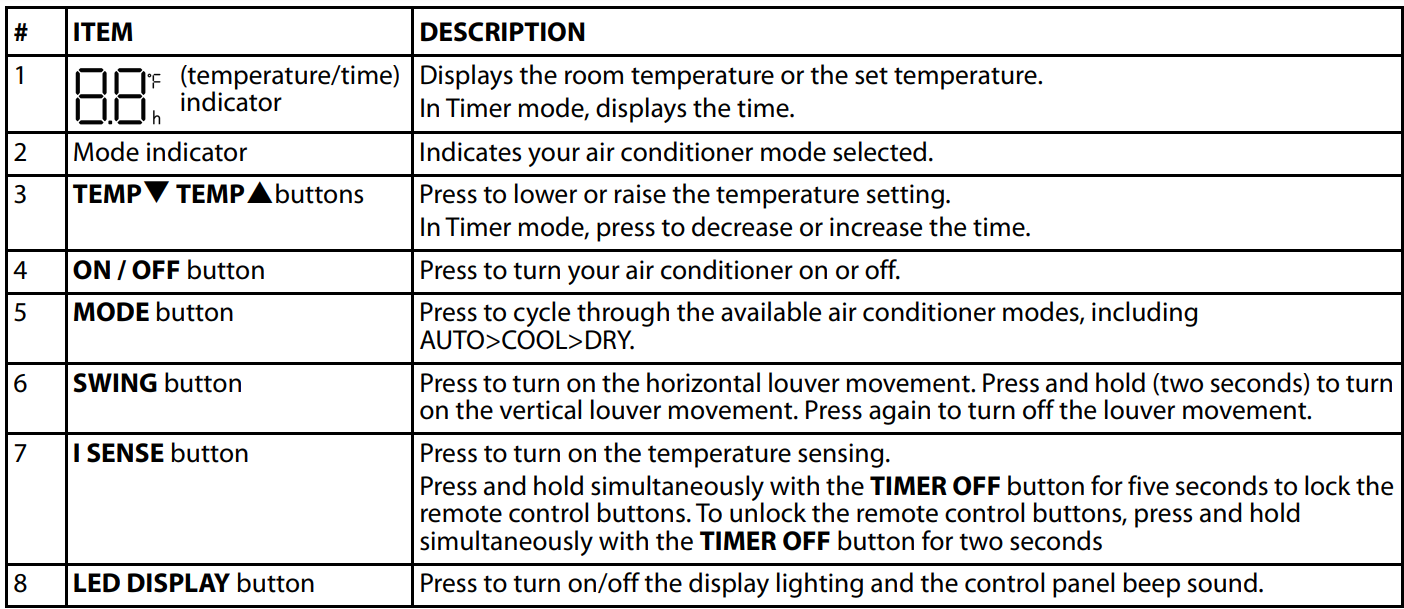

Remote control display screen
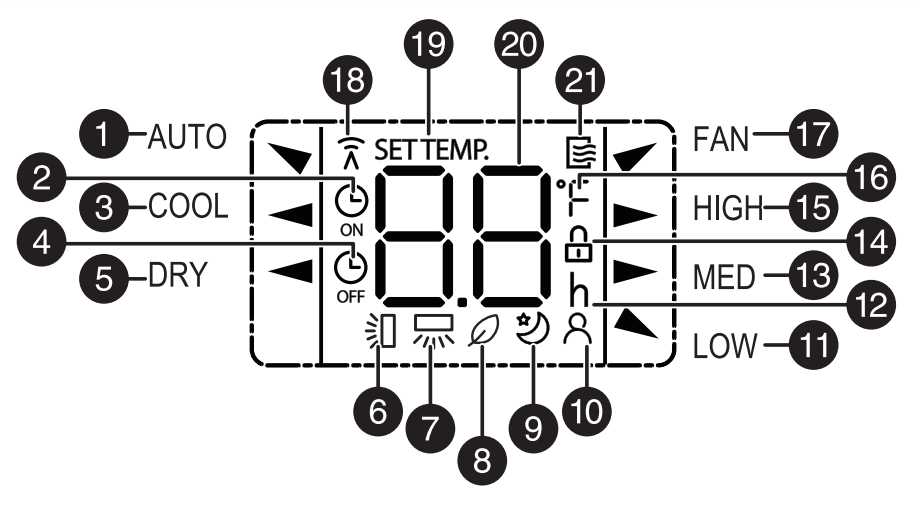
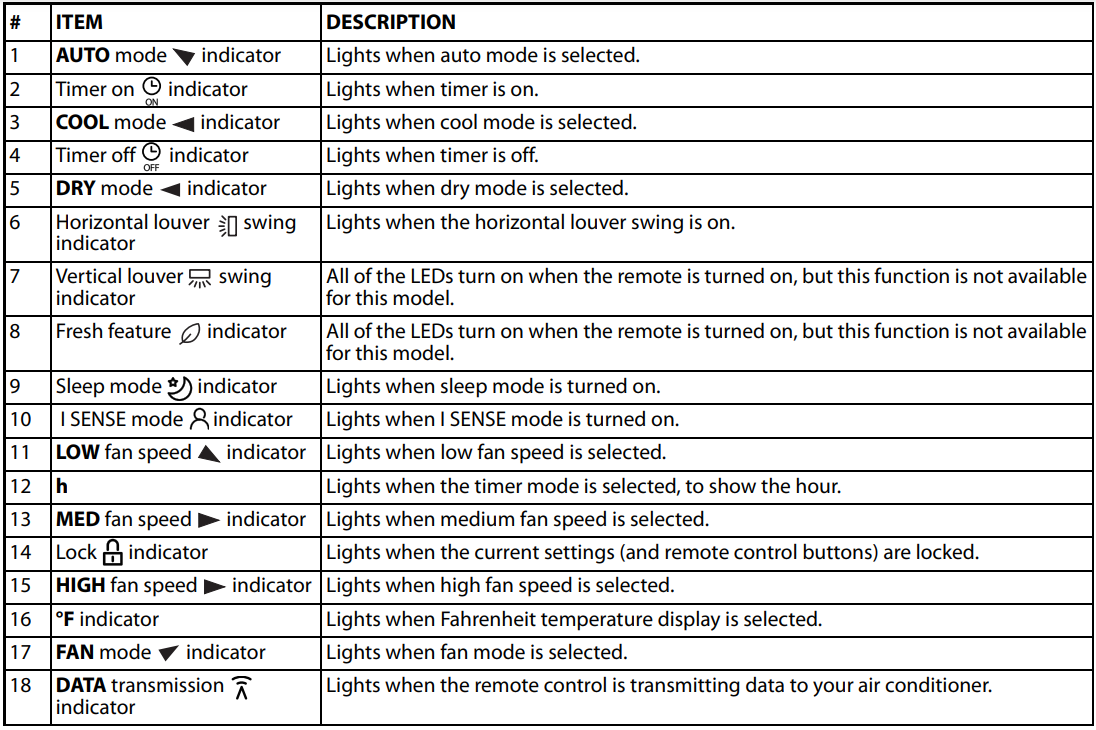

Using the remote control
Notes
- The remote control must be pointed at your air conditioner and used within 26.2 ft. (8 m).
- Your air conditioner will beep when the remote control signal is received.
- Curtains, other materials, and direct sunlight can interfere with the infrared signal receiver.
Installing the remote control batteries
- Slide the cover of the battery compartment off.
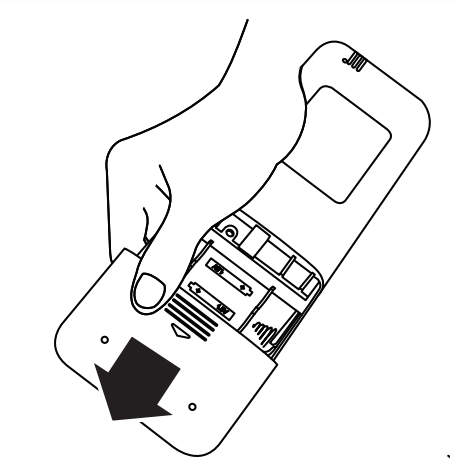 Insert two AAA (included) batteries. Make sure that the + and – symbols on the batteries match the symbols in the battery compartment.
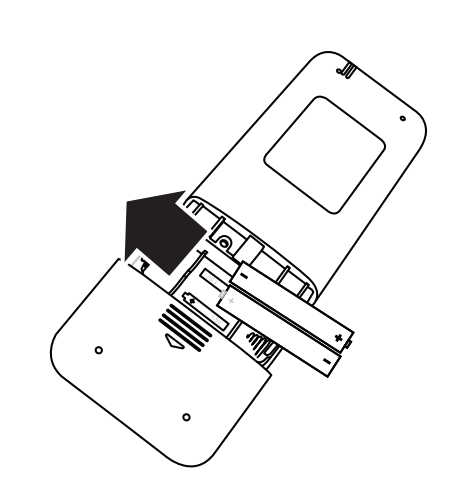 Reinstall the cover.
Before you mount your air conditioner
BEFORE YOU BEGIN
- Read these instructions completely and carefully.
- IMPORTANT: Save these instructions for local inspector’s use.
- IMPORTANT: Observe all governing codes and ordinances.
- Note to Consumer: Keep these instructions for future reference.
- Note to Installer: Be sure to leave these instructions with the Consumer.
- Completion time: Approximately one hour.
- Skill level: Installation of this appliance requires basic mechanical skills.
- We recommend that two people install this product.
- Proper installation is the responsibility of the installer.
- Product failure due to improper installation is not covered under the Warranty.
- You MUST use all supplied parts and use proper installation procedures as described in these instructions when installing this air conditioner.
- If any piece of hardware is missing, DO NOT INSTALL THE AIR CONDITIONER. Call customer service
Understanding the window requirements
Your air conditioner is designed to be installed in standard double-hung windows with opening widths of 22-36 in. (55.9-91.4 cm) and a window height of 13.5 in. (34.3 cm). The lower sash must open sufficiently to allow a clear vertical opening of 13.7 in. (34.9 cm). Side louvers and the rear of the AC must have clear air space to allow enough airflow through the condenser for heat removal. The rear of the unit must be outdoors, not inside a building or garage.
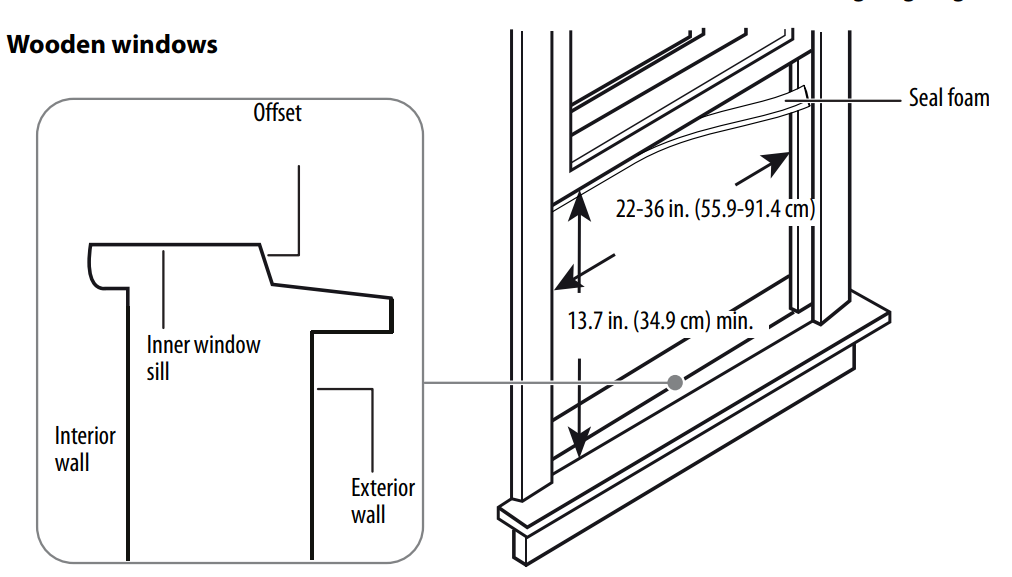
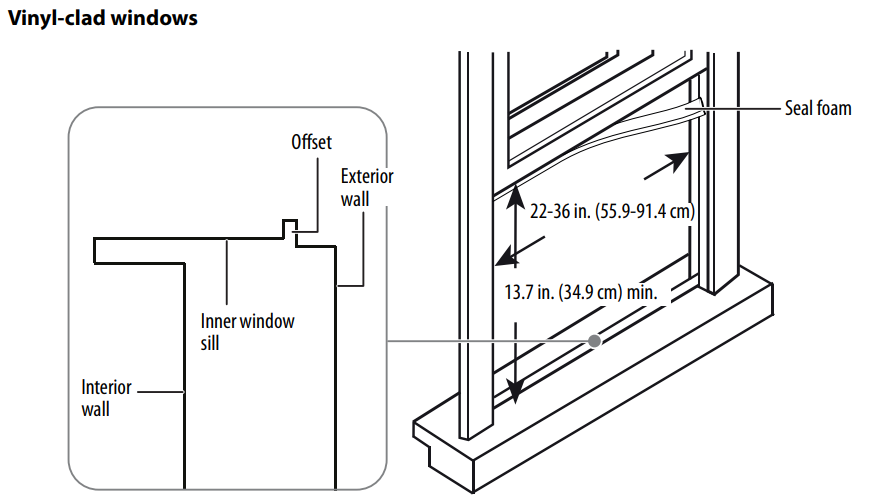
Dealing with storm windows
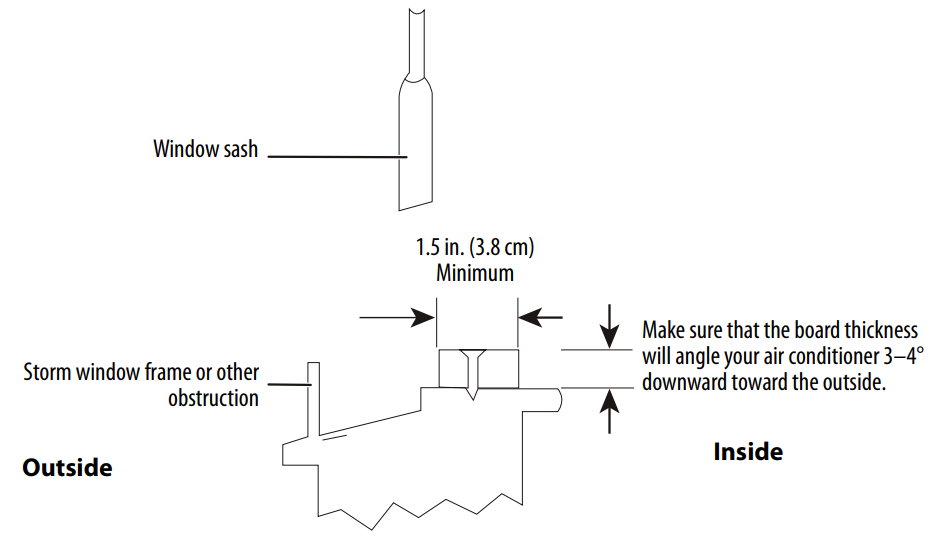
If a storm window blocks your air conditioner, remove it before installing your air conditioner. If the storm window cannot be removed:
- Make sure that the storm window’s drain holes or slots are not caulked or painted shut. Accumulated rainwater or condensation must be able to drain out.
- Attach a piece of wood across the entire window sill with nails or screws to correctly angle your air conditioner.Your air conditioner should be tilted back about 3-4° downward toward the outside. After proper installation, condensate should not drain from the overflow drain hole during normal use. If it does, adjust the angle of your air conditioner.
- You must secure the support bracket to the added wood piece using the provided 1” type A screws. Refer to Step2: Installing the support bracket on page 18
Installing your air conditioner
Step 1: Preparing the support bracket
- Remove your air conditioner, support bracket, and hardware from the box and place it on a flat surface.
- Remove the packing material.
- Find the center of your window and lightly mark it with a pencil.
- Press the left spring push pin and adjust the left extension arm out, then do the same for the right extension arm.
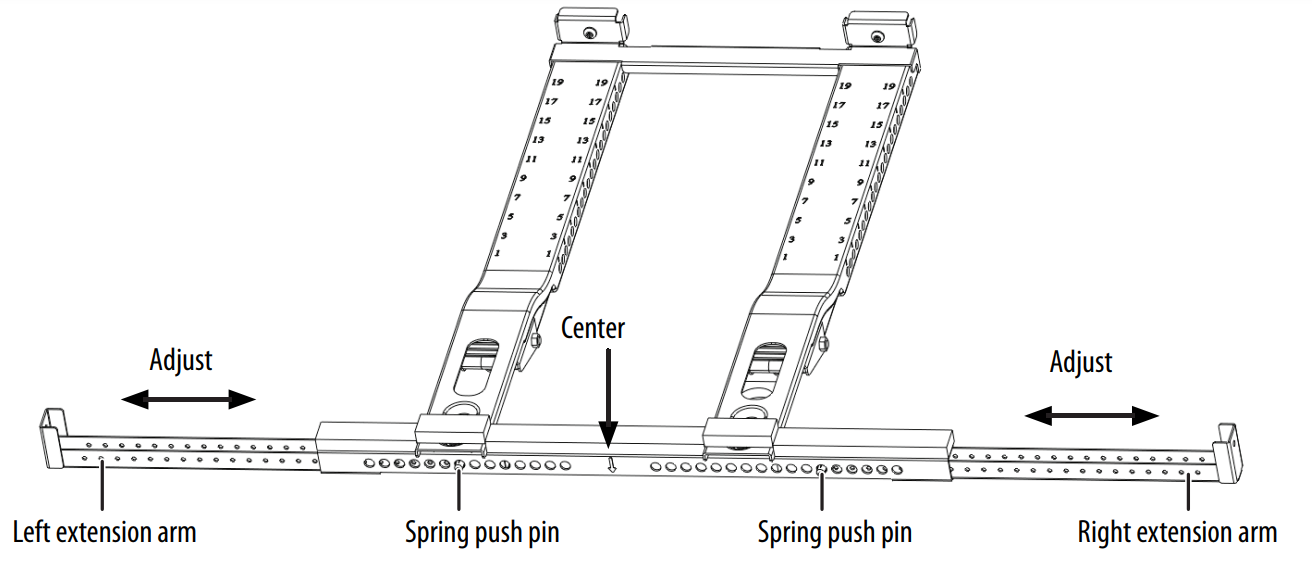 Measure the width of the inner windowsill. Make sure that the center of the support bracket lines up with the center of the window, then adjust the extension arms to the width you just measured. The support bracket will be offset to the left when centered.
- Cut bracket sealing foam strips to length and apply to the bottom of the bracket.
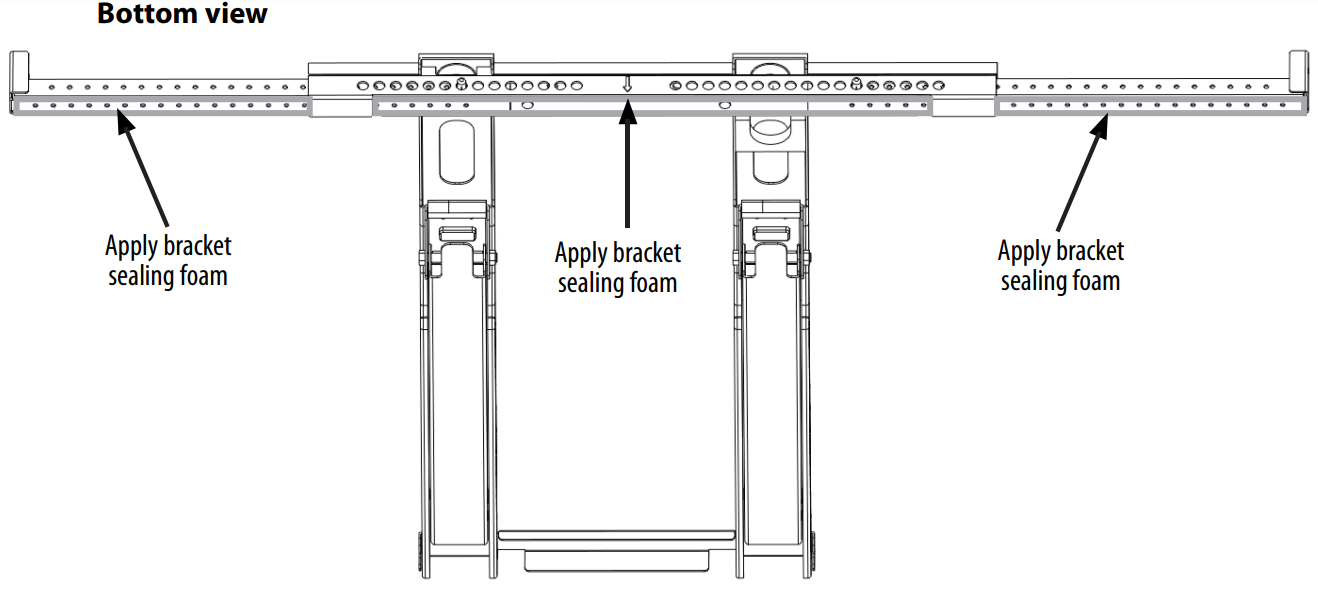
Step 2: Installing the support bracket
- Open the window where your air conditioner is being installed.
- Place the main support bracket into the window opening, making sure that the horizontal bracket and extension arms are located on the indoor side of the window.
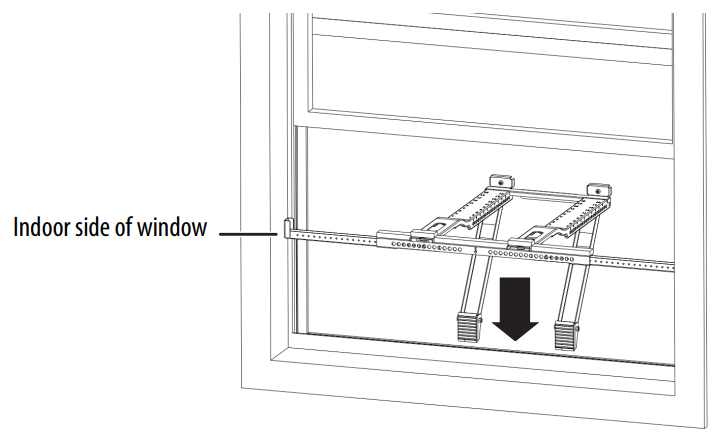 Lower the bracket until it rests on the windowsill
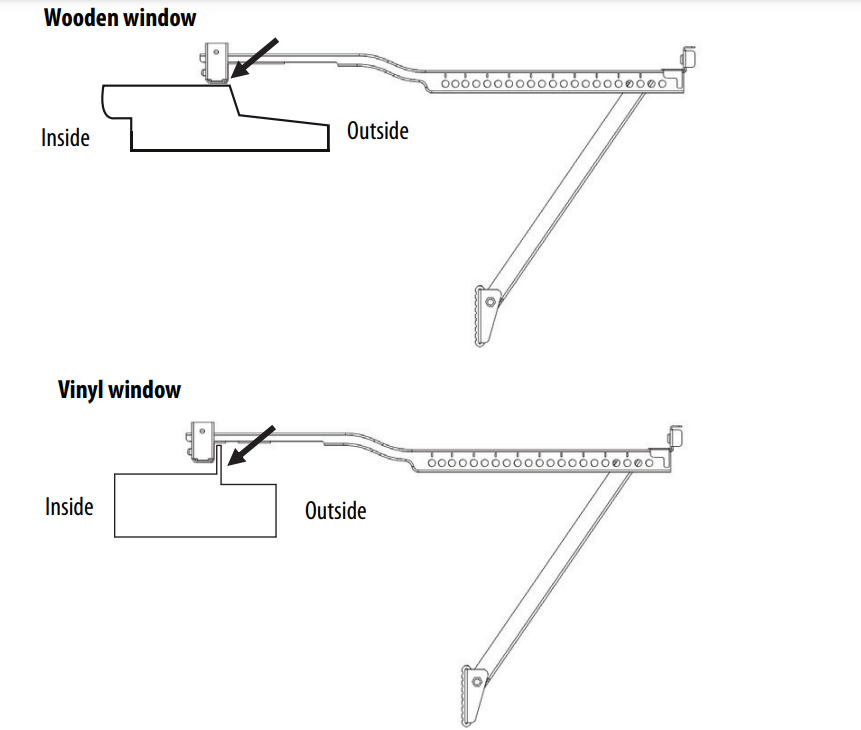 For wooden windows with a flat sill, secure the bracket to the windowsill by drilling 1/8 in. pilot holes andsecuring the bracket to the window with the 1/2” and 1” type A screws. For vinyl windows with a flat sill, secure the bracket to the windowsill by drilling 1/8 in. pilot holes and securing the bracket to the window with the 1/2” type A screws.
 Move the angled support arms toward the exterior wall until the feet touch the wall. Place a level on the bracket and adjust the support arms so that it is level or tilted 1/4 bubble downward and towards the outside.
 Insert the main support pin through the holes in the main support and angled support arm.
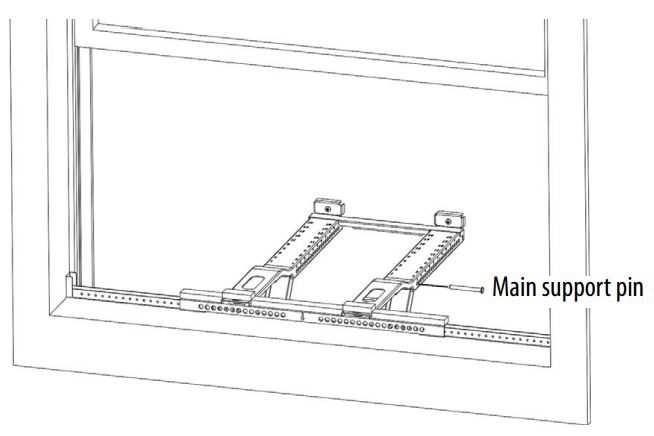 Using the numbers on the main support, repeat the adjustment for the other angled support arm matching the hole number from the first support arm.
- Check the level again and make sure that the bracket is secure. If further adjustment is required, use alternate holes where the main supports attach to the horizontal bracket.
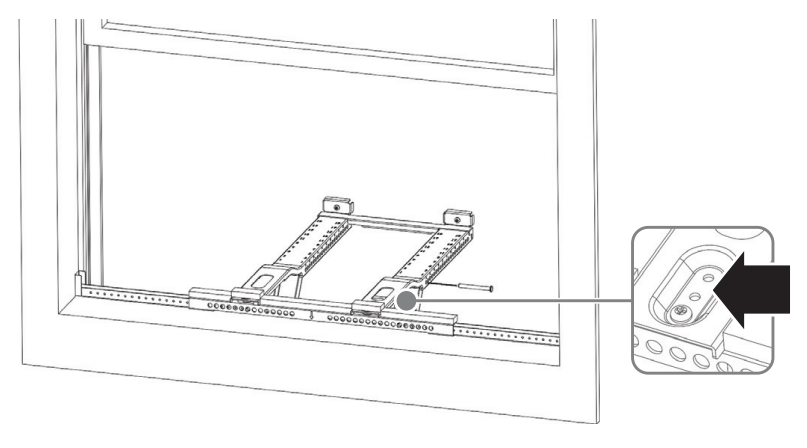 After making any final adjustments, insert the two cotter pins into the main support pin on both support brackets
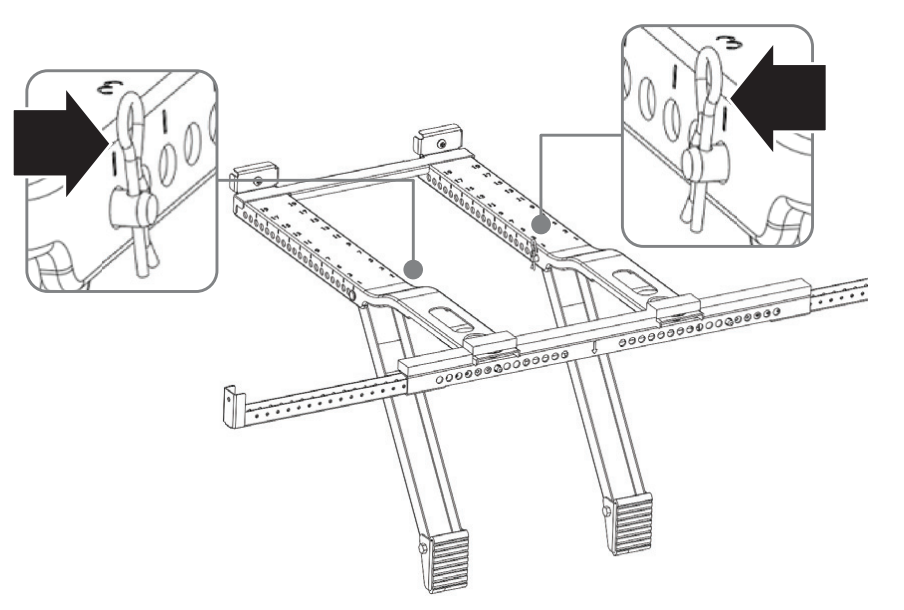 If necessary, cover the holes on the front of the bracket with bracket-sealing foam.

Step 3: Installing your air conditioner on the support bracket
- Measure the width of your window track (the vertical track your window slides up and down in). If it measures 1/2“or less, flip the anti-tip bracket so that the small end faces out, then continue with your air conditioner installation.
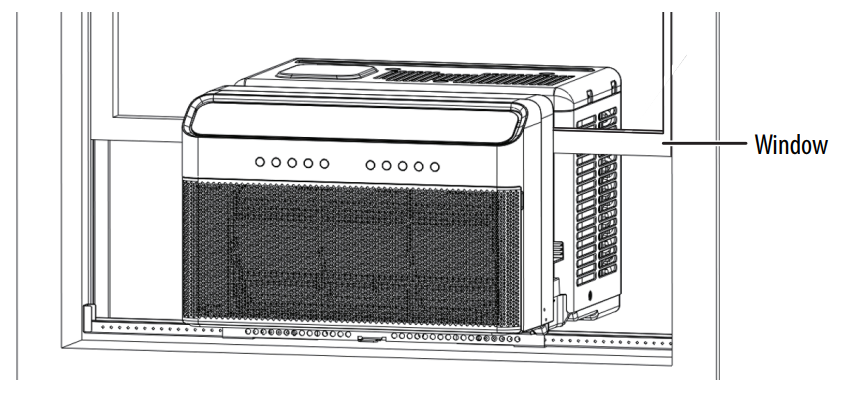
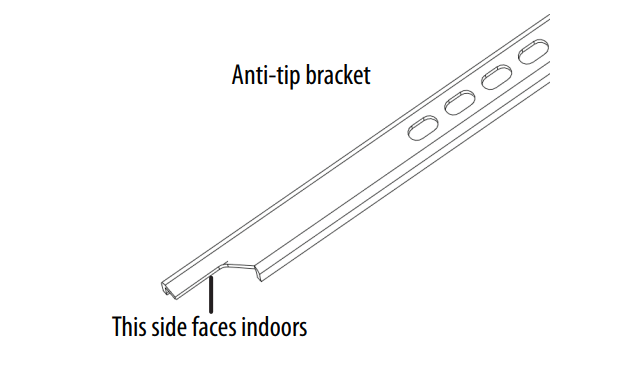 Set your air conditioner on top of the support bracket, making sure that the grooves on the bottom of your air conditioner align with the main supports. Using a level, check for proper tilt towards the outside.
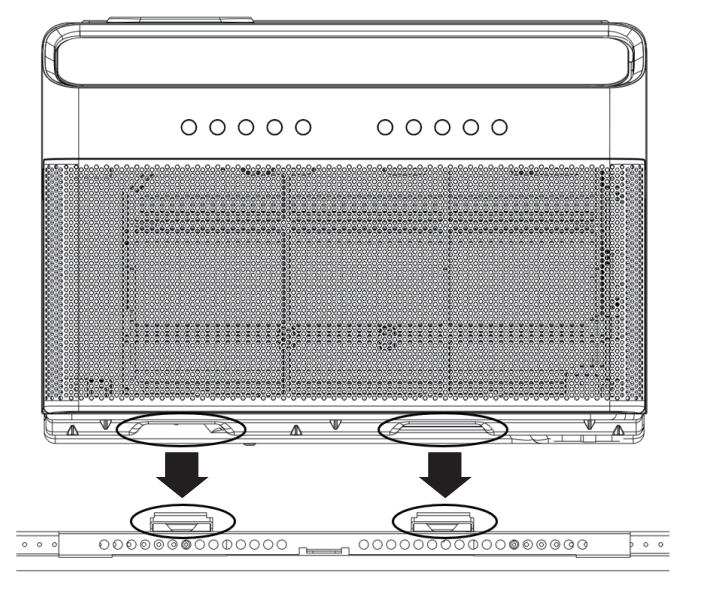 Pull the window down into the slot on top of your air conditioner to help align it correctly. Keep the window partially inserted into the slot to help support your air conditioner during installation.
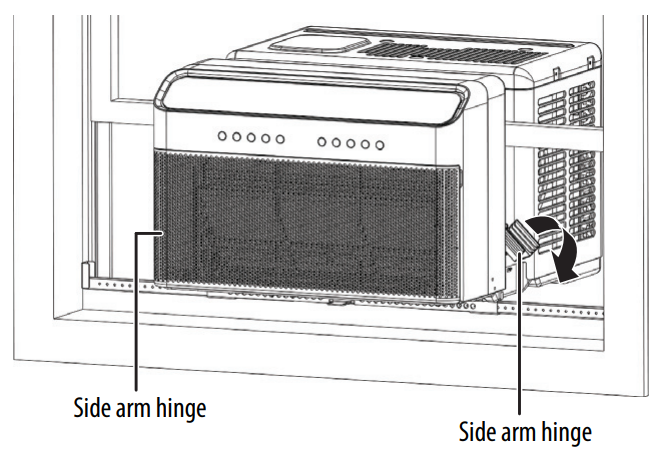
 Fold down both side arm hinges.
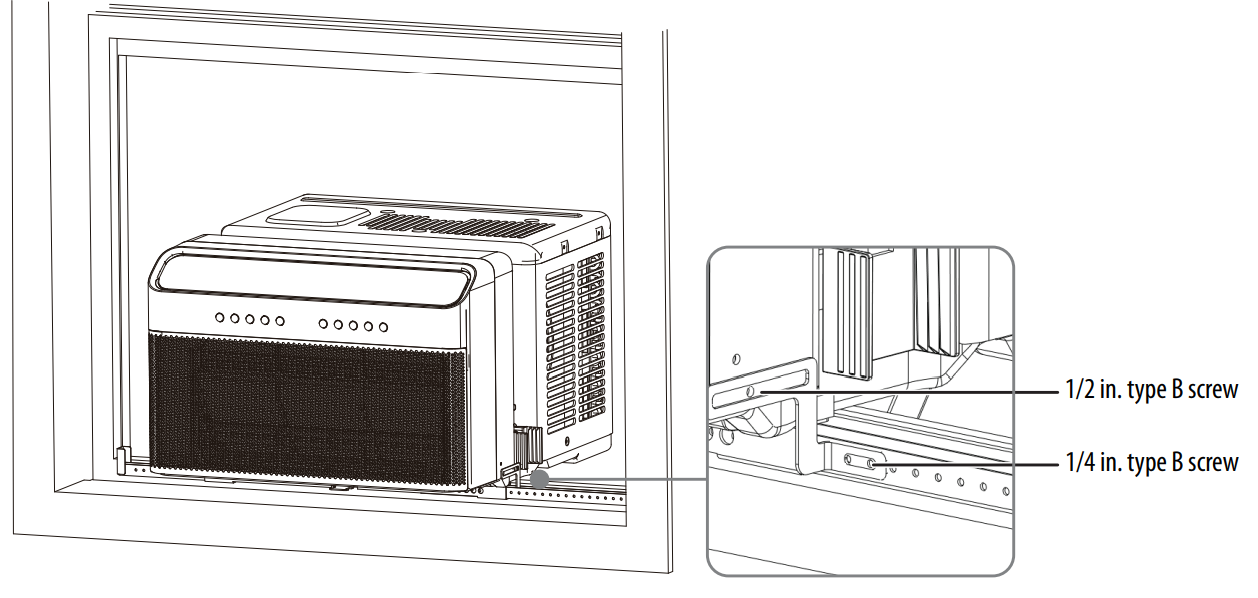
 Using 1/4 in. and 1/2 in. type B screws, install the open window brackets with an “L” shaped screwdriver if needed.
Step 4: Installing the sealing foam and anti-tip brackets
- Measure the distance between the right side arm hinge and the closest part of the window frame. Add 1/4 in. to this distance and cut the side arm foam block to width.
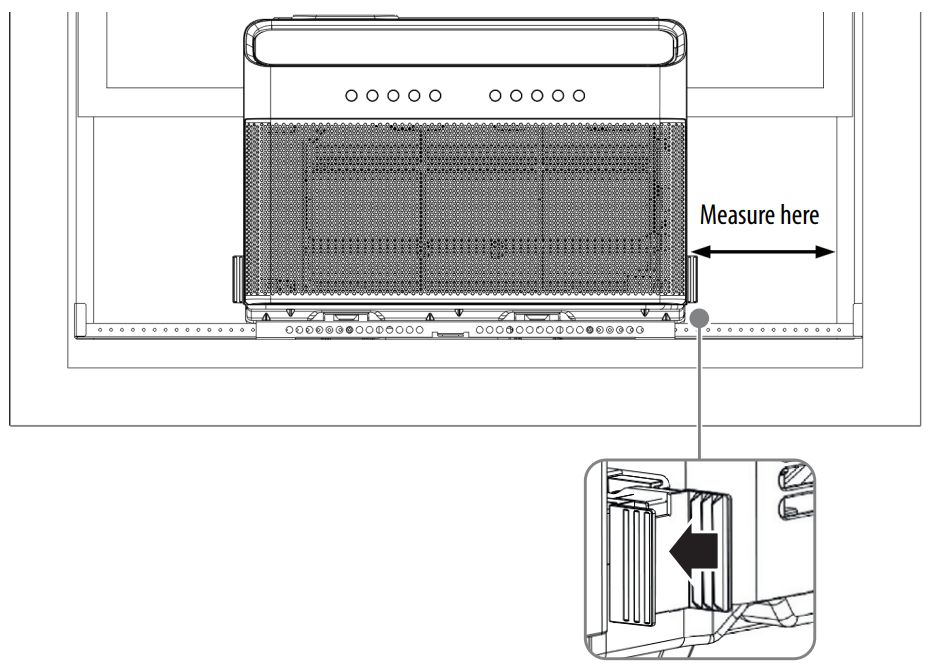 Apply window sealing foam to the side arm foam block as shown. Note that the window sealing foam attaches to the side next to your air conditioner.
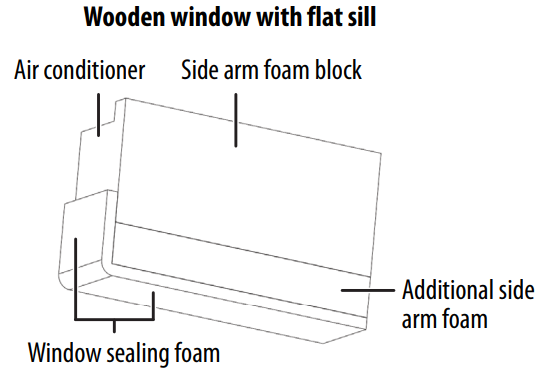
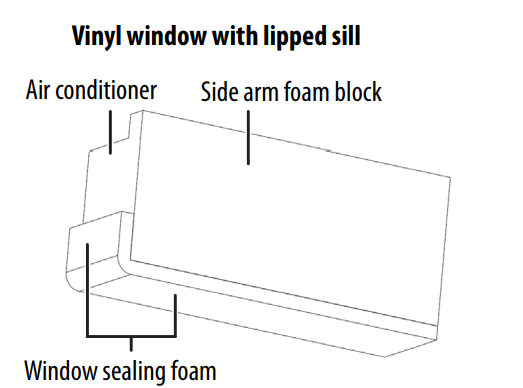 Insert a side arm foam block into the side arm hinge until the top front of the side arm foam is flush with the top of the hinge.
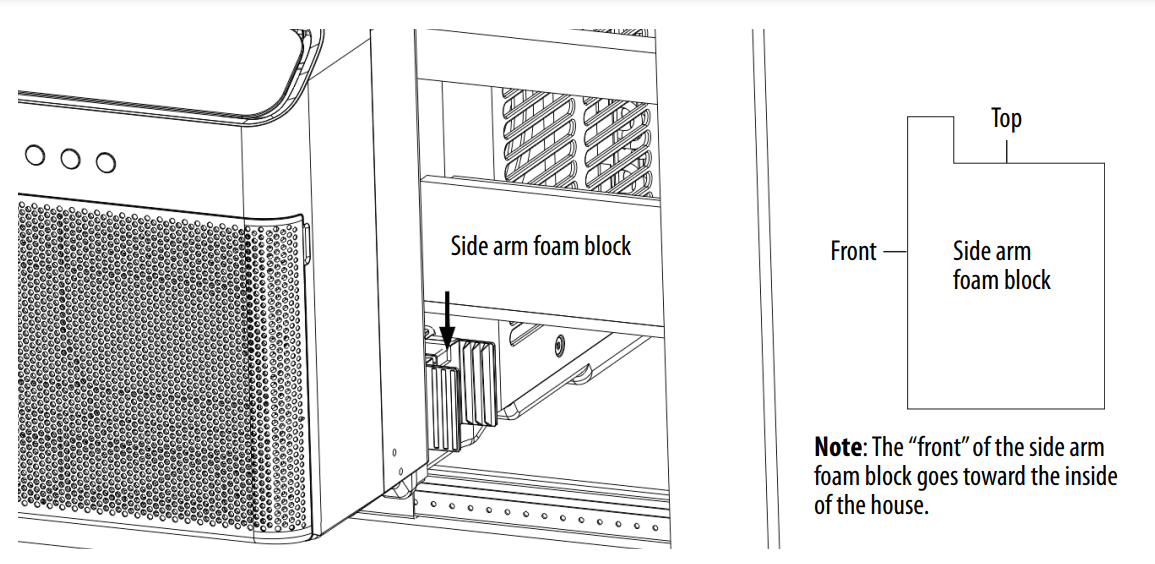 Repeat steps 1 through 3 for the left side of your air conditioner.
- Remove the two 1/2 in. screws from the top left and right sides of your air conditioner
- Extend the anti-tip brackets (one on each side of your air conditioner) into the window tracks (the vertical track in which your window slides up and down) until they stop.
 Secure the brackets in place using the screws you removed.
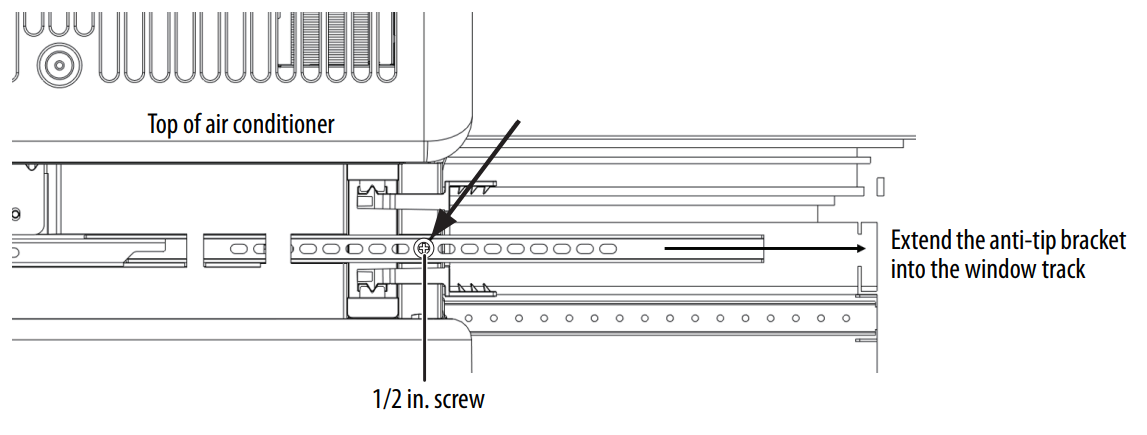 Install a strip of window sealing foam to the bottom of your lower window sash, sealing any small gaps between the window and your air conditioner, then close the window and check for gaps.
- Fill any gaps with the included foam, as needed.
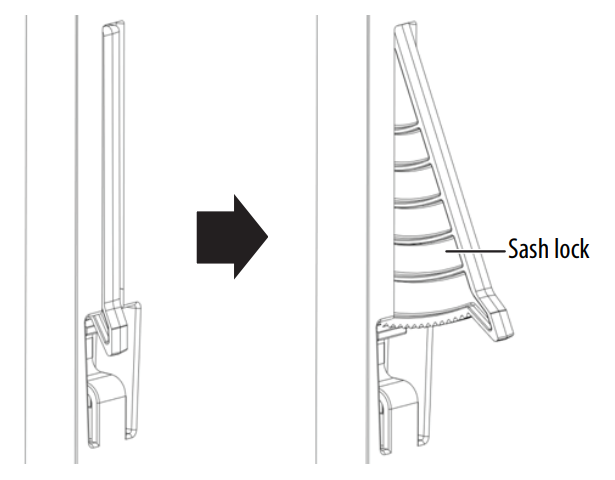
- Extend the integrated window locks (located in the U channel) until they contact the window. For additional security, you can install the optional sash lock.
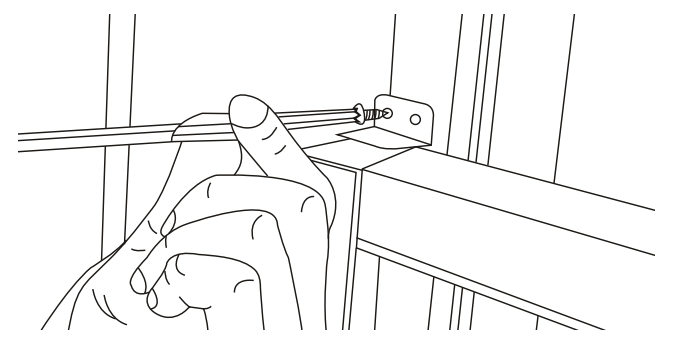
 To secure the lower sash in place, attach the right angle sash lock with 1/2 in. type A screws.
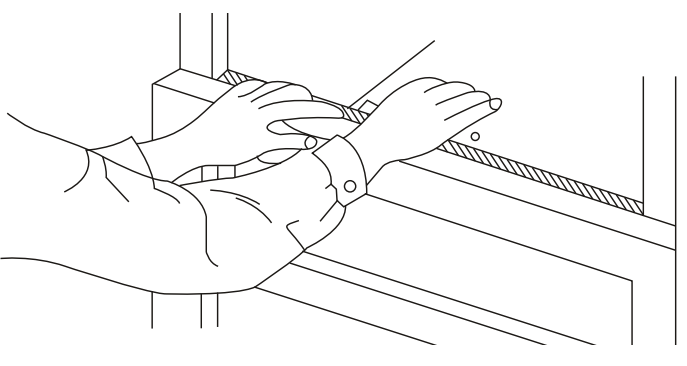
 Cut strips of window sash foam and insert them in the space between the upper and lower sashes.
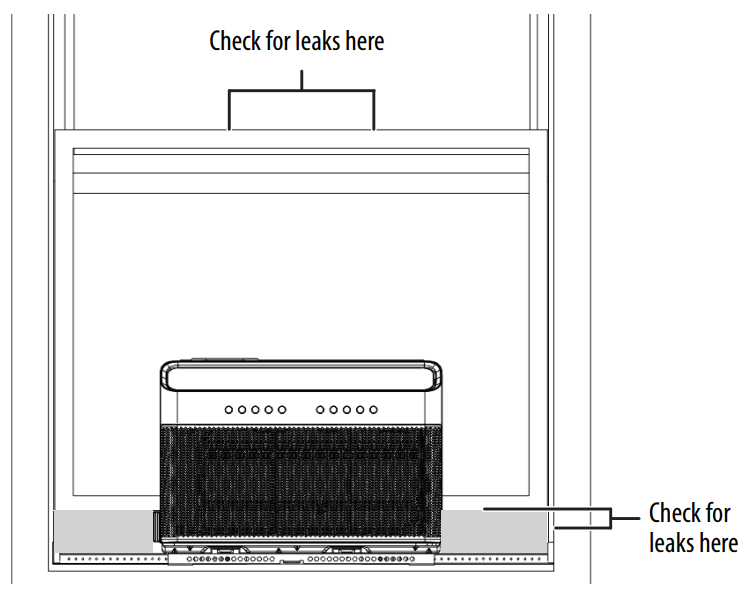
 As a final check, review the installation and check for any gaps or openings. Seal any gaps with additional sealing foam (provided), to make sure that there are no leaks.
Using your air conditioner
You can control your air conditioner by using the control panel on the front of the unit or by using the remote control. If using the remote control, always point it at the control panel on your air conditioner.
Using your air conditioner for the first time
- Plug in your air conditioner (be sure to follow the power cord instructions on page 4).
- Turn the power on to your air conditioner using the ON/OFF button.
- Select the Cool mode setting.
- Adjust the louvers for comfortable airflow (see Controlling airflow on page 29).
- Make sure that the airflow, both inside and outside, is not obstructed.
- Once the room has cooled, adjust the thermostat to a comfortable setting.
Turning your air conditioner on/off
Plug in your air conditioner, then press on your air conditioner, or ON/OFF on your remote control, to turn your air conditioner on or off.
Selecting an air conditioner mode
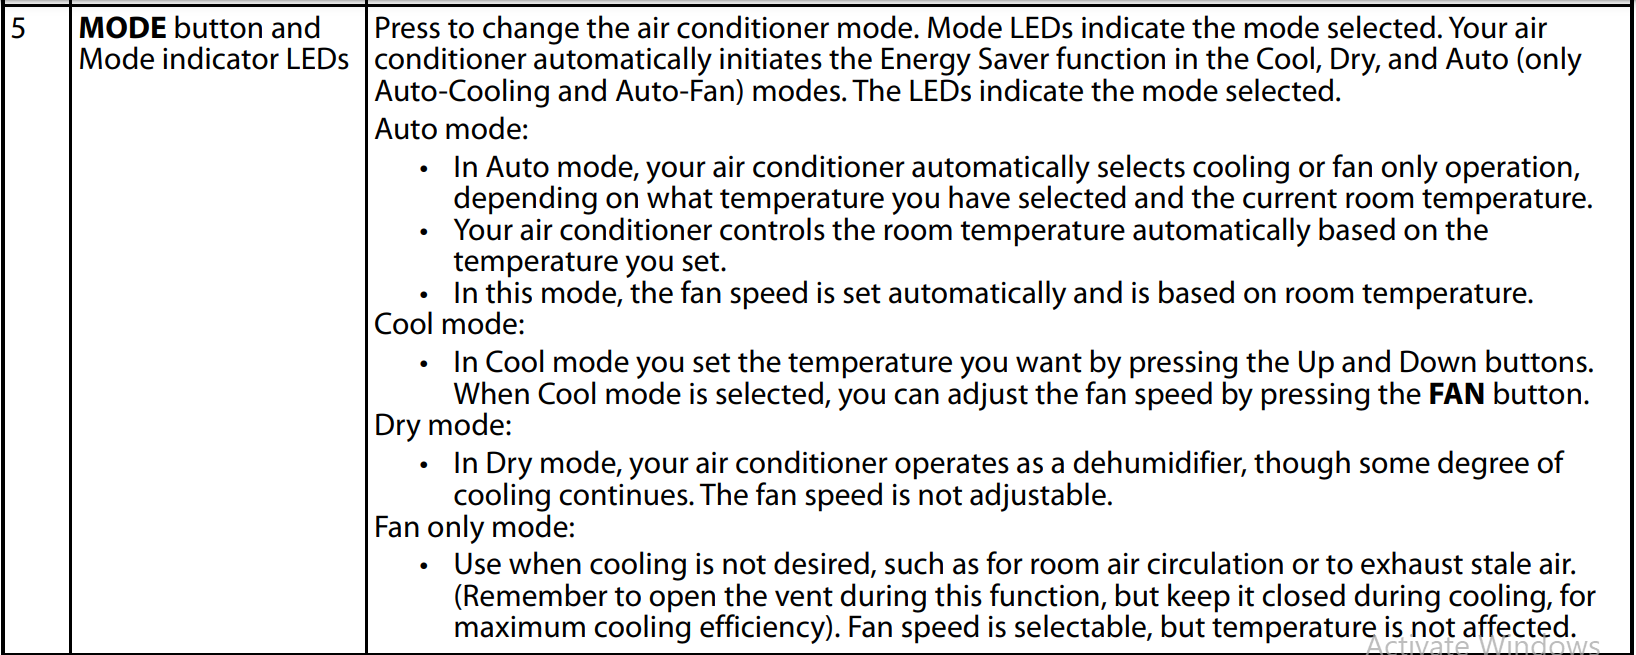
Press the MODE button repeatedly, on your air conditioner or your remote control, to cycle through Auto, Cool, Dry, and Fan modes. An indicator lights to show which mode is selected.
- Auto: Your air conditioner automatically selects cooling or fan, depending on the temperature you have selected and the room temperature. Fan speed cannot be adjusted, and it starts or stops based on the room temperature. You can adjust the temperature setting up to 86° F (30° C) or down to 60° F (16° C). The display shows the set temperature.
- Cool: Your air conditioner cools your room, with the compressor turning on and off and the fan remaining on to maintain the temperature you have selected. You can adjust the temperature setting up to 86° F (30° C) or down to 60° F (16° C). The display shows the set temperature.
- Dry: Your air conditioner operates as a dehumidifier. Some degree of cooling may occur as well.
- Fan: Your air conditioner circulates or exhausts air but does not cool the room. The display shows the actual room temperature, not our set temperature.
Selecting the fan speed
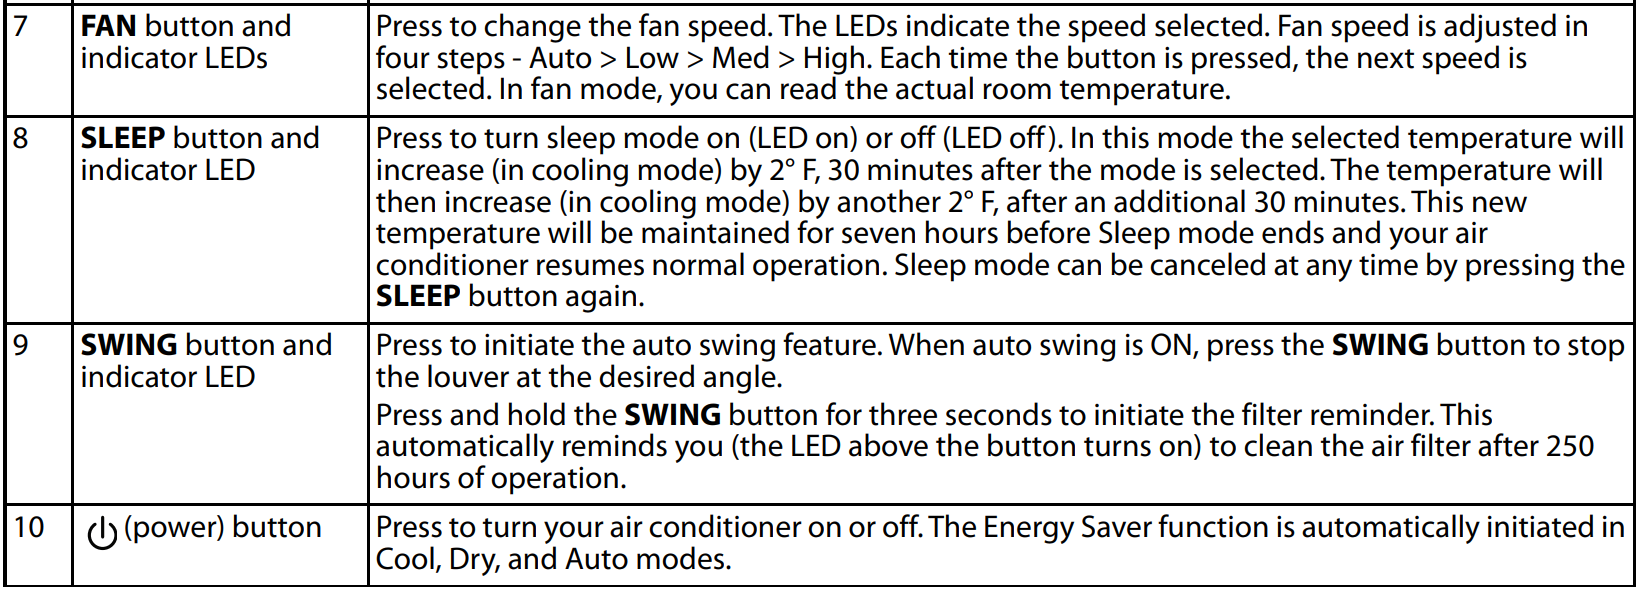
Press the FAN button repeatedly to cycle through the available fan speeds. Choices include Auto, Low, Med, or High. In Dry mode, the fan speed is set to Low automatically.
Using ECO (energy saver) mode
While using the ECO mode, the fan runs for three minutes after the compressor shuts off, then cycles on for two minutes at 10-minute intervals. When the room temperature is above the set temperature, the compressor turns back on and starts cooling again.
- Press the ECO button on your air conditioner to turn on ECO mode when using Cool, Dry, or Auto (auto-cooling or auto-fan) modes.
Setting the timer
The combined on/off timer lets you automatically start and stop your air conditioner after a set amount of time. You can set Timer On to Off or Timer Off to On using your air conditioner control panel or the remote control.
Timer On
Set the timer to automatically turn on your air conditioner after a set time.
- Press the TIMER button on your air conditioner, or TIMER ON on the remote control, until the Timer On LED or (on the remote control) lights.
- To set how long to wait before your air conditioner turns on, press / (up/down arrows) to adjust the delay time from 0.5–10 hours in half-hour increments, then 10–24 hours in one-hour increments. Your air conditioner starts running after the timer counts down from the set time.
Timer Off
Set the timer to automatically turn off your air conditioner after a set time.
- Press the TIMER button on your air conditioner, or TIMER OFF on the remote control, until the Timer Off LED or (on the remote control) lights.
- To set how long you want your air conditioner to run, press / (up/down) to adjust the delay time from 0.5–10 hours in half-hour increments, then 10–24 hours in one-hour increments. Your air conditioner stops running after the timer counts down from the set time.
Timer On to Off
Set Timer On to Off to automatically turn your air conditioner on, then back off, after a set time.
- Press TIMER ON until the Timer Off LED lights.
- To set how long to wait before your air conditioner turns on, press / (up/down) to adjust the delay time from 0.5– 10 hours in half-hour increments, then 10–24 hours in one-hour increments.
- Press TIMER ON again. The number next to Timer Off blinks.
- To set how long you want your air conditioner to run, press / (up/down) to adjust the delay time from 0.5–10 hours in half-hour increments, then 10–24 hours in one-hour increments. The setting is automatically saved after pointing the remote control at your air conditioner for one second. Your air conditioner starts when the Timer Ontime elapses, then turns off again after the Timer Off time elapses.
Timer Off to On
Set Timer Off to On to automatically turn your air conditioner off, then back on, after a set time.
- Press TIMER OFF until the number next to Timer Off blinks.
- To set how long you want your air conditioner to run, press / (up/down) to adjust the delay time from 0.5–10 hours in half-hour increments, then 10–24 hours in one-hour increments.
- Press TIMER OFF again. The number next to Timer On blinks.
- To set how long to wait before your air conditioner turns on, press / (up/down) to adjust the delay time from 0.5 to 10 hours in half-hour increments, then 10–24 hours in one-hour increments. The setting is automatically saved after pointing the remote control at your air conditioner for one second. Your air conditioner turns off when the Timer Off time elapses, then turns on again after the Timer On time elapses.
Using the remote as a thermostat (I SENSE)
The remote control can function as a remote thermostat for precise temperature control at its location.
- To turn on the I SENSE feature, aim the remote control toward your air conditioner and press I SENSE. The remote displays the temperature at its actual location and sends a signal to your air conditioner every three minutes. Note: I SENSE can only be turned on with the remote control.
- To turn off I SENSE, press I SENSE again.
Using the check filter reminder
- The check filter indicator lights (the LED above the SWING button on your air conditioner) automatically after 250 hours of operation. See Cleaning the Air Filter on page 30.
- To reset after cleaning the filter, press and hold the SWING button for three seconds. The light turns off.
Using sleep mode
During Sleep mode, the temperature will increase by 2° F (1–2° C) 30 minutes after the mode is selected, then increase by another 2° F (1–2° C) after an additional 30 minutes. This new temperature is maintained for 6–7 hours, then Sleep mode turns off. Your air conditioner cools to the original temperature and continues to operate as first programmed.
- Press the SLEEP button to turn on sleep mode. The sleep indicator on your air conditioner, or the remote control lights.
- To turn off Sleep mode, press the SLEEP button again. The sleep indicator on your air conditioner, or the remote control turns off.
Turning the display on or off
Press the LED button on your air conditioner, or the LED DISPLAY button on your remote control, to turn your air conditioner display on or off.
Locking air conditioner settings
- Press I SENSE and TIMER OFF for five seconds to lock the remote control’s settings so that they cannot be changed. Press I SENSE and TIMER OFF for two seconds again to unlock the remote control.
Controlling airflow
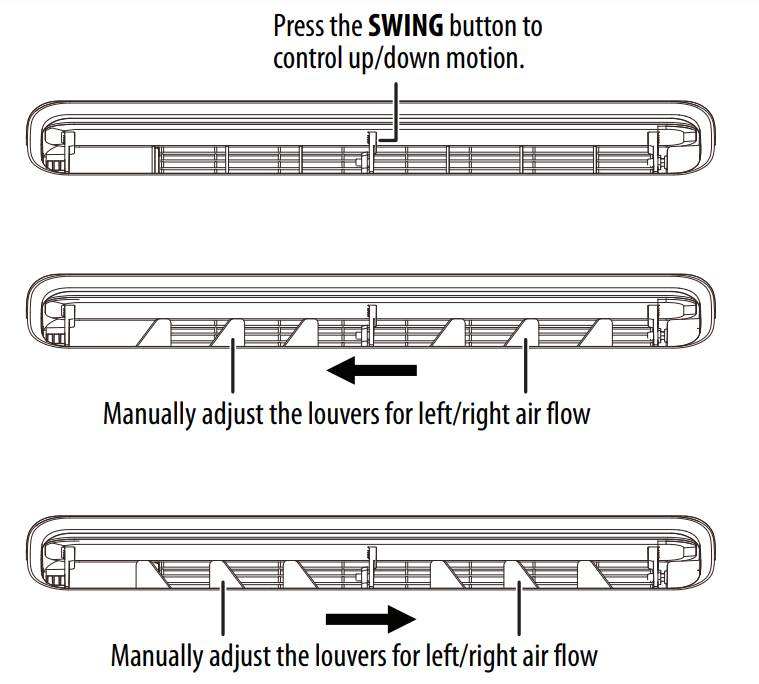
The louvers on the front of your air conditioner let you direct the airflow up or down and left or right throughout the room as needed. Press the SWING button until the desired up/down direction is obtained. Move the louvers from side to side until the desired left/right direction is obtained.
Understanding sounds
Cleaning and maintaining your air conditioner
CAUTION
Unplug your air conditioner before cleaning to prevent shock or fire hazards
Cleaning the cabinet
- Dust the cabinet and front with an oil-free cloth, or wash with a cloth dampened in a solution of warm water and mild liquid dish-washing detergent. Rinse thoroughly and wipe dry.
- Never use harsh cleaners, wax, or polish on the cabinet.
- Make sure that you wring excess water from the cloth before wiping around the controls. Excess water in or around the controls can damage your air conditioner.
Cleaning the air filter
- Open the front panel of your air conditioner.
- Grasp the center of the filter, then pull it up and out.
- Wash the filter with warm water, then rinse thoroughly. Gently shake excess water from the filter, and let it air dry. Make sure that the filter is thoroughly dry before replacing it.

Removing your air conditioner from the window
- Turn your air conditioner off, and disconnect the power cord.
- Remove the sash sealing foam from between the windows, then unscrew the safety sash lock.
- Retract the integrated window locks, if used.
- Remove the screws and retract the anti-tip brackets.
- Remove the side arm foam blocks from both sides of your air conditioner.
- Keeping a firm grip on your air conditioner, raise the window sash and carefully remove your air conditioner
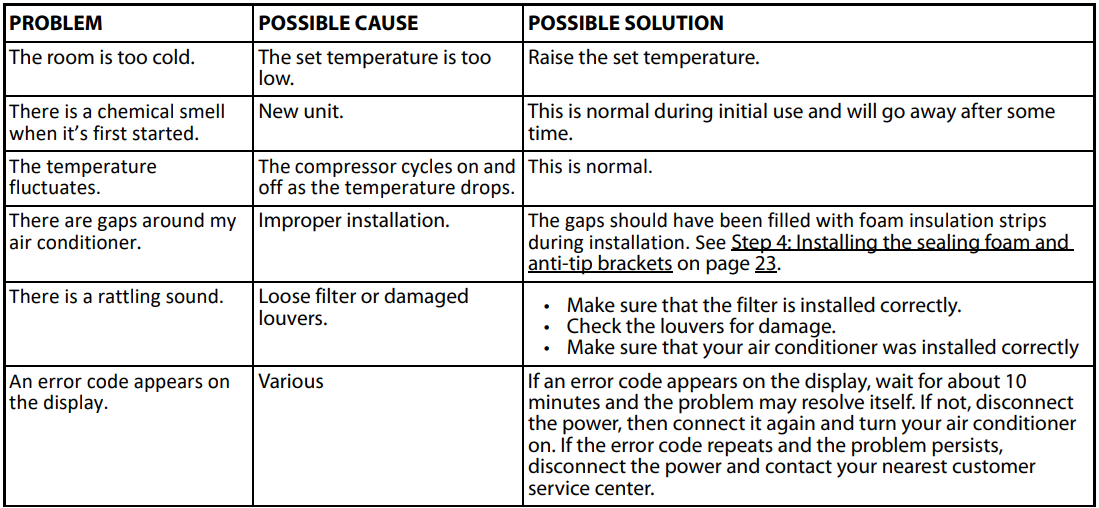
Troubleshooting

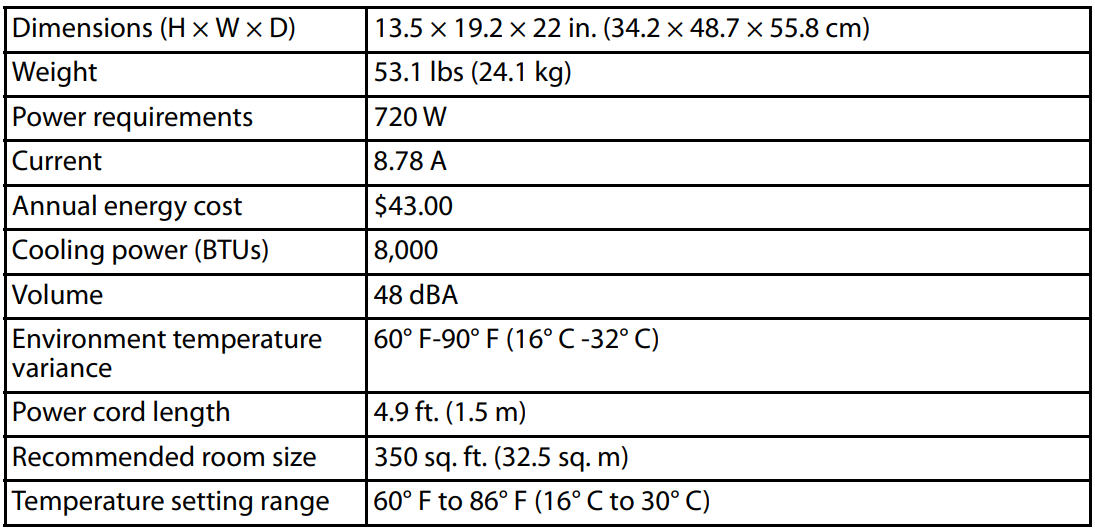
Specifications
Legal notices
FCC and IC Information
The device should comply with local and national regulations.
- In Canada, it should comply with CAN ICES-3(B)/NMB-3(B).
- In the USA, this device complies with part 15 of the FCC Rules. Operation is subject to the following two conditions:
- this device may not cause interference, and
- this device must accept any interference, including interference that may cause undesired operation of the device.
This equipment has been tested and found to comply with the limits for a Class B digital device, under Part 15 of the FCC Rules. These limits are designed to provide reasonable protection against harmful interference in a residential installation. This equipment generates, uses, and can radiate radio frequency energy and, if not installed and used by the instructions, may cause harmful interference to radio communications.
However, there is no guarantee that interference will not occur in a particular installation. Suppose this equipment does cause harmful interference to radio or television reception, which can be determined by turning the equipment off and on. In that case, the user is encouraged to try to correct the interference by one or more of the following measures:
- Reorient or relocate the receiving antenna.
- Increase the separation between the equipment and the receiver.
- Connect the equipment to an outlet on a circuit different from that to which the receiver is connected.
- Consult the dealer or an experienced radio/TV technician for help
ONE-YEAR LIMITED WARRANTY
Definitions
The Distributor* of Insignia branded products warrants to you, the original purchaser of this new Insignia-branded product (“Product”), that the Product shall be free of defects in the original manufacturer of the material or workmanship for one (1) year from the date of your purchase of the Product (“Warranty Period”). For this warranty to apply, your Product must be purchased in the United States or Canada from a Best Buy branded retail store or online at www.bestbuy.com or www.bestbuy.ca and is packaged with this warranty statement.
How long does the coverage last?
The Warranty Period lasts for 1 year (365 days) from the date you purchased the Product. Your purchase date is printed on the receipt you received with the Product.
What does this warranty cover?
During the Warranty Period, if the original manufacture of the material or workmanship of the Product is determined to be defective by an authorized Insignia repair center or store personnel, Insignia will (at its sole option): (1) repair the Product with new or rebuilt parts, or (2) replace the Product at no charge with new or rebuilt comparable products or parts. Products and parts replaced under this warranty become the property of Insignia and are not returned to you. If service of Products or parts is required after the Warranty Period expires, you must pay all labor and parts charges. This warranty lasts as long as you own your Insignia Product during the Warranty Period. Warranty coverage terminates if you sell or otherwise transfer the Product.
How to obtain warranty service?
If you purchased the Product at a Best Buy retail store location or from a Best Buy online website (www.bestbuy.com or www.bestbuy.ca), please take your original receipt and the Product to any Best Buy store. Make sure that you place the Product in its original packaging or packaging that provides the same amount of protection as the original packaging. To obtain warranty service, in the United States and Canada call 1-877-467-4289. Call agents may diagnose andcorrect the issue over the phone.
Where is the warranty valid?
This warranty is valid only in the United States and Canada at Best Buy branded retail stores or websites to the original purchaser of the product in the country where the original purchase was made.
What does the warranty not cover?
This warranty does not cover:
- Food, beverage, and or medicine loss/spoilage.
- Customer instruction/education
- Installation
- Set up adjustments
- Cosmetic damage
- Damage due to weather, lightning, and other acts of God, such as power surges
- Accidental damage
- Misuse
- Abuse
- Negligence
- Commercial purposes/use, including but not limited to use in a place of business or communal areas of a multiple dwelling condominium or apartment complex, or otherwise used in a place other than a private home.
- Modification of any part of the Product, including the antenna
- Display panel damaged by static (non-moving) images applied for lengthy periods (burn-in).
- Damage due to incorrect operation or maintenance
- Connection to an incorrect voltage or power supply
- Attempted repair by any person not authorized by Insignia to service the Product
- Products sold “as is” or “with all faults”
- Consumables, including but not limited to batteries (i.e. AA, AAA, C, etc.)
- Products where the factory-applied serial numbers have been altered or removed
- Loss or Theft of this product or any part of the product
- Display panels containing up to three (3) pixel failures (dots that are dark or incorrectly illuminated) grouped in an area smaller than one-tenth (1/10) of the display size or up to five (5) pixel failures throughout the display. (Pixel-based displays may contain a limited number of pixels that may not function normally.)
- Failures or Damage caused by any contact including but not limited to liquids, gel,s or pastes
REPAIR REPLACEMENT AS PROVIDED UNDER THIS WARRANTY IS YOUR EXCLUSIVE REMEDY FOR BREACH OF WARRANTY. INSIGNIA SHALL NOT BE LIABLE FOR ANY INCIDENTAL OR CONSEQUENTIAL DAMAGES FOR THE BREACH OF ANY EXPRESS OR IMPLIED WARRANTY ON THIS PRODUCT, INCLUDING, BUT NOT LIMITED TO, LOST DATA, LOSS OF USE OF YOUR PRODUCT, LOST BUSINESS, OR LOST PROFITS. INSIGNIA PRODUCTS MAKES NO OTHER EXPRESS WARRANTIES CONCERNING THE PRODUCT, ALL EXPRESS AND IMPLIED WARRANTIES FOR THE PRODUCT, INCLUDING BUT NOT LIMITED TO ANY IMPLIED WARRANTIES OF AND CONDITIONS OF MERCHANTABILITY AND FITNESS FOR A PARTICULAR PURPOSE, ARE LIMITED IN DURATION TO THE WARRANTY PERIOD SET FORTH ABOVE AND NO WARRANTIES, WHETHER EXPRESS OR IMPLIED, WILL APPLY AFTER THE WARRANTY PERIOD. SOME STATES, PROVINCES, AND JURISDICTIONS DO NOT ALLOW LIMITATIONS ON HOW LONG AN IMPLIED WARRANTY LASTS, SO THE ABOVE LIMITATION MAY NOT APPLY TO YOU. THIS WARRANTY GIVES YOU SPECIFIC LEGAL RIGHTS, AND YOU MAY ALSO HAVE OTHER RIGHTS, WHICH VARY FROM STATE TO STATE OR PROVINCE TO PROVINCE.
For more Manuals by INSIGNIA, visit MANUALSDOCK
Faqs About Insignia NS-AC8WU3 8000 BTU Window Air Conditioner
What is the cooling capacity of the Insignia NS-AC8WU3?
The Insignia NS-AC8WU3 has a cooling capacity of 8000 BTUs (British Thermal Units), which is suitable for cooling rooms up to around 350-400 square feet in size.
Is the installation process difficult?
The installation process for the NS-AC8WU3 involves mounting the unit in a standard window opening. It typically requires two people for safe and efficient installation, but it’s relatively straightforward if you follow the included instructions.
Does it come with a remote control?
Yes, the Insignia NS-AC8WU3 comes with a remote control for convenient operation from a distance.
What are the energy efficiency ratings of this model?
The energy efficiency of air conditioners is typically measured by the Energy Efficiency Ratio (EER) and the Seasonal Energy Efficiency Ratio (SEER). Specific ratings for the NS-AC8WU3 may vary, but it’s generally designed to be energy efficient.
Is it noisy?
Like most window air conditioners, the NS-AC8WU3 does produce some noise during operation. However, it’s designed to operate relatively quietly, especially when compared to older models.
Does it have any additional features?
Some additional features of the NS-AC8WU3 may include adjustable fan speeds, a programmable timer, and various operating modes such as cooling, fan-only, and dehumidification.
What is the warranty coverage for this model?
Warranty coverage for the NS-AC8WU3 may vary depending on the retailer and region. It’s essential to check the warranty information provided with the product or contact the manufacturer for details.
How do I clean and maintain the air conditioner?
Regular maintenance, including cleaning the filter and coils, is essential for optimal performance and efficiency. The user manual should provide specific instructions on how to clean and maintain your unit.
Can it be used in a room without a window?
The NS-AC8WU3 is designed specifically for window installation. Using it in a room without a window may not be feasible or safe.
Is professional installation recommended?
While it’s possible to install the NS-AC8WU3 yourself, professional installation may be recommended if you’re not comfortable with the process or if you have specific installation requirements.

