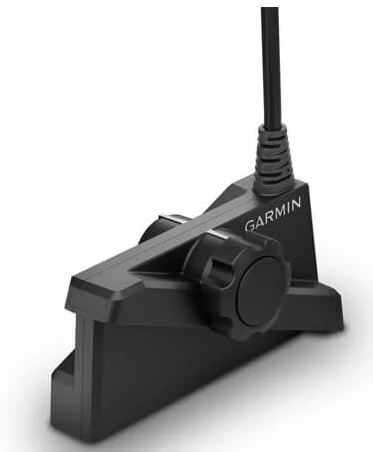
Garmin LiveScope Plus LVS34 Transducer
About Garmin
We create goods with internal engineering designed for outdoor use. We do this to help our clients maximize the time spent following their passions.
With more than 19,000 employees spread across 35 nations, we serve the automobile, aviation, marine, outdoor, and fitness markets with GPS navigation and wearable technology. We believe that there is always room for innovation and improvement.
Important Safety Information
WARNING
See the Important Safety and Product Information guide in the Chartplotter product box for product warnings and other important information.
You are responsible for the safe and prudent operation of your vessel. A SONAR is a tool that enhances your awareness of the water beneath your boat. It does not relieve you of the responsibility of observing the water around your boat as you navigate.
CAUTION
Failure to install and maintain this equipment by these instructions could result in damage or injury.
To obtain the best performance and avoid damage to your boat, you must install the Garmin® device according to these instructions.
Read all installation instructions before proceeding with the installation. If you experience difficulty during the installation, go to support.garmin.com for more information.
Software Update
You must update the Garmin chartplotter software when you install this device. For instructions on updating the software, see your chartplotter owner’s manual at support.garmin.com.
Installation Support Videos
You can view videos online for assistance when installing this device. You can access the videos by going to garmin.com/videos/lvs34 in your web browser.
Tools Needed
- Drill
- Drill bit suitable for the GLS™ 10 sonar module selected mounting hardware and surface
- Flat screwdriver or 8 mm wrench or socket to install the barrel mount clamp
- Electrical tape (preferred) or cable ties
Parts Bags
The installation hardware for the transducer is included in labeled bags. As you complete the installation process, each procedure begins with a reference to the label on the parts bag needed to complete the procedure. You can use this table to review or verify the parts bags needed for the installation procedures.
NOTE: You should leave all parts in the labeled bags until you are instructed to open a bag in the instructions. Not all hardware is used for all installation types.
- Contains parts needed when installing the perspective mount
- Contains parts needed when installing the perspective or shaft mount
- Contains parts needed when installing the perspective, shaft, or barrel mount
- Contains parts needed when installing the barrel mount
- Contains parts needed when installing the shaft mount
- Contains the optional low-profile mounting screws
Mounting Considerations
NOTICE
Using third-party or self-fabricated mounts could lead to transducer damage or loss. Damage or loss sustained when using a third-party or self-fabricated mount is not covered under warranty.
Using the hardware supplied, you can mount the transducer on your trolling motor in one of three ways.
- Perspective Mount (Installing the Transducer on the Perspective Mode Mount)
◦ You can mount the transducer on the trolling motor shaft using the perspective view mount and bracket.
◦ When using the perspective view bracket, the transducer can be used for perspective, downward, and forward views. - Barrel Mount (Installing the Transducer on a Trolling Motor Barrel)
◦ You can mount the transducer on either side of the trolling motor barrel.
◦ When mounted on the barrel, the transducer can be used for downward and forward views.
◦ When mounted on the barrel, the transducer cannot be used for perspective view. - Shaft Mount (Installing the Transducer on the Trolling Motor Shaft)
◦ You can mount the transducer on either side of the trolling motor shaft.
◦ When mounted directly on the shaft, the transducer can be used for downward and forward views.
◦ When mounted directly on the shaft, the transducer cannot be used for perspective view.
◦ Mounting the transducer directly on the shaft allows a lower-profile installation than using the perspective-mount bracket.
When planning the installation, you should observe these considerations.
- You must angle the transducer correctly for the selected view to work properly.
- Installing the transducer with the included knobs allows for tool-free transitions between sonar views.
- You can use the included low-profile hardware instead of the knobs for a more permanent transducer view position.
- You should mount the transducer in a location where it will not be jarred when launching, hauling, or storing.
- You must install the sonar module in a location with adequate ventilation where it will not be exposed to extreme temperatures.
- You should mount the sonar module in a location where the LEDs are visible, where the cables can be connected, and where the device will not be submerged.
Cable Considerations
NOTICE
Zip ties and cable clamps can over-tighten and damage or break the cable or cause cable fatigue due to repeated rotation of the motor.
You should use black electrical tape to secure the cable above and below the rotating joint. If you secure the cable with zip ties, do not over-tighten the zip ties.
You should secure the cable above and below the pivot joint of your trolling motor. You should create a service loop at least 25 cm (10 in.) long in the cable, with the rotating joint centered on the loop.
Routing the Transducer Cable
You should test-fit the transducer and cable before installation.
- Allow a loose gap of at least 10 cm ( 4 in.) above and 10 cm (4 in.) below the rotating joint to create a loop in the cable. The loop must be large enough to allow full rotation of the transducer in both directions. Allow a minimum of 25 cm (10 in.) of cable to cover the 20 cm (8 in.) section between mounting points.
- Use black electrical tape to secure the transducer cable to the shaft.
- Test the full rotation of the trolling motor to ensure the cable clears the rotating joint and is not pulled tight due to tension during rotation.

Installing the Ferrite Bead on the Transducer Cable
NOTICE
To comply with FCC regulations, and with similar regulations of other countries if applicable, and to reduce electromagnetic interference (EMI) or “noise,” you should install a ferrite bead on each transducer cable.
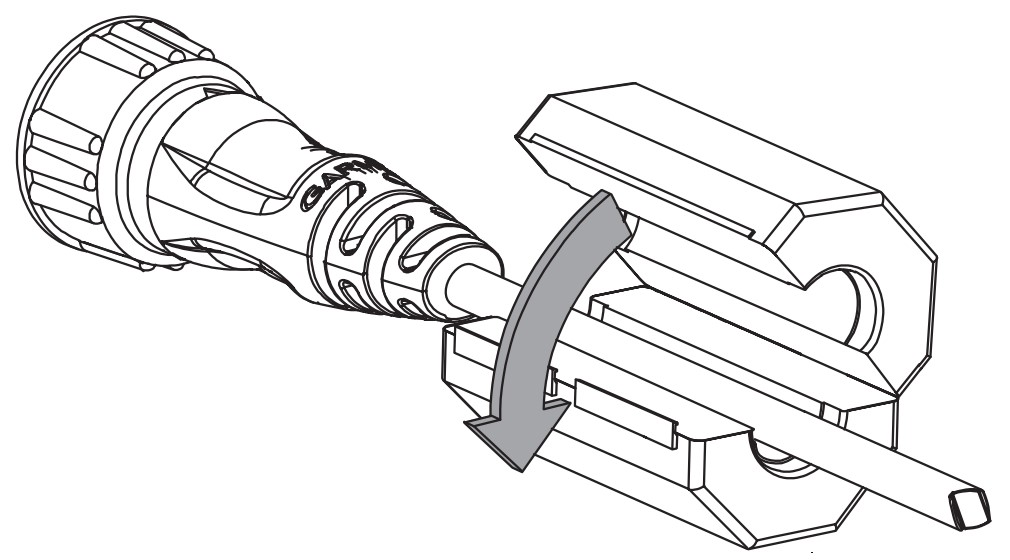
- Position the included ferrite bead on the transducer cable, near the connector.
- Snap the ferrite bead securely around the transducer cable.
Using the Optional Split Collar
If you plan to drill a hole or need to route the cable through a tight space during installation, you can remove the existing solid locking collar on the cable before routing it. After routing the cable to the final location, you can install the included split locking collar before making the connection.
- Use side-cutting pliers to cut through the existing solid collar.
NOTE: Take care when cutting the existing collar to avoid damaging the cable or the connector. - Remove the solid collar from the cable connector and save the existing o-ring if it is not damaged.
- Route the cable to the connection location.
- If needed, separate the two pieces of the optional split collar.
- Snap the pieces together around the cable connector.
- Insert either the original o-ring or the included replacement o-ring around the connector and into the collar.
Installing the Transducer on the Perspective Mode Mount
Labels identifying the parts bags required for this procedure:
NOTICE
You must secure the transducer cable to the shaft or other secure location during installation. Damage to the transducer cable wire or the cable jacket can cause transducer failure.
NOTE: To avoid obstructions in the sonar image, you should mount the transducer on the shaft as far from the motor as possible.
- Remove the perspective mode extension arm, the front half of the mounting bracket, and the short knob from the parts bag.
- Remove the back half of the mounting bracket and four screws from the parts bag.
- Remove the long knob from the parts bag.
- If the trolling motor shaft is equal to or less than 25 mm (1 in.) in diameter, remove the rubber liner from the parts bag.
- Identify the arrow on the front half of the mounting bracket to ensure that you orient the bracket with the wide end of the slant at the top when you attach the bracket to the trolling motor shaft.
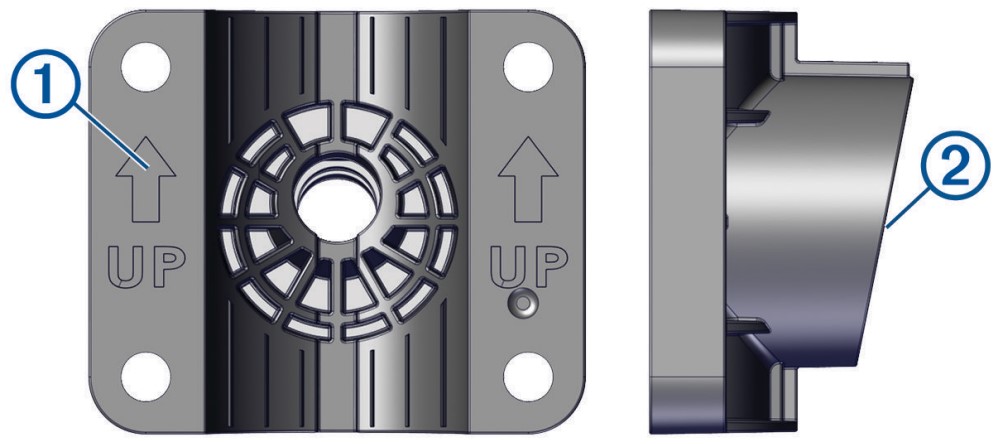
NOTE: The perspective mode bracket has an 11-degree angle to allow the extension arm to transition between all three sonar views. - If you are installing the transducer on a trolling motor shaft equal to or less than 25 mm (1 in.) in diameter, wrap the rubber liner around the shaft in the location you want to install the mount.
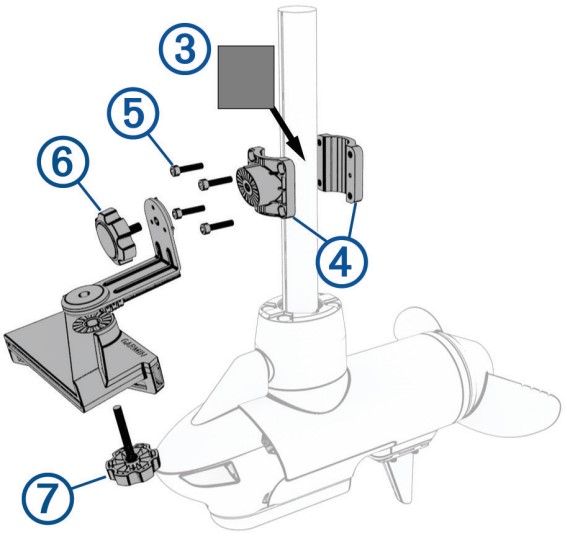 NOTE: The rubber liner is not needed when installing the transducer on a trolling motor with a shaft diameter larger than 25 mm (1 in.).
 - Orient the mounting bracket on the shaft so the arrows on the inside of the front half of the bracket point up. The bracket should be aligned so the center screw hole faces the front of the trolling motor.
- Place the bracket around the rubber liner on the trolling motor shaft, insert the screws into the mount bracket, and secure them using the M5 hex wrench in the parts bag.
- (Optional) Transition the trolling motor from the deployed to the stowed position and back again to test the location of the mounting bracket and make any adjustments as needed.
- With the 90-degree angle pointing downward, attach the shorter length of the extension arm to the mounting bracket using the shorter knob.
- Place the transducer below the longer length of the extension arm and attach it using the longer knob.
NOTE: You can secure the extension arm to the mounting bracket and the transducer to the extension arm using the included low-profile hardware instead of the knobs if you do not plan to switch transducer modes frequently during use (Installing the Transducer Using Low Profile Mounting Hardware). - Secure the transducer cable to the motor shaft or other secure location.
- Route the transducer cable to the installation location of the sonar module while taking these precautions.
• You must route the cable so that it does not come in contact with the propeller when the trolling motor is operating.
• You should not route the cable close to electrical wires or other sources of electrical interference.
• You must route the cable so it is not pinched when the trolling motor is deployed or stowed.
NOTE: If necessary, for extra cable length you can connect an optional extension cable, available at buy.garmin.com or from your Garmin dealer. - Position the transducer to your desired angle.
Viewing Modes
Using the perspective mode mount and extension arm, you can change the orientation angle of the transducer between three sonar views.
When installing the transducer using the recommended adjustment knobs, no tools are necessary to change the orientation between these three fields of view. You must loosen the knobs to change the orientation of the arm and transducer and tighten them to set the orientation.
You can verify the sonar view using the notches on the perspective mount bracket, the shaft mount, and the transducer.
NOTE: The notches are not labeled on the transducer hardware, so you can use these tables and diagrams to understand the positioning of the transducer and perspective view bracket when changing between sonar views.
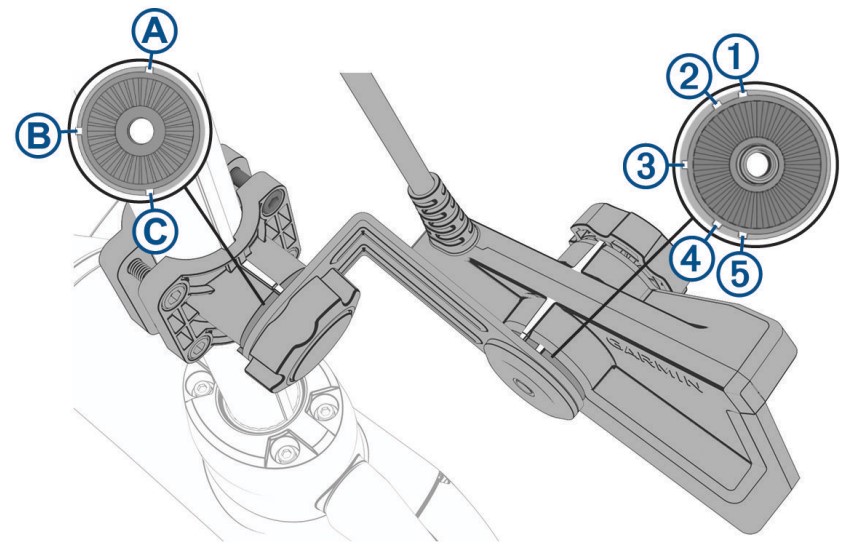
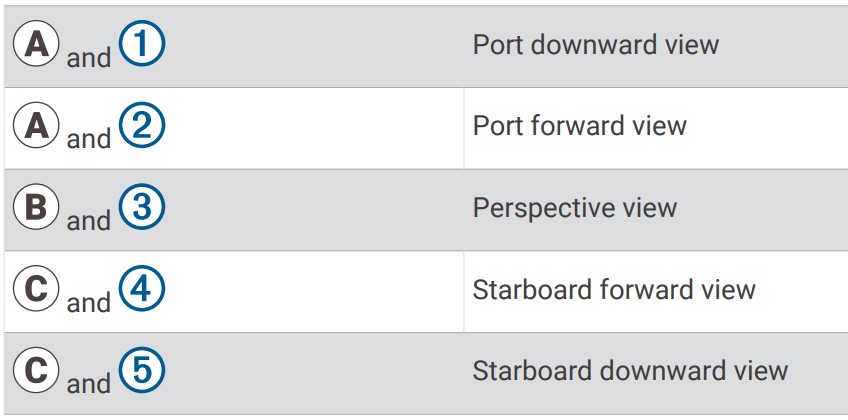


You should align the marks on the transducer and extension arm to verify the appropriate orientation before tightening the knob.
Installing the Transducer on a Trolling Motor Barrel
Labels identifying the parts bags required for this procedure:
NOTICE
You must secure the transducer cable to the shaft or other secure location during installation. Damage to the transducer cable wires or cable jacket can cause transducer failure.
- Remove the rubber liner from the parts bag.
- Remove the hose clamp and trolling motor barrel mount from the parts bag.
- Insert the hose clamp through the slot on the trolling motor mount until equal lengths extend on both sides of the mount.

- Place the rubber liner against the trolling motor barrel where you plan to secure the mount.
- Secure the hose clamp around the trolling motor barrel using a flat screwdriver or 8 mm wrench or socket.
- Remove the knob from the parts bag.
- Attach the transducer to the mount using the knob, and tighten the knob by hand.
NOTE: You can secure the transducer to the mount using the included low-profile hardware instead of the knob if you do not plan to switch transducer modes frequently during use (Installing the Transducer Using Low Profile Mounting Hardware). - Secure the transducer cable to the motor shaft or other secure location.
- Route the transducer cable to the installation location of the sonar module while taking these precautions.
• You must route the cable so that it does not come in contact with the propeller when the trolling motor is operating.
• You should not route the cable close to electrical wires or other sources of electrical interference.
• You must route the cable so it is not pinched when the trolling motor is deployed or stowed.
NOTE: If necessary, for extra cable length you can connect an optional extension cable, available at buy.garmin.com or from your Garmin dealer. - Position the transducer to your desired angle (Trolling Motor Barrel Mount Orientation).
Trolling Motor Barrel Mount Orientation
The orientation angle depends on which side of the trolling motor you have mounted the transducer on, and your desired field of view.
When installing the transducer using the recommended adjustment knob, no tools are necessary to change the orientation from forward to downward, or vice versa. You must loosen the knob to change the orientation and tighten it to set the orientation.
NOTE: You should align the marks as shown on the transducer and mount to verify the appropriate orientation before tightening the knob.
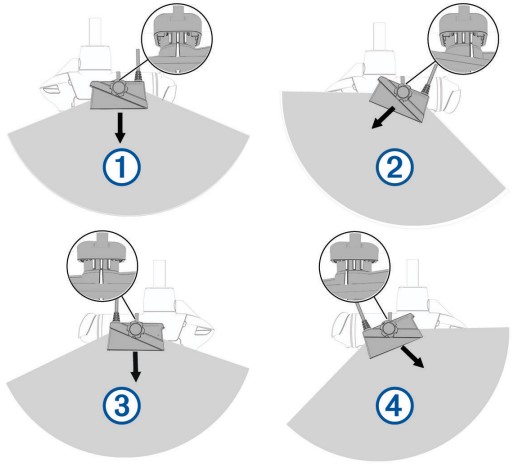
- Port side, downward view
- Port side, forward view
- Starboard side, downward view
- Starboard side, forward view
Installing the Transducer on the Trolling Motor Shaft
Labels identifying the parts bags required for this procedure:
NOTICE
You must secure the transducer cable to the shaft or other secure location during installation. Damage to the transducer cable wire or the cable jacket can cause transducer failure.
NOTE: To avoid obstructions in the sonar image, you should mount the transducer on the shaft as far from the motor as possible.
- Remove the back of the shaft-mount bracket and four screws from the parts bag.
- Remove the front half of the shaft mount bracket from the parts bag.
- If the trolling motor shaft is equal to or less than 25 mm (1 in.) in diameter, remove the rubber liner from the parts bag.
- Identify the arrow on the front half of the shaft mount bracket to ensure that you orient the bracket with the narrow end of the angle at the top when you attach the bracket to the trolling motor shaft.

NOTE: The trolling motor shaft bracket has an 8-degree angle to reduce the effects of the trolling motor barrel interference with the transducer beam. - If you are installing the transducer on a trolling motor shaft equal to or less than 25 mm (1 in.) in diameter, wrap the rubber liner around the shaft in the location where you want to install the mount.

NOTE: The rubber liner is not needed when installing the transducer on a trolling motor with a shaft diameter larger than 25 mm (1 in.). - Place the shaft-mount bracket around the rubber liner on the trolling motor shaft.
- Insert the screws into the shaft mount bracket and secure them using the M5 hex wrench in the parts bag.
- (Optional) Transition the trolling motor from the deployed to the stowed position and back again to test the location of the mounting bracket and make any adjustments as needed.
- Remove the knob from the parts bag.
- Attach the transducer to the mount using the knob, and tighten the knob by hand.
NOTE: You can secure the transducer to the mount using the included low-profile hardware instead of the knob if you do not plan to switch transducer modes frequently during use (Installing the Transducer Using Low Profile Mounting Hardware). - Secure the transducer cable to the motor shaft or other secure location.
- Route the transducer cable to the installation location of the sonar module while taking these precautions.
• You must route the cable so that it does not come in contact with the propeller when the trolling motor is operating.
• You should not route the cable close to electrical wires or other sources of electrical interference.
• You must route the cable so it is not pinched when the trolling motor is deployed or stowed.
NOTE: If necessary, for extra cable length you can connect an optional extension cable, available at buy.garmin.com or from your Garmin dealer. - Position the transducer to your desired angle, and tighten the knob (Installing the Transducer on the Trolling Motor Shaft).
Trolling Motor Shaft Mount Orientation
The orientation angle depends on which side of the trolling motor shaft you mount the bracket on, and your desired field of view.
When installing the transducer using the recommended adjustment knob, no tools are necessary to change the orientation from forward to downward, or vice versa. You must loosen the knob to change the orientation and tighten it to set the orientation.
NOTE: You should align the marks as shown on the transducer and mount to verify the appropriate orientation before tightening the knob.

- Port side, downward view
- Port side, forward view
- Starboard side, downward view
- Starboard side, forward view
Installing the Transducer on a Pole
You can use the included hardware to install the transducer on a pole (not included). Installing the transducer on a pole is similar to installing the transducer on a trolling motor shaft. If needed, you can refer to the diagram provided for installing the transducer on a trolling motor shaft when installing the transducer on a pole (Installing the Transducer on the Trolling Motor Shaft).
NOTE: The included shaft bracket features an 8-degree angle to reduce the effects of the trolling motor barrel interference with the transducer beam. When installing the transducer on a pole, you can purchase a flat bracket with no angle if you prefer. See your Garmin dealer or go to buy.garmin.com for details.
Labels identifying the parts bags required for this procedure:
NOTICE
You must secure the transducer cable to the pole or other secure location during installation. Damage to the transducer cable wire or the cable jacket can cause transducer failure.
- Remove the back of the shaft-mount bracket and four screws from the parts bag.
- Remove the front half of the shaft mount bracket from the parts bag.
- If the pole is equal to or less than 25 mm (1 in.) in diameter, remove the rubber liner from the parts bag.
- If the pole is equal to or less than 25 mm (1 in.) in diameter, wrap the rubber liner around the pole in the location you want to install the mount.
- Place the shaft-mount bracket around the rubber liner on the pole.
- Insert the screws into the shaft mount bracket, and secure them using the M5 hex wrench in the parts bag.
- Remove the knob from the parts bag.
- Place the transducer against the shaft-mount bracket, and secure it using the knob.
NOTE: You can secure the transducer to the mount using the included low-profile hardware instead of the knob if you do not plan to switch transducer modes frequently during use (Installing the Transducer Using Low Profile Mounting Hardware). - Secure the transducer cable to the pole or other secure location, and route the cable to the location of the sonar module.
Installing the Transducer Using Low Profile Mounting Hardware
If you do not plan to change the viewing mode of the transducer often or prefer a lower-profile installation without the adjustment knobs, you can use the included hardware to install the transducer instead of using the knobs.
Labels identifying the parts bags required for this procedure:
- Secure the mounting bracket to the trolling motor barrel (Installing the Transducer on a Trolling Motor Barrel) or shaft (Installing the Transducer on the Trolling Motor Shaft) (Installing the Transducer on the Perspective Mode Mount) according to the appropriate instructions, but do not use the included adjustment knobs.
- Select an action:
• If you are installing the transducer on the barrel or shaft of the trolling motor, use the longer low-profile screw and metal washer from the parts bag to secure the transducer to the mounting bracket.
• If you are installing the transducer using the perspective mode mount and extension arm, use the shorter low-profile screw and metal washer from parts bag to secure the extension arm to the mounting bracket, and use the longer low-profile screw and metal washer from parts bag to secure the transducer to the extension arm. - Adjust the view of the transducer and tighten the low-profile screws using the M5 hex wrench in the parts bag.
Mounting the GLS 10 Black Box Device
NOTICE
If you are mounting the device in fiberglass, when drilling the pilot holes, use a countersink bit to drill a clearance counterbore through only the top gel-coat layer. This will help to avoid cracking in the gel-coat layer when the screws are tightened.
NOTE: Screws are included with the device, but they may not be suitable for the mounting surface. Before you mount the device, you must select a mounting location, and determine what screws and other mounting hardware are needed for the surface.
- Place the black box device in the mounting location, and mark the location of the pilot holes.
- Drill a pilot hole for one corner of the device.
- Loosely fasten the device to the mounting surface with one corner, and examine the other three pilot-hole marks.
- Mark new pilot-hole locations if necessary, and remove the device from the mounting surface.
- Drill the remaining pilot holes.
- Secure the device to the mounting location.
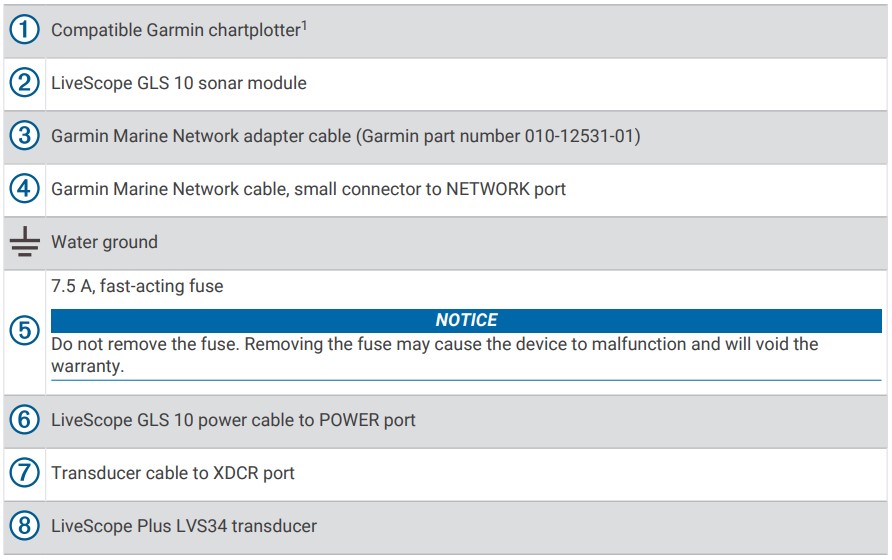
Installation Diagram
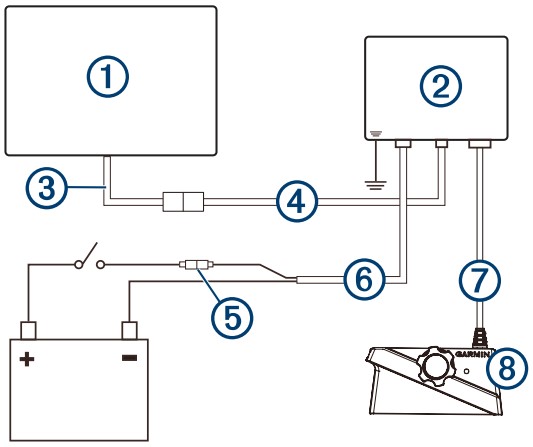
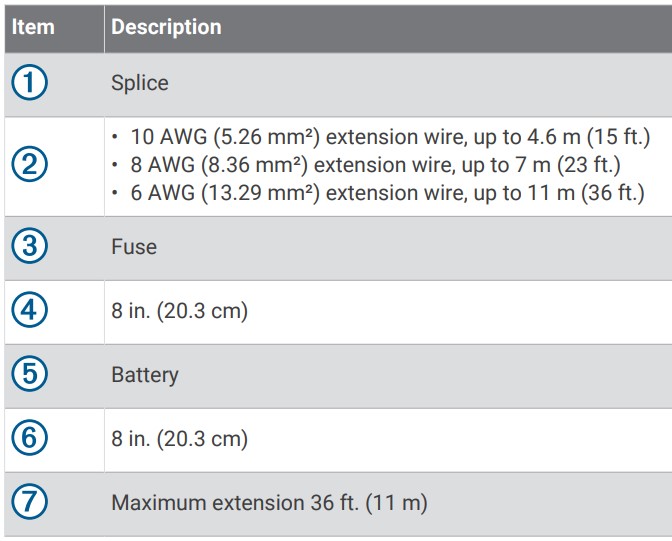
Power Cable Extensions
If necessary, you can extend the power cable using the appropriate wire gauge for the length of the extension.

- Fuse
- Battery
- 9 ft. (2.7 m) no extension

Blink Codes
After the sonar module is installed, it turns on when the chartplotter is turned on. The color status LED on the sonar module indicates its operational status.

Transducer Settings and Operation
For transducer settings and operation information, see your chartplotter owner’s manual. Configuring the Viewing Mode After installing the transducer, you should configure the software for how you plan to use the transducer.
- Select an action:
• On the chartplotter, select Sonar > LiveScope > Options > Sonar Setup > Installation > Orientation. - Select the viewing mode you plan to use with the transducer.
TIP: If you plan to change the viewing mode of the transducer during use, you should select Auto for the best results.
Calibrating the Compass
Before you can calibrate the compass, the transducer must be installed far enough away from the trolling motor to avoid magnetic interference, and deployed in the water. Calibration must be of sufficient quality to enable the internal compass.
NOTE: The compass may not work if you mount the transducer on the motor.
NOTE: For best results, you should use a heading sensor such as the SteadyCast™ heading sensor. The heading sensor shows the direction the transducer is pointing relative to the boat.
You can begin turning your boat before calibrating, but you must fully rotate your boat 1.5 times during calibration.
- From an applicable sonar view, select Options > Sonar Setup > Installation.
- If necessary, select Use AHRS to turn on the AHRS sensor.
- Select Calibrate Compass.
- Follow the on-screen instructions.
Appendix
LiveScope Plus LVS34 Specifications

LiveScope GLS 10 Sonar Module Specifications

Open-Source Software License
To view the open-source software license(s) used in this product, go to developer.garmin.com/open-source/linux/.
Cleaning the Transducer
Aquatic fouling accumulates quickly and can reduce your device’s performance.
- Remove the fouling with a soft cloth and mild detergent.
- Wipe the device dry.
FAQs about Garmin LiveScope Plus LVS34 Transducer
How far is the Garmin LiveScope able to see?
200′ or more distant. That’s a very amazing perspective for sonar in real time. This method stabilizes the display on your chartplotter screen, even in choppy conditions.
How should my LiveScope transducer be kept safe?
A shroud called the Livescope Guardian is designed to cover your Livescope transducer and shield it from harm during trailering, rough-water running on the lake, and other situations where you don’t want to risk scratching the lenses: fishing in shallow grass and brush
What works well with the LVS34?
All current model GPSMAP devices, as well as EchoMap UHD and EchoMap ULTRA, are compatible with the Garmin LVS34 LiveScope PLUS.
Which transducer works best with LiveScope?
If you’re looking for a sonar transducer, the Panoptix 22 and the Garmin LiveScope Plus are excellent options. Although they are slightly more costly, they provide improved clarity and scanning capabilities. The Garmin GT56 22 is more affordable and yet provides excellent performance if you’re on a tight budget.
Where is the ideal location for a Garmin LiveScope transducer to be mounted?
The transducer should be mounted as near as feasible to the boat’s center line. disrupt the sonar beam, which may result in uneven detection on the boat’s opposite side. Viewed from the rear is the transducer. It is not permissible to install the transducer in the propeller’s path on single-drive vessels.
How does a transducer for LiveScope work?
The Garmin Livescope technology allows you to see real-time sonar beneath and around your boat. It displays a view of what’s under the boat in real time, as opposed to a view of what was under it in the past. Transom mount or thru-hull transducer option are available for it.
Is LiveScope compatible with the Garmin Echomap UHD 93sv?
A number of Garmin transducers are supported by this chartplotter (separately offered), such as the Panoptix LiveScopeTM scanning sonar system, which provides real-time boat visibility.
Which battery size works best with a LiveScope?
The Dakota Lithium 46 amp hour (Ah) battery is needed for 8 hours or more of run time, or a 12V 25Ah battery is needed for 4 hours. The Garmin Livescope may draw up to 8 amps per hour. We suggest the Dakota Lithium Powerbox+ 60 for fishing from kayaks, canoes, or any small boat that has a chance of rolling over.
What is a fishing LiveScope?
With the help of LiveScope, a live scanning sonar, you can see fish moving beneath and around your boat in great detail in real time! Capt. Mike is scup fishing with the 1/2 ounce Hogy Heavy Minnow in this video.
What does LiveScope Plus entail?
The LiveScope Plus System, the most recent advancement in LiveScope technology, provides greater target separation, lower noise, sharper pictures, and increased resolution.
For more manuals by Germin, visit Manualsdock


