Garmin Dezl OTR500 GPS Truck Navigator
About Garmin
We create goods with internal engineering designed for outdoor use. We do this to help our clients maximize the time spent following their passions. With more than 19,000 employees spread across 35 nations, we serve the automobile, aviation, marine, outdoor, and fitness markets with GPS navigation and wearable technology. We believe that there is always room for innovation and improvement.
Device Overview
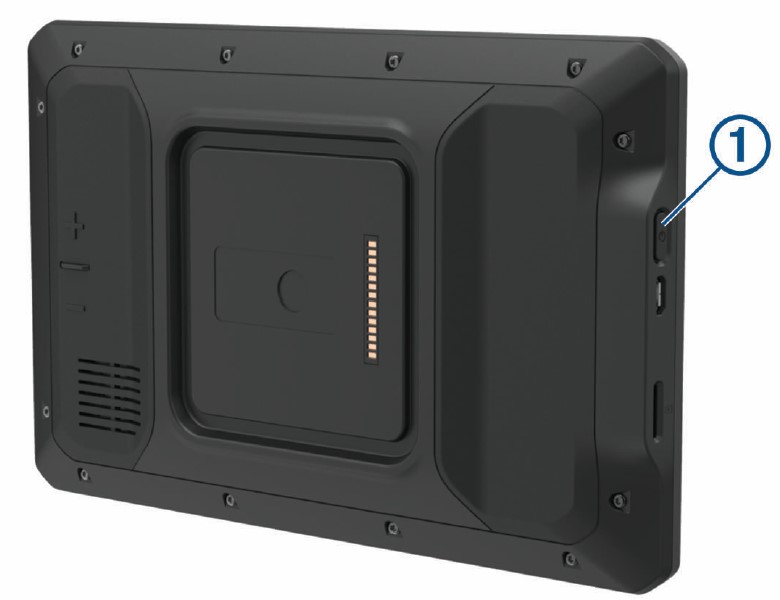
- Microphone for hands-free calling and voice command
- Volume control
- Power key
- Micro USB power and data port
- Map and data memory card slot
- Magnetic mount interface with 14-pin connector
- Speaker
Mounting and Powering the Device in Your Vehicle
WARNING:
- This product contains a lithium-ion battery. To prevent the possibility of personal injury or product damage caused by battery exposure to extreme heat, store the device out of direct sunlight.
- Both the device and its mount contain magnets. Under certain circumstances, magnets may cause interference with some internal medical devices and electronic devices, including pacemakers, insulin pumps, or hard drives in laptop computers. Keep the device away from medical devices and electronic devices.
- Before you use your device on battery power, you should charge it.
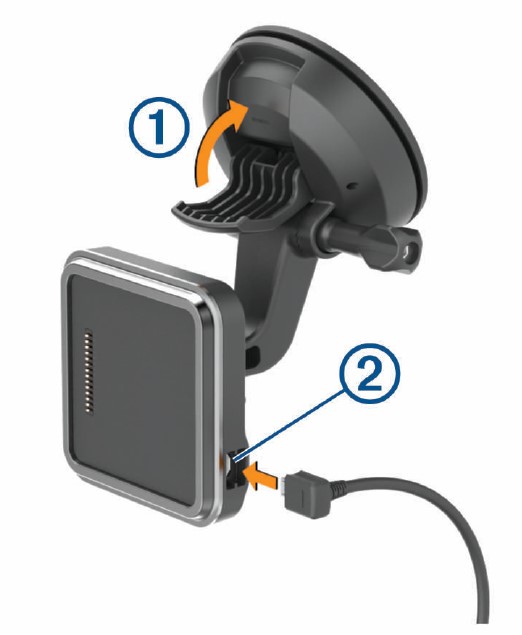
- Open the lever 1, press the suction cup to the windshield, and flip the lever back toward the windshield. The lever must be oriented toward the top of the windshield.

- Plug the vehicle power cable into the port 2 on the mount.
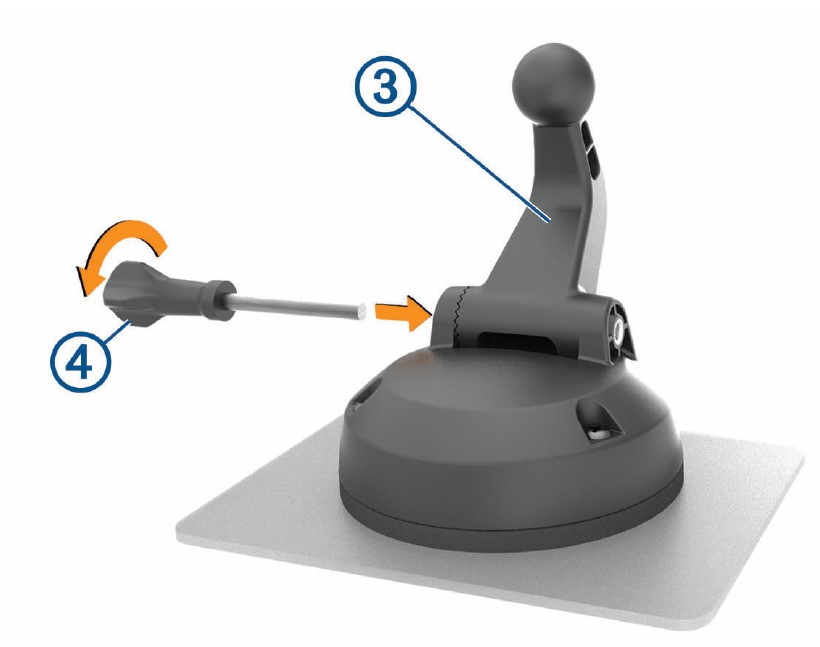
- If necessary, loosen the thumbscrew on the suction cup arm 3 and the nut on the ball mount 4, and adjust the mount for better viewing and operation.

- Tighten the thumbscrew on the suction cup arm and the nut on the ball mount.
- Place the device onto the magnetic mount.

- Plug the other end of the vehicle power cable into a power outlet in your vehicle.
Installing the Screw-Down Mount on the Dashboard
Before you can attach the screw-down ball mount to your dashboard, you must select a suitable location on the dashboard.
WARNING: It is your responsibility to ensure the mounting location complies with all applicable laws and ordinances and does not block your view of the road during the safe operation of your vehicle.
NOTICE:
- Avoid wires, gauges, airbags, airbag covers, HVAC, and other items when drilling pilot holes and attaching the mount to the vehicle. Garmin® is not responsible for any damages or consequences arising from the installation.
- Garmin recommends professional installation of the screw-down ball mount.
- Place mount 1 on the selected location.

- Using the mount as a template, mark the three screw locations.
- Drill pilot holes (optional).
For some types of mounting material, drilling pilot holes is necessary. - Securely fasten the mount to the surface using the supplied screws
- Insert the ball mount arm into the mount.

- Insert the thumbscrew 4 into the mount, and tighten it to secure the ball mount arm.
Installing the Ball Mount Adapter
Your device includes a one-inch ball mount that is compatible with third-party mounting solutions.
- Remove the four screws securing the mount socket to the magnetic mount.

- Remove the mount socket.
- Secure the one-inch ball mount 3 to the magnetic mount using the screws removed in step 1.

Turning the Device On or Off
- To turn the device on, press the power key 1, or connect the device to power.

- To put the device in power-saving mode, press the power key while the device is on.
While in power saving mode, the screen is off and the device uses very little power, but it can wake instantly for use.
TIP: You can charge your device faster by putting it in power-saving mode while charging the battery. - To turn off the device completely, hold the power key until a prompt appears on the screen, and select Power Off.
Acquiring GPS Signals
When you turn on your navigation device, the GPS receiver must collect satellite data and establish the current location. The time required to acquire satellite signals varies based on several factors, including how far you are from the location where you last used your navigation device, whether you have a clear view of the sky, and how long it has been since you last used your navigation device. The first time you turn on your navigation device, it may take several minutes to acquire satellite signals.
- Turn on the device.
- Verify
 appears in the status bar, and enable location services if it does not.
 - If necessary, go to an open area with a clear view of the sky, away from tall buildings and trees.
Acquiring Satellites appears at the top of the navigation map until the device determines your location.
Home Screen
NOTE: The home screen layout may vary if it has been customized.
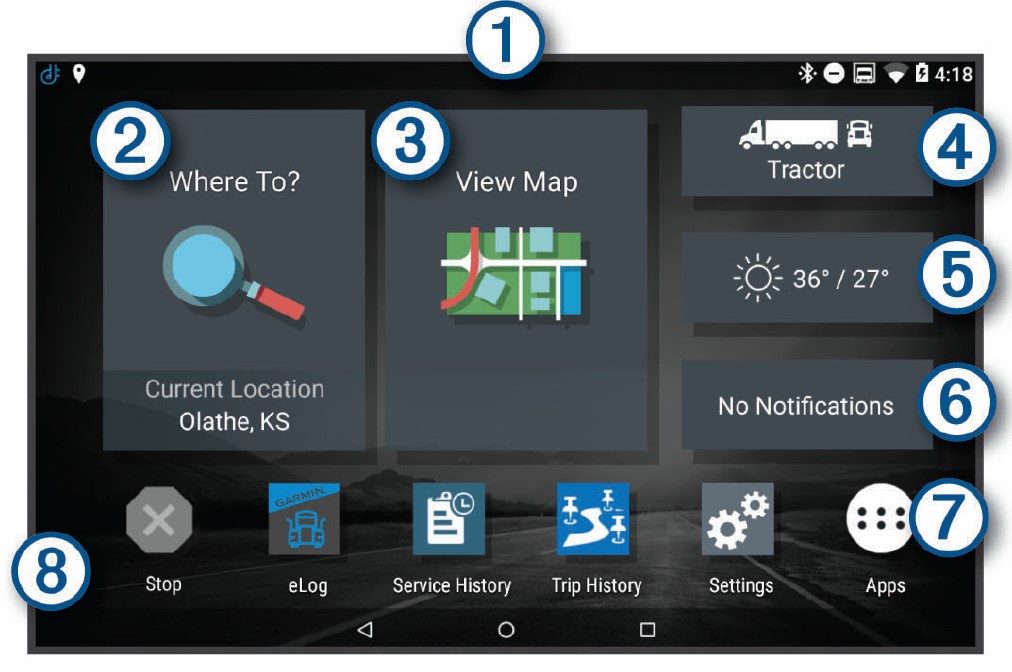
- Swipe down to view notifications.
Swipe down twice to quickly change settings and backlight brightness. - Select to start a route.
- Select to view the map.
- Select to change your vehicle profile.
- Select to view weather information for your current location. The dēzl app is required.
- Select to view smart notifications. The dēzl app is required.
- Select to open the app drawer. The app drawer contains shortcuts to all the apps installed on your device.
- Hold to customize the wallpaper or add widgets to the home screen.
Opening an App
The home screen contains shortcuts for frequently used apps. The app drawer contains all the apps installed on your device, organized into two tabs. The dēzl tab contains Garmin apps useful for navigation, dispatching, and hours of service recording. The Tools tab contains apps useful for communication and other tasks.
Select an option to open an app:
- Select an app shortcut from the home screen.
- Select
 , select a tab, and select an app.
Adding Shortcuts to the Home Screen
- Select
 .
. - Select an app tab to view additional applications.
- Hold an application, and drag it to a location on the home screen.
Viewing Notifications
- Swipe down from the top of the screen.
The list of notifications appears. - Select an option:
- To launch the action or app mentioned in the notification, select the notification.
- To dismiss a notification, swipe the notification to the right.
Status Bar Icons
The status bar is located at the top of the main menu. The status bar icons display information about features on the device.
Using the Touchscreen
- Tap the screen to select an item.
- Drag or swipe your finger across the screen to pan or scroll.
- Pinch two fingers together to zoom out.
- Spread two fingers apart to zoom in.
Adjusting the Screen Brightness
The device can use an ambient light sensor to adjust the screen brightness to your vehicle conditions automatically. You can also adjust the brightness manually, using either the notification panel or the settings menu.
- Select an option:
- Swipe down twice from the top of the screen to expand the quick settings in the notification panel.
- Select Settings > Device > Display > Brightness Level.
- Use the slider bar to adjust the brightness.
Vehicle Profiles
WARNING: Entering your vehicle profile characteristics does not guarantee that your vehicle’s characteristics will be accounted for in all route suggestions or that you will receive warning icons in all cases. Limitations may exist in the map data such that your device cannot account for these restrictions or road conditions in all cases. Always defer to all posted road signs and road conditions when making driving decisions.
Routing and navigation are calculated differently based on your vehicle profile. The activated vehicle profile is indicated by an icon in the status bar.
The navigation and map settings on your device can be customized separately for each vehicle type.
When you activate a truck vehicle profile, the device avoids including restricted or impassable areas in routes based on the dimensions, weight, and other characteristics you entered for your vehicle.
Adding a Vehicle Profile
You can add a vehicle profile that includes the weight, dimensions, and other characteristics of your vehicle.
- From the home screen, select the vehicle profile widget.
- Select an option:
- To add a straight truck with a permanently attached cargo area, select Straight Truck.
- To add a tractor or a tractor-trailer combination, select Tractor.
- To add a bus, select Bus.
- Follow the on-screen instructions to enter the vehicle characteristics.
After you add a vehicle profile, you can edit the profile to enter additional detailed information, such as the vehicle identification number or trailer number
Car Profile
The car profile is a preloaded vehicle profile intended for use in an automobile without a trailer. While using the car profile, the device calculates standard automobile routes, and routing for large vehicles is not available. Some features and settings specific to large vehicles are not available while using the car profile.
Switching the Vehicle Profile
Each time you turn on your device, it prompts you to select a vehicle profile. You can manually switch to another vehicle profile at any time.
- Select an option:
- Swipe down twice from the top of the screen, and select the vehicle profile icon, such as
 or
or .
. - From the home screen, select the vehicle profile widget.
- Swipe down twice from the top of the screen, and select the vehicle profile icon, such as
- Select a vehicle profile.
The vehicle profile information appears, including measurements and weight. 3 Select Select.
Changing Your Trailer Information
Before you can change your trailer information, you must enter a vehicle profile for a tractor.
When you change the trailer on your tractor, you can change the trailer information in your vehicle profile without changing the tractor information. You can switch quickly between frequently used trailers.
- From the home screen, select the vehicle profile widget.
- Select the tractor vehicle profile to use with the trailer.
- Select
 .
. - Select an option:
- To use a recent trailer configuration, select a trailer configuration from the list.
- To enter a new trailer configuration, select New Configuration, and enter the trailer information.
Editing a Vehicle Profile
You can edit a vehicle profile to change vehicle information or add detailed information to a new vehicle profile, such as the vehicle identification number, trailer number, or odometer reading. You can also rename or delete a vehicle profile.
- From the home screen, select the vehicle profile widget.
- Select the vehicle profile to edit.
- Select an option:
- To edit the vehicle profile information, select
 , and select a field to edit.
 - To rename a vehicle profile, select
 >
> > Rename Profile.
 - To delete the vehicle profile, select
 >
>  > Delete.
- To edit the vehicle profile information, select
Device Information
Viewing E-label Regulatory and Compliance Information
- From the settings menu, swipe to the bottom of the menu.
- Select About Device > Regulatory information.
Specifications
- Operating temperature range: From -20° to 55°C (from -4° to 131°F)
- Charging temperature range: From 0° to 45°C (from 32° to 113°F)
- Radiofrequency (dēzl OTR800 / LGV800): 2.4 GHz @ 14 dBm
- Radiofrequency (dēzl OTR1000 / LGV1000): 2.4 GHz @ 15 dBm
- Power input: Vehicle power using the included vehicle power cable. AC power using an optional accessory (for home and office use only).
- Battery type: Rechargeable lithium-ion
Charging the Device
NOTE: This Class III product shall be powered by an LPS power supply. You can charge the battery in the device using any of these methods.
- Install the device in the mount, and connect the mount to vehicle power.
- Connect the device to an optional power adapter accessory, such as a wall power adapter.
You can purchase an approved Garmin AC-DC adapter suitable for home or office use from a Garmin dealer or www.garmin.com. The device may charge slowly when connected to a third-party adapter.
Device Maintenance
Garmin Support Center
Go to support.garmin.com for help and information, such as product manuals, frequently asked questions, videos, and customer support.
Device Care
NOTICE
- Avoid dropping your device.
- Do not store the device where prolonged exposure to extreme temperatures can occur, because it can cause permanent damage.
- Never use a hard or sharp object to operate the touchscreen, or damage may result.
- Do not expose the device to water.
Cleaning the Outer Casing
NOTICE: Avoid chemical cleaners and solvents that can damage plastic components.
- Clean the outer casing of the device (not the touchscreen) using a cloth dampened with a mild detergent solution.
- Wipe the device dry.
Cleaning the Touchscreen
- Use a soft, clean, lint-free cloth.
- If necessary, lightly dampen the cloth with water.
- If using a dampened cloth, turn off the device and disconnect the device from power.
- Gently wipe the screen with a cloth.
Avoiding Theft
- Remove the device and mount it from sight when not in use.
- Remove the residue left on the windshield by the suction cup.
- Do not keep your unit in the glove compartment.
- Register your device using the Garmin Express software (garmin.com/express).
Resetting the Device
You can reset your device if it stops functioning.
Hold the power key for 12 seconds.
Removing the Device, Mount, and Suction Cup
Removing the Mount from the Suction Cup
- Loosen the nut that secures the magnetically powered mount to the suction cup ball.
- Turn the device mount to the right or left.
- Apply pressure until the socket on the mount releases the ball on the suction cup.
Removing the Suction Cup from the Windshield
- Flip the lever on the suction cup toward you.
- Pull the tab on the suction cup toward you.
Troubleshooting
The suction cup will not stay on my windshield
- Clean the suction cup and windshield with rubbing alcohol.
- Dry with a clean, dry cloth.
- Mount the suction cup (Mounting and Powering the Device in Your Vehicle, page 4).
The mount does not hold my device in place while I drive
For the best results, you should keep the vehicle mount clean and position the device close to the suction cup. If the device shifts position while you are driving, you should complete these actions.
- Remove the powered mount from the suction cup arm, and wipe the ball and socket with a cloth.
Dust and other debris may reduce the friction in the ball and socket joint and allow the joint to shift while you are driving. - Rotate the hinged arm toward the suction cup as far as your windshield angle allows.
Positioning the device closer to the windshield reduces the effect of jarring and vibration from the road.
My device is not acquiring satellite signals
- Verify the location services feature is enabled (Enabling or Disabling Location Services, page 63).
- Take your device out of parking garages and away from tall buildings and trees.
- Remain stationary for several minutes.
The device does not charge in my vehicle
- Verify the vehicle is turned on and is supplying power to the power outlet.
- Verify the interior temperature of the vehicle is within the charging temperature range indicated in the specifications.
- In the vehicle fuse box, verify the fuse for the vehicle power outlet is not broken.
My battery does not stay charged for very long
- Decrease the screen brightness
- Shorten the display timeout
- Decrease the volume
- Turn off the Wi-Fi radio when it is not in use
- Put the device in power-saving mode when not in use
- Keep your device away from extreme temperatures.
- Do not leave your device in direct sunlight.
My device does not connect to my phone
- Select Settings > Bluetooth.
The Bluetooth option must be enabled. - Enable Bluetooth wireless technology on your phone and bring your phone within 10 m (33 ft.) of the device.
- Verify your phone is compatible.
Go to www.garmin.com/bluetooth for more information. - Complete the pairing process again.
To repeat the pairing process, you must unpair your phone and device, and complete the pairing process.
FAQs about Garmin Dezl OTR500 GPS Truck Navigator
Do weigh stations appear on the Garmin DEZL?
With PrePass®, truck drivers may avoid weigh stations and make time-saving decisions on the go thanks to on-screen notifications.
The best Garmin GPS for truck drivers is which?
The Top 5 Truck GPSs. Rand McNally TND 750 is ranked as the best overall. Garmin Dezl OTR800, ranked #2 Most Versatile. Garmin Dezl 580 LMT-S, third-best accessories.
What can the DEZL app for Garmin do?
NOTE: To transmit locations from a mobile device, Android users must have the dzlTM app version 2.00.09 or newer installed. versions of the dzlTM App software and the update procedure. To find an address, company, or place of interest and transfer it to your Garmin device for navigation, utilize the dzlTM App.
How does Garmin determine the traffic?
Our sources for traffic data include the following: Worldwide historical traffic data is available. Real-time traffic is spotted by users of Garmin smartphone applications. Data on fleet management and public information from our partners.
How does Garmin obtain traffic information?
Where do the traffic statistics originate? Traffic warnings are generated by a system that collects and analyzes traffic flow data from more than 2 billion observation points each month, including information from millions of Garmin device users. data collected from millions of mobile phone users.
What distinguishes a truck GPS from a regular GPS?
For position identification and calculating the most effective route based on the current traffic and road conditions, a trucker’s GPS tends to be far more accurate. Both programs are used to determine the most efficient path to a given location.
Has the Garmin dzl has a dash cam?
This 7″ navigator has cutting-edge arrival planning, unique routing2 depending on the size and weight of your rig, and an integrated dash cam1 to safeguard your driving reputation.
Dash cameras are present on the Garmin dzl.
This 7″ navigator has cutting-edge arrival planning, unique routing2 depending on the size and weight of your rig, and an integrated dash cam1 to safeguard your driving reputation.
For more manuals by Garmin, Visit Manualsdock


