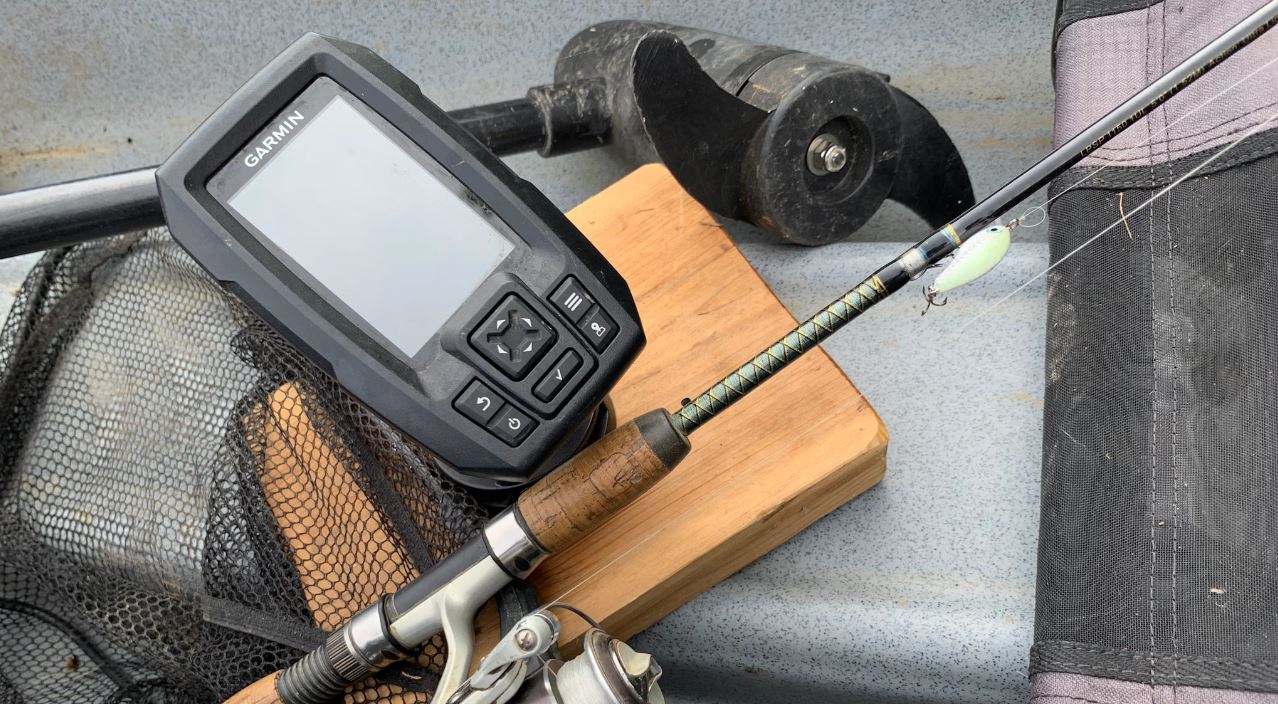
Garmin 010-01550-00 Striker 4 with Transducer
About Garmin
We create goods with internal engineering designed for outdoor use. We do this to help our clients maximize the time spent following their passions. With more than 19,000 employees spread across 35 nations, we serve the automobile, aviation, marine, outdoor, and fitness markets with GPS navigation and wearable technology. We believe that there is always room for innovation and improvement.
Introduction
WARNING See the Important Safety and Product Information guide in the product box for product warnings and other important information.
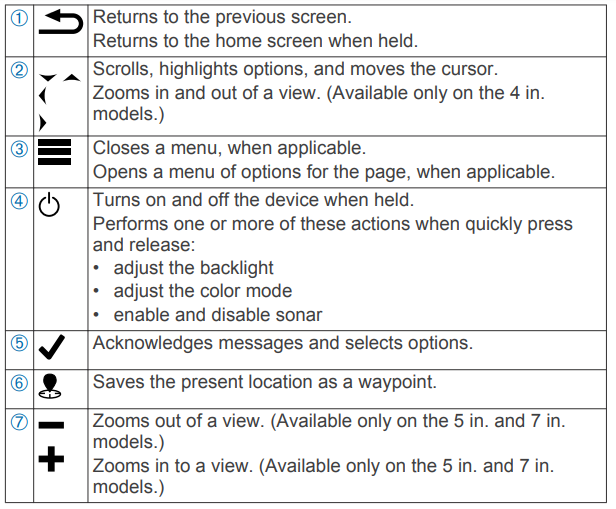
Device Overview
Contacting Garmin® Product Support
- Go to www.garmin.com/support for in-country support information.
- In the USA, call 913-397-8200 or 1-800-800-1020.
- In the UK, call 0808 238 0000.
- In Europe, call +44 (0) 870 850 1241.
Zooming on the STRIKER 4
You can zoom in and out of the Waypoint Map.
- Select a to zoom in.
- Select ~ to zoom out.
Panning on the STRIKER 4
You can move the Waypoint Map to view an area other than your present location.
- Select 4 or › to start panning.
- Use the arrow keys to pan.
TIP: You can select 3 to zoom.
Adjusting the Backlight
- Select Settings > System > Display > Backlight.
TIP: Press O from any screen to open the backlight settings. - Adjust the backlight.
Adjusting the Color Mode
- Select Settings > System > Display > Color Mode.
TIP: Press O from any screen to access the color settings. - Select an option.
Setting the Beeper
You can set when the device makes sounds.
- Select Settings > System > Beeper.
- Select an option:
- To have the device beep when you select an item and when an alarm is triggered, select On (Selections and Alarms).
- To have the device beep only when alarms are triggered, select Alarms Only.
GPS Satellite Signal Acquisition
When you turn on the fish finder, the GPS receiver must collect satellite data and establish the current location. When the fishfinder acquires satellite signals, ll appears at the top of the Home screen. When the fishfinder loses satellite signals, the nail disappears and a flashing question mark appears over 8 on the screen.
- For more information about GPS, go to https://www.garmin.com/en-US/aboutGPS/
Home Screen
The fishfinder home screen provides access to all of the features in the fishfinder. The features are dependent on the accessories you have connected to the fish finder. You may not have all of the options and features discussed in this manual. When viewing another screen, you can return to the home screen by holding it. You can customize the layout of the screens
Customizing the Home Screen
You can add items to and rearrange items on the Home screen.
- From the Home screen, select Customize Home.
- Select an option:
- To rearrange an item, select Rearrange, select the item to move, and select the new location.
- To add an item to the Home screen, select Add, and select the new item.
- To remove an item you have added to the Home screen, select Remove, and select the item.
Adding a New Layout to the Home Screen of the STRIKER 5 or 7
You can create a custom screen to suit your needs, which is added to your home screen.
- Select Customize Home > Add > Add New Layout.
- Select a function layout.
- Select a window to change.
- select a screen to ado
- Repeat steps 3 and 4 for additional windows.
- Select Data (Hidden) (optional).
- Select an option:
- To customize the data shown on the screen, select Overlay Numbers
- To turn on and off the compass tape data bar, select Compass Tape
- Select Next.
- Enter a name for the combination.
TIP:- Select / to save.
- Hold E to clear data.
- Select + or – to change the lettercase.
- Use the arrow keys to resize the windows.
- Use the arrow keys to select a home screen location.
Adding a Custom Layout to the Home Screen of the STRIKER 4
You can create a custom screen to suit your needs, which is added to your home screen.
- Select Customize Home > Add > Add New Layout.
- Select the first function to add.
- Select the second function to add.
- Select Split to choose the direction of the split screens (optional).
- Select Next.
- Enter a name for the combination.
TIP: Select / to save.- Select to change the letter case.
- Hold E to clear data.
- Use the arrow keys to resize the windows.
- Use the arrow keys to select a home screen location.
Adding the Numbers Screen
Before you can customize the Numbers screen, you must add it to the home screen. You can view numeric data on the home screen using the Numbers screen.
- Select Customize Home > Add > Numbers.
Numbers
To customize the Numbers screen, select Numbers > E
- Change Numbers: Sets what type of number data is displayed.
- Change Layout: Sets the amount of number data that is displayed.
- Reset Trip: Resets the trip data and allows you to record new trip data.
- Reset Odometer: Resets the odometer data and allows you to record new odometer data.
- Reset Maximum Speed: Resets the maximum speed for the trip and allows you to record a new maximum speed.
Adding the Data Graphs Screen
Before you can customize the Data Graphs screen, you must add it to the home screen. You can view graphical sonar data on the home screen using the Data Graphs screen. From the home screen, select Customize Home > Add > Data Graphs.
Data Graphs
To customize the Data Graphs screen, select Data Graphs >
- Change Graph: Sets the type of data displayed on the screen.
- Depth Graph Settings: Sets the amount of time and the range of depth that appears in the depth graphs.
- Temperature Graph Settings: Sets the amount of time and the range of depth that appear in the temperature graphs.
Sonar
The full-screen page, the split frequency page, and the flasher page are visual representations of the area beneath your boat. You can customize these sonar views.
Full-Screen Sonar
You can see a full-view graph of sonar readings from a transducer on the full screen. Select Traditional or DownVü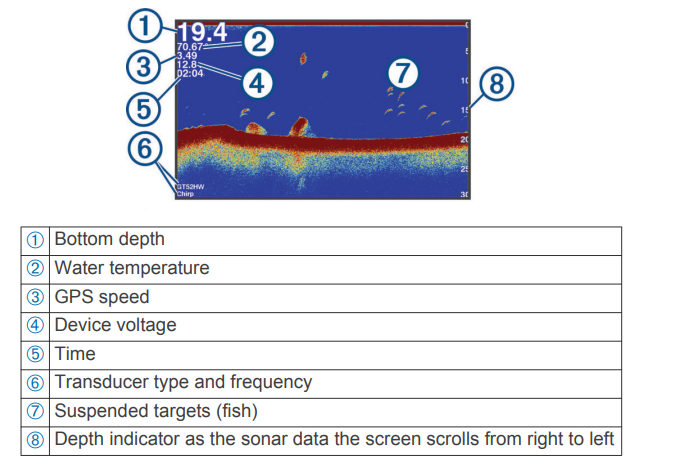
DownVü Sonar View
NOTE: Not all models support Down Vü sonar technology and transducers.
- DownVü high-frequency sonar provides a clearer picture below the boat, providing a more detailed representation of structures the boat is passing over.
- Traditional transducers emit a conical beam. The DownVü scanning sonar technology emits a narrow beam, similar to the shape of the beam in a copying machine. This beam provides a clearer, picture-like image of what is beneath the boat.
SideVü Sonar View
- NOTE: Not all models support SideVü sonar and scanning transducers.
- NOTE: To receive SideVü scanning sonar, you need a compatible transducer and fishfinder.
SideVü scanning sonar technology shows you a picture of what lies to the sides of the boat. You can use this as a search tool to find structures and fish.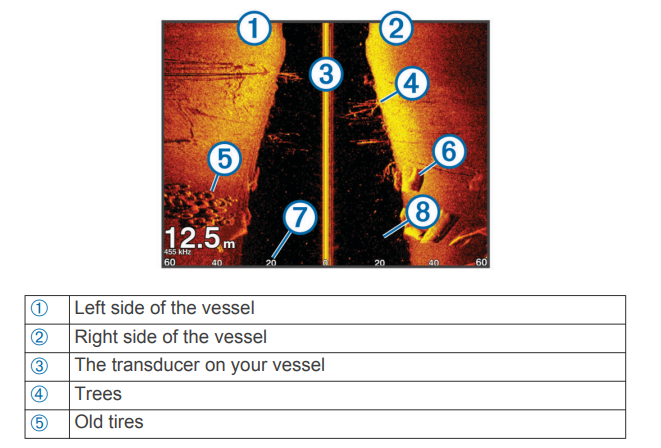

Split-Screen Frequency
You can view two frequencies from the split frequency screen.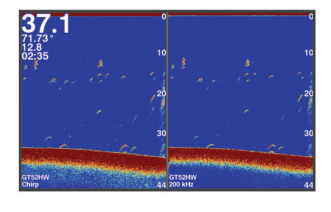
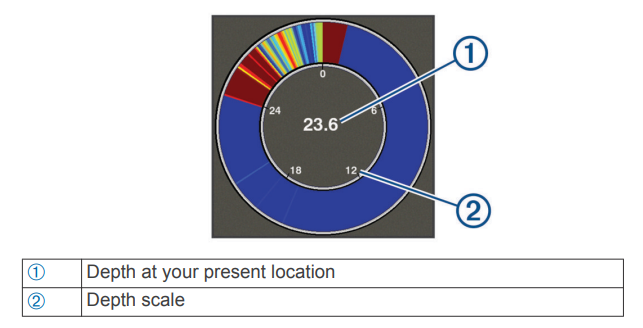
Flasher
The flasher shows sonar information on a circular depth scale, indicating what is beneath your boat. It is organized as a ring that starts at the top and progresses clockwise. Depth is indicated by the scale inside the ring. Sonar information flashes on the ring, when it is received at the depth, indicated. The colors indicate different strengths of the sonar return.
- Select Flasher.
Split-Zoom View
On the split-zoom page, you can see a full-view graph of sonar readings on the right side of the screen, and a magnified portion of that graph on the left side of the screen.
- From a sonar screen, select E => Split Zoom.

Selecting the Transducer Type
If you are not using the included transducer, you must set the transducer type to enable the sonar to function optimally. If you are using the included transducer, you do not need to complete these steps.
- 1 Select Settings > My Vessel > Transducer Type.
- Select the type of transducer you are using.
Creating a Waypoint on the Sonar Screen Using Your Present Location
- From a sonar view, select &.
- If necessary, edit the waypoint information.
Pausing the Sonar
Not all options are available on all models.
- Select an option:
- From the Traditional or Down Vü sonar screen, select 1 or
- From the SideVü sonar screen, select ~ or _
Creating a Waypoint on the Sonar Screen Using a Different Location
- 1 From a sonar view, pause the sonar.
- Select a location.
- Select J
- If necessary, edit the waypoint information.
Overlay Number Settings
You can customize the data shown on the sonar screen.
NOTE: Not all features are available on all devices. From a sonar screen, select E > Overlay Numbers.
- Navigation Inset: This shows the navigation inset when the vessel is navigating to a destination.
- Device Voltage: Shows the voltage of the device.
- Speed: Shows the vessel’s current speed.
- Time of Day: Shows the current time of day.
- Compass Tape: Shows the compass tape data bar.
- Depth: Shows the transducer’s current depth.
- Water Temp.: Shows the current water temperature.
Sonar Gain and Noise Settings
You can adjust the amount of gain and noise on a sonar screen. The gain setting controls the sensitivity of the sonar receiver to compensate for water depth and water clarity. Increasing the gain shows more detail, and decreasing the gain reduces screen clutter.
NOTE: Setting the gain on one page applies the setting to all the pages.
Setting the Gain Manually
- From a sonar screen, select > Gain.
- Select A or › until you begin to see noise in the water portion of the screen.
- Select ~ or ‹ to decrease the gain.
Setting the Gain Automatically
NOTE: To set the gain on the split-frequency screen, you must set each frequency separately.
- SelectE > Gain.
- Select Enable Auto Gain, if applicable.
- Select an option:
- To display higher sensitivity, weaker sonar returns with more noise automatically, select Auto High.
- To display medium-sensitivity sonar returns with moderate noise automatically, select Auto Med.
- To display lower-sensitivity sonar returns with less noise automatically, select Auto Low.
Hiding Surface Noise
You can hide or display the sonar returns near the surface of the water. Hiding surface noise helps reduce screen clutter.
NOTE: Setting the surface noise to show or hide on one screen applies that setting to all screens. This feature may not be available with all transducers.
- From a sonar screen, select; = > Sonar Setup > Noise Reject > Surface Noise.
Interference
The Interference setting adjusts sonar sensitivity to reduce the effects of interference from nearby sources of noise.
Setting the Interference
- From a sonar screen, select > Sonar Setup > Noise Reject > Interference.
- Select an option.
Setting the Bottom Search Limit
You can set a maximum depth at which the auto range feature searches for the bottom. A lower limit acquires data about the bottom faster than a higher limit.
- From a sonar screen, select = > Sonar Setup > Bottom Search Limit.
- Select a range.
Setting the Scroll Speed
You can set the rate at which the sonar image moves across the screen. A higher scroll speed shows more detail, especially while moving or trolling. A lower scroll speed displays sonar information on the screen longer. Setting the scroll speed on one sonar view applies to all the sonar views.
Configuring the Appearance of Suspended Targets
- NOTE: Configuring the appearance of suspended targets on one screen applies that setting to all screens.
- NOTE: This feature is not available on all sonar views.

- From a sonar screen, select Appearance > Fish Symbols.
- Select an option. ; > Sonar Setup >
Turning on the A-Scope
The a-scope is a vertical flasher along the right side of the full-screen sonar view. This feature expands the most recently received sonar data so that it is easier to see. It can also help detect fish that are close to the bottom.
- NOTE: This feature is not available on all sonar screens. From the full screen page, select = > Sonar Setup > Appearance > A-Scope

Device Configuration
System Settings Select Settings > System.
- Display: Adjusts the backlight brightness (Adjusting the Backlight, page 1) and color scheme (Adjusting the Color Mode, page 1).
- GPS: Provides information about the GPS satellite settings and fixes.
- Language: Sets the on-screen language.
- Simulator: Turns on the simulator and allows you to set the speed and simulated location.
- Beeper: Turns on and off the tone that sounds for alarms and selections (Setting the Beeper, page 1).
- Auto Power: Turns on the device automatically when power is applied.
- System Information: Provides information about the device and the software version.
- System Information Select Settings > Settings > System Information.
- Event Log: This allows you to view a log of system events.
- Software Information: Provides information about the device and the software version.
- Garmin Devices: Provides information about connected Garmin devices.
- Factory Settings: Restores the device to factory settings.
NOTE: This deletes any setting information you have entered.
Setting the Keel Offset
You can enter a keel offset to compensate the surface reading for the depth of a keel, making it possible to measure water depth or depth below the keel instead of depth below the transducer. Enter a positive number to offset for a keel. You can enter a negative number to compensate for a large vessel that may draw several feet of water.
- Complete an action, based on the location of the transducer:
- If the transducer is installed at the water line, measure the distance from the transducer location to the keel of the boat. Enter this value in steps 3 and 4 as a positive number to display the depth below the keel.
- If the transducer is installed at the bottom of the keel 2, measure the distance from the transducer to the water line. Enter this value in steps 3 and 4 as a negative number to display water depth. Enter a 0 in this value to display the depth below the keel and the depth below the transducer.

- Select Settings > My Vessel > Keel Offset.
- Select + or – based on the location of the transducer.
- Enter the distance measured in step 1
Restoring the Factory Default Settings
NOTE: This deletes all settings information you have entered
- Select > System > System Information > Factory Settings.
- Select an option.
Registering Your Device
Help us better support you by completing our online registration today.
- Go to http://my.garmin.com.
- Keep the original sales receipt, or a photocopy, in a safe place.
Specifications
Software License Agreement
BY USING THE DEVICE. YOU AGREE TO BE BOUND BY THE TERMS AND CONDITIONS OF THE FOLLOWING SOFTWARE LICENSE AGREEMENT. PLEASE READ THIS AGREEMENT CAREFULLY.
Garmin Ltd. and its subsidiaries (“Garmin”) grant you a limited license to use the software embedded in this device (the “Software”) in binary executable form in the normal operation of the product. Title, ownership rights, and intellectual property rights in and to the Software remain in Garmin and/or its third-party providers. You acknowledge that the Software is the property of Garmin and/or its third-party providers and is protected under the United States of America copyright laws and international copyright treaties. You further acknowledge that the structure, organization, and code of the Software, for which source code is not provided, are valuable trade secrets of Garmin and/or its third-party providers and that the Software in source code form remains a valuable trade secret of Garmin and/or its third-party providers. You agree not to decompile, disassemble, modify, reverse assemble, reverse engineer, or reduce to human readable form the Software or any part thereof or create any derivative works based on the Software. You agree not to export or re-export the Software to any country in violation of the export control laws of the United States of America or the export control laws of any other applicable country.
Troubleshooting
My device does not turn on
- Push the power cable into the back of the device. Even if the cable seems to be connected, you should push it firmly so that it is fully seated.
- Make sure the power source is generating power. You can check this in several ways. For example, you can check whether other devices powered by the source are functioning.
- Check the fuse in the power cable.
- The fuse should be located in a holder that is part of the red wire of the power cable. Check that the proper size fuse is installed. Refer to the label on the cable or the installation instructions for the exact fuse size needed. Check the fuse to make sure there is still a connection inside of the fuse. You can test the fuse using a multimeter. If the fuse is good, the multimeter reads 0 ohm.
- Check to make sure the device is receiving at least 10 Vdc, but 12 Vdc is recommended
- To check the voltage, measure the female power and ground sockets of the power cable for DC voltage. If the voltage is less than 10 Vdc, the device will not turn on.
My sonar does not work
- Push the transducer cable into the back of the device. Even if the cable seems to be connected, you should push it firmly so that it is fully seated.
- Check to make sure the sonar transmission is turned on.
FAQS About Garmin 010-01550-00 Striker 4 with Transducer
Can the Garmin Striker 4 go very deep?
Freshwater* 1,600 feet, saltwater* 750 feet
What frequency is the transducer in the Garmin Striker 4?
77/200 kHz
Is it necessary to submerge the Garmin transducer?
If the transducer is operated for a lengthy amount of time outside of the water, it may burn out and develop problems.
What type of transducer does the Garmin Striker 4 have?
The Garmin CHIRP (77/200 kHz) transducer found in the STRIKER 4 fishfinder offers noticeably more clarity and detail for fish and structure than conventional 77/200 kHz transducers.
How long does the battery on a Garmin Striker-4 last?
8h
The Garmin striker-4 is water resistant.
Water-resistant to IPX7.
What is the Garmin Striker-4’s amp capacity?
Your battery is a 9-amp, but the circuit requires 23 amps.
Can you ice fish with the Garmin Striker 4 transducer?
very useful for ice fishing.
What does the Garmin Striker 4’s scope mean?
The a-scope is a vertical flasher that runs along the right side of the image and displays what is currently visible beneath the transducer.
How is the Garmin Striker 4 propelled?
Lead-acid battery with 12 volts.
For more manuals by Garmin, Visit Manualsdock

