Escort M2 Smart Dash Cam
About Escort redar
At ESCORT, we’ve used patented sophisticated sensing technologies to create a premium driving experience. We’ve connected millions of vetted drivers, who are now sharing real-time alerts via our ESCORT Live mobile app.
Introduction
Congratulations! You’ve made the smart choice by purchasing an M2 Dash Cam from Escort. The Escort M2 camera provides peace of mind by continuously recording the road in beautiful HD video. With cutting-edge features, phenomenal video quality, and an industry-leading focus on user experience, the Escort M2 is the best solution to record your ride.
M2 DASH CAM FEATURES
- Front-View Lens
with 1080P Full HD Quality - Dual-Band Wi-Fi
Flawless Connectivity - 140° Field of View
- Embedded GPS
Location and Speed Information - Includes 16GB SD Card

PRODUCT SERVICE AND SUPPORT
For any questions about operating or installing this new Escort product, PLEASE CONTACT ESCORT FIRST…do not return this product to the retail store. The contact information for Escort will vary depending on the country in which you purchased and utilize the product. For the latest contact information, please go to www.escortradar.com/support
WHAT’S IN THE BOX
- M2 Camera
- USB Data Cable
- Long Bolt/Washers/Bracket for use with Windshield Mount
- Quick Start Guide

OPTIONAL ACCESSORIES – available at www.escortradar.com
Direct Wire: 0010058-1
Wires your dash cam and radar directly into the fuse box for a quick and clean installation without any dangling wires. Necessary to enable Parking Mode features on the Dash Cam.

HARDWARE INTERFACE


Note: Some components from your compatible detector’s mount will be used. Your M2 is pre-mounted on the Camera Mount Arm.
Attach ESCORT M2 to EZ Mag Mount™
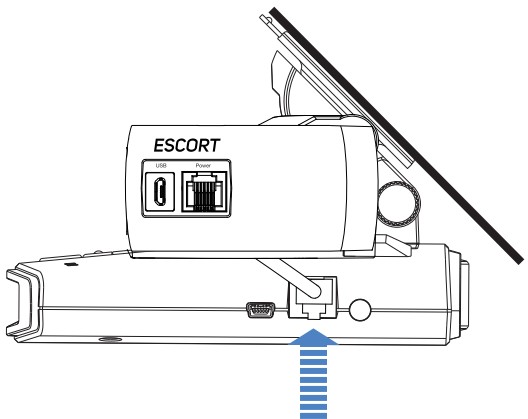
Remove your detector from the sticky mount and attach the M2 as shown below.
- Remove the Detector from the Windshield and Detach the EZ Mag Mount™

- Attach ESCORT M2 to Mount

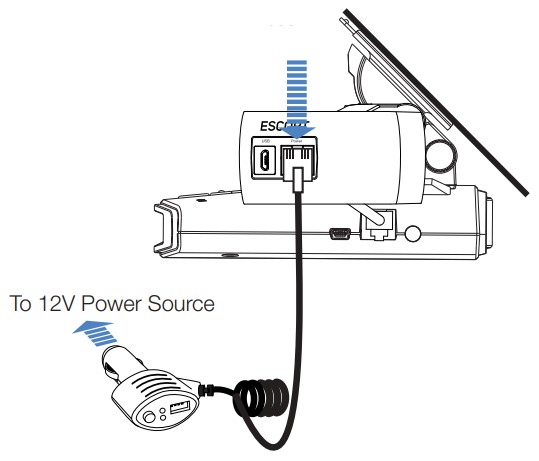
- Attach radar/laser detector to EZ Mag Mount™ with M2 installed

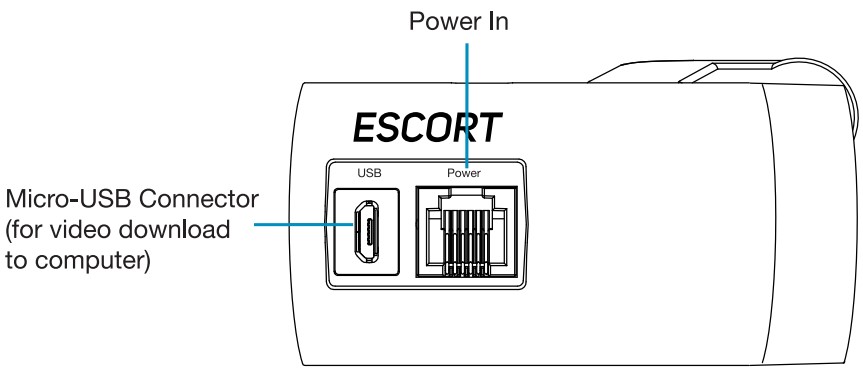
- Connect M2 power cable to radar/laser detector

Warning: Tighten Thumb Screw firmly to ensure stable video recordings
Operation
POWERING ON THE DEVICE
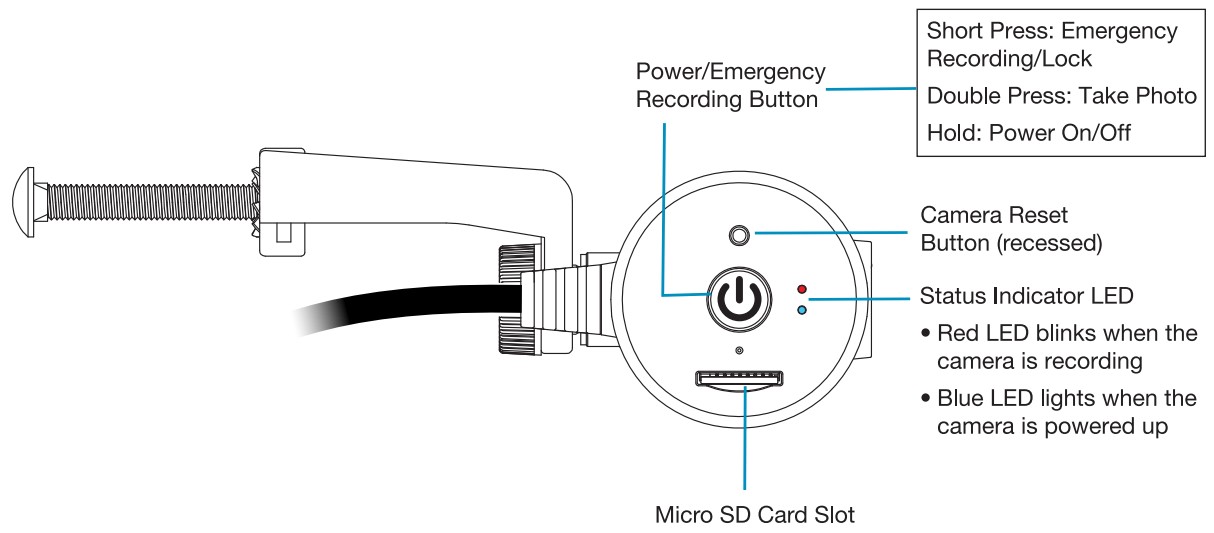
The device will power on automatically when plugged in and can also be powered by pressing and holding the Multifunction button until the LEDs activate (when connected to power).
LOOP RECORDINGS
Once the SD card is full, the camera will continuously overwrite the oldest footage recorded with recent recordings. To protect a clip so that it will not be overwritten, press the Multifunction button so that the clip is moved into the locked content partition.
EMERGENCY RECORDINGS
An Emergency Recording is triggered when the Multifunction button is pressed or when the G-Sensor registers a significant impact (hard braking or collision). Emergency Recordings create locked files that are not overwritten by Continuous Loop Recording. To ensure that important footage is not lost surrounding an incident, the prior video clip is locked if the incident happens within 30 seconds of the beginning or end of a clip.
MICRO SD MEMORY CARD
The device comes with a Micro SD memory card. To remove the SD card, press firmly on the SD card to push it further into the slot. There will be a click and the SD card will pop out on release. Extract the card and replace it as necessary by inserting a card into the slot and pressing it until it locks in place. This camera is compatible with Micro SD cards up to 128GB. Please be sure to format the card in-camera before use. Class 10 high-endurance cards from reputable brands are recommended for constant video recording of a dash camera.
VOLUME ADJUST
Models with LCD displays allow the user to select “Volume” in the settings menu to adjust the volume of notifications and voice announcements. Both products with LCD displays and allow for volume adjustment using the Drive Smarter Mobile App.
VOICE ANNOUNCEMENTS
Your M2 will use voice announcements to give you important camera system information when your SD card is full or an impact is detected
INITIAL SETUP
When first powered on, the device will automatically begin loop recording. To adjust dash cam settings, you will need to connect to the Drive Smarter mobile app. We strongly recommend pairing it with the Drive Smarter App to download the latest firmware and adjust the camera’s settings. Please follow the directions below to pair the app with the camera.
DRIVE SMARTER® APP CONNECTION
The M2 uses a Bluetooth® connection to the Drive Smarter app. Smartphone integration allows for:
- Cloud Video Management: Viewing your camera’s footage from the phone without having to connect the camera or SD card to a computer. From here you can download videos and save them to your phone
- Live-View: Viewing a live stream into the camera when within proximity of the camera’s Wi-Fi network.
- MayDay: Drive Smarter’s MayDay feature allows you to create an emergency contact and auto-upload your location and MayDay notice when the camera’s G-Sensor detects a severe impact/ collision.
- Over-The-Air Firmware Updates: Have the latest features and bug fixes loaded to your camera via the mobile application.
- Configure Camera Settings: Change your resolution, enable parking mode, set the date and time, and more through the app.

CONNECTION INSTRUCTIONS
- Start the Drive Smarter App and log in/create an account.
- Follow the instructions in the Drive Smarter App to create a vehicle and connect the camera
- When complete, a chime will sound on the camera and it will appear as Connected in the Drive Smarter App.
VIDEO SETTINGS
- Video Resolution:
This setting allows you to set the following resolutions on your M2. Higher resolutions will give you a clearer image but generate larger file sizes.
The available resolutions are:
- 1080P Full HD ……….. 1920×1080 30 Frames per Second
- 720P HD ………………. 1280×720 30 Frames per Second
- Loop Clip Time:
This setting allows you to control the duration of each individual movie clip on the device. Video clips can be set to durations of 1 minute, 2 minutes, or 3 minutes.
VIDEO AND PHOTO PLAYBACK MODE
This device stores video and pictures on its removable Micro SD Card. You can view the camera’s videos and photos using the Drive Smarter App or by removing the SD card and inserting it into your PC.

MEMORY CARD STORAGE

- Loop Recordings:
Once the SD card is full, the camera will continuously overwrite the oldest footage recorded with recent recordings. To protect a clip so that it will not be overwritten, press the Multifunction button while recording so that the clip is moved into the locked content partition. - Emergency Recordings:
An Emergency Recording is triggered when the Multifunction button is pressed or when the G-Sensor registers a significant impact (hard braking or collision). Emergency Recordings create locked files that are not overwritten by Continuous Loop Recording. To ensure that important footage is not lost surrounding an incident, the adjacent video clip is locked if the incident happens within 30 seconds of the beginning or end of a clip. - Photos:
Photos are automatically saved in the Locked partition of the SD card. Once your Locked Content partition is full of Events, Favorites, and/or Photos you will be asked to “Format the SD Card” by the camera. You can do this by formatting the SD card on your PC or by using the Drive Smarter App. This will delete your Locked content and make space for new content. Please save all important footage by downloading it via the Drive Smarter app or by manually uploading it to your PC.
SAFETY FEATURES
The M2 Dash Cam comes with several safety features designed to protect you and your vehicle. You can adjust the level of protection that fits you via Drive Smarter App settings.
G-Sensor Impact Detection:
The M2 Dash Cam includes a built-in G-Sensor which allows the device to determine when the car has been in a collision. If it detects a collision, it automatically locks the recording being made at the time of the accident. Additionally, if the event occurs within 30 seconds of the start or end of a clip, the adjacent recording will also be locked so you always have at least 30 seconds saved from before and after the event. You can use this setting to set the sensitivity of the G-Sensor from 1-3 or turn it off. Level 1 is the easiest to activate the G-sensor. Level 3 will only lock videos when the most severe impacts are detected. Locked videos created as a result of a G-sensor impact detection are stored in the Events folder on the SD card.
Parking Mode & Motion Detection:
Enable by connecting to the Drive Smarter app and enabling Parking Mode and/or Motion Detection. Parking Mode uses the Motion Sensor and G-Sensor to monitor while your vehicle is parked. When you are parked, the dash cam will be “sleeping”, but it will monitor surroundings for motion along with G-Sensor impacts. If it detects motion or if it detects an impact, then the unit will wake up and start recording.
The camera will enter parking mode after 5 minutes. If there is no motion during this period, the recording will stop (the camera monitors for g-sensor impacts or motion). If the motion is detected or if a G-sensor impact above Level 1 is triggered, the unit will wake up and start saving 1-minute clips for as long as the activity is being detected.
Notes:
- Parking Mode only works properly if the dash cam is powered. Either the Cigarette Lighter Socket must remain on with the ignition off, or the dash cam must be hardwired to a constant power source (use optional hardwire cord 0010058-1).
- If you park where there is lots of activity that keeps triggering the motion sensor, then the unit might never time out and enter the sleep state. For this, you can use the “Auto Surveillance Shutoff” setting to prevent unnecessary recording.
If leaving your vehicle off for more than 48 hours (or less if your battery is old) please use the “Auto Surveillance Shutoff” setting to set a time limit on Parking Mode and prevent your battery from being drained. - You can choose to have your camera monitor for impacts and/or motion by controlling the ‘Parking Mode’ and ‘Motion Detection’ settings separately.
GENERAL SETTINGS
Connect your M2 to the Drive Smarter App to configure the following settings.
- Video Resolution:
Allows you to select the desired video resolution for loop recordings and emergency videos. Lower resolution settings result in smaller file sizes, which makes the files easier to transfer and share. - Loop Clip Time:
Loop recordings and emergency videos can be saved in 1-minute, 2-minute, or 3-minute clips depending on your preference. Smaller (1 min) files are easier to transfer to your phone and share. - Wi-Fi:
Allows enabling/disabling WiFi connection on the device and viewing the camera’s WiFi name and password. - GPS:
GPS can be disabled if needed. Enabling this setting allows your recordings to have an exact GPS location stamped on the footage. This also always allows you to know the location of your vehicle if the camera is wired via a hardwire kit and connected to a Wi-Fi hotspot installed in the car. - Date/Time:
- Enable “Automatic” mode to have date/time settings based on the camera’s GPS signal. Having the correct date and time ensures that timestamps associated with your videos are accurate. In this mode, you will still have to ensure that you have picked the correct “Time Zone” and enabled or disabled “Daylight Savings” based on your location.
- To manually set the date and time, cursor down to “Manual”, and select it. You will now be able to enter the Date and Time information.
- Microphone:
The microphone can be enabled or disabled via settings or on the main screen. When disabled your recorded videos will be silent. - Motion Detection:
Enabling Motion Detection allows your camera to monitor movement around the camera (changes in light) which can be used to record any suspicious activity around the vehicle when parked. This setting screen allows you to choose which of the available cameras should be used to monitor for activity. If leaving your vehicle off for more than 48 hours (or less if your battery is old) please use the “Auto Surveillance Shutoff” setting to set a time limit on Motion Detection to prevent your battery from being drained.
Note: For Motion Detection to work the camera needs to be connected via a hardwire kit (part: 0010058-1) or be plugged into an ‘always on’ Cigarette Lighter Socket. You can check if your vehicle has an ‘always on’ CLA adapter online or in the vehicle’s owner’s manual.
- Parking Mode:
Enabling Parking Mode allows your camera to monitor for changes in its internal G-Sensor/accelerometer. Bumps, Collisions, and break-ins can trigger the G-Sensor to save valuable footage from the moment of impact. If leaving your vehicle off for more than 48 hours (or less if your battery is old) please use the “Auto Surveillance Shutoff” setting to set a time limit on Motion Detection and prevent your battery from being drained.
Note: For Parking Mode to work the camera needs to be connected via a hardwire kit (part: 0010058-1) or be plugged into an ‘always on’ Cigarette Lighter Socket. You can check if your vehicle has an ‘always on’ CLA adapter online or in the vehicle’s owner’s manual.
- Surveillance Auto Shutoff:
If leaving your vehicle off for more than 48 hours (or less if your battery is old) please use the “Auto Surveillance Shutoff” setting to set a time limit on Motion Detection and Parking Mode to prevent your battery from being drained. - G-Sensor:
You can use this setting to set the sensitivity of the G-Sensor from 1-3 or turn it off. Level 1 is the easiest to activate the G-sensor. Level 3 is the setting that will only lock videos when the most severe impacts are detected. Level 1 is recommended for most users. - Watermark (Date/Time, Speed, GPS, Driver ID Video Stamp)
The watermark settings allow you to toggle having the date/time, speed, GPS coordinates, the Escort logo, and a custom Driver ID stamped into the bottom of all recorded video. - Driver ID Watermark:
This setting allows you to associate a Driver ID with the camera (for example: John, Employee 12, or a license plate number, etc). This allows you to set the name of the driver which will be stamped on the footage as part of the watermark. - Exposure:
Allows you to adjust how light or dark videos and images will appear on the camera. - Drive Smarter Services:
These settings allow you to select which videos you would like auto-uploaded to the Drive Smarter App for sharing/review. You can also choose to have Incident Reports sent to your insurance provider, as well as Mayday alerts sent to your Emergency Contact if a severe G-Sensor event is detected. - Speed Units:
Choose between miles/hour or kilometers/hour as the speed unit stamped in the watermark
Firmware Updates
Ensure the camera is connected to a constant power source during the update process. Failure to do so could result in your unit becoming non-functional. Your vehicle cigarette lighter socket or a household outlet works best.
Using the Drive Smarter App
- Power up your camera by connecting to a constant power source such as your vehicle’s CLA adapter or a household outlet.
- When you Connect your camera, the app will check if a newer firmware update is available on the server.
- Press ‘Download’ on the notification to download the latest Firmware.
- Follow the instructions on the Drive Smarter App. If successful, the camera’s LEDs will begin blinking while the firmware is being installed.
- To confirm that the Firmware update was successful, you can check the ‘About’ screen in your camera’s settings menu.
Using a Mac or PC
For optimal performance, check www.drivesmarter.com periodically for software updates.
- Connect the dash cam to your computer using the included USB to Micro-USB cable.
- The camera will be listed in Windows Explorer/Finder.
- Download the update file from www.drivesmarter.com and save it to your computer. It will end with “.bin” as the file extension. Note: You do not need to double-click or open this file on the computer.
- Copy/paste the .bin file you downloaded into the root directory into the root directory of the Camera’s SD Card.
- Wait for the file to transfer and then safely disconnect the Dash Cam from the computer. The Dash Cam will turn off.
- Plug the Micro USB cord into a reliable power source such as your home’s outlet or your vehicle’s CLA adapter. The Dash Cam will turn on and automatically boot into the Firmware Update Menu.
- Follow the directions on the camera display to update firmware if the unit has one. Units without displays will update automatically.
- You can check if your camera is up to date by checking the firmware in your camera’s ‘About’ setting submenu in the camera or via the app.
Troubleshooting
If your unit does not appear to be operating properly, please follow these troubleshooting steps:
- Make sure the power cord is properly connected.
- Make sure the socket of your vehicle’s cigarette lighter is clean and free of corrosion.
- Make sure the power cord’s cigarette lighter adapter is firmly seated in your cigarette lighter.
- Make sure you have downloaded the latest firmware to your unit.
Warranty
LIMITED 1-YEAR WARRANTY
Escort, Inc. (“Escort”) warrants that this product and the component parts thereof will be free of defects in workmanship and materials for a period of one year from the date of the first consumer purchase. This warranty may be enforced by the first consumer purchaser. If the product is under warranty, it will be repaired or exchanged depending on the model as determined at Escort’s sole discretion. Such remedy shall be your sole and exclusive remedy for any breach of warranty.
The procedure for obtaining service and support, and the applicability of this warranty, will vary depending on the country or jurisdiction in which you purchased and utilized the product. For details on obtaining product service, support, and warranty please visit https://www.escortradar.com/pages/contact-us Provided that the product is utilized within the U.S.A.- Escort will, without charge, repair, or replacement, at its option, defective products, products or component parts upon delivery to the Escort Factory Service department, accompanied by proof of the date of first consumer purchase, such as a duplicated copy of a sales receipt.
You must pay any initial shipping charges required to ship the product for warranty service, but the return charges, to an address in the U.S.A., will be at Escort’s expense if the product is repaired or replaced under warranty.
This warranty gives you specific legal rights, and you may also have other rights which may vary from state to state and country to country.
Exclusions
This limited warranty does not apply:
- To any product damaged by accident;
- In the event of misuse, ordinary wear, failure to follow directions, or improper maintenance of the product or as a result of unauthorized alterations or repairs;
- If the serial number has been altered, defaced, or removed;
- If the product was purchased or is utilized in a jurisdiction not covered by the limited warranty.
All implied warranties, including warranties of merchantability and fitness for a particular purpose, are limited in duration to the length of this warranty. Escort shall not be liable for any incidental, consequential, or other damages; including, without limitation, damages resulting from loss of use or cost of installation.
Some states and countries do not allow limitations on how long an implied warranty lasts and/or do not allow the exclusion or limitation of incidental or consequential damages, so the above limitations may not apply to you. This warranty gives you specific legal rights, and you may also have other rights that vary from state to state and country to country.
FAQs about Escort M2 Smart Dash Cam
What does the m2 dash cam’s parking mode do?
In the case of a bump or collision while parked, parking mode enables you to save priceless footage (hardwire connection required). DUAL-BAND WI-FI – Ensure an error-free connection to the cloud and get alerts and updates for your program automatically.
What distinguishes an M1 dash cam from an M2 dash cam?
Both dash cams offer Full HD 1080P video in crystal clear quality, but the M2 has more sophisticated capabilities like dual-band Wi-Fi networking, built-in GPS, and cloud video management.
What is the M2 memory card’s speed?
All mobile phones with M2 slots and devices with memory stick pro duo slots are compatible with M2 when an adapter is used. Storage capacity of 8 GB. 15 Mbps or more as the minimum write speed.
What is the M2 SD card’s speed?
The Memory Stick Micro (M2) has capacities of 64 MB, 128 MB, 256 MB, 512 MB, 1 GB, 2 GB, 4 GB, 8 GB, and 16 GB and measures 15 12.5 1.2 mm (approximately one-quarter the size of the Duo). The greatest transmission speed possible with this format is 160 Mbit/s, with a theoretical limit of 32 GB.
When parked, do you remove the dash camera?
In order to prevent your car from being broken into, it is a good idea to take your dash camera out once you have parked. It is recommended to put your camera in a discrete location if you have parking mode on it or want to keep it in your car.
Does the battery drain in parking mode?
The Parking Mode Cable makes an effort to stop the dash cam from completely draining the battery, making it impossible to start the car. The efficiency of this feature, however, can be constrained by the battery’s capacity degrading due to the vehicle’s age and temperature.
When the automobile is not in motion, can the dash camera record?
Yes, dash cams from manufacturers like Momento do capture activities around your car even while the engine is off. This is made possible by a function known as “Parking mode”. Even while the engine is off, your dash cam might keep recording in parking mode.
For my escort m2 dash cam, how can I format my SD card?
The dash cam’s micro SD card is correctly positioned. Connect the dash cam to the Drive Smarter app, access the settings menu, and format the micro SD card if the error persists after checking steps 1 and 2. Please be aware that after formatting, all videos will be deleted from the micro SD card.
GPS on a dash camera?
While you’re driving, GPS captures precise speed and location information for your dash cam. This will record the precise location of your car and display the path you have taken as well as your current speed. This is important for determining the precise location of an occurrence, which is important for an insurance claim.
How do dash cameras automatically start recording?
Dash cameras are made to record continuously while your car is running. Most cameras power up and start functioning as soon as they are plugged into a 12V power source or hardwired into the car’s fuse box, while several cameras allow you to manually turn the power on or off.
For more manuals by Escort redar, visit Manualsdock


