
Epson SureColor P7000 Standard Edition Printer
About EPSON
One of the biggest producers of computer printers and equipment for information and imaging is the Japanese multinational electronics corporation Seiko Epson Corporation, also known as Epson.
Introduction to Your Printer
Refer to these sections to learn more about your printer and this manual.
- Printer Features
- Notations Used in the Documentation
- Printer Part Locations
Printer Features
The Epson SureColor P6000/P7000/P8000/P9000 Series printers include these special features:
High productivity
- Precise Piezo-based print head capable of 8 or 10 channels with 360 nozzles per inch
- Available 150, 300, or 700 ml large-capacity ink cartridges
- Optional internal print server offloads print data from computer and network quickly
Reliability
- User-scheduled cleaning cycles improve print head health over prolonged idle periods
- Ink-repellant print head surface for reduced nozzle clogging
High resolution
- Prints at resolutions up to 2880 x 1440 dpi
- Supports variable-sized droplet technology as small as 3.5 picoliter
Easy-to-use setup and operation
- Intuitive, easy-to-read, color LCD display
- Front-loaded media for easy access
- Easy-to-use software
Optional Equipment and Replacement Parts
- Parent topic: Introduction to Your Printer
Optional Equipment and Replacement Parts
For information on how to purchase genuine Epson ink, accessories, and paper visit epson.com (U.S. sales) or epson.ca (Canadian sales). You can also purchase accessories from an Epson-authorized reseller. To find the nearest one, call 800-GO-EPSON (800-463-7766).
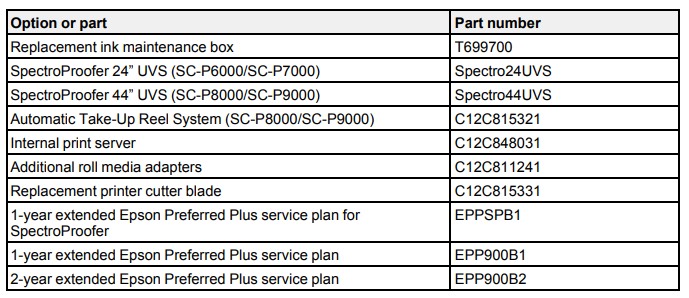
Parent topic: Printer Features
Notations Used in the Documentation
Follow the guidelines in these notations as you read your documentation:
- Warnings must be followed carefully to avoid bodily injury.
- Cautions must be observed to avoid damage to your equipment.
- Notes contain important information about your printer.
- Tips contain additional printing information.
- Parent topic: Introduction to Your Printer
Printer Part Locations
Check the printer part illustrations to learn about the parts on your printer.
- Product Parts – Front
- Product Parts – Back
- Control Panel Parts
- Parent topic: Introduction to Your Printer
Product Parts
Front

- Front cover
- Left and right ink bays
- Paper basket
- Casters
- Paper supports
- Manual holder
- Control panel
- Paper feed slot
- Roll paper cover
- Roll paper holder
Parent topic: Printer Part Locations
Back
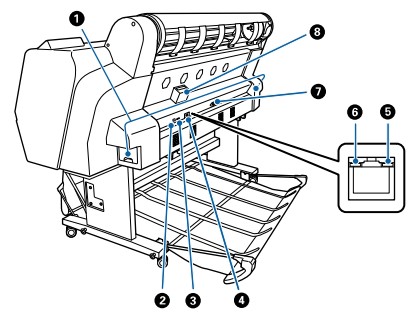
- Maintenance box
- USB port
- Interface for optional equipment
- LAN port
- LAN data light
- LAN status light
- AC inlet
- Slot for optional internal print server
Parent topic: Printer Part Locations
Control Panel Parts
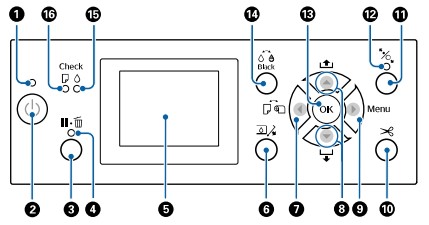
- The power light
- The power button
- The pause/cancel button
- The pause/cancel light
- LCD screen
- The open ink cover button
- The paper source and left arrow button
- The paper feed and arrow buttons
- The Menu and right arrow button
- The paper-cut button
- The load paper button
- The load paper light
- The OK button
- The Black ink button
- The Check ink light
- The Check paper light
LCD Screen Display
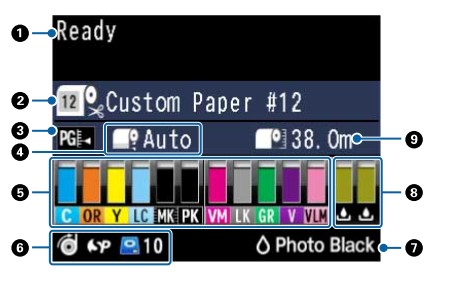
- Status messages
- Paper source and the selected Paper Type The icon indicates the current paper source settings. The selected Paper Type is listed to the right of the icon.
- Roll paper with Auto Cut enabled
- Roll paper with Auto Cut disabled
- Cut sheet paper
- Platen gap setting
- Standard
- Narrow
- Wide
- Wider
- Widest
- Roll paper margin setting
- Ink status
- Amount of ink remaining in the cartridge
- The ink level is low
- The ink cartridge is expended
- Ink error; check the status message on the LCD screen
- Optional accessory status (if applicable)
- Auto-Take Up Reel (SC-P8000/SC-P9000 only)
- SpectroProofer®
- An optional Internal Print Server is installed
- An optional Internal Print Server is being accessed
- Photo Black or Matte Black ink selected
- Press the Black ink button to switch cartridge types
- Maintenance box status
- Amount of space remaining in the maintenance box
- The maintenance box is nearing the end of its service life
- The maintenance box is full
- Roll paper remaining
Parent topic: Printer Part Locations
Media Handling
See these sections to load and handle media on your product.
- Roll Paper Handling
- Cut Sheet Handling
- Using the Paper Basket
- Creating Paper Configurations
- Using the Auto Take-up Reel
- Available Epson Papers
- Borderless Paper Type Compatibility
Roll Paper Handling
See these sections to load, cut, and remove roll paper in your product.
- Loading Roll Paper
- Cutting Roll Paper
- Removing Roll Paper
- Parent topic: Media Handling
Loading Roll Paper
You can load roll paper with a 2- or 3-inch core and a width of up to 24 inches (61 cm) (SC-P6000/SCP7000) or 44 inches (112 cm) (SC-P8000/SC-P9000).
- Open the roll paper cover.
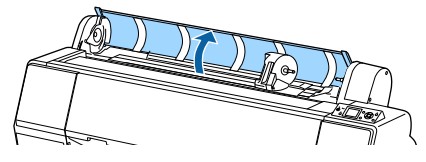
- Firmly push down the lock lever on the roll paper holder and move the holder to the left.
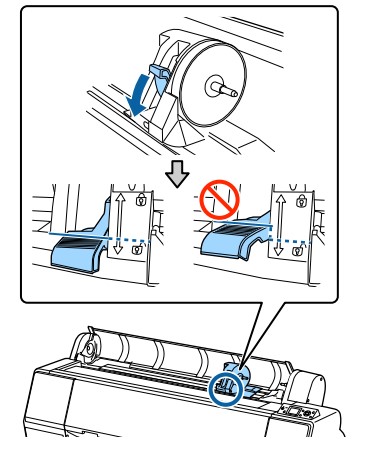
Note: Make sure you push the lock lever down to unlock it completely. - Place the roll paper on top of the printer.

- If necessary, slide the tabs on the roll media adapters to the position that matches the core size of the roll paper

- Release the tension levers on both roll media adapters.
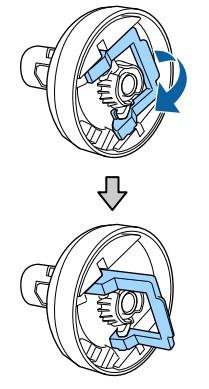
- Push the adapters into the paper core at both ends of the roll. Then push down the tension levers

- Move the roll paper to the right side until it touches the roll paper guide.

- Slide the roll paper holder until the left adapter aligns with the arrow on the holder.

- Roll the paper slowly into position.

- Slide the roll paper holder to the right to secure it in the printer. Make sure both ends of the roll paper are secured in the adapters.
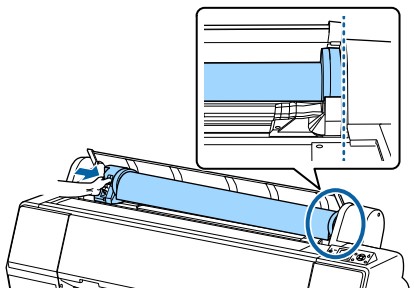
- Pull up the lock lever on the roll paper holder to it in place.

- If the load paper light is not on, press the load paper button.
- Insert the paper into the paper feed slot and pull it down until the edge of the paper is even with the center of the stand.

Note: If the paper does not feed through the slot, you may need to decrease the suction by pressing the paper feed button. Make sure you return the suction to its default setting after the paper is loaded. - Close the roll paper cover.

Note: To prevent dust from accumulating inside the printer, always keep the roll paper cover closed unless you are loading or unloading media. - Press the load paper button.
Note: An uneven or damaged leading edge on the roll paper may cause loading issues. Press the paper cut button once within 3 seconds of pressing the load paper button to trim the edge of the roll paper. - Press the pause/cancel button to move the paper into the printing position or wait for the paper to move into position automatically.
- On the screen that appears, select one of the following settings:
- If the paper settings are correct, select Keep Settings Above.
- Select Change Settings so you can adjust the settings.
- Press the OK button.
To avoid indenting or creasing the paper, remove it from the paper path and roll it up when you are not printing.
Note: Store roll paper on its end or horizontally (if the packaging end-caps are installed). Never store roll paper on its edge, as a flat spot can develop and lead to imaging artifacts on the prints.
Parent topic: Roll Paper Handling
FAQs Epson SureColor P6000 Standard Edition Printer
What is the Epson SureColor P7000 Standard Edition Printer?
The Epson SureColor P7000 is a large-format inkjet printer designed for professional use in photography, fine art, and graphic design.
What are the key features of the Epson SureColor P7000 Standard Edition Printer?
Some of the key features of the Epson SureColor P7000 include its 10-color UltraChrome HDX ink system, high-capacity ink cartridges, advanced media handling capabilities, and high-resolution printing up to 2400 x 1200 dpi.
What types of media can the Epson SureColor P7000 Standard Edition Printer handle?
The Epson SureColor P7000 can handle a wide range of media types, including glossy, luster, matte, fine art, and even thicker board stocks up to 1.5mm thick.
What is the maximum printable width of the Epson SureColor P7000 Standard Edition Printer?
The maximum printable width of the Epson SureColor P7000 is 24 inches.
What is the difference between the Standard and Designer Editions of the Epson SureColor P7000?
The Standard Edition of the Epson SureColor P7000 is designed for general-purpose use, while the Designer Edition includes a built-in spectrophotometer and software for color matching and calibration for more precise color management.
What is the price of the Epson SureColor P7000 Standard Edition Printer?
The price of the Epson SureColor P7000 Standard Edition varies depending on the retailer, but it typically ranges from $2,800 to $3,500.
What operating systems are compatible with the Epson SureColor P7000 Standard Edition Printer?
The Epson SureColor P7000 is compatible with Windows and Mac operating systems.
What is the warranty on the Epson SureColor P7000 Standard Edition Printer?
The Epson SureColor P7000 comes with a standard one-year warranty, which can be extended with an optional Epson Service Agreement.
For more manuals by EPSON, Visit Manualsdock
[embeddoc url=”https://manualsdock.com/wp-content/uploads/2023/03/Epson-SureColor-P6000-Standard-Edition-Printer.pdf” download=”all”]


