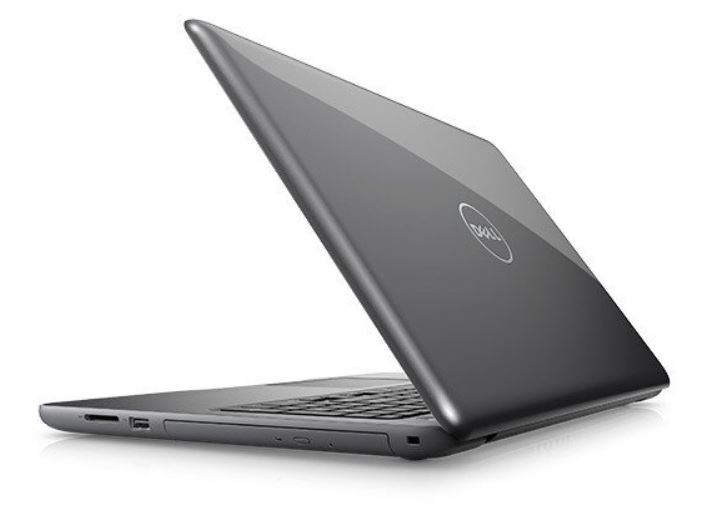
Dell Inspiron 15 5000 Series Laptop
About DELL
Dell is an American multinational computer technology company that designs, develops, and sells personal computers, servers, data storage devices, network switches, software, computer peripherals, and other technology-related products and services. The company was founded in 1984 by Michael Dell, who started selling computers from his dorm room at the University of Texas at Austin.
Today, Dell is one of the world’s largest technology companies, with a presence in more than 180 countries and territories. Its products are used by individuals, small businesses, and large corporations, and the company is known for its innovative designs, quality products, and customer support. In addition to its hardware and software products, Dell offers a range of services, including consulting, support, and managed services.
Before working inside your computer
NOTE: The images in this document may differ from your computer depending on the configuration you ordered.
Before you begin
- Save and close all open files and exit all open applications.
- Shut down your computer. Click Start > Power > Shut down.
NOTE: If you are using a different operating system, see the documentation of your operating system for shut-down instructions. - Disconnect your computer and all attached devices from their electrical outlets.
- Disconnect all attached network devices and peripherals, such as keyboard, mouse, and monitor from your computer.
- Remove any media card and optical disc from your computer, if applicable.
After working inside your computer
CAUTION: Leaving stray or loose screws inside your computer may severely damage your computer.
Steps
- Replace all screws and ensure that no stray screws remain inside your computer.
- Connect any external devices, peripherals, or cables you removed before working on your computer.
- Replace any media cards, discs, or any other parts that you removed before working on your computer.
- Connect your computer and all attached devices to their electrical outlets.
- Turn on your computer
Removing the optical drive
NOTE: Before working inside your computer, read the safety information that shipped with your computer and follow the steps in Before working inside your computer. After working inside your computer, follow the instructions in After working inside your computer. For more safety best practices, see the Regulatory Compliance home page at www.dell.com/regulatory_compliance.
Procedure
Steps
- Remove the screw that secures the optical-drive assembly to the base cover.
- Using a plastic scribe, push the optical drive through the screw hole to release the optical-drive assembly.
- Slide the optical-drive assembly out of the optical-drive bay
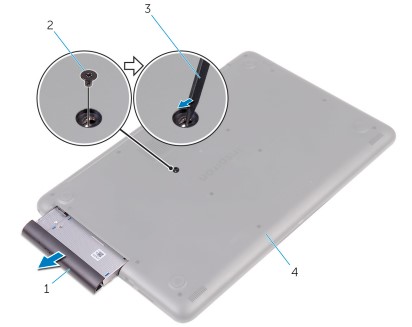
- optical-drive assembly
- M2x4 screw
- plastic scribe
- base cover
- Remove the screws that secure the optical-drive bracket to the optical drive.
- Remove the optical-drive bracket.
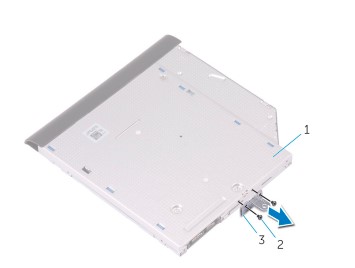
- optical drive
- M2x3 screws (2)
- optical-drive bracket
- Pull the optical-drive bezel carefully to remove it from the optical drive.
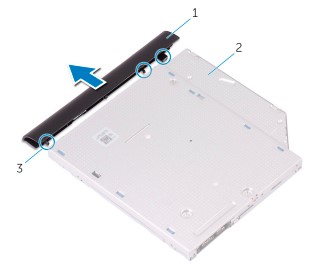
- optical-drive bezel
- optical drive
- tabs (3)
Replacing the optical drive
NOTE: Before working inside your computer, read the safety information that shipped with your computer and follow the steps in Before working inside your computer. After working inside your computer, follow the instructions in After working inside your computer. For more safety best practices, see the Regulatory Compliance home page at www.dell.com/regulatory_compliance.
Procedure
Steps
- Align the tabs on the optical-drive bezel with the slots on the optical drive and snap the optical-drive bezel into place.
- Align the screw holes on the optical-drive bracket with the screw holes on the optical drive.
- Replace the screws that secure the optical-drive bracket to the optical drive.
- Slide the optical-drive assembly into the optical-drive bay.
- Align the screw hole on the optical-drive bracket with the screw hole on the base cover.
- Replace the screw that secures the optical-drive assembly to the base cover.
Replacing the base cover
NOTE: Before working inside your computer, read the safety information that shipped with your computer and follow the steps in Before working inside your computer. After working inside your computer, follow the instructions in After working inside your computer. For more safety best practices, see the Regulatory Compliance home page at www.dell.com/regulatory_compliance.
Procedure
Steps
- Connect the battery cable to the system board, if applicable.
CAUTION: To avoid accidental damage to the power-adapter port, do not press the base cover against the power-adapter port when you snap the base cover to the computer base. - Place the base cover on the palm rest and keyboard assembly, and snap the base cover into place starting from the power adapter port.
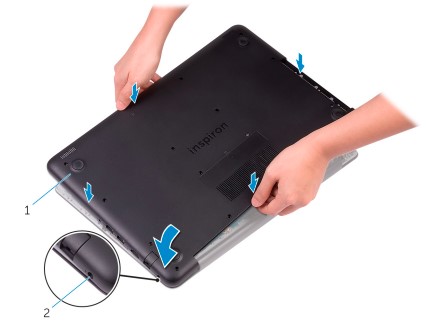
- base cover
- power-adapter port
- Replace the screws that secure the base cover with the palm rest and keyboard assembly.
Replacing the hard drive
NOTE: Before working inside your computer, read the safety information that shipped with your computer and follow the steps in Before working inside your computer. After working inside your computer, follow the instructions in After working inside your computer. For more safety best practices, see the Regulatory Compliance home page at www.dell.com/regulatory_compliance.
CAUTION: Hard drives are fragile. Exercise care when handling the hard drive.
Procedure
Steps
- Align the screw holes on the hard-drive bracket with the screw holes on the hard drive.
- Replace the screws that secure the hard-drive bracket to the hard drive.
- Connect the interposer to the hard-drive assembly.
- Align the screw holes on the hard-drive assembly with the screw holes on the palm rest and keyboard assembly.
- Replace the screws that secure the hard-drive assembly to the palm rest and keyboard assembly.
- Connect the hard-drive cable to the system board and close the latch to secure the cable.
Post-requisites
Steps
- Replace the I/O board.
- Replace the base cover.
- Replace the optical drive.
Removing the battery
NOTE: Before working inside your computer, read the safety information that shipped with your computer and follow the steps in Before working inside your computer. After working inside your computer, follow the instructions in After working inside your computer. For more safety best practices, see the Regulatory Compliance home page at www.dell.com/regulatory_compliance.
Lithium-ion battery precautions
CAUTION:
- Exercise caution when handling Lithium-ion batteries.
- Discharge the battery completely before removing it. Disconnect the AC power adapter from the system and operate the computer solely on battery power—the battery is fully discharged when the computer no longer turns on when the power button is pressed.
- Do not crush, drop, mutilate, or penetrate the battery with foreign objects.
- Do not expose the battery to high temperatures, or disassemble battery packs and cells.
- Do not apply pressure to the surface of the battery.
- Do not bend the battery.
- Do not use tools of any kind to pry on or against the battery.
- Ensure any screws during the servicing of this product are not lost or misplaced, to prevent accidental puncture or damage to the battery and other system components.
- If the battery gets stuck inside your computer as a result of swelling, do not try to release it as puncturing, bending, or crushing a lithium-ion battery can be dangerous. In such an instance, contact Dell technical support for assistance. See www.dell.com/contactdell.
- Always purchase genuine batteries from www.dell.com or authorized Dell partners and resellers.
- Swollen batteries should not be used and should be replaced and disposed of properly. For guidelines on how to handle and replace swollen Lithium-ion batteries, see Handling swollen Lithium-ion batteries.
Prerequisites
Steps
- Remove the optical drive.
- Remove the base cover.
- Remove the I/O board.
- Remove the hard drive.
Procedure
Steps
- Remove the screws that secure the battery bracket to the system board and palm rest and keyboard assembly.
- Lift and remove the battery bracket.
Replacing the system-board assembly
NOTE: Before working inside your computer, read the safety information that shipped with your computer and follow the steps in Before working inside your computer. After working inside your computer, follow the instructions in After working inside your computer. For more safety best practices, see the Regulatory Compliance home page at www.dell.com/regulatory_compliance.
NOTE: Your computer’s Service Tag is stored in the system board. You must enter the Service Tag in the BIOS setup program after you replace the system board.
NOTE: Replacing the system board removes any changes you have made to the BIOS using the BIOS setup program. You must make the appropriate changes again after you replace the system board.
Procedure
Steps
- Replace the heat-sink assembly.
- Connect the power adapter port cable and power button board cable to the back of the system board.
- Carefully turn the system board over.
- Using the alignment post, place the system board on the palm rest and keyboard assembly.
- Align the screw hole on the system board with the screw hole on the palm and keyboard rest assembly.
- Replace the screw that secures the system board to the palm rest and keyboard assembly.
- Replace the screw that secures the heat-sink assembly to the system board.
- Slide the speaker cable and coin-cell battery cable into the connectors on the system board.
- Slide the touch-pad cable, keyboard backlight cable, and keyboard cable into the connectors and close the latches.
- Slide the status-light board cable into the connector on the system board and close the latch.
- Connect the optical-drive interposer cable to the system board and the optical-drive interposer.
- Close the latch that secures the optical-drive interposer cable to the system board.
- Close the right display hinge.
- Connect the display cable to the system board.
- Replace the screws that secure the right display hinge to the palm rest and keyboard assembly.
Post-requisites
Steps
- Replace the wireless card.
- Replace the memory modules.
- Replace the battery.
- Replace the hard drive.
- Replace the I/O board.
- Replace the base cover.
- Replace the optical drive.
Troubleshooting
Diagnostics
Power and battery-status light/hard-drive activity light Indicate the battery-charge status or the hard-drive activity.
NOTE: Press Fn+H to toggle this light between the power and battery-status light and hard-drive activity light.
Hard-drive activity light
Turns on when the computer reads from or writes to the hard drive.
Power and battery-status light
Indicates the power and battery-charge status.
- Solid white — The power adapter is connected and the battery has more than 5 percent charge.
- Amber — The computer is running on battery and the battery has less than 5 percent charge.
Off
- The power adapter is connected and the battery is fully charged.
- The computer is running on battery and the battery has more than 5 percent charge.
- A computer is in a sleep state, hibernation, or turned off.
The power and battery-status light blinks amber along with beep codes indicating failures. For example, the power and battery-status light blinks amber two times followed by a pause, and then blinks white three times followed by a pause. This 2,3 pattern continues until the computer is turned off indicating no memory or RAM is detected. The following table shows the different power and battery-status light patterns and the problems that each light pattern indicates.
Light patterns
|
Light pattern |
Problem description |
|
2,1 |
CPU failure |
|
2,2 |
System board: BIOS and ROM failure |
|
2,3 |
No memory or RAM detected |
|
2,4 |
Memory or RAM failure |
|
2,5 |
Invalid memory installed |
|
2,6 |
System board or chipset error |
|
2,7 |
LCD failure |
|
3,1 |
CMOS battery failure |
|
3,2 |
PCI or video card or chip failure |
|
3,3 |
Recovery image not found |
|
3,4 |
Recovery image found but invalid |
Handling swollen Lithium-ion batteries
Like most laptops, Dell laptops use lithium-ion batteries. One type of lithium-ion battery is the lithium-ion polymer battery.
Lithium-ion polymer batteries have increased in popularity in recent years and have become standard in the electronics industry
due to customer preferences for a slim form factor (especially with newer ultra-thin laptops) and long battery life. Inherent to
lithium-ion polymer battery technology is the potential for swelling of the battery cells.
The swollen battery may impact the performance of the laptop. To prevent possible further damage to the device enclosure or
internal components leading to malfunction, discontinue the use of the laptop and discharge it by disconnecting the AC adapter
and letting the battery drain.
Swollen batteries should not be used and should be replaced and disposed of properly. We recommend contacting Dell product
support for options to replace a swollen battery under the terms of the applicable warranty or service contract, including options for replacement by a Dell-authorized service technician.
The guidelines for handling and replacing Lithium-ion batteries are as follows:
- Exercise caution when handling Lithium-ion batteries.
- Discharge the battery before removing it from the system. To discharge the battery, unplug the AC adapter from the system and operate the system only on battery power. When the system will no longer power on when the power button is pressed, the battery is fully discharged.
- Do not crush, drop, mutilate, or penetrate the battery with foreign objects.
- Do not expose the battery to high temperatures, or disassemble battery packs and cells.
- Do not apply pressure to the surface of the battery.
- Do not bend the battery.
- Do not use tools of any type to pry on or against the battery.
- If a battery gets stuck in a device as a result of swelling, do not try to free it as puncturing, bending, or crushing a battery can be dangerous.
- Do not attempt to reassemble a damaged or swollen battery into a laptop.
- Swollen batteries that are covered under warranty should be returned to Dell in an approved shipping container (provided by Dell)—this is to comply with transportation regulations. Swollen batteries that are not covered under warranty should be disposed of at an approved recycling center. Contact Dell product support at https://www.dell.com/support for assistance and further instructions.
- Using a non-Dell or incompatible battery may increase the risk of fire or explosion. Replace the battery only with a compatible battery purchased from Dell that is designed to work with your Dell computer. Do not use a battery from other computers with your computer. Always purchase genuine batteries from https://www.dell.com or otherwise directly from Dell.
Lithium-ion batteries can swell for various reasons such as age, number of charge cycles, or exposure to high heat. For more
information on how to improve the performance and lifespan of the laptop battery and to minimize the possibility of occurrence
of the issue,
FAQS Dell Inspiron 15 5000 Series Laptop
How long does the battery last on the Dell Inspiron 15?
The Dell Inspiron 15 (3525) features a subpar display and a respectable battery life, but everything just seems poorer when compared to the competition. First, let’s examine the positive news. In our testing, the 41Wh battery of the Inspiron allowed it to operate for more than 9 hours.
Dell Inspiron 15 5000’s screen size is 15 inches.
16 inches
Is there a graphics card in the Dell Inspiron 15 5000?
Windows 10 laptop Dell Inspiron 15 5000 sports a 15.60-inch screen with a 1920×1080 resolution. It has an 8GB RAM configuration and a Core i5 processor. The 256GB HDD storage on the Dell Inspiron 15 5000 is generous.
How long does the battery on a Dell Inspiron last?
A Dell laptop battery has a typical lifespan of 6 to 7 hours per charge and may withstand up to 1000 recharge cycles before needing to be replaced. However, this data could change depending on a number of variables. The content of this article will be thoroughly examined.
How long does a Dell laptop battery last when completely charged?
The typical laptop battery life is between one and ten hours after a single full charge and after unplugging the power adapter. This duration is determined by the battery’s age, its capacity (mAH), the activity being performed on the laptop, and its capacity.
Is the touchscreen on the Dell Inspiron 15 5000 Series?
You may personalise your Inspiron 5000 Series (Intel®) laptop with two touch choices without affecting the screen’s quality. Select Full HD touch for even deeper immersion in games and photographs or HD touch for clear, vivid images.
What is the Dell Inspiron 15 5000’s clock speed?
A base frequency of 1.30 GHz and a top frequency of 4.70 GHz are available for the Intel Core i7-1165G7. With four cores and a 12 MB cache, this core i7 processor is powerful.
What does the term “Dell Inspiron” mean?
The Inspiron (/nsprn/ IN-spirr-on, formerly stylized as inspiron) is a range of laptops, desktops, and all-in-one computers targeted at consumers that are sold by Dell.
What is the Dell Inspiron 15 5000 Series’ build quality?
Additionally, build quality is quite constant. Although the underside has a little give, the screen feels strong, and the wrist rest scarcely moves, all the internal parts are firmly shielded. The Dell Inspiron 15 would be easy to carry about in a backpack and expect to last the whole of our journey.
Does the Dell Inspiron 15 5000 allow RAM upgrades?
Inspiron 15 – 5584 5000-Series – Maximum 32GB RAM Upgrades.
For more manuals for Dell, Visit Manualsdock
[embeddoc url=”https://manualsdock.com/wp-content/uploads/2023/08/Dell-Inspiron-15-5000-Series-Laptop-Service-Manual.pdf” download=”all”]


