Cambridge Audio CXA61 Integrated Stereo Two-Channel Amplifier
About Cambridge Audio
Cambridge Audio is a British company that specializes in the design and manufacture of high-quality audio equipment. The company was founded in 1968 in Cambridge, England, and has since become known for producing a wide range of products, including amplifiers, speakers, CD players, and digital-to-analog converters.
Introduction
Last updated: May 26, 2022, 09:48. Revision #4895 This guide is designed to make installing and using this product as easy as possible. Information in this document has been carefully checked for accuracy at the time of printing; however, Cambridge Audio’s policy is one of continuous improvement, therefore design and specifications are subject to change without prior notice.
This document contains proprietary information protected by copyright. All rights are reserved. No part of this manual may be reproduced by any mechanical, electronic, or other means, in any form, without prior written permission of the manufacturer. All trademarks and registered trademarks are the property of their respective owners.
The Bluetooth® word mark and logos are registered trademarks owned by Bluetooth SIG, Inc. and any use of such marks by Audio Partnership Plc is under license. Other trademarks and trade names are those of their respective owners.
Qualcomm is a trademark of Qualcomm Incorporated, registered in the United States and other countries, used with permission. aptX is a trademark of Qualcomm Technologies International, Ltd., registered in the United States and other countries, used with permission. Qualcomm aptX is a product of Qualcomm Technologies International, Ltd © Copyright Cambridge Audio Ltd
For upcoming news on future products, software updates and exclusive offers, make sure you register your product at https://www.cambridgeaudio.com/register
What’s included with the CXA61/81?
Last updated: May 26, 2022 11:24. Revision #4894
Inside the box of your CXA you will receive:

- CXA Integrated Amplifier
- Remote Control
- 3 x AAA Batteries
- UK power cord (5A fused) (Depending on which country the CXA61/81 was purchased in),
- EU power cord (Depending on which country the CXA61/81 was purchased in),
- CU power cord (Depending on which country the CXA61/81 was purchased in)
- Bluetooth Antenna
- Orange Control Bus Cable
- Safety Guide
- Quickstart Guide
Front panel controls
Last updated: June 14, 2022 01:19. Revision #4893
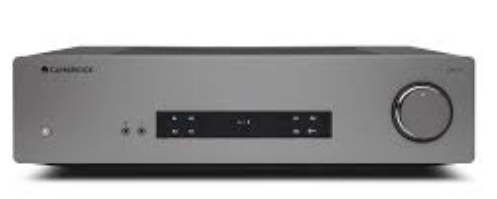
- Standby/On – Switches the unit between Standby mode (indicated by dim power LED) and On (indicated by bright power LED). Standby mode is
a low power mode (0.5 Watts). The unit should be left in Standby mode when not in use.
The CXA has Auto Power Down (APD) enabled by default, and the unit will automatically switch to standby after 20 minutes of inactivity. See the
‘Setup menu’ section for further details. - MP3 input (CXA61 only) – Allows you to connect a portable audio device, such as a smart phone, directly into the front of the unit using the
3.5mm stereo-jack.
Note: The MP3 input can only be selected when a jack is inserted. Plugging in a device into the jack socket automatically selects the MP3 input.
With the jack inserted pressing the A4 button will toggle between A4 and MP3 inputs. The MP3 input is shown by A4 being lit orange. - Headphones – Allows for the connection of stereo headphones with a 3.5mm jack plug. Headphones with an impedance of between 8 and 600
ohms are recommended.
Note: Plugging in headphones will automatically mute the loudspeaker, pre-out, and sub outputs. - Analogue source select buttons – Push the appropriate input selection button to select the source you want.
Notes:- On the CXA81, pressing the A1 input selection button will toggle between balanced and unbalanced. The balanced input is shown by A1
being lit orange, while the unbalanced input is shown by A1 being lit blue. - There will be no sound from the amp if the correct input button isn’t selected. If an audio source is connected to the balanced input, for
example, ensure that the A1 input light is lit orange.
- On the CXA81, pressing the A1 input selection button will toggle between balanced and unbalanced. The balanced input is shown by A1
- Protection indicator – See the ‘CAP5’ section for further details.
- Speaker A/B – Press to scroll through the speaker sets connected to the loudspeaker terminals on the back panel (speaker sets A, B or A and B). This can be used for listening to an extra set of loudspeakers in another room. See the ‘Connections’ section for further details.
- Mute indicator – The light will flash to show the outputs are muted.
- Digital source select buttons – Push the appropriate input selection button to select the source that you wish to listen to.
Notes:- Pressing the Bluetooth/USB button will toggle between the two inputs. The USB Audio is shown by the symbol being lit orange and the
Bluetooth source is shown by the symbol being lit blue. - There will be no sound from the amp if the correct input button isn’t selected. If an audio source is connected to the USB Audio input, for
example, ensure that the Bluetooth/USB button is lit orange.
- Pressing the Bluetooth/USB button will toggle between the two inputs. The USB Audio is shown by the symbol being lit orange and the
- Volume – Use to increase/decrease the level of the sound from the outputs of the Cambridge Audio amplifier. This control affects the level of all outputs.
Rear panel connections
Last updated: November 15, 2022 04:12. Revision #7890

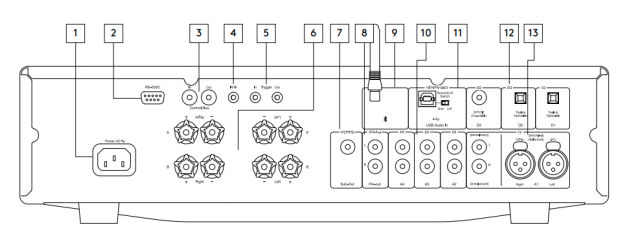
- AC power socket – Once you have completed all connections to the Cambridge Audio amplifier, plug the AC power cable into an appropriate mains socket then
switch on. Your Cambridge Audio amplifier is now ready for use. - RS232C – RS232 is a standard serial data communication protocol, which allows devices that support RS232 to communicate with each other as
part of a home automation system.
Custom install control – a full protocol is available for the CXA on our website here. - Control bus – RCA sockets used to send and receive power and volume commands from other connected CX Series products. For more
information on the Control Bus, see ‘Control Bus’ section. - IR in – Allows modulated IR commands from an IR repeater or custom install systems to be received by the Cambridge Audio amplifier. Commands received by
the IR In socket are not looped out of the Control Bus.
Note: The IR input doesn’t provide any power, so any device connected to this input will need to have its own power source. - Trigger in/out – The CXA can be connected to the trigger control output of home automation equipment to control the power state of the CXA. The input level should be 12V. The trigger out provides a continuous 12v, this is active while the CXA is powered on. This can be used to turn on other equipment that has a trigger in.
- Speaker terminals
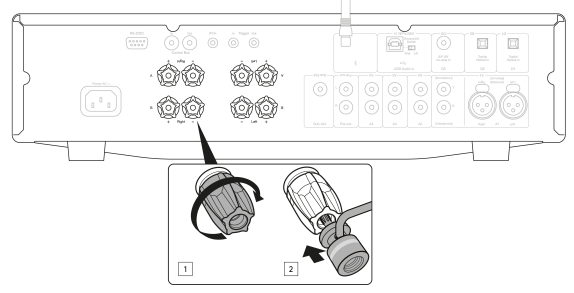
Note: When using a banana plug, make sure the speaker terminals are completely tightened before inserting the plug.
Two sets of loudspeaker terminals are available:- A (main loudspeaker terminals) and
- (secondary loudspeaker terminals). Connect the wires from your left channel loudspeaker to the left terminals on the CXA, and the wires from your right channel loudspeaker to the
right terminals on the CXA. - Always ensure that the positive connection on the Cambridge Audio amplifier is connected to the positive connection on the speaker and the negative connection on the amplifier is connected to the negative connection on the speaker.
- The Red terminal is the positive output.
- The Black terminal is the negative output. Care should be taken to ensure no stray strands of wire short the speaker outputs together. Please ensure that the loudspeaker terminals have been tightened completely to provide a good electrical connection. It is possible for the sound quality to be affected if the screw terminals are loose.
Note: The speaker terminals will need to have the round pips removed before you can insert a banana plug into them.
- Sub out – Connect to the input on an active subwoofer, if required.
Note: There is a low pass filter of approximately 2.3 kHz applied to the Sub Out, no frequencies above 2.3 kHz will be sent to a subwoofer connected to this output. This is so that there is minimal phase added by the CXA at the Sub Out frequencies.
The crossover frequency can be adjusted on the Subwoofer itself. - Pre-out – For connection to the unbalanced inputs of a power amplifier or active subwoofer.
Note: There is not a low pass filter applied to the Pre-Out, so the full frequency range will be sent to a subwoofer connected to the Pre-Out. - Bluetooth antenna – Used for Bluetooth audio streaming. See ‘Bluetooth’ section for details.
- Analogue inputs (A1 Unbalanced, A2, A3 and A4) – Suitable for any ‘line level’ source equipment such as CD players, DAB or FM/AM tuners etc.
These inputs are for analogue audio signals only. They should not be connected to the digital output of a CD player or other digital devices.
Note: For the balanced XLR inputs, pin1 is ground, pin2 is positive and pin3 is negative. - USB audio in – A USB B type socket to enable the playback of audio from a computer running either Microsoft Windows or Apple Mac OS X
operating systems. Some builds of Linux are also suitable.
Notes:
Always use a high-quality USB connection cable certified as USB Hi-Speed. USB cable connections longer than 3m may result in inconsistent
audio performance.
Always turn the volume to minimum, switch to another input or turn the CXA off before plugging/unplugging cables to the USB input or
whilst booting up/shutting down your PC/Mac.
Ground/Lift switch – The Ground/Lift switch enables the USB interface earth to connect or disconnect the CXA signal ground. Disconnecting
(lifting) the earth can be useful if electronic hum is heard through the speakers when the USB input is selected. The switch should otherwise be left
in the Ground position. - Digital inputs (D1, D2 AND D3) – TOSLINK and S/P DIF co-axial digital inputs.
Coaxial – Use a high quality 75 ohm digital RCA Phono interconnect cable (not one designed for normal audio use). This input is suitable for 16-24
bit content up to 192kHz.
TOSLINK optical – Use a high quality TOSLINK fibre optic interconnect cable designed specifically for audio use. This input is suitable for 16-24 bit
content up to 96kHz (TOSLINK is not recommended at 192kHz sampling rates).
Note: To obtain the best results from your system we recommend using only high-quality Cambridge Audio interconnects. This will ensure that you
hear your system as we designed it. Please ask your dealer for details. - A1 inputs
Note: Balanced (XLR) is available on the CXA81 only.
A1 inputs feature either unbalanced (phono/RCA) or balanced (XLR) connections. The balanced connection is the higher quality option and can
reject noise and interference in the cable when used with other equipment that supports this function.
An XLR connector is wired Pin 1 – Ground; Pin 2 – Hot (in-phase); Pin 3 – Cold (phase-inverted).
Remote control
Last updated: July 12, 2022 01:13. Revision #5136 The CXA remote control handset duplicates the front panel control functions and is also able to control other CX series products. The supplied AAA batteries must be fitted before the remote control can be used.
The handset buttons function as described below:

- Brightness – Alters the brightness of the CXA display lights. There are
two brightness levels and an option to switch off the backlight.
Note: When the CXA display lights are selected to be off, selecting any
of the functions will briefly switch on the lights to show the change. - Mute – Press to mute or unmute the loudspeakers, pre-out, sub, and the headphone outputs. The light will flash on the front of the unit to show the outputs are muted.
- Standby/On – Switches the CXA between On and Standby mode.
- Sources – Used to select the source inputs.
Note: For the CXA81, the A1 button has the double function of selecting the balanced or unbalanced A1 input, and will toggle between the two inputs when double pressing. The MP3 source can only be selected when
there is a jack connected to the input. - Volume up/down – Volume level adjustment.
Note: If the remote control will not function, please check that the batteries have not expired, and that there is nothing blocking the front panel IR receiver.
Getting connected
Last updated: November 11, 2022 10:55. Revision #7753 When designing our Cambridge Audio amplifiers, we include features that allow you to connect your system in various ways. The inclusion of features such as Pre-Out and Speaker B connections mean that you can flexibly configure your system depending on your requirements.
Note: When using a banana plug, make sure the speaker terminals are completely tightened before inserting the plug.
Basic connections
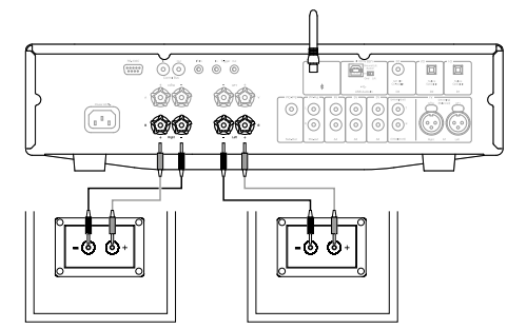
The diagram below shows the basic connection of your Cambridge Audio amplifier to a CD player using the D3 coaxial digital input source and a pair of loudspeakers

Speaker B connections The Speaker B connections on the back of the amplifier allow for a second set of speakers to be used (i.e. speakers located in another room). The Speaker A/B button on the front panel scrolls through the selection of speaker A only, speaker B only, and speaker A and B together.
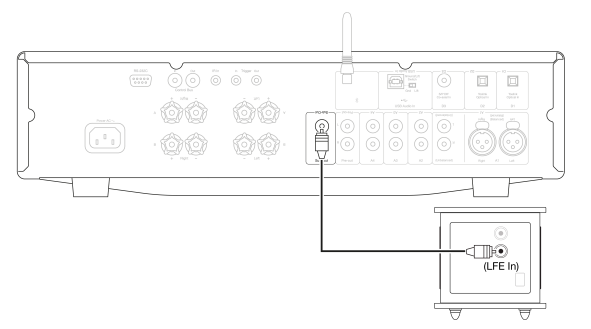
Sub out connections
The Sub Out is for connecting to the LFE/Sub input of an active subwoofer. The diagram below shows how to connect the Cambridge Audio amplifier to an active subwoofer via the LFE/Sub input on the subwoofer.
Preamp out connections
The Preamp Out sockets are for connecting to the input sockets of a power amplifier or active subwoofer. The diagram below shows how to connect the amplifier to an active subwoofer via the Line In inputs on the subwoofer.

Balanced audio connections (CXA81 only) The diagram below shows how to connect the CXA81 to the CXN Network player using the Balanced Audio inputs via three pin XLR connectors. The CXA81 can also be connected to non-Cambridge Audio sources with balanced outputs.
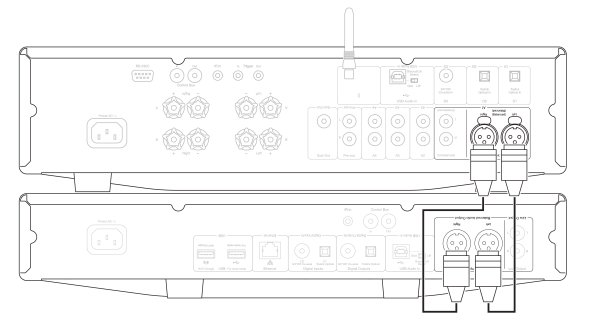
Balanced connections in an audio system are designed to reject electrical noise, from power wiring etc, and also the effects of noise currents flowing through ground connections. The basic principle of balanced interconnection is to get the signal you want by subtraction, using a three wire connection. One signal wire (the hot or in-phase) carries the normal signal, while other (the cold or phase-inverted) carries an inverted version. The balanced input senses the difference between the two lines to give the wanted signal. Any noise voltages that appear identically on both lines (these are called common-mode signals) are cancelled by the subtraction.
The CXA81 is designed to work at its highest performance when a balanced interconnect is used.
Note: To select the balanced input on the CXA81, press the A1 button twice on the front panel or on the remote control so that the A1 light on the front panel display lights up Orange. Repeatedly pressing the A1 button will toggle between balanced and unbalanced inputs.
Connecting a TV A TV can be connected to one of the digital inputs on the CXA, as long as the TV has the required Optical or Coaxial output. Ensure that the output audio settings on the TV are set to PCM or Stereo, as the CXA is only able to decode a Stereo signal. Please also ensure that the digital input that the TV is connected to has been selected on the front panel of the CXA (D1, D2 or D3).
Enabling ‘TV Mode’ within the CXA: Some Connected TVs will send an inconsistent sample rate to the CXA, that the Digital-to-analog converter inside the amplifier is unable to process. This can result in audio dropouts and glitches. If this is the case with your CXA, ‘TV Mode’ will need to be enabled within the amplifier.
The serial number for your CXA61 and CXA81 will indicate whether or not ‘TV Mode’ is already pre-installed or whether this will require manual installation.
Pre-Installed (October 2020 Onwards): The serial numbers for units that contain ‘TV Mode’ pre-installed are laid out as such; ‘KW C11125 7060 0001’. If the third set of numbers are or are greater than 7060, this indicates that your amplifier was manufactured after October 2020 and already has ‘TV Mode’ installed.
To enable ‘TV mode’ on Pre-Installed units:
- Enter the Setup menu by putting the CXA in standby mode.
- Whilst in Standby mode, press and hold the Speaker A/B button until the A/B lights flash alternatively and the sources A1-A4 light up.
See below source buttons for setup configuration:
Note: Button selected (on) is represented by Blue light.- A2 off – The CXA is set to the best digital input audio setting on input D2.
- A2 on – The CXA is set to a more tolerant digital input setting for input D2 that should reduce the chance of having the signal intermittently drop.
- To save the setup settings and exit the setup menu, press the Speaker A/B button.
Note: Pressing the Standby/On button while in the setup menu will exit this setup menu and will not save the setup settings.
Uninstalled (Pre October 2020):
If your CXA pre-exists the above stated serial number combination (the third set of numbers is lower than 7060), then please contact our support team at https://www.cambridgeaudio.com/gbr/en/contact and we will be able to provide you with instructions on how to perform this update manually.
Please note: Your TV will have to be connected to TOSLINK OPTICAL input D2 for TV Mode to work.
Advanced connections
Last updated: November 15, 2022 04:16. Revision #7901
USB audio connection
The CXA USB Audio input enables the playback of audio from Microsoft Windows or Apple Mac OS X personal computers (and some Linux builds). When connected via a USB cable, the computer will identify the CXA as an audio device. Specifying the CXA in the computer’s audio control panel, will enable it to play audio data either stored locally on the computer or streamed to the computer via a network or the internet.

Important Note: Always turn the volume to minimum, switch to another input or turn the CXA off before plugging/unplugging cables to the USB input or whilst booting up/shutting down your PC/Mac.
Note: Always use a high quality USB ‘A to B’ cable certified as USB Hi-Speed. USB cable connections longer than 3m may result in inconsistent
audio performance.
The CXA is both USB 2.0 (Hi-Speed) and USB 1.1 (Full-speed) USB port compatible.
It should also work with USB 3.0 ports where the PC will simply treat the CXA as if it were a USB 2.0 or 1.1 device.
The CXA supports two USB Audio protocols (not the same as the port types themselves):
- USB Audio Class 1 (which works over USB 1.1 ports and supports up to 24-bit/96kHz)
- USB Audio Class 2 (which requires a USB 2.0 port and can support up to 32-bit/384kHz)
The default configuration is USB Audio Class 2.
How to connect a Windows PC to the CXA via the USB audio input With the CXA switched to USB Audio Class 1, the CXA will work with Windows 7 or above and accept audio up to 24-bit/96kHz. With the CXA switched to USB Audio Class 2, the CXA needs the Cambridge Audio USB Audio 2.0 Driver to be loaded and can then accept up to 32-
bit/384kHz.
- With the CXA in Standby mode and/or the volume set to minimum, connect your PC to the CXA via a USB A to B cable.
- For the highest quality play back, ensure that the CXA is set to USB 2.0 mode.
See the ‘Setup Menu’ section below for a guide on how to change USB mode. (The default configuration is USB Audio Class 2)
3. Download the Windows USB 2.0 driver.
See the “How do I install the latest USB Audio driver” section below, for a guide on how to download the USB driver. - Select the USB Audio source on the front panel of the CXA.
You can do this by pressing the Bluetooth/USB button, which will toggle between the two inputs. The USB Audio is shown by the symbol being lit orange. - Choose the CXA as your output speaker via your Windows PC’s sound settings.
Note: To ensure you are getting the highest quality play back possible, ensure that the maximum sample rate for the CXA is selected, up to 384
kHz. This can be done via your Windows PC by selecting ‘Control Panel’ > ‘Sound’ > ‘Speaker Properties’ > ‘Advanced’ Tab, and selecting the maximum sample rate and bit depth from the drop down menu.
How to install the latest USB audio driver for the CXA61/81
To install the latest USB Audio driver for your CXA61/81, please follow the steps below:
- Download the correct driver for your Windows operating system from https://casupport.cambridgeaudio.com/product/4831129-CXA6181/message/asjc3o7wl07xm1ht-Windows-Audio-USB-Class-2-Driver
- Unzip the downloaded folder, and double click on the application file to run the installer. This is highlighted in the image below.

- Run the installer, and follow the instructions.
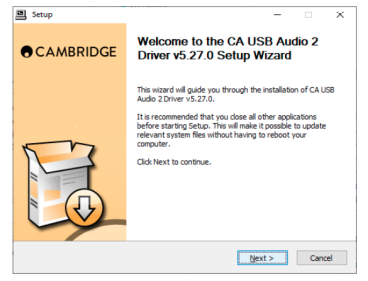
- Allow the update to progress, click next, and then finish to complete the installation.

- Confirm the installation by opening the CA Control Panel, and checking the driver version.

How to connect an Apple Mac to the CXA via the USB audio input
No extra drivers are required. With the CXA switched to USB Audio 1.0 the CXA will work with the native Mac OS-X 10.5 (Leopard) or above Audio 1.0 driver and accept audio up to 24-bit/96kHz. 19 With the CXA switched to USB Audio Class 2 the CXA works with the native Mac OS-X 10.5 (Leopard) or above Audio 2.0 driver and can accept audio up to 32-bit/384kHz.
- With the CXA in Standby mode and/or the volume set to minimum, connect your Mac to the CXA via a USB A to B cable, or C to B cable depending on the USB ports on your Mac.
- Select the USB Audio source on the front panel of the CXA. You can do this by pressing the Bluetooth/USB button, which will toggle between the two inputs. The USB Audio is shown by the symbol being lit orange.
- Choose the CXA as your output speaker via your Mac’s sound settings
Note: To ensure you are getting the highest quality play back possible, ensure that the maximum sample rate for the CXA is selected, up to 384 kHz.
This can be done via your Mac by selecting ‘Audio Midi Setup > ‘Sound’ > ‘Speaker Properties’ > ‘Advanced’ Tab, and selecting the maximum sample rate and bit depth from the drop down menu.
Use with Linux For most builds of Linux with the CXA switched to USB Audio Class 1 the CXA will work with the native Audio 1.0 driver and accept audio up to 24- bit/96kHz.
Some very new builds of Linux are now supporting USB Audio Class 2 for which the CXA should be switched to Audio 2.0 to accept audio up to 32- bit/384kHz.
For both cases because Linux builds vary according to their creators choice of software components including drivers it is not possible to guarantee operation and Audio drivers may need to be loaded.
‘Class drivers’ as they are called for generic support of Audio Class 1.0 or Audio Class 2.0 devices may be available from the Linux community, we do not supply these.
Note: It is not possible to connect a USB drive or HDD directly to the CXA61/81 via the ‘USB Audio’ input. The ‘USB Audio’ input on the CXA61/81 will only support a direct connection with a PC or Mac. You will, however, be able to use one of our network players in combination with the CXA61/81 to do this.
Setup menu
Last updated: June 6, 2022 08:54. Revision #4888
To enter the setup menu
- . Put the CXA in standby mode.
- Whilst in Standby mode, press and hold the Speaker A/B button until the A/B lights flash alternatively and the sources A1-A4 light up

Note: Press the Speaker A/B button once to leave the Setup menu and place the CXA back into Standby mode.
See below source buttons for setup configuration:
Note: Button selected is represented by Blue light.
Auto power down (APD)
- A1 off – Disables the APD (Auto power down) function.
- A1 on – Sets the APD time to 20 minutes.
Note: Auto power down is a power down function that automatically switches the CXA into standby mode if there is no audio. The APD time represents the amount of time required for there to be no audio before the CXA is automatically put into the standby mode.

Clipping function
- A3 on – Clipping function enabled. The volume nudges down if signal clipping is detected.
- A3 off – Clipping function is disabled.
USB mode
- A4 on – Puts the CXA in USB Audio Class 2 mode.
- A4 off – Puts the CXA in USB Audio Class 1 mode.
Notes:
- To save the setup settings and exit the setup menu, press the Speaker A/B button.
- Pressing the Standby/On button while in the setup menu will exit this setup menu and will not save the setup settings.
Factory reset
A factory reset can be performed to restore the CXA to its original factory settings:
- Whilst the CXA is in standby mode, press and hold the speaker A/B button;
- Then when the A/B lights flash, press D1, D3, USB, D2 in a U shape sequence.

Bluetooth
Last updated: June 6, 2022 08:55. Revision #4887 Bluetooth audio streaming Selecting this allows the CXA to receive Bluetooth audio from most phones, tablets and laptops.
Pairing To begin streaming high quality music from your device it will first need to be paired with the CXA. Select the Bluetooth source on the CXA to enter discovery mode.
Notes:
- Your device can only be paired and connected to the CXA while the Bluetooth source is selected. This can be done by selecting the Bluetooth/USB source button on the front panel. The Bluetooth source is shown as being selected by the symbol being lit blue.

- The CXA is always in discoverable mode when there is no Bluetooth connection. Discoverable mode means that the CXA is able to be paired to another Bluetooth device.
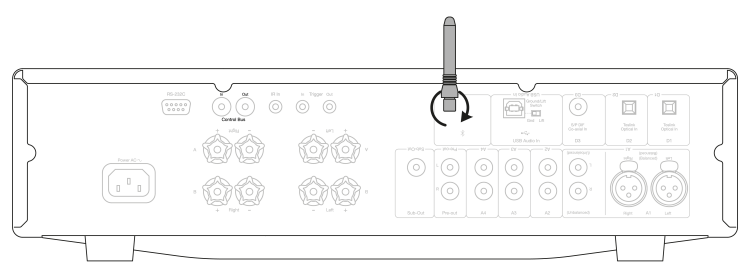
- The supplied Bluetooth antenna must be inserted into the rear of the unit to enable Bluetooth functionality.
Bluetooth troubleshooting guide
If you are having problems connecting your Bluetooth device to the CXA, please try the following troubleshooting steps:
- Ensure that the supplied Bluetooth antenna is properly connected to the back of the unit. The CXA61/81 will be unable to connect to a Bluetooth device without the antenna connected. Try disconnecting and then re-connecting the antenna.
- Ensure that the Bluetooth source has been selected by selecting the Bluetooth/USB Audio button on the front panel. The Bluetooth source is shown by the symbol being lit blue. When the USB source is active the LED will be orange.
- Ensure that your Bluetooth device is in pairing mode and not already connected to another Bluetooth unit.
- Forget the CXA from your devices’ list of discoverable Bluetooth items and start the pairing process again.
- Perform a factory reset on the CXA (see ‘Factory Reset’ section above).
Control Bus
Last updated: June 6, 2022 08:56. Revision #4896 The Control Bus allows any compatible Cambridge products to synchronise when powering up the units. See the following diagrams when connecting the CXA using the provided Control Bus cable. Another added feature with this Control Bus is the use of the StreamMagic app. You can use the StreamMagic app to control the CXA via the CXN.
StreamMagic app (via CXN) When using the app to turn the CXN on/off, this will also turn the CXA on/off. The app can also be used to control the volume of the CXA. Connect the CXN control bus out to CXA in. For more information, see the CXN manual.

CXA with CXC When turning the CXA on/off, this will also turn the CXC on/off. Connect the CXA control bus out to CXC in.

CXA with CXN
Note: Without using the StreamMagic app to control the CXA. When turning the CXA on/off, this will also turn the CXN on/off. Connect the CXA control bus out to CXN in.

CXA with CXN and CXC When turning the CXN on/off, this will turn the CXA and CXC on/off. With all three CX devices, connect the CXN Control Bus out to CXA Control Bus in. Then connect the CXA Control Bus out to CXC Control Bus in.

Note: Do not loop back from the CXC Control Bus out to the CXN Control Bus in.
Control Bus will also need to be enabled and set to ‘Amplifier’ within the CXN device settings in the StreamMagic app, once the app has been connected to the CXN.
If you don’t want the devices to go into standby automatically, we would recommend disabling the APD feature on each device.
CAP5 Last updated: June 6, 2022 08:58. Revision #4897 Cambridge Audio has developed a proprietary protection system to ensure reliability and a long life for its amplifiers and the speakers they are connected to.
This protection system comprises of five main protection methods:
- DC detection
- Indication – Unit has switched off during operation. The front panel LED light flashes together in the following sequence, one flash with long pause between flashes. Read below for more information.
- Description – CAP5 offers loudspeaker protection if the output of the amplifier goes to a high constant voltage (DC) because of some internal fault. This is a rare fault although detecting it could just save those expensive loudspeakers.
- Remedy – Due to the necessary sensitivity of the DC protection circuit, extremely hard clipping of the amplifier may cause DC protection to be triggered. If this fault occurs, please contact your dealer for service.
- Over temperature detection
- Indication – Unit has switched off during operation. The front panel LED light flashes together in the following sequence, two quick flashes with long pause between flashes. Read below for more information.
- Description – Over temperature is caused by a combination of high listening levels and low impedance speakers. CAP5 includes temperature detection which constantly monitors the heat generated by the output transistors. If the monitored temperature reaches a high level (suitably within the limits of the output devices) the amplifier will automatically switch into a fault mode. The unit should ideally be left for 15 minutes in this state to cool down adequately. If the unit has not fully cooled down then the temperature may reach the limit soon after the amplifier is powered up. If the loudspeaker impedance is low the temperature of the amplifier may rise faster as the amplifier is working harder. If the amplifier is mounted in a cabinet or the ventilation slots are obstructed the over temperature detection may activate/reactivate after a short listening time.
- Remedy – The internal temperature of the output transistors has reached the over temperature limit. Leave the unit for 15 minutes to cool down before pressing the Standby button to resume normal operation.
- Overvoltage/Overcurrent detection
- Indication – Unit has switched off during operation. The front panel LED light flashes together in the following sequence, three quick flashes with
long pause between flashes. Read below for more information. - Description – CAP5 offers V/I (voltage/current) protection by constantly monitoring the output transistors to keep them working inside their Safe Operating Area (SOA). The SOA is a set of limits given by the output transistor manufacturer to ensure reliability. The V/I protection has been incorporated within the Cambridge Audio amplifier circuitry to provide a fast response to temporary overload conditions. When the V/I protection is triggered the unit will continue to operate but distortion may be heard as the unit protects the output transistors.
- Remedy – Reduce the volume. If distortion is still present, check the speaker connections and ratings.
- Indication – Unit has switched off during operation. The front panel LED light flashes together in the following sequence, three quick flashes with
- Short circuit detection
- Indication – Unit has switched off during power up. The front panel LED light flashes together in the following sequence, four quick flashes with long pause between flashes. Read below for more information.
- Description – During power up from Standby CAP5 performs a check on the loudspeaker terminals to see if a short across the terminals has been accidentally introduced. If the resistance measured across the loudspeaker terminals is too low the unit will stay in Standby mode until the fault has been removed and Power up is re-attempted.
- Remedy – There may be a short circuit between the loudspeaker terminals. Check all loudspeaker connections before attempting to switch the unit out of Standby.
- Intelligent clipping detection
- Indication – Volume is reduced automatically.
- Description – – CAP5 has the ability to detect when the Cambridge Audio amplifier starts to clip or overdrive at its output, which can damage loudspeakers, and
28 degrade the sound. Clipping distortion is caused at high volume levels when the output signal attempts to go outside the maximum voltage that the Cambridge Audio amplifier can provide, causing the tops of the signal to flatten off. When CAP5 detects clipping the volume will be automatically reduced down until CAP5 detects an undistorted output.
Note: The clipping detection is disabled by default. The clipping detection can be enabled in the Setup menu (see ‘Setup menu’ section).
If CAP5 is persisting, it is also advisable to check the specifications of your speakers to ensure that they are compatible with the CXA61/81. Both amplifiers can be used with speakers with an impedance of between 4 and 8 Ohms.
The CXA61 outputs 60W RMS into 8 Ohms and 90W RMS into 4 Ohms, while the CXA81 outputs 80W RMS into 8 Ohms and 120W RMS into 4 Ohms. If your connected speakers fall outside of these specifications, then this could also be a reason for CAP5 protection being activated.
Troubleshooting
Last updated: November 15, 2022 04:23. Revision #7911
There is no power
- Ensure the AC power cord is connected
- Ensure the plug is fully inserted into the wall socket and is switched
- Check fuse in the mains plug or
There is no sound
- Make sure the unit is not in Standby
- Check that the source component is properly
- Check that your speakers are properly
- Make sure the selected speaker A/B light corresponds to the speaker terminals that the loudspeakers are connected
- Make sure unit is not in mute
- Check that the correct analogue or digital input button has been selected on the front See the ‘Front Panel Connections’ section for more information.
There is no sound on one channel
- Check speaker
- Check
There is weak bass or diffused stereo imaging
- Ensure that speakers are not wired out of
Speaker A/B and mute light flashing
- See section on CAP5 protection
The remote handset does not function
- Check that the batteries have not
- Ensure that nothing is blocking the remote
There is no audio when connecting a Mac/PC to the USB audio input
- Ensure that all the steps within the ‘USB Audio Connection’ section of the manual have been
- Ensure that the USB Audio source has been selected by selecting the Bluetooth/USB Audio button on the front panel. The USB Audio source is shown by the symbol being lit orange.
- Ensure that your PC/Mac is connected to the USB Audio input with a USB A to B
- If you are connecting a PC and using the CXA in USB Audio Class 2, make sure that the correct USB driver is downloaded. The driver is available from https://casupport.cambridgeaudio.com/product/4831129-CXA6181/message/asjc3o7wl07xm1ht-Windows-Audio-USB-Class-2-Driver.
- If you have downloaded a Cambridge Audio USB 0 Driver, ensure that the CXA is set to USB Audio Class 2 in the Setup Menu.
There is no audio when connecting a TV to the CXA
- The CXA is unable to decode a Dolby or Surround signal, ensure that the audio settings on your TV are set to PCM or
- Ensure that your TV is connected to one of the SP/DIF or TOSLINK inputs on the
There are drop outs in audio when connected to a TV via Toslink
- Please see the ‘Getting Connected’ > ‘Connecting a TV’ section in the For more frequently asked questions (FAQ’s), technical advice and information on getting the most out of your CXA, please visit the Support section on Cambridge Audio’s website: https://casupport.cambridgeaudio.com/product/4831129-CXA6181
Technical specifications
Last updated: June 1, 2022 08:17. Revision #4899
CONTINUOUS POWER OUTPUT
- CXA81: 80W RMS into 8 Ohms, 120W RMS into 4 Ohms
- CXA61: 60W RMS into 8 Ohms, 90W RMS into 4 Ohms
Digital-to-analog converter
- CXA81: ES9016K2M
- CXA61: ES9010K2M
THD (UNWEIGHTED)
- <0.002% 1kHz at 80% of rated power
- <0.02% 20Hz – 20kHz at 80% of rated power
FREQUENCY RESPONSE
- <5Hz – 60kHz +/-1dB
S/N RATIO (REF 1W INTO 8 OHM)
- >93 dB
S/N RATIO (REF FULL POWER)
- >105 dB
INPUT SENSITIVITY
- Input A1-A4 (unbalanced) 370mV RMS
INPUT IMPEDANCES
- CXA81: Input A1 (balanced) 50 kOhm Input A1-A4 (unbalanced) 43 kOhm
INPUTS
- Balanced (CXA81 only), Unbalanced, MP3 jack (CXA61 only), Coax SPDIF, TOSLINK, Bluetooth, USB Audio
OUTPUTS
- Speakers, Headphone, Preamplifier Output, Sub Output
POWER AMP DAMPING FACTOR
- >110 at 1kHz
USB AUDIO INPUT
USB Type B conforming to USB Audio Class 1 or USB Audio Class 2 (user selectable)
BLUETOOTH
- 4.2 A2DP/AVRCP supporting SBC, aptX and aptX HD codecs
COMPATIBILITY
- USB Audio Class 1: Up to 24-bit 96kHz (asynchronous)
- USB Audio Class 2: Up to 32 bit 384kHz (asynchronous) and up to DSD-256 TOSLINK: 16/24-bit 32-96kHz
- Coax SPDIF: 16/24-bit 32-192kHz
MAX POWER CONSUMPTION
- CXA81: 750W
- CXA61: 600W
STANDBY POWER CONSUMPTION
- <0.5W
DIMENSIONS
- 115 x 430 x 341mm (4.5 x 16.9 x 13.4”)
WEIGHT
- CXA81: 8.7kg (19.1Lbs)
- CXA61: 8.3kg (18.3lbs)
FAQs Cambridge Audio CXA61
Has the CXA61 had a tone control?
The tone and balance settings from the 60 are likewise gone in the 61. The integrated Digital-to-analog converter differs as well. While the earlier CXA60 offered a Wolfson WM8740 chip, the CXA61 has an ESS Sabre ES9010K2M chip.
Should I always have my integrated amplifier on?
However, with very few exceptions, it is best to leave a power amp or preamp powered on constantly. Keep your equipment’s lights on so that it will last longer and sound better.
Why doesn’t my Cambridge Audio have sound?
NO SOUND IS PRESENT Verify that the appropriate input source is chosen on the front panel. Verify that the speakers are properly attached. Check aerial connections and choose an available station if using the tuner. Verify that the device is not in mute mode.
How reliable is Cambridge Audio?
Cambridge is no stranger to producing excellent analog-only integrated amplifiers; their 851A is a fantastic illustration of how an integrated amplifier should be implemented. The Digital-to-analog converter in the CX series Cambridge Audio amplifiers, however, is a really good unit and is not an afterthought like it is in some integrated amplifiers.
How durable are integrated amplifiers?
The likelihood that your amp will sound as good as new is high if you change them every 10 or 20 years. This is what? Of course, you shouldn’t make any changes if there are no problems with your amp or the sound. The best part about amps is probably how easy you can see when something is amiss.
When not in use, should I disconnect my integrated amplifier?
The likelihood of anything going wrong with an integrated amplifier is extremely remote because they are typically built to last for a very long time. Unplugging it when you’re done playing is obviously the best course of action. However, if you leave everything on and use a reliable surge protector, almost nothing bad can happen.
Why is my stereo powered but silent?
Make sure that no wire or lead is connected to a chassis ground by inspecting each set of wires and speaker. This will cause the internal Cambridge Audio amplifier to be turned off by the radio, which will result in the on but no sound problem. Dedicated positive and negative connections from the radio to each speaker connected to the radio are required.
How can I get in touch with Cambridge Audio CXA61?
It must be inside your wireless router’s coverage area. Important: Avoid plugging or unplugging the wifi dongle while the device is turned on. Go to the Wi-Fi settings on an iOS device and choose “CXN v2.” Alternatively, you can directly connect the CXN v2 to the Wi-Fi network: Enter your password after choosing your Wi-Fi network.
Does AC or DC current flow in audio?
AC As a result, an AC signal can be any electrical AUDIO signal. An audio signal has a voltage range of only a few volts, whereas an electrical current has a typical range of 110–120 volts or 220 volts with a frequency of 60 or 50 Hz (see map).
Cambridge CXA61: Is it a Digital-to-analog converter?
With a variety of inputs, including an asynchronous USB, and a choice of fixed or variable analog outputs on both RCA phonos and XLRs, the CXN is also intended to function as a Digital-to-analog converter and a digital preamp.
For more Cambridge Audio Manuals visit ManualsDock


