Brookstone Self-Setting Clock
About BROOKSTONE
Brookstone is a well-known brand that specializes in providing innovative and high-quality products for the home and lifestyle. The company was founded in 1965 and has since become a trusted name in the industry, with a reputation for designing and creating innovative and unique products that enhance people’s daily lives.
Brookstone’s products range from home and office accessories, to gadgets and electronics, to personal care items and travel essentials. Their focus is on creating products that are both functional and stylish, with an emphasis on quality, durability, and ease of use.
One of Brookstone’s most popular products is the Self-Setting Clock, which uses advanced technology to automatically set and adjust the time, making it a convenient and reliable timekeeping solution. The brand is known for its commitment to innovation and customer satisfaction and has won numerous awards for its products over the years.
CAUTION
- TO REDUCE THE RISK OF ELECTRIC SHOCK, DO NOT REMOVE THE COVER. THERE ARE NO SERVICEABLE PARTS INSIDE.
- TO REDUCE THE RISK OF FIRE OR ELECTRIC SHOCK, DO NOT EXPOSE THIS UNIT TO RAIN OR MOISTURE.
- The lightning flash with an arrowhead symbol within an equilateral triangle is intended to alert the user to the presence of uninsulated “dangerous voltage” within the unit’s enclosure that may be of sufficient magnitude to constitute a risk of electric shock.
- The exclamation point within an equilateral triangle is intended to alert the user to the presence of important operating and maintenance (servicing) instructions in the literature accompanying the unit.
IMPORTANT SAFETY INSTRUCTIONS
All the safety and operating instructions should be read, adhered to, and followed before the unit is operated.
DANGER
To reduce the risk of electric shock, burns, fire, or injury:
- Do not use it while bathing or in a shower.
- Do not place or store the unit where it can fall or be pulled into a tub or sink.
- Do not place in or drop into water or other liquid.
- Do not reach for a unit that has fallen into the water. Unplug it immediately.
- Care should be taken so that objects do not fall and liquids are not spilled onto the unit.
WARNINGS
- Close supervision is necessary when this unit is used by or near children.
- Use this unit only for its intended use as described in this manual.
- Unplug this unit during lightning storms or when unused for long periods of time.
- Never drop or insert an object into any opening.
- Protect the power cord from being walked on or pinched, particularly at plug outlets, convenience receptacles, and the point where it exits the unit.
- Do not allow the cord to touch hot surfaces. Wrap the cord loosely around the unit when storing.
- The unit should be situated away from direct sunlight or heat sources such as radiators, electric heaters, heat registers, stoves, or other units (including amplifiers) that produce heat. Avoid placing on top of stereo equipment that radiates heat.
- Never block the air openings of the unit with materials such as clothing, plastic bags or papers, or place it on a soft surface such as a bed or couch, where the air openings may be blocked.
- Do not overload the electrical outlet. Use only the power source as indicated.
- Do not carry this unit by a cord or use the cord as a handle.
- Never operate this unit if it has a damaged cord or plugs, if it is not working properly, or if it has been dropped or damaged, or dropped into water. If the unit’s power supply cord or plug is damaged, do not attempt to fix it yourself.
- To avoid the risk of electric shock, do not disassemble or attempt to repair the unit. The incorrect repair can cause a risk of electric shock or injury to persons when unit is used.
- Do not operate in the presence of explosive and/or flammable fumes.
FCC INFORMATION
This equipment has been tested and found to comply with the limits for a Class B Digital Device, pursuant to Part 15 of the FCC Rules. These limits are designed to provide reasonable protection against harmful interference in a residential installation. This equipment generates, uses and can radiate radio frequency energy and, if not installed and used in accordance with the instructions, may cause harmful interference to radio communications. However, there is no guarantee that interference will not occur in a particular installation. If this equipment does cause harmful interference to radio or television reception, which can be determined by turning the equipment off and on, the user is encouraged to try to correct the interference by one or more of the following measures:
- Reorient or relocate the receiving antenna.
- Increase the distance between the equipment and the receiver.
- Connect the equipment to an outlet on a circuit different from that to which the receiver is connected.
- Consult the dealer or an experienced radio/TV technician for help.
This equipment complies with Part 15 of the FCC Rules. Operation is subject to the following two conditions:
- This equipment may not cause harmful interference.
- This equipment must accept any interference received, including interference that may cause undesired operation.
Modifications not authorized by the manufacturer may void the user’s authority to operate this device.
BATTERY PRECAUTIONS
- Dispose of the old battery properly. Do not dispose of the old battery in a fire.
- Do not leave the battery where a child or pet could play with or swallow it. If the battery is swallowed, contact a physician immediately.
- The battery may explode if mistreated. Do not attempt to recharge or disassemble the battery.
- Use only a fresh battery of the required size and type. Do not mix old and new batteries, different types of batteries, or rechargeable batteries of different capacities.
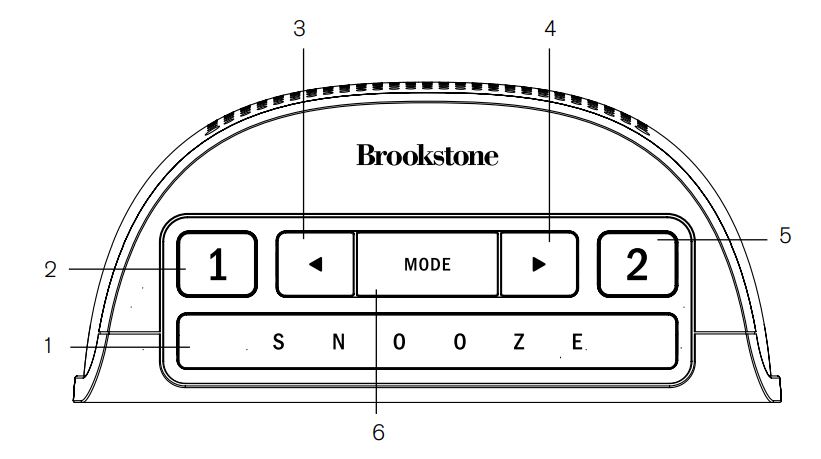
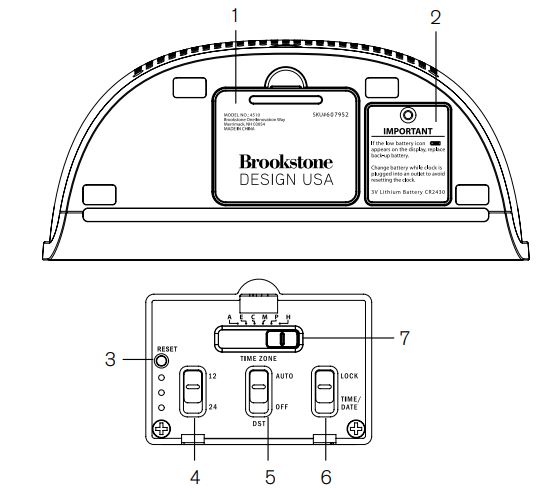
LOCATION OF CONTROLS

- SNOOZE
- Alarm 1
 Back
Back Forward
- Alarm 2
- MODE


- Control Compartment Cover
- Back-up Battery Compartment Cover
- Reset Button
- 12/24 Time Format
- Daylight Savings Time Switch
- Lock, Time/Date Set Switch
- Time Zone Switch
Operation
plugging in your clock for the first time
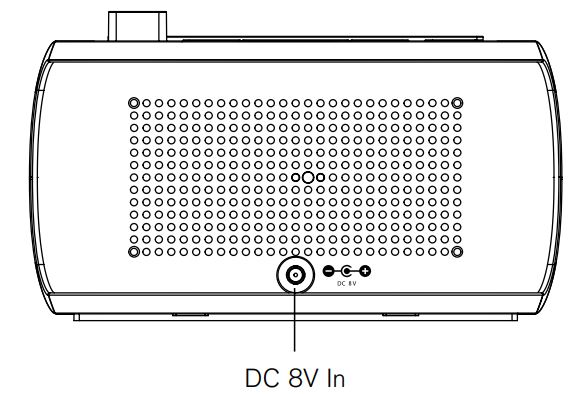
- Plug the DC 8V ADAPTER (included) into a power outlet.
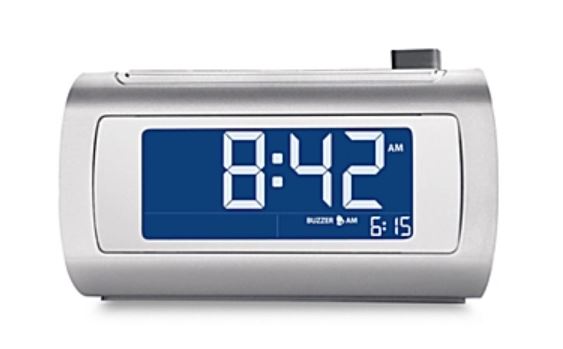
- The first time you connect your new clock to an outlet, the internal computer will automatically set the correct time and date for the Eastern Time Zone, which is the initial default setting. The display will scan for a few seconds and then show the correct Time and Date in the Eastern Zone.
- If you need to change to a different time zone, you only need to do this once and the clock will remember the new default zone setting and will always return to that setting after a power interruption.
- There are six time zones programmed into your clock:
- a—Atlantic time
- e—eastern time (Default setting)
- c—central time
- m—mountain time
- p—pacific time
- h—Hawaiian time
- To change the default time zone display, open the CONTROL COMPARTMENT COVER on the bottom of the clock and adjust the TIME ZONE switch to the correct zone. Close the CONTROL COMPARTMENT COVER.
Setting the 12/24 time format
The 12-hour format is set as the default. To change the 12/24 hour time format, open the CONTROL COMPARTMENT COVER on the bottom of the clock and adjust the 12/24 TIME FORMAT switch to the desired format. Close the CONTROL COMPARTMENT COVER.
Setting the Daylight savings time (Dst)
To change the DST format, open the CONTROL COMPARTMENT COVER on the bottom of the clock and adjust the DST switch to either AUTO or OFF.
- AUTO—the unit will automatically “spring ahead” 1 hour on the second Sunday in March at 2:00AM, and “fall back” 1 hour on the first Sunday in November at 2:00AM.
- OFF—no automatic DST adjustments will occur.
Note: in the event the dates for Daylight savings time change, the time may be set manually.
Close the CONTROL COMPARTMENT COVER.
Adjusting the backlight
- There are 5 backlight settings: HIGH, MEDIUM, LOW, DIM and OFF.
- Press the SNOOZE button for 3 seconds and continue to hold to toggle through each of the backlight settings. The backlight setting will change every 3 seconds while the SNOOZE button is being pressed and held.
- If the backlight is set to OFF, you may press the SNOOZE bar once to turn the backlight to LOW for 5 seconds to check the time.
Note: if the backlight is set to off when the alarm sounds or during snooze, the backlight will automatically illuminate on low. backlight will remain on during snooze.
SETTING AND ACTIVATING ALARMS
- Press and hold the MODE button for 2 seconds. The clock will go into Alarm Set mode. Alarm 1 time will flash.
- Press the FORWARD/BACK buttons to scroll to the desired alarm time— hold down the FORWARD/BACK buttons to accelerate scrolling.
- Press the MODE button to save the Alarm 1 time. Alarm 2 time will flash.
- Press the FORWARD/BACK buttons to scroll to the desired alarm time— hold down the FORWARD/BACK buttons to accelerate scrolling.
- Press MODE to save Alarm 2 time. If MODE is not pressed after setting either just the first alarm or both alarms, the alarm information will be saved and the clock will display after 5 seconds.
- Activate the alarms by pressing the ALARM 1 or ALARM 2 buttons on the top of the unit. When the button is in the “up” position the alarm is activated and its icon and information will appear on the display.
Note: the buzzer incrementally increases in volume, reaching its loudest setting in 30 seconds.
Deactivating the alarm
- The ALARM 1 and/or ALARM 2 button must be in the “up” position to activate the alarm.
- When the alarm sounds, press the ALARM 1 or ALARM 2 button into its “down” position to shut off the alarm.
- The buzzer will sound for 20 minutes if the alarm is not turned off or the SNOOZE button isn’t pressed. The alarm will then automatically reset for the following day.
Using snooze
- When the alarm is sounding, press the SNOOZE button to activate Snooze.
- The alarm will sound again in 10 minutes. You may repeat this action 6 times. After the 6th time, the alarm buzzer will continue to sound for 20 minutes if the alarm is not manually turned off. The alarm will then automatically reset for the following day.
- During a Snooze, the alarm icon will blink.
- If the backlight is set to OFF when the alarm sounds or during Snooze, the backlight will automatically illuminate on LOW.
Manually setting the time and Date
- Open the CONTROL COMPARTMENT COVER on the bottom of the clock to access the CONTROL PANEL.
- The time can be set by sliding the LOCK, TIME/DATE switch to TIME/DATE. The time graphics will flash on the display.
- Press the FORWARD/BACK buttons to scroll to the desired time— hold down the FORWARD/BACK buttons to accelerate scrolling.
- Press the MODE button to save time and to reach the date set mode. The month will flash on the display.
- Press the FORWARD/BACK buttons to scroll to the desired month— hold down the FORWARD/BACK buttons to accelerate scrolling.
- Press the MODE button to save the month and to reach the day set mode. The day will flash on the display.
- Press the FORWARD/BACK buttons to scroll to the desired day— hold down the FORWARD/BACK buttons to accelerate scrolling.
- Press the MODE button to save the day and to reach the year-set mode. The year will flash on the display.
- Press the FORWARD/BACK buttons to scroll to the desired year— hold down the FORWARD/BACK buttons to accelerate scrolling.
- Go to the CONTROL PANEL on the bottom of the unit and slide the LOCK, TIME/DATE switch back to LOCK to save time and date and to achieve normal operation and close the CONTROL COMPARTMENT COVER.
Reset
If your clock is not working properly, use this function to reset the unit. Activating the RESET function will revert the date and time to January 1, 2008, at 12:00 a.m.
- Open the CONTROL COMPARTMENT COVER on the bottom of the clock to access the CONTROL PANEL.
- Press the RESET button with a pointed object to reset the clock. The clock will then reset to January 1, 2008, at 12:00 a.m.
Note: once you have manually reset the correct date and time, the clock will resume setting itself if there is a power interruption from that date forward. - Close the CONTROL COMPARTMENT COVER.
INSTALLING THE BACKUP BATTERY
When the backup CR2430 battery (included) is running low, the low battery icon![]()
Note: to avoid manually resetting your clock, replace a spent battery while the clock is plugged into an outlet.
- Remove the screw on the door of the BATTERY COMPARTMENT and lift the cover.
- Place 1 new CR2430 button cell battery into the BATTERY COMPARTMENT according to the polarity indicator.
- Replace the BATTERY COMPARTMENT door and secure the screw.
SPECIFICATIONS
- Power Supply: AC 120V 60Hz 5W (Input) DC 8V 250mA (Output)
- Battery: DC 3V×1 pc (Size: CR2430) for back-up
One (1) Year Limited Warranty
Brookstone® warrants this product against defects in materials and/or workmanship under normal use for a period of ONE (1) YEAR from the date of purchase by the original purchaser (“Warranty Period”). If a defect arises and a valid claim is received within the Warranty Period, at its option, Brookstone will either 1) repair the defect at no charge, using new or refurbished replacement parts, or 2) replace the product with a new product that is at least functionally equivalent to the original product, or 3) provide a store credit in the amount of the purchase price of the original product.
A replacement product or part, including a user-installable part installed in accordance with instructions provided by Brookstone, assumes the remaining warranty of the original product. When a product or part is exchanged, any replacement item becomes your property and the replaced item becomes Brookstone’s property. When a store credit is given, the original product must be returned to Brookstone and becomes Brookstone’s property.
Obtaining service:
To obtain warranty service, call Brookstone Limited Warranty Service at 1-800-292-9819. Please be prepared to describe the product that needs service and the nature of the problem. A purchase receipt is required. All repairs and replacements must be authorized in advance. Service options, parts availability, and response times will vary. You are responsible for delivery and the cost of delivery of the product or any parts to the authorized service center for replacement, per our instructions.
Limits and exclusions:
Coverage under this Limited Warranty is limited to the United States of America, including the District of Columbia and the U.S. Territories of Guam, Puerto Rico, and the U.S. Virgin Islands. This Limited Warranty applies only to products manufactured for Brookstone that can be identified by the “Brookstone” trademark, trade name, or logo affixed to them or their packaging.
The Limited Warranty does not apply to any non-Brookstone products. Manufacturers or suppliers other than Brookstone may provide their own warranties to the purchaser, but Brookstone, in so far as permitted by law, provides these products “as is.” This warranty does not apply to
- a) damage caused by failure to follow instructions relating to the product’s use or the installation of components;
- b) damage caused by accident, abuse, misuse, fire, floods, earthquake or other external causes;
- c) damage caused by service performed by anyone who is not a representative of Brookstone;
- d) accessories used in conjunction with a covered product;
- e) a product or part that has been modified to alter functionality or capability;
- f) items intended to be periodically replaced by the purchaser during the normal life of the product including, without limitation, batteries or light bulbs;
- g) any product sold “as is” including, without limitation, floor demonstration models and refurbished items; or
- h) a product that is used commercially or for a commercial purpose.
Some states disallow the exclusion or limitation of incidental or consequential damages or how long an implied warranty lasts, so the above exclusions or limitations may not apply to you. This warranty gives you specific legal rights and you may also have other rights, which vary from state to state.
Merrimack, New Hampshire USA 03054 • 800-846-3000 • www.Brookstone.com
FAQs About Brookstone Self-Setting Clock
How is a Brookstone alarm clock used?
The MODE button should be pressed and held for 2 seconds. Alarm Set mode will be activated on the clock. The first alarm time will flash. By pressing the FORWARD/BACK keys and holding them down, you can speed up scrolling to the appropriate alarm time.
Do alarm clocks restart after a power outage?
During a power outage, digital clocks and alarm clocks will need to be reset. It might be frightening when the power goes out, especially at night, because you might sleep through it but your alarm might not sound. During a power outage, be sure to unplug your clocks and timers because the surge or outage could harm them after the power is restored.
What is the name of a self-setting clock?
Atomic Date and Time
Why don’t clocks use batteries instead?
Mechanical clocks don’t require a battery to keep time like their digital and quartz cousins do. Instead, they use a wound spring’s energy storage. All mechanical clocks must therefore be wound in order to maintain precise time throughout time. Energy is required to operate every mechanical clock.
What is the Brookstone reset procedure?
To execute a system reset, press and hold the LIGHTS ON/OFF BUTTON for around 5 seconds, or until the WI-FI STATUS LED INDICATOR turns off.
How can I turn off my alarm from Brookstone?
When the alarm time is specified, the alarm will turn on automatically. Press and hold the ALM key in regular mode display once to turn off the alarm (OFF).
What results in time loss on an electric clock?
Power outages and the condition of the unit’s backup battery may be to blame for this. The strength of the backup battery, for instance, will determine whether time is gained or lost if a power outage occurs and the clock radio uses it.
What stops a clock from running?
It’s almost usually a battery problem when a clock stops or loses time. Quartz movements are straightforward and extremely dependable. Fact: Underperforming batteries are the primary cause of almost all slow or stopped clocks.
Are alarms functional without power?
If you’ve made the right equipment investments, an alarm system can function without power. The easiest approach to guarantee ongoing security is to choose a home alarm system that includes a device with a battery backup. In case of a power outage, battery backups are helpful for keeping your home alarm operational.
For more manuals by Brookstone, visit ManualsDock


