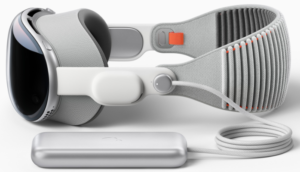
Apple Vision Pro and vision OS Setup Guide
Find settings on Apple Vision Pro
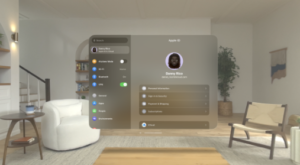
In the Settings app ![]() , you can search for settings you want to change, such as your passcode, Environment settings, and more.
, you can search for settings you want to change, such as your passcode, Environment settings, and more.
- Press the Digital Crownto open Home View.
If you don’t see your apps, look at the tab bar on the left, then tap Apps ![]() .
.
- Tap Settings
 , then do one of the following to find the setting you want:
- Scroll through the settings on the left, then tap the one you want.
- Select the search field, enter a term—“volume,” for example—then choose a setting in the search results.
- Look at
 in the search field, say what you’re looking for (instead of typing), then choose a setting in the search results.
Connect Apple Vision Pro to the internet
Connect your Apple Vision Pro to the internet by using an available Wi-Fi network.
Connect Apple Vision Pro to a Wi-Fi network
- Go to Settings
 > Wi-Fi, then turn on Wi-Fi.
 - Tap a network, then enter the password (if required).
To join a hidden network, tap Other, then enter the name of the network, the security type, and password.
If ![]() appears at the top of Control Center, Apple Vision Pro is connected to a Wi-Fi network. (To verify this, open Safari to view a webpage.) Apple Vision Pro reconnects when you return to the same location.
appears at the top of Control Center, Apple Vision Pro is connected to a Wi-Fi network. (To verify this, open Safari to view a webpage.) Apple Vision Pro reconnects when you return to the same location.
Join a Personal Hotspot
If an iPhone or an iPad (Wi-Fi + Cellular) is sharing a Personal Hotspot, you can use its cellular internet connection.
- Go to Settings
 > Wi-Fi, then choose the name of the device sharing the Personal Hotspot.
 - If asked for a password on your Apple Vision Pro, enter the password shown in Settings
 > Cellular > Personal Hotspot on the device sharing the Personal Hotspot.
If ![]() appears at the top of Control Center, Apple Vision Pro is connected to a Personal Hotspot. (To verify this, open Safari to view a webpage.)
appears at the top of Control Center, Apple Vision Pro is connected to a Personal Hotspot. (To verify this, open Safari to view a webpage.)
Sign in with your Apple ID on Apple Vision Pro
Your Apple ID is the account you use to access Apple services such as the App Store, Apple Music, FaceTime, iCloud, and more—so all your devices work together seamlessly.
Note: Children under 13 years of age can’t sign in to Apple Vision Pro with their Apple ID. Children ages 13 years and older should be supervised by an adult while using Apple Vision Pro.
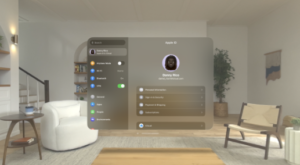
Sign in with your Apple ID
If you didn’t sign in during setup, do the following:
- Go to Settings
 , then tap Sign in to your Apple Vision Pro.
 - Enter your Apple ID and password.
If you don’t have an Apple ID, you can create one.
- If you protect your account with two-factor authentication, enter the six-digit verification code.
If you forgot your Apple ID or password, see the Recover your Apple ID website.
Change your Apple ID settings
- Go to Settings
 > [your name].
 - Do any of the following:
- Update your contact information
- Change your password
- Add or remove Account Recovery Contacts
- View and manage your subscriptions
- Update your payment methods or billing address
- Manage Family Sharing subscriptions, shared purchases, and more
Use iCloud on Apple Vision Pro
iCloud securely stores your photos, videos, documents, backups, and more—and keeps them updated across all your devices—automatically. With iCloud, you can also share photos, calendars, notes, folders, and files with friends and family. iCloud provides you with an email account and 5 GB of free storage for your data. For more storage and additional features, you can subscribe to iCloud+.
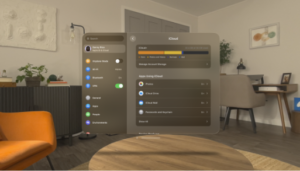
Change your iCloud settings
Sign in with your Apple ID, then do the following:
- Go to Settings
 > [your name] > iCloud.
 - Turn on the features you want to use—such as Photos, iCloud Drive, iCloud Backup, and more.
For information on how to customize iCloud features on your other devices, see “Set up iCloud and change settings on all your devices” in the iCloud User Guide.
Ways to use iCloud on Apple Vision Pro
iCloud can keep your Apple Vision Pro backed up automatically. See Back up Apple Vision Pro.
You can also keep other information, such as the following, stored in iCloud and kept up to date across your Apple Vision Pro and other Apple devices:
- Photos and videos; see Use iCloud Photos on Apple Vision Pro.
- Files and documents; see Turn on iCloud Drive.
- Contacts, Calendars, Notes, and Reminders
- Data from compatible third-party apps and games
- Messages threads; see Set up Messages on Apple Vision Pro.
- Passwords and payment methods; see Make your passkeys and passwords available on all your devices with Apple Vision Pro and iCloud Keychain.
- Safari bookmarks and open tabs; see Bookmark websites in Safari on Apple Vision Proand Use tabs and Tab Groups in Safari on Apple Vision Pro.
Set a passcode and use Optic ID to unlock Apple Vision Pro
For better security, set a passcode that needs to be entered to unlock Apple Vision Pro when you turn it on or wake it. You can also set up and use Optic ID to conveniently unlock Apple Vision Pro, authorize purchases and payments, and sign in to many third-party apps with the uniqueness of your iris. Optic ID data is encrypted and never leaves your device.
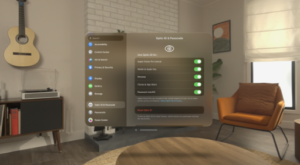
Set or change the passcode
- Go to Settings
 > Optic ID & Passcode.
 - Do any of the following:
- Set a passcode: Tap Turn Passcode On, then enter your passcode.
- Change your passcode: Tap Change Passcode.
Turn off the passcode
- Go to Settings
 > Optic ID & Passcode.
 - Choose Turn Passcode Off.
Erase data after 10 failed passcodes
You can set Apple Vision Pro to erase all information, media, and personal settings after 10 consecutive failed passcode attempts.
- Go to Settings
 > Optic ID & Passcode.
 - Turn on Erase Data.
After all data is erased, you must restore Apple Vision Pro from a backup or set it up again.
Use Optic ID
- Go to Settings
 > Optic ID & Passcode.
 - Tap Set up Optic ID, then follow the instructions.
You can reset Optic ID or change what Optic ID is used for at any time.
After you set a passcode, you can use Optic ID to unlock Apple Vision Pro. For additional security, you must enter your passcode to unlock your Apple Vision Pro under certain conditions, such as when:
- You turn on or restart your Apple Vision Pro.
- There are five unsuccessful attempts to unlock your Apple Vision Pro with Optic ID.
- You haven’t set up your iPhone to enable Optic ID.
Use your iPhone to enable Optic ID
If your iPhone and Apple Vision Pro are signed in with the same Apple ID, you can use your iPhone to enable Optic ID even when you’d normally have to use your passcode.
- Go to Settings
 > Optic ID & Passcode.
 - Tap your iPhone below Nearby iPhone Enables Optic ID.
Optic ID will be available if your iPhone is nearby and has been unlocked in the past hour.
Capture and edit your Persona (beta) on Apple Vision Pro
Your Persona is a dynamic, natural representation of your face and hand movements that can be used while you’re wearing Apple Vision Pro. You can use your Persona in a FaceTime call, or in another app that uses the Persona Virtual Camera to show your Persona.
After you capture your Persona, EyeSight is personalized to show your eyes to others nearby.
Tips for capturing your Persona
- Take your time getting ready. Capturing won’t start until you’re holding your Apple Vision Pro at eye level.
If you don’t start the capture within 15 minutes, it’s cancelled. You can restart the capture after you put your Apple Vision Pro back on.
- Find a space with front-facing, even lighting, so there aren’t shadows on your face.
Avoid bright light sources overhead or in the background.
- Stand or sit in front of a simple, neutral background without too many details.
- Stay in the same location and position during the capture process.
- Relax your shoulders while holding Apple Vision Pro.
- Natural, genuine facial expressions produce the best results.
Edit or recapture your Persona
After you capture your Persona, you can adjust the lighting or select a pair of glasses. You can also recapture your Persona at any time—for example, to reflect a change in your hairstyle or outfit.
When you recapture your Persona, EyeSight is also automatically updated.
- Go to Settings
 > Persona.
 - Tap Edit Details or Recapture.
Your Persona is stored encrypted on your device and requires Optic ID or your passcode to access (depending on your settings). If you have Optic ID turned on and then turn it off, your Persona is deleted.
You can’t capture or edit your Persona if Travel Mode is turned on and during FaceTime calls. Persona isn’t available while others are using your Apple Vision Pro with Guest User.
If you’d like to share your feedback with Apple to help improve Persona, go to Settings > Persona, then tap Provide Apple with Feedback.
What does Eyesight show?
Eyesight reveals your eyes on the front of your Apple Vision Pro, and lets those nearby know when you’re using apps or fully immersed in an experience.
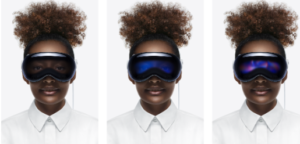
Here are some of the ways that Eyesight informs others around you what you’re doing on Apple Vision Pro:
- When you wear Apple Vision Pro and have captured your Persona (beta), Eyesight is personalized with your own eyes.
If you haven’t captured your Persona, EyeSight shows an impression of your eyes without personalized eye details.
- When you’re using an app or in an interactive experience, EyeSight shows an animation to let others know you may not be able to see them.
- When you’re capturing spatial photos and videos, capturing your view, or sharing your view with others, EyeSight shows an animation letting people know that you’re using the camera.
EyeSight only appears when you’re wearing the device and others are around you. The front display shows the Apple logo when you turn on Apple Vision Pro and a progress bar when you update visionOS.
Delete your personalized EyeSight
You can delete your personalized EyeSight, but your Persona is not affected. If you delete your personalized Eyesight, others still see an impression of your eyes.
- Go to Settings
 > People Awareness.
 - Tap Delete Eyesight.
If you delete your personalized Eyesight and want to use it again later, you need to recapture your Persona.
Connect headphones, game controllers, and other Bluetooth accessories to Apple Vision Pro
You can connect Bluetooth® accessories like headphones, game controllers, keyboards, and more to your Apple Vision Pro.
For an even more immersive experience, you can pair AirPods Pro (2nd generation) with MagSafe Charging Case (USB-C), which provides Lossless Audio with ultra-low latency when paired with Apple Vision Pro (using a proprietary wireless audio protocol).
AirPods (2nd generation), AirPods Pro (1st or 2nd generation) with MagSafe Charging Case (Lightning), and AirPods Max wireless headphones use Apple AAC Bluetooth Codec to ensure excellent audio quality.
Bluetooth connections aren’t lossless.
Note: Not all Bluetooth accessories can be connected to Apple Vision Pro. See the Apple Support article Use Bluetooth accessories with your Apple Vision Pro.

Pair Bluetooth headphones, a game controller, or other device
- Follow the instructions that came with the Bluetooth device to put it in discovery mode.
- Do any of the following:
- Connect AirPods, Beats headphones, a game controller, or another supported Bluetooth device: Go to Settings
 > Bluetooth, turn on Bluetooth, then tap the name of the device.
 - Connect other Bluetooth headphones: Go to Settings
 > Accessibility > Hearing Devices > Other Devices, then tap the name of your device.
- Connect AirPods, Beats headphones, a game controller, or another supported Bluetooth device: Go to Settings
For more information about using AirPods with Apple Vision Pro, see the Apple Support article Use AirPods with Apple Vision Pro.
Customize a wireless game controller
After you pair a compatible game controller, you can customize it for supported games from Apple Arcade and the App Store.
- Go to Settings > General > Game Controller.
- Choose an option for buttons you want to change, or tap Add App to create custom controls for a certain app.
Note: Apple Arcade availability varies by country or region.
Unpair a Bluetooth device
- Go to Settings
 > Bluetooth.
 - Tap
 next to the name of the device, then tap Forget This Device.
If you don’t see the Devices list, make sure Bluetooth is turned on.
If you have Air Pods and you tap Forget This Device, they’re automatically removed from other devices where you’re signed in with the same Apple ID.
Disconnect from Bluetooth devices
To quickly disconnect from all Bluetooth devices without turning Bluetooth off, open Control Center, then tap the Bluetooth button.
Use Air Drop on Apple Vision Pro to send items to nearby devices
With Air Drop, you can wirelessly send your photos, videos, websites, locations, and more to other nearby devices (iOS 7, iPad OS 13, OS X 10.10, vision OS 1.0, or later required). Air Drop transfers information using Wi-Fi and Bluetooth—both must be turned on. To use Air Drop, you need to be signed in with your Apple ID. Transfers are encrypted for security.
Tip: You can use Air Drop to securely share app and website passwords with someone using an iPhone, iPad, Mac, or Apple Vision Pro. See Share passkeys and passwords securely with AirDrop on Apple Vision Pro.
Send an item using Air Drop
- Open the item, then tap
 , Share, Air Drop,
  , or another button that displays the app’s sharing options.
 - Tap
 , then tap the person you want to share with. (You can also use Air Drop to share between your own devices.)
If someone doesn’t appear in Air Drop, ask them to open Control Center and allow Air Drop to receive items. (If they have a Mac with macOS 12 or earlier, ask them to allow themselves to be discovered in Air Drop in the Finder.)
Allow others to send items to your Apple Vision Pro using AirDrop
- Open Control Center, then tap
 .
.
If you don’t see , you can add it to Control Center. See Add or remove Control Center options.
 - Tap Contacts Only or Everyone for 10 Minutes to choose who you want to receive items from.
You can accept or decline each request as it arrives. Tap ![]() at the top of your view, then choose an option.
at the top of your view, then choose an option.
Set up Apple Pay on your Apple Vision Pro
After you set up Apple Pay, you can make secure payments in apps and on websites that support Apple Pay. You can also send and receive money from friends and family in Messages and make purchases from participating businesses.
Add a credit or debit card
If you’ve added a card to Apple Pay on your iPhone, iPad, or Mac, you can easily add it on your Apple Vision Pro. You can also add a new card.
- Go to Settings
 > Wallet & Apple Pay, then tap Add Card. You may be asked to sign in with your Apple ID.
 - Do one of the following:
- Add a new card: Tap Debit or Credit Card, tap Continue, then enter your card details manually.
- Add your previous cards (including Apple Card): Tap Previous Cards, then choose any cards you previously used. These cards may include the card associated with your Apple ID, cards you use with Apple Pay on your other devices, cards you added to Safari AutoFill, or cards you removed from Wallet. Tap Continue, authenticate with Optic ID or your passcode, then follow the instructions.
- Add a card from a supported app: Tap the app of your bank or card issuer.
The card issuer determines whether your card is eligible for Apple Pay, and may ask you for additional information to complete the verification process.
Use compatible cards with Apple Pay
If you saved cards in Safari Autofill, you can turn on Compatible Cards to verify that they can be used with Apple Pay.
- Go to Settings
 > Wallet & Apple Pay.
 - Turn on Compatible Cards.
The card issuer determines whether your card is eligible for Apple Pay, and may ask you for additional information to complete the verification process.
Set the default card and shipping information
The first card you add becomes your default card for payments. You can set a different card as the default at any time. You can also set the default shipping address and contact information you want to use.
- Go to Settings
 > Wallet & Apple Pay.
 - Tap an option below Transaction Defaults, such as Default Card or Shipping Address.
Use Apple Pay in apps and Safari on Apple Vision Pro
You can make purchases using Apple Pay in apps and on the web using Safari wherever you see the Apple Pay button.
- During checkout, tap the Apple Pay button.
- Review the payment information.
You can change the credit card, billing and shipping addresses, and contact information. - To complete the payment, double-click the top button, then glance at
 to authenticate with Optic ID, or enter your passcode.
Set up and use Apple Cash on Apple Vision Pro (U.S. only)
With Apple Cash, you can make purchases using Apple Pay; send, request, and receive money in the Messages app ![]() ; and transfer your Apple Cash balance to your bank account.
; and transfer your Apple Cash balance to your bank account.
Set up and use Apple Cash
Do any of the following:
- Go to Settings
 > Wallet & Apple Pay, then turn on Apple Cash.
 - In Messages, send or accept a payment.
Accept payments with Apple Cash
Money you receive is added to your Apple Cash balance. You can choose to automatically or manually accept payments.
- Go to Settings
 > Wallet & Apple Pay, then tap Apple Cash.
 - Choose to automatically or manually accept payments.
If you choose Manually Accept Payments, you have 7 days to accept a payment before it’s returned to the sender.
View your balance and transactions
- Go to Settings
 > Wallet & Apple Pay, then tap Apple Cash to view your balance.
 - Do any of the following:
- View your transactions: Tap Transactions. Scroll down to see your transactions grouped by year.
- Get a statement: Scroll down, then tap Request Transaction Statement.
Manage your Apple Cash
- Go to Settings
 > Wallet & Apple Pay, then tap Apple Cash.
 - Do any of the following:
- Add money from a debit card.
- Transfer money to your bank.
- Update your bank account information.
Manage Apple Pay cards and activity on Apple Vision Pro
In Settings , you can manage the cards you use for Apple Pay and review your recent transactions.
View the information for a card and change its settings
- Go to Settings
 > Wallet & Apple Pay.
 - Tap a card, then do any of the following:
- Tap Transactions to view your recent history. To hide this information, turn off Show History. To view all your Apple Pay activity, see the statement from your card issuer.
- View the last four digits of the card number and Device Account Number—the number transmitted to the merchant.
- Change the billing address.
- Remove the card from Apple Pay.
Change your Apple Pay settings
- Go to Settings
 > Wallet & Apple Pay.
 - Do any of the following:
- Set your default card.
- Add the shipping address and contact information for purchases.
Remove your cards from Apple Pay if your Apple Vision Pro is lost or stolen
To remove your cards from Apple Pay, do any of the following:
- On a Mac or PC: Sign in to your Apple ID account (or sign into apple.com). In the Devices section, select the lost Apple Vision Pro. In the Wallet & Apple Pay section, click Remove Items.
- On an iPhone or iPad: Go to Settings
 > [your name], select the lost Apple Vision Pro, then tap Remove Items (below Wallet & Apple Pay).
 - Call the issuers of your cards.
If you remove cards, you can add them again later.
If you sign out of iCloud in Settings > [your name], all your credit and debit cards for Apple Pay are removed from Apple Vision Pro. You can add the cards again the next time you sign in.
Use Family Sharing on Apple Vision Pro
Family Sharing lets you and up to five other family members share access to Apple services, purchases, an iCloud storage plan, and more.
One adult family member—the organizer—invites other family members to participate. When family members join, Family Sharing is set up on everyone’s devices automatically. The group then chooses which services and features they want to use and share.
You can set up your Family Sharing group on your iPhone, iPad, or Mac, and use subscriptions, shared purchases, and more on your Apple Vision Pro.
Share Apple subscriptions
- Go to Settings
 > [your name] > iCloud, then tap Family Sharing.
 - Tap Manage Subscriptions, then tap a subscription.
Share App Store subscriptions
You can choose which eligible App Store  subscriptions you share with family members. For information about the App Store, see Get apps in the App Store on Apple Vision Pro.
- Go to Settings
 > [your name] > Subscriptions.
 - Do one of the following:
- Share all new subscriptions: Turn on Share with Family.
- Change the settings for a specific subscription: Tap the subscription, then turn Share with Family on or off.
If you don’t see Share with Family, the subscription isn’t eligible for sharing.
Share purchases
- Go to Settings
 > [your name] > iCloud, then tap Family Sharing.
 - Tap Purchase Sharing, then follow the instructions.
Tip: To turn off purchase sharing for yourself, tap [your name], then turn off Share Purchases. Family Sharing members won’t see your purchases, but you can still see items other members have shared with you.
Frequently Asked Questions
How do I find settings on Apple Vision Pro?
Navigate to the Settings app and search for the settings you want to change, such as passcode, environment settings, and more.
How do I connect my Apple Vision Pro to the internet?
Connect your device to an available Wi-Fi network through Settings.
How can I sign in with my Apple ID on Apple Vision Pro?
Access your Apple ID settings via Settings and sign in to enjoy seamless integration with Apple services.
What can I use iCloud for on Apple Vision Pro?
iCloud securely stores your data, including photos, videos, documents, backups, and more, ensuring synchronization across all your devices.
How do I set a passcode and use Optic ID to unlock Apple Vision Pro?
Enhance security by setting a passcode and utilizing Optic ID for unlocking your device, authorizing purchases, and more.
How can I capture and edit my Persona on Apple Vision Pro?
Learn how to capture your Persona, a representation of your face and hand movements, and personalize your EyeSight experience.

