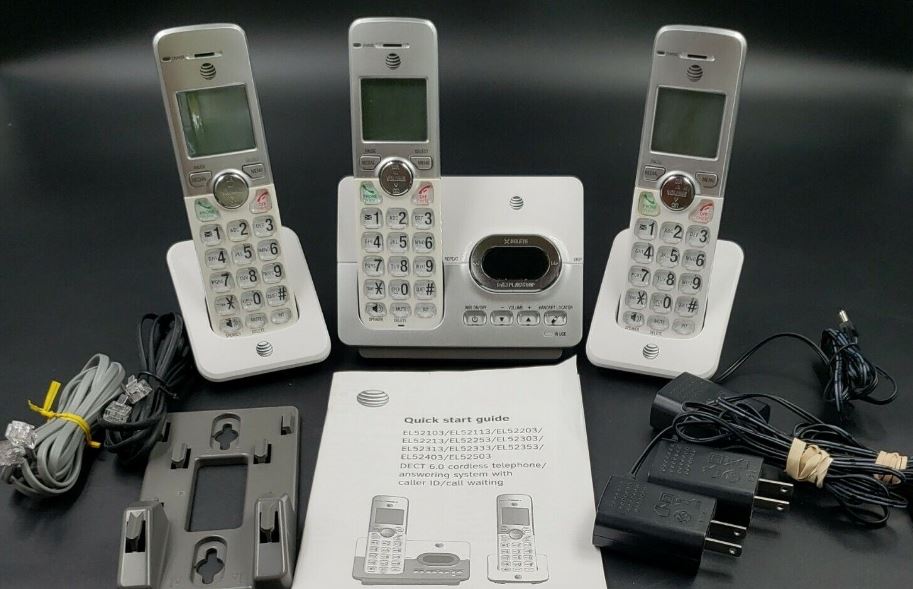
ATT EL52103 DECT Cordless Telephone
About AT&T
An international telecommunications holding corporation with its headquarters in Downtown Dallas, Texas, is AT&T Inc. It is the largest wireless provider in the United States and the third-largest telecoms firm in the world by revenue.
Instructions
This quick start guide provides you with basic installation and operation instructions. A limited set of features are described in abbreviated form.
Parts checklist
Your telephone package contains the following items. Save your sales receipt and original packaging if warranty service is necessary.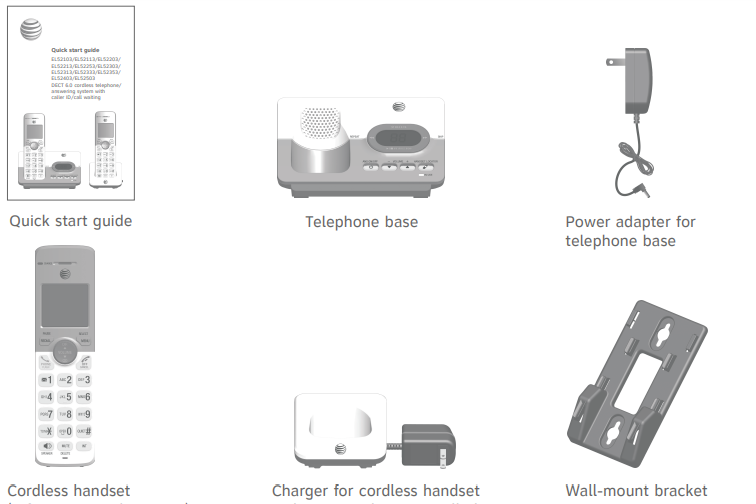

- Quick start guide
- Telephone base
- Power adapter for a telephone base
- Cordless handset
- (1 for EL52103/EL52113)
- (2 for EL52203/ EL52213/EL52253)
- (3 for EL52303/EL52313/ EL52333/EL52353)
- (4 for EL52403)
- (5 for EL52503)
- Charger for cordless handset with power adapter installed
- (1 for EL52203/ EL52213/EL52253)
- (2 for EL52303/EL52313/ EL52333/EL52353)
- (3 for EL52403)
- (4 for EL52503)
- Wall-mount bracket
- Battery for cordless handset
- (1 for EL52103/EL52113)
- (2 for EL52203/ EL52213/EL52253)
- (3 for EL52303/EL52313/ EL52333/EL52353)
- (4 for EL52403)
- (5 for EL52503)
- Battery compartment cover
- (1 for EL52103/EL52113)
- (2 for EL52203/ EL52213/EL52253)
- (3 for EL52303/EL52313/ EL52333/EL52353)
- (4 for EL52403)
- (5 for EL52503)
- Telephone line cord
Installation
Install the telephone base and charger, as shown below. If you subscribe to high-speed Internet service (DSL – digital subscriber line) through your telephone line, you must install a DSL filter on the DSL line. If you want to mount your telephone on a wall, use the included wall-mount bracket and refer to the Wall-mount installation in the online user’s manual for details.

ImPorTanT InformaTIon:
Use only the power adapter(s) provided with this product. To obtain a replacement, visit our website at www.telephones.att.com or call 1 (800) 222-3111. In Canada, dial 1 (866) 288-4268.
Battery installation
Install the battery, as shown below.
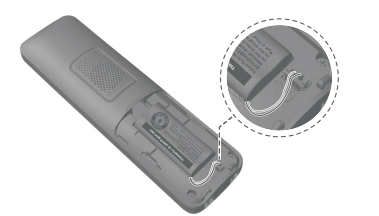
- Plug the battery connector securely into the socket inside the handset battery compartment, matching the color-coded label. Insert the supplied battery with the label ThIs sIDE uP facing up, as indicated.
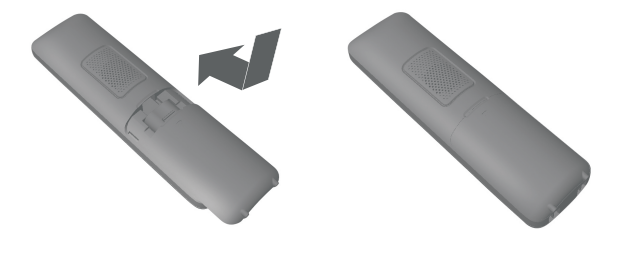
- Align the cover flat against the battery compartment, then slide it upwards until it clicks into place.
- Charge the handset by placing it face up in the telephone base or charger. The charge light is on when charging

Battery installation
To replace the battery, press the tab and slide the battery compartment cover downwards. Lift out the old battery and disconnect it from the handset. Follow the instructions to install and charge the new battery.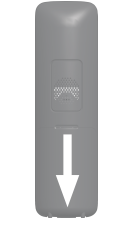
ImPorTanT InformaTIon:
Use only the supplied rechargeable battery or replacement battery (model BT162342/BT262342). To order, visit our website at www.telephones.att.com or call 1 (800) 222-3111. In Canada, dial 1 (866) 288-4268.
Battery charging
Once you have installed the battery, the screen indicates the battery status (see the following table). If necessary, place the handset in the telephone base or charger to charge the battery. For best performance, keep the handset in the telephone base or charger when not in use. The battery is fully charged after 16 hours of continuous charging. See Technical specifications on page 37 for battery operating times.
If the screen is blank, you need to charge the handset without interruption for at least 30 minutes to give the handset enough charge to use the telephone for a short time. The screen shows a Low battery until you have charged the battery without interruption for at least 30 minutes. The following table summarizes the battery charge indicators and actions to take.
notes:
- If you are on a call in low battery mode, you hear 4 short beeps every 50 seconds.
- If no battery is installed in the handset when you place it in the telephone base or charger, the screen shows no battery. Follow the instructions in Battery Installation on page 3 to install the battery.
After you install your telephone or power returns following a power outage, the handset will prompt you to set the date and time (see page 9). To skip setting the date and time, press off/CanCEL.
handset overview

Telephone base overview
Menu overview
Use the menu to change the telephone settings.
- Press Menu/SELECT in idle mode (when the handset is not in use) to enter the main menu.
- Press CID or DIr to scroll through menu items.
- Press Menu/sELECT to select or save the indicated item.
-or-
- Press off/CanCEL to cancel an operation, back up to the previous menu, or exit the menu display. Press and hold off/CanCEL to cancel an operation and return to idle mode.
Feature summary
Default settings are indicated by an asterisk (*).
Telephone settings
Use the feature summary on page 8 to find and set features. The following are a few examples of common features to set. Refer to handset settings and answering system settings in the online user manual for detailed instructions on setting all telephone features.
Making, answering, and ending calls
Making a call
- Press Phone/fLash or /sPEaKEr and then dial the number using the dialing keys.
-or-
Enter the number using the dialing keys and then press PhonE/fLash or /sPEaKEr to dial.
While predialing a number, you can:
- Press and hold rEDIaL/PausE to insert a 3-second dialing pause (a P appears).
- Press muTE/DELETE or off/CanCEL to erase a digit.
- Press and hold muTE/DELETE or off/CanCEL to return to idle mode.
answering a call
Press PhonE/fLash, /sPEaKEr, or any dialing key (0-9, or #).
Ending a call
Press off/CanCEL or put the handset in the telephone base or charger to end the call.
handset speakerphone
During a call, press /sPEaKEr to switch between speakerphone and normal handset use. Press off/CanCEL to hang up.
Temporary silencing
While the telephone is ringing, press off/CanCEL or muTE/DELETE to silence the ringer temporarily on that handset only. This turns off the ringer without disconnecting the call. The next incoming call rings normally at the preset volume.
options while on the call
volume control
While on a call, press DIr/voLumE to increase or press CID/voLumE to decrease the listening volume.
note: The handset volume setting and speakerphone volume setting are independent. Changing one does not affect the other.
Join a call in progress
If a handset is already on a call and you would like to join the call, press PhonE/fLash or /sPEaKEr on another system’s handset. To exit the call, press off/CanCEL or place the handset in the telephone base or charger. The call does not end until all handsets hang up.
notes:
- This feature is only applicable to models with more than one handset.
- For models with two to four handsets, all handsets can be used at the same time on an outside call. For models with five handsets, you can use a maximum of four handsets. If the fifth handset attempts to join the call, the handset screen shows unable to call.
Chain dialing
While on a call, you can initiate a dialing sequence from numbers stored in the directory, caller ID log, or redial list. Doing this can be useful if you wish to access other numbers (such as bank account numbers or access codes).
To initiate a dialing sequence from the directory, caller ID log, or redial list while on a call, access the number through the menu system:
- While on a call, press Menu/selected, then scroll to Directory or Caller ID log. Press mEnu/sELECT.
-or-
While on a call, press rEDIaL/PausE to show the redial list.
- Scroll to the desired number. If you are in the directory, you can use the dialing keys to find the desired directory entry (see search by name in the online user’s manual for more details).
- Press Menu/SELECT to dial the displayed number.
redial
Each handset stores the 10 most recently called numbers in the redial list.
- To review and call numbers in the redial list, press rEDIaL/PausE in idle mode. The most recently called number appears on the screen.
- To view up to 10 recently called numbers, press DIr, CID, or rEDIaL/PausE repeatedly to scroll through the numbers in the list.
- When the desired number appears, press PhonE/fLash or /sPEaKEr to dial the number.
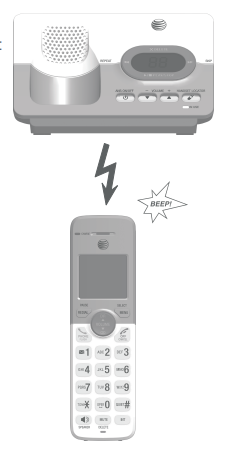
handset locator
Use the handset locator to find misplaced handset(s).
To start the paging tone:
- Press /the handset locator at the telephone base to start the paging tone on all handsets for 60 seconds.
To stop the paging tone:
- Press PHONE/FLASH, /SPEAKER, OFF/CANCEL, or any dialing key (0-9, or #) on the handset(s).
- WordPress/handset locator on the telephone base.
- Put the handset in the telephone base or charger.
Call screening
If Call screening is on, the incoming messages can be played through the speaker on the telephone base or the handsets. You can press PhonE/fLash on the handset to stop recording and speak to the caller.
Call screening at the handset:
If the answering system is turned on and there is an incoming call answered by the answering system, the handset screen shows To screen call, press [Select]. Press Menu/SELECT on the handset to screen the call.
Call screening at the base:
You can turn call screening on or off using the handset. When call screening is off, you can temporarily turn on the call screening by pressing /PLay/sToP or /voLumE+ on the telephone base. The call screening will return to off for the next incoming call.
message playback
- If there are only new messages or there are both new and old messages, the system plays only the new messages (in chronological order). If there are no new messages, the system plays all old messages (in chronological order). When playback begins, the total number of messages is announced.
- You can play messages from either the telephone base or a handset.
- On the telephone base, press /PLay/sToP to listen to messages. Use the corresponding key on the telephone base to repeat, skip, delete, or adjust the volume of messages.
- On a handset, press Menu/sELECT twice to select Play messages. Use the corresponding key, as indicated on the screen, to repeat, skip, or delete a message.
Delete all old messages
You can delete all old messages in idle mode. Once deleted, you cannot retrieve them. You cannot delete messages until you have listened to them.
- On the telephone base: Press x/DELETE twice.
- On a handset:
- Press Menu/SELECT in idle mode.
- Press CID or DIr to scroll to Answering sys, then press Menu/selected.
- Press CID or DIr to scroll to Delete all old, then press Menu/sELECT twice.
Directory overview
The directory is stored in the telephone base and shared by all handsets. It stores up to 50 entries. Changes made to the directory on any one handset apply to all. Only one handset can review the directory at a time.
Create directory entries
- Press Menu/SELECT in idle mode. Press CID or DIr to scroll to Directory and then press Menu/selected.
- Press Menu/selected to choose to add a contact.
- Use the dialing keys to enter the telephone number (up to 30 digits). Press Menu/SELECT to save the number in the display.
- Enter the name when prompted. Use the dialing keys to enter a name (up to 15 characters). Each time you press a key, the character on that key appears. Additional key presses produce other characters on that key. Refer to the Character chart under Create directory entries of the online user’s manual for information on entering special characters.
- Press Menu/sELECT to store your new directory
Adding and registering handsets
Your telephone system can support up to five handsets. The handsets provided within your product package are already registered as hanDsET 1, and so forth. You can purchase an additional handset AT&T EL50003 or AT&T EL50013 to expand your telephone system. EL50003 (silver) is for use with EL52103/EL52203/EL52253/ EL52303/EL52353/EL52403/EL52503. EL50013 (champagne) is for use with EL52113/EL52213/EL52313/EL52333. Additional handsets are assigned numbers in the sequential order they are registered (up to hanDsET 5). Each handset must be registered to the telephone base before use. register a handset to the telephone base:
- Before you begin registration, make sure the handset is out of the telephone base or charger and shows To register hs… and …see manual, alternately.
- Put the handset you wish to register on the telephone base cradle.
- The USB light on the telephone base turns on. After about 10 seconds, the handset shows registering… The handset shows registered and you hear a confirmation tone if the registration is For registration, put the handset on the telephone base, not the handset charger. was successful. The In usE light turns off. The handset is now registered with the telephone base. If the registration fails, the handset displays failed and then To register hs… and …see manual, alternately. Try the registration again by removing the handset from the telephone base and then placing it back in.

notes:
- You cannot register a handset if any other system handset is in use.
- You can only register one handset to the telephone base at a time.
Deregistering handsets
If you want to replace a handset or reassign the designated handset number of a registered handset, you must deregister all handsets that are registered to the telephone base, and then register each handset individually. To make deregistration easier, read all of the instructions on this page before you begin.
Deregister all handsets from the telephone base:
- Press and hold /hanDsET LoCaTor on the telephone base for about 10 seconds until the In usE light on the telephone base turns on and starts to flash. Then, release /hanDsET LoCaTor.
- Immediately press /hanDsET LoCaTor again. You must press /hanDsET LoCaTor while the In usE light is still flashing. The In usE light flashes for approximately five seconds.
- The deregistration takes about 10 seconds to complete. If the deregistration was successful, all handsets display To register hs… and …see manual, alternately. To register the handset(s) to the telephone base again, follow the registration instructions on the previous page.
notes:
- If the deregistration fails, you may need to reset the system and try again. To reset, unplug the power from the telephone base and plug it back in.
- You cannot deregister the handsets if any other system handset is in use.
- Even if the battery is depleted, you can still deregister the handsets by following the steps mentioned above. After the handset is charged for at least ten minutes, the screen shows To register hs… and …see manual, alternately.
Troubleshooting
If you have difficulty with your telephone, please try the following suggestions. For customer service, or to purchase accessories or replacement parts, visit our website at www.telephones.att.com, or call 1 (800) 222-3111. In Canada, dial 1 (866) 288-4268. When you call customer service, you will need the serial number or model number found at the bottom of the telephone base.
my telephone doesn’t work at all.
- Make sure the power cord is securely plugged in.
- Make sure that the battery connector is securely plugged into the cordless handset.
- Make sure the telephone line cord is securely and firmly plugged into the telephone base and the telephone wall jack.
- Charge the battery in the cordless handset for at least 16 hours. For optimum daily performance, return the cordless handset to the telephone base or charger when not in use.
- If the battery is depleted, it may take approximately 30 minutes to charge the handset before it shows Low battery, refer to Battery charging on page 5 for details.
- Reset the telephone base. Unplug the electrical power. Wait for approximately 15 seconds, then plug it back in. Allow up to one minute for the cordless handset and telephone base to reset.
- You may need to purchase a new battery. Please refer to the Battery installation on page 3.
The display shows no line. I cannot get a dial tone.
- First, try all of the suggestions mentioned above.
- If the previous suggestions do not work, disconnect the telephone line cord from your telephone and connect the telephone line cord to another telephone.
- If there is no dial tone on that other telephone either, your telephone line cord may be defective. Install a new telephone line cord.
- If changing the telephone line cord does not help, the wall jack (or the wiring to this wall jack) may be defective. Try using a different wall jack in your home to connect your EL52103/EL52113/EL52203/EL52213/EL52253/EL52303/EL52313/ EL52333/EL52353/EL52403/EL52503 telephone, or contact your telephone service provider (charges may apply).
I cannot dial out.
- First try all the suggestions in The display shows no line. I cannot get a dial tone.
- Make sure you have a dial tone before dialing. The cordless handset may take a second or two to find the telephone base and produce a dial tone. This is normal. Wait an extra second before dialing.
- Check that all the telephones connected to the same telephone line are hung up.
- Make sure to set the dial mode to the correct setting (pulse dialing or tone dialing) for the service in your area.
- Eliminate any background noise. Noise from a television, radio, or other appliances may cause the telephone not to dial out properly. If you cannot eliminate the background noise, first try muting the cordless handset before dialing, or dialing from another room with less background noise.
- If other telephones in your home are having the same problem, the problem is in your wiring or telephone service. Contact your telephone service provider (charges may apply).
my cordless handset isn’t performing normally.
- Make sure the power cord is securely plugged into the telephone base. Plug the power adapter into a different, working electrical outlet not controlled by a wall switch.
- Move the cordless handset closer to the telephone base. You might have moved out of range.
- Reset the telephone base. Unplug the electrical power. Wait for 15 seconds, then plug it back in. Allow up to one minute for the cordless handset and telephone base to reset.
- Other electronic products such as HAM radios and other DECT phones, can cause interference to your cordless telephone. Try installing your telephone as far away as possible from these types of electronic devices.
out of range or no PWR at base appears on my cordless handset.
- Ensure that the telephone base is powered on.
- Place the cordless handset in the telephone base for one minute to allow the cordless handset and base to synchronize.
- Move the cordless handset closer to the telephone base. You might have moved out of range.
- Reset the telephone base. Unplug the electrical power. Wait for 15 seconds, then plug it back in. Allow up to one minute for the cordless handset and telephone base to reset.
- Other electronic products such as HAM radios and other DECT phones, can cause interference to your cordless telephone. Try installing your telephone as far away as possible from these types of electronic devices.
The batteries do not hold a charge.
- If the cordless handset is in the telephone base or charger and the charge light does not turn on, refer to the item The charge light is off on page 25.
- Charge the battery in the cordless handset for at least 16 hours. For optimum daily performance, return the cordless handset to the telephone base or charger when not in use.
- If the battery is depleted, it may take approximately 30 minutes to charge the handset before it shows a Low battery. Refer to Battery charging on page 5 for details.
- You may need to purchase a new battery. Please refer to the Battery installation on page 3.
The charge light is off.
- Make sure the power cord is plugged in correctly and securely.
- Make sure the battery is installed correctly in the handset. Follow the instructions in Battery Installation on page 3 to install the battery.
- Unplug the electrical power. Wait for 15 seconds, then plug it back in. Allow up to one minute for the cordless handset and telephone base to reset.
- Clean the cordless handset and telephone base charging contacts each month using a pencil eraser or cloth.
I get noise, static, or weak signals even when I’m near the telephone base.
- If you subscribe to high-speed Internet service (DSL – digital subscriber line) through your telephone line, you must install a DSL filter between the telephone line cord and the telephone wall jack (see Installation on page 2). The filter prevents noise and caller ID problems caused by DSL interference. Please get in touch with your DSL service provider for more information about DSL filters.
- Other electronic products, such as computers, wireless routers, microwave ovens, and other cordless telephones can interfere with the performance of your cordless telephone. You may be able to improve the performance of your telephone by installing the telephone base as far away as possible from other electronic devices.
- Do not install this telephone near a microwave oven or on the same electrical outlet. You may experience decreased performance while the microwave oven is operating.
- If your telephone is plugged in with a modem or a surge protector, plug the telephone (or modem/surge protector) into a different location. If this doesn’t solve the problem, relocate your telephone or modem farther apart from one another, or use a different surge protector.
- Relocate your telephone to a higher location. The telephone will likely have better reception when installed in a high area.
- If the other telephones in your home are having the same problem, the problem is in your wiring or telephone service. Contact your telephone service provider (charges may apply).
I experience poor sound quality when using the speakerphone.
- For increased sound quality while using the speakerphone, place the handset on a flat surface with the dial pad facing up.
- When using a speakerphone, controlling background noise in your environment is essential. While you are listening to your party, press muTE/DELETE to temporarily turn your microphone off. When it is your turn to speak, remember to press muTE/DELETE again to turn the microphone on.
- Excessive background noise will cause a speakerphone to fade in and out. Try controlling the background noise by turning off any audio devices near the speakerphone. Also, try to avoid interrupting the person at the other end of the conversation while they are speaking. If background noise cannot be controlled, you should terminate speakerphone operation and return to normal handset mode.
I hear other calls while using my telephone.
- Disconnect the telephone base from the telephone wall jack, and plug in a different telephone. If you still hear other calls, the problem is probably in your wiring or telephone service. Call your telephone service provider (charges may apply).
I’ve set my LCD language to Spanish or French and I don’t know how to change it back to English.
- Press Menu/SELECT in idle mode, then enter 364# using the dialing keys. You hear a confirmation tone.
I subscribe to a nontraditional telephone service that uses my computer to establish connections, and my telephone doesn’t work.
- Make sure your computer is powered on.
- Make sure your Internet connection is working properly.
- Make sure that the software is installed and running for your nontraditional telephone service.
- Make sure to plug your USB port adapter into a dedicated USB port on your computer. Do not plug into a multiple port USB hub (USB splitter) that is not powered.
- In a few rare instances, the USB port on your computer may not have enough power. In these instances, try using a USB hub with its external power supply.
If you are using a firewall, it may prevent access to your nontraditional telephone service. Contact your service provider for more information.
Technical specifications
Important safety information
This symbol is to alert you to important operating or servicing instructions that may appear in this user’s manual. Always follow basic safety precautions when using this product to reduce the risk of injury, fire, or electric shock.
safety information
- read and understand all instructions in the user’s manual. observe all markings on the product.
- avoid using a telephone during a thunderstorm. There might be a slight chance of electric shock from lightning.
- Do not use a telephone in the vicinity of a gas leak. Under certain circumstances, a spark may be created when the adapter is plugged into the power outlet, or when the handset is replaced in its cradle. This is a common event associated with the closing of any electrical circuit. The user should not plug the phone into a power outlet, and should not put a charged handset into the cradle if the phone is located in an environment containing concentrations of flammable or flame-supporting gases unless there is adequate ventilation. A spark in such an environment could create a fire or explosion. Such environments might include: medical use of oxygen without adequate ventilation; industrial gases (cleaning solvents; gasoline vapors; etc.); a leak of natural gas; etc.
- Do not use this product near water, or when you are wet. For example, do not use it in a wet basement or shower, or next to a swimming pool, bathtub, kitchen sink, or laundry tub. Do not use liquids or aerosol sprays for cleaning. If the product comes in contact with any liquids, unplug any line or power cord immediately. Do not plug the product back in until it has dried thoroughly.
- Install this product in a protected location where no one can trip over any line or power cords. Protect cords from damage or abrasion.
- If this product does not operate normally, read Troubleshooting on pages 23-26 in this user’s manual. If you cannot solve the problem, or if the product is damaged, refer to Limited warranty on pages 35-36. Do not open this product except as may be directed in your user’s manual. Opening the product or reassembling it incorrectly may expose you to hazardous voltages or other risks.
- replace batteries only as described in Battery Installation on page 3 in your user’s manual. Do not burn or puncture batteries — they contain caustic chemicals.
- The power adapters are intended to be correctly oriented in a vertical or floor mount position. The prongs are not designed to hold the plug in place if they are plugged into a ceiling an under-the-table, or a cabinet outlet.
Cautions:
- Use only the power adapters provided with this product. To obtain a replacement, visit our website at telephones.att.com, or call 1 (800) 222–3111.
In Canada, dial 1 (866) 288-4268.
- Use only the supplied rechargeable battery or replacement battery (model BT162342/ BT262342). To order, visit our website at telephones.att.com or call 1 (800) 222-3111. In Canada, dial 1 (866) 288-4268.
- To prevent the fire or battery explosion risk, replace with the correct battery type. Dispose of used batteries according to the instructions.
Especially about cordless telephones
- Privacy: The same features that make a cordless telephone convenient create some limitations. Telephone calls are transmitted between the telephone base and the handset by radio waves, so there is a possibility that your cordless telephone conversations could be intercepted by radio-receiving equipment within range of the cordless handset. for this reason, you should not think of cordless telephone conversations as being as private as those on corded telephones.
- Electrical power: The telephone base of this cordless telephone must be connected to a working electrical outlet which is not controlled by a wall switch. Calls cannot be made from the handset if the telephone base is unplugged, switched off, or if the electrical power is interrupted.
- Potential TV interference: Some cordless telephones operate at frequencies that may cause interference to TVs and VCRs. To minimize or prevent such interference, do not place the telephone base of the cordless telephone near or on top of a TV or VCR. If interference is experienced, moving the cordless telephone farther away from the TV or VCR will often reduce or eliminate the interference.
- rechargeable batteries: This product contains nickel-metal hydride rechargeable batteries. Exercise care in handling batteries in order not to create a short circuit with conductive materials such as rings, bracelets, and keys. The battery or conductor may overheat and cause harm. Observe proper polarity between the battery and the battery charger.
- nickel-metal hydride rechargeable batteries: Safely dispose of these batteries. Do not burn or puncture. Like other batteries of this type, if burned or punctured, they could release caustic material which could cause injury.
Precautions for users of implanted cardiac pacemakers Cardiac pacemakers (applies only to digital cordless telephones): Wireless Technology Research, LLC (WTR), an independent research entity, led a multidisciplinary evaluation of the interference between portable wireless telephones and implanted cardiac pacemakers. Supported by the U.S. Food and Drug Administration, WTR recommends to physicians that:
Pacemaker patients
- Should keep wireless telephones at least six inches from the pacemaker.
- Should NOT place wireless telephones directly over the pacemaker, such as in a breast pocket, when it is turned ON.
- Should use the wireless telephone at the ear opposite the pacemaker.
WTR’s evaluation did not identify any risk to bystanders with pacemakers from other persons using wireless telephones.
Eco mode
This power-conserving technology reduces power consumption for optimal battery performance. The ECO mode activates automatically whenever the handset is synchronized with the telephone base.
Especially about telephone answering systems
Two-way recording: This unit does not sound warning beeps to inform the other party that the call is being recorded. To ensure that you comply with any federal or state regulations regarding recording a telephone call, you should start the recording process and then inform the other party that you are recording the conversation.
FCC Part 15
This equipment has been tested and found to comply with the requirements for a Class B digital device under Part 15 of the Federal Communications Commission (FCC) rules.
These requirements are intended to provide reasonable protection against harmful interference in a residential installation. This equipment generates, uses, and can radiate radio frequency energy and, if not installed and used by the instructions, may cause harmful interference to radio communications. However, there is no guarantee that interference will not occur in a particular installation. If this equipment does cause harmful interference to radio or television reception, which can be determined by turning the equipment off and on, the user is encouraged to try to correct the interference by one or more of the following measures:
- Reorient or relocate the receiving antenna.
- Increase the separation between the equipment and the receiver.
- Connect the equipment to an outlet on a circuit different from that to which the receiver is connected.
- Consult the dealer or an experienced radio/TV technician for help.
Changes or modifications to this equipment not expressly approved by the party responsible for compliance could void the user’s authority to operate the equipment.
This device complies with Part 15 of the FCC rules. Operation is subject to the following two conditions:
- this device may not cause harmful interference, and
- this device must accept any interference received, including interference that may cause undesired operation. Privacy of communications may not be ensured when using this telephone.
To ensure the safety of users, the FCC has established criteria for the amount of radio frequency energy that can be safely absorbed by a user or bystander according to the intended usage of the product. This product has been tested and found to comply with the FCC criteria. The handset may be safely held against the ear of the user. The telephone base shall be installed and used such that parts of the user’s body other than the hands are maintained at a distance of approximately 20cm (8 inches) or more.
This Class B digital apparatus complies with Canadian requirements:
- CAN ICES-3 (B)/NMB-3(B)
Limited warranty
The AT&T brand is used under license – any repair, replacement, or warranty service, and all questions about this product should be directed to our website at https://www.att.com
FAQs about ATT EL52103 DECT Cordless Telephone
How long does it take an ATT cordless phone to charge?
The battery on your phone needs 16 hours to fully charge.
How do I connect my cordless AT&T phone to my base?
The unregistered device will first show the following:For four seconds, press [HOLD] on the base, then [#] on the handset. Step 2: Press and hold the HOLD button on the phone base for around four seconds, or until the message “Registering handset…” shows on the base display. Step 3: At this point, hit # on the phone.
AT&T cordless phones are produced by who?
According to our investigation, there are just two significant producers of cordless phones: Panasonic and VTech, the latter of which also produces phones under the AT&T brand. There are smaller companies, but we stuck closely to the bigger brands for support and warranty reasons.
How much time can a cordless phone go without being charged?
Cordless phones typically come with lithium ion batteries to spare you from going through limitless amounts of disposables. When you put them back in the charging cradle, they will automatically recharge, and many of them have a standby time of up to a week.
What is the lifespan of AT&T batteries?
While the batteries in your door and window sensors may have a shelf life of up to 10 years, their usable lifespan is only up to 2 years.
Cordless phones link in what way?
Simply said, cordless phones connect to the base unit, which is connected to the mains and a landline phone connection, using radio frequency.
What is pairing in DECT?
Select Telstra handsets and devices can be linked directly to the modem using the cordless phone base station included in the Telstra Smart Modem 1.1 and Gen 2 (DECT – Digital Enhanced Cordless Telecommunications).
The DECT button is not visible.
Your gateway’s DECT button can be found on the side or back of the device.
What is the DECT phone’s range?
Panasonic DECT phones have a range of up to 50 meters indoors and 300 meters outdoors.
A cordless DECT phone system: what is it?
Digital Enhanced Cordless Telecommunications is known as DECT. It is a wireless protocol that is frequently used to landlines. The development of the wireless standard has greatly improved wireless communication. Simply said, WiFi is to the Internet what DECT is to landline telephone.
Which batteries work with cordless phones?
Fortunately, the majority of cordless phones use two common 1.2v AAA rechargeable batteries, often Nickel Metal Hydride (NiMH) batteries. You can easily remove, swap out, and recharge these batteries in a universal AAA battery charger.
For more manuals by AT&T, visit Manualsdock

