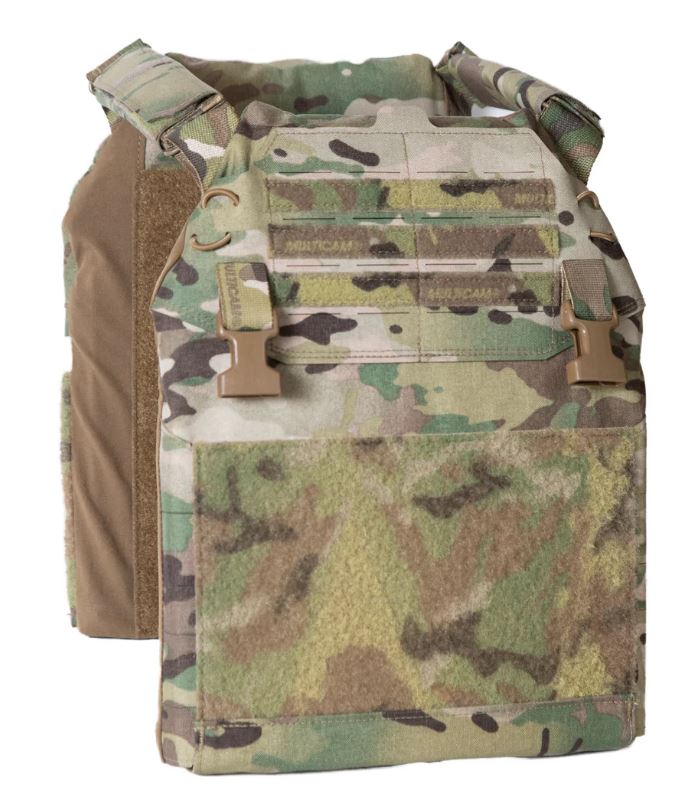
RAINE RTG Base Plate Carrier System
RTG BASE SIZING AND ADJUSTMENT
Sizing of Bags
Raine carries two different-sized bases at launch, medium and large. These bags are sized to hold SAPI plates.
Securing the Plates
- The plate bags are bottom-loaded. Lift the bottom hook/loop section to open the bottom of the bag. Proceed to insert the plate.
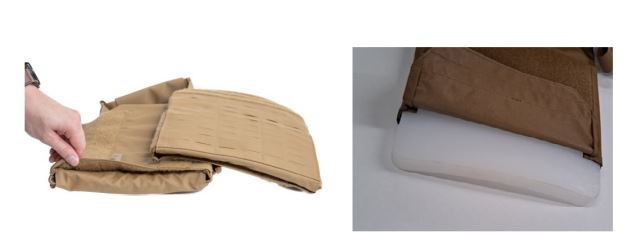
- Once the plate is inserted, tuck the flap back into place and secure the hook/loop closure. This will ensure a snug and tight fit for the plate. Perform this process for the front and back bags. You can overlap the hook/loop flap to adjust the height up to 1.5”.
SHOULDER STRAP ADJUSTMENT
- Grab the front bag part and locate the upper right shoulder strap channel. Grab one of the provided shoulder straps in your plastic accessory bag. This bag will be with your original packaging. Thread the hook/loop end face up through the metal ring on the plate bag corner (pictured).

- Secure the hook/loop tab to attach this end of the strap.
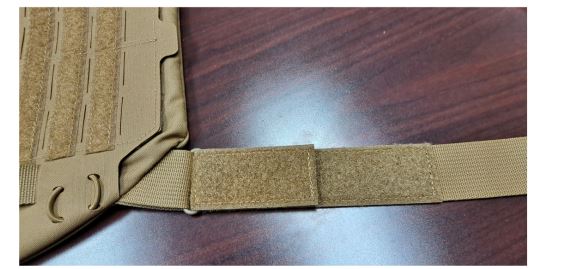
- Grab the back bag component. Loop the back end of the shoulder strap through the upper left shoulder strap
corner of the back bag.
- Before securing the back of the strap, repeat the first three steps for the other side so each side is at the same step.
- On both sides, thread the strap back over the top of the far metal loop and feed under the left metal loop as pictured. From there you size and secure the length to your preference.
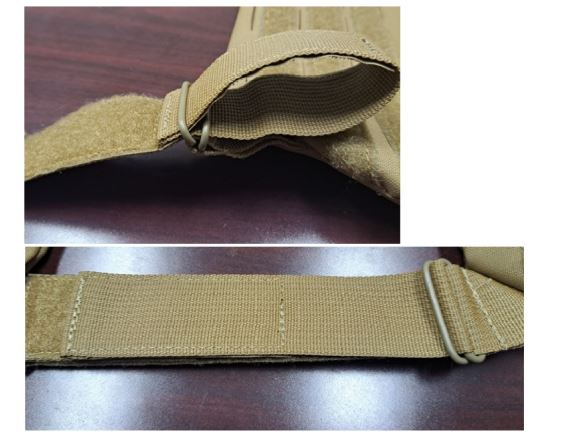
- Find the two shoulder pads in your accessory bag. Wrap and secure the hook/loop closure as pictured. Slide the pads to your desired location to provide the most comfort. These pads can also be used for cable management if needed.

SHOULDER STRAP TUBES ™ INSTALLATION (OPTIONAL)
The following instructions are for customers who want to install Shoulder Quick Release with FirstSpear Tubes™ on one or both of their shoulder straps. This is completely optional. Shoulder TUBES™ are priced separately as an add-on option on the listing.
- Make sure your two shoulder straps are fully removed from the carrier. Reverse the steps from section 2 to do this. You will need a male shoulder repair buckle and a standard shoulder buckle of the First Spear Shoulder Quick Release Buckles.
- Pinch together the corner webbing to attach the TUBES ™ shoulder male repair buckle.
- Thread through the female shoulder buckle on the shoulder strap. Use the heavy hook/loop end of the strap as pictured.
- Secure the hook/loop tab down to lock in the female shoulder buckle. The front installation will be complete.
- Finish the strap installation on the back bag. Loop through the end as pictured above. Be sure to adjust the length to your body size as described in section 2. Once you have the correct length, secure the back loop as pictured below.
ADJUSTABLE PLACARD/CHEST RIG STRAP SETUP
- Locate your two adjustable chest rig straps in your accessory bag.
- Thread the webbing through one side of the top buckle as pictured below.
- Size the loop at this stage to fit your chest rig or placard. If you use the Raine MOLLE placard, size the loop to 1” for the medium base bag. Size the loop to 1 -1/8” for the large base bag. For other systems, you will need to do some trial and error to fit your accessory.
- Once you have the loops sized to your desired length you are ready to continue. Thread the webbing through the opposite side of the buckle.
- Secure the loop by wrapping the webbing tail over the top of the buckle and inserting it into the first side as pictured below.
- Continue this process for both straps. You are now ready to insert the loops into the front base bag.
- Open the top admin pouch and insert the bottom loop into the open chest rig slits.
- Continue this process for the left and right sides. You are all set to begin using this function. Below we will detail how to use G-Hook or standard buckle attachment.
G-HOOK Attachment
- For G-hook attachment, you just need to utilize the base webbing loops to insert G-hook hardware as pictured below. Adjust the length of the loop to fit your accessory.
Standard Buckle Attachment
- Find the two standard repair buckles that are provided in your accessory bag. You can pinch together the webbing of the hanging web loop to install them as pictured below. Continue this process for the left and right sides. This completes the installation. Be sure to adjust the length of the loops to fit your accessory.
For Large Base Bags
- Locate the provided shock cord included in your accessory bag. Insert one of the ends into the bottom left corner hole in the upper corner of the front plate bag. Be sure to open the top admin pouch flap to help complete this installation. Feed the cord through the hole.
- Feed the other end of the cord through the bottom right hole and straighten out each end on the other side to make sure they are the same length.
- Insert the end from the right hole into the backside of the top right hole. Pull through and thread the cord.
- Thread the front cord back through the final top left corner hole. Pull through so you have two tails. Tie them together as pictured below.
- Open the top admin pocket and secure the tied tail inside. You have completed the installation. This configuration can be used to hold a PTT device or assist with cable management.
SIZING AND ADJUSTMENT
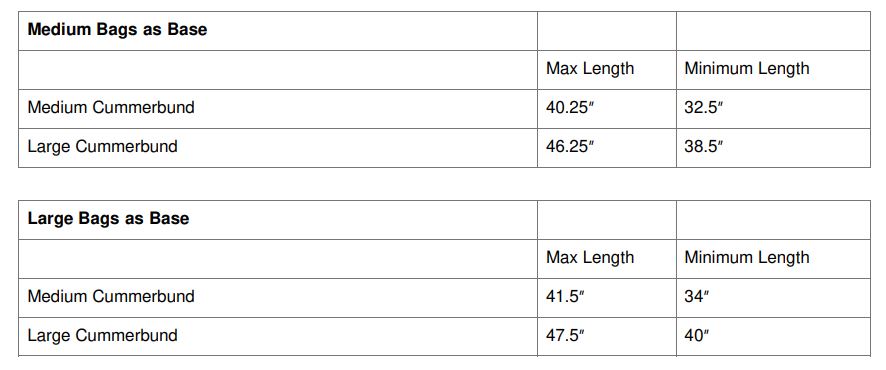
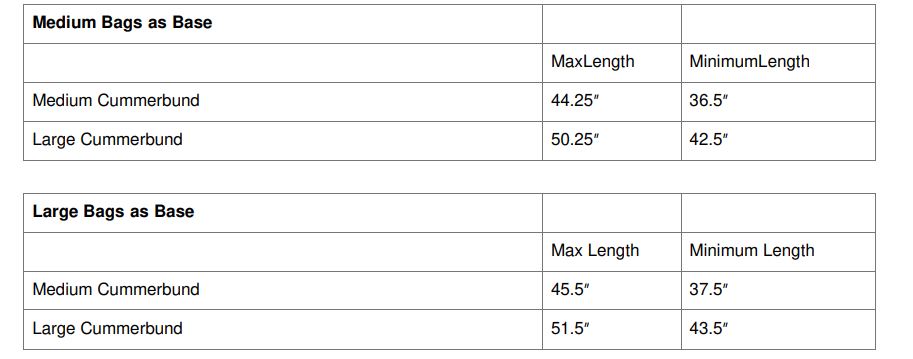
- Cummerbund Measurements.
- Lengths-Measurements when lying flat.

Inner Circumference for H/L Cummerbund
Inner Circumference for TUBES™ Cummerbund
Measurement Instructions
- Start by finding the chart with your plate bag size. Cross-reference your cummerbund size. To determine the proper fit, measure around your waist at the naval to get a circumference. You will need to allow extra length to account for clothing. You will also need some extra length if you intend to utilize the 5.56 magazine cells. INSTALLATION-TUBES™ Cummerbund.
Male Repair Buckle Installation
- Locate the two male repair buckles pre-installed with your TUBES ™ cummerbund. The male buckles are inserted into the cummerbund upon receipt. Release them to begin.
- The buckle will be threaded into the side laser cut slits on your RTG plate carrier front bags.
- Use a flathead screwdriver or multi-tool to lift the inside right slit over the first lip of the top repair buckle opening. Once cleared, push the lip into the slit to secure that side.
- Continue the same process on the top slit to thread the top portion of the repair buckle into the laser-cut opening.
- Repeat the same technique on the bottom section of the repair buckle. Use your flathead screwdriver or multitool to thread the buckle into the bottom laser slits. Your installation will be complete. (You can use the same process for the left and right side buckles).
Back of TUBES™ Cummerbund Hook/Loop Installation and Adjustment
- Locate your back plate bag. Lift the securing flap on the bottom of the carrier and lift the back side of the bag as shown below. The full flap will release from the back hook/loop to reveal a large loop field.
- Attach the cummerbund to the male TUBES™ buckles on the front bag that have already been installed.
- Put the carrier over your shoulders and wrap the sides of the cummerbund around you to get an idea of the sizing you need.
- Take off the plate carrier and attach the hook/loop back tabs onto the large loop field on the back bag to secure the cummerbund down. You may have to readjust a co timesmes to get the most comfortable fit.
- If you need a smaller size, you can overlap the hook/loop tabs to tighten it.
- You can reach the minimum length by forfeiting the last elastic 5.56/radio cell and pushing the bottom laminate loop on each side. You will be able to further overlap the cummerbund to achieve a smaller size. This works for the large and medium cummerbund.
- Once you have achieved a comfortable fit, you are ready to secure the flap. Lower the large back flap over to secure the hook/loop.
- Once you have inserted your back plate into the back bag, you can secure the bottom flap to finish the process.
Installation-Hook/Loop Cummerbund
- Attach the front hook/loop tabs to the front bag loop field. Line up the tabs as pictured below.
- Put the carrier over your shoulders and wrap the sides of the cummerbund around you to get an idea of the sizing you need.
- Take off the plate carrier and attach the hook/loop back tabs onto the large loop field on the back bag to secure the cummerbund down. You may have to readjust a couple of times to get the most comfortable fit.
- If you need a smaller size, you can overlap the hook/loop tabs to tighten it.
- You can reach the minimum length by forfeiting the last elastic 5.56/radio cell and pushing the bottom laminate loop on each side. You will be able to further overlap the cummerbund to achieve a smaller size. This works for the large and medium cummerbund.
- Once you have achieved a comfortable fit, you are ready to secure the flap. Lower the large back flap over to secure the hook/loop bottom flap.
- Once you have inserted your back plate into the back bag, you can secure the bottom flap to finish the process.
FOR MORE MANUALS BY RAINE, VISIT MANUALSDOCK


