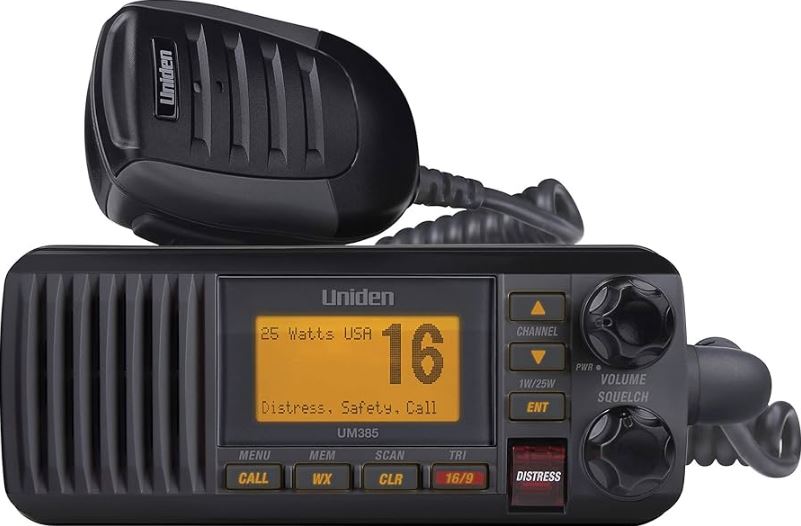
Uniden UM385BK 25 Watt Fixed Mount Marine Vhf Radio
About Uniden
Uniden America Corporation, the North American subsidiary of Japan-based Uniden Corporation, manufactures and markets wireless consumer electronic products including home security and video security systems, Bearcat® scanners, FRS/GMRS radios, marine radios, radar detectors, dash cams, and other wireless personal communications products. Based in Irving, Texas, Uniden sells its products through retailers and distributors throughout North, Central, and South America.
FEATURES
- Waterproof Radio – Complies with IPX4 waterproof standards, which means the radio is resistant to damage from rain or splashing water.
- Large, dot matrix display
- Advanced DSC Class D functions, including Test Calling
- Channel select buttons on the microphone
- Memory scan mode – Lets you save channels to memory and monitor them in quick succession.
- Transmitter Power Level Select – Lets you boost the transmitter power from 1 watt to 25 watts for added transmission distance.
- Battery level display and tone – Sounds an alert tone if the battery voltage goes too high or too low.
- Triple Watch Operation – Checks the Coast Guard Distress/Hailing channels 16 and 9 in the background.
- All marine VHF channels for the U.S., Canada, and international waters
- National Oceanic and Atmospheric Administration (NOAA) weather channel watch
- Sounds a warning tone when a hazard alert is issued for your area.
EXPLANATION OF TERMS
- DSC
Digital Selective Calling. A VHF radio standard for communicating among boats and sending automated distress calls. - FIPS
Federal Information Processing Standard. A set of location codes roughly equivalent to your county codes. - WX
Weather Radio - GPS
Global Positioning System - NMEA
National Marine Electronics Association. The organization governs standards for electronic equipment used on boats. NMEA 0183 is the standard for serial data communication used by GPS. - MMSI
Maritime Mobile Service Identity number. A unique, nine-digit number that identifies you and your boat when making DSC calls. It is also used by the Coast Guard if you send an automated distress call. - Station
Any DSC radio, whether it’s operated on a boat, at a marina, or by a shore station.
Parts of the Radio
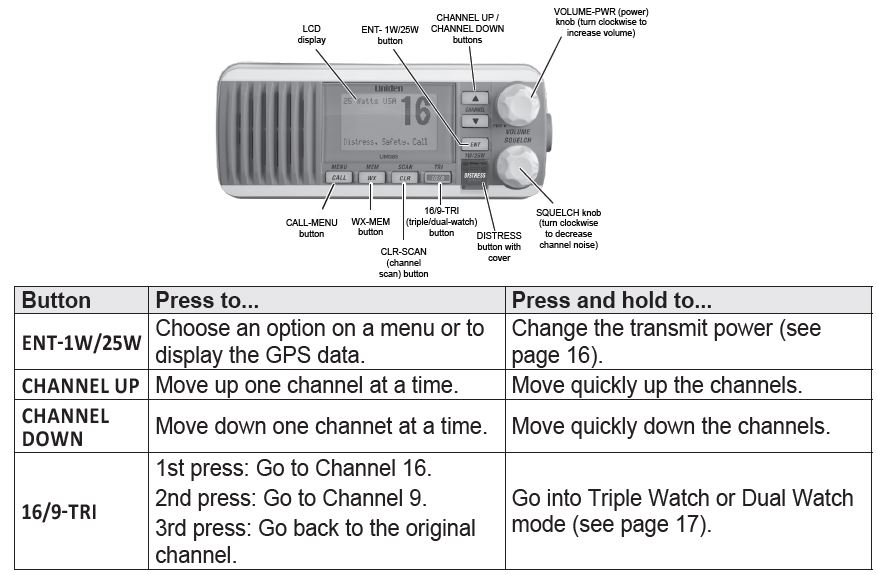
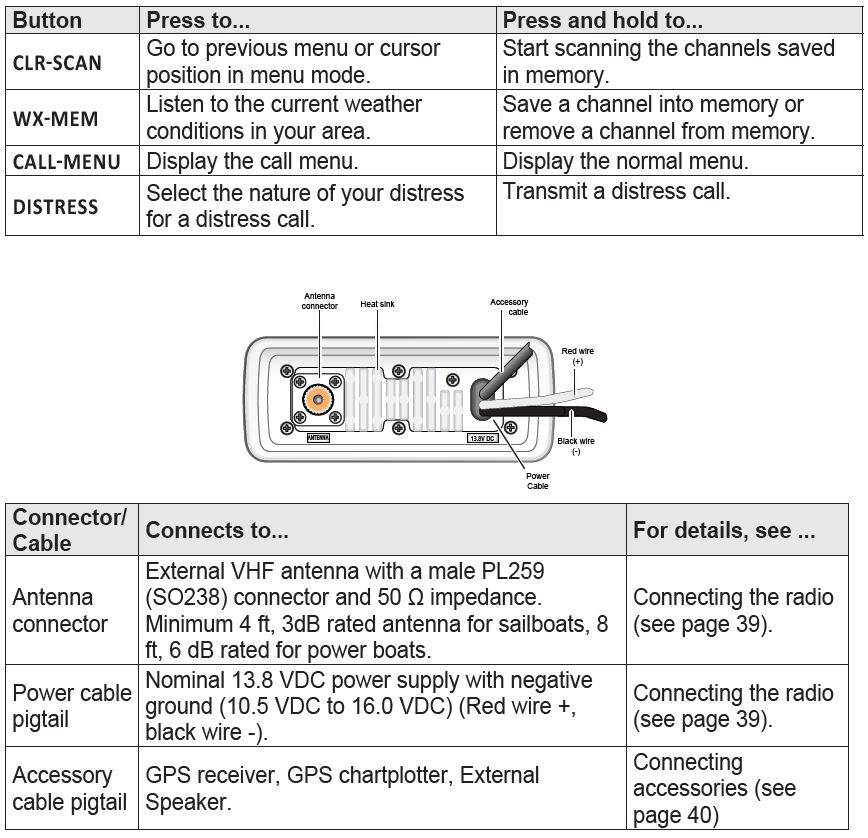
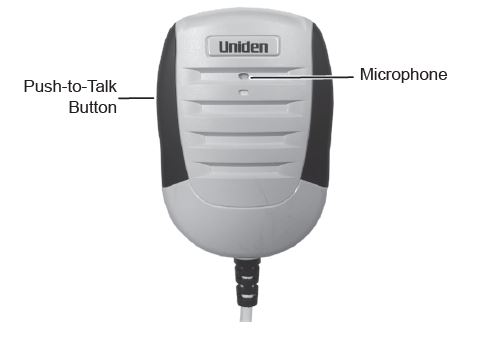
Parts of the Microphone
HOW IT WORKS
Your radio has three basic modes of operation:

In addition to the three basic operation modes, your radio also provides three different “watch” modes which you can activate during any of the three basic modes. In these watch modes, the radio briefly checks for activity on a specific channel then returns to its previous mode. 
# NOTE:
You are required to monitor channel 16 whenever your boat is underway. You should have either Triple Watch or Dual Watch on at all times.
Normal Mode Operation
Normal mode monitors whatever channel you select, and you can transmit on that channel also. While using normal mode, the display lets you see the following information (not all indicators will display at the same time):

Using the radio in normal mode
- To transmit, press and hold PUSH TO TALK on the microphone. Release the button when you are finished talking.
- For the best sound quality, hold the microphone about two inches from your mouth while you’re talking.
- Press CHANNEL UP on the radio or the microphone to move up one channel at a time. Press and hold either button to scroll quickly up the channels.
- Press CHANNEL DOWN on the radio or the microphone to move down one channel at a time. Press and hold either button to scroll quickly down the channels.
- To change the transmit power, press and hold ENT-1W/25W for two seconds. The transmit power switches between 1 watt and 25 watts each time you press and hold ENT-1W/25W.
Normal mode with Weather Alert Watch
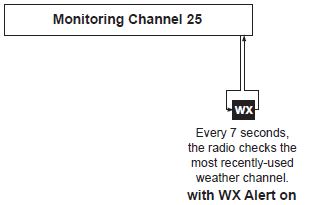
If you activate the Weather Alert Watch while operating in normal mode, the radio checks the most recently used weather channel every seven seconds. If it detects a weather alert for your area, it will change the channel to the last-used weather channel. The radio will not check the weather channel while you are actively transmitting; it waits until your transmission is finished and then checks the weather channel. To turn the Weather Alert Watch on or off, press and hold CALL-MENU while the radio is idle. Select Setup and then WX-Alert Mode. Use CHANNEL UP and CHANNEL DOWN to choose WX Alert Mode setting ON or Off.
Normal mode with Triple and Dual Watch
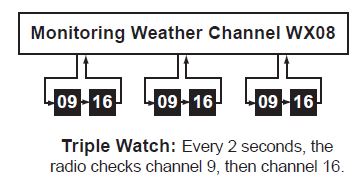
If you activate Triple Watch while operating in normal mode, the radio checks channels 16 and 9 every two seconds; with Dual Watch turned on, the radio only checks channel 16. The radio will not check channels 16 or 9 while you are actively transmitting; it waits until your transmission is finished and then checks the channels. Press and hold 16/9-TRI (on the radio or the microphone) for two seconds to turn Triple/Dual Watch on or off. (To change between Triple or Dual Watch, see page 17.)

Normal mode with both Weather Alert and Triple/Dual Watch
You can activate Weather Alert Watch and Triple/ Dual Watch at the same time. The radio performs both checks at their scheduled time.

Scan Mode
You can save channels into memory and then use scan mode to monitor those channels. When the radio detects a signal on a channel, it pauses on that channel as long as the signal is received; when the transmission stops, the radio will continue scanning.

In scan mode, you can get the following information from the display (some indicators will not always be displayed).

Using the radio in scan mode
- You cannot transmit while in scan mode.
- You must have two or more channels in memory to start a scan.
- To save a channel into memory, select the channel, then press and hold WX-MEM for two seconds. Memory will show on the display.
- To remove a channel from memory, set the radio to that channel, then press and hold WX-MEM for two seconds. Memory will no longer show on the display.
- To activate scan mode, press and hold CLR-SCAN. Press and hold CLR-SCAN again to return to the previous mode.
- When the radio automatically stops on a channel, press CHANNEL UP to leave that channel and resume scanning.
- To end the scan, press the microphone’s PUSH TO TALK, CALL-MEM, or WX-MEM buttons. The radio remains on the last scanned channel.
Scan mode with Weather Alert Watch
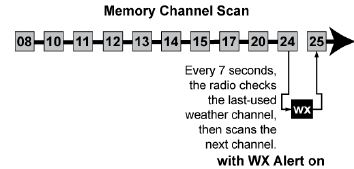
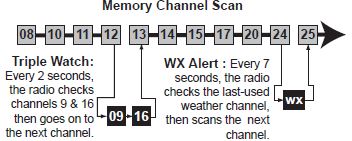
If you activate Weather Alert Watch while operating in scan mode, the radio checks the most recently used weather channel every seven seconds, then continues scanning the next channel in memory.
To turn Weather Alert Watch on or off, press and hold CALL-MENU while the radio is idle. Select Setup and then WX-Alert Mode. Use CHANNEL UP and CHANNEL DOWN to choose WX Alert Mode setting On or Off.
Scan mode with Triple and Dual Watch
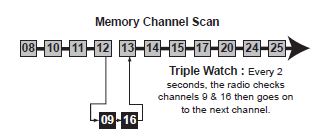
- If you activate Triple Watch while operating in scan mode, the radio checks channels 16 and 9 every two seconds, then goes on to scan the next channel; with Dual Watch turned on, the radio only checks channel 16.
- Press and hold 16/9-TRI (on the radio or the microphone) for two seconds to turn Triple/Dual Watch on or off. (To change between Triple or Dual Watch, see page 17.)
- Press and hold the CLR-SCAN key to turn off Scan mode and set the radio to Triple/Dual Watch mode.
Scan mode with both Weather Alert and Triple/Dual Watch
You can activate Weather Alert Watch and Triple/Dual Watch at the same time. The radio performs both checks at their scheduled time.
Weather Mode
In cooperation with the FCC, NOAA also uses the weather channels to alert you of other hazards besides weather (child abduction alerts, nuclear, biological, etc.). In weather mode, the radio monitors one of the ten NOAA weather channels. If any type of alert is received for your area, the radio sounds an alert tone and displays the type of alert. In weather mode, the display shows the following:

Using the radio in weather mode
- You cannot transmit while in weather mode.
- To enter weather mode, press WX-MEM.
- Weather mode can filter out alerts that do not affect your location if the location code (FIPS code) of the alert is entered in your radio (see page 17). If you have no FIPS codes programmed into your radio, the radio will notify you of all alerts in any area.
- To turn off the radio’s alert tone, press any button.
- To cancel weather mode and return to the previous marine channel, press the WX-MEM button again.
Weather mode with Weather Alert Watch
Because weather mode already monitors the weather channels, you don’t need Weather Alert Watch to check the weather channel every seven seconds. If you activate the Weather Alert Watch while operating in weather mode, it operates as a type of “sleep mode”: the radio stays on the weather channel and mutes the speaker. If an alert is detected for your area, the radio sounds an alert tone and turns the speaker back on. This mode is very useful when you are anchoring for the night but want to stay informed of any hazards in your area.
To turn Weather Alert Watch on or off, press and hold CALL-MENU while the radio is idle. Select Setup and then WX-Alert Mode. Use CHANNEL UP and CHANNEL DOWN to choose WX Alert Mode setting On or Off.
Weather mode with Triple and Dual Watch
If you activate Triple Watch while operating in weather mode, the radio checks channels 16 and 9 every two seconds; with Dual Watch turned on, the radio only checks channel 16. Press and hold 16/9-TRI (on the radio or the microphone) for two seconds to turn Triple/Dual Watch on or off. (To change between Triple or Dual Watch, see page 17.)
Test Calls
Making Test Calls (Test)
You can use the test call feature to make sure your radio is working and configured correctly. To avoid overloading coastal receiving stations, you should limit test calls to these stations to once a week.
# NOTE:
Many coastal stations have specific frequencies and MMSI numbers you should use for making test calls. Before making a test call to a coastal station, be sure to check the Local Notice to Mariners (LNM), issued every week by the US Coast Guard. The LNMs for each region are available online at http://www.navcen.uscg.gov/lnm/default.htm.
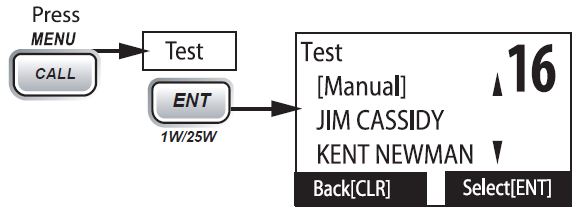
- Press CALL-MENU to display the call menu.
- Select Test.
- The radio displays the names listed in your directory; use CHANNEL UP and CHANNEL DOWN to choose the directory entry you want to send a test call to and press the ENT-1W/25W button. If you want to send a test call to a station that is not in your directory, select Manual. The radio prompts you to enter the MMSI number you want to call. Enter the MMSI number the same way you enter directory entries (see page 22). Enter all nine digits and press the ENT-1W/25W button.
- The radio displays the MMSI number you are about to call and asks you to confirm. If you want to call the displayed number, select Send. To cancel the call, select Cancel.

- The radio automatically switches to channel 70 to transmit the test call request, then switches back to the last-used channel.
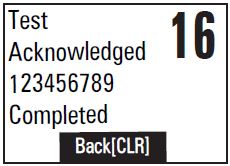
- When the other station acknowledges the test call, the radio displays an acknowledgment screen.
Receiving Test Calls
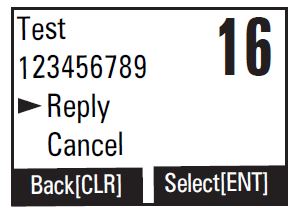
When another station sends you a test call, the radio displays the test request screen.
- To acknowledge the test call, select Reply.
- To reject the test call, select Cancel.
Enabling automatic test call reply
If you want the radio to automatically reply to all test call, you can enable automatic test call reply.
- Press and hold CALL-MENU to display the normal menu.
- Select Setup and then Test Reply. Choose Auto and press ENT-1W/25W. The radio will automatically send an acknowledgement when it receives a test call.

- To disable automatic test call reply, repeat the steps above and select Manual.
Position Request and Reply
Requesting another station’s position (POS Request)
Anytime you need to know where another boat currently is—to find your boating partners, to respond to a request for assistance, etc.—you can send a position request to their radio:
- Press CALL-MENU to display the call menu.
- Select DSC Call sub-menu, then select POS Request.
- The radio displays the names listed in your directory; use CHANNEL UP and CHANNEL DOWN to choose the directory entry you want to contact and press ENT-1W/25W. If you want to contact a station that is not in your directory, select Manual. The radio prompts you to enter the MMSI number you want to call. Enter the MMSI number the same way you enter directory entries (see page 22). Enter all nine digits and press ENT-1W/25W.
- The radio displays the MMSI number you are about to contact and asks you to confirm. If you want to request the position of the displayed MMSI number, select Send. To cancel the request, select Cancel.
- When the other station responds, the radio displays the MMSI number, the longitude, and the latitude of the other station. If your radio is connected to a chartplotter through the NMEA OUT connection (see page 43), the position information will also be displayed on the plotter screen.
- If the other station does not have valid GPS data, the radio displays No Position.
Receiving a position request (Position Reply)
When another station requests your current position, the radio displays the following screen:
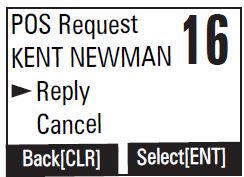
To send your current position to the other station, select Reply; the radio transmits your latitude and longitude to the other station. If you select Reply but the radio does not have valid GPS data, it transmits the reply code with No Position.
- To reject the position request, select Cancel.
Enabling automatic position reply
If you want the radio to automatically transmit your current position whenever it receives a position request, you can enable automatic position reply. Most boaters activate automatic position reply for safety reasons or because they subscribe to a marine towing service. Sometimes – for example, in some competitive situations – you may not want other stations to get your position without your manual confirmation
- Press and hold CALL-MENU to display the normal menu.
- Select Setup and then POS Reply.
- Choose Auto and press ENT-1W/25W. The radio will automatically transmit your position when it receives a position request.
- To disable automatic position reply, repeat the steps above and select Manual.
Sending your own position (Position Send)
If your radio is connected to a GPS receiver, you can send your boat’s position to someone else. If you are requesting assistance or using an all ships call to give a safety warning, you can send your current position so other stations know where you are:
- Press CALL-MENU to display the call menu.
- Select Position Send.
- The radio displays the names listed in your directory; use CHANNEL UP and CHANNEL DOWN to choose the directory entry you want to contact and press ENT-1W/25W. If you want to contact a station that is not in your directory, select Manual. The radio prompts you to enter the MMSI number you want to call. Enter the MMSI number the same way you enter directory entries (see page 22). Enter all nine digits and press ENT-1W/25W.
- The radio displays the MMSI number you are about to contact and asks you to confirm. If you want to transmit your position to the displayed MMSI number, select Send. To cancel the transmission, select Cancel.
- The radio transmits your MMSI number, your longitude, and your latitude to the other station.
Putting the Radio on Standby
If you are leaving your radio or do not wish to answer any DSC calls, you can put your radio in standby mode. If your radio receives an individual call, it will automatically respond with a message that indicates your radio is currently unattended. Follow the steps below to put your radio in standby:

- Display the Call menu.
- Select Standby to place your radio in standby mode. The radio displays the standby screen, above.
- To cancel standby and return to the mode your radio was in, press any button.
Disabling Automatic Channel Switching
If you are involved in a bridge-to-bridge call, you may not want the radio to automatically switch channels when it receives a DSC call. In cases like this, you can disable automatic channel switching. If you receive an individual call, the radio will respond with an unattended code, just as if the radio were in Standby.
- Press and hold CALL-MENU to display the normal menu.
- Select Setup and then Auto CH SW.
- Choose Off and press ENT-1W/25W. The radio will not automatically switch channels until you reactivate this feature.
# NOTE:
Use this feature with caution. Deactivating automatic switching and then forgetting it can make it hard for you to receive DSC calls.
If you have unread incoming DSC calls, the radio displays a message icon ( ). You will be able to review who has called. The radio displays the last 10 distress calls and the last 20 non-distress calls it received (see the receive log on page 29).
Renaming Channels
If you discover that a marine radio channel has a different common name in your local area, you can change the name of that channel to make it easier for you to use (see the channel lists beginning on page 36 for the default channel names). To rename a channel, follow the steps below:
- Display the normal menu and choose the Setup sub-menu.
- Select Channel Name. The screen displays the list of channels.
- Use CHANNEL UP and CHANNEL DOWN to choose the channel you want to change and press ENT-1W/25W.
- Select Rename to enter a new name for this channel. The radio prompts you to enter a new name for this channel. Each name can be up to 12 characters. Use CHANNEL UP and CHANNEL DOWN to change the first character.
- When the first character is correct, press ENT-1W/25W. The cursor moves to the next character. Enter the remaining 11 characters of the name. If the name is shorter than 12 characters, press and hold ENT-1W/25W to complete the name entry. If you make a mistake while entering a number, press CLR-SCAN to erase the wrong number and the cursor is moved to the left digit.
- When you finish entering the name, the radio displays the new channel name and asks you to confirm. To save this new channel name, select Yes; to cancel the change, select No. The radio returns to the channel list.
- To restore a channel back to its original name, select the channel and choose Default.
- When you are satisfied with the channel list, select Exit to close the menu screen.
INSTALLING THE HARDWARE
MOUNTING THE RADIO
Your radio can sit at any angle in the mounting bracket so it can easily accommodate the best location. First, determine the best place to mount the radio. For optimum performance, find a location that can:
- Properly support the weight of the radio, approximately 2.2 pounds or 1.1 kilograms. You may need to use some type of anchor with the mounting screws to hold the radio, depending on the surface.
- Keep the battery leads as short as possible.
- Keep the antenna lead-in wire as short as possible.
- Allow free airflow around the heat sink on the rear of the radio.
- Avoid interference with the ship’s compass.
- Install the radio into the mounting bracket.
- Position the radio in the desired location. Mark the edges of the bracket on the mounting surface.
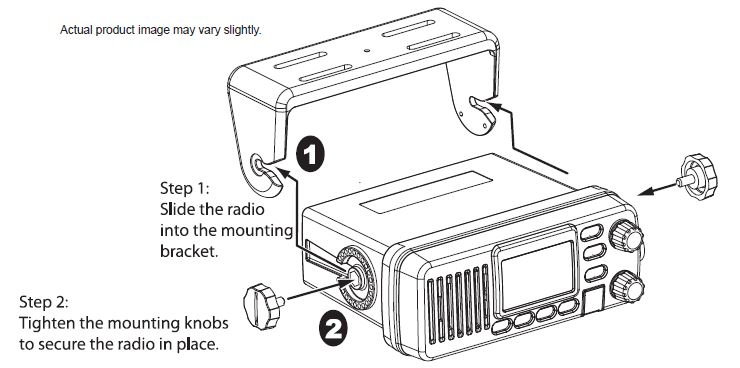
- Remove the mounting bracket drill template from the back of the manual, and use the template to mark the drill holes on the mounting surface.
- Drill the holes for the mounting bracket; be sure to follow any special requirements of the mounting surface.
- Remove the bracket from the radio, and use the mounting hardware to secure the bracket to the mounting surface.
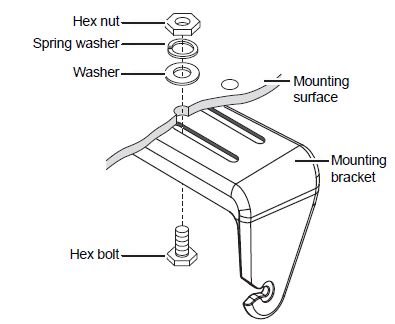
- Install the radio back into the mounting bracket.
CONNECTING THE RADIO
To operate correctly, your radio requires two electrical connections:
- providing it with power from the boat’s electrical system
- connecting a VHF-FM marine antenna to the antenna connector

- Connect the BLACK wire of the power cable to the NEGATIVE (-) side of your power source.
- Connect the RED wire of the power cable to the POSITIVE (+) side of your power source.
# NOTE: To extend the life of the radio, use waterproof tape to seal electrical connections. - Install your antenna according to the manufacturer’s instructions.
- If necessary, consult the FCC guidelines for antenna separation. See Antenna Selection and Installation on page 63 for more details. (In summary, the FCC recommends that antennas up to 3 dB be installed a minimum of 3 feet from any occupied location; antennas over 3 dB should be installed at least 6 feet away.)
- Connect the PL-259 connector from the antenna lead-in wires to the SO238 connector labeled ANTENNA on the back of your radio.
- Plug the power cable into the power cable pigtail on the back of your radio.
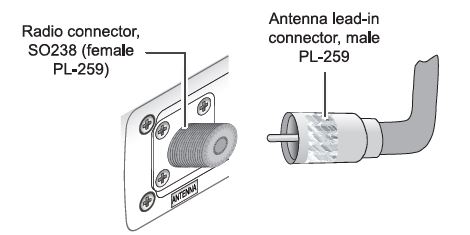
Connecting the Accessory Cable
Use the accessory cable to connect the radio to a GPS receiver, a GPS chartplotter, and an external speaker. The wiring diagram below shows the connections for each accessory.

Connecting to a GPS Receiver
If you connect the radio to a GPS receiver, the radio can automatically transmit your current position during an automated distress call or during a normal DSC call. Your radio supports a standard NMEA0183 input from a GPS receiver. Follow the steps below to connect your radio to your GPS receiver:
- Connect the GREEN wire of the included accessory cable to the GPS DATA OUTPUT (-) WIRE or the GROUND WIRE on your GPS receiver.
- Connect the YELLOW wire of the included accessory cable to the GPS DATA OUTPUT (+) WIRE on your GPS receiver.
- Be certain all wire connections are secure and that all open wires are adequately covered.
# NOTE: to extend the life of the radio, use waterproof tape to seal electrical connections. - Plug the accessory cable into the accessory cable pigtail on the back of your radio.
GPS Verification
If the GPS receiver is correctly connected and it transmits valid data, the display shows GPS Data OK. Press ENT-1W25W to open the GPS status screen and see detailed GPS data:

If the GPS does not send coordinates within 30 minutes, an audible alert sounds once and the display shows Input GPS. This message remains until the coordinates are updated. After 4 hours, the audible alert sounds again if no coordinates are received and the GPS is connected. After 23.5 hours, the radio deletes the current coordinates and displays Input GPS. See page 19 to manually set the GPS coordinates.
Configuring the GPS
If the radio is receiving valid GPS data, it will automatically set the clock to your local time based on the GPS location. You can adjust your local time forward or back one hour if necessary (for example, if you are close to the border of a time zone); you can also adjust for Daylight Savings Time. Follow the steps below to adjust the time:
- Display the normal menu and choose the Setup sub-menu.
- Select GPS Setup and then choose Time Adjust.
- The display shows your current local time. To adjust the time forward one hour, use CHANNEL UP. To adjust the time back one hour, use the CHANNEL DOWN button. Press the ENT-1W/25W button when you are finished.
- The display prompts you to confirm the setting: choose Set to save the new time or Cancel to exit time setup without saving. The radio returns to the GPS Setup menu.
- If your local area observes Daylight Savings Time, choose Daylight Save and press the ENT-1W/25W button.
- If Daylight Savings Time is currently in effect, select On. If Daylight Savings Time is not currently in effect, select Off.
- Press ENT-1W/25W. The radio activates the new time setting and returns to the GPS Setup menu.
Connecting to a Chartplotter
Your radio provides a standard NMEA0183 GPS output that you can connect to a Chartplotter. When it receives another boat’s position data in a DSC call, the radio sends the position data to the chart plotter so you can see the location:
- Connect the BROWN wire of the accessory cable to the NEGATIVE (-) wire of your chart plotter’s NMEA data INPUT.
- Connect the WHITE wire of the accessory cable to the POSITIVE (+) wire of your chart plotter’s NMEA data INPUT
- Be certain all wire connections are secure and that all open wires are adequately covered.
# NOTE:
To extend the life of the radio, use waterproof tape to seal electrical connections.
Connecting to an External Speaker
You can use an external speaker to monitor the radio from a different part of your boat or in a noisy environment. If you adjust the VOLUME-PWR knob on the radio, it will also adjust the external speaker volume. Your radio supports an external speaker with the following specifications:
- Minimum impedance of 4 Ohms
- Minimum power handling of 10 Watts
- Connect the BLACK wire of the accessory cable to the GROUND WIRE of your external speaker.
- Connect the RED wire of the accessory cable to the POSITIVE (+) WIRE of your external speaker.
- Be certain all wire connections are secure and that all open wires are adequately covered.
NOTE:
To extend the life of the radio, use waterproof tape to seal electrical connections.
FAQs about Uniden UM385BK 25 Watt Fixed Mount Marine Vhf Radio
A 25 watt VHF radio can transmit how far?
A 25-watt marine radio, for instance, will typically have a range of 5 nautical miles (9 km) between antennas installed on small boats at sea level, but will have a maximum range of 60 nautical miles (111 km) between antennas mounted on tall ships.
A maritime VHF radio can communicate how far?
Your VHF radio’s primary communication range is short-range, often 5–10 miles, and at least 20 miles to a USCG station. You often require a satellite phone or an MF/HF maritime radiotelephone to communicate over greater distances.
What is the preferred method of requesting assistance over VHF radio?
For a number of reasons, VHF radio is regarded as the most efficient medium for maritime communication and distress signals. It is built to survive inclement weather and wetness and has more reliable reception than cell phones.
What is a VHF radio’s normal maximum power?
Each fixed-mount VHF radio has a 25 watt or 1 watt transmission power option. A handheld’s maximum power output is approximately 5 watts. If your radio contact is close by, use either type’s low power level (1 watt) to shorten the signal’s range beyond your target.
What is the range of radio frequency?
Similar to other frequency E&M radiation, radio waves may move across space at a constant speed, or c, which equals 2.998 x 10⁸ meters per second. Photons may have a frequency similar to that of radio waves.
How can we broaden the radio frequency spectrum?
An antenna’s height can be increased to improve reception quality, increase broadcast range, and lessen the likelihood that the transmission would be obstructed by hills or dense forest.
What are the uses of VHF radio?
A Very High Frequency (VHF) Marine Radio enables fast communication between your boat and other boats, marinas, bridges, and the United States Coast Guard (USCG), while it is not necessary in recreational vessels under 65.5 feet long.
What VHF channel do you use?
Your VHF radio’s most crucial channels are 13, 16, 19, 22, and 70. Commercial shipping communicates its operations and confirms passage on Channel 13. The FCC (Federal Communications Commission) has assigned channel 16 (156.8 MHz) VHF-FM as the country’s distress, safety, and calling frequency.
How do you determine wavelength?
By using the formulas = wave speed/frequency or = v / f, the wavelength may be determined from the wave speed and frequency. A wave’s valley is its lowest point, while a wave’s peak is its highest point.
What distinguishes a wavelength from a frequency?
A wave cycle’s frequency and wavelength are crucial elements. The distance between any two matching spots on adjacent waves is also referred to as a wavelength. In addition, frequency is the quantity of waves that travel through a certain spot in a given period of time.
For more manuals by Uniden, Visit Manualsdock

