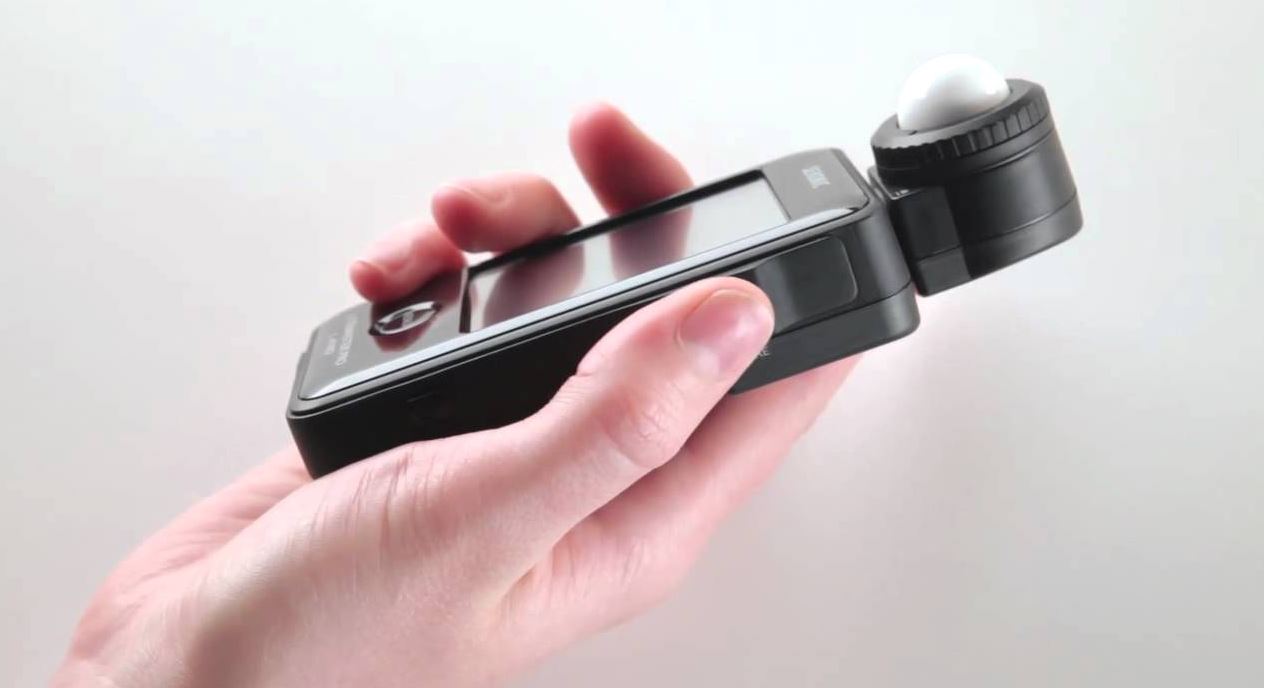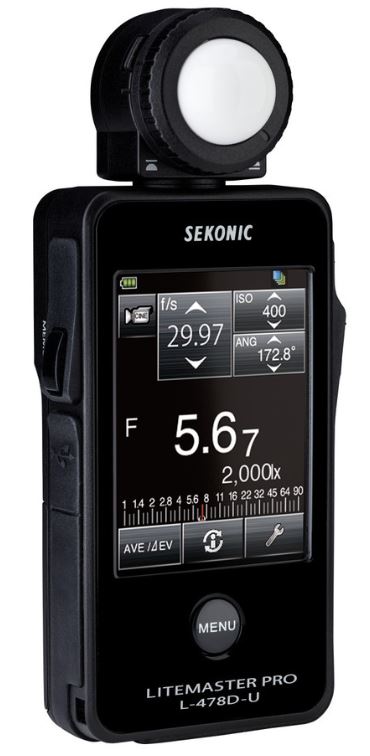
Sekonic L-478D-U Lightmeter
About Sekonic
Sekonic is a well-known Japanese manufacturer of light meters and exposure meters primarily used in photography and cinematography. These devices are essential tools for photographers and cinematographers to measure and control the amount of light in a scene, ensuring proper exposure settings for their cameras.
Sekonic’s light meters are designed to measure various aspects of light, such as ambient light, flash, and incident light. They provide precise readings that help photographers and cinematographers determine the ideal shutter speed, aperture, and ISO settings for their cameras to achieve the desired exposure. Sekonic’s meters are widely used in both studio and outdoor photography, as well as in the film and video production industry.
Sekonic has a reputation for producing high-quality and reliable light meters that cater to the needs of professionals and enthusiasts alike. Their products often include features such as spot metering, color temperature measurement, and wireless capabilities to enhance their functionality.
Accompanying Accessories
The following items are included with the L-478 Series. After opening the package, please be sure that everything is included. If any of the following items should be missing, please contact your local camera store or retail organization.
Parts Designations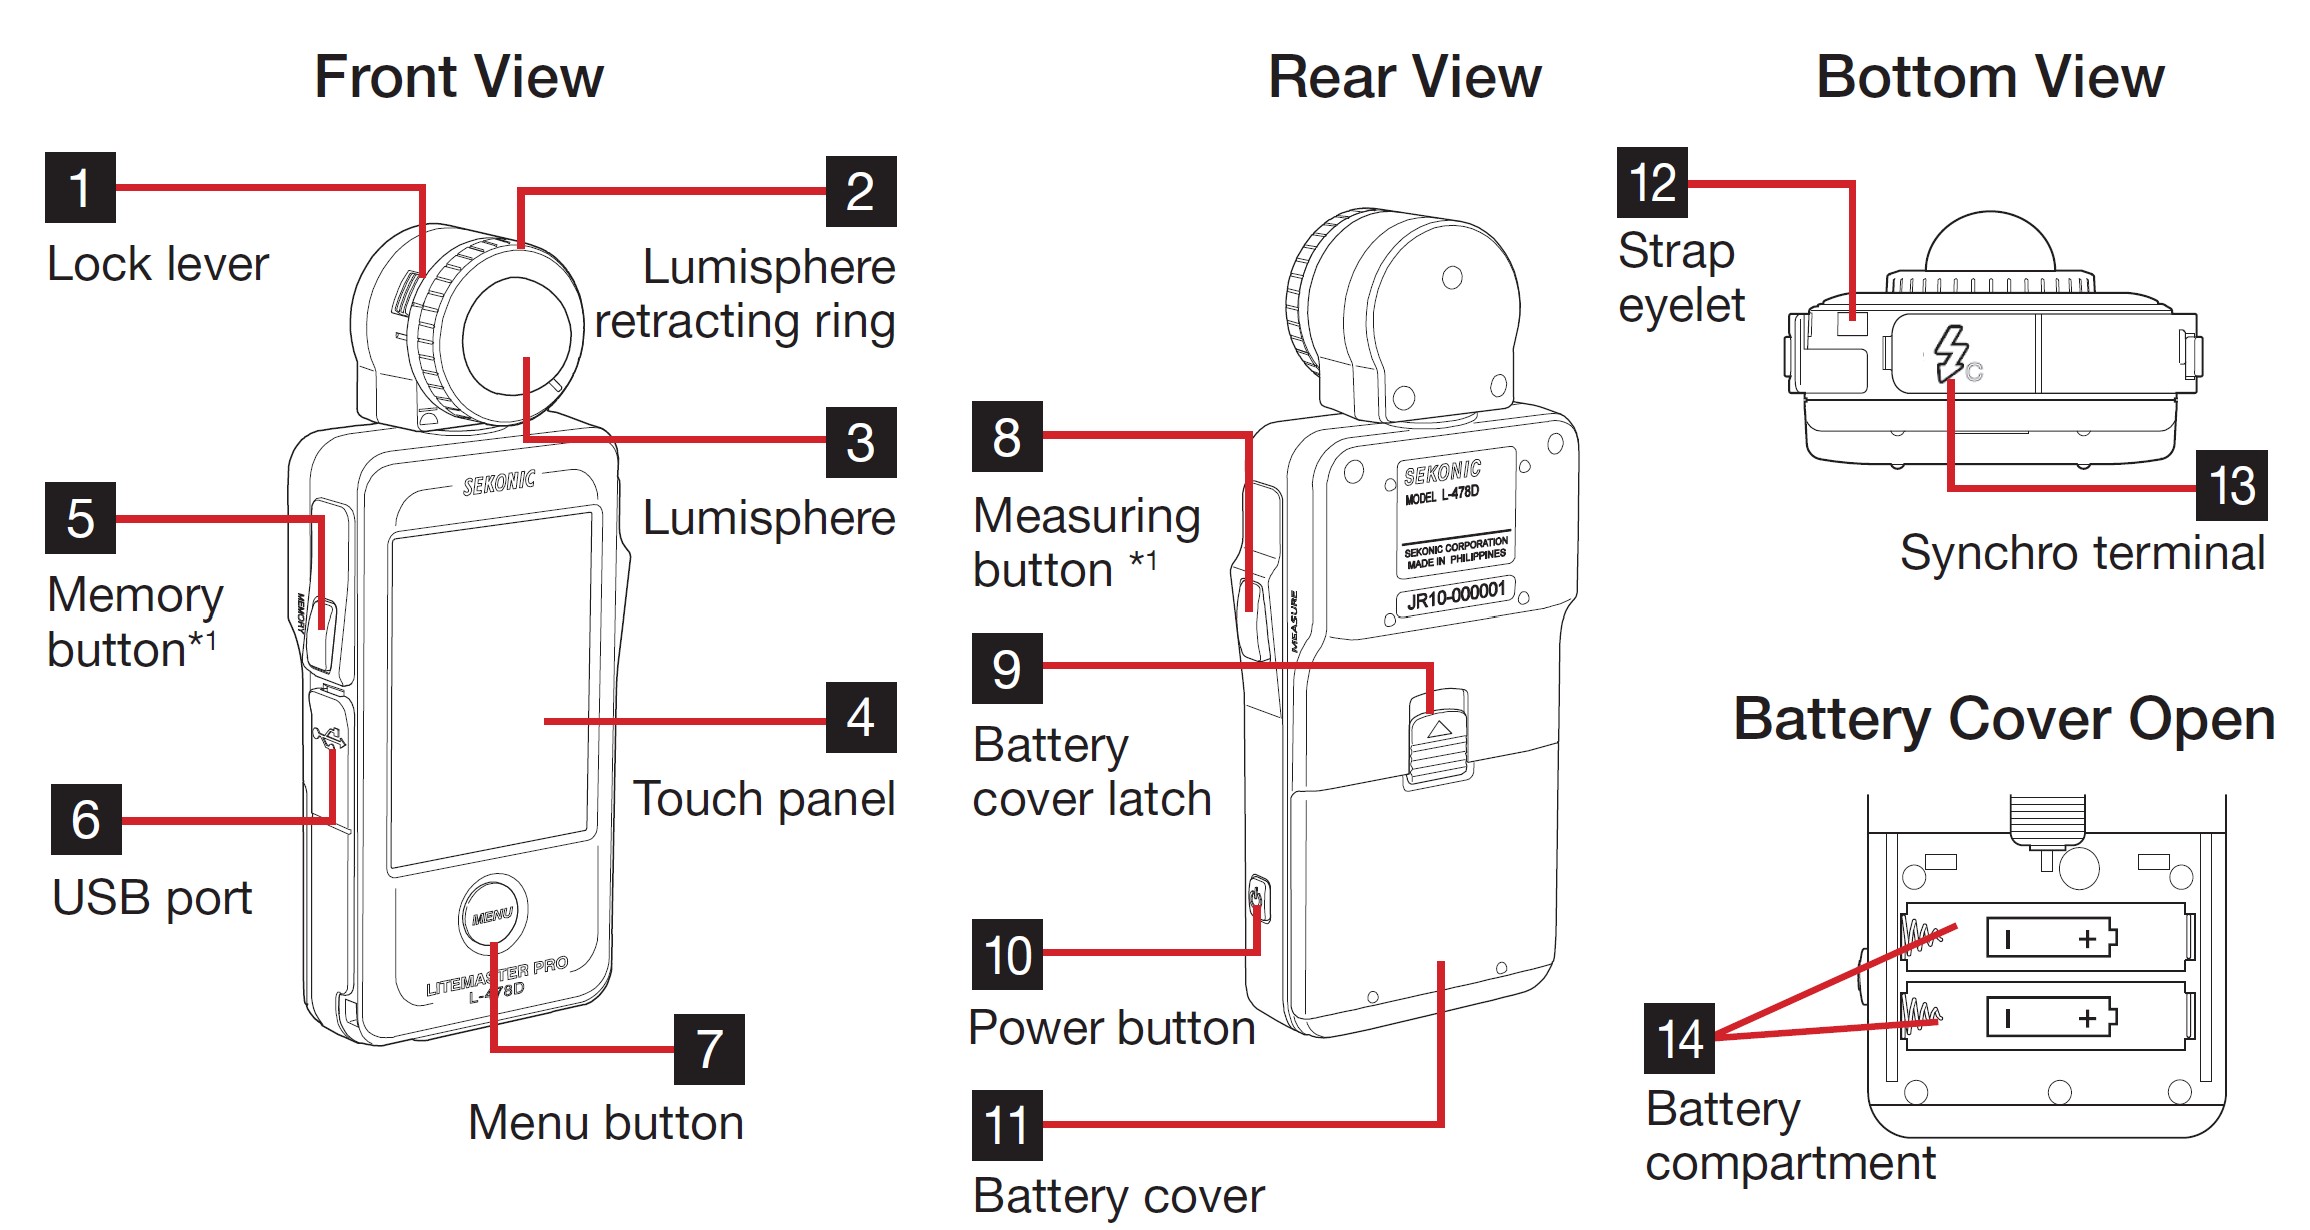

Before Using
Attaching the Strap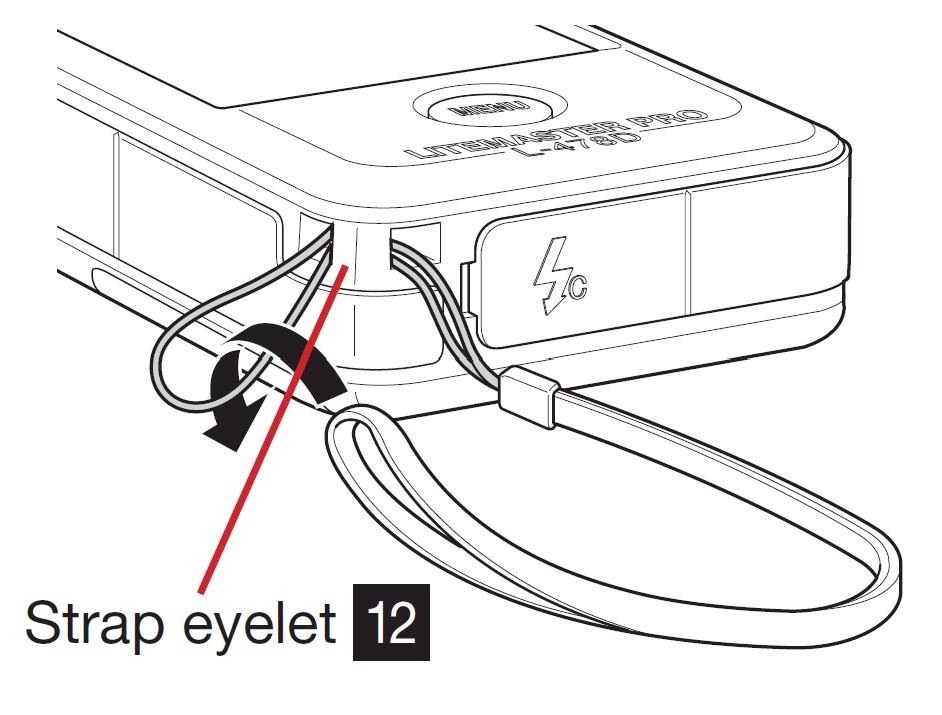
- Pass the strap included through the outer hole of the Strap eyelet 12.
- Pass the opposite end of the strap through the loop at the end of the strap.
Warning:
- Infants or toddlers may accidentally wrap the strap around their neck, so please place it in a location out of their reach. There is a danger of suffocation.
- This neck strap is made of polyester fiber. Please refrain from using the product if synthetic fibers cause your skin to become irritated, inflamed, or itchy in order to prevent worsening your symptoms.
Inserting the Batteries
- Requires two AAA alkaline manganese batteries.
- Slide the Battery cover latch 9 in the direction of the arrow and remove the Battery cover 11 .
- Insert the batteries according to the “+” and “–” symbols in the Battery compartment 14.
* As shown in the diagram to the right, please note both positive sides of the batteries are facing in the same direction. - While lining up the two tabs on the Battery Cover 11, press the Battery Cover 11 back into place from above.
Warning: Do not place batteries in an open flame, attempt to short them, disassemble them, apply heat to them, or recharge them (except rechargeable batteries). They may burst and cause fires, serious injury, or damage to the environment.
Caution:
- Insert the batteries minus (-) side first. When removing batteries, pull out the plus (+) side first.
- Do not use batteries with any other rating than the one specified. Also, do not mix old and new batteries.
- If the meter will not be used for an extended period of time, it is recommended to remove the batteries to avoid possible damage caused by battery leaking.
Power ON/OFF
Power ON: Press the Power button 10 for one second.
The meter will turn on, and after the title screen is displayed, the Measuring screen appears.
Power OFF: Press and hold the Power button 10 for one second or longer. The meter will turn off and the display will disappear.
Checking the Battery Capacity
When the power is turned on, the battery power indicator is displayed at the upper left of the LCD.
Cautions about Changing the Batteries during Measurement
- Always turn off the power before replacing the batteries.
- If an unexpected display appears on the LCD during battery replacement or measurement, ie. settings other than selected, or if the meter does not respond when a button is pressed, remove the batteries, wait at least 10 seconds, and then re-install them.
Auto Power OFF Function
To save battery power, the meter will automatically turn off five minutes after the last button is pressed.
Basic Operations
Basic Operation Flow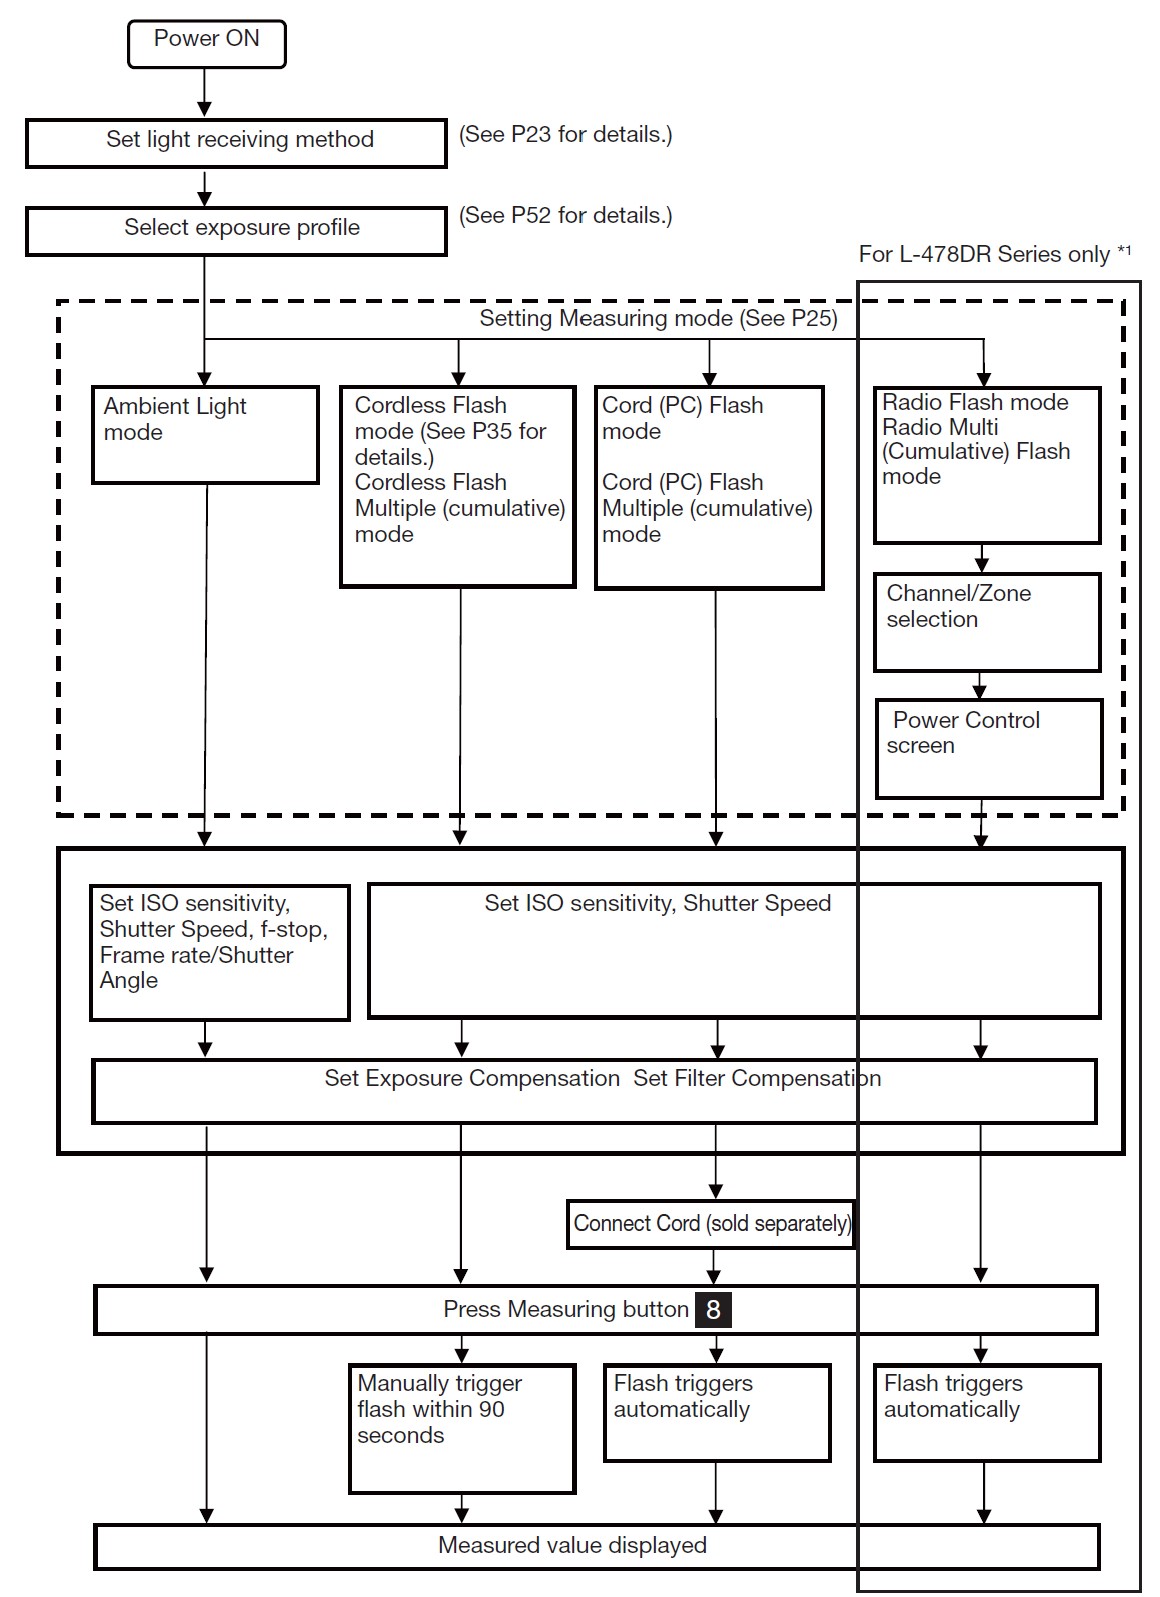
Setting Light Receiving System
Measuring with Incident Light Function (Lumisphere Extended /Retracted)
Use either an extended or retracted (flat) lumisphere to measure incident light. Point the lumisphere at the camera (lens optical axis) from a position close to the subject and then measure.
- Extending Lumisphere
Rotate the Lumisphere retracting ring 2 to align the mark with the extended symbol on the meter head. - Retracting Lumisphere
Rotate the Lumisphere retracting ring 2 to align the mark with the retracted symbol on the meter head.
 Measuring with Reflected Light System
Use a 5-degree Viewfinder, and reflected light attachment, (sold separately) to make reflected light readings with the L-478 Series.
This method measures the brightness (luminance) of the light reflected from the subject. It is useful for distant objects such as landscapes when you cannot go to the position of the subject, or for metering subjects that generate light (neon signs, etc.), highly reflective surfaces, or translucent subjects (stained glass, etc.).
Reflected light measurements are made at the camera position by aligning the circle in the viewfinder eyepiece with the subject area to be measured.
* See the operating manual included with 5-Degrees Viewfinder (sold separately).
- Remove the Lumisphere
The lumisphere unit is removed by holding both the upper and lower sections of the Lumisphere retracting ring and turning it
to the left while pushing the Lock lever 1 downward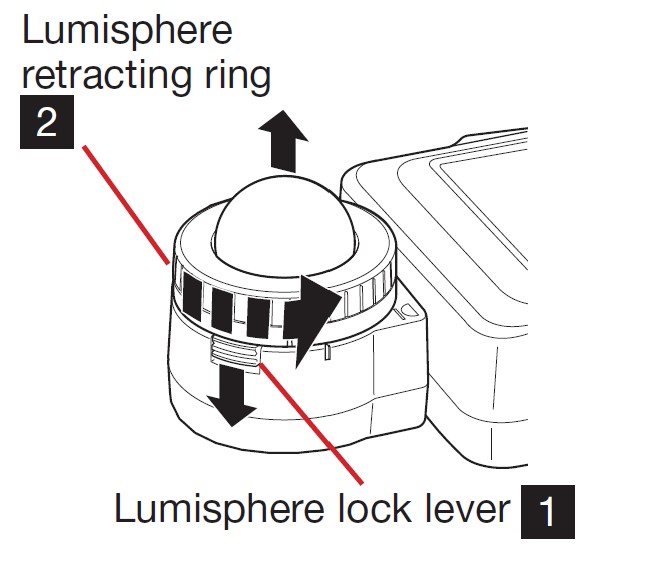
- Attach the Lumisphere
Align the mark on the Lumisphere with the mark on the meter head and, while pressing it in, turn the Lumisphere to the right until it clicks into place.
* Check to see that the Lumisphere lock lever 1 is engaged.
Setting Measuring Mode
Touch the Measuring mode icon at the top left of the Measuring screen and then select any one of the Measuring modes.
* The Measuring modes displayed on the Measuring Mode Selection screen will change depending on the settings at Custom Setting.
About Measuring Modes
Optional Accessories (Sold Separately)
Synchro Cord
This is a five-meter-long cord with three plugs. An exposure meter, a camera, and a flash can all be connected at the same time without the need to plug or unplug the cord during a shooting. Also, one of the terminals has a locking mechanism to ensure connection with a meter.
The cord has two male connectors and one female one.
The connector with the lock function is a male one.
18% Standard Gray Card
This is a gray card (125mm × 130mm = 4.3” x 4”) with an 18% reflection ratio, and folds to 72mm x 125mm (=2.8” x 4.9”) to fit in a shirt pocket. Use this for proper reflected light measurements of mostly bright (white) or dark (black) subjects.
Exposure Profile Target II
Simpler to use, this is the test target (350mm × 210mm = 13.8” × 8.3”) used to create camera exposure profiles. One side consists of a central 18% gray patch that is surrounded by 25 patches arranged in 1/6th stop values that are successively brighter and darker, while the other side is an 18% gray card, so it can be used to determine digital camera white balancing and spot metering.
Exposure Profile Target
This is a more economical test target (280mm x 180mm = 11” x 7”) used to create camera exposure profiles. One side is nine gray patches including black and white, and the other side is an 18% gray card for digital camera white balancing and spot metering.
Viewfinder 5°
This is a viewfinder with a five-degree light receiving angle for spot metering in reflected light.
It is useful for distant subjects such as landscapes when you cannot go to the position of the subject, or for metering subjects that generate light (neon signs, etc.), highly reflective surfaces, or translucent subjects (stained glass, etc.).
Specifications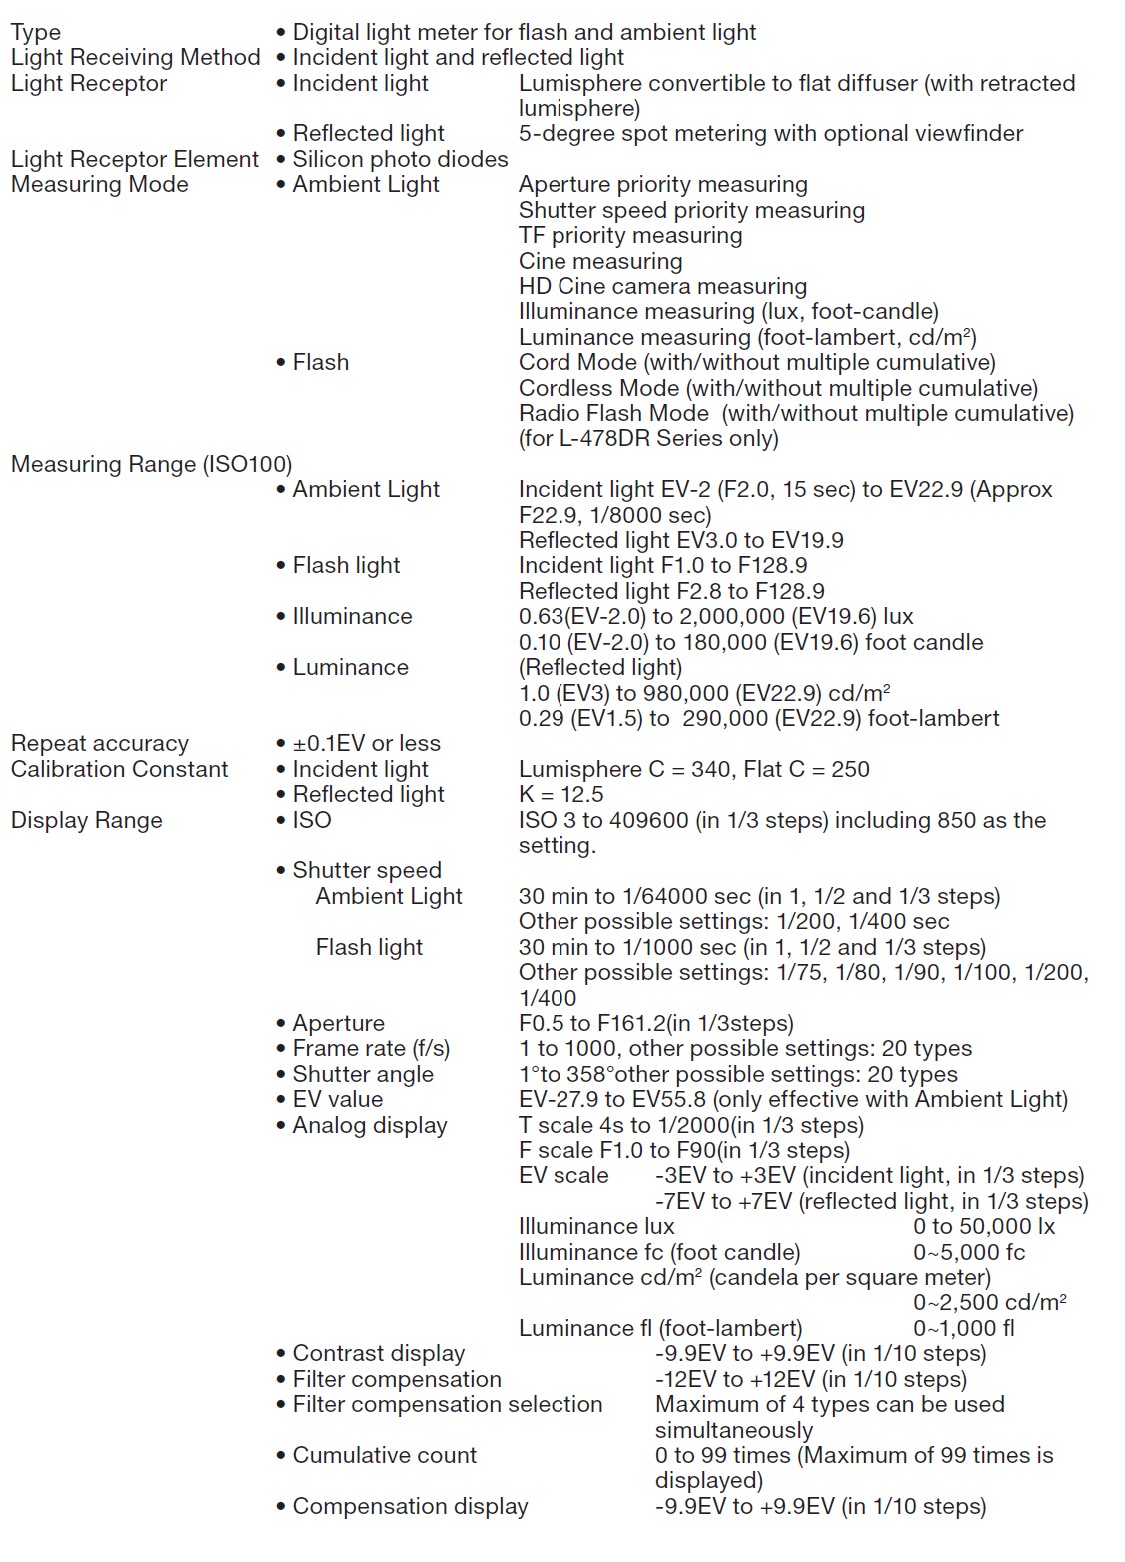

Safety Guide and Maintenance
Caution:
- To avoid damaging this meter, never drop it or subject it to shock.
- Avoid using it in water spray or rain as doing so may cause damage.
- Avoid storing it in high-temperature and/or humid locations as doing so may cause damage.
- Beware of condensation caused by sudden temperature changes, as such condensation may cause damage or malfunction.
- Do not place the meter in direct sunlight during midsummer or near heaters, etc., as the temperature of the meter will rise beyond that of the air temperature. Be careful when using the meter in hot locations.
Notes:
- Although the LCD monitor is manufactured with very high precision technology with over 99.9% effective pixels, there might be a few dead pixels. Dead pixels, that do not or always light up, are not a malfunction.
Maintenance Notes
- If your meter is splashed with water, wipe immediately with a soft dry cloth. Leaving the meter wet may cause rust or corrosion
- Keep the light receptor head clean and free from dust,/dirt, and avoid scratching as accuracy may be affected.
- When the light meter gets dirty, clean it with a soft dry cloth. Never use organic cleaners (like thinner or benzene).
- Refer servicing only to qualified and authorized personnel in case of product malfunction.
- Contact your local camera store or retail organization for warranty and service.
Troubleshooting
If your meter is not operating properly, as you expect, please consult the following conditions and attempt the suggested solutions before contacting Sekonic. Non-operation can be due to incorrect, mis-setting of the meter or battery condition. Should your meter malfunction, please contact the place where the meter was purchased or Sekonic for service and repair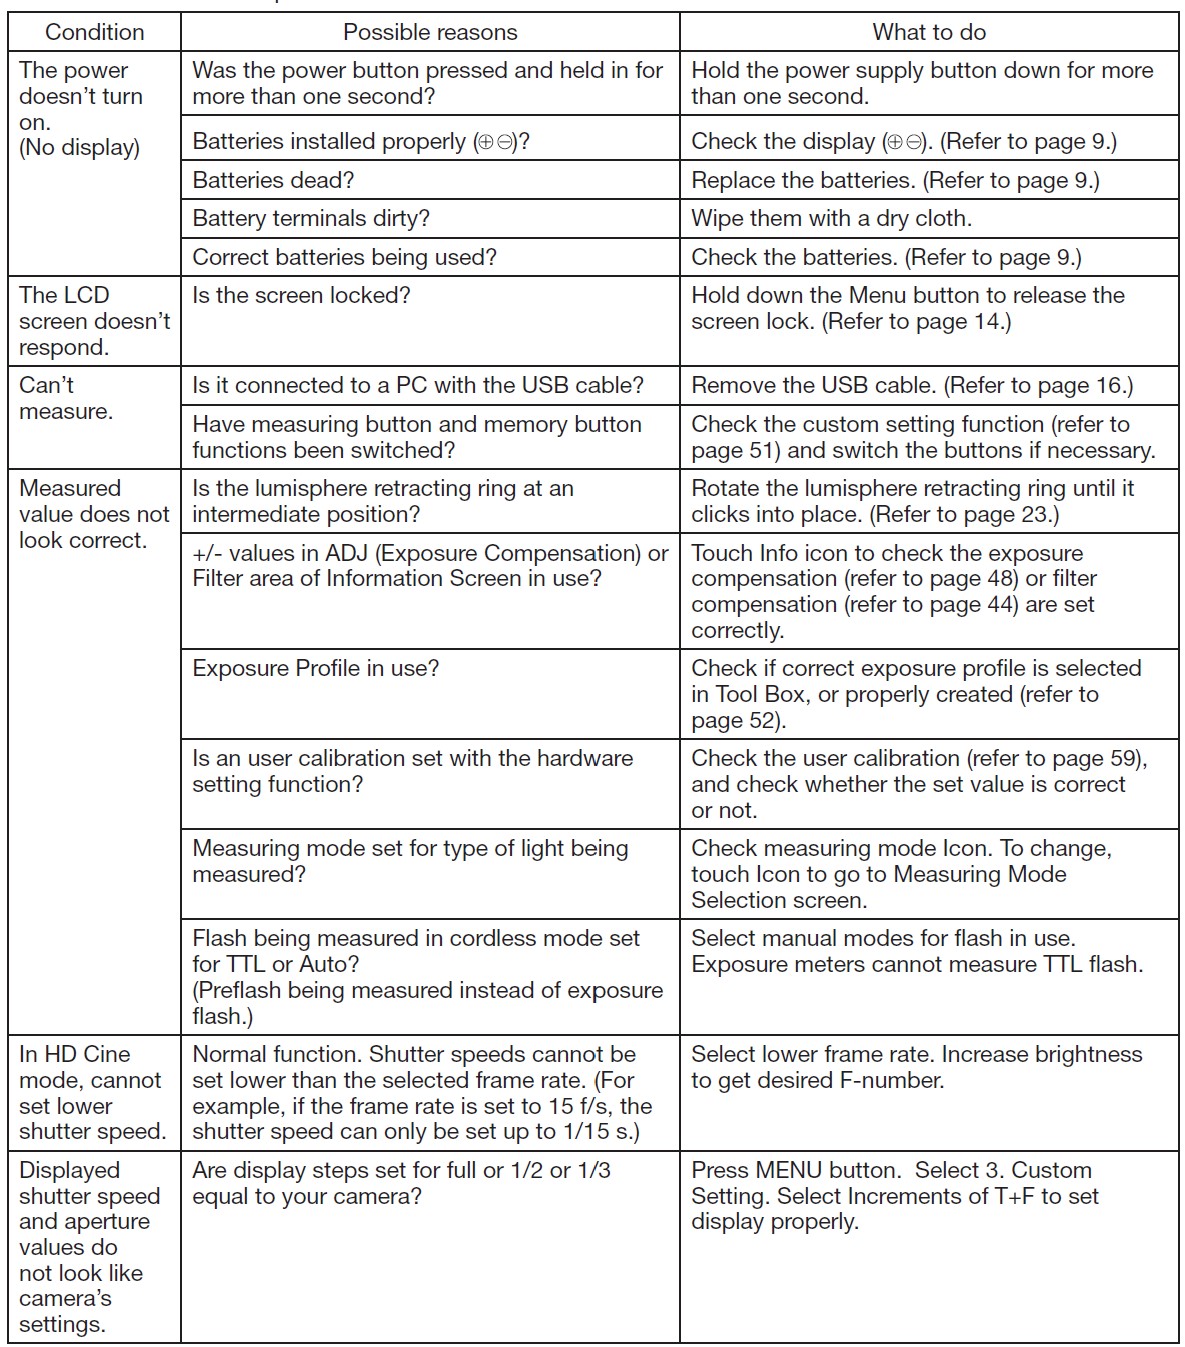
 .
.
Support
- 7-24-14, Oizumi-Gakuen-Cho, Nerima-Ku, Tokyo 178-8686 Japan
- Tel: +81(0)3-3978-2335
- Fax: +81(0)3-3978-5229
- Website: http://www.sekonic.com
FAQS About Sekonic L-478D-U Lightmeter
What distinguishes sekonic L 478D from L 478DR?
The L-478DR and L-478D are different in that the former features a built-in PocketWizard remote control and the latter does not.
Does Sekonic still operate?
Sekonic still creates and develops meters for many facets of photography today.
What advantages does a light meter have?
The ideal shutter speed and aperture size are displayed together with ambient light measurement.
What distinguishes sekonic L 478D and Dr from one another?
There is built-in Pocketwizard support in the DR version.
What exactly does EU sekonic light meter mean?
Below Exposure
What country produces sekonic meters?
Nerima, Japan
How is a light meter operated?
You must go to manual mode on your camera and select an ISO setting in order to use a reflecting light meter. Then, to turn on the meter, position your camera towards your subject and halfway push the shutter button.
A light meter’s accuracy is how precise?
Most meters have a 3–7% range.
A light meter: Is it reliable?
You can almost always trust them to give you accurate readings.
Anyone may use a light meter.
if a flash is being used
For more manuals by Sekonic, Visit Manualsdock
[embeddoc url=”https://manualsdock.com/wp-content/uploads/2023/09/Sekonic-L-478D-U-Lightmeter-Operating-Manual.pdf” download=”all”]

