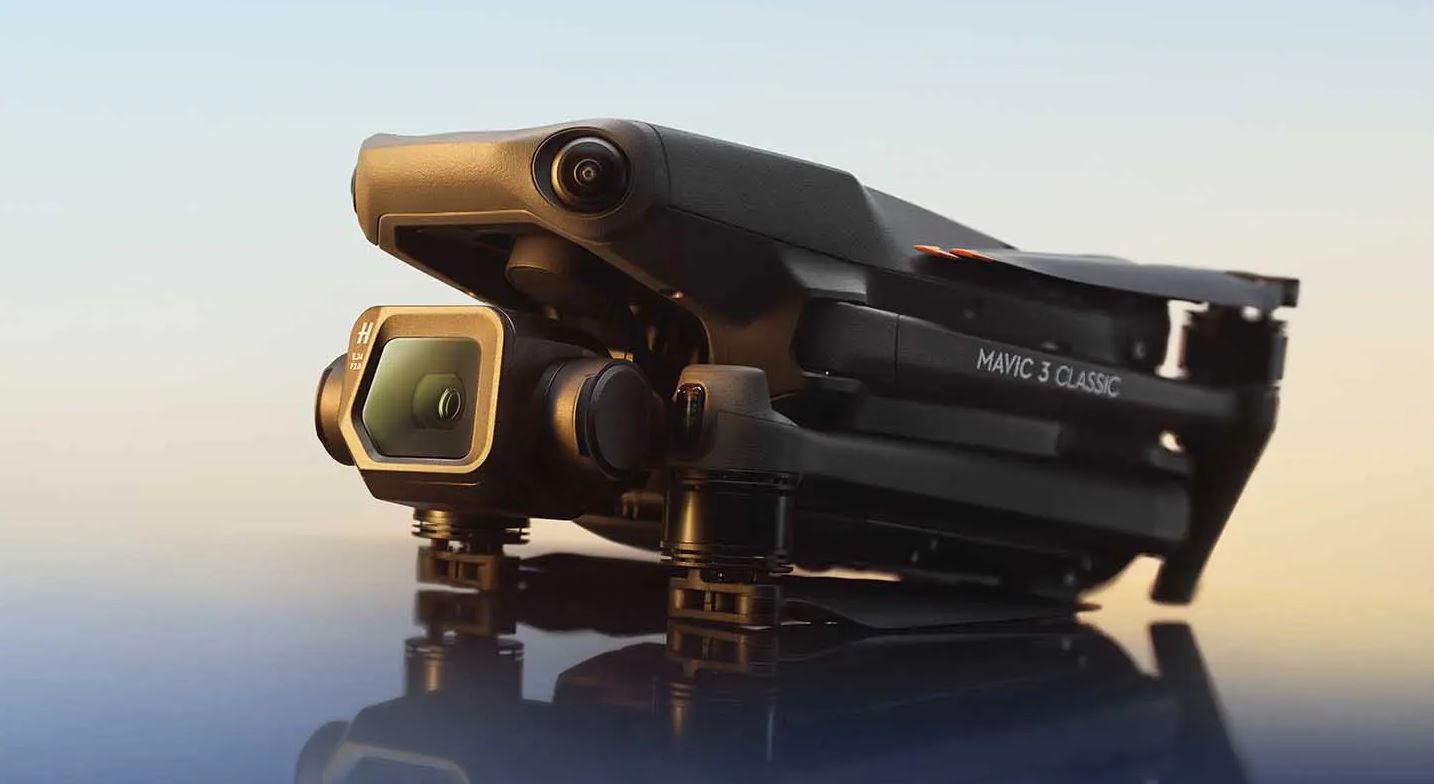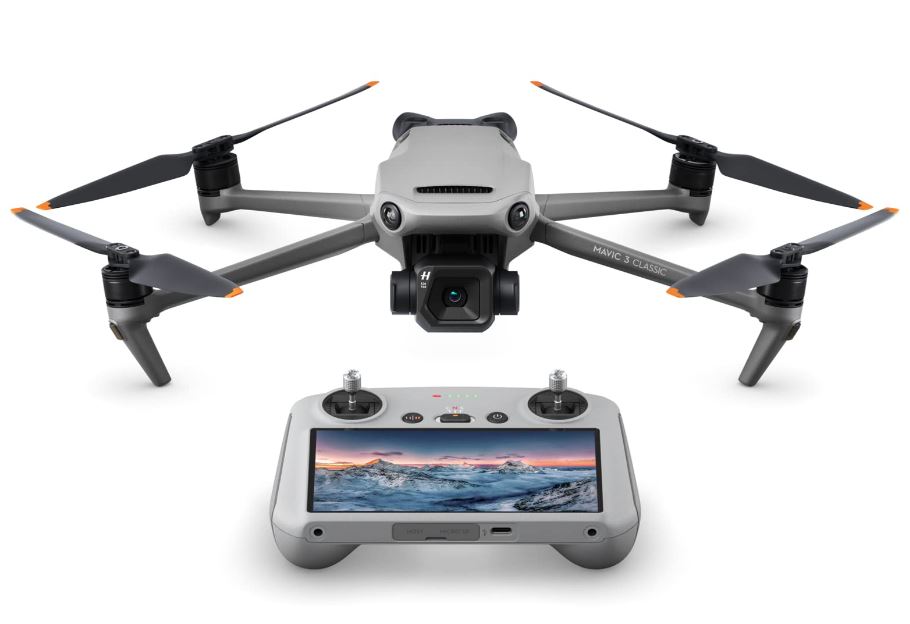
DJI Mavic 3 Classic Drone
ABOUT DJI
DJI, or Da-Jiang Innovations Science and Technology Co., Ltd., is a Chinese technology company specializing in the manufacturing and development of unmanned aerial vehicles (UAVs), commonly known as drones. DJI is considered one of the world’s leading companies in the drone industry.
Founded in 2006 by Frank Wang, DJI is headquartered in Shenzhen, China, and has grown rapidly to become a global leader in consumer and professional-grade drones. The company’s products range from small consumer drones to advanced commercial and industrial drones used for various applications.
Read Before the First Flight
Read the following documents before using DUI™ FPV.
- User Manual
- Quick Start Guide
- Disclaimer and Safety Guidelines
It is recommended to watch all tutorial videos on the official DJI website and read the disclaimer and safety guidelines before using them for the first time. Prepare for your first flight by reviewing the quick start guide and refer to this user manual for more information.
Video Tutorials
Go to the address below or scan the QR code to watch the DJI Mavic 3 Classic tutorial videos, which demonstrate how to use the Mavic 3 Classic safely:
Download the DJI Fly App
Make sure to use DJI Fly during the flight. Scan the QR code above to download the latest version.
- The DJI RC remote controller has the DJI Fly app already installed. Users are required to download DJI Fly to their mobile device when using DJI RC-N1 remote controller
- The Android version of DJI Fly is compatible with Android v6.0 and later. The iOS version of DJI Fly is compatible with iOS v11.0 and later.
Download DJI Assistant 2 (DJI FPV series)
Download DJI ASSISTANT™M 2 (Consumer Drones Series) at http://www.dji.com/mavic-3-classic/downloads.
- The operating temperature of this product is -10° to 40° C. It does not meet the standard operating temperature for military-grade applications (-55° to 125° C), which is required to endure greater environmental variability. Operate the product appropriately and only for applications that meet the operating temperature range requirements of that grade.
Product Profile
Introduction
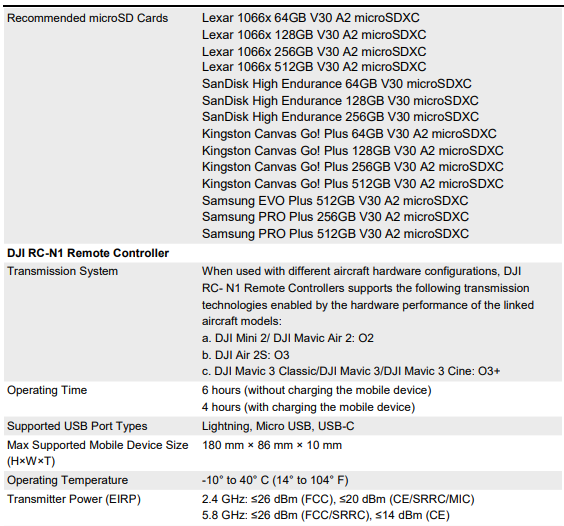
DJI Mavic 3 Classic features both an Infrared Sensing System and Forward, Backward, Upward, Lateral, and Downward Vision Systems, allowing for hovering and flying indoors as well as outdoors and for automatic Return to Home while avoiding obstacles in all directions. The aircraft has a maximum flight speed of 47 mph (75.6 kph) and a maximum flight time of 46 minutes The DJI RC remote controller has a built-in 5.5-in screen with a resolution of 1920×1080 pixels. Users can connect to the internet via Wi-Fi while the Android operating system includes both Bluetooth and GNSS. The DJI RC remote controller comes with a wide range of aircraft and gimbal controls as well as customizable buttons. It has a maximum operating time of approximately 4 hours. The RC-N1 remote controller displays the video transmission from the aircraft to DJI Fly on a mobile device. The aircraft and camera are easy to control using the onboard buttons and the remote controller has a runtime of 6 hours.
Feature Highlights
- Gimbal and Camera: DJI Mavic 3 Classic uses a 4/3 CMOS sensor Hasselblad L2D-20c camera, capable of shooting 20MP photos and 5.1K 50fps/DCI 4K 120fps H.264/H.265 videos. The camera has an adjustable aperture of f/2.8 to f/11, a dynamic range of 12.8 stops, and supports 10-bit D-Log video.
- Video Transmission: With four built-in antennas and DJI’s long-range transmission 03+ technology, DJI Mavic 3 Classic offers a maximum transmission range of 15 km and video quality at up to 1080p 60fps from the aircraft to the DJI Fly app. The remote controller works at both 2.4 and 5.8 GHz and is capable of selecting the best transmission channel automatically.
- Intelligent Flight Modes: The user can focus on operating the aircraft while the Advanced Pilot Assistance System 5.0 (APAS 5.0) helps the aircraft to avoid obstacles in all directions and effortlessly capture complex shots using Focus Track, MasterShots, QuickShots, and Hyperlapse.
warning
- The maximum flight time was tested in an environment without wind while flying at a consistent flight speed of 20.1 mph (32.4 kph). The maximum flight speed was tested at sea level altitude without wind. Note that the maximum flight speed is limited to 42 mph (68.4 kph) in the European Union (EU). These values are for reference only
- The remote controller reaches its maximum transmission distance (FCC) in a wide-open area with no electromagnetic interference at an altitude of about 400 ft (120 m). The maximum transmission distance refers to the maximum distance that the aircraft can still send and receive transmissions. It does not refer to the maximum distance the aircraft can fly in a single flight. The maximum runtime was tested in a laboratory environment and without charging the mobile device. This value is for reference only.
- 5.8 GHz is not supported in some regions. Observe the local laws and regulations.
- DJI RC-N1, DJI RC remote controller, and all types of ND filters are fully compatible with Mavic 3 Classic
Using it for the First Time
DJI Mavic 3 Classic is folded before being packaged. Follow the steps below to unfold the aircraft and remote controller.
Preparing the Aircraft
- Remove the storage cover.
- All Intelligent Flight Batteries are in hibernation mode before delivery to ensure safety. Charge and activate the Intelligent Flight Batteries for the first time. It takes approximately 1 hour and 36 minutes to fully charge an Intelligent Flight Battery using the provided DJI 65W charger. Charging time is tested when using the fixed cable of the charger. It is recommended to use this cable to charge the Intelligent Flight Battery.
- Unfold the front arms, followed by the rear arms. and then the propeller blades.
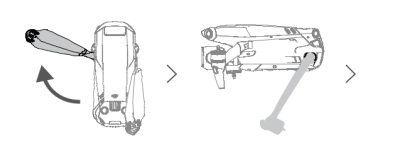
- Make sure to unfold the front arms before unfolding the rear arms.
- Make sure the storage cover is removed and all arms are unfolded before powering on the aircraft. Otherwise, it may affect the aircraft’s self-diagnostics.
- Attach the storage cover when the aircraft is not in use.
- DJI 65W charger is not included in the Mavic 3 Classic (Drone Only). It is recommended to use a PD 65W charger to charge the Intelligent Flight Battery.
Preparing the Remote Controller
Follow the steps below to prepare to use the DJI RC remote controller.
- Remove the control sticks from the storage slots and mount them on the remote controller.

- The remote controller needs to be activated before first use and an internet connection is required for activation. Press, and then press again and hold the power button to power on the remote controller. Follow the on-screen prompts to activate the remote controller.
Follow the steps below to prepare the DJI RC-N1 remote controller.
- Remove the control sticks from their storage slots on the remote controller and screw them into place.
- Pull out the mobile device holder. Choose an appropriate remote controller cable based on the type of mobile device. A Lightning connector cable, Micro USB cable, and USB-C cable are included in the packaging. Connect the end of the cable with the phone icon to your mobile device. Make sure the mobile device is secured.

Activating DJI Mavic 3 Classic Aircraft
DJI Mavic 3 Classic requires activation before using it for the first time. After powering on the aircraft and remote controller, follow the on-screen prompts to activate DJI Mavic 3 Classic using DJI Fly. An internet connection is required for activation.
Binding the Aircraft and Remote Controller
It is recommended to bind the aircraft and remote controller to help ensure the best possible after-sales service. Follow the on-screen prompts after activation to bind the aircraft and remote controller.
Updating Firmware
A prompt will appear in DJI Fly when new firmware is available. It is recommended to update the firmware whenever prompted to do so to ensure the best possible user experience.
Diagram
Aircraft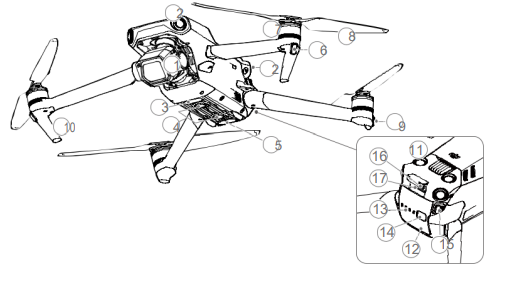
- Gimbal and Camera
- Horizontal Omnidirectional Vision System
- Auxiliary Bottom Light
- Downward Vision System
- Infrared Sensing System
- Front LEDs
- Motors
- Propellers
- Aircraft Status Indicators
- Landing Gears (Built-in antennas)
- Upward Vision System
- Intelligent Flight Battery
- Battery Level LEDs
- Power Button
- Battery Buckles
- USB-C Port
- microSD Card Slot
DJI RC Remote Controller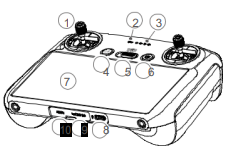
- Control Sticks
Use the control sticks to control the movement of the aircraft. The control sticks are removable and easy to store. Set the flight control mode in DJI Fly. - Status LED
Indicates the status of the remote controller. - Battery Level LEDs
Displays the current battery level of the remote controller. - Flight Pause/Return to Home (RTH) Button
Press once to make the aircraft brake and hover in place (only when GNSS or Vision Systems are available). Press and hold to initiate RTH. Press again to cancel RTH - Flight Mode Switch
Switch between Cine, Normal, and Sport mode. - Power Button
Press once to check the current battery level. Press, and then press and hold to power the remote controller on or off. When the remote controller is powered on, press once to turn the touchscreen on or off. - Touchscreen
Touch the screen to operate the remote controller. Note that the touchscreen is not waterproof. Operate with caution. - USB-C Port
For charging and connecting the remote controller to your computer. - microSD Card Slot
For inserting a microSD card. - Host Port (USB-C)
Reserved port. - Gimbal Dial
Controls the tilt of the camera. - Record Button
Press once to start or stop recording.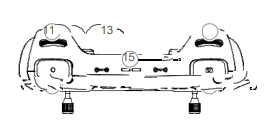
- Camera Control
Dial Control zoom in/out by default. The dial function can be set in DJI Fly. - Focus/Shutter Button Press halfway down on the button to aut-focus and press down to take a photo. Press once to switch to photo mod when in record mode
- Speaker
Outputs sound.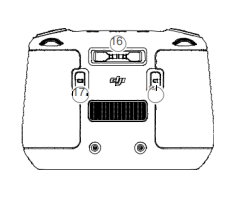
- Control Sticks
Storage Slot For storing the control sticks. - Customizable C2
Button Control Auxiliary Bottom Light by default (switch between recentering the gimbal and pointing the gimbal downward by default when using in EU). The function can be set in DJI Fly. - Customizable C1
Button Switch between recentering the gimbal and pointing the gimbal downward. The function can be set in DJI Fly.
RC-N1 Remote Controller
- Power Button
Press once to check the current battery level. Press once, then again, and hold to power the remote controller on or off. - Flight Mode Switch
Switch between Sport, Normal, and Cine mode. - Flight Pause/Return to Home (RTH) Button
Press once to make the aircraft brake and hover in place (only when GNSS or Vision Systems are available). Press and hold the button to initiate RTH. Press again to cancel RTH. - Battery Level LEDs
Displays the current battery level of the remote controller. - Control Sticks
Use the control sticks to control the aircraft movements. Set the flight control mode in DJI Fly. The control sticks are removable and easy to store - Customizable Button
Press once to recenter the gimbal or tilt the gimbal downward (default settings). Press twice to turn the Auxiliary Bottom Light on or off. The button can be set in DJI Fly. - Photo/Video Toggle
Press once to switch between photo and video mode. - Remote Controller Cable
Connect to a mobile device for video linking via the remote controller cable. Select the cable according to the mobile device. - Mobile Device Holder
Used to securely mount the mobile device to the remote controller. - Antennas
Relay aircraft control and video wireless signals. - USB-C Port
For charging and connecting the remote controller to the computer - Control Sticks Storage
Slot For storing the control sticks.
- Gimbal Dial Controls
the tilt of the camera. - Shutter/Record Button
Press once to take photos or start or stop recording. - Mobile Device Slot
Used to secure the mobile device.
Aircraft
DJI Mavic 3 Classic contains a flight controller, video downlink system, vision systems, infrared sensing system, propulsion system, and an Intelligent Flight Battery.
Flight Modes
DJI Mavic 3 Classic has three flight modes, plus a fourth flight mode that the aircraft switches to in certain scenarios. Flight modes can be switched via the Flight Mode switch on the remote controller.
- Normal Mode: The aircraft utilizes GNSS and the Forward, Backward, Lateral, Upward, and Downward Vision Systems and Infrared Sensing System to locate and stabilize itself. When the GNSS signal is strong, the aircraft uses NSS to locate and stabilize itself. When the GNSS is weak but the lighting and other environmental conditions are sufficient, the aircraft uses the vision systems to locate and stabilize itself. When the Forward, Backward, Lateral, Upward, and Downward Vision Systems are enabled and lighting and other environmental conditions are sufficient, the maximum tilt angle is 30° and the maximum flight speed is 15 m/s.
- Sport Mode: In Sport mode, the aircraft uses GNSS for positioning and the aircraft responses are optimized for agility and speed making it more responsive to control stick movements. Note that obstacle sensing is disabled and the maximum flight speed is 21 m/s (19 m/s when flying in the EU).
- Cine Mode: Cine mode is based on Normal mode and the flight speed is limited, making the aircraft more stable during shooting The aircraft automatically changes to Attitude (ATTI) mode when the Vision Systems are unavailable or disabled and when the GNSS signal is weak or the compass experiences interference. In ATTI mode, the aircraft may be more easily affected by its surroundings. Environmental factors such as wind can result in horizontal shifting, which may present hazards, especially when flying in confined spaces.
Aircraft Status Indicators
DJI Mavic 3 Classic has front LEDs and aircraft status indicators.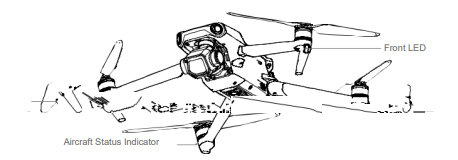
When the aircraft is powered on but the motors are not running, the front LEDs glow solid red to display the orientation of the aircraft. When the aircraft is powered on but the motors are not running, the aircraft status indicators display the status of the flight control system. Refer to the table below for more information about the aircraft status indicators.
Advanced Pilot Assistance Systems
The Advanced Pilot Assistance Systems 5.0 (APAS 5.0) feature is available in Normal and Cine mode. When APAS is enabled. the aircraft continues to respond to user commands and plans its path according to control stick inputs and the flight environment. APAS makes it easier to avoid obstacles and obtain smoother footage for a better flying experience. Keep moving the control sticks in any direction. The aircraft will avoid the obstacles by flying above, Keep moving the control sticks in any direction. The aircraft will avoid the obstacles by flying above, below, or to the left or right of the obstacle. The aircraft can also respond to the control stick inputs while avoiding obstacles.
- When APAS is enabled, the aircraft can be stopped by pressing the Flight Pause button on the remote controller or tapping the screen in DJI Fly.
- The aircraft hovers for three seconds and awaits further pilot commands.
- To enable APAS, go to DJI Fly and select ∞ > Safety > Bypass.
- Select Normal or Nifty mode when using Bypass. In nifty mode, the aircraft can fly faster, smoother, and closer to obstacles obtaining better footage while avoiding obstacles. Meanwhile, the risk of crashing with the obstacles increases.
- Fly with caution.
Nifty cannot work normally in the following situations:
- When aircraft orientation changes rapidly flying near obstacles when using Bypass.
- When flying through narrow obstacles such as canopies or bushes at high speed.
- When flying near obstacles that are too small to detect.
- When flying with the propeller guard.
Landing Protection
Landing Protection will activate if Obstacle Avoidance is set to Bypass or Brake and the user pulls the throttle stick down to land the aircraft. Landing Protection is enabled once the aircraft begins to land.
- During Landing Protection, the aircraft will automatically detect and carefully land on suitable ground.
- If the ground is determined unsuitable for landing, the aircraft will hover when the aircraft descends below 0.8 m. Pull down on the throttle stick for more than five seconds and the aircraft will land without obstacle avoidance.
Flight Recorder
Flight data including flight telemetry, aircraft status information, and other parameters are automatically saved to the internal data recorder of the aircraft. The data can be accessed using DJI Assistant 2 (Consumer Drones Series).
QuickTransfer
Mavic 3 Classic can connect directly to mobile devices via Wi-Fi, enabling users to download photos and videos from the aircraft to the mobile device through DJI Fly without the need for the RC-N1 remote controller. Users can enjoy faster and more convenient downloads with a transmission rate of up to 80 MB/s.
Battery Features
- Battery Level Display: the battery level LEDs display the current battery level.
- Auto-Discharging Function: to prevent swelling, the battery automatically discharges to approximately 97% of the battery level when it is idle for one day, and automatically discharges to approximately 60% of the battery level when it is idle for five days. It is normal to feel moderate heat being emitted from the battery while it is discharging.
- Balanced Charging: the voltages of the battery cells are automatically balanced during charging.
- Overcharge Protection: the battery stops charging automatically once fully charged.
- Temperature Detection: to prevent damage, the battery only charges when the temperature is between 41° and 104° F (5° and 40° C). Charging stops automatically if the temperature of the battery exceeds 122° F (50° C) during charging.
- Overcurrent Protection: the battery stops charging if an excess current is detected.
- Over-discharge Protection: discharging stops automatically to prevent excess discharge when the battery is not in-flight use. Over-discharge protection is not enabled when the battery is in-flight use.
- Short Circuit Protection: the power supply is automatically cut if a short circuit is detected.
- Battery Cell Damage Protection: the goggles display a warning prompt when a damaged battery cell is detected.
- Hibernation Mode: the battery switches off after 20 minutes of inactivity to save power. If the battery level is less than 10%, the battery enters Hibernation mode to prevent over-discharge after being idle for six hours. In Hibernation mode, the battery level indicators do not illuminate. Charge the battery to wake it from hibernation.
- Communication: information about the voltage, capacity, and current of the battery is transmitted to the aircraft.
Using the Battery
Checking Battery Level
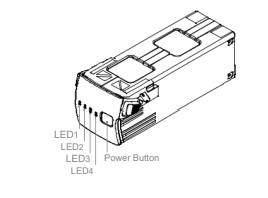
- Press the power button once to check the battery level.
Powering On/Off
Press the power button once, then press again, and hold for two seconds to power the battery on or off. The battery level LEDs display the battery level when the aircraft is powered on.
Low Temperature Notice
- Battery capacity is significantly reduced when flying in low-temperature environments of -10° to 5° C (14° to 41° F). It is recommended to hover the aircraft in place for a while to heat the battery. Make sure to fully charge the battery before takeoff.
- Batteries cannot be used in extremely low-temperature environments of lower than -10° C (14° F).
- When in low-temperature environments, end the flight as soon as DJI Fly displays the low battery level warning.
- To ensure the optimal performance of the battery, keep the battery temperature above 20° C (68° F).
- The reduced battery capacity in low-temperature environments reduces the wind speed resistance performance of the aircraft. Fly with caution.
- Fly with extra caution at high sea levels.
Charging the Battery
Fully charge the Intelligent Flight Battery before every flight
Using DJI 65W Portable Charger
- Connect the DJI 65W Portable Charger to an AC power supply (100-240 V, 50/60 Hz).
- Attach the aircraft to the charger using the battery charging cable with the battery powered off.
- The battery level LEDs display the current battery level during charging.
- The Intelligent Flight Battery is fully charged when all the battery-level LEDs are off. Detach the charger when the battery is fully charged
Inserting the Intelligent Flight Battery
Insert the Intelligent Flight Battery into the battery compartment of the aircraft. Make sure it is mounted securely and that the battery buckles click into place.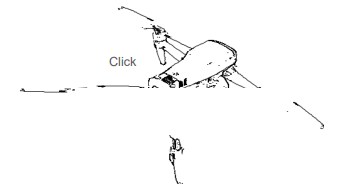
Removing the Intelligent Flight Battery
Press the textured part of the battery buckles on the sides of the Intelligent Flight Battery to remove it from the compartment
Flight Test
Takeoff/Landing Procedures
- Place the aircraft in an open, flat area with the aircraft status indicator facing towards you.
- Power on the goggles, remote controller, and the aircraft.
- Wait until the aircraft status indicator blinks green slowly to indicate that the Home Point has been recorded and put on the goggles.
- Start the motors.
- Gently push the throttle stick up to take off.
- Pull the throttle stick down to land the aircraft.
- Stop the motors after landing.
- Power off the aircraft, goggles, and remote controller.
Video Suggestions and Tips
- The pre-flight checklist is designed to help you fly safely and to ensure that you can record video during flight. Go through the full pre-flight checklist before each flight.
- Select the gimbal operation mode.
- It is recommended to use Normal mode to take photos or record videos.
- DO NOT fly in bad weather conditions such as when it is raining or windy.
- Choose the camera settings that best suit your needs.
- Perform flight tests to establish flight routes and to preview scenes.
- Push the control sticks gently to keep the aircraft movement smooth and stable.
- When using Manual mode, fly in an open, wide, and sparsely populated environment to ensure flight safety.
Specifications

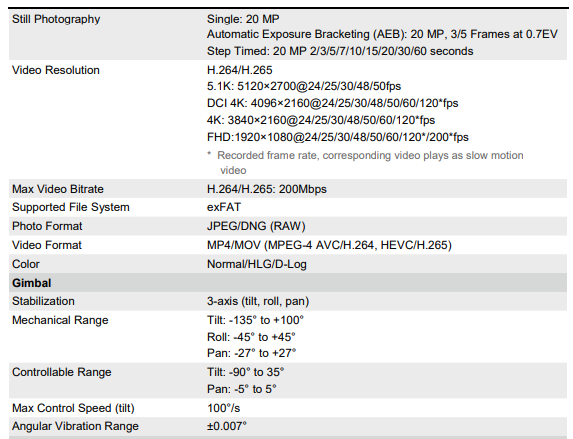


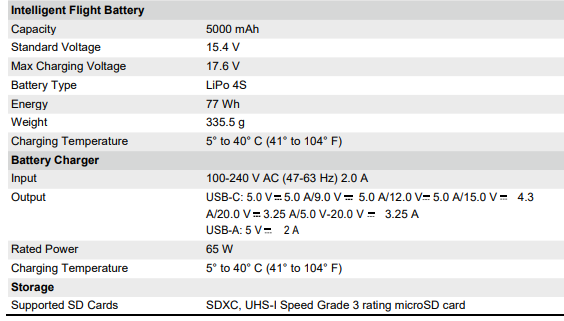


Updating Firmware
Use DJI Fly or DJI Assistant 2 (DJI FPV series) to update the firmware.
Using DJI Fly
When you connect the aircraft or remote controller to DJI Fly, you will be notified if a new firmware update is available. To start updating, connect your remote controller or mobile device to the internet and follow the onscreen instructions. Note that you cannot update the firmware if the remote controller is not linked to the aircraft. Internet is required.
Using DJI Assistant 2 (DJI FPV series)
Update the aircraft and remote controller firmware separately using DJI Assistant 2 (Consumer Drones Series)
Follow the instructions below to update the aircraft firmware through DJI Assistant 2 (Consumer Drones Series):
- Launch DJI Assistant 2 (Consumer Drones Series) and log in with your DJI account.
- Power on the aircraft and connect the aircraft to a computer via the USB-C port.
- . Select DJI Mavic 3 Classic and click on Firmware Updates on the left panel.
- Select the firmware version that you wish to update to.
- Wait for the firmware to download. The firmware update will start automatically. 6. The aircraft will reboot automatically after the firmware update is complete.
Maintenance Instructions
To avoid serious injury to children and animals, observe the following rules:
- Small parts, such as cables and straps, are dangerous if swallowed. Keep all parts out of reach of children and animals.
- Store the Intelligent Flight Battery and remote controller in a cool, dry place away from direct sunlight to ensure the built-in LiPo battery does NOT overheat. Recommended storage temperature: between 22° and 28° C (71° and 82° F) for storage periods of more than three months. Never store in environments outside the temperature range of 14° to 113° F (-10° to 45° C).
- DO NOT allow the camera to come into contact with or become immersed in water or other liquids. If it gets wet, wipe it dry with a soft, absorbent cloth. Turning on an aircraft that has fallen in water may cause permanent component damage. DO NOT use substances containing alcohol, benzene, thinners, or other flammable substances to clean or maintain the camera. DO NOT store the camera in humid or dusty areas.
- DO NOT connect this product to any USB interface older than version 3.0. DO NOT connect this product to any “power USB” or similar devices.
- Check every aircraft part after any crash or serious impact. If there are any problems or questions, contact a DJI-authorized dealer.
- Regularly check the Battery Level Indicators to see the current battery level and overall battery life. The battery is rated for 200 cycles. It is not recommended to continue use afterward
- After-Flight Checklist a. Make sure the Intelligent Flight Battery and the propellers are in good condition. b. Make sure that the camera lens and Vision System sensors are clean. c. Make sure to attach the gimbal protector before storing or transporting the aircraft.
- Make sure to transport the aircraft with the arms folded when powered off.
- Make sure to transport the remote controller with antennas folded when powered off.
- The battery will enter sleep mode after long-term storage. Charge the battery to exit from sleep mode.
- Use the ND filter if the exposure time needs to be prolonged. Refer to the product information on how to install the ND filters.
- Store the aircraft, remote controller, battery, and charger in a dry environment.
- Remove the battery before servicing the aircraft (e.g., cleaning attaching, and detaching the propellers). Make sure that the aircraft and the propellers are clean by removing any dirt or dust with a soft cloth. Do not clean the aircraft with a wet cloth or use a cleanser that contains alcohol. Liquids can penetrate the aircraft housing, which can cause a short circuit and destroy the electronics.
- Make sure to turn off the battery to replace or to check the propellers.
Troubleshooting Procedures
- Why can the battery not be used before the first flight? The battery must be activated by charging before using it for the first time.
- How to solve the gimbal drift issue during flight? Calibrate IMU and compass in DJI Fly. If the problem persists, contact DJI Support.
- No function Check if the Intelligent Flight battery and the remote controller are activated by charging. If the problems persist, contact DJI support.
- Power-on and start-up problems Check if the battery has power. If yes, contact DJI support if it cannot be started normally.
- SW update issues Follow the instructions in the user manual to update the firmware. If the firmware update fails, restart all the devices and try again. If the problem persists, contact DJI support.
- Procedures to reset to factory default or last known working configuration Use the DJI Fly app to reset to factory default.
- Shutdown and power-off problems Contact DJI support.
- How to detect careless handling or storage in unsafe conditions Contact DJI support.
Risk and Warnings
When the aircraft detects a risk after powering on, there will be a warning prompt on DJI Fly. Pay attention to the list of situations below.
- If the location is not suitable for takeoff.
- If an obstacle is detected during flight.
- If the location is not suitable for landing.
- If the compass and IM experience interference and need to be calibrated. 5. Follow the on-screen instructions when prompted.
FAQS About DJI Mavic 3 Classic Drone
Can the Mavic 3 Classic fly very far?
15 km
How long does it take to charge a DJI Mavic 3 Classic?
when using the DJI 65W Portable Charger, roughly 96 minutes.
Can the Mavic 3 Classic carry a lot of weight?
It has a carrying capacity of 500 grams.
Can a Mavic 3 drone be flown at night?
The Night Video Mode on the DJI Mavic 3 Drone supports 4K30fps and ISO 800 to 12800. However, flying at night might be difficult due to poor visibility. Two auxiliary lights on the drone’s underside are designed to help with takeoff and landing in low-light conditions.
What is the Mavic 3 Classic’s operating temperature?
This product can operate in temperatures between -10 and 40 C.
Does the Mavic 3 Classic work in the snow?
Flying a drone during a snowstorm is also not advised because the snow may soak the drone.
Can the Mavic 3 be charged in a car?
You can charge up to three batteries at once with the Mavic 3 Car Charger and the Mavic 3 Battery Charging Hub.
The DJI Mavic 3’s battery life is how long?
46 mins
Has the Mavic 3 Classic zoom?
The Mavic 3 allows you to switch to the Zoom lens, thus it’s okay that the Mavic 3 Classic is fixed to that standard lens.
What classification is the DJI Mavic 3 Classic?
Mavic 3 flights under category A1
The DJI Mavic 3 Classic belongs to what class?
Class C1 drones are the majority of camera drones.
For more manuals by DJI, Visit Manualsdock
[embeddoc url=”https://manualsdock.com/wp-content/uploads/2023/09/DJI-Mavic-3-Classic-Drone-User-Manual.pdf” download=”all”]

