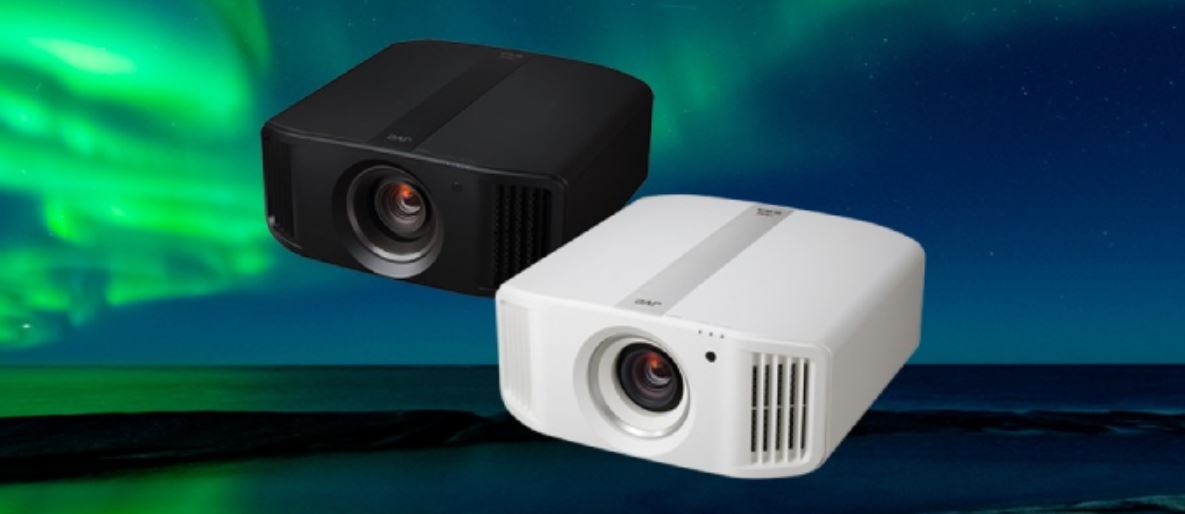
JVC Night Vision D-ILA Projectors
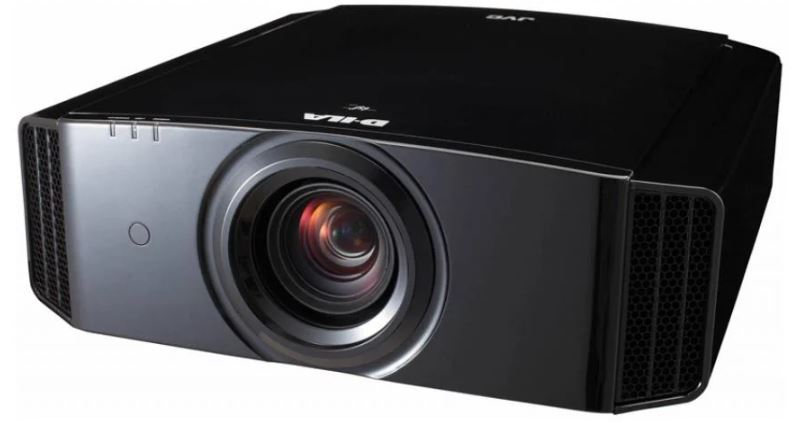
About JVC
JVC (JVCKENWOOD Europe B.V.) is JVCKENWOOD Corporation’s wholly owned subsidiary. JVC is a renowned creator and manufacturer of sophisticated audio and video products that employ cutting-edge technologies to produce high-quality sound and visuals.
JVC provides high-definition displays and home theater projectors, digital video camcorders, home theater systems, audio components and systems, portable audio products, digital storage devices, audio and video accessories, and automobile audio/video products in its consumer products.
Controls and Features
Main Unit – Front
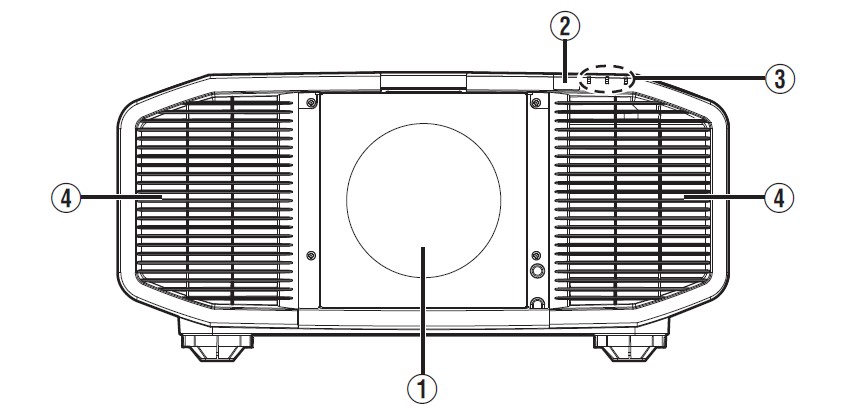
- (1) Lens (sold separately)
A Zoom lens or short focal length lens is optional. - (2) Remote Sensor (front)
Please aim the remote control at this area when using it.
* There is also a remote sensor at the rear.
- (3) Indicator
Refer to “Indicator Display on the Main Unit” P. 68. - (4) Exhaust vent
Warm air is discharged to cool down the internal temperature.
Do not block the vents.
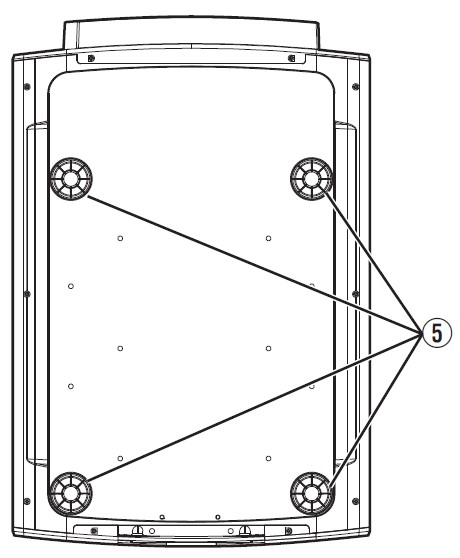
Main Unit – Bottom
- (5) Feet
The height and angle of the projector can be adjusted by turning the foot. (0 to 5 mm) (P. 21)
When the foot is removed, it can be used as the mounting hole for the ceiling mount bracket.
Main Unit – Rear
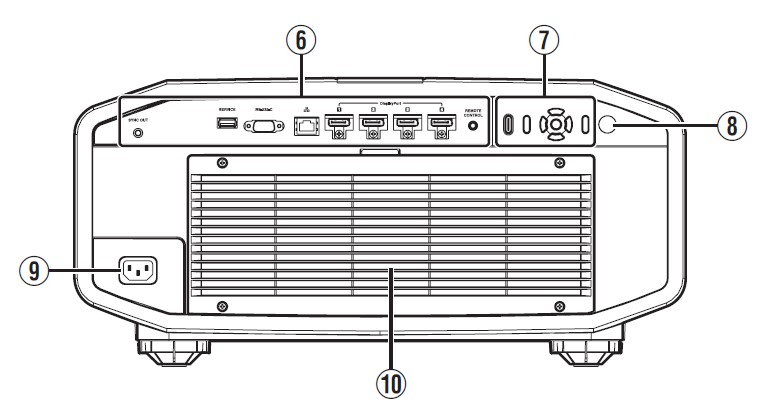 (6) Input terminals
For details on the terminals, refer to “Main Unit – Input Terminals” P. 14.- (7) Operation panel
For more details, please refer to the “Operation panel” in the diagram below. - (8) Remote Sensor (rear)
Please aim the remote control at this area when using it.
* There is also a remote sensor at the front. - (9) Power input terminal
Connect the supplied power cord to this terminal. - (10) Air Inlets
The inlets take in air to cool down the internal temperature.
Do not block the inlet. Do not blow hot air on the inlet.
Doing so may cause the unit to malfunction.
Operation panel

Main Unit – Input Terminals
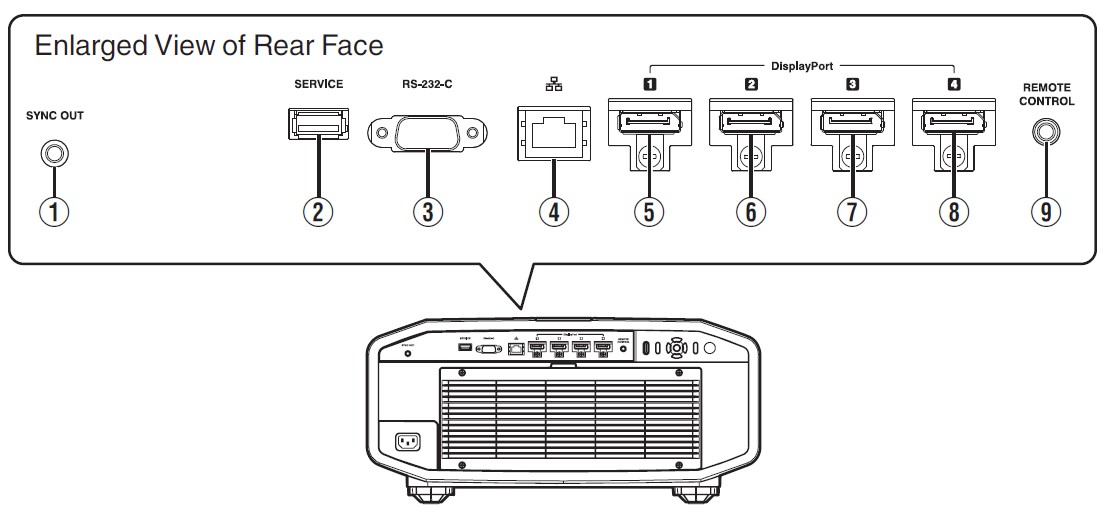
- (1) [SYNC OUT] terminal
For synchronizing with other equipment. - (2) [SERVICE] terminal
For updating the software using a commercially available USB flash drive. - (3) [RS-232C] terminal (D-sub 9-pin male)
The projector can be controlled by connecting a PC to this terminal. - (4) [LAN] terminal (RJ-45)
The projector can be controlled by connecting it to a PC through the computer network for control commands to be sent to the projector. - (5) [DisplayPort 1] input terminal
- (6) [DisplayPort 2] input terminal
- (7) [DisplayPort 3] input terminal
- (8) [DisplayPort 4] input terminal (20-pin male)
For connecting to devices that support DisplayPort output. (P. 22) - (9) [REMOTE CONTROL] terminal (stereo mini jack)
Outputs L and R sync signals during 3D signal input. (P. 45)
This terminal is used to connect the remote control directly to the projector with the cable.
Remote Control

- (1) [STANDBY]
Turns off the power. (P. 25) - (2) [ON]
Turns on the power. (P. 24) - (3) [DISPLAYPORT]
Switches the input from [DisplayPort 1] to [DisplayPort 4], [Dual], or [Quad]. (P. 24) - (4) [LENS CONTROL]
For adjusting focus, zoom, and shift. (P. 36) - (5) [C.M.D.]
For setting frame processing. (P. 34)
- Pressing the button each time switches the mode in the following sequence: “Off” ” “Mode 1” ” “Mode 2” ” “Mode 3”…
- (6) [MOTION ENHANCE]
Switches the Motion Enhance setting. (P. 34) - (7) [HIDE]
Hides the image temporarily. (P. 24) - (8) [LIGHT]
Illuminates the buttons on the remote control. - (9) [JKH I] keys
For selecting an item. - (10) [OK]
Confirms a selected item. - (11) [MENU]
Displays the menu, or hides the menu if it is displayed. - (12) [BACK]
Returns to the previous menu. - (13) [PICTURE MODE]
Switches the picture mode. (P. 28)
- Press [NATURAL], [DYNAMIC], or [USER1] to [USER6] to switch to the respective picture mode.
- Pressing [NAME EDIT] enables the name of the picture mode from [USER1] to [USER6] to be edited.
- (14) [GAMMA]
Switches the gamma. (P. 31)
- Pressing the button each time switches the configurable gamma in sequence.
- (15) [COLOR TEMP.]
Switches the color temperature. (P. 30)
- Pressing the button each time switches the configurable color temperature in sequence.
- (16) [LENS AP.]
For setting the aperture. (P. 28) - (17) [PIC. ADJ.]
Displays the picture quality adjustment gauge. (P. 34)
Pressing the button each time displays the adjustment gauge in the following sequence: “Contrast” ” “Brightness” ” “Color” ” “Tint” ” “Sharpness” ” “LD Current” IR Current” LD Gain” ” “IR Gain” ” “Aperture” ” “Picture Tone” ” “Dark Level” ” “Bright Level”.
Loading Batteries into the Remote Control
Loading the batteries

Removing the batteries

- If the remote control has to be brought closer to the unit to operate, it means that the batteries are wearing out. Replace the batteries with new ones (AAA).
- Insert the batteries according to the marks. Be sure to insert the s end first. When removing the battery, do so from the end.
- If an error occurs while using the remote control, remove the batteries and wait for five minutes. Load the batteries again and operate the remote control.
Effective Range of Remote Control Unit
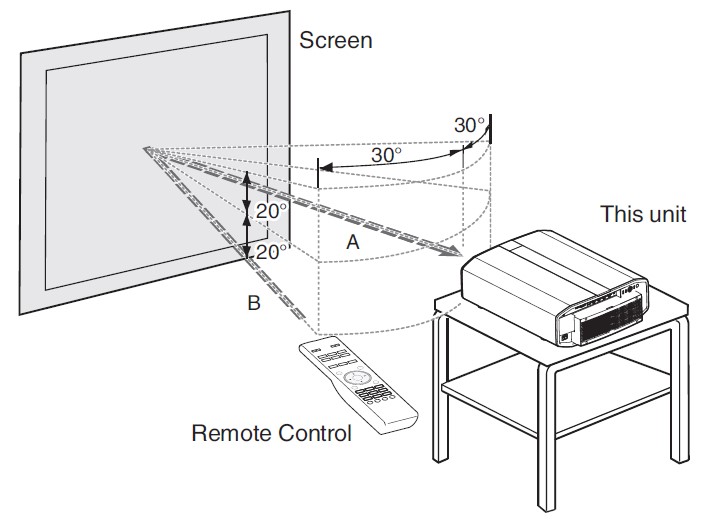
When aiming the remote control toward the sensor on this unit (front or rear), ensure that the distance to the sensor is within 7m.
If the remote control fails to work properly, move closer to this unit.
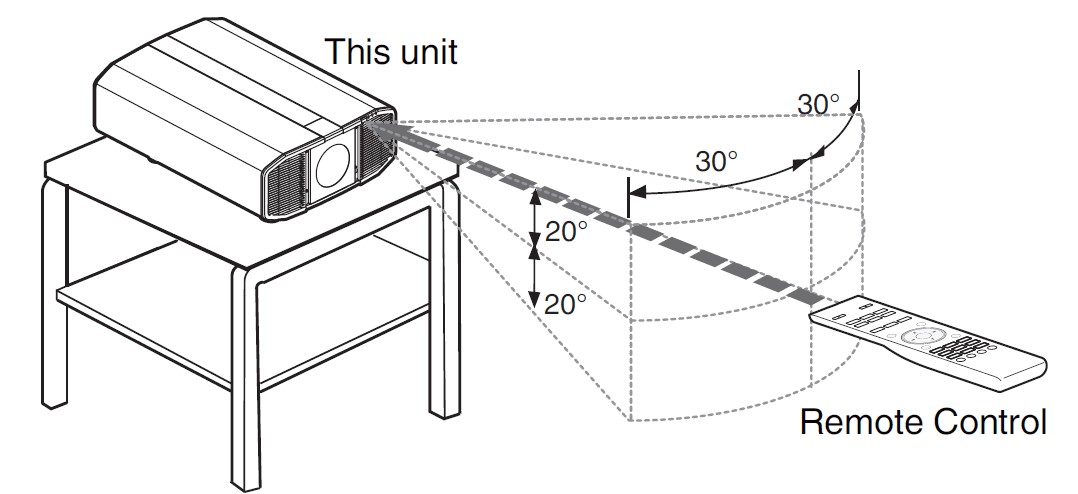
Control through reflection off a screen, etc. Ensure that the total distance A (between this unit and the screen) and distance B (between the remote control and the screen) is within 7 m.
* As the efficiency of signals reflected from the remote control unit varies with the type of screen used, the operable distance may decrease.
CAUTION
- Do not put the remote control in a place with exposure to direct sunlight or high temperature. It may be deformed due to heat, or the internal components may be adversely affected resulting in fire hazards.
- Remove the batteries from the remote control when storing the remote control. Storing the remote control for a prolonged period without removing the batteries can cause battery leakage.
Menu
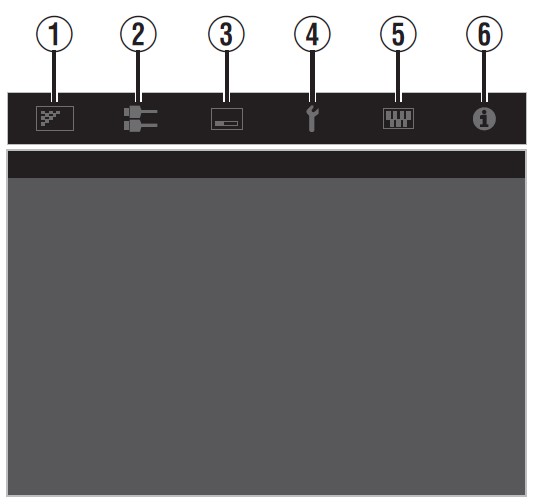
Select the icon at the top of the menu to display its corresponding setting item as shown below.

Connecting the Projector
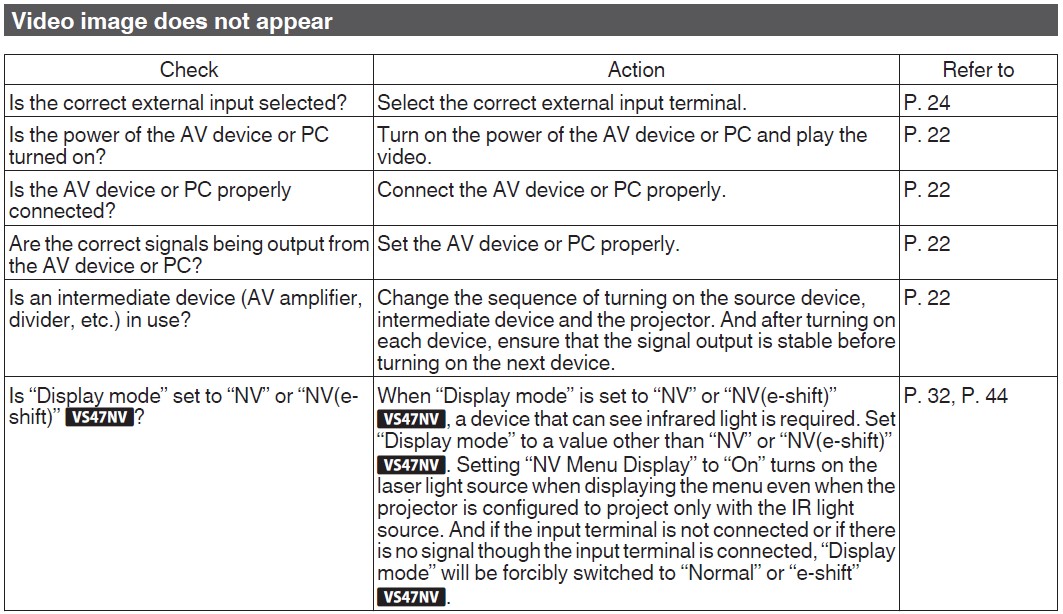
- Do not turn on the power until the connection is complete.
- The connection procedures differ according to the device used. For details, please refer to the instruction manual of the device to be connected.
- This projector is used for projecting images. To output the audio of connected devices, please connect a separate audio output device, such as an amplifier or speaker.
- Some cables cannot be connected to this unit due to the size of their connector cover.
Connecting to the DisplayPort Terminals

- For single-channel input signals, connect to one of the [DisplayPort 1], [DisplayPort 2], [DisplayPort 3], or [DisplayPort 4] input terminals.
- For two-channel input signals, connect to the [DisplayPort 1] and [DisplayPort 3] input terminals.
- For four-channel input signals, connect to the [DisplayPort 1] to [DisplayPort 4] input terminals. “Types of Possible Input Signals” (P. 63)
- Video images may not appear if a cable that does not support HBR2 is used. Use a cable that supports HBR2.
- When disconnecting the DisplayPort cable, make sure to release the latch and unplug the cable.
Connecting to the LAN Terminal

- The network is used to control this unit. It is not used for sending or receiving video signals.
- Please contact your network administrator for information concerning the network connection.
- For more information on control, please refer to “External Control” P. 56.
Connecting to the RS-232C Terminal

- For more information on control, please refer to “External Control” P. 56.
Connecting to the REMOTE Terminal

- For more details on the wired remote controller and connection cable, please consult your dealer.
Connecting the Power Cord (Supplied Accessory)
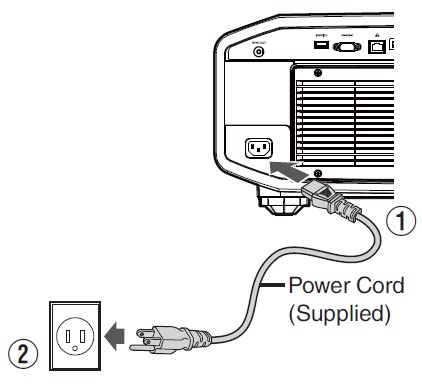
- Connect the power cord supplied to the power input terminal on the main unit
- Insert the supplied power plug into the wall outlet.
Precautions to prevent fire and electric shock
- The power consumption of this unit is large. Please connect it directly to the wall outlet.
- When you are not using the projector, please unplug the power cord from the outlet.
- Connect it using only the power cord supplied.
- Do not use a voltage other than the indicated power voltage.
- Do not damage, break or modify the power cord. Do not place a heavy object on the power cord, or heat or pull it. Doing so may damage the power cord.
- Do not unplug the power cord with wet hands.
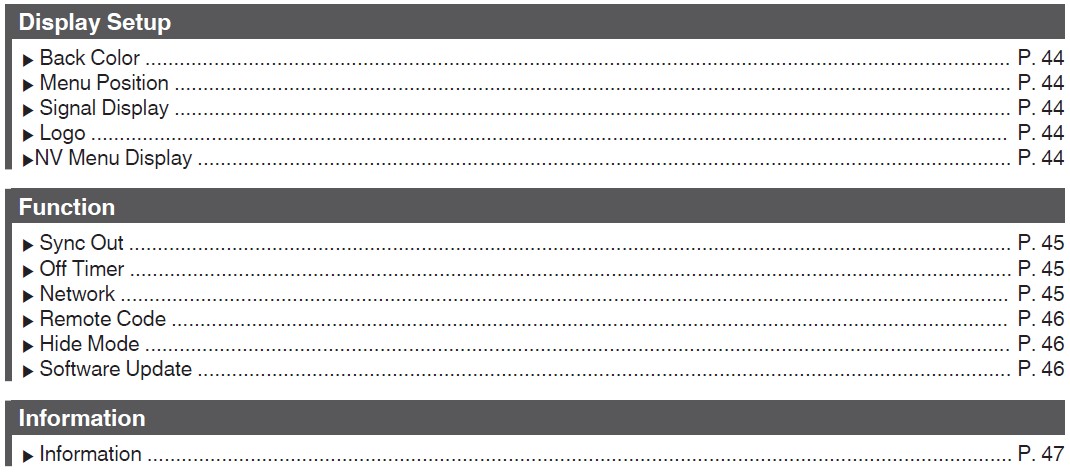
Adjustments and Settings in the Menu
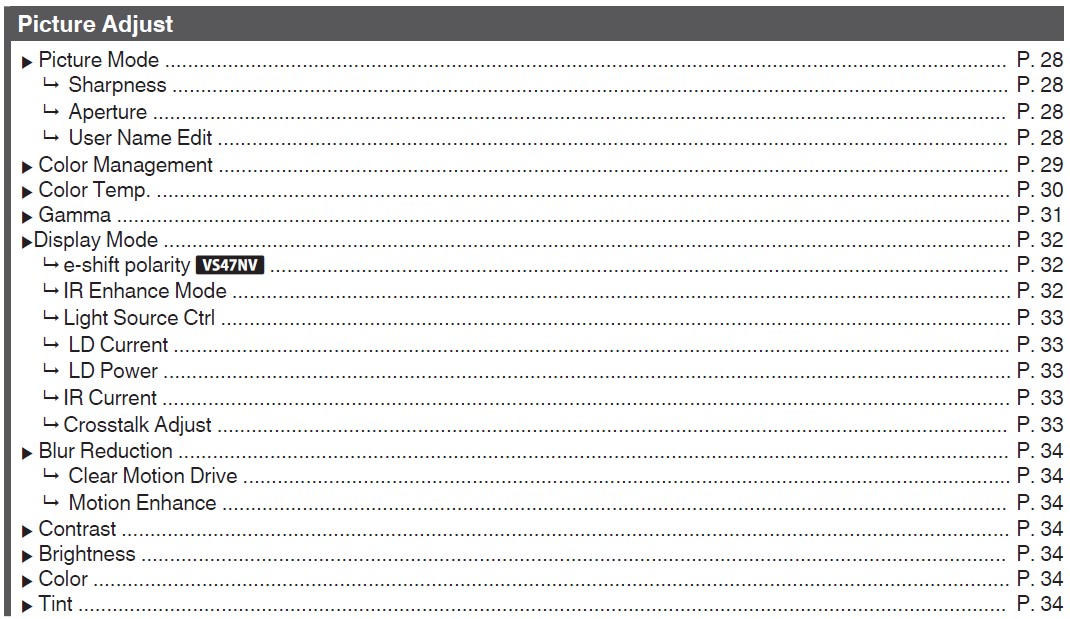
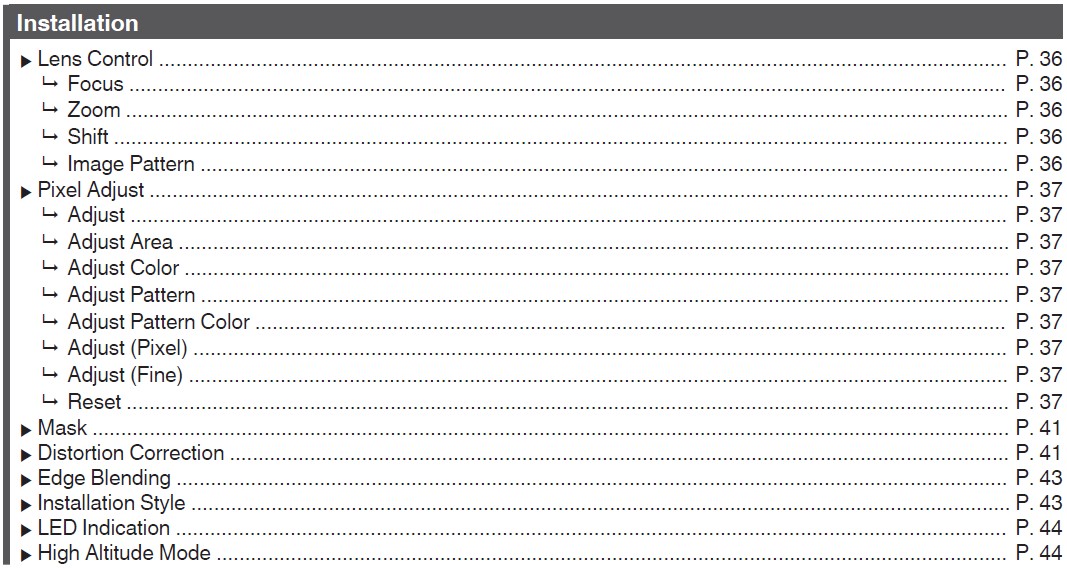
Pressing the [MENU] button displays the menu.
Press the keys to select an item, followed by pressing the [OK] button to confirm the selection.
List of Menu Items

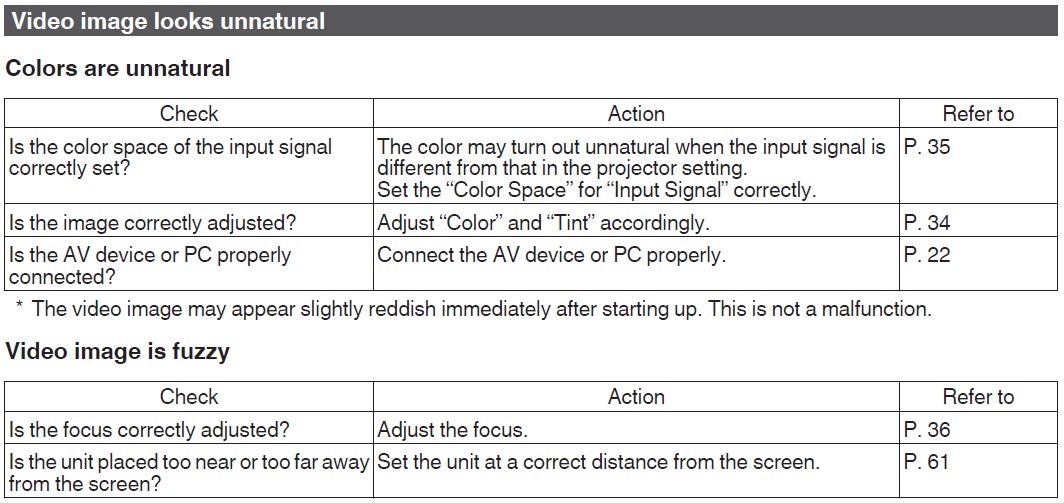
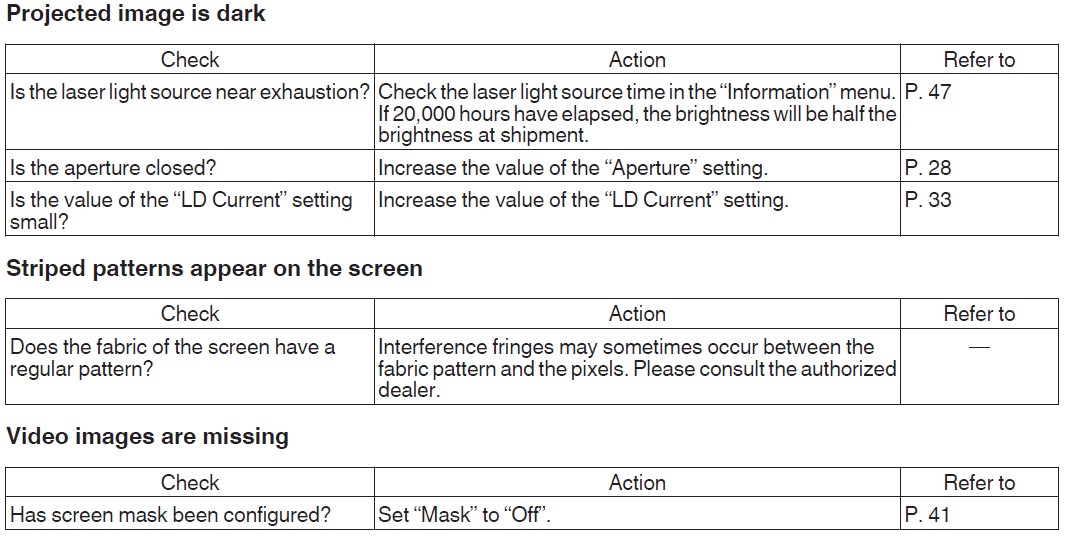
Troubleshooting
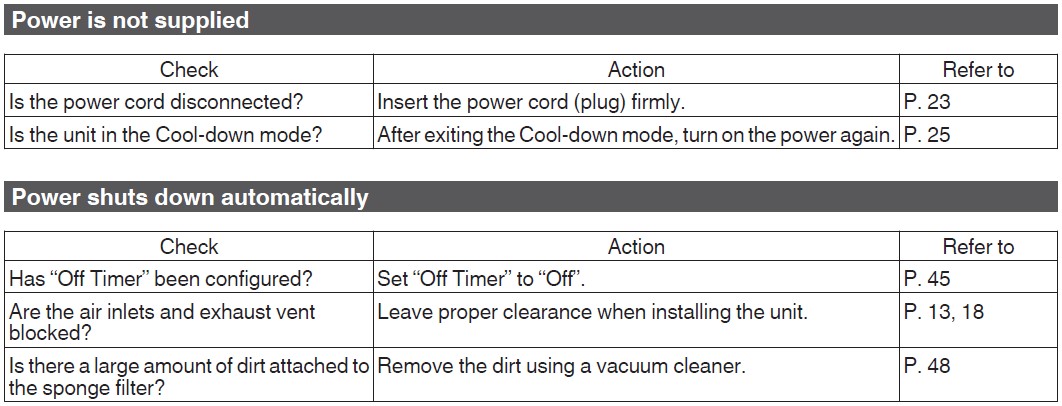
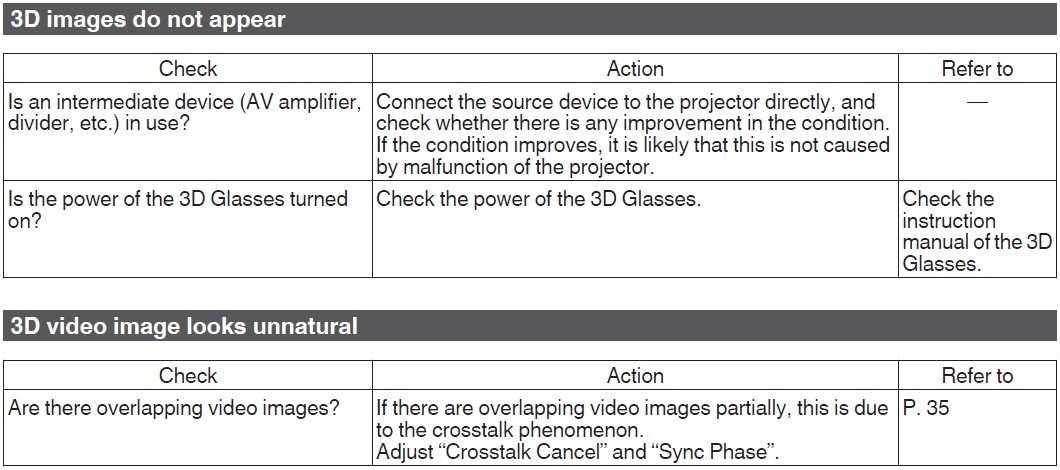
Before sending the unit to your authorized dealer for repair, please check the following points. The following symptoms are not malfunctions.
You do not need to worry about the following symptoms if there is no abnormality on the screen.
A part of the top or front surface of the unit is hot.
A creaking sound is heard from the unit.
An operating sound is heard from the inside of the unit.
Color smear occurs on some screens.
This unit is a digital device. This unit may become unable to operate normally due to external static or noise. Perform the following operations when such malfunctions occur.
- If the unit is in the Standby mode, pull out the power plug, followed by inserting it again
- Press the A button on the projector unit to turn on the power again


FAQS About JVC Night Vision D-ILA Projectors
How durable are JVC projectors?
You can watch for up to 20,000 hours while using the laser light source in high power mode.
What causes my JVC projector to repeatedly shut off?
Your projector will turn off on its own if the air filter is blocked and in desperate need of a good clean. This protects it from overheating. In this instance, your projector shutting off is a safety measure because if it gets too hot, the dust in the filter could catch fire.
How is a JVC projector cleaned?
The JVC projector’s instruction booklet advises carefully wiping away any dust with a moist cloth. On the dry lens cloth, dab a small amount of lens cleaning solution. To prevent streaking, don’t oversaturate the cloth.
E shift JVC projector: what is it?
JVC’s exclusive high-resolution display technology called “e-shift” shifts each pixel by 0.5 pixels both vertically and horizontally in order to provide 4 times as many pixels as the original image.
How long can a projector be used?
Lamps. The most popular projector light sources are halide bulbs, which typically have an average lifespan of 1,000–5,000 hours. A light with a 1,000-hour lifespan may provide uninterrupted viewing for 41 days (just over one month), whereas one with a 5,000-hour lifespan can be used continuously for almost seven months.
What is the JVC projector’s refresh rate?
With input speeds of up to 1080P/240Hz and latency as low as 6.25ms (1.5 frames), the new projector is compatible.
How long may a projector be left on?
The average lamp life of a projector is 1,500 to 2,000 hours, but more recent versions can operate for up to 5,000 hours before the bulb needs to be changed.
Do projectors automatically shut off?
On occasion, the projector may shut itself off to avoid further harm from overheating. Please make sure there are no objects near the projector, and do your best to keep any filters clean.
For more manuals by JVC, Visit Manualsdock
[embeddoc url=”https://manualsdock.com/wp-content/uploads/2023/08/JVC-Night-Vision-D-ILA-Projectors-Instructions.pdf” download=”all”]

