HP LaserJet Enterprise M506 Series Printer

About HP
HP (short for Hewlett-Packard) is a multinational technology company headquartered in Palo Alto, California, United States. The company specializes in developing and manufacturing a wide range of computer hardware and software products, including personal computers, laptops, printers, scanners, and storage devices.
HP was founded in 1939 by Bill Hewlett and Dave Packard in a garage in Palo Alto, California. Today, the company has grown into one of the largest technology companies in the world, with operations in more than 170 countries and over 60,000 employees.
Printer Overview
Printer views
Printer front view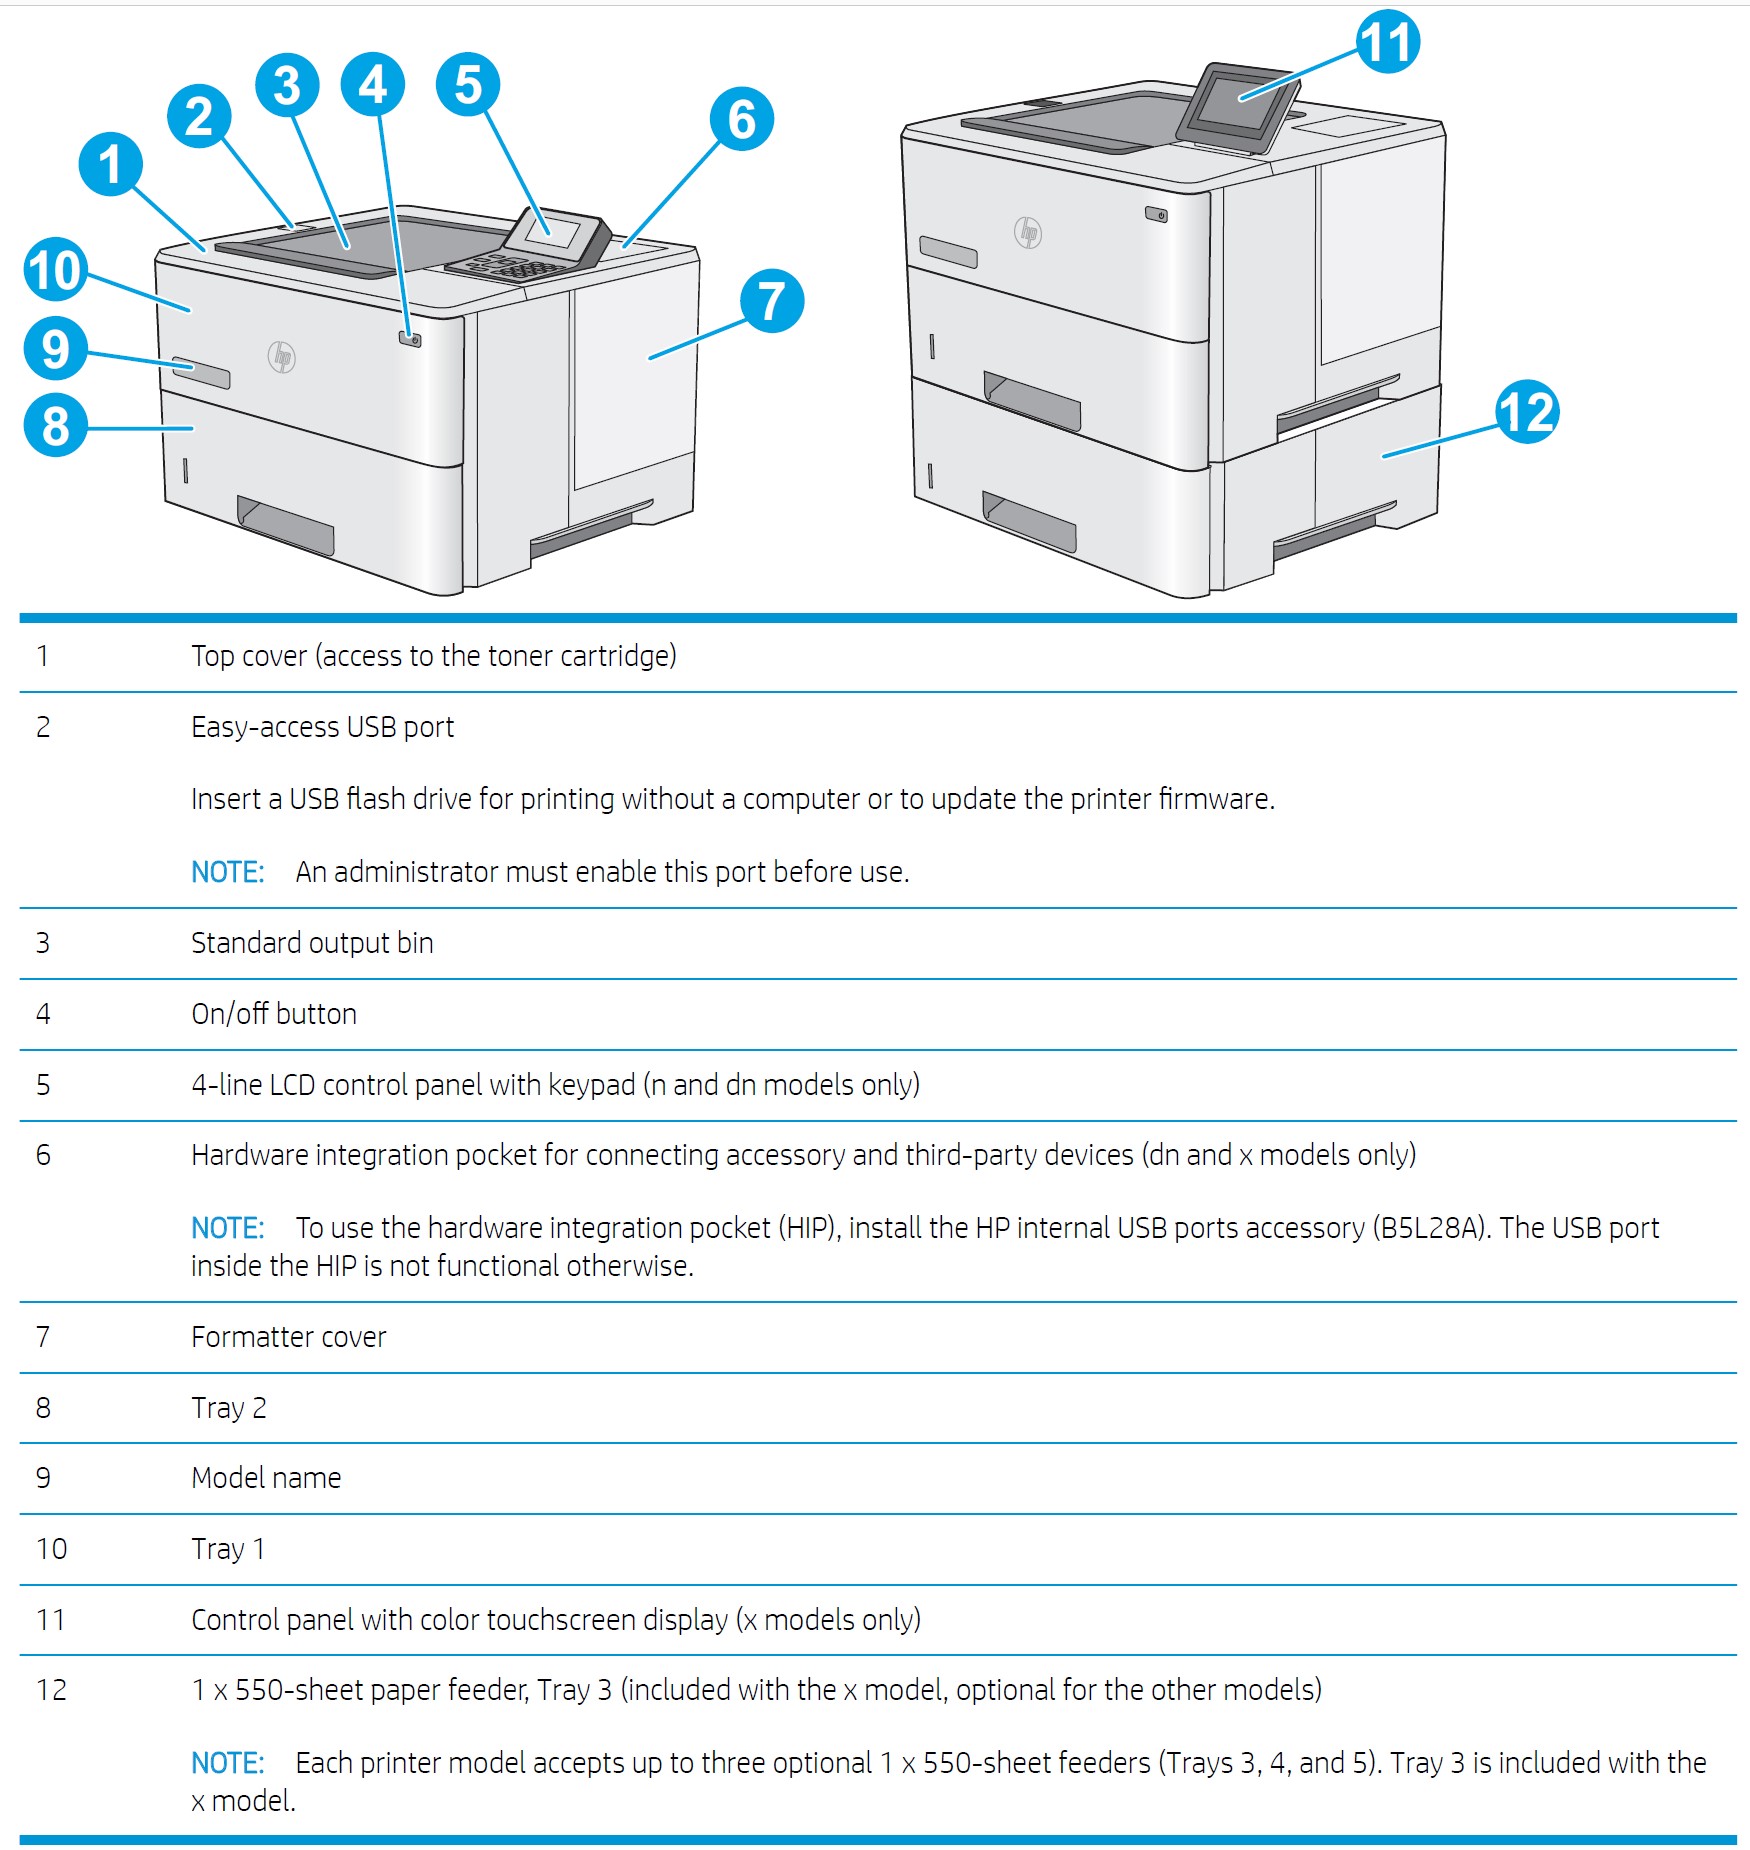
Printer back view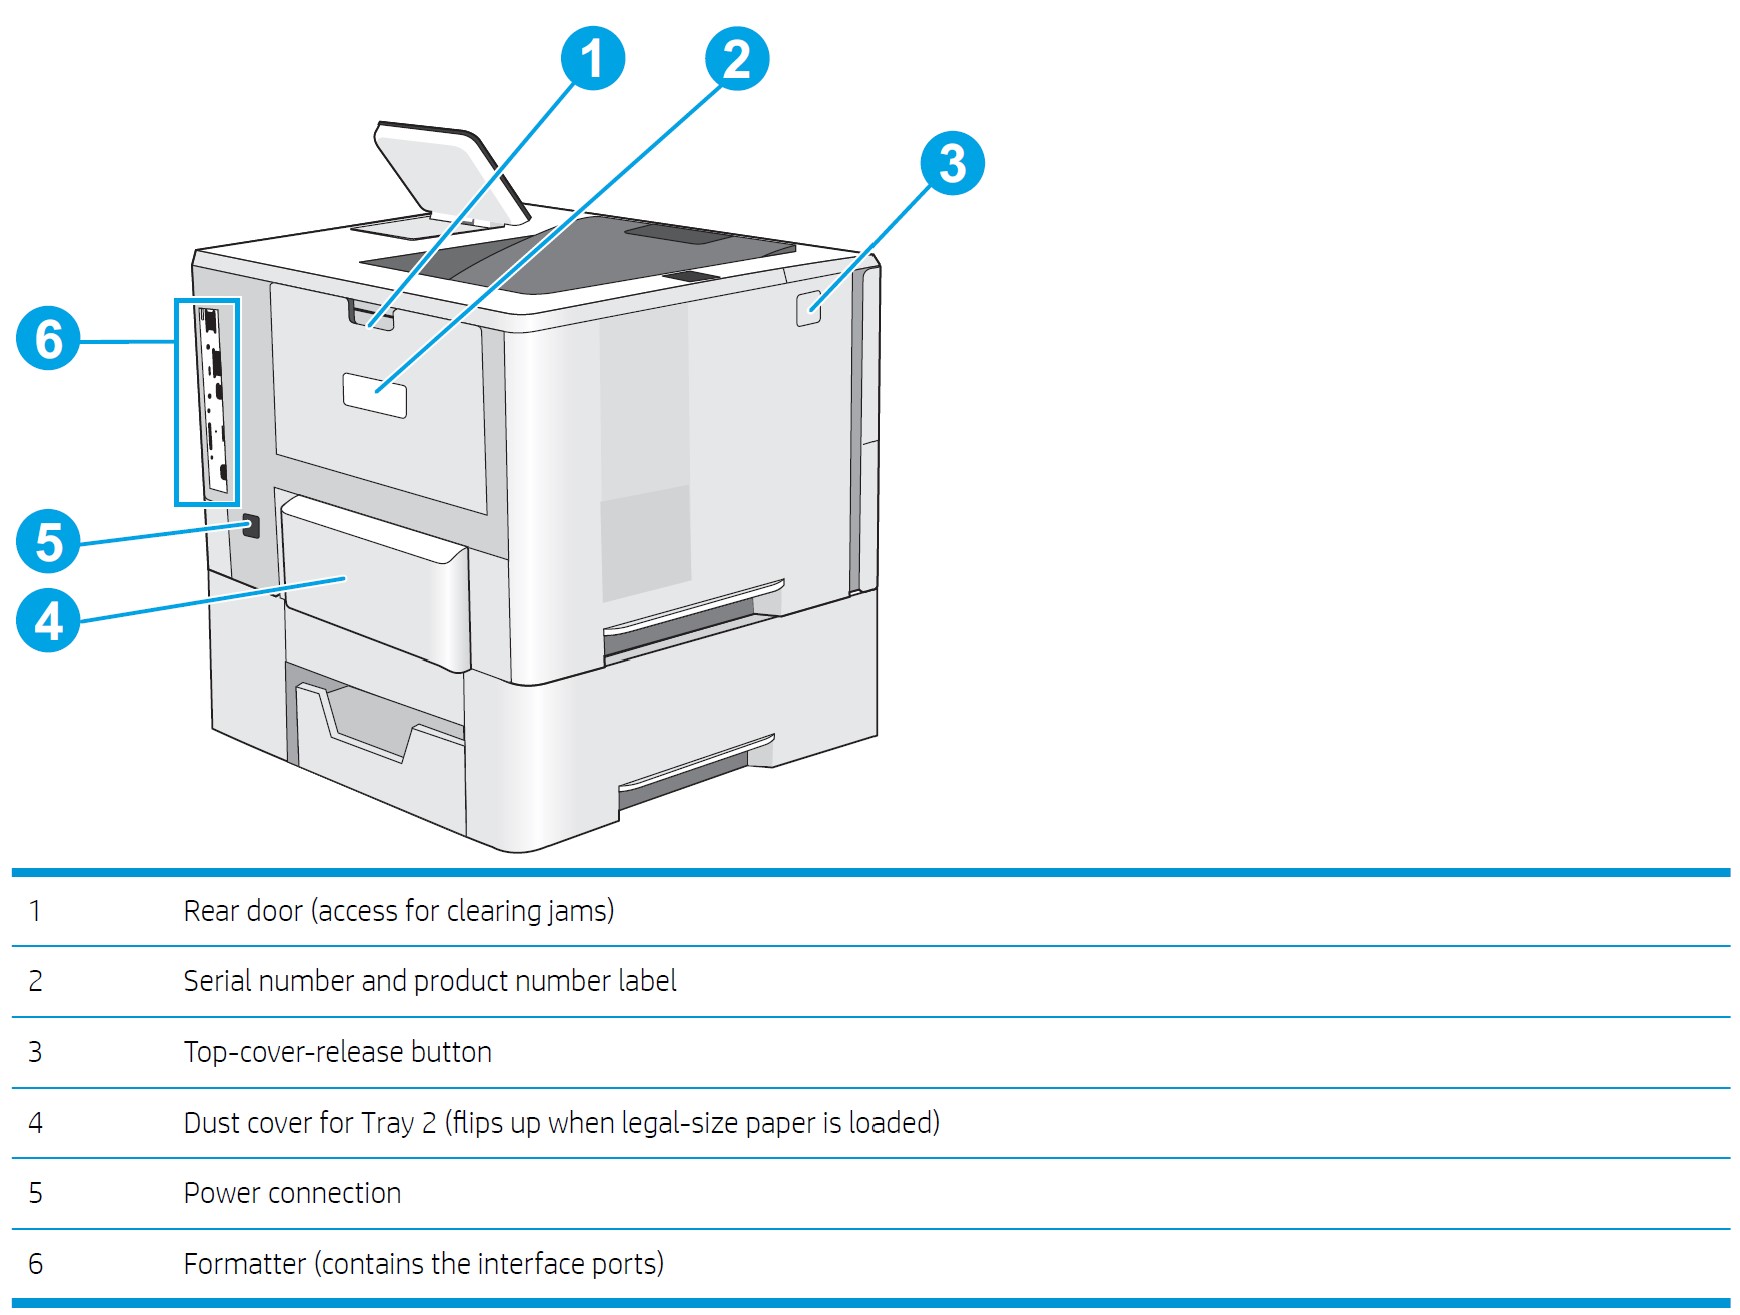
Interface ports
Control-panel view (4-line control panel, n and dn models only)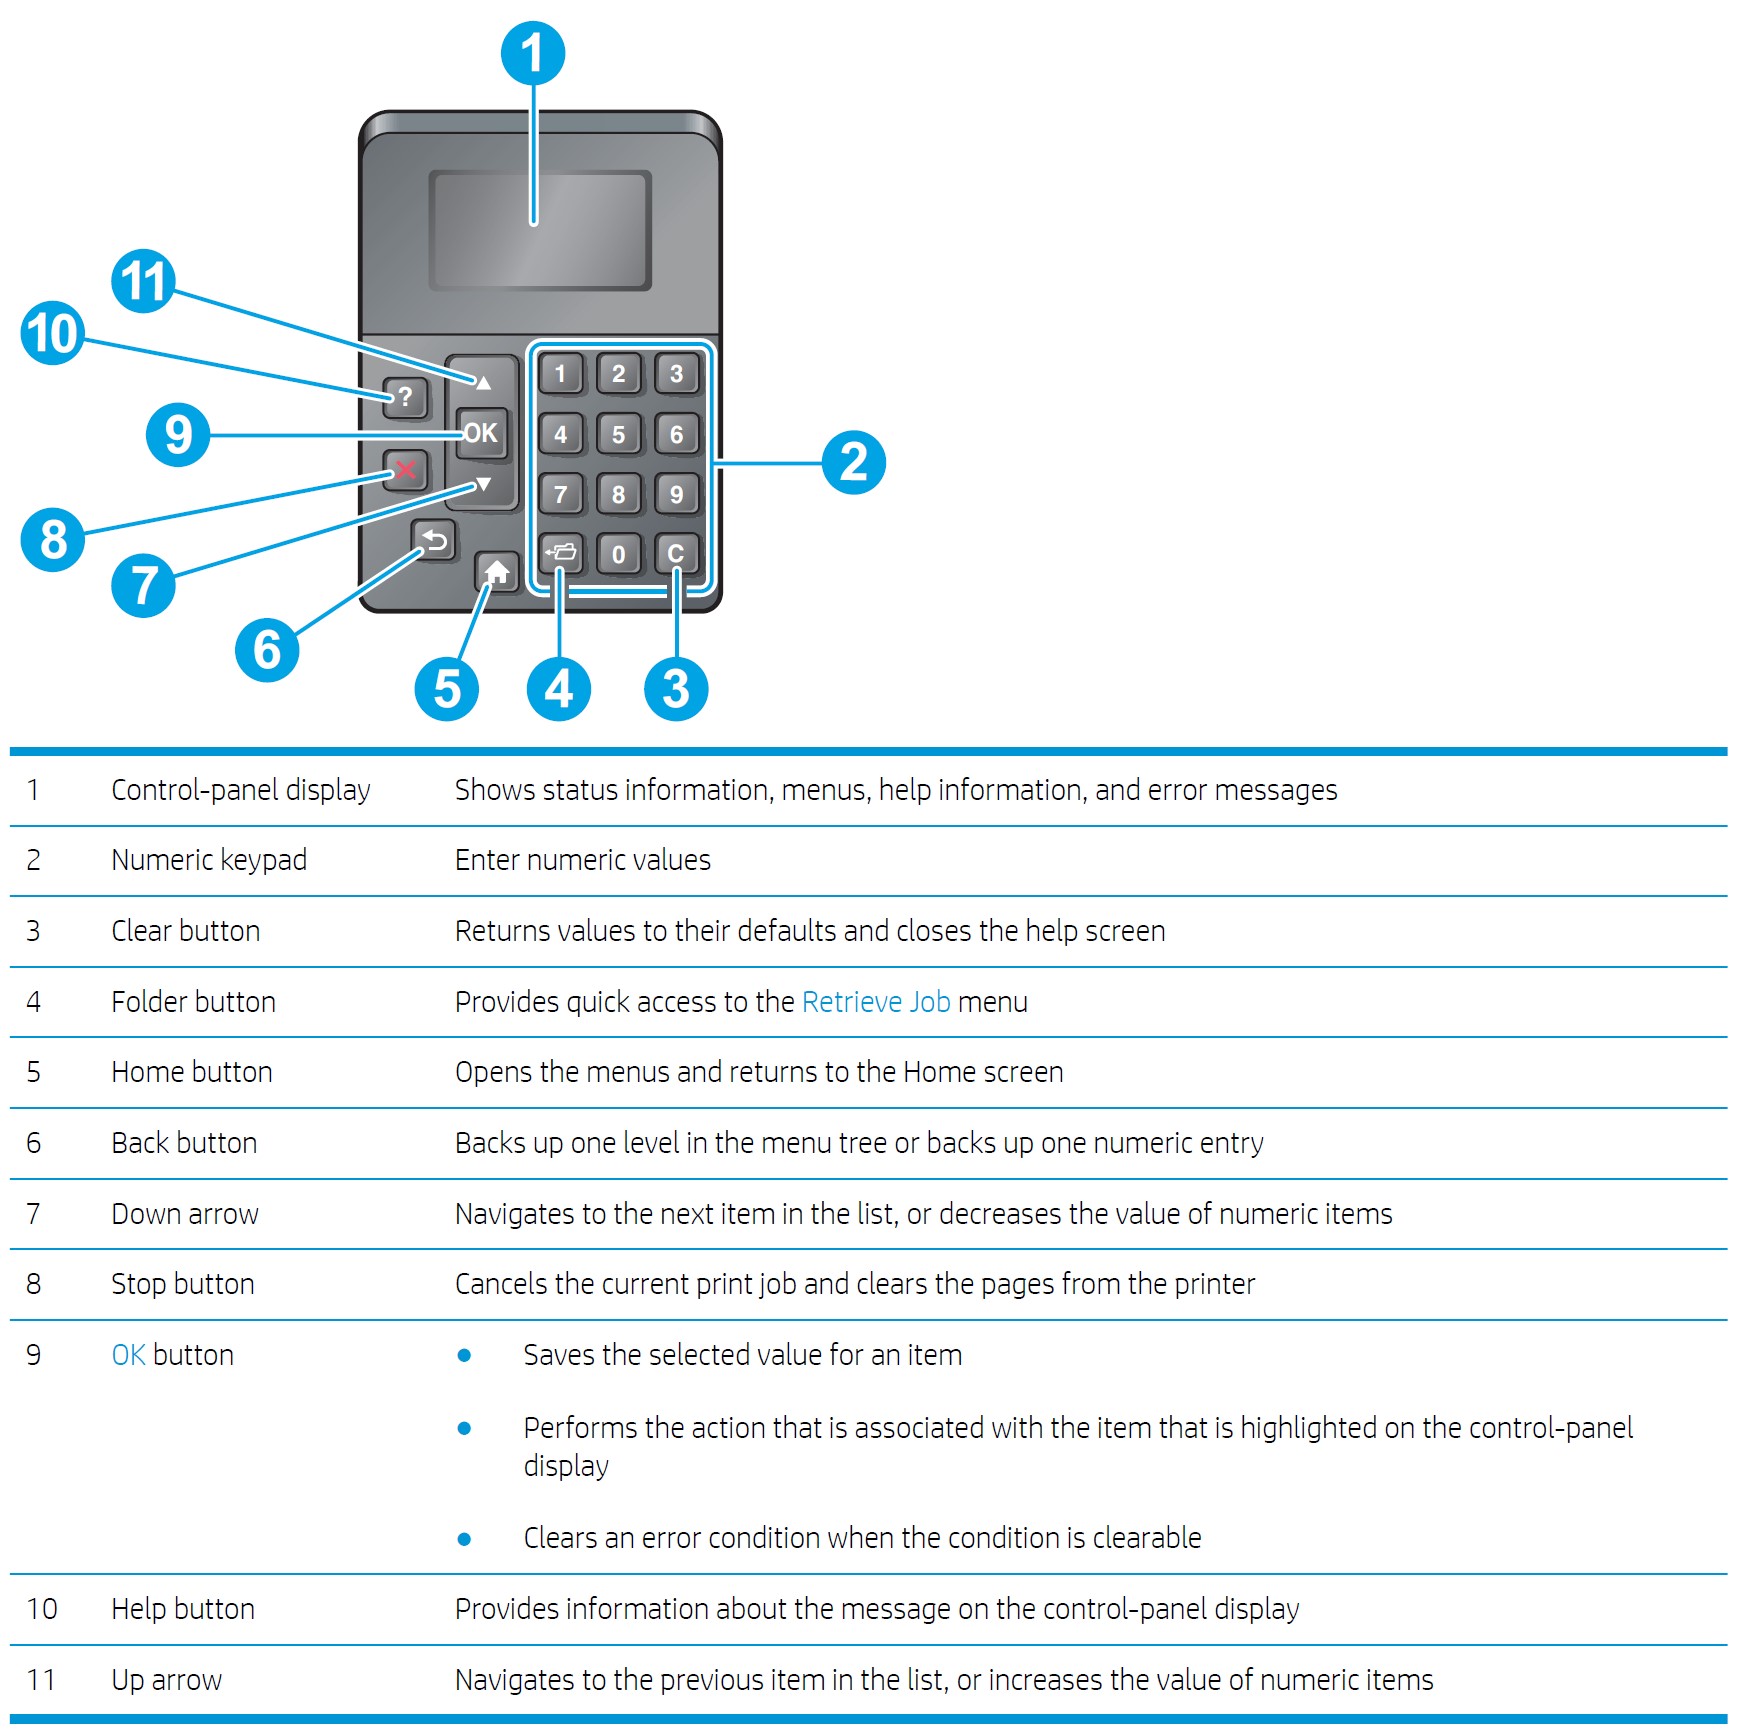
Control-panel view (touchscreen control panel, x model only)
NOTE: Tilt the control panel for easier viewing.
The Home screen provides access to the printer features and indicates the current status of the printer.
Return to the Home screen at any time by touching the Home button. Touch the Home button on the lower edge of the printer control panel, or touch the Home button in the upper-left corner of most screens.
NOTE: The features that appear on the Home screen can vary, depending on the printer configuration.

Printer specifications
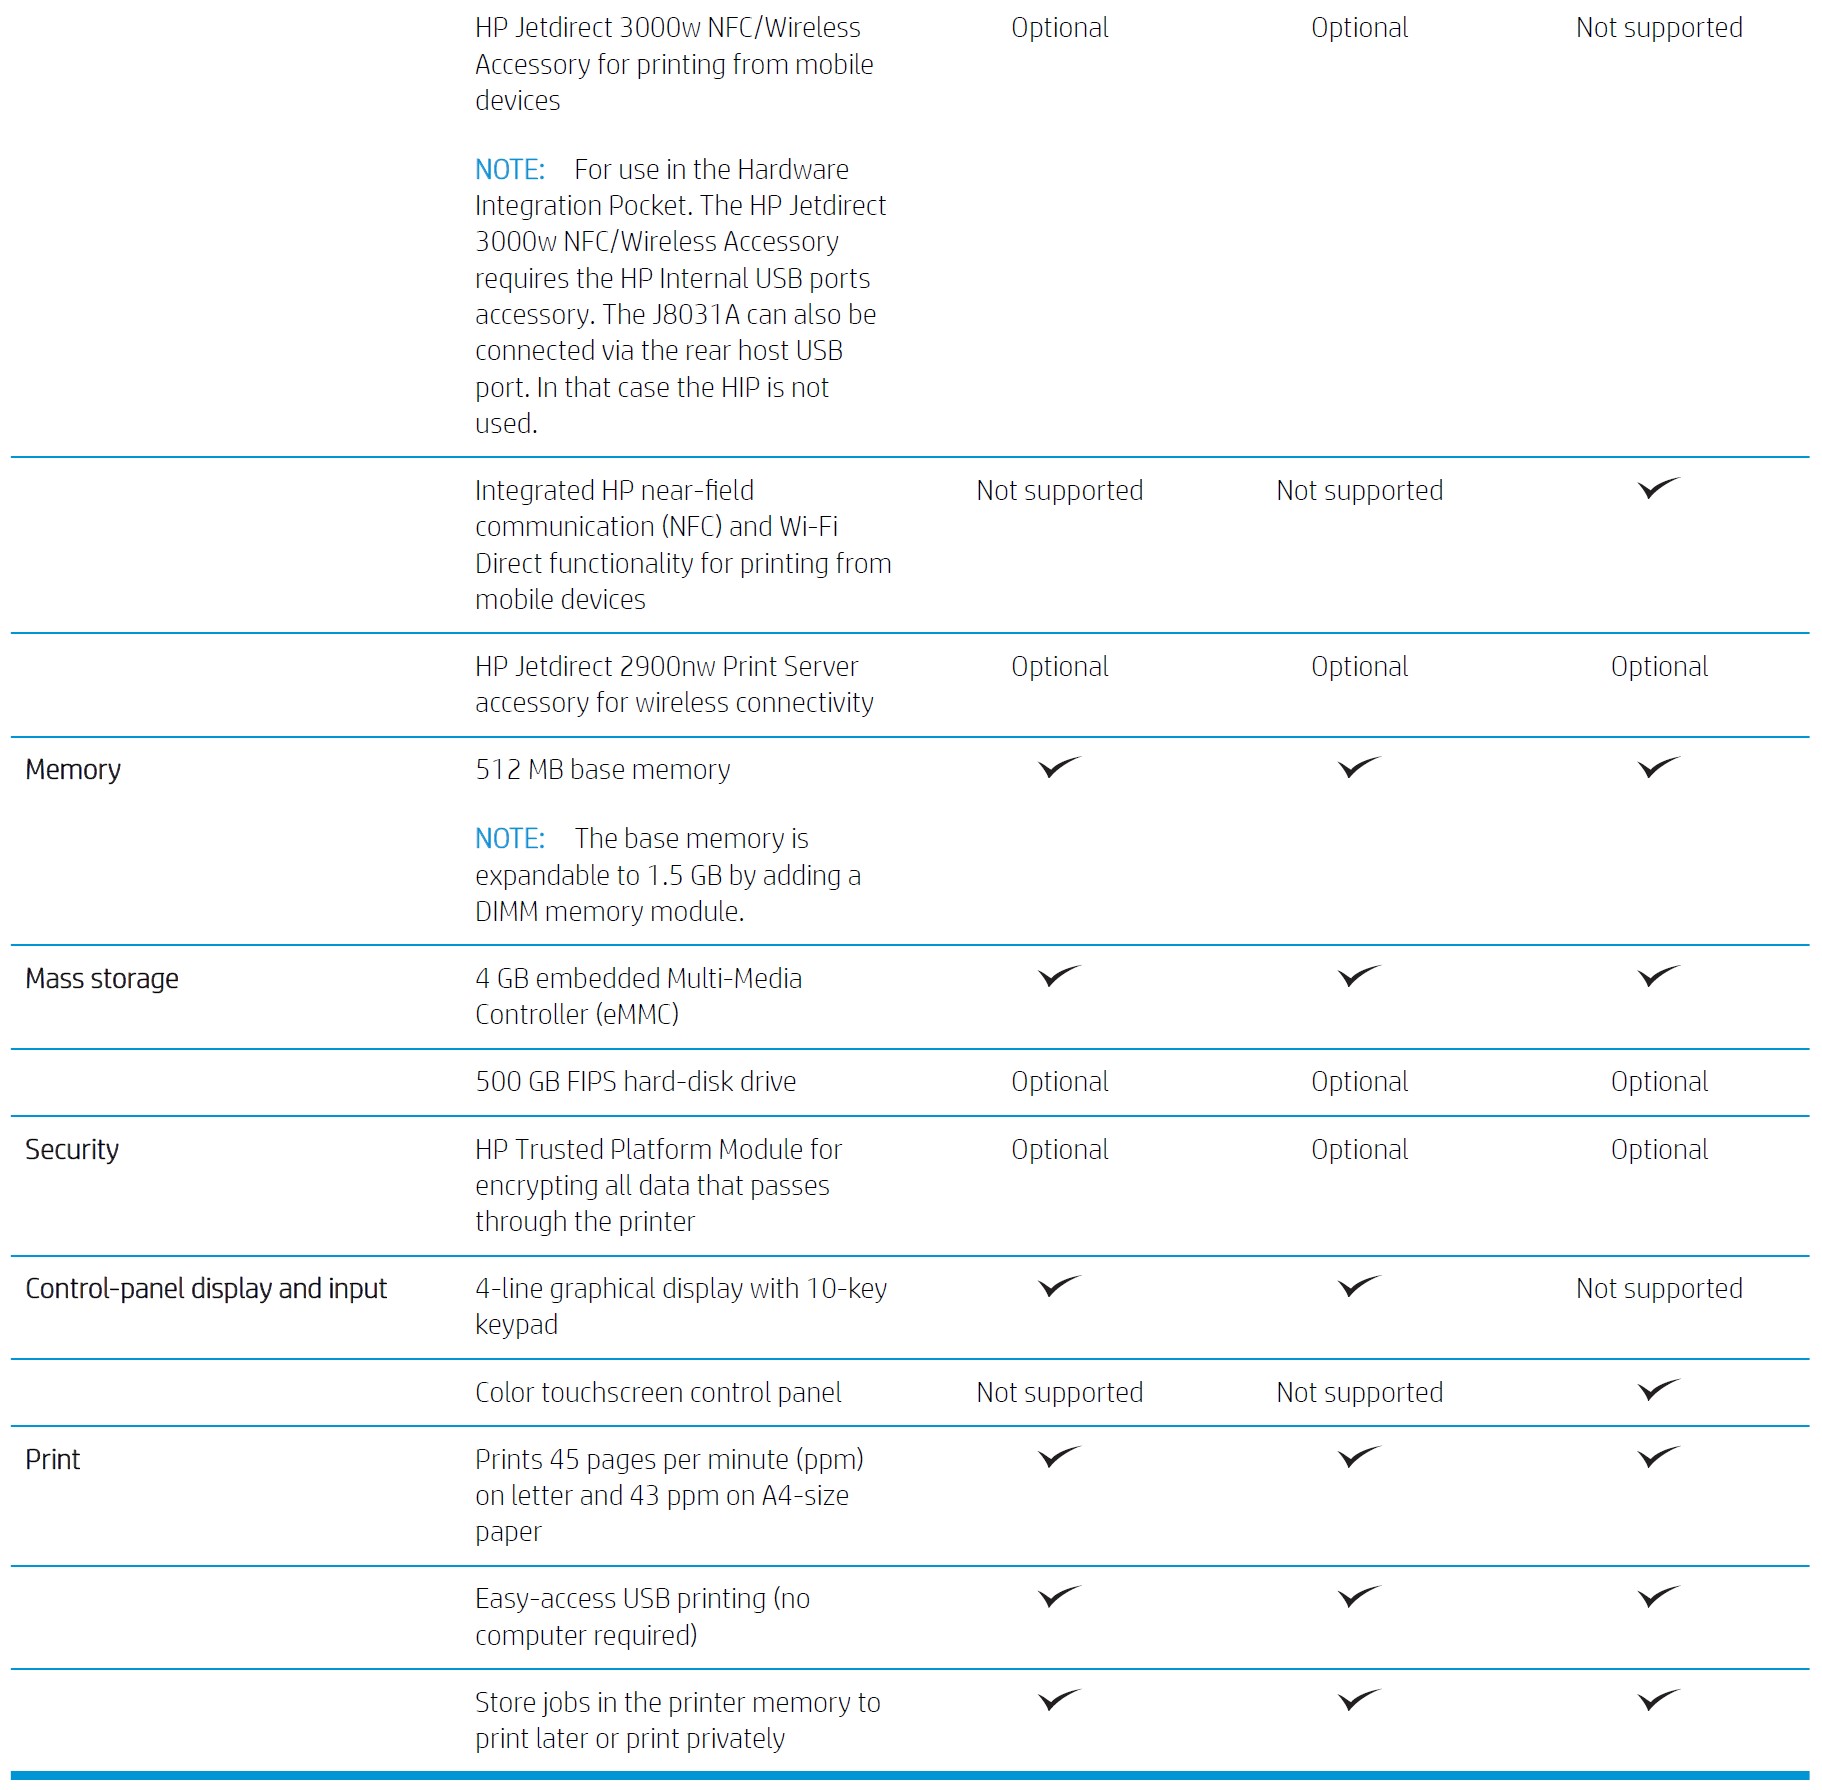
Technical specifications
Supported operating systems
The following information applies to the Printer-Specific Windows PCL 6 and OS X print drivers and to the in-box software installation CD.
Windows: The HP Software Installer CD installs the “HP PCL.6” version 3 print driver, the “HP PCL 6” version 3 print driver, or the “HP PCL-6” version 4 print driver, depending on the Windows operating system, along with optional software when using the full software installer. Download the “HP PCL.6” version 3 print driver, the
“HP PCL 6” version 3 print driver, and the “HP PCL-6” version 4 print driver from the printer-support Web site for this printer: www.hp.com/support/ljM506.
Mac computers, OS X, and iOS devices: Mac computers and Apple iOS mobile devices are supported with this printer. The OS X print driver and print utility are available for download from hp.com and may also be available via Apple Software Update. The HP installer software for OS X is not included in the in-box CD. Follow these steps to download the HP installer software for OS X:
- Go to www.hp.com/support/ljM506.
- Select Support Options, under Download Options select Drivers, Software & Firmware, and then select the printer bundle.
- Click the operating system version, and then click the Download button.
Supported operating systems and print drivers
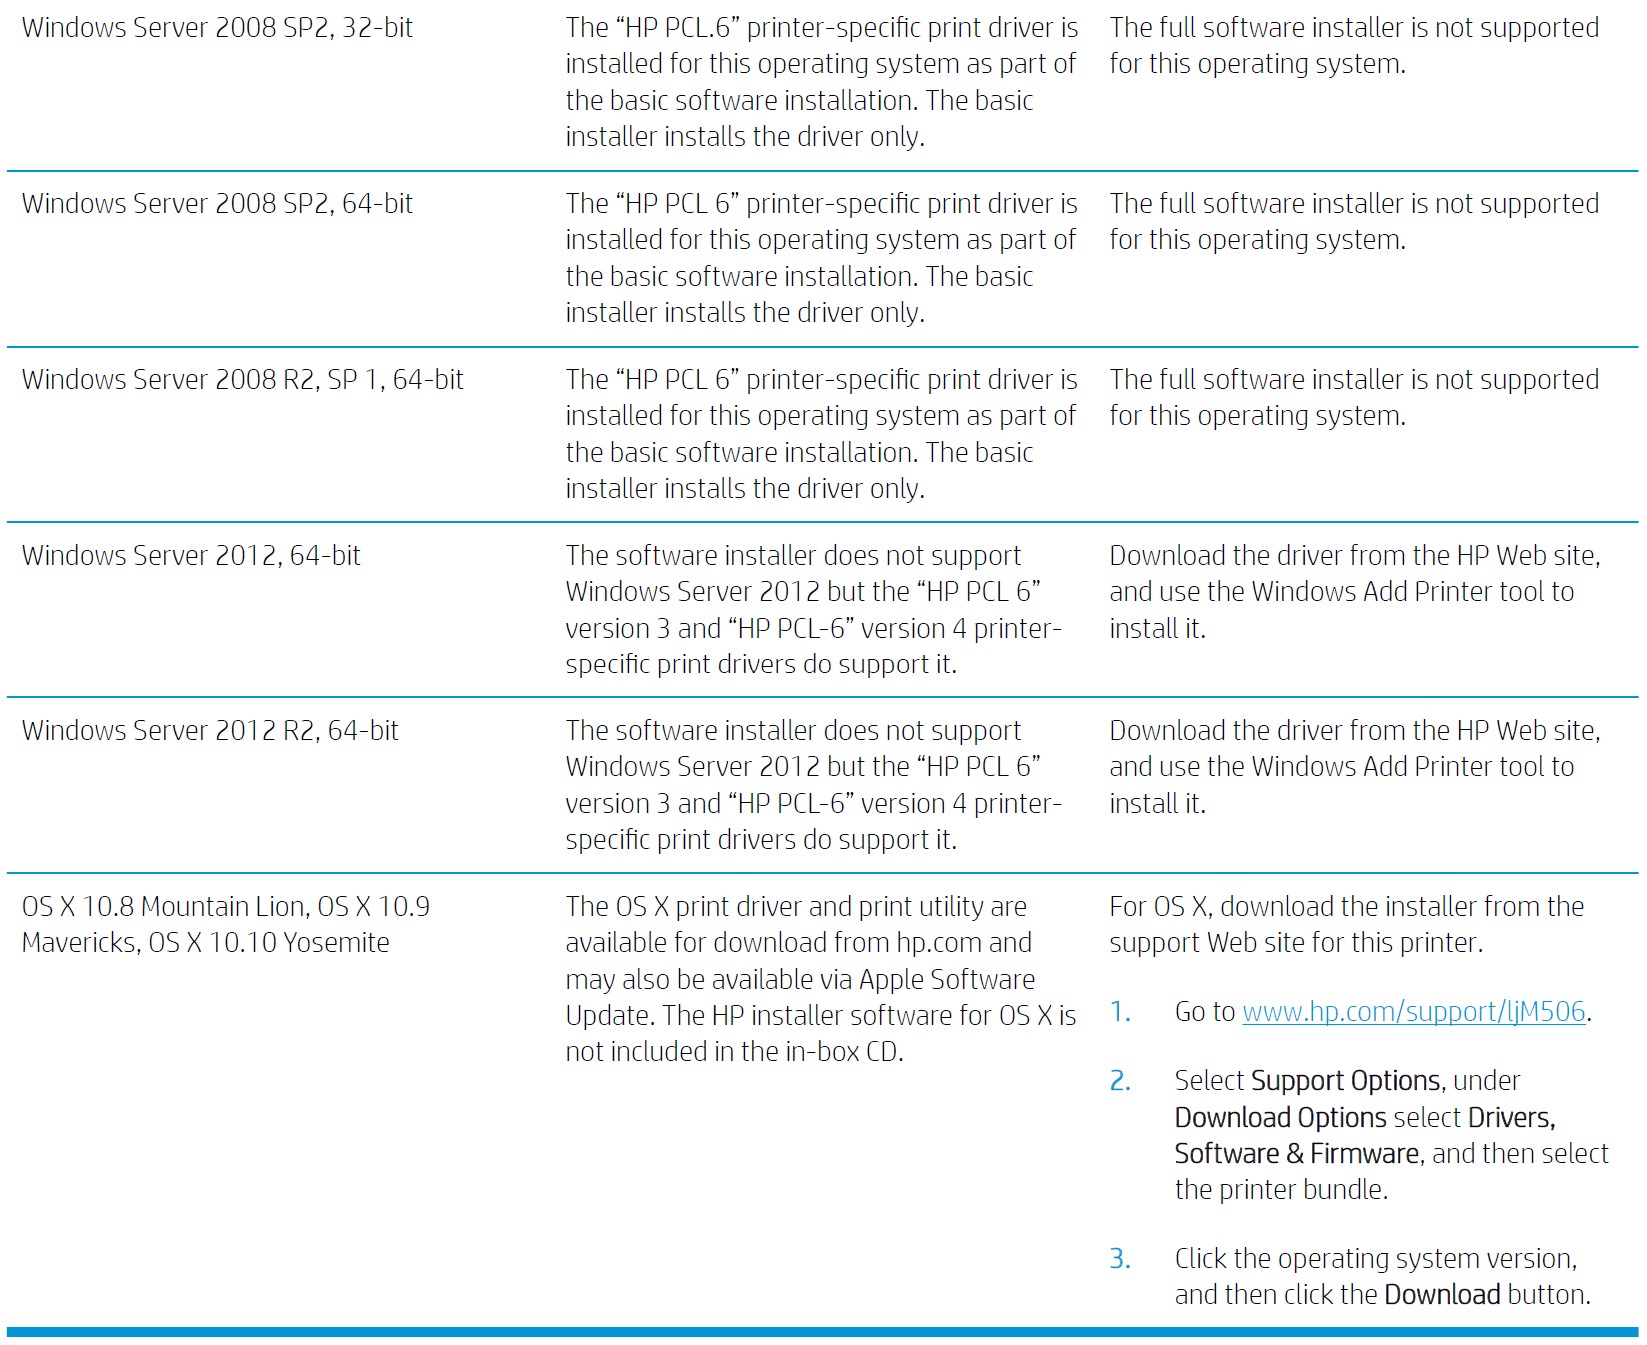
NOTE: For a current list of supported operating systems, go to www.hp.com/support/ljM506 for HP’s all-inclusive help for the printer.
NOTE: For details on client and server operating systems and for HP UPD driver support for this printer, go to www.hp.com/go/upd. Under Additional information, click the links.
Minimum system requirements
Mobile printing solutions
- The printer supports the following software for mobile printing:
NOTE: The HP ePrint Software supports the following operating systems: Windows 7 SP 1 (32-bit and 64-bit); Windows 8 (32-bit and 64-bit); Windows 8.1 (32-bit and 64-bit); Windows 10 (32-bit and 64-bit); and OS X versions 10.8 Mountain Lion, 10.9 Mavericks, and 10.10 Yosemite.
- HP ePrint via email (Requires HP Web Services to be enabled and the printer to be registered with HP Connected)
- HP ePrint app (Available for Android, iOS, and Blackberry)
- ePrint Enterprise app (Supported on all printers with ePrint Enterprise Server Software)
- HP Home and Biz app (Available for Symbian/Nokia devices)
- Google Cloud Print 1.0 (Requires the printer to be registered with HP Connected and then registered with Google Cloud)
- AirPrint
- Android Printing
Printer dimensions
Dimensions for the n and dn models
Dimensions for the x model
Dimensions for the 1 x 550-sheet paper feeder
Dimensions for the cabinet/stand
1 These values are subject to change. For current information, go to www.hp.com/support/ljM506.
Dimensions for the printer with three 1 x 550-sheet paper feeders and the cabinet/stand

1 These values are subject to change. For current information, go to www.hp.com/support/ljM506.
Power consumption, electrical specifications, and acoustic emissions
See www.hp.com/support/ljM506 for current information.
CAUTION: Power requirements are based on the country/region where the printer is sold. Do not convert operating voltages. This will damage the printer and void the printer warranty.
Operating-environment range
Printer hardware setup and software installation
For basic setup instructions, see the Hardware Installation Guide that came with the printer. For additional instructions, go to HP support on the Web.
Go to www.hp.com/support/ljM506 for HP’s all-inclusive help for the printer. Find the following support:
- Install and configure
- Learn and use
- Solve problems
- Download software and firmware updates
- Join support forums
- Find warranty and regulatory information
Paper trays
Load paper to Tray 1 (multipurpose tray)
Introduction
The following information describes how to load paper in Tray 1. This tray holds up to 100 sheets of 75 g/m2 (20 lb) paper.
NOTE: Select the correct paper type in the print driver before printing. CAUTION: To avoid jams, never add or remove paper from Tray 1 during printing.
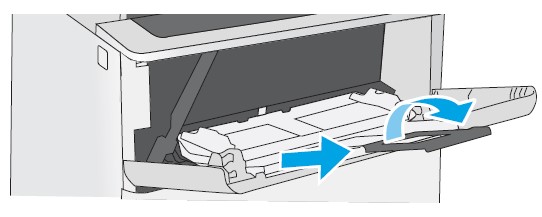
- Grasp the handle on either side of Tray 1, and pull it forward to open it.

- Pull out the tray extension to support the paper.
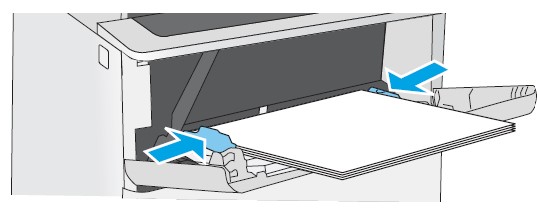
- Spread the paper guides to the correct size, and then load the paper in the tray. Make sure that the paper fits under the fill line on the paper guides.
 NOTE: The maximum stack height is 10 mm (0.4 in), or approximately 100 sheets of 75g paper.
 - Adjust the side guides so that they lightly touch the paper stack, but do not bend it.
Tray 1 paper orientation
When using paper that requires a specific orientation, load it according to the information in the following table.
NOTE: The Alternative Letterhead Mode settings affect the way to load letterhead or preprinted paper. This setting is disabled by default. When using this mode, load paper for automatic duplex printing. 
Use alternative letterhead mode
Use the Alternative Letterhead Mode feature to load letterhead or preprinted paper into the tray the same way for all jobs, whether printing to one side of the sheet of paper or to both sides. When using this mode, load paper for automatic duplex printing.
To use the feature, enable it by using the printer control-panel menus.
Enable Alternative Letterhead Mode by using the printer control-panel menus
- Press the Home button on the product control panel.
- Open the following menus:
- Administration
- Manage Trays
- Alternative Letterhead Mode
- Select Enabled, and then touch the Save button or press the OK button.
Load paper to Trays 2, 3, 4, and 5
Introduction
The following information describes how to load paper in Tray 2 and the optional 550-sheet trays (part number F2A72A). These trays hold up to 550 sheets of 75 g/m2 (20 lb) paper.
NOTE: The procedure to load paper for the 550-sheet trays is the same as for Tray 2. Only Tray 2 is shown here.
CAUTION: Do not extend more than one paper tray at a time.
- Open the tray.
 NOTE: Do not open this tray while it is in use.
 - Before loading the paper, adjust the paper-width guides by squeezing the adjustment latches and sliding the guides to the size of the paper being used.
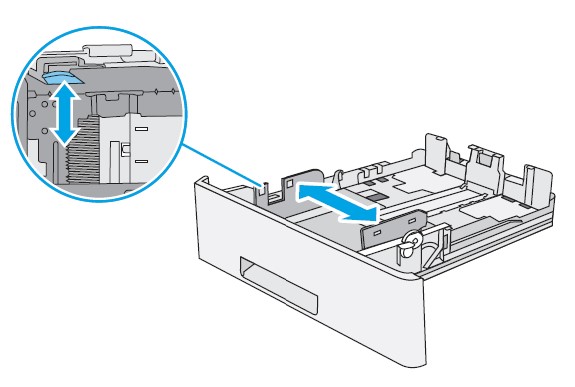
- Adjust the paper-length guide by squeezing the adjustment latch and sliding the guide to the size of the paper being used.

- To load legal-size paper into the tray, squeeze the lever on the back of the tray that is to the left of the center, and then extend the tray back to the correct paper size.
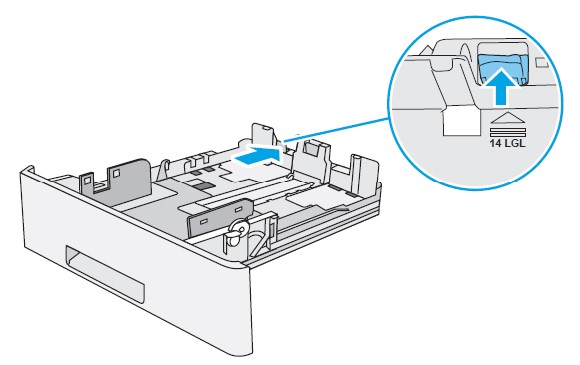 NOTE: This step does not apply to other paper sizes.
 - Load paper into the tray.
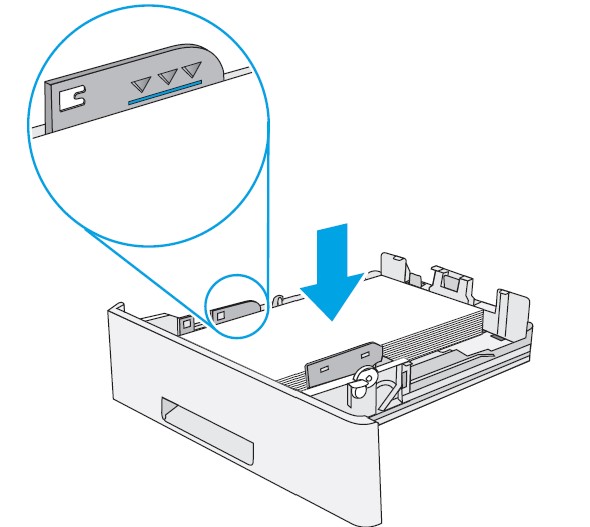 NOTE: Do not adjust the paper guides tightly against the paper stack. Adjust them to the indentations or markings in the tray.
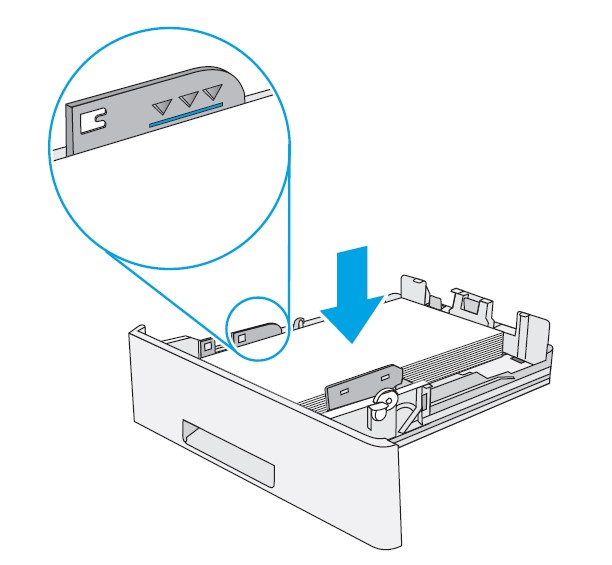
NOTE: To prevent jams, adjust the paper guides to the correct size and do not overfill the tray. Be sure that the top of the stack is below the tray full indicator, as shown in the enlargement in the illustration. - Close the tray.
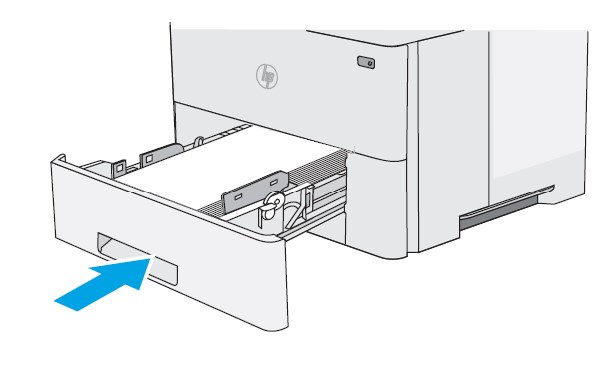
- The tray configuration message is displayed on the printer control panel.
- If the paper size and type shown are not correct, select Modify to choose a different paper size or type.

For custom-size paper, specify the X and Y dimensions for the paper when the prompt displays on the printer control panel.
Tray 2 and the 550-sheet trays paper orientation
When using paper that requires a specific orientation, load it according to the information in the following table.
NOTE: The Alternative Letterhead Mode settings affect the way to load letterhead or preprinted paper. This setting is disabled by default. When using this mode, load paper for automatic duplex printing.
Use alternative letterhead mode
Use the Alternative Letterhead Mode feature to load letterhead or preprinted paper into the tray the same way for all jobs, whether printing to one side of the sheet of paper or to both sides. When using this mode, load paper for automatic duplex printing.
To use the feature, enable it by using the printer control-panel menus.
Enable Alternative Letterhead Mode by using the printer control-panel menus
- 1. Press the Home button on the product control panel.
- Open the following menus:
- Administration
- Manage Trays
- Alternative Letterhead Mode
- Select Enabled, and then touch the Save button or press the OK button.
Load and print envelopes
Introduction
The following information describes how to print and load envelopes. Use only Tray 1 to print on envelopes. Tray 1 holds up to 10 envelopes.
To print envelopes using the manual feed option, follow these steps to select the correct settings in the print driver, and then load the envelopes into the tray after sending the print job to the printer.
Print envelopes
- From the software program, select the Print option.
- Select the printer from the list of printers, and then click or tap the Properties or Preferences button to open the print driver. NOTE: The name of the button varies for different software programs.
NOTE: To access these features from a Windows 8 or 8.1 Start screen, select Devices, select Print, and then select the Printer. - Click or tap the Paper/Quality tab.
- In the Paper size drop-down list, select the correct size for the envelopes.
- In the Paper type drop-down list, select Envelope.
- In the Paper source drop-down list, select Manual feed.
- Click the OK button to close the Document Properties dialog box.
- In the Print dialog box, click the OK button to print the job.
Envelope orientation
Clear paper jams
Jam locations
Auto-navigation for clearing jams
The auto-navigation feature assists in clearing jams by providing step-by-step instructions on the control panel. When you complete a step, the printer displays instructions for the next step until you have completed all steps in the procedure.
Experiencing frequent or recurring paper jams?
To reduce the number of paper jams, try these solutions.
- Use only paper that meets HP specifications for this printer.
- Use paper that is not wrinkled, folded, or damaged. If necessary, use paper from a different package.
- Use paper that has not previously been printed or copied on.
- Make sure the tray is not overfilled. If it is, remove the entire stack of paper from the tray, straighten the stack, and then return some of the paper to the tray.
- Make sure the paper guides in the tray are adjusted correctly for the size of the paper. Adjust the guides so they are touching the paper stack without bending it.
- Make sure that the tray is fully inserted into the printer.
- If you are printing on heavy, embossed, or perforated paper, use the manual feed feature and feed sheets one at a time.
- Open the Trays menu on the printer control panel. Verify that the tray is configured correctly for the paper type and size.
- Make sure the printing environment is within recommended specifications.
Clear paper jams in Tray 1
Use the following procedure to clear paper jams in Tray 1. When a jam occurs, the control panel displays an animation that assists in clearing the jam.
- If most of the sheet of paper is visible in the tray, slowly pull the jammed paper out of the printer. Make sure that the entire sheet is removed. If it tears, continue with the following steps to find the remnants.

If most of the sheet of paper has been pulled inside the printer, continue with the following steps. - Press the top-cover-release button on the left side of the printer.
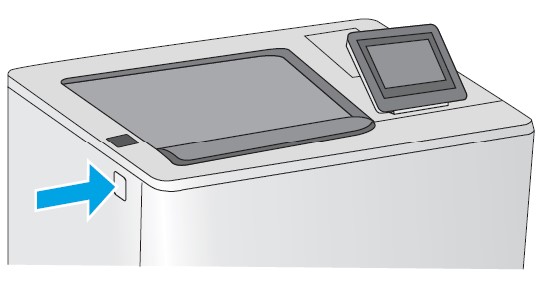
- Open the front door.
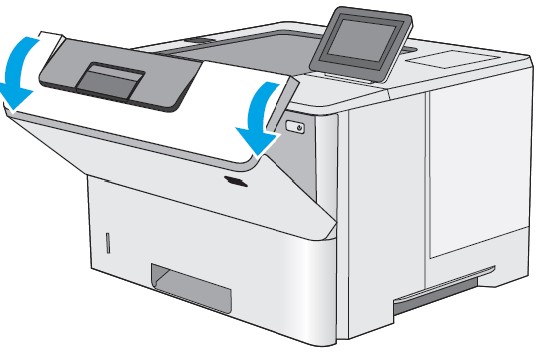
- Remove the toner cartridge.

- Lift the jam-access cover and slowly remove any jammed paper. Be careful not to tear the paper.

- Reinsert the toner cartridge.

- Close the front door.
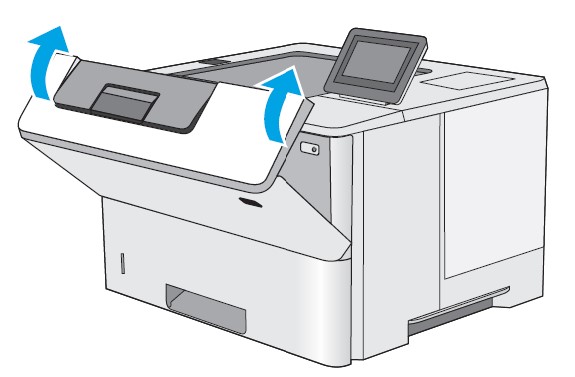
Clear paper jams in Tray 2 and the 550-sheet trays
Use the following procedure to check for paper in all possible jam locations related to Tray 2 and the 550-sheet trays. When a jam occurs, the control panel displays an animation that assists in clearing the jam.
- Remove the tray from the printer.

- Remove the paper from the tray, and discard any damaged paper.
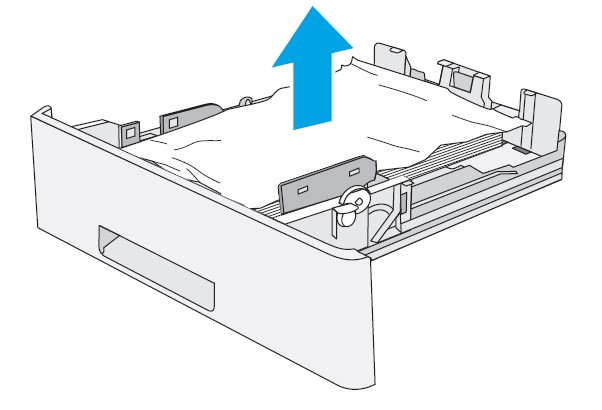
- Verify that the rear paper guide is adjusted to the indentation for the correct paper size. If necessary, pinch the release and move the rear paper guide to the correct position. It should click into place.
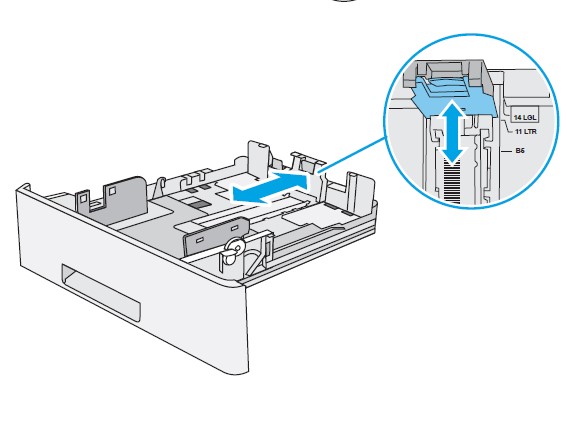
- Load the paper into the tray. Make sure that the stack is flat at all four corners and that the top of the stack is below the maximum-height indicators.
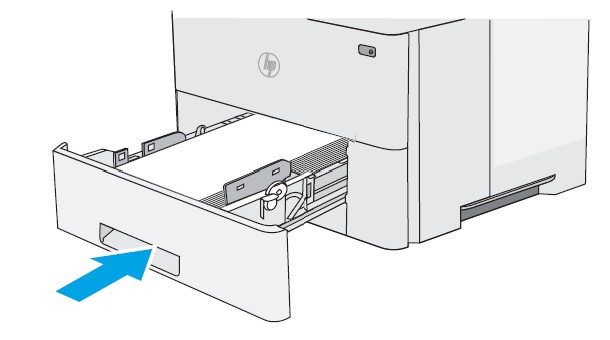
- Reinsert and close the tray.
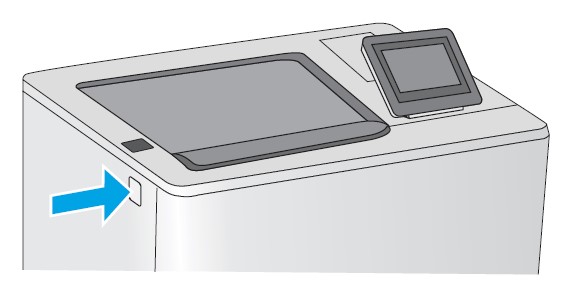
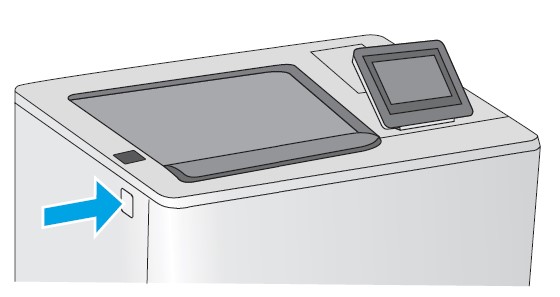
- Press the top-cover-release button on the left side of the printer.
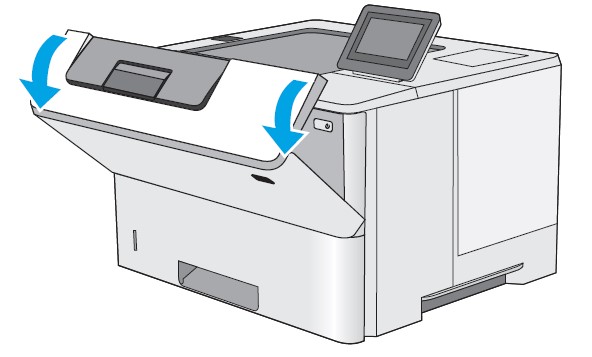
- Open the front door.
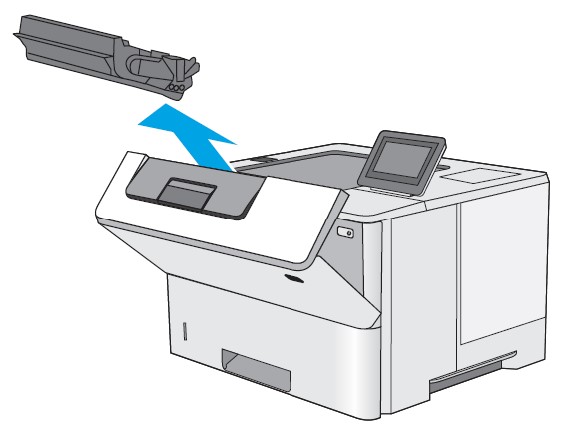
- Remove the toner cartridge.
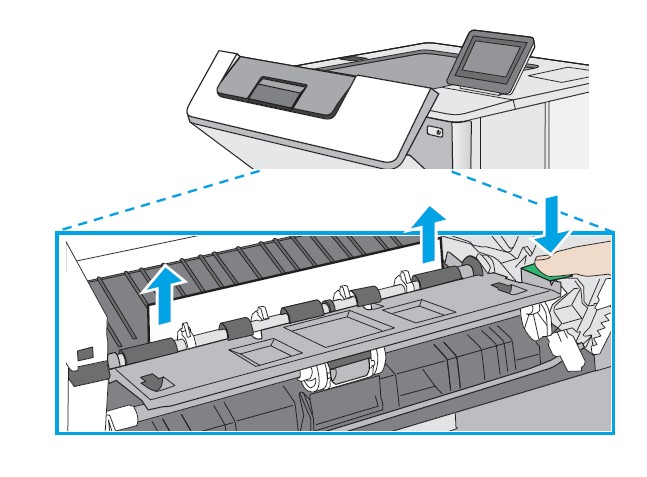
- Lift the jam-access cover and slowly remove any jammed paper. Be careful not to tear the paper.
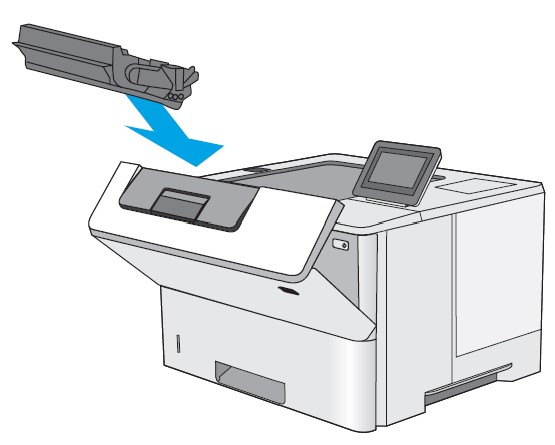
- Reinsert the toner cartridge.
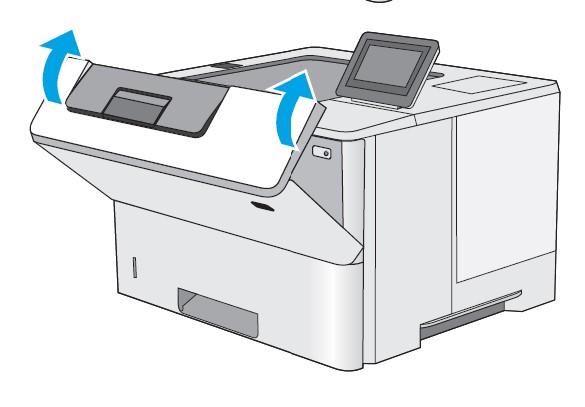
- Close the front door.
Clear paper jams in the toner-cartridge area
Use the following procedure to check for paper in all possible jam locations in the toner cartridge area. When a jam occurs, the control panel displays an animation that assists in clearing the jam.
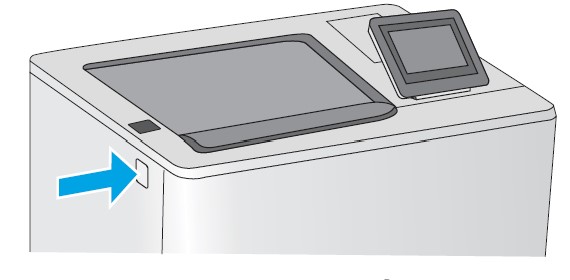
- Press the top-cover-release button on the left side of the printer.
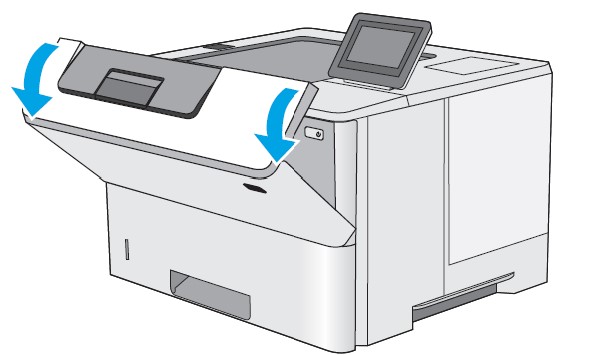
- Open the front door.
- Remove the toner cartridge.

- Lift the jam-access cover and slowly remove any jammed paper. Be careful not to tear the paper.
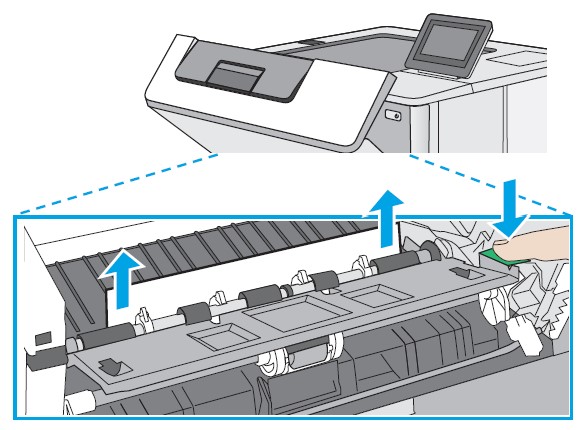
- Reinsert the toner cartridge.

- Close the front door.

Clear paper jams in the rear door and the fuser area
Use the following procedure to clear paper jams in the rear door and fuser area. When a jam occurs, the control panel displays an animation that assists in clearing the jam.
NOTE: The fuser is hot while the printer is in use. Wait for the fuser to cool before clearing the jams.
- Open the rear door.

- Remove any jammed paper.
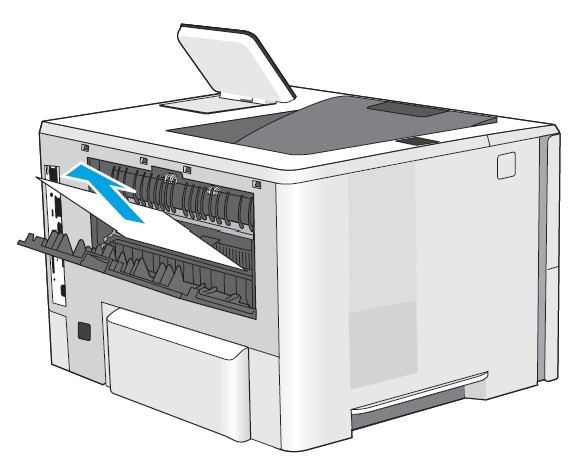
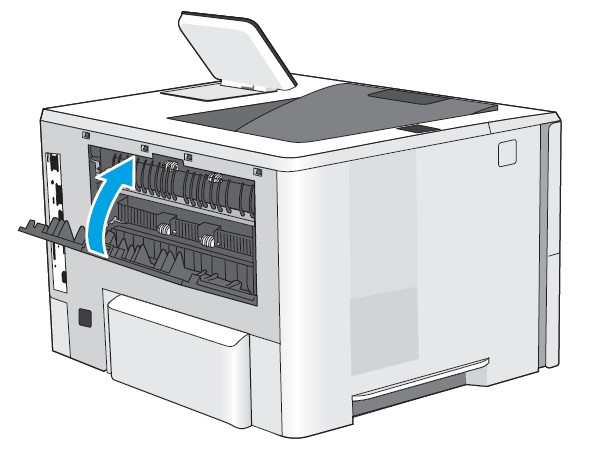
- Close the rear door

Clear paper jams in the output bin
Use the following procedure to check for paper in all possible jam locations in the output bin. When a jam occurs, the control panel displays an animation that assists in clearing the jam.
- If the paper is visible in the output bin, grasp the leading edge and remove it.

Clear paper jams in the duplexer
Use the following procedure to check for paper in all possible jam locations in the automatic duplexer. When a jam occurs, the control panel displays an animation that assists in clearing the jam.
- Remove Tray 2 from the printer.

- Pull forward on the green tab inside the tray area to release the duplex pan.

- Remove any jammed paper.

- Close the duplex pan.
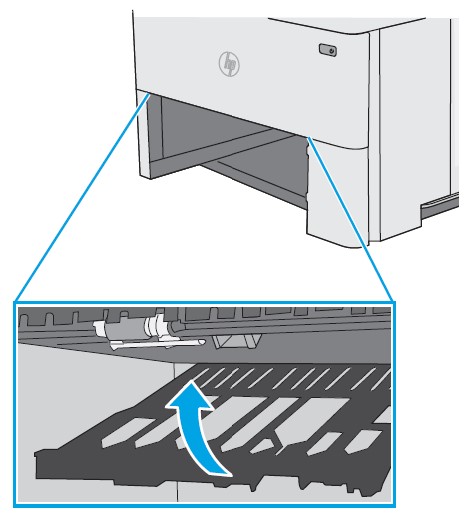
- Reinsert and close the tray.

- Open the rear door.
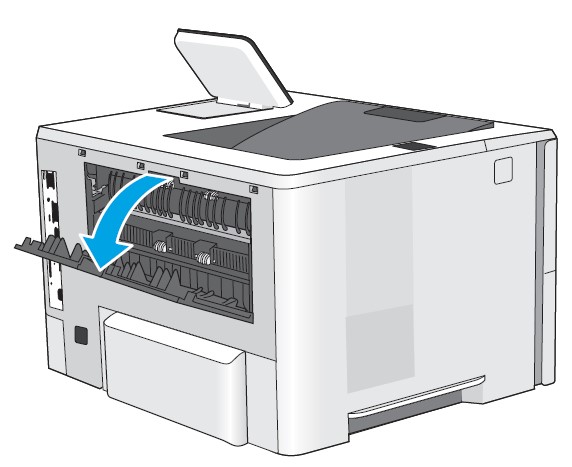
- Remove any jammed paper.

- Close the rear door
- Press the top-cover-release button on the left side of the printer.
- Open the front door.

- Remove the toner cartridge.
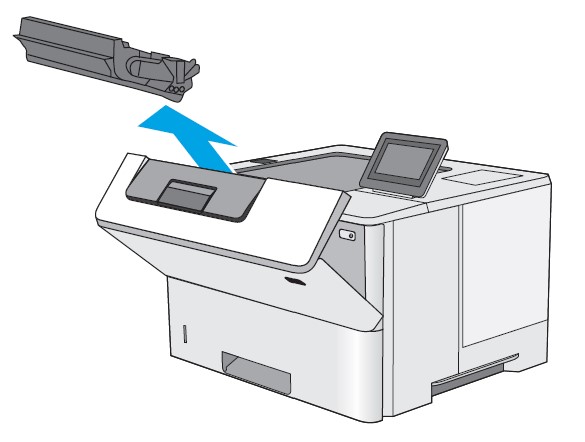
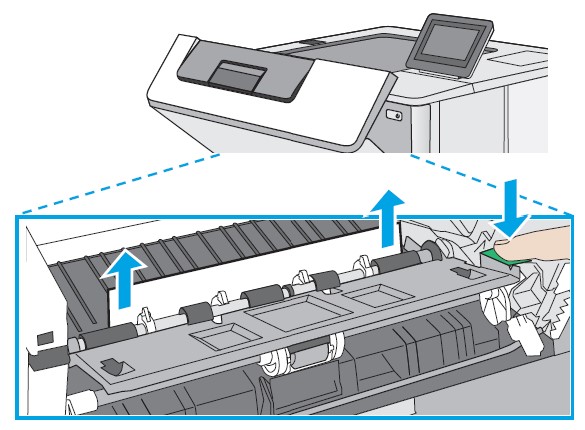
- Lift the jam-access cover and slowly remove any jammed paper. Be careful not to tear the paper.
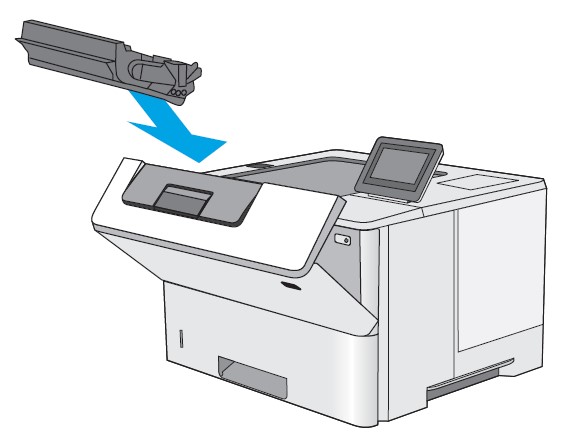
- Reinsert the toner cartridge.
- Close the front door.

FAQs HP LaserJet Enterprise M506 Series Printer
What is the HP M506’s print speed?
The speed is 45 ppm for letter-size and 43 ppm for A4 size.
What distinguishes LaserJet Pro from LaserJet Enterprise?
Enterprise-level hardware is made to support more users and bigger print volumes. Pro-level devices, on the other hand, are best used by one or two end users at most. We do suggest Pro series printers in specific cases.
What is the HP LaserJet M506’s default administrator?
The default password is any password you want; there is no default password. The username default is admin (all lowercase).
What is the LaserJet M506’s duty cycle?
The HP LaserJet Enterprise M506 offers a maximum resolution of 1200 x 1200 dpi and prints at a speed of up to 45 sheets per minute.
The HP M506 is wireless.
Embedded and optional security mechanisms can be used to protect sensitive data that is kept on the printer and during transmission. With safe mobile printing alternatives, stay connected. Use network-free, optional, wireless direct printing that is 128-bit encrypted.
What advantages does LaserJet offer?
In comparison to comparable inkjet printers, laser printers print pages more fast. With a laser printer as opposed to an inkjet, the printing process is noticeably quieter. Toner does not have the potential to dry out and become useless even when not in use for extended periods of time.
Can laser printers produce coloured prints?
While laser printers do create good colour and black-and-white results, inkjet printers are still thought of as the masters of high-resolution colour printing.
How does the HP LaserJet Enterprise M506 print the configuration page?
Select Reports from the Home screen on the printer control panel. Configuration/Status Pages should be chosen. Choose the Configuration Page. To print the Jetdirect and setup pages, choose Print.
How much does an HP M506 printer cost in Pakistan?
The cost of the most recent HP LaserJet Enterprise M506dn in Pakistan is 122,999 PKR, as of July 2023.
Are HP printers Bluetooth-enabled?
A Bluetooth radio that is integrated into some HP printers allows for connecting with a computer, smartphone, or tablet to enable wireless printing. the printer’s Bluetooth radio should be turned on. To access Bluetooth settings, hit the Bluetooth button, or go to the Setup or Network menu, depending on the model.
For more manuals by HP, Visit Manualsdock


