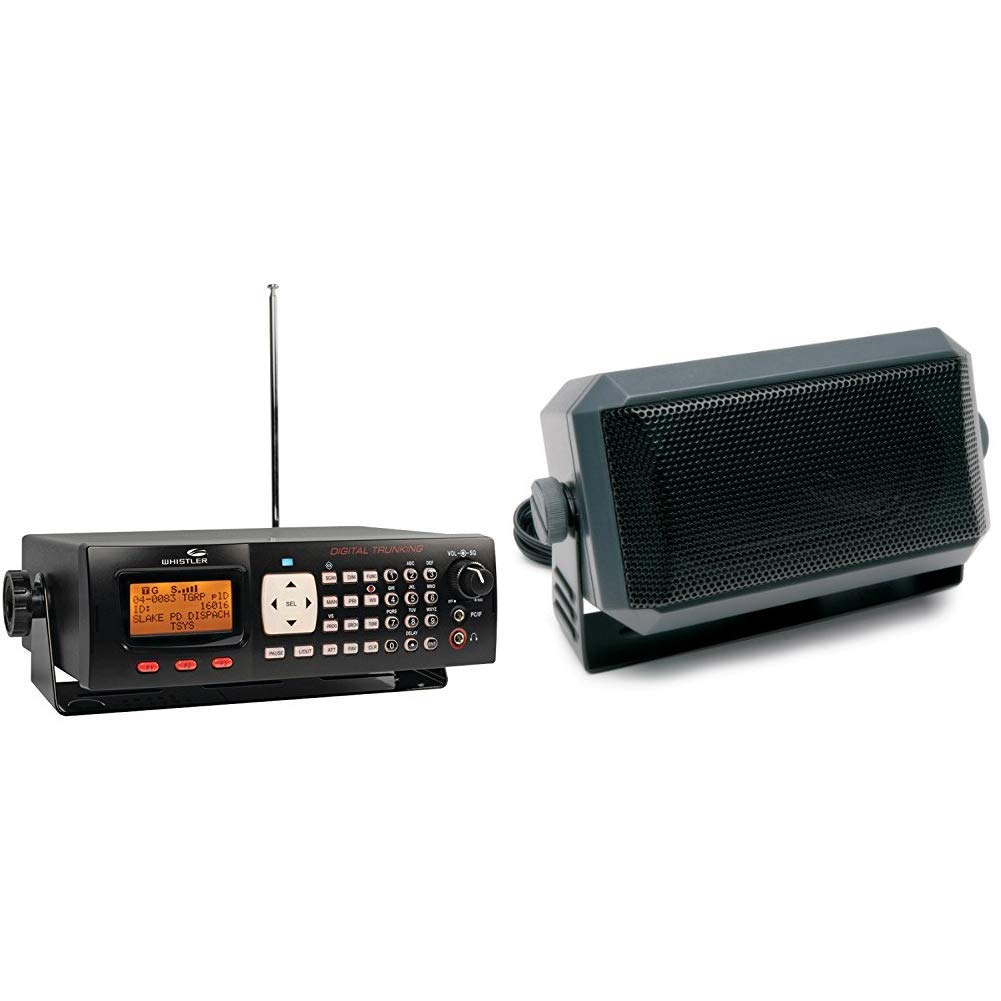
Whistler WS1065 Desktop Digital Scanner
About Whistler
Whistler Group, Inc. is a company that specializes in designing and manufacturing electronics, particularly in the field of radio communication and detection devices. They are known for producing a range of products such as radar detectors, laser detectors, dash cameras, and two-way radios.
Whistler’s radar detectors and laser detectors are designed to help drivers identify and mitigate the risks of speeding tickets by alerting them to the presence of speed enforcement devices used by law enforcement agencies. Their dash cameras are meant to provide drivers with a record of their journeys and any incidents that might occur on the road.
WELCOME
Thank you for choosing a Whistler product. We are dedicated to providing products that represent both quality and value. Please read the user manual carefully before using this product. If you have additional questions, please visit the FAQ page on our website at www.whistlergroup.com or call toll-free 800-531-0004, 8 am to 5 pm CT, Monday through Friday to speak to a Customer Service Representative.
Introduction
Scanning technology has changed dramatically over the years. The WS1065 scanner with Object Oriented User Interface is designed to help the hobbyist build a collection of channels to scan:
- Start small and expand
- Organize channels and talk groups
- Remove unwanted channels and talk groups
What is Object Oriented Scanning? Programming scanning receivers can be challenging, but object-oriented programming simplifies the process by using common conventions for scanning concepts that have common characteristics.
A Scannable Object is any defined item that can be scanned or monitored, including:
- Conventional, non-trunked radio frequencies
- Talkgroups used on a trunked radio system
- Radio services
- Defined searches
Because the same basic elements define scannable objects, the Object Oriented User Interface (OOUI) is designed to simplify scanning by managing all scannable objects similarly. When you learn how to program one type of object, you can program other types of scannable objects as well.
SCANNING LEGALLY
Package Contents
- Screws (2)
- Mounting bracket
- DIN sleeve
- Keys (2)
- Rubber washers (2)
- Lock washers (2)
- Rubber feet (5)
- Knobs (2)
- AC adapter
- Antenna
- DC cable with fuse
- User’s Guide
- QuickStart Guide
Scanning Legally
Your scanner covers frequencies used by many different groups including police and fire departments, ambulance services, government agencies, private companies, amateur radio services, military operations, pager services, and wireline (telephone and telegraph) service providers. It is legal to listen to almost every transmission your scanner can receive. However, there are some transmissions you should never intentionally listen to.
These include:
- Telephone conversations (cellular, cordless, or other means of private telephone signal transmission)
- Paging transmissions
- Any intentionally decoded scrambled or encrypted transmissions
According to the Electronic Communications Privacy Act (ECPA), you are subject to fines and possible imprisonment for intentionally listening to, using, or divulging the contents of such a transmission unless you have the consent of a party to the communication (unless such activity is otherwise illegal). This scanner has been designed to prevent the reception of illegal transmissions. This is done to comply with the legal requirement that scanners be manufactured to not be easily modifiable to pick up those transmissions.
FEATURES
Do not open your scanner’s case to make any modifications that could allow it to pick up transmissions that are illegal to monitor. Doing so could subject you to legal penalties. We encourage responsible, legal scanner use. In some areas, mobile use of this scanner is unlawful or requires a permit. Check the laws in your area. It is also illegal in many areas to interfere with the duties of public safety officials by traveling to the scene of an incident without authorization.
Features
- Intuitive Object-Oriented User Interface
- Context Sensitive Help
- Scan List
- V-Scanner Technology – Save complete backup radio configurations, up to 21 versions.
- SKYWARN™ Storm Spotter Function
- SAME and All Hazards Weather Alerting
- Multi-System Trunking
- Exclusive Automatic Adaptive Digital Tracking – Adapts to multipath or fading for P25 digital systems
- Exclusive Digital AGC
- LTR Home Repeater AutoMove
- Subaudible Squelch Decoder
- Spectrum Sweeper – Advanced feature for finding active frequencies.
- Zeromatic – Enhances the scanner’s ability to lock on to the actual center frequency of a search hit instead of an adjacent frequency.
- P25 NAC Functionality
- Alert LED and Audible alarms
- High-Speed USB PC Interface
- Real-time Signal Strength Indicator
- Upgradeable CPU and DSP Firmware
INSTALLATION OF ANTENNA
Setup Antenna
You scanner’s antenna connects easily, or you can use a variety of antennas, such as an external mobile antenna or an outdoor base station antenna. To connect an external antenna, follow the installation instructions supplied with the antenna. Always use 50-ohm coaxial cable, such as RG-58 or RG-8 low-loss dielectric coaxial cable. You may also need a BNC adapter.
To connect the included antenna:
Your scanner’s frequency sensitivity depends on its location and the antenna length. For best reception, adjust the antenna’s length as follows:
WARNING: Use extreme caution when installing or removing an outdoor antenna. If the antenna starts to fall, let it go! It could contact overhead power lines. If the antenna touches a power line, touching the antenna, mast, cable, or guy wires can cause electrocution and death. Call the power company to remove the antenna. DO NOT attempt to do so yourself.
WARNING: Outdoor antennas must be properly grounded to prevent static buildup and lightning damage. Article 810 of the National Electrical Code, ANSI/NFPA 70, provides information about proper grounding of the antenna mast, connection of coaxial cable to a lightning arrestor, size of grounding conductors, location of the lightning arrestor and connection of grounding conductors to grounding electrodes.
Additionally, disconnect your radio from the outdoor antenna during electrical storm activity to prevent damage. The diagram below provides an example of a proper antenna grounding system.
Desktop Operation
The mounting bracket works as a desktop stand when attached underneath the radio. Use the provided rubber feet to prevent sliding or scratching. Do not use the rubber feet if mounting permanently to a fixed surface. Extra pads are provided for additional stability.
- Attach the adhesive rubber feet to the mounting bracket.
- Attach the two adhesive rubber washers over the mounting holes, between the mounting bracket sides and the scanner’s side holes.
- Position the bracket with the two recessed feet toward the front of the scanner.
- Use the two provided knobs to secure the scanner within the mounting bracket.
Mount Installation
Attach the bracket over the radio to suspend the scanner from above. Attach the bracket underneath the scanner to mount it on top of a flat surface. Your WS1065 also fits into the included DIN-E compatible sleeve for existing dashboard openings.
NOTE: In some cases, installation requires specialized tools and skills. If in doubt, seek assistance from a local car audio electronics installation shop, or a local two-way radio dealer. Select a location that does not interfere with driving or with the deployment of your vehicle’s airbags. Do not mount this or any other equipment where the deployment of the airbags might cause it to be propelled toward passengers. If necessary, seek advice from your automotive dealer or service shop.
ACCESSORIES
- Use the mounting bracket as a template to mark the locations for the two mounting screws.
- Drill holes that are slightly smaller than the screws. Use caution not to damage wiring or components behind the mounting surface.
- Using the provided screws and lock washers, attach the mounting bracket to your vehicle.
Headphones and Speakers
You can plug headphones (not supplied) or an amplified speaker (not supplied) with a 1/8-inch (3.5 mm) mini-plug earphone or in the headphone jack on top of your scanner. This automatically disconnects the internal speaker.
NOTE: Use an amplified speaker with this scanner; Non-amplified speakers do not provide sufficient volume for comfortable listening.
Listening Safely
- To protect your hearing, follow these guidelines when you use headphones:
- Set the volume to zero before putting on headphones. With the headphones on, adjust the volume to a comfortable level.
- Avoid increasing the volume after you set it. Over time, your sensitivity to a volume level decreases, so volume levels that do not cause discomfort might damage your hearing.
- Avoid or limit listening at high-volume levels. Prolonged exposure to high-volume levels can cause permanent hearing loss.
- Wearing headphones while operating a motor vehicle can create a traffic hazard and is illegal in most areas. Even though some headphones let you hear some outside sounds when listening at normal volume levels, they still can present a traffic hazard. Exercise extreme caution!
EXTERNAL POWER
AC Adapter
You must use a power source that supplies 12-14.4 VDC and is rated for 600 mA. Its center tip must be set to positive and its plug must fit the scanner’s DC 13.8V jack. The supplied DC power adapter meets these specifications. Using a DC adapter that does not meet these specifications could damage the scanner or the adapter.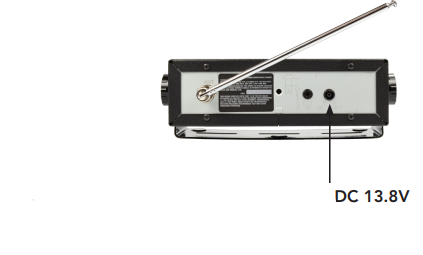
To Connect the AC Adapter
- Plug the supplied AC adapter into the DC 13.8V
- Plug the AC adapter into your wall outlet.
WARNING: To prevent electric shock, do not use the AC adapter’s polarized plug with an extension cord, receptacle, or other outlet unless you can fully insert the blades to prevent blade exposure.
DC Power Cable
Connect the supplied DC power cable to a vehicle power source:
- Disconnect your battery’s negative (-) terminal.
NOTE: Disconnecting your battery may reset some devices in your vehicle, such as automotive audio systems, navigation systems, or alarm systems.
- Route the supplied DC power cord between a power source and the mounting location for your scanner.
- Ground the power cord’s black wire to your vehicle’s chassis.
NOTE: The grounding screw must make complete contact with the metal frame of your vehicle.
- Connect the power cord’s red wire to a voltage source that turns on and off with the ignition switch, such as a spare accessory terminal in your vehicle’s fuse box.
- Insert the power plug into the DC power jack on the rear of the radio.
- Reconnect the cable to the negative (-) terminal of your vehicle’s battery.
NOTE: If your vehicle’s engine is running, you might hear electrical noise from the engine while scanning. This is normal.
WARNING: The DC power cord is equipped with an inline fuse. This fuse protects your scanner and your vehicle from damage in case of equipment malfunction or a short circuit. Do not remove the inline fuse holder from the DC power cord. If the fuse blows, replace it with a 2A fuse and apply power again. If the fuse blows again, check all wiring for short circuits, and check the radio for a malfunction.
KEYPAD
Understanding the Keypad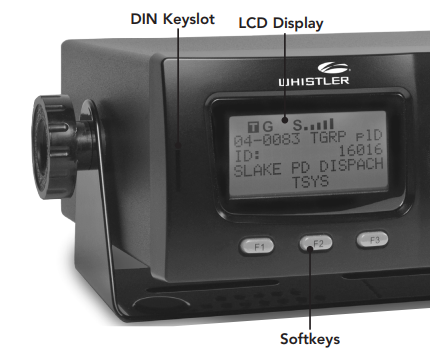
Your WS1065 features an easy-to-understand backlit keypad.


- – Used to navigate through objects and menu items. For some menu items, the side buttons can be used to change settings.
- Press SEL to select the highlighted item.
Turning on the Scanner
The squelch and attenuator control scanner sensitivity. If the squelch is set too low, the scanner may stop on noise or silence.
Note: Make sure the scanner’s antenna is connected before you turn it on.
- Turn the SQUELCH knob to about mid-position.
- Turn the VOLUME knob to turn on the radio.
- Turn SQUELCH down (counterclockwise) until you hear the noise.
- Turn SQUELCH up (clockwise) a little past where the noise stops. The higher the squelch is set, the stronger the signal required to break the squelch.
DISPLAY
Understanding the Display Icons
Your WS1065 features a high-contrast, backlit Liquid Crystal Display (LCD).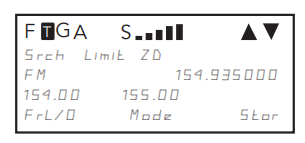
The scanner uses the following top row of icons: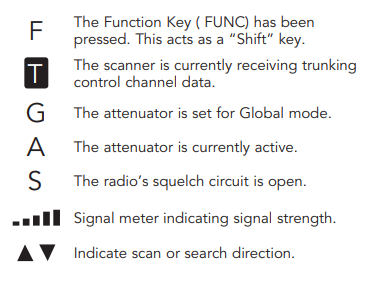
Programming Cables
The simplest method for programming a new scanner is using a PC/IF cable, which is included with the scanner. The cable lets you use the software provided by RadioReference.com and its constantly updated database to program your new scanner quickly and easily. RadioReference.com also provides a range of resources to help improve your overall scanning experience.
CLONING
Scanner Cloning
If you have access to a compatible scanner that is already programmed for your area, you can transfer that scanner’s programming using a standard stereo patch cord (not included), terminated with 1/8” male stereo plugs at each end.
The WS1065 is compatible with the following scanner models:
- PRO-106, PRO-197, PRO-651, PRO-652, GRE PSR-500, PSR-600, Whistler WS1040 and WS1065.
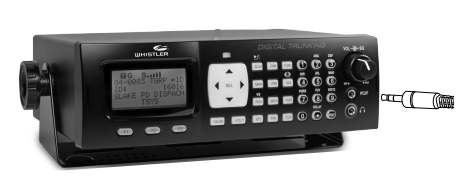
To clone a scanner:
- Connect the two scanners at their PC/IF
- Turn on both scanners.
- On the source scanner, press PROG.
- Press the GLOB
- Use the 4-direction keypad to locate the Clone Send
- Press SEL to transfer data.
MANUAL PROGRAMMING
NOTE: Working memory and global settings are transferred but not V-Scanner folders. The target scanner’s working memory will be overwritten. In some cases, the CCDump output may interfere with cloning.
To turn off CCDump:
- Press PROG.
- Press FUNC and then the GLOB
- Use the 4-direction keypad to locate the CCDump option and change the setting.
- Press the Save
Manual Programming
Modern radio systems can be complex and challenging to program. If you choose to program your scanner manually, refer to the “Manual Programming Guide” on page 54.
Specifications
- Working Memory 1800 programmed objects (conventional channels, trunking talkgroups, limit searches, service searches, and Spectrum Sweeper configurations) using a flexible “Scannable Object” system.
- Virtual Scanners 21 Virtual Scanner (V-Scanner) folders.
- Searches Seven preprogrammed dedicated service searches, one dedicated limit search. Programmable service or limit search objects.
- Priority Talkgroup and conventional channel priority.
- Conventional Receiver Modes AM, FM, NFM, CTCSS, DCS, P25 NAC
- Trunking Receiver Modes
- Motorola Type I/II/III Analog and Digital, GE/Ericsson/
- MA-COM EDACS Narrowband and Wideband, EF Johnson LTR
- Receiver System Triple conversion PLL super-heterodyne
- 1st IF …………………………………………………380.8 MHz(The 1st LO uses the high side of receive frequency range for VHF and UHF Low/T, and the low side of receive frequency range for >512 MHz)
- 2nd IF ………………………………………………….21.4 MHz The second LO uses the low side of 1st IF)
- 3rd IF……………………………………………………. 455 kHz (The 3rd LO uses the low side of the 2nd IF)
- Frequency Range
- VHF Low ……………………. 25.00000 – 54.00000 MHz
- VHF Aircraft ……………. 108.00000 – 136.99166 MHz
- VHF High ………………..
- 137.00000 – 174.00000 MHz
- 216.00250 – 224.9950 MHz
- 225.00000 – 299.93750 MHz
- UHF Low/T ……………. 300.00000 – 512.00000 MHz
- UHF High
- 764.00000 – 960.00000 MHz*
- 1240 .00000 – 1300.0000 MHz
Excludes Cellular Mobile Radiotelephone Service frequencies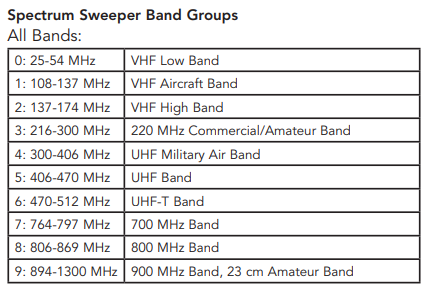

- CB – Searches the Citizens Band radio frequencies.
- Marine – Searches the VHF-FM marine radio band. FRS/GMRS/MURS/DOT/STAR (F/G/MURS)
- Railroad – Searches the Association of American Railroads (AAR) VHF railroad frequencies used in the US and Canada.
- Weather frequencies …………… 162.400, 162.425, 162.450, 162.475, 162.500, 162.525, 162.550 MHz
- Scanning Rate ………….. Approx. 40-60 channels per second
- Search Rate ……………………. Approx. 60-90 steps per second
- Display ………….. LCD with amber LED backlight, 4 lines of 16 characters each, plus 13 display icons
- Zeromatic …………….. Automatically zeroes receiver on correct frequency during searches
- Audio Output ………………………………………………………..1.8 W
- Internal Speaker …………………………..77 mm 8 ohms dynamic
- Operating Voltage …………. 12-14.4 VDC, 13.8 VDC nominal, 16VDC Max.
- Dimensions (WxDxH)
-
- 7.3 x 5.3 x 2.2 inches
- 185 x 135 x 55 mm
- Weight ………………………… Approx. 42.3 ounces, 1200 grams (not including mounting hardware and antenna)
- Memory backup …………. No backup battery is required, utilizes non-volatile EEPROM memory
Specifications are typical; individual units might vary. Specifications and depictions are subject to change and improvement without notice.
Maintenance
- Keep the scanner dry; if it gets wet, wipe it dry immediately. Use and store the scanner only in normal temperature environments. ‘
- Handle the scanner carefully; do not drop it. Keep the scanner away from dust and dirt, and wipe it with a damp cloth occasionally to keep it looking new.
Modifying or tampering with the scanner’s internal components can cause a malfunction and might invalidate its warranty and void your FCC authorization to operate it.
Birdie Frequencies
Birdies are operating frequencies, which all scanners have, that are created inside the scanner’s receiver and can cause interference. If the interference is not severe, adjusting the squelch might omit the birdie, but if you program one of these frequencies after a search you will hear only noise on that frequency.
To find birdies in your scanner:
- Disconnecting the antenna.
- Ensure no other nearby radio or TV sets are turned on near the scanner.
- Press TUNE and then press PSE. The scanner will search for frequencies and occasionally stop as if it has found a signal. This is a birdie.
- Make a list of all the birdies in your scanner for future reference.
- Press L/OUT to lock out the frequency for any future searches after you have reconnected the antenna.
PC INTERFACE
System Requirements IBM PC or compatible computer equipped with Universal Serial Bus (USB) connection and Windows 8, Windows 7, Windows Vista, and Windows XP
NOTE: Although the USB interface cable supports full-speed USB communications, actual data transfer speed depends on the scanner’s hardware.
Installing USB drivers on Windows 8/7/Vista/XP
- To install any new driver on Windows 8, Windows 7/ Vista/XP you need to log on as an administrator.
- Insert the PC interface cable into the USB port of your computer. Depending on the PC’s Operating System the drivers for the interface cable may be already installed. If so, the cable is now ready for use. Connect the scanner plug to the PC/IF port of your scanner.
- If the drivers are not currently installed in the PC it will automatically launch the Found New Hardware Wizard. The PC will automatically start installing the USB cable drivers.
PC INTERFACE
Viewing the Cable Port Settings
To specify the COM port number in your scanner application software, you can view the port settings when the cable is plugged into your computer.
- Open your systems Control Panel. Double-click the System icon.
- Select the Hardware tab, then select Device Manager.
- Scroll to Ports, then click the + sign to expand the Ports list.
- Look in your PC’s Device Manager for Ports (COM & LPT) to confirm the cable’s COM port number.
Installation Troubleshooting
- If Windows does not detect the cable when plugged in, try using any other USB port if available.
- If the installation fails, remove the cable reboot your computer, and perform the installation again.
FCC Statement
This equipment has been tested and found to comply with the limits for a scanning receiver, pursuant to Part 15 of the FCC Rules. These limits are designed to provide reasonable protection against harmful interference in a residential installation. This equipment generates, uses, and can radiate radio frequency energy and, if not installed and used in accordance with the instructions, may cause harmful interference to radio communications. However, there is no guarantee that interference will not occur in a particular installation. If this equipment does cause harmful interference to radio or television reception, which can be determined by turning the equipment off and on, the user is encouraged to try to correct the interference by one or more of the following measures:
- Reorient or relocate the receiving antenna.
- Increase the separation between the equipment and the receiver.
- Connect the equipment to an outlet on a circuit different from that to which the receiver is connected.
This device complies with Part 15 of the FCC Rules. Operation is subject to the following two conditions:
- This device may not cause harmful interference.
- This device must accept any interference received, including interference that may cause undesired operation.
Consumer Warranty
This Whistler product is warranted to the original purchaser for a period of one (1) year from the date of original purchase against all defects in materials and workmanship when purchased from an authorized Whistler retailer. This limited warranty is void if the unit is abused, misused, modified, or installed improperly, or if the housing and/or serial numbers have been removed. There are no express warranties covering this product other than those outlined in this warranty. All express or implied warranties for this product are limited to one (1) year. Whistler is not liable for damages arising from the use, misuse, or operation of this product including but not limited to loss of time, inconvenience, loss of use of your product, or property damage caused by your product or its failure to work, or any other incidental or consequential damages including personal injury.
DO NOT RETURN ITEMS TO THE STORE WHERE PURCHASED. FOR WARRANTY INFORMATION, CONTACT WHISTLER CUSTOMER SERVICE AT 1-866-923-8719.
- Representatives are available to answer your questions
- Monday – Friday from 8:00 a.m. to 5:00 p.m. CT
Service Under Warranty
During the warranty period, defective units will be repaired or replaced (with the same or a comparable model), at Whistler’s option, without charge to the purchaser when returned prepaid, with dated proof of purchase to the address below. Units returned without dated proof of purchase will be considered out of warranty and therefore are not covered by the described Limited Warranty. (Refer to the Service Out of Warranty section.) Due to the specialized equipment necessary for testing Whistler products, there are no authorized service centers other than Whistler. When returning a unit for service under warranty, please follow these instructions:
- Ship the unit in the original carton or a suitable sturdy equivalent, fully insured, with return receipt requested to:
-
- Whistler Repair Dept. 1412 South 1st St. Rogers, AR. 72756
Please allow 3 weeks turnaround time.
- Whistler Repair Dept. 1412 South 1st St. Rogers, AR. 72756
IMPORTANT: Whistler will not assume responsibility for loss or damage incurred in shipping. Therefore, please ship your unit insured with the return receipt requested. CODs will not be accepted!
- Include with your unit the following information, clearly printed:
-
- Your name and physical street address for shipping (no PO Boxes), a daytime telephone number, and an email address (if applicable).
- A detailed description of the problem (e.g., “device will not Power ON”).
- A copy of your dated proof of purchase or bill of sale.
- Be certain your unit is returned with its serial number. Units without serial numbers are not covered under warranty.
IMPORTANT: To validate that your unit is within the warranty period, make sure you keep a copy of your dated proof of purchase. For warranty verification purposes, a copy of your dated store receipt must accompany any Whistler product sent in for warranty work.
Service Out Of Warranty
Units will be repaired at “out of warranty” service rates when:
- The unit’s original warranty has expired.
- A dated proof of purchase is not supplied.
- The unit has been returned without its serial number.
- The unit has been misused, abused, modified, installed improperly, or had its housing removed.
The minimum out-of-warranty service fee for your Whistler Scanner is $120.00 (U.S.). If you require out-of-warranty service, please return your unit as outlined in the section “Service Under Warranty” along with a cashier’s check or money order in the amount of $120.00. Payment may also be made by MasterCard, VISA, or American Express.
Personal checks are not accepted.
In the event repairs cannot be covered by the minimum service fee, you will be contacted by a Whistler technical service specialist who will outline options available to you.
IMPORTANT: When returning your unit for service, be certain to include a daytime telephone number and an email address (if applicable).
Customer Service
If you have questions concerning the operation of your Whistler product or require service during or after the warranty period, please call Customer Service at 1-866-923-8719. Representatives are available to answer your questions Monday – Friday from 8:00 a.m. to 5:00 p.m. (CT) or visit the F.A.Q.’s at www.whistlergroup.com.
FAQS About Whistler WS1065 Desktop Digital Scanner
What frequencies does the Whistler WS1065 Desktop Digital Scanner cover?
The Whistler WS1065 Desktop Digital Scanner is designed to cover a wide range of frequencies, including those used by public safety agencies, weather broadcasts, and more. Gain insights into the specific frequency bands this scanner supports.
Can the WS1065 Scanner be programmed for trunking systems?
Discover the capabilities of the Whistler WS1065 in terms of trunking system compatibility. Learn how to program and utilize this feature for efficient monitoring of communication networks.
What types of memory configurations does the WS1065 offer?
Explore the memory options available with the Whistler WS1065 Desktop Digital Scanner. Understand how the memory is organized and how to best utilize it for storing your favorite channels and settings.
Is the WS1065 scanner compatible with digital and analog signals?
Learn about the versatility of the Whistler WS1065 in handling both digital and analog signals. Understand the benefits of this dual capability for comprehensive scanning across different communication technologies.
How does the Dynamic Memory Allocation feature work on the WS1065?
Gain insights into the innovative Dynamic Memory Allocation feature of the WS1065. Understand how it optimizes memory usage dynamically, allowing for efficient storage and quick access to frequently monitored channels.
What accessories are compatible with the Whistler WS1065 scanner?
Get information on accessories that enhance the functionality of the WS1065 scanner. Explore compatible accessories to customize and maximize your scanning experience.
How does the Skywarn Storm Spotter Functionality work on the WS1065?
Learn about the Skywarn Storm Spotter functionality and how it aids in monitoring severe weather conditions. Understand the role of the WS1065 in keeping you informed during critical weather events.
Can the WS1065 be updated with the latest firmware?
Find out about the firmware update capabilities of the Whistler WS1065. Stay informed on how to keep your scanner up-to-date with the latest features and improvements.
What programming options are available for the WS1065 scanner?
Explore the various programming options for the WS1065, including manual programming and software-based programming. Understand the steps involved in programming the scanner to suit your specific monitoring preferences.
How does the Signal Stalker feature enhance scanning capabilities on the WS1065?
Discover the functionality of the Signal Stalker feature and how it enhances the WS1065 scanning experience. Learn how this feature helps in identifying and tracking signals efficiently.

