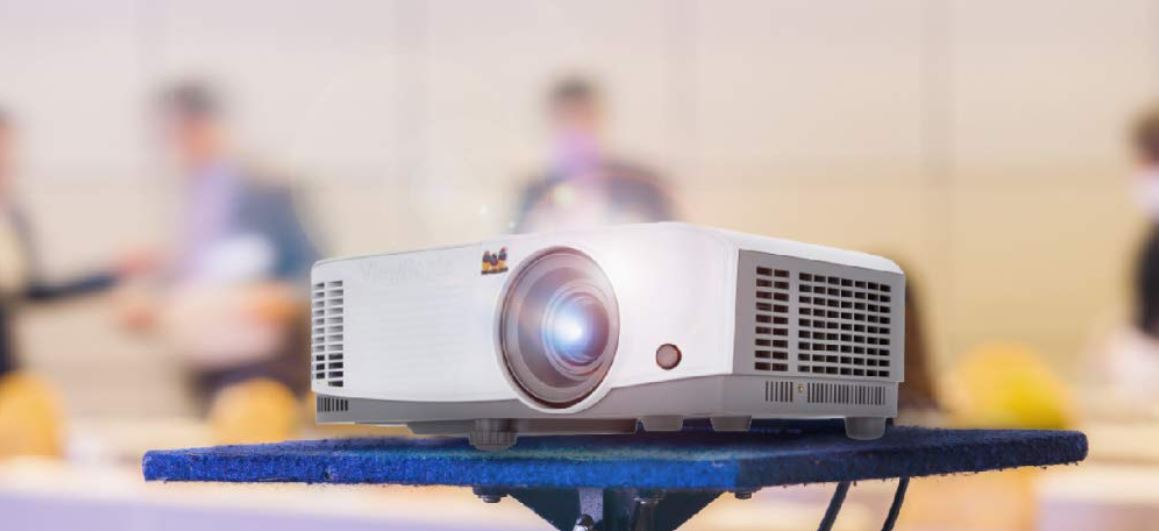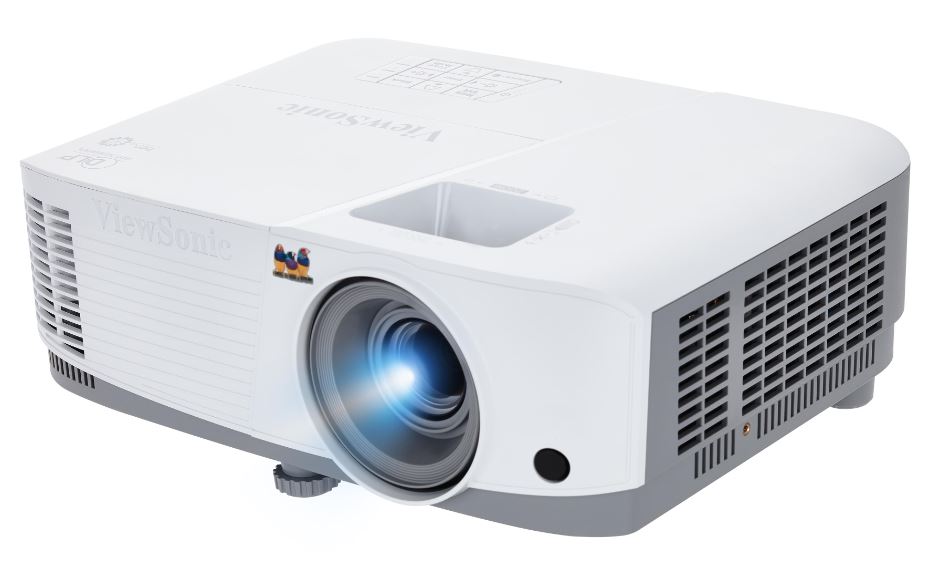
ViewSonic PA503S 3800 Lumens SVGA Projector
About ViewSonic
ViewSonic is a global company that specializes in visual display solutions, including monitors, projectors, digital signage, and interactive displays. Founded in 1987, ViewSonic has established itself as a leading provider of innovative and high-quality display products for both consumer and professional markets.
The company offers a wide range of display solutions to cater to various needs and environments. Their product lineup includes computer monitors for gaming, business, and home entertainment purposes, interactive flat panel displays for education and collaboration, projectors for classrooms and conference rooms, and digital signage solutions for advertising and information displays.
Introduction
Projector features
The projector integrates high-performance optical engine projection and a user-friendly design to deliver high reliability and ease of use.
Some of the features may not be available on your projector. Actual performance may vary and is subject to model specifications.
- The power saving function decreases the power consumption of the lamp by up to 70% when no input signal can be detected for a set period.
- Presentation timer for better control of time during presentations
- Supports 3D display
- Color Management allowing color adjustments to your liking
- Less than 0.5W power consumption when power saving mode is turned on
- Screen Color correction allowing projection on surfaces of several predefined colors
- Quick auto search speeding up the signal-detecting process
- Color modes provide choices for different projection purposes
- One-key auto-adjustment to display the best picture quality (only for analog signal)
- Digital keystone correction to correct distorted images
- Adjustable color management control for data/video display
- Ability to display 1.07 billion colors
- Multi-language On-Screen Display (OSD) menus
- Switchable normal and economic modes to reduce power consumption
- Component HDTV compatibility (YPbPr)
- HDMI CEC (Consumer Electronics Control) function allows synchronized power ON/ OFF operation between the projector and a CEC-compatible DVD player device connected to the HDMI input of the projector
The apparent brightness of the projected image will vary depending on the ambient lighting conditions, and selected input signal contrast/brightness settings, and is directly proportional to projection distance.
The lamp brightness will decline over time and may vary within the lamp manufacturer’s specifications. This is normal behavior.
Shipping contents
- Projector
- Power Cord
- Quick Start Guide
- Remote Control & Batteries
- VGA Cable
- Replacement lamp (optional) (Please contact qualified service personnel for changing the lamp)
- Soft carry case (optional)
- Dust filter (optional)
Controls and functions of the Projector
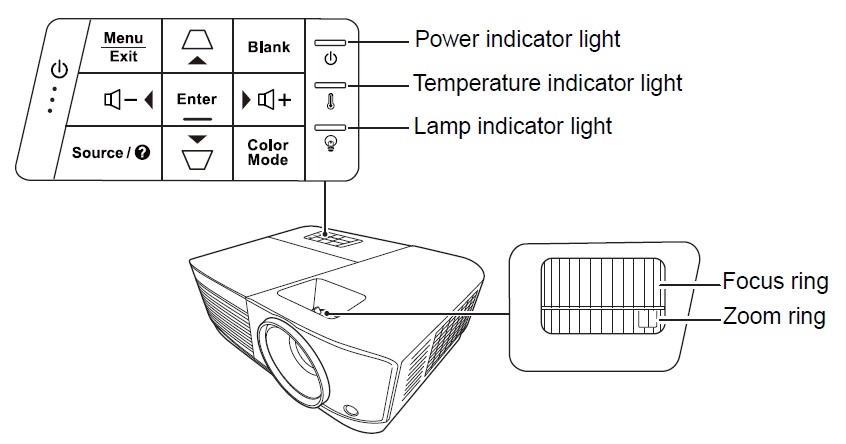
- Power
Toggles the projector between standby mode and Power ON. - Keystone keys
Manually corrects distorted images resulting from an angled projection. - Left/ Right/ Up/ Down
Select the desired menu items and make adjustments when the On-Screen Display (OSD) menu is activated. - Menu
Turns on the On-Screen Display (OSD) menu. - Exit
Goes back to the previous OSD menu, exits, and saves menu settings. - Source
Displays the source selection bar. - Help
Displays the HELP menu with a long press for 3 seconds. - Blank
Hides the screen picture. - Enter
Enacts the selected On-Screen Display (OSD) menu item when the On-Screen Display (OSD) menu is activated. - Color Mode
Selects an available picture setup mode. - Volume Up
Increases the volume level. - Volume Down
Decreases the volume level.
Remote control
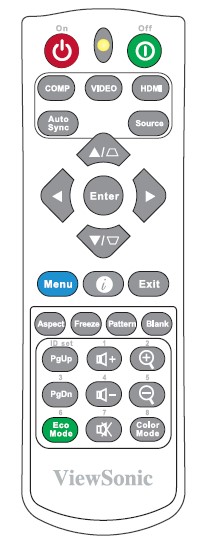
To use the remote mouse control keys (Page Up, Page Down), see “Using the remote PgUp/PgDn function” on page 7
for details.
- On/ Off
Toggles the projector between standby mode and Power ON. - COMP
Select source from Computer In port for display. - VIDEO
Select source from VIDEO or SVIDEO port for display. - HDMI
Select the source from the HDMI port for display. - Auto Sync
Automatically determines the best picture timings for the displayed image. - Source
Displays the source selection bar. - Keystone keys
Manually corrects distorted images resulting from an angled projection. - Enter
Enacts the selected On-Screen Display (OSD) menu item. - Left/ Right/ Up/ Down
Select the desired menu items and make adjustments. - Menu
Turns on the On-Screen Display (OSD) menu. - Information
Displays the INFORMATION menu. - Exit
Exits and saves menu settings. - Aspect
Displays the aspect ratio selection bar. - Freeze
Freezes the screen picture. - Pattern
Displays embedded test pattern. - Blank
Hides the screen picture. - PgUp (Page Up)/PgDn (Page Down)
Operates your display software program (on a connected PC) which responds to page up/down commands (like Microsoft PowerPoint). Only available when a PC input signal is selected. - Eco Mode
Displays the lamp mode selection bar. - Volume Up
Increases the volume level. - Volume Down
Decreases the volume level. - Mute
Toggles the projector audio between on and off. - Zoom In
Magnifies the projected picture size. - Zoom Out
Reduces the projected picture size. - Color Mode
Displays the color mode selection bar.
Remote control code
The projector can be assigned to 8 different remote control codes, 1 to 8. When several adjacent projectors are in operation at the same time, switching the remote control codes can prevent interference from other remote controls. Set the remote control code for the projector first before changing that for the remote control.
To switch the code for the projector, select between 1 to 8 in the SYSTEM > Remote Control Code menu.
To switch the code for the remote control, press the ID set, and the number button corresponding to the remote control code set in the projector OSD together for 5 seconds or more. The initial code is set to 1. When the code is switched to 8, the remote control can control every projector.
If different codes are set on the projector and remote control, there will be no response from the remote control. When that happens, a message will display to remind you to switch the code for the remote control.

Using the remote PgUp/PgDn function
The capability of operating your computer with a remote control gives you more flexibility when delivering presentations.
- Set the input signal to a PC signal.
- Connect the projector to your PC or notebook with a USB cable before using the remote control in place of your computer’s mouse. See “Connecting a computer or monitor” on page 14 for details.
- To operate your display software program (on a connected PC) which responds to page up/down commands (like Microsoft PowerPoint), press PgUp/PgDn.
Remote control effective range
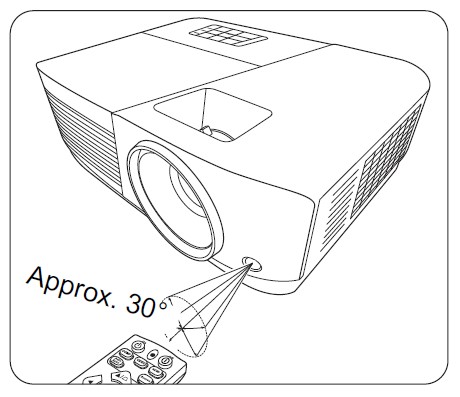
Refer to the illustration about the location of the infra– Red (IR) remote control sensor(s). The remote control must be held at an angle within 30 degrees perpendicular to the projector’s IR remote control sensor(s) to function correctly.
The distance between the remote control and the sensor(s) should not exceed 8 meters (~ 26 feet).
Make sure that there are no obstacles between the remote control and the IR sensor(s) on the projector that might obstruct the infrared beam.
Replacing the remote control batteries
- To open the battery cover, turn the remote control over to view its back, press the finger grip on the cover, and slide it down in the direction of the arrow as illustrated.
- Remove any existing batteries (if necessary) and install two AAA batteries observing the battery polarities as indicated in the base of the battery compartment. Positive (+) goes to positive and negative (-) goes to negative.
- Refit the cover by aligning it with the base and pushing it back down into position. Stop when it clicks into place.

WARNING
- Avoid leaving the remote control and batteries in an excessive heat or humid environment like the kitchen, bathroom, sauna, sunroom, or in a closed car.
- Replace only with the same or equivalent type recommended by the battery manufacturer.
- Dispose of the used batteries according to the manufacturer’s instructions and local environmental regulations for your region.
- Never throw the batteries into a fire. There may be a danger of an explosion.
- If the batteries are drained or if you will not be using the remote control for an extended period, remove the batteries to avoid damage to the remote control from possible battery leakage.
Connection
When connecting a signal source to the projector, be sure to:
- Turn all equipment off before making any connections.
- Use the correct signal cables for each source.
- Ensure the cables are firmly inserted.
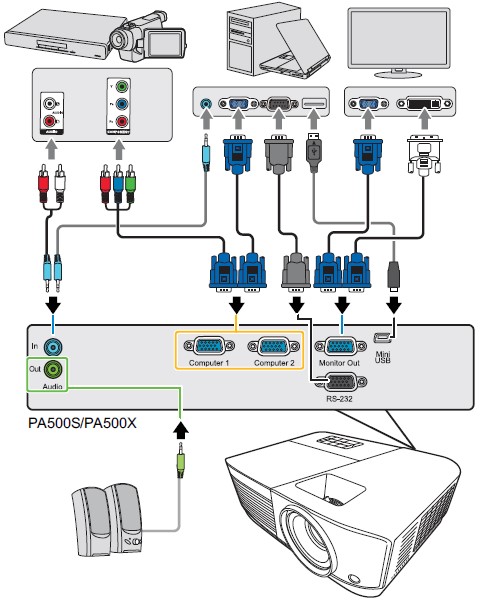
In the connections shown below, some cables may not be included with the projector (see “Shipping contents” on page 4). They are commercially available from electronics stores.
The connection illustrations below are for reference only. The connecting jacks available on the projector vary with each projector model.
For detailed connection methods, see pages 14-17.
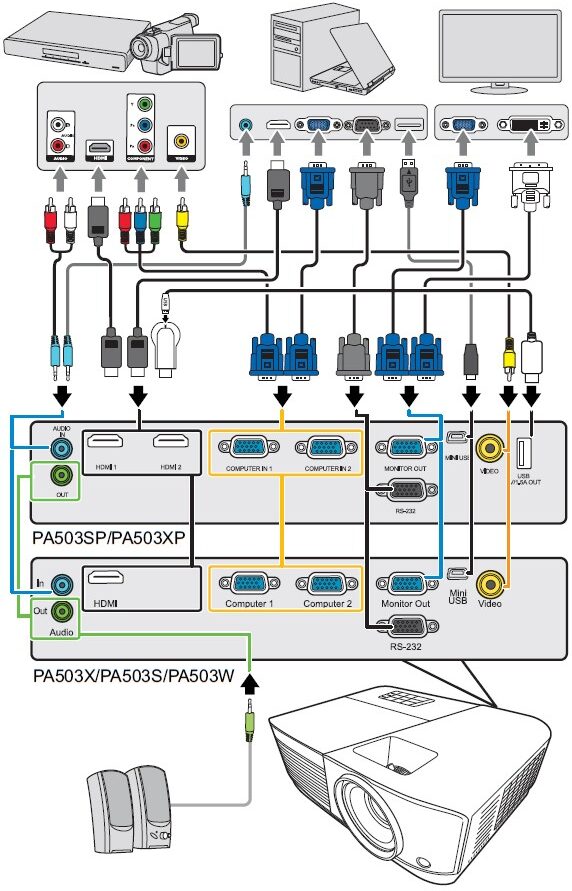
*USB Type A connector supports 5V/1.5A power output for HDMI dongle charging.
Connecting a computer or monitor
Connecting a computer
- Take the supplied VGA cable and connect one end to the D-Sub output socket of the computer.
- Connect the other end of the VGA cable to the Computer 1 or Computer 2 signal input socket on the projector.
- If you wish to use the remote mouse control function, take a USB cable and connect the larger end to the USB port of the computer, and the smaller end to the Mini USB socket on the projector. See “Using the remote PgUp/PgDn function” on page 7 for details.
Many notebooks do not turn on their external video ports when connected to a projector. Usually a key combo like FN + F3 or CRT/LCD key turns the external display on/off. Locate a function key labeled CRT/LCD or a function key with a monitor symbol on the notebook. Press FN and the labeled function key simultaneously. Refer to your notebook’s documentation to find your notebook’s key combination.
Connecting a monitor
If you want to view your presentation close-up on a monitor as well as on the screen, you can connect the Monitor Out signal output socket on the projector to an external monitor with a VGA cable following the instructions below:
- Connect the projector to a computer as described in “Connecting a computer” on page 14.
- Take a suitable VGA cable (only one supplied) and connect one end of the cable to the D-Sub input socket of the video monitor. Or if your monitor is equipped with a DVI input socket, take a VGA to DVI-A cable and connect the DVI end of the cable to the DVI input socket of the video monitor.
- Connect the other end of the cable to the Monitor Out socket on the projector.
The Monitor Out output only works when a Computer 1 connection is made to the projector. To use this connection method in the standby mode, turn on the Active VGA Out function under the POWER MANAGEMENT > Standby Settings menu.
Connecting Video source devices
You can connect your projector to various Video source devices that provide any one of the following output sockets:
- HDMI
- Component Video
- Video (composite)
You need only connect the projector to a Video source device using just one of the above connecting methods, however, each provides a different level of video quality. The method you choose will most likely depend upon the availability of matching terminals on both the projector and the Video source device as described below:
Best video quality
The best available video connection method is HDMI. If your source device is equipped with an HDMI socket, you can enjoy uncompressed digital video quality. See “Connecting an HDMI device” on page 16 for how to connect the projector to an HDMI source device and other details.
If no HDMI source is available, the next best video signal is Component video (not to be confused with composite video). Digital TV tuners and DVD players output Component video natively, so if available on your devices, this should be your connection method of choice in preference to (composite) video.
See “Connecting a Component Video source device” on page 16 for how to connect the projector to a component video device.
Least video quality
Composite Video is an analog video and will result in a perfectly acceptable, but less than optimal result from your projector, being the least video quality of the available methods described here.
See “Connecting a composite Video source device” on page 16 for how to connect the projector to a composite Video device.
Connecting audio
You can make use of the projector speaker in your presentations, and also connect separate amplified speakers to the Audio Out socket of the projector. The audio output is controlled by the projector Volume and Mute settings.
Connecting an HDMI device
You should use an HDMI cable when making the connection between the projector and HDMI devices.
- Take an HDMI cable and connect one end to the HDMI output port of the video device.
- Connect the other end of the cable to the HDMI input port on the projector.
In the unlikely event that you connect the projector to a DVD player via the projector’s HDMI input and the projected picture displays the wrong colors, please change the color space to YUV. See “Changing HDMI input settings” on page 22 for details.
Connecting a Component Video source device
Examine your Video source device to determine if it has a set of unused Component Video output sockets available:
- If so, you can continue with this procedure.
- If not, you will need to reassess which method you can use to connect to the device.
- Take a VGA (D-Sub)-Component adaptor cable and connect the end with 3 RCA-type connectors to the Component Video output sockets of the Video source device. Match the color of the plugs to the color of the sockets; green to green, blue to blue, and red to red.
- Connect the other end of the VGA (D-Sub)-Component adaptor cable (with a D-Sub type connector) to the Computer 1 or Computer 2 socket on the projector.
If the selected video image is not displayed after the projector is turned on and the correct video source has been selected, check that the Video source device is turned on and operating correctly. Also, check that the signal cables have been connected correctly.
Connecting a composite Video source device
Examine your Video source device to determine if it has a set of unused composite Video output sockets available:
- If so, you can continue with this procedure.
- If not, you will need to reassess which method you can use to connect to the device.
- Take a Video cable and connect one end to the composite Video output socket of the Video source device.
- Connect the other end of the Video cable to the Video socket on the projector.
If the selected video image is not displayed after the projector is turned on and the correct video source has been selected, check that the Video source device is turned on and operating correctly. Also, check that the signal cables have been connected correctly.
You need only connect to this device using a composite Video connection if Component Video input is unavailable for use. See “Connecting Video source devices” on page 15 for details.
Playing sound through the projector
You can make use of the projector speaker in your presentations, and also connect separate amplified speakers to the Audio Out socket of the projector.
Maintenance
Care of the projector
You need to keep the lens and/or filter (optional accessory) clean regularly.
Never remove any parts of the projector. Contact your dealer when any part of the projector needs replacing.
Cleaning the lens
Clean the lens whenever you notice dirt or dust on the surface.
- Use a canister of compressed air to remove dust.
- If there is dirt or smears, use lens-cleaning paper or moisten a soft cloth with lens cleaner and gently wipe the lens surface.
- CAUTION
Never rub the lens with abrasive materials.
Cleaning the projector case
Before you clean the case, turn the projector off using the proper shutdown procedure as described in “Shutting down the projector” on page 33 and unplug the power cord.
- To remove dirt or dust, wipe the case with a soft, lint-free cloth.
- To remove stubborn dirt or stains, moisten a soft cloth with water and a neutral pH detergent. Then wipe the case.
- CAUTION
Never use wax, alcohol, benzene, thinner, or other chemical detergents. These can damage the case.
Storing the projector
If you need to store the projector for an extended time, please follow the instructions below:
- Make sure the temperature and humidity of the storage area are within the recommended range for the projector. Please refer to “Specifications” on page 50 or consult your dealer about the range.
- Retract the adjuster’s foot.
- Remove the battery from the remote control.
- Pack the projector in its original packing or equivalent.
Transporting the projector
It is recommended that you ship the projector with its original packing or equivalent.
Using the dust filter (optional accessory)
CAUTION
- It is recommended to clean the dust filter every 100 hours after the dust filter is installed.
- Be sure to turn off the projector and unplug it from the power source before installing or detaching the filter.
- If your projector is ceiling-mounted or is not easily accessible, pay special attention to your safety when replacing the dust filter.
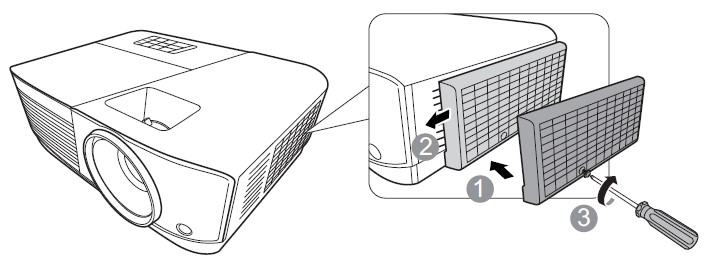
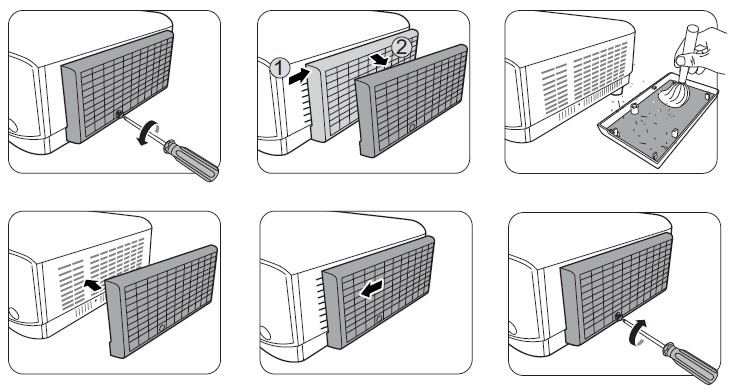
Installing the dust filter
- Be sure to turn off the projector and unplug it from the power source.
- As the arrows are shown to the right, fit the filter by aligning and inserting it into the projector slots.
- Tighten the screw that secures the dust filter.
For first-time installation:
- Open the OSD menu and go to the ADVANCED > Filter Settings menu.
- Press Enter and the Filter Settings page is displayed.
- Highlight Filter Mode and press / to select On. The filter timer starts counting.
Set Filter Mode to On only when using the projector after the dust filer (optional accessory) is properly attached. Failing to do so will result in a shorter lamp life.
Obtaining the filter hour information
- Open the OSD menu and go to the ADVANCED > Filter Settings menu.
- Press Enter. The Filter Settings page is displayed.
- You will see the Filter Hours information on the menu.
Cleaning the dust filter
- Be sure to turn off the projector and unplug it from the power source.
- Loosen the screw that secures the dust filter.
- Use a small vacuum cleaner or a soft brush to sweep the dust on the filter away.
- Re-install the dust filter.
Resetting the filter timer
- Open the OSD menu and go to the ADVANCED > Filter Settings menu.
- Press Enter and the Filter Settings page is displayed.
- Highlight Reset Filter Hours and press Enter. A warning message is displayed asking if you want to reset the filter timer.
- Highlight Reset and press Enter.
CAUTION
Remember to set Filter Mode to Off in the ADVANCED > Filter Settings menu when using the projector with the dust filter removed. Setting Filter Mode to Off does not reset the filter timer. The timer will continue counting the next time you fit the filter back on and set Filter Mode to On.
Lamp information
Getting to know the lamp hour
When the projector is in operation, the duration (in hours) of lamp usage is automatically calculated by the built-in timer.
- To obtain the lamp hour information:
- Open the OSD menu and go to the ADVANCED > Lamp Settings menu.
- Press Enter and the Lamp Settings page is displayed.
- You will see the Lamp Hours information on the menu.
- To leave the menu, press Exit.
Extending lamp life
The projection lamp is a consumable item. To keep the lamp live as long as possible, you can do the following settings via the OSD menu.
Setting Lamp Mode
Setting the projector in Eco/Dynamic Eco/SuperEco mode reduces system noise, and power consumption and extends the lamp operation life.

It is not recommended that you use SuperEco mode for a long time.
To set the lamp mode, go to the ADVANCED > Lamp Settings > Lamp Mode menu and press / to select. Or you can press Eco Mode on the remote control to select.
Setting Auto Power Off
This function allows the projector to turn off automatically after a set period once no input source is detected to prevent unnecessary waste of lamp life.
- Open the OSD menu and go to the POWER MANAGEMENT > Smart Energy menu.
- Press Enter and the Smart Energy page is displayed.
- Highlight Auto Power Off and press.
- If the preset time lengths are not suitable for your needs, select Disable. The projector will not automatically shut down in a certain period.
Setting Sleep Timer
This function allows the projector to turn off automatically after a set period to prevent unnecessary waste of lamp life.
- Open the OSD menu and go to the POWER MANAGEMENT > Smart Energy menu.
- Press Enter and the Smart Energy page is displayed.
- Highlight the Sleep Timer and press.
- If the preset time lengths are not suitable for your presentation, select Disable. The projector will not automatically shut down in a certain period.
Setting Power Saving
The projector lowers the power consumption if no input source is detected after 5 minutes to prevent unnecessary waste of lamp life. You can further decide if you would like the projector to turn off automatically after a set period.
- Open the OSD menu and go to the POWER MANAGEMENT > Smart Energy menu.
- Press Enter and the Smart Energy page is displayed.
- Highlight Power Saving and press.
- When Enable is selected, the projector lamp will be changed to Eco mode after no signal is detected for 5 minutes.
The lamp power will be changed to SuperEco mode after no signal is detected for 20 minutes.

Timing of replacing the lamp
Please install a new lamp or consult your dealer when the Lamp indicator light lights up. An old lamp may cause a malfunction in the projector and in some instances, the lamp may explode.
CAUTION
The Lamp indicator light and Temperature indicator light will light up if the lamp becomes too hot. Turn the power off and let the projector cool for 45 minutes. If the Lamp indicator light or Temperature indicator light still lights up after turning the power back on, please contact your dealer. See “Indicators” on page 48 for details.
Replacing the lamp
Turn the power off and disconnect the projector from the power outlet. Please contact qualified service personnel to change the lamp.
Indicators
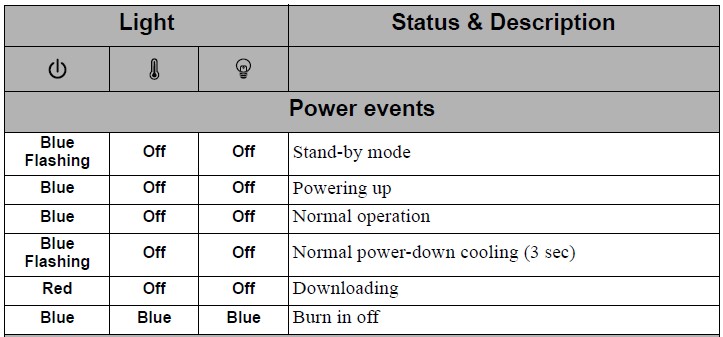
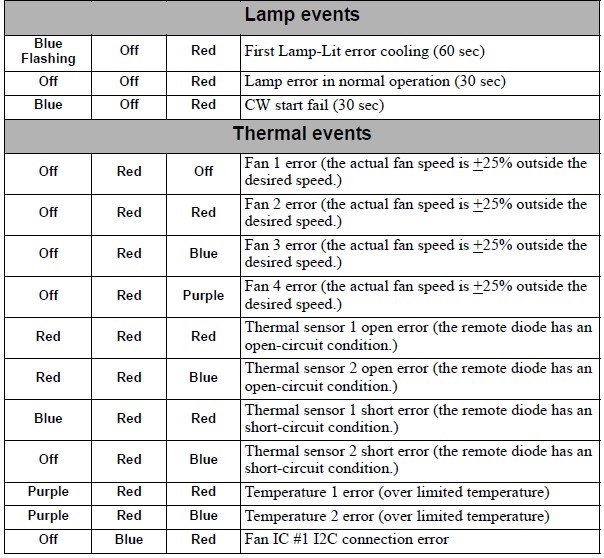
Troubleshooting
The projector does not turn on.

No picture

Blurred image

The remote control does not work

Specifications
Dimensions
294 mm (W) x 110 mm (H) x 218 mm (D) (Excluding extrusions)

Ceiling mount installation
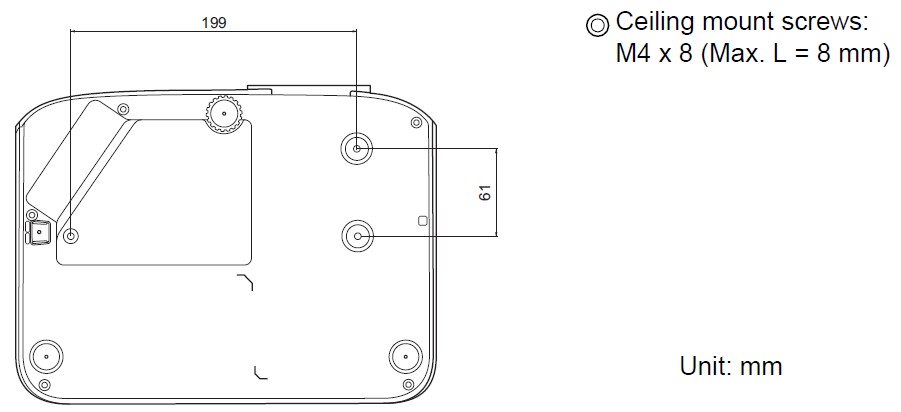
FAQS About ViewSonic PA503S 3800 Lumens SVGA Projector
How much does the ViewSonic PA503W cost in Pakistan?
ViewSonic PA503W Price-Performance Projector, 3,600 Lumens, Rs. 159900.00 in Pakistan
What are the Viewsonic projector’s specifications?
Featuring a brightness of 3800 ANSI Lumens and a contrast ratio of 22,000:1
How long is the lifespan of a ViewSonic projector?
20,000 hours
What is the ViewSonic projector’s refresh rate?
Refresh rate of 240Hz
How is a ViewSonic projector cleaned?
To eliminate dust, use a compressed air canister.
A projector can it operate all day?
As long as there is adequate ventilation to keep the projector cool.
ViewSonic projector is produced by who?
With its corporate headquarters in Brea, California, the United States, and a research and development facility in New Taipei City, Taiwan, ViewSonic Corporation is a Taiwanese-American privately held global electronics firm.
How should my ViewSonic projector screen be adjusted?
The size of the projected picture will change depending on how near the projector is to the screen and how far it is from the screen.
How long can a projector operate nonstop?
1,000 to 5,000 hours.
Why does my ViewSonic projector always shut off by itself?
If the projector overheats, verify if the unit has adequate ventilation so that air can flow around it.
How do I keep the dust off of my projector?
The projector can be protected with a dust cover, but you can also use a soft, clean cloth or a plastic bag.
For more manuals by ViewSonic, Visit Manualsdock
[embeddoc url=”https://manualsdock.com/wp-content/uploads/2023/09/ViewSonic-PA503S-3800-Lumens-SVGA-Projector-User-Guide.pdf” download=”all”]

