StarTech PEXUSB312EIC USB PCIE Card
About StarTech.com
StarTech.com is a leading manufacturer of connectivity and technology products, specializing in solutions for computer connectivity, IT infrastructure, and audio-video applications. The company offers a wide range of products, including cables, adapters, docking stations, KVM switches, network devices, and other accessories.
StarTech.com focuses on providing high-quality, reliable products that meet the needs of both consumers and businesses. They strive to offer solutions that enable seamless connections and enhance productivity in various environments, such as offices, data centers, and home setups.
The company has a diverse product lineup that supports various technologies and standards, including USB, Thunderbolt, HDMI, DisplayPort, Ethernet, and more. Their products are compatible with multiple operating systems, including Windows, macOS, Linux, and Android, ensuring broad compatibility across different devices and platforms.
In addition to its wide product range, StarTech.com is known for its customer support and technical assistance. They provide comprehensive documentation, user guides, and drivers for their products, as well as personalized support through their customer service channels.
StarTech.com has established a reputation for delivering reliable connectivity solutions and has become a trusted brand for professionals and consumers seeking high-quality connectivity products.
Product diagram
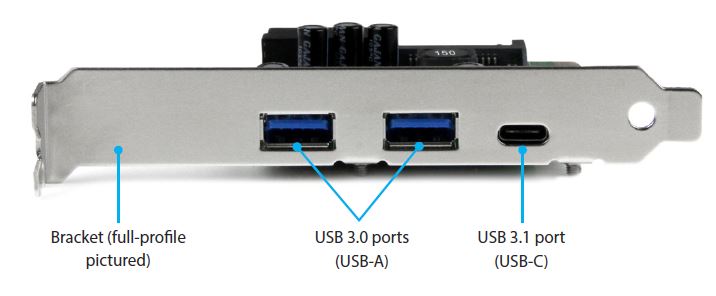
Front view

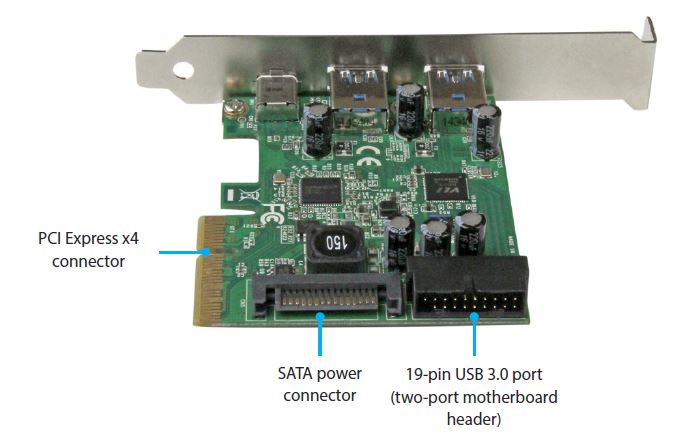
Rear view
Introduction
This 5-port USB 3.1 combo card lets you add a variety of types and generations (speeds) of USB ports to your computer through a PCI Express slot. It offers:
- One external USB-C™ port (USB 3.1 Gen 2 – 10Gbps)
- Two external USB-A ports (USB 3.1 Gen 1 – 5Gbps)
- Two internal USB-A motherboard header ports (USB 3.1 Gen 1 – 5Gbps)
By offering both USB Type-A and USB Type-C™ ports, as well as USB motherboard-style headers, you can easily connect a range of modern and legacy USB devices both inside and outside your computer. It’s a perfect solution for upgrading your desktop or server to support a variety of USB 3.0 and USB 3.1 devices.
The card allocates USB 3.1 Gen 2 (10Gbps) bandwidth to the USB-C port, while USB 3.0 (5Gbps) bandwidth is shared equally between the card’s remaining ports (two USB-A ports, and two motherboard-style headers).
Packaging contents
- 1 x 5-port USB 3.1 combo card
- 1 x low-profile bracket
- 1 x quick-start guide
Requirements
- A computer enabled with PCI Express, and an available PCI Express x4, x8, or x16 slot
- An available 15-pin SATA power connector (optional, but recommended)
- Any of the following operating systems:
- Windows® 10 (32-bit or 64-bit)
- Windows 8.1 (32-bit or 64-bit)
- Windows 8 (32-bit or 64-bit)
- Windows 7 (32-bit or 64-bit)
- Windows Server® 2012
- Windows Server 2008 R2
- Mac OS 10.8 and later (tested up to 10.10)
- Linux® 3.5
- Optional: An available 19-pin USB 3.0 2-port header on your computer’s motherboard or case
- Optional: An available 19-pin USB 3.0 2-port header cable
System requirements are subject to change. For the latest requirements, please visit www.startech.com/PEXUSB312EIC.
About USB 3.0, USB 3.1 Gen 1, and USB 3.1 Gen 2
USB 3.0 is also known as USB 3.1 Gen 1. This connectivity standard offers speeds up to 5Gbps. Any mention of USB 3.0 in this manual or on the StarTech.com website for PEXUSB312EIC refers to the 5Gbps USB 3.1 Gen 1 standard. Any mention of USB 3.1 Gen 2 refers to the 10Gbps Gen 2 standard.
The PEXUSB312EIC has both USB 3.1 Gen 1 (5Gbps) and USB 3.1 Gen 2 (10Gbps) ports.
About the card’s USB-C port
Not all USB-C ports support the full functionality of the USB Type-C standard. Some ports might only provide data transfer, and might not support video (DP alt mode), or USB power delivery 2.0. The card’s USB-C port is USB 3.1 Gen 2 (10Gbps). This port supports data throughput only. It does not support DP alt mode or USB power delivery.
Hardware installation
Install the low-profile bracket
The card can be installed in a low-profile or a full-profile computer. The full-profile bracket comes preinstalled on the card, but if you have a small form-factor computer you can install the low-profile bracket instead.
- Use a Phillips head screwdriver to remove the two bracket screws from the card.
- Remove the full-profile bracket from the adapter.
- Line up the low-profile bracket with the bracket holes on the back of the card.
- Insert the two bracket screws you removed in Step 1 and tighten them in place.
Install the PCIe card
Warning! PCIe cards can be severely damaged by static electricity. If an anti-static strap isn’t available, discharge any built-up static electricity by touching a large grounded metal surface for several seconds.
- Turn off your computer and any devices or peripherals that are connected to it (for example, printers, external storage, and so on).
- Unplug the power cable from the back of your computer.
- Disconnect any peripheral devices that are connected to your computer.
- Remove the cover from your computer case. Consult the documentation that came with your computer for details about how to do this safely.
- Locate an open PCIe slot and remove the corresponding metal cover plate from the back of your computer case. Consult the documentation that came with your computer for details about how to do this safely. This card works in PCIe slots of x4, x8, or x16 lanes.
- Gently insert the card into the open PCIe slot and fasten the bracket to the back of the case.
Note: If you install the card into a low-profile (small form-factor) desktop system, it may be necessary to replace the preinstalled full-profile bracket with the included low-profile (half-height) installation bracket. - Optional: Connect a 15-pin SATA power connector from your computer’s power supply to the card’s SATA power connector.
Note: It’s highly recommended that you connect SATA power to ensure sufficient power is provided to the card as well as to each USB port. - Optional: Connect a 19-pin USB 3.0 motherboard header cable to the
card’s motherboard header, and to USB 3.0 header on your computer’s case or motherboard. - Place the cover back onto your computer case.
- Reconnect the power cable to the back of your computer.
- Reconnect all of the peripheral devices that you disconnected in step 3.
- Turn on your computer.
Driver installation
Install the driver
Depending on your operating system, once the card is installed in your host computer the required drivers might automatically install. If drivers do not automatically install once the card is inserted into your computer’s PCI Express slot, follow the instructions below to manually install the driver.
- If the Found New Hardware dialog box appears on your screen, close the dialog box or click Cancel.
- To download the latest drivers, open a web browser and navigate to www.startech.com/PEXUSB312EIC.
- Click the Support tab.
- Download the driver.
- When the download is complete, extract the contents of the compressed file that you downloaded.
- Double-click the appropriate driver for the version of the operating system that you’re running and follow the on-screen instructions to complete the installation.
- If prompted, restart your computer to complete the installation.
Technical support
StarTech.com’s lifetime technical support is an integral part of our commitment to providing industry-leading solutions. If you ever need help with your product, visit www.startech.com/support and access our comprehensive selection of online tools, documentation, and downloads. For the latest drivers/software, please visit www.startech.com/downloads
Warranty information
This product is backed by a two-year warranty. StarTech.com warrants its products against defects in materials and workmanship for the periods noted, following the initial date of purchase. During this period, the products may be returned for repair, or replacement with equivalent products at our discretion. The warranty covers parts and labor costs only. StarTech.com does not warrant its products from defects or damages arising from misuse, abuse, alteration, or normal wear and tear.
Limitation of Liability
In no event shall the liability of StarTech.com Ltd. and StarTech.com USA LLP (or their officers, directors, employees, or agents) for any damages (whether direct or indirect, special, punitive, incidental, consequential, or otherwise), loss of profits, loss of business, or any pecuniary loss, arising out of or related to the use of the product exceed the actual price paid for the product. Some states do not allow the exclusion or limitation of incidental or consequential damages. If such laws apply, the limitations or exclusions contained in this statement may not apply to you.
FCC Compliance Statement
This equipment has been tested and found to comply with the limits for a Class B digital device, pursuant to part 15 of the FCC Rules. These limits are designed to provide reasonable protection against harmful interference in a residential installation. This equipment generates, uses, and can radiate radio frequency energy and, if not installed and used in accordance with the instructions, may cause harmful interference to radio communications.
However, there is no guarantee that interference will not occur in a particular installation. If this equipment does cause harmful interference to radio or television reception, which can be determined by turning the equipment off and on, the user is encouraged to try to correct the interference by one or more of the following measures:
- Reorient or relocate the receiving antenna.
- Increase the separation between the equipment and the receiver.
- Connect the equipment to an outlet on a circuit different from that to which the receiver is connected.
- Consult the dealer or an experienced radio/TV technician for help
This device complies with part 15 of the FCC Rules. Operation is subject to the following two conditions: (1) This device may not cause harmful interference, and (2) this device must accept any interference received, including interference that may cause undesired operation. Changes or modifications not expressly approved by StarTech.com could void the user’s authority to operate the equipment.
FAQs About StarTech PEXUSB312EIC USB PCIE Card
Q: What is the StarTech.com PEXUSB312EIC USB 3.1 PCIe Card?
A: The StarTech.com PEXUSB312EIC is a PCIe expansion card that adds USB 3.1 Gen 2 ports to a desktop computer. It provides two USB Type-A ports and one USB Type-C port, allowing you to connect USB devices with high-speed data transfer rates.
Q: Are there any specific driver requirements for the StarTech.com PEXUSB312EIC USB 3.1 PCIe Card?
A: The StarTech.com PEXUSB312EIC USB 3.1 PCIe Card generally uses the standard USB drivers provided by the operating system. However, it’s recommended to visit the StarTech.com website and download the latest drivers specifically designed for the card to ensure optimal performance and compatibility.
Q: Can I use the StarTech.com PEXUSB312EIC USB 3.1 PCIe Card in a laptop?
A: No, the StarTech.com PEXUSB312EIC USB 3.1 PCIe Card is designed specifically for desktop computers and cannot be used in laptops or other portable devices. It requires an available PCIe slot, which is typically only available in desktop computer configurations.
Q: What are the maximum data transfer rates supported by the StarTech.com PEXUSB312EIC USB 3.1 PCIe Card?
A: The StarTech.com PEXUSB312EIC USB 3.1 PCIe Card supports USB 3.1 Gen 2, which offers data transfer rates of up to 10 Gbps (gigabits per second) when used with compatible USB devices. This allows for fast and efficient file transfers and data synchronization.
Q: Can I use the USB ports on the StarTech.com PEXUSB312EIC USB 3.1 PCIe Card for charging devices?
A: The StarTech.com PEXUSB312EIC USB 3.1 PCIe Card is primarily designed for data transfer purposes rather than dedicated charging. While the USB ports on the card may provide some charging capability, it is not optimized for charging devices. For efficient device charging, it’s recommended to use a dedicated USB charging port or a charging hub.
Q: Where can I find additional support or documentation for the StarTech.com PEXUSB312EIC USB 3.1 PCIe Card?
A: For additional support, documentation, and drivers for the StarTech.com PEXUSB312EIC USB 3.1 PCIe Card, you can visit the StarTech.com website. They provide product-specific support, user guides, FAQs, and driver downloads. You can also contact their customer support team for further assistance.
Q: Does the StarTech.com PEXUSB312EIC USB 3.1 PCIe Card require any additional configuration or setup?
A: In most cases, the StarTech.com PEXUSB312EIC USB 3.1 PCIe Card should work plug-and-play after installation. The operating system should automatically recognize the card and install the necessary drivers. However, it’s always a good practice to check for driver updates and ensure that your system is up to date for the best compatibility and performance.
For manuals by Startech.com, visit Manualsdock
[embeddoc url=”https://manualsdock.com/wp-content/uploads/2023/05/StarTech.com-PEXUSB312EIC-USB-3.1-PCIE-Card-Installation-Guide.pdf” download=”all”]


