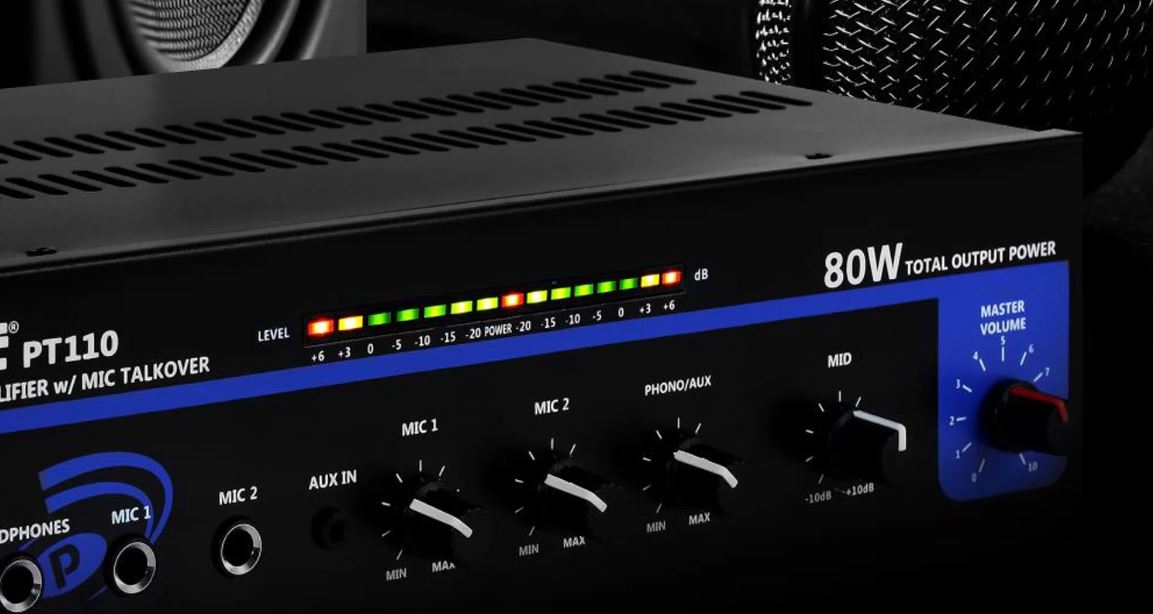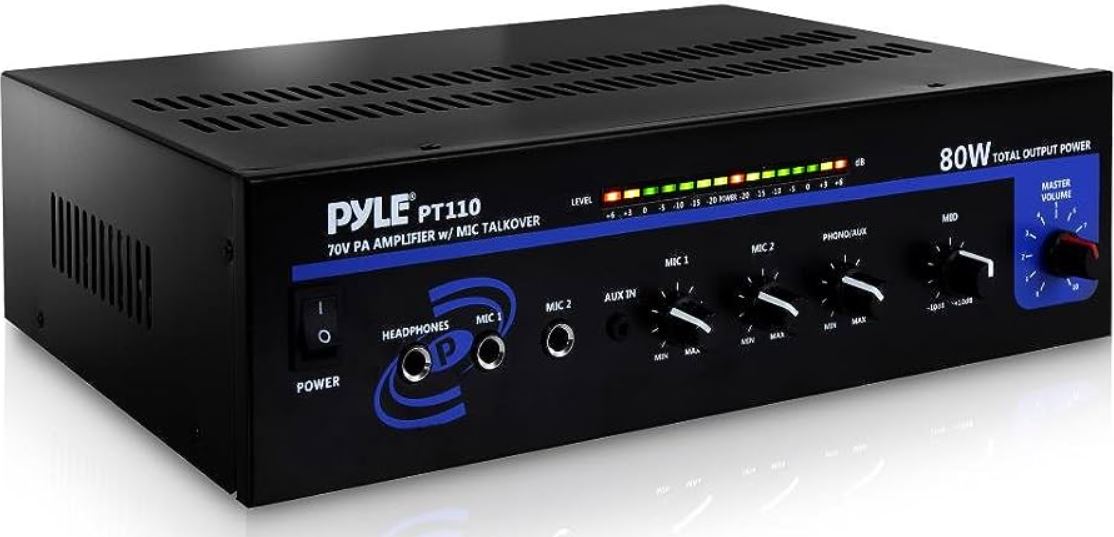
Pyle PT110 Public Address Mono Amplifier
About Pyle
Pyle is a well-known consumer electronics company that specializes in manufacturing a wide range of audio equipment and accessories. The company was founded in 1960 and is based in Brooklyn, New York. Pyle Audio has built a reputation for producing affordable and quality audio products, catering to various consumer needs.
INTRODUCTION
Your New PYLE PT110/PT210 PA AMPLIFIER gives you the power and versatility you need in a professional sound system. The amplifier’s wide frequency response makes it suitable for amplifying music or vocal program material. It can be used for live bands, office paging systems, public announcements, or a variety of other installations. Please read this manual thoroughly before you attempt to set up and use the amplifier. It contains a range of installation suggestions as well as instructions to ensure safe usage. Installed properly, you can expect years of trouble-free service from this product.
FEATURES AND CONTROLS
FRONT PANEL – PT110/PT210
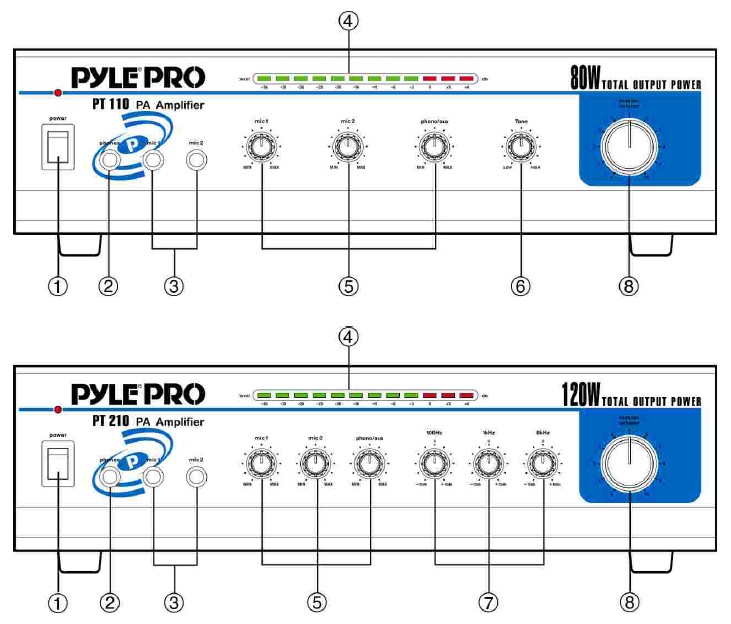
- Power On/Off
- Phone Jack: Connect a pair of stereo headphones for private listening or cueing (monitoring) sound before ‘airing’ it.
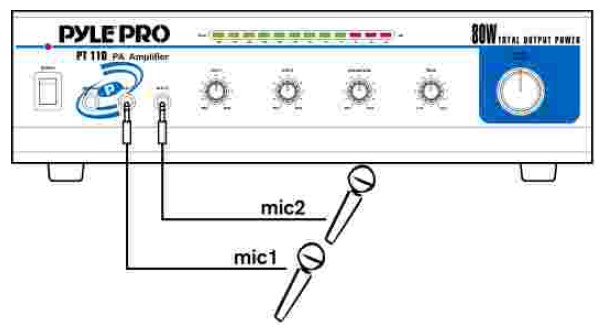
- MIC 1 & MIC 2 Jack: Allows you to connect up to two 6.35mm type microphones.
- LED Level Display Meter
- Three Input Sources Mixing Controls: Controls the sound level for each of the audio input sources.
PHONO/AUX: Select and connect an alternative high-level (AUX/CD) or low-level (PHONO) audio sound source. - Tone Control (PT110): This lets you adjust the sound frequency to the acoustics of a particular performance environment.
- 100 Hz, 1 kHz, & 8 kHz Equalizer Controls (PT210): To enhance the sound or tailor the high, midrange, and low frequencies for each audio source input to the acoustics of a particular performance environment, you can adjust these equalizer tone controls.
- Master Volume: Let you adjust the overall sound level.
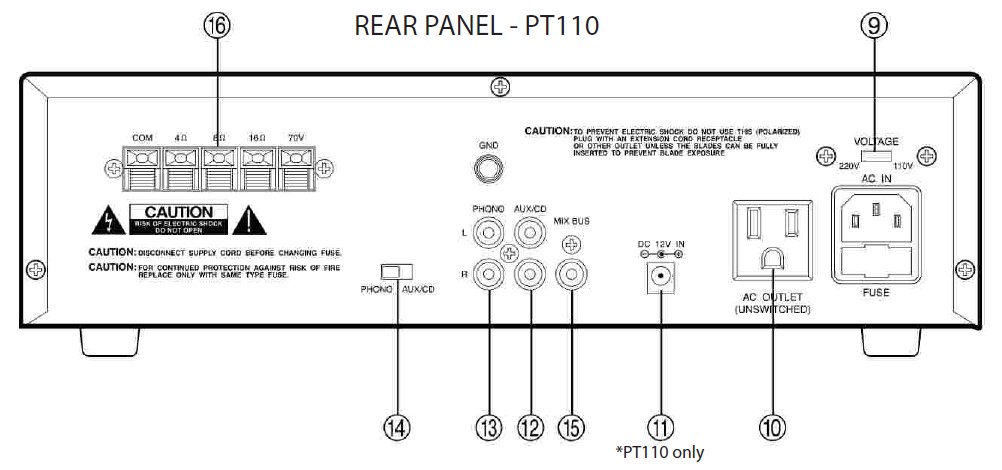
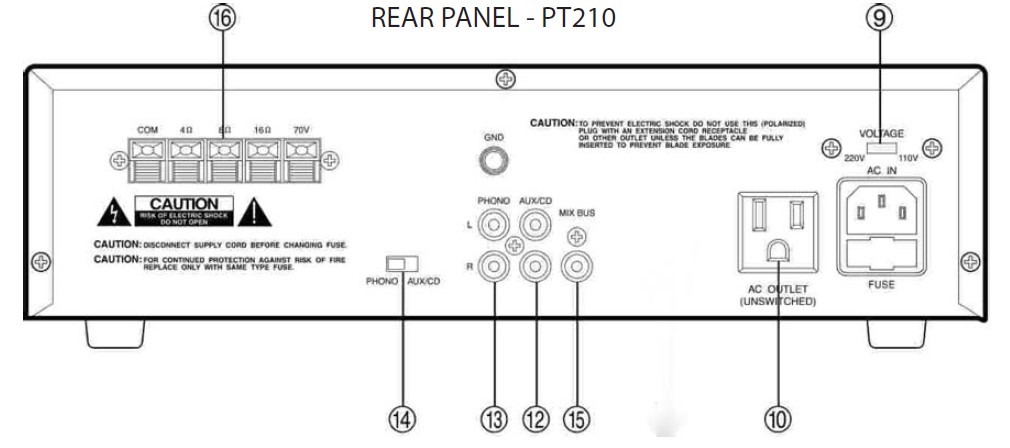
- Voltage Switch: The amplifier has a selectable input voltage from 110V/60Hz which is the standard in USA and CANADA. You can also switch the input voltage to 220V/50Hz for EUROPEAN operation. Please make sure the switch is in the proper position before operating, otherwise, severe damage will result in not being covered by the warranty. Please also replace the fuse with the proper rating in this situation (see the SPECIFICATIONS for the fuse rating).
- Unswitched AC Accessory Outlet – 300W MAX.
- DC 4A/12V Input Jack * On model PT110 ONLY: Allows you to power the amplifier from a 12-volt battery source.
- AUX / CD Input Jack: Allows you to connect any high-level sound source, such as a CD player, tape deck, or tuner, to the CD/AUX jack.
- PHONO Input Jack: You can connect a low-level audio input source, such as a magnetic cartridge turntable to the L PHONO and R PHONO jacks.
- PHONO and AUX/CD Input Selector: This lets you select the input source you want to connect to the amplifier.
- MIX BUS Jack: Allows you to connect another PT110/PT210 to this jack to double the size of your PA system.
- Push-Terminal Connectors: Let you easily connect speaker wires directly to the amplifiers.
INSTALLATION GUIDELINES
Connecting the GND (GROUND) screw terminal
If you connect a low-level audio input source (turntable) to the PHONO, please connect your turntable’s ground wire (usually black or green) to the amplifier’s GND terminal, to avoid a low-frequency hum. You can also use this screw to ground any other system connection.
Input connections
The PT110/PT210 accept a broad range of input sources, including Microphones (up to two simultaneously) Compact Disc (CD) player Cassette, Reel-to-Reel, or another tape player Radio Tuner Magnetic Cartridge Turntable
Connecting microphones
The MIC 1 and MIC 2 jacks permit you to connect two microphones with a 6.35mm plug.
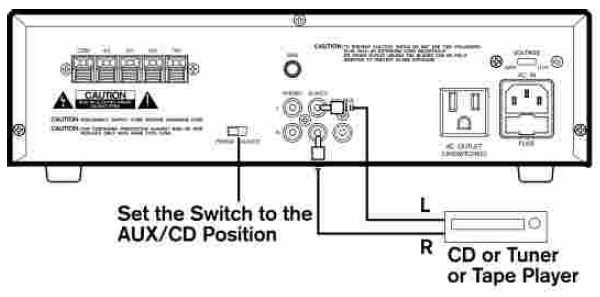
Connecting a CD tape player, or tuner
In this situation, set the PHONO and AUX/CD SELECTOR switch to the AUX/CD
Connecting a turntable
In this situation, set the PHONO and AUX/CD SELECTOR switch to the PHONO.

Speaker connections
One or more speakers (4, 8, or 16-Ohm) speakers can be connected to the amplifier with or without transformers. However, before you connect any speaker to the amplifier, the total speaker impedance must be calculated to avoid damage to the amplifier. A total speaker impedance greater than 16 Ohms or less than 4 Ohms can cause this damage to occur.
To begin with, to ensure equal volume from each speaker, all connected speakers should have the same impedance.
A proper total impedance with the 4 to 16 Ohms range can be achieved by combining series and parallel speaker connections. Please see the diagrams which follow the same impedance.
Finally, always use the shortest length of speaker wire possible of proper gauge. Usually, 18-gauge wire is adequate for lengths under 25 feet, while 16-gauge is used for greater lengths.
System 1: Single speaker system
- Connect the speaker (-) terminal to the amplifier COMMON terminal
- Depending on the speaker being used, connect the speaker (+) terminal to the amplifier’s 4-Ohm, 8-Ohm, or 16-Ohm amplifier terminal.

System 2:Two (or more) speakers in series
- Connect the LEFT SPEAKER (-) to the amplifier COMMON terminal.
- Connect the LEFT SPEAKER (+) to the RIGHT SPEAKER (-).
- Connect the RIGHT SPEAKER (+) to the amplifier’s 4-Ohm, 8-Ohm, or 16-Ohm terminal, depending on the TOTAL IMPEDANCE of the two speakers.
If each speaker has an impedance of 8 Ohms, the total speaker impedance in this series configuration is 16 Ohms.
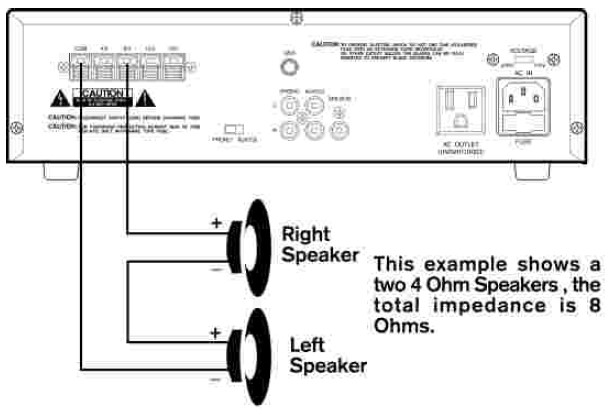
NOTE: ADDITIONAL SPEAKERS MAY BE INCLUDED IN SERIES, BUT IT IS NECESSARY TO CALCULATE TOTAL IMPEDANCE AND CONNECT THE SPEAKER CIRCUIT TO A TERMINAL OF APPROPRIATE IMPEDANCE. FOR EXAMPLE, IF THREE SPEAKERS OF 4-OHM ARE USED, THE TOTAL IMPEDANCE IS 12 OHMS, YOU SHOULD CONNECT TO THE 16-OHM TERMINAL.
System 3:Two (or more) speakers in parallel
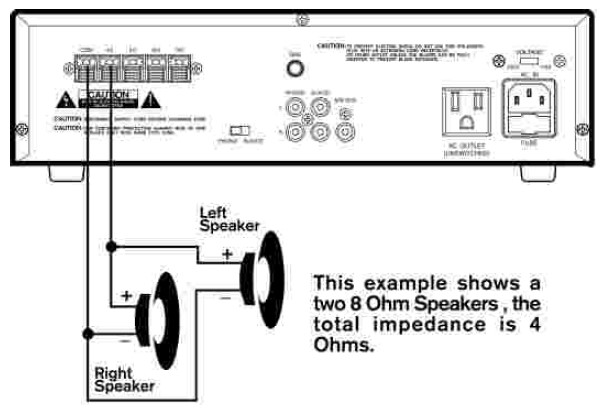
- Connect the LEFT SPEAKER (-) to the RIGHT SPEAKER (-).
- Connect BOTH the LEFT SPEAKER (-) and the RIGHT SPEAKER (-) to the amplifier COMMON terminal.
- Connect the LEFT SPEAKER (+) to the RIGHT SPEAKER (+).
- Connect BOTH the LEFT SPEAKER (+) and RIGHT SPEAKER (+) to the amplifier 4-Ohm, 8-Ohm, or 16-Ohm terminal, depending on the TOTAL IMPEDANCE of the two speakers. If each speaker has an impedance of 8-Ohm, the total speaker impedance in this parallel configuration is 4 Ohms.
System 4:Four speakers in series/parallel combination
- Group the four speakers into two pairs.
- Connect each pair of speakers in SERIES (see system 2 above). If you connect 8-ohm speakers, the total impedance of each pair is 16 ohms.
- Connect the two pairs of speakers in PARALLEL, If you connect 8-ohm speakers, the total impedance of both pairs is 8 ohms. Note: If each of the four speakers is 8 ohms, the total speaker impedance of the combined series/parallel connection described above is also 8 ohms. Likewise, the total speaker impedance is 4 or 16 ohms, if the speakers are 4 or 16 ohms respectively.
- Connect the speakers’ (-) terminals to the amplifier’s COMMON terminal.
- Connect the speakers’ (+) terminals to the amplifier’s 4-Ohm, 8-Ohm, or 16-Ohm terminal, depending on the TOTAL IMPEDANCE of the FOUR SPEAKERS
See the chart below for some sample system suggestions:
COMBINATION OF TWO SERIES PAIRS IN PARALLEL
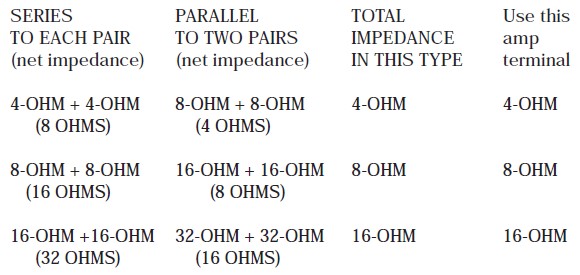

SERIES/PARALLEL VARIATIONS
Although the description above is for combining TWO SERIES PAIRS in a PARALLEL hook-up, you may also select to combine a SERIES PAIR and a PARALLEL PAIR in a PARALLEL hook-up. Simply be sure you have properly calculated the total impedance, and connect the (+) speaker circuit wire to the proper amp terminal. For example, if you use a SERIES PAIR of 8-Ohms speakers (the total impedance is 16 ohms) and a PARALLEL PAIR of 8-Ohms speakers (the total impedance is 4 ohms) in a PARALLEL hook-up, the TOTAL IMPEDANCE of this system is 3.2 OHMS, so you should connect the (+) speaker circuit wire to the 4- OHM terminal.
See the chart below for some sample system suggestions:
COMBINATION OF ONE SERIES PAIR AND ONE PARALLEL PAIR IN PARALLEL
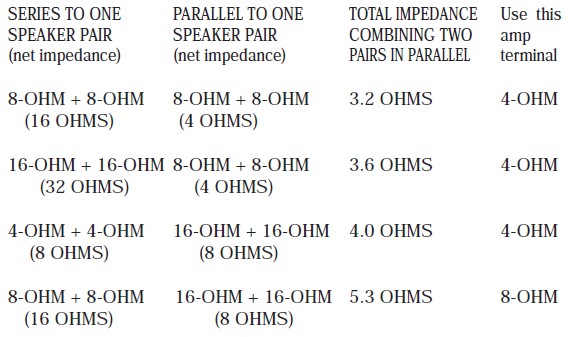

This example shows the first three systems in the chart. In this case, the 4-Ohm terminal is used your system impedance may be varied depending on the impedances of the individual speakers, and may require hooking up to the 8 or 16 Ohms terminal.
System 5: Connecting speakers with transformers
- Locate the input taps on your transformer. These taps are on the side of the transformer and are rated in watts, 10, 5, 2.5, 1.25, or 0.62. Usually, each speaker in a system uses the same wattage tap. Connect the selected tap to the amplifier 70V RMS terminal. If you wish a particular speaker to have a higher volume level, connect the wire from 70V RMS to a
higher wattage tap on the transformer. - Connect the transformer’s COMMON tap on the primary side to the amplifier COMMON terminal.
- Connect the speaker’s (+) terminals to the transformer’s secondary tap that matches the speaker’s TOTAL IMPEDANCE. Located on the opposite side of the transformer, these secondary taps are outputs and are rated in Ohms 4, 8, or 16.
- Connect the speaker’s (-) terminals to the transformer’s COMMON tap on the secondary side.
NOTE: Before connecting the speakers, please be sure the total wattage of the primary tap you use does not exceed the amplifier’s maximum power rating, PT110 20W and PT210 40W.
ALSO: Avoid, where possible, multiple connections to the 70V RMS and COMMON terminals.

Using headphones
To listen privately, or to monitor sound sources, connect a pair of low-impedance stereo headphones (not supplied) with a 6.35mm plug into the PHONES jack on the amplifier front panel.
Please listen safely. Follow these recommendations: Do not listen at extremely high volume levels. Extended, High-volume listening can lead to permanent hearing loss.
Always start with the volume control set to a LOW level BEFORE you put the headphones on. Then gradually increase the volume as necessary.
Connecting to standard AC power
After making all other connections, set the POWER switch to the OFF position. Then connect the power cord to a standard AC outlet. Connecting to 4A/12V DC power (PT110) You can power the amplifier from your vehicle’s 12-volt
battery. Connect the supplied DC power cable’s barrel plug to the DC 12V IN jack on the amplifier, and then connect the cable’s other end to the 12-volt accessory socket on the vehicle, such as the cigarette-lighter socket.
CAUTIONS:
PLEASE UNPLUG THE AC POWER CORD BEFORE CONNECTING THE DC POWER CABLE FOR THIS 12V POWER USAGE, AND DISCONNECT THE DC POWER CABLE BEFORE PLUGING IN THE AC POWER CORD FOR AC POWER USAGE. THE VEHICLE USED FOR THIS POWER SOURCE MUST HAVE A NEGATIVE GROUND ELECTRICAL SYSTEM. IF YOU ARE NOT SURE OF IT, PLEASE CHECK WITH YOUR VEHICLE’S DEALER.
Turning the amplifier on
- Turn on the audio input source equipment which is connected to the amplifier INPUT jack.
- Set all volume levels (MASTER, MIC 1, MIC 2, and PHONO/AUX) to their minimum level settings.
- Press the power switch to turn the amplifier on.
- Adjust the controls of MIC 1, MIC 2, and PHONO/AUX to the achieve desired volume and balance.
Using the LED power meter
The meter LED position indicates the amplifier output power.
Using the MASTER volume control
The MASTER volume control increases or decreases output level gain. To obtain the best performance with the least distortion, be sure to adjust the output level so that the LED meter does not continually exceed the right extreme of the meter’s range.
CAUTION: Setting the output level too high can overdrive the amplifier, causing permanent damage.
Using the MIX BUS jack
You can connect another PT110/PT210 to this jack to double the size of your PA system. This lets you use up to four microphones and two turntables (or two auxiliaries) sound sources.
Use a shield cable with phono plugs at each end, and connect the cable between the MIX BUS jacks on the back of two amplifiers. For the best results, do not use a cable longer than 6 feet.

Specifications
- Output Power at THD 10%, 1 kHz: 20W (PT110)/40W (PT210)
- Maximum Power: 80W (PT110)/120W (PT210)
- THD at 1W, 1 kHz Low-Pass Filter
MIC 1………………………………………………………….1%
MIC 2………………………………………………………….1%
AUX/CD ……………………………………………………..1%
PHONO ………………………………………………………1% - Frequency Response (at 1W, +/- 3 dB)
MIC 1………………………………………….80 Hz – 20 kHz
MIC 2………………………………………….80 Hz – 20 kHz
AUX/CD ……………………………………..80 Hz – 20 kHz - PHONO (RIAA 100 Hz/10 kHz)……+13 dB/-13.5 dB
- Input Sensitivity (at 10% THD, 1kHz)
MIC 1 …………………………………………………….2.5 mV
MIC 2 …………………………………………………….2.5 mV
AUX/CD…………………………………………………150mV
PHONO…………………………………………………..3.5mV - Signal-Noise Ratio (Input Shorted) with WTD
MIC 1……………………………………………………….60dB
MIC 2……………………………………………………….60dB
AUX/CD …………………………………………………..70dB
PHONO ……………………………………………………60dB - Noise Level (Input Shorted)…………………………0.75mV
- Tone Control (PT110) -15dB (High Cut at 10 kHz)
- Equalizer Control Range (PT210)
100 Hz……………………………………………….+/- 10 dB
1 kHz…………………………………………………+/- 10 dB
8 kHz…………………………………………………+/- 10 dB - Power Requirement
120V AC, 60 Hz/240V AC, 50 Hz
4A 12V DC (OPTION OF PT110) - Power Fuse
120V AC ……………………1.2A (PT110)/1.5A (PT210)
240V AC ………………….0.6A (PT110)/0.75A (PT210) - Dimensions H x W x D,
3 1/3 x 12 3/4 x 8 9/10(inches)
85 x 324 x 226(mm) - Weight, (kg)
(PT110)3.56kgs/(PT210) 3.92 kgs
FAQS About Pyle PT110 Public Address Mono Amplifier
What uses does a mono amplifier have?
The ideal method for building an amplifier brick of superior quality is said to be using mono power amps. Mono power amplifiers can be utilized as a musical instrument amplifier in addition to being used in Hi-Fi and High-End settings.
What does a monoblock amplifier do?
A monoblock amplifier is a solitary component (“block”) in charge of boosting a solitary channel (“mono”). Instead of being split among several channels, a monoblock amplifier amplifies a single channel.
Can a mono amp power two subwoofers?
By wiring each pair in parallel before connecting them to the amplifier in parallel arrangement, up to 4 subwoofers can be connected to a single Signature Series monoblock amplifier.
Where can I hear mono sound?
Monaural sound is no longer the norm for telephone networks, radiotelephone communications, and auditory induction loops for use with hearing aids, but stereo sound has essentially taken its place in most entertainment applications.
What are some practical uses for amplifiers?
Process control, communications, computers, power and signal sources, displays, and measuring systems are just a few of the industries that employ them.
What number of channels does a monoblock amplifier have?
lone channel
Why have two inputs on mono amps?
to enable the conversion of a stereo signal to a mono one for a subwoofer amp
How many channels at an amp do I need?
For each speaker you want to power, you’ll need one channel of amplification.
A mono amplifier is what?
Only one channel can be amplified with a mono amp.
What frequencies fall under mono?
Anything below 200 Hz is often summed to mono as a general rule of thumb.
For more manuals by Pyle, Visit Manualsdock
[embeddoc url=”https://manualsdock.com/wp-content/uploads/2023/08/Pyle-PT110-Public-Address-Mono-Amplifier-User-Guide.pdf” download=”all”]

