![]()
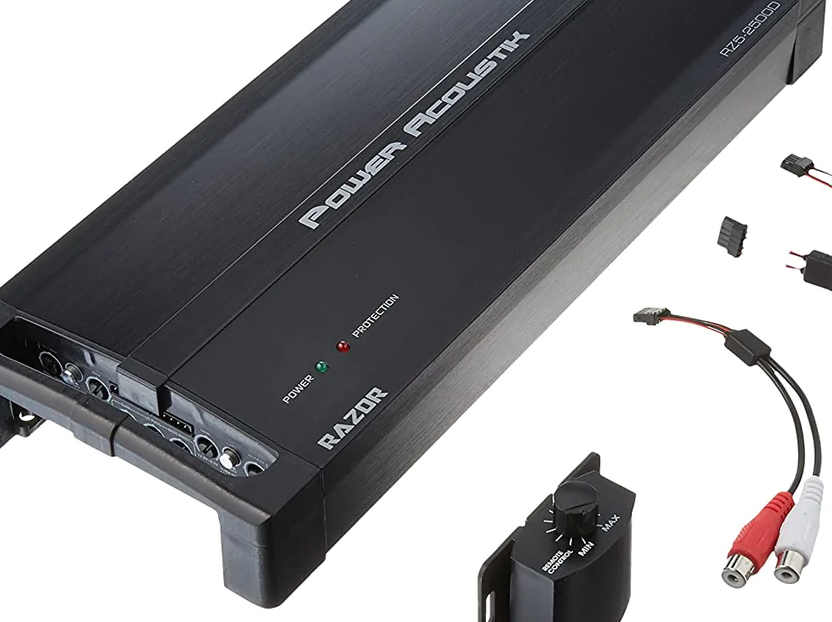
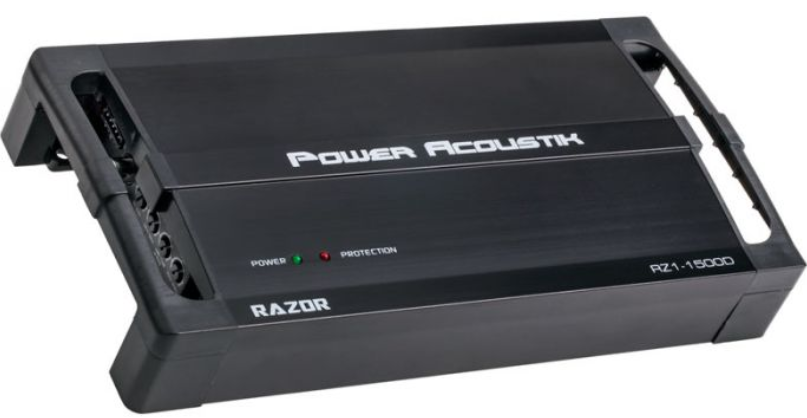
Power Acoustik RZ1-1500D Class D Monoblock Amplifier
Features
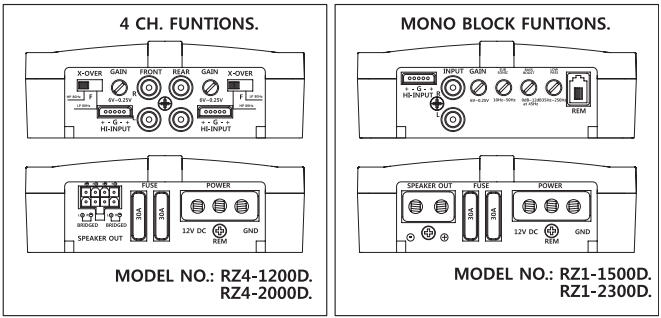
4 Channel (RZ4-1200D/RZ4-2000D)
- Total Harmonic Distortion: 0.05%
- Frequency Response: 10-35kHz
- Signal-to-Noise Ratio:70dB
- Damping Factor: > 250 Stereo
- Channel Separation: < 55dB
- Input Sensitivity: 200mV-6V
- Class D Digital Full Range Amplifier
- Full MOSFET PWM Power Supply
- SMD Technology on Double Sided PCB
- 8ga Power Terminals & 12ga Speaker Outputs
- High & Low Level Signal Inputs
- Selectable 80Hz 12dB High/Low Pass Filter
- 2-Ohm Stereo, 4-Ohm Bridged Stable
Mono Block(RZ1-1500D/RZ1-2300D)
- Variable 35-250Hz 12dB Low Pass Filter
- Variable 10-50Hz 12dB Subsonic Filter
- Variable 0-12dB 45Hz Bass Boost
- Total Harmonic Distortion: 0.5%
- Frequency Response: 20-150kHz
- Signal-to-Noise Ratio:70dB
- Damping Factor: > 100
- Input Sensitivity: 200mV-6V
- Class D Digital Monoblock Amplifier
- Full MOSFET PWM Power Supply
- SMD Technology on Double Sided PCB
- 8ga Power & 8ga Speaker Output Terminals
- High & Low Level Signal Inputs
- Remote Mount Gain Control Included
Warnings
POWER ACOUSTIK highly recommends that a fuse or circuit breaker be placed within 18″ of the battery. Although products have adequate internal protection, a pinched power wire between the component and the battery may result in a fire. The protection device should be placed where it can be accessed easily and all wiring should be routed safely and correctly according to the following guidelines:
Do not run wiring close to hot or spinning objects. Always use wire grommets when routing wire through the firewall or any other metal panels. Make sure that the potential for pinched wiring is avoided by routing all wires away from moving hinges and seats. This also includes brake, gas, and clutch pedals, hood and trunk hinges, etc.
Caution:
Continuous exposure to excessive sound pressure levels may cause permanent hearing loss. POWER ACOUSTIK strongly advises that you use common sense when setting volume levels. If you experience ringing in the ears, it could cause permanent hearing damage
CAUTION!
When connecting our amplifiers to pre-wired stock speakers, care must be taken that there are no common connections between left and right speaker wires, i.e. minus to minus or plus to plus connections, as this will cause the amplifier to go into immediate protection or may cause damage to the amplifier. Output connections are not common chassis ground. Please follow the hookup instructions in this owner’s manual.
Wire Size
Most people understand the importance of a clean signal source for good sound reproduction. It’s often surprising how many people (even professional car audio people) will obsess about signal wire but routinely provide the amplifier only a fraction of the current it needs to do its job. The most common wire gauge used in car audio is 10-gauge.
Gain control
Proper gain setting is one of the most important factors in setting up a stereo system. at the same time, gain setting is most often done wrong. Turning up the gain of an amp is the very last thing you should ever do to a system. First, hook up the system with all gain controls at a minimum (turn the gain pot fully counter-clockwise with a small screwdriver). Then turn on the head unit and turn up the volume. If you achieve a clean sound, and, more volume than you want, you don’t need to make any adjustments.
However, if you turn up the volume and begin to hear the distorted sound before it becomes loud, you are clipping (distorting) the deck (probably a little over ¾ volume). Turn the deck down just enough to hear a clean sound again, and then move to the next component in your system. With the deck playing at “maximum clean volume” adjust the gain of the next component to its “maximum clean volume”. If you adjust your gains this way, always starting at the head unit and working down the line to the amplifier, you will get the most performance out of your amplifiers) with the least amount of unwanted distortion and noise.
Cross over Controls
All Razor series amplifiers have electronic crossovers built in. This allows you to build multi-amp systems without the need for added electronic crossovers. The “HP, F, LP” control allows the user to choose exactly what crossover frequency the amp will use. Selectable switch for 80Hz High pass (HP) Full pass (F) 80Hz Low pass (LP).
Bass Boost Control
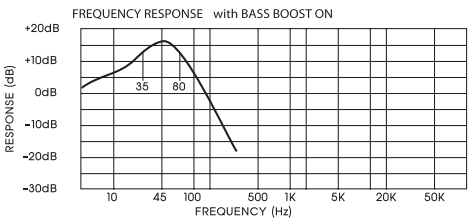
POWER ACOUSTIK has provided all Series amplifiers with a variable Bass equalization circuit. Each amplifier has a “Bass Boost” control, which allows adjustment of the bass from OdB to as much as 18dB. This adjustment is made at a frequency of 44Hz. Use the Bass Boost with caution. Too much equalization can easily cause amplifier clipping and may even damage your speakers
Low pass Controls
The amplifier is used to drive a subwoofer. The frequencies above the crossover point will be attenuated at 12dB /octave. Permits adjustment of the crossover frequency, by rotating the knob to select any frequency between 50Hz to 250Hz as the crossover point.
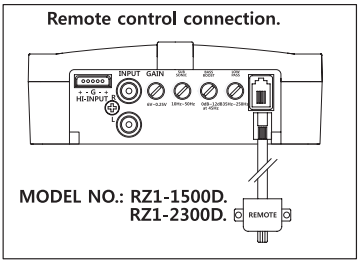
Remote Control
Can control the bass’s low tone according to your inclination. The low tone of Power Acoustik can hear deep and clean sound because of control gain.
Caution
Use the line offered at the factory. Otherwise, can be responsible for noise occurrence.
Subsonic filter Control
To protect your speakers, we have designed a new sub-sonic filter. The filter is a 12dB/octave, high pass that is variable from 15 Hz to 50 Hz, so you can match the filter to your woofer enclosure.
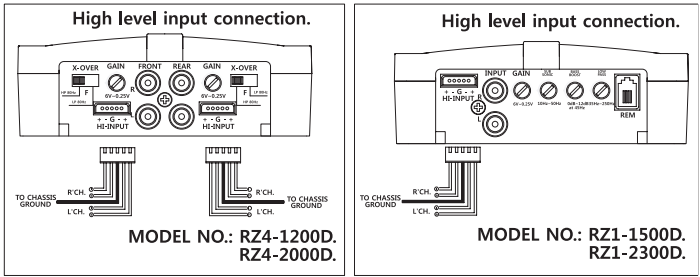
High-Level input
Connect speaker output from factory radio to amplifier. To hear more clarity, you must connect the chassis ground, please.
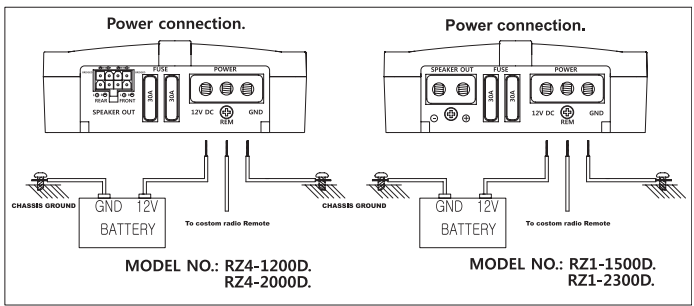
Power connections
It is important to have good-quality power and ground connections. Remember, to complete an electrical circuit, the ground connection is just as important as the positive power connection. Before any power connections are made, disconnect the ground cable at the battery. When the power supply lead, memory backup lead, or ground lead are extended use a 5mm (AWG5) or larger automotive grade cable that will withstand friction and heat to safeguard against fires occurring as a result of short-circuiting.
GND = Connect the proper gauge ground wire to the amplifier “GND” terminal. Locate the position on the chassis of the car to which the amplifier is to be grounded.
NOTE: Do not ground the amplifier to the “frame of the car. The frame on most cars and trucks is not grounded to the chassis(body). Use a Solder or a clamp ring to connect the ground wire. Pre-drill the prepped chassis to bolt the ground ring terminal with nut, bolt, and lock washers. Insulate metal and connector with paint or silicon to prevent rust and oxidation.
Silicon also works great to prevent nuts and bolts from working loose in the harsh environment of an automobile. Upon completion of the ground connection, grab the wire or connector and confirm that it is a solid connection. To prevent engine noise, it is recommended to ground the head unit and other audio electronics in the same location.
REM = Connect the remote wire (power antenna output) from the head unit to the remote turn-on wire of the amplifier. If the head unit is not equipped with a remote/antenna output, locate a wire that is controlled by the accessory position of the key. It is important to have the amplifier turned off with the radio or key. If the amplifier remains on, the result will most likely be a dead battery.
12V = Connect the proper gauge power wire to the amplifier “B+” terminal. Run a wire towards the no greater fuse holder than 0.5 meters from the battery. Remember, the fuse is to protect the safety of the car in the case of a short. Connect the fuse holder to the battery, but do not install the fuse at this time.
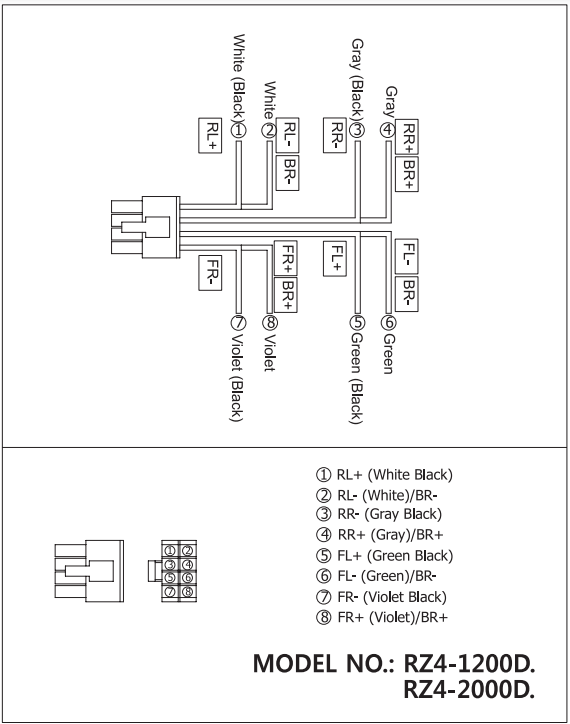
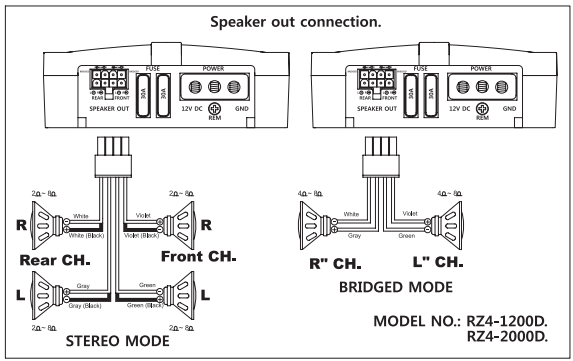
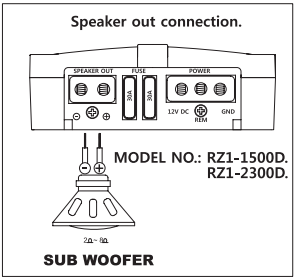
Speaker connections
Stereo Separation
The ability of an amplifier to maintain the separation between the right and left channels is what allows an amplifier to reproduce an accurate sound stage. Music is recorded with each instrument in its location on a sound stage. You should hear it the same way in your vehicle.
Installation Guidelines
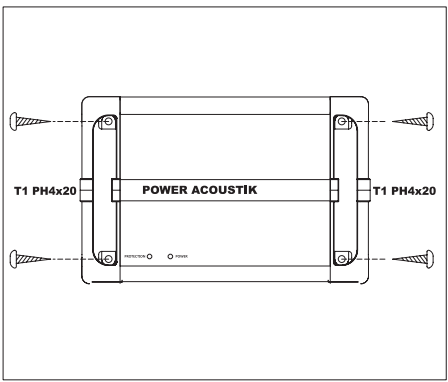
Mounting your Reference Amplifier is easy. Keep in mind the following guidelines:
- The negative battery terminal must be disconnected before any electrical connections are made.
- The amplifier may be mounted in any direction, on wood, metal, or carpet.
- The metal case of the amplifier may be grounded or left isolated.
- The amplifier requires adequate ventilation. Position the amplifier with sufficient surrounding area for proper cooling.
- Keep the amplifier out of the engine compartment and other locations that may cause excessive heat or moisture.
- Make sure that the mounting screws will not penetrate the gas tank, brake and fuel lines, wiring, or other critical parts of your car when installed.
- Do not mount the amplifier to a subwoofer enclosure or any other place that may have excessive vibration!
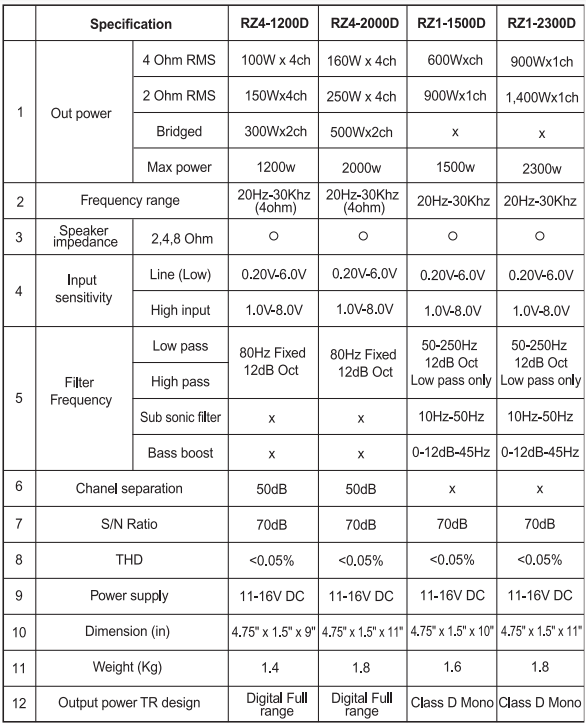
Specifications
Turning on the amplifier
The amplifier automatically turns on a few seconds after you turn your vehicle’s ignition switch to ACC or ON or turn on your auto sound system, depending on how you wired the system. The POWER Indicator on the top of the amplifier lights when the amplifier is on.
Important:
Your amplifier requires 30 amps or more of power from your vehicle’s battery during operation. To protect your battery from discharging, do not operate the amplifier unless your vehicle is running.
Adjusting the audio level
For the best performance, you must set GAIN(MIN/MAX) on the side of the amplifier to adjust the level of the audio signals that enter the amplifier.
- Use a screwdriver to turn GAIN(MIN/MAX) fully counterclockwise to MIN.
- Turn the auto sound system’s volume control to about one-third of its full range.
- Adjust GAIN(MIN/MAX) to a comfortable listening level.
- Turn up the auto sound system’s volume control until the sound begins to distort. Then immediately turn the volume down to a point just before where the distortion began.
- Adjust GAIN(MIN/MAX) until the sound is at the maximum level you want the amplifier to produce.
- Adjust the auto sound system’s volume control to a comfortable listening level.
Caution:
Never turn up the auto sound system’s volume control more than needed to adjust the audio level, more than two-thirds of its maximum volume.
NOTE :
Raising the Bass Frequency allows higher frequencies to reach the bass speakers centered around 45Hz. This “BUMP” can have a dramatic effect on the bass system’s apparent volume. Use caution! When adjusting this control serious subwoofer damage may result from overpowering or over-excursion.
Troubleshooting
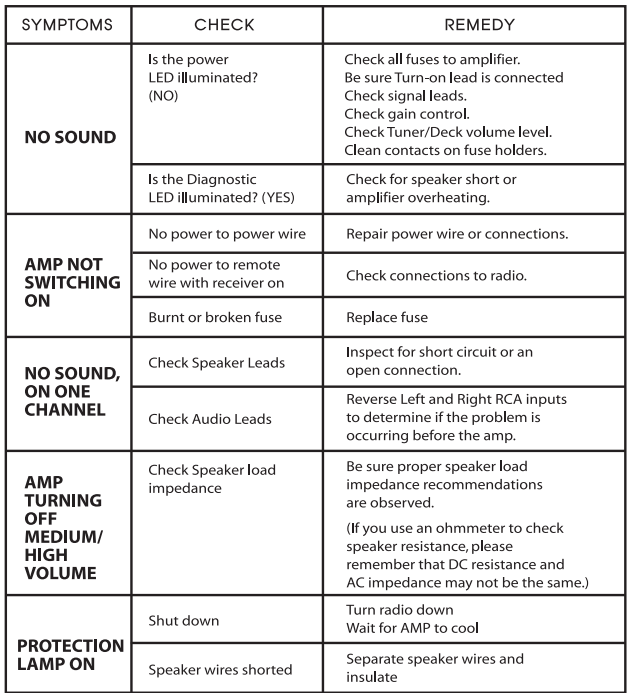
Warning
Investigate the layout of your automobile before drilling or cutting any holes. Take care when you work near the gas tanks, lines, hydraulic lines, and electrical wiring. Don’t use a power amplifier without securely mounting it. Attach this system securely to the automobile to prevent damage, particularly in the event of an accident. Don’t mount this system so that the wire connections are unprotected or are subject to pinching or damage from nearby objects.
The +12V DC power wire must be fused at the battery-positive terminal connection. Before making or breaking power connections at this system’s power terminals, disconnect the +12V wire at the battery end. Confirm your radio/cassette player and/or other equipment is turned off while connecting the input jacks and speaker terminals. If you need to replace the power fuse, replace it only with a fuse identical to that supplied with the system. Using a fuse of a different type or rating may result in damage to this system which isn’t covered by the warranty.
CONSUMER LIMITED WARRANTY
PowerAcoustik Electronics. (The Company) warrants to the original retail purchaser of its products that should this product under normal use and conditions, be proven defective in material or workmanship within 1 Year from the original date of purchase and professional installation or 90 Days if self-installed. Those items with manufacturer’s defects will be repaired or replaced at our option without charge for parts and repair labor.
To obtain repair or replacement within the terms of this warranty, the product or products are to be returned with proof of warranty coverage (e.g. a copy of the receipt for your purchase and installation), Specific information about the nature of the defects), all transportation costs are to be paid by the sender including a cashierís check for $15.00 to cover the return freight and packing.
This warranty does not extend to the elimination of externally generated static or noise, or to cover installation costs for initial installation, removal, or reinstallation of the products or to damaged, media sources (DVDis, VHS tapes, Speakers, Amplifiers, Car stereois or Electrical System Failures). This warranty does not apply to any product or part thereof which, in the opinion of the company, has been abused or damaged through alteration or modification, improper installation, mishandling, misuse, neglect, accident, or by the removal of the unit.
The Extent of the company’s liability under this warranty is limited to the repair or replacement provided above and, in no event, should the company’s liability exceed the purchase price paid by the purchaser for the product. This warranty is instead of all other express warranties or liabilities. Any implied warranties, including any implied warranty of merchantability, shall be limited to the duration of this written warranty. Any action for breach of warranty hereunder including any implied warranty of merchantability must be brought within 48 months from the original date of purchase.
In no case shall the company be liable for any consequential or incidental damages for breach of this or any other warranty, express or implied, whatsoever. No person or representative is authorized to assume for the company any liability other than expressed herein in connection with the sale of this product. Some states do not allow limitations on how long an implied warranty lasts or the exclusion of incidental or consequential damage so the above limitations or exclusions may not apply to you. This warranty gives you specific legal rights and you may also have other rights. which varies from state to state.
For more Manuals by Power Acoustik, visit ManualsDock
FAQS About Power Acoustik RZ1-1500D Class D Monoblock Amplifier
What is the Power Acoustik RZ1-1500D Class D Monoblock Amplifier?
The Power Acoustik RZ1-1500D is a Class D monoblock amplifier designed to deliver high-quality audio performance for car audio systems.
What is the RMS power rating of the RZ1-1500D?
The RMS power rating of the RZ1-1500D is 750 watts at 4 ohms and 1,200 watts at 2 ohms.
Does the RZ1-1500D support bridged operation?
Yes, the RZ1-1500D amplifier supports bridged operation, allowing for increased power output.
What are the dimensions of the RZ1-1500D amplifier?
The dimensions of the RZ1-1500D are approximately [insert dimensions here].
What features does the RZ1-1500D offer for thermal and overload protection?
The RZ1-1500D amplifier features thermal and overload protection circuits to safeguard against overheating and overloading.
Does the RZ1-1500D have a variable low-pass filter?
Yes, the RZ1-1500D amplifier includes a variable low-pass filter to customize the frequency output according to your preferences.
What is the signal-to-noise ratio (SNR) of the RZ1-1500D?
The signal-to-noise ratio of the RZ1-1500D is [insert SNR value here], ensuring clear audio signal transmission.
What is the input sensitivity range of the RZ1-1500D?
The input sensitivity range of the RZ1-1500D is [insert sensitivity range here], providing compatibility with various audio sources.
Does the RZ1-1500D come with a remote bass control?
Yes, the RZ1-1500D amplifier includes a remote bass control for convenient adjustment of bass levels from the driver’s seat.
What is the warranty coverage for the RZ1-1500D amplifier?
Power Acoustik typically offers a [insert warranty duration here] warranty for the RZ1-1500D, covering manufacturing defects and malfunctions.

