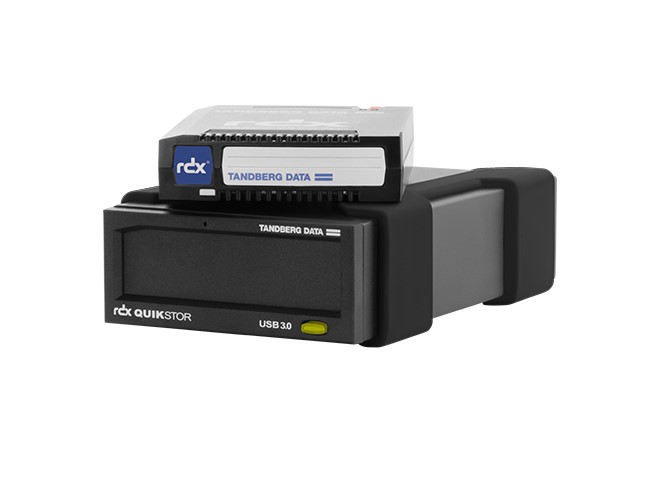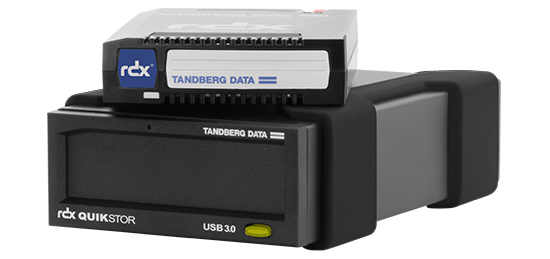
Overland Tandberg Data RDX QuikStor Drive
About Overland Tandberg
Overland-Tandberg is a company that specializes in data storage and data protection solutions. They offer a wide range of products, including tape drives, tape libraries, and backup software, designed for businesses and organizations that require reliable and scalable storage solutions.
Introduction
The RDX QuikStor device is a removable, ruggedized, hard disk drive system. It features backup application compatibility, a high-speed transfer rate for fast backups, portable cartridges, and a high level of data reliability. The RDX drive is available as an internal SATA device ( RDX Internal Drives) or external USB device (see Figure 2. RDX External Drive).
- RDX Internal Drives

- 3.5-inch Internal SATA Drive
- 5.25-inch Internal SATA Drive
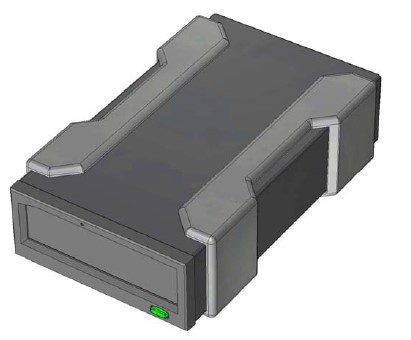
- External USB Drive
Capacity and Transfer Rates
The capacity and transfer rate of the RDX QuikStor data storage system is outlined in the table below (see Table 1). Capacity and transfer rate will vary depending on the RDX cartridge type used.
Capacity and Transfer Rates
| Characteristic | RDX 40 GB
Media |
RDX 80 GB
Media |
RDX 120 GB
Media |
| Native capacity (GB) | 40 | 80 | 120 |
| Compressed capacity (GB) | 80 | 160 | 240 |
| Average sustained transfer rate (MBs/sec) | SATA 30 MBps/USB 25 MBps | ||
| Burst transfer rate | Internal SATA 1.5 Gbps/External USB 480 Mbps | ||
| Average access time (msec) | 15 | ||
| Function | Removable disk drive | ||
|
Command set |
Packet command feature set, per ATA/ATAPI-7 SCSI primary commands (SPC-2)
SCSI block commands (SBC-2) |
||
| Logical block size | 512 bytes | ||
| Supported file systems | ext2, ext3, FAT32 and NTFS* | ||
*NTFS is the default file system on the cartridge.
Supported Media
The RDX QuikStor hard drive system supports any RDX cartridge. RDX cartridges are available in different capacity configurations depending on your storage requirements.
- Software The RDX QuikStor works with all industry backup applications that support removable disk media. See your backup software manual for instructions on backing up data.
- Windows™ Software The RDX QuikStor and Utilities CD provides essential Windows software for use with the RDX QuikStor unit. The RDX QuikStor software contains a removable disk utility which is a Windows application that provides basic diagnostic tests capabilities and firmware upgrades for the RDX QuikStor unit. See Installing Unit Software for Windows™ page 13 and Using the Removable Disk Utility page 17 for more information on these applications.
- Linux Software There is a separate document available on our website describing how to use the RDX QuikStor with Linux.
Front Panel Features
The front of the RDX QuikStor unit has the following features and indicators:
- Eject Button/Power Indicator.
- Cartridge Indicator (located on cartridge).
- Emergency Eject Hole.
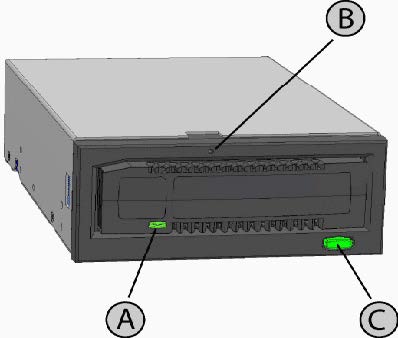
- Cartridge Indicator (located on cartridge)
- Emergency Eject Hole
- Eject Button/Power Indicator
Power Indicator
The eject button is illuminated by a power indicator. Table 2 describes the operation of this indicator:
| Indicator Status | Meaning | Description |
| OFF | No Power | The unit does not have power |
| Steady GREEN | Ready | The power is on and the RDX QuikStor unit is working properly |
| Blinking GREEN | Ejecting | The unit is ejecting the cartridge |
|
Steady AMBER |
Fault |
RDX QuikStor unit has detected a fault condition. For more information, run a diagnostic application (see Using the Removable Disk Utility page 17). |
|
Blinking AMBER |
Prevent |
The host computer is accessing the media, and the user has pressed the eject button. The unit will blink amber for a few seconds and then return to a steady green. The unit will eject the cartridge after the host access completes. |
Cartridge Indicator
The cartridge indicator displays the current status of the cartridge. Table 3 describes the operation of this indicator:
| Indicator Status | Meaning | Description |
| OFF | Not Ready | The cartridge is not inserted properly or the unit has no power |
| Steady GREEN | Ready | Cartridge is ready |
| Blinking GREEN | Activity | Reading, writing, seeking |
|
Steady AMBER |
Fault |
RDX QuikStor unit has detected a cartridge fault condition. For more information, run a diagnostic application (see Using the Removable Disk Utility page 17). |
Installing the RDX QuikStor Internal Drive
Before You Begin The RDX QuikStor unit ships ready to install in a standard 3.5-inch or 5.25-inch half-high drive bay depending on the configuration you order.
Depending on your computer you may need a standard (flat-blade) or Philips screwdriver to remove the computer cover and install the drive in your computer.
Important Information on Electro-Static Damage To protect your computer and drive from electro-static damage (ESD), follow these guidelines:
- Before you open your computer or remove the RDX QuikStor unit from its antistatic bag, ground yourself by touching the metal chassis of your computer or some other grounded object. For optimal protection, use an electrostatic grounding strap.
Note Your computer must be plugged into a grounded electrical outlet to be properly grounded.
- Do not touch any printed circuit boards or electronic chips on your RDX QuikStor device or on your computer.
- Turn your computer and any peripheral devices off before installing the RDX QuikStor unit.
Installation Instructions
- Carefully unpack the unit and accessories.
- Turn off the computer.
- Open the computer cover, using a screwdriver if necessary.
- Mount the unit. Slide the RDX QuikStor unit into an unused drive bay until the bezel is flush with the front of the computer. Secure the unit using four mounting screws, being careful not to over-tighten the screws.
- Attach the power cable to the power connector (see Figure 4. RDX Internal SATA Connectors below).
- Connect the SATA data cable to the SATA data connector (see Figure 4. RDX Internal SATA Connectors below).
- Check all cables in your computer system. Before you reinstall your computer cover ensure that all cables are correctly routed so that they will not bind or become crimped. Also, make sure that no cables have loosened during the installation.
- Replace your computer cover.
- Turn on the computer.
- During power-up press the F2 key, or another hotkey, to enter BIOS setup mode. Enable the SATA port connected to your RDX QuikStor unit. Save changes and exit from BIOS.
- If running Windows you must install the RDX software (see Installing Unit Software for Windows™ page 13)
RDX Internal SATA Connectors
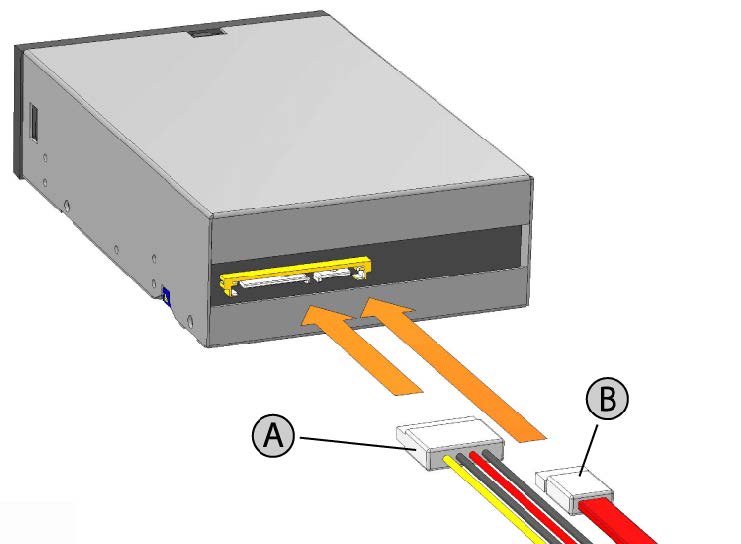
- Power Adapter Cable
- SATA Data Cable
Installing the RDX QuikStor External Drive
- Carefully unpack the unit and accessories.
- Attach the USB cable to the USB port on the back of the RDX QuikStor unit and connect it to an available USB 2.0 port on the computer (see Figure 5. RDX External USB Connectors below).
- Attach the power cable to the power connector (see Figure 5. RDX External USB Connectors below) and plug it into an outlet.
- Select a convenient location for the RDX QuikStor External drive that is flat, sturdy, level, and close to the host server. The drive can be oriented horizontally or vertically.
- If running Windows install the RDX software (see Installing Unit Software for Windows™ page 13).
RDX External USB Connectors

- AC Power Adapter
- USB Cable
Installing Unit Software for Windows™
The RDX User’s Guide and Utilities CD provides essential Windows software for use with the RDX QuikStor unit. The RDX QuikStor unit software for Windows installs:
- A removable disk utility that provides basic diagnostic tests capabilities and firmware upgrades.
- A software update that enables the eject button to operate correctly under the Windows operating system.
- A supplement that automatically sets the system to DMA mode for improved performance.
- The software included in this CD will start automatically during Windows startup and will not interfere with any other applications running on your computer.
Note If the RDX software is not installed the eject button and right-click eject method may not work properly.
To install the software (Microsoft™ Windows XP/Server 2003/Windows 2000):
Note You must be logged in as the Administrator or have administrator privileges to install the software.
- Insert the RDX QuikStor User’s Guide and Utilities CD into the CD-ROM drive on the computer.
- Use Windows Explorer to browse to the CD-ROM drive (i.e. D:).
- Double-click on setup.exe to install the program. This installer will copy files into C:/Program Files/RDX.
- Restart the computer.
Operating the RDX QuikStor Unit
This section describes typical activities involved in operating and maintaining the RDX QuikStor unit. For instructions on using your backup software, see the manual that came with your software.
Handling the RDX Cartridges
Although RDX cartridges are ruggedly built, they must be handled with care to ensure data integrity and long life. Observe the following precautions:
- Store cartridges in their protective cases when you are not using them.
- Keep cartridges away from dust, dirt, and moisture.
- Avoid direct sunlight, heat sources, temperature extremes or rapid changes in temperature.
- Never try to force the cartridge into the unit. If it is difficult to insert, check the orientation and try again.
- Do not drop cartridges where non-operational specifications may be exceeded.
Loading and Unloading Cartridges
The front of your unit has an opening for inserting RDX cartridges. A protective door covers the opening. Below and to the right of the door is the power indicator that doubles as a cartridge-eject button.
To Load a Cartridge Insert the cartridge in the unit with the keyed corner facing the upper left corner of the unit and the write-protect tab on the back right (see Figure 6. Loading the Cartridge). The cartridge only fits in one orientation. Push the cartridge gently into the unit until it is locked in place with a clicking sound.
Loading the Cartridge
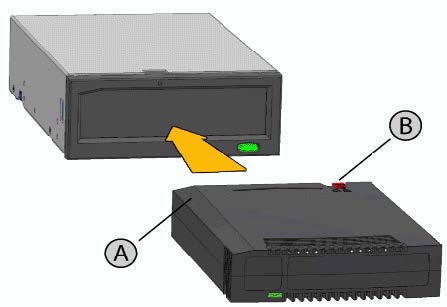
- Keyed Corner
- Write Protect Tab
To Unload a Cartridge
To unload a cartridge using the mouse right-click method (Windows™ only):
- While running Windows Explorer locate the drive letter for the device.
- Right-click on the device and select Eject.
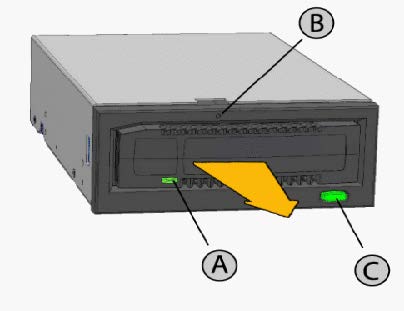
- When the cartridge has been ejected by the unit, grasp the exposed sides of the cartridge and pull the cartridge straight out (see Figure 7. Unloading the Cartridge).
To unload a cartridge using the eject button: - Push the eject button.
- When the cartridge has been ejected by the unit, grasp the exposed sides of the cartridge and pull the cartridge straight out (see Figure 7. Unloading the Cartridge).
Caution If the RDX software is not installed the eject button and right-click eject method may not work properly (see Installing Unit Software for Windows™ page 13).
Unloading the Cartridge
- Cartridge Indicator (located on cartridge)
- Emergency Eject Hole
- Eject Button/Power Indicator
To Emergency Eject a Cartridge
Note Do not emergency eject an RDX cartridge while the cartridge activity indicator is flashing.
If the cartridge does not eject, using either the eject button or the right-click eject method then use the following emergency eject hole method to recover the cartridge:
- Insert a straightened paper clip into the Emergency Eject Hole (see Figure 7. Unloading the Cartridge).
- When the cartridge has been ejected by the unit, grasp the exposed sides of the cartridge and pull the cartridge straight out (see Figure 7. Unloading the Cartridge).
The RDX Utility is a Windows™ application that allows you to diagnose problems with your RDX QuikStor device. With the utility, you can:
- Identify RDX QuikStor devices attached to your computer.
- Retrieve device and cartridge status information.
- Upgrade the firmware in the RDX QuikStor device.
- Test the unit and the cartridge.
Using Removable Disk Utility
- To run the RDX Utility for Windows:
- Click Start > All Programs > RDX Utility > RDX Utility.
- For instructions on using removable disk utility, click Help.
- If the software is not installed on your computer, see Installing Unit Software for Windows™ page 13 for installation instructions.
Troubleshooting
The Power Indicator is OFF RDX QuikStor Internal Drive
If the power indicator is off, the RDX Internal unit does not have power. Follow these steps to verify the cable connections in the rear of the unit:
- Turn off the computer.
- Check the SATA power and SATA data cable connections in the rear of the unit.
- Turn on the computer.
RDX QuikStor External Drive
If the power indicator is off, the RDX External unit does not have power. Follow these steps to verify the cable connections in the rear of the unit:
- Check the power connection at the back of the unit.
- Check that the power adapter is plugged into an outlet.
- If plugged into an outlet strip make sure that it is turned on.
The Power Indicator is Steady AMBER
If the power indicator is steady amber, the RDX QuikStor unit is not working properly. The error is due to one of the following conditions:
- The unit cannot eject the cartridge due to an obstruction.
- The internal electronics are damaged or malfunctioning.
Follow these steps to remove a stuck cartridge:
Insert a straightened paper clip into the Emergency Eject Hole (see Figure 7. Unloading the Cartridge). in the Using the Drive: Loading and Unloading Cartridges section).
- When the cartridge has been ejected by the unit, grasp the exposed sides of the cartridge and pull the cartridge straight out.
The Power Indicator is Blinking AMBER, and the Cartridge does not Eject If the power indicator is blinking amber after you press the eject button, the Host computer is accessing the media. The RDX QuikStor unit will eject the cartridge after the Host access completes.
If the cartridge does not eject after the Host computer access completes, you may not be running the correct unit software. See Installing Unit Software for Windows™ page 13 for instructions on installing the software. If the cartridge still does not eject, use Windows Explorer to eject the cartridge. In Windows Explorer, right-click on the drive letter for the RDX QuikStor unit (i.e. F:), and select Eject.
The Cartridge Indicator is Steady AMBER
The cartridge indicator is located on the front of the cartridge. If this indicator is amber, the cartridge is not working properly. The error is due to one of the following conditions:
- The cartridge is not compatible with the RDX QuikStor unit.
- The cartridge has been severely damaged.
- The cartridge has not been fully inserted.
Run the removable disk utility to obtain more information about the failure. See Using the Removable Disk Utility page 17.
The Cartridge does not Eject
Follow these steps to remove a stuck cartridge:
Insert a straightened paper clip into the Emergency Eject Hole (see Figure 3. Front Panel Feature in Loading and Unloading Cartridges page 14).
- When the cartridge has been ejected by the unit, grasp the exposed sides of the cartridge and pull the cartridge straight out.
The Unit does not Appear in the Device Manager (Windows™)
If the unit does not appear in the Windows Device Manager and the power indicator is green, follow these steps to rescan the hardware:
Bring up the Device Manager: Right-click on My Computer
Select Manage
Select Device Manager
Right-click on the top folder (this should be your computer’s name).
- Select Scan for Hardware Changes You should see your RDX QuikStor device listed under Disk drives. If the device does not appear, restart the computer.
Unit Performance Seems Slow - RDX Internal Drive Some Intel chipset-based SATA ports do not by default operate in DMA mode for the RDX Internal device. This results in slower performance and weaker data protection. Reinstall the unit software for Windows to set the SATA ports to the correct mode. Refer to Installing Unit Software for Windows™ page 13.
- RDX External Drive The RDX External device may appear slow based on the type of USB port the device is attached to. Make sure your unit is connected to a USB 2.0 port instead of a USB 1.1 port. For best performance connect directly to a USB 2.0 root hub on the PC and not an external hub. If using an external hub, make sure it is USB 2.0 compliant.
- Also the USB bus shares bandwidth between all USB devices connected to the systems, including the RDX External unit. The use of cameras, flash memory devices, etc. on the USB bus will decrease the performance of the device. Remove extra devices if they are not necessary.
Linux Users Systems running Linux may see reduced performance when doing backups on RDX cartridges configured for FAT32. For best performance configure the file system on the RDX cartridges for ext2 or ext3. Refer to the separate document available on our website describing how to use the RDX QuikStor with Linux.
Write Error
If the backup application reports a write error, follow these steps:
- Verify that the write protect switch on the cartridge is set to the “unlock position.
- Check the cartridge indicator on the front of the cartridge. If this indicator is amber, the cartridge is not working properly. This may be due to severe damage to the cartridge. Run the RDXutility software to obtain more information about the failure.
- Replace the cartridge if the error persists.
General
| Manufacturer | Tandberg Data |
| Model Names | RDX |
| Interface Type | Internal SATA or External USB |
Performance
| Characteristic | RDX 40 GB Media | RDX 80 GB Media | RDX 120 GB Media |
| Native capacity (GB) | 40 | 80 | 120 |
| Compressed capacity (GB) | 80 | 160 | 240 |
| Average sustained transfer rate | SATA 30 MBps/USB 25 MBps | ||
| Burst transfer rate | Internal SATA 1.5 Gbps/External USB 480 Mbps | ||
| Average access time (msec) | 15 | ||
| Function | Removable disk drive | ||
|
Command set |
· Packet command feature set, per ATA/ATAPI-7
· SCSI primary commands (SPC-2) · SCSI block commands (SBC) |
||
| Logical block size | 512 bytes | ||
| Supported file system | ext2, ext3, FAT32 and NTFS* | ||
Capacity and transfer rate will vary depending on the RDX cartridge type used. *NTFS is the default file system on the cartridge.
Reliability
| Unrecoverable error rate | 1 error per 1014 bits read |
| MTBF | 550,000 hours |
Physical
| RDX Internal Devices | RDX External Device | ||
| Form Factor | 3.5 inch internal | 5.25-inch half-height internal | External |
| Height | 41.4 mm (1.63 inches) | 41.4 mm (1.63 inches) | 51.8 mm (2.04 inch) |
| RDX Internal Devices | RDX External Device | ||
| Width | 101.6 mm (4.00 inch) | 146.0 mm (5.75 inches) | 109.8 mm (4.32 inch) |
| Depth | 159.4 mm (6.28 inch) including bezel | 171.9 mm (6.77 inches) including bezel | 177.5 mm (7.00 inch) including bezel |
| Weight | 408 g (0.90 lbs) | 635 g (1.40 lbs) | 540 g (1.19 lbs) |
| Orientation | Horizontal ± 90° | Horizontal ± 90° | Horizontal ± 90° |
Power
| Internal RDX QuikStor devices | External RDX QuikStor device | |
| Voltage Tolerance | +5VDC ±5% | +12VDC ±10% |
| Power Consumption (Typical/Peak) | 7.5W / 13W | 6.6W / 13W |
| AC Adapter | N/A | Universal Adapter 100-240 VAC, 50-60Hz input |
Environmental
| RDX QuikStor unit | Operational | Non-Operational |
| Temperature | 10 to 40°C | -40 to 65°C |
| Thermal Gradient | 10°C/hour | 20°C/hour |
| Relative Humidity | 20 to 80%, non-condensing | 10 to 90%, non-condensing |
| Maximum Wet Bulb Temperature | 29°C, non-condensing | 38°C, non-condensing |
| Altitude | -50 ft to 10,000 ft | -50 ft to 35,000 ft |
| Vibration | sine vib 0.25G peak, 3-200 Hz | random vib 1.54G RMS |
| Shock | half sine 31G @ 2.6ms | half sine 71G @ 2 ms |
UL and C-UL
This information technology equipment is UL- certified and C-UL- certified for use with personal computers.
CE Compliance
Electromagnetic Compatibility
This device complies with the following standards in accordance with the European Directives 89/336/EEC:
- Immunity EN 55024
- Emission EN 55022 class B
Safety (Low Voltage Directive)
This device complies with the following standards in accordance with European Directives 91/263/EEC:
- EN 60950-1:2001
These definitions are classified as per safety standards: - EN 60950-1:2001
- SELV: Safety Extra Low Voltage
FCC Compliance Statement
This equipment has been tested and found to comply with the limits for a Class B digital device pursuant to Part 15 of FCC Rules. These limits are designed to provide reasonable protection against harmful interference in a residential installation.
This equipment generates, uses, and can radiate radio frequency energy and, if not installed and used in accordance with the instructions, may cause harmful interference to radio communications. However, there is no guarantee that interference will not occur in a particular installation.
If this equipment does cause harmful interference to radio or television reception, which can e determined by turning the equipment off and on, the user is encouraged to correct the interference by one or more of the following measures:
- Reorient or relocate the receiving antenna.
- Increase the separation between the equipment and the receiver.
- Connect the equipment to an outlet on a circuit different from that to which the receiver is connected.
- Consult the dealer or an experienced radio/television technician for help.
Note This device complies with Part 15 of the FCC Rules. Operation is subject to the following two conditions:
- This device may not cause harmful interference, and
- This device must accept any interference received, including interference that may cause undesired operation.
Canadian Compliance (Industry Canada) When tested in at least one intended host: This digital apparatus does not exceed the Class B limits for radio noise emissions from digital apparatus set out in the interference-causing equipment standard entitled “Digital Apparatus”, ICES-003 of the Canadian Department of Communications.
Cet appareil numérique respecte les limites bruits radioélectriques applicables aux appareils numériques de Class B prescrites dans la norme sur le matériel brouilleur: “Appareils Numériques”, NMB-003 édictée par le Ministre Canadien des Communications.
FAQs About Overland Tandberg Data RDX QuikStor
What is Overland Tandberg Data RDX QuikStor?
Overland Tandberg Data RDX QuikStor is a removable disk-based storage solution that offers high-capacity, rugged, and reliable data backup and recovery.
How does Overland Tandberg Data RDX QuikStor work?
Overland Tandberg Data RDX QuikStor uses a removable RDX cartridge that contains a hard drive or solid-state drive (SSD). The cartridge is inserted into the QuikStor dock, which connects to the computer via USB, SATA, or SCSI interface. The QuikStor software is then used to manage the backup and recovery process.
What are the advantages of using Overland Tandberg Data RDX QuikStor?
Overland Tandberg Data RDX QuikStor offers several advantages over traditional backup solutions, including:
High capacity: Cartridges are available in capacities up to 5TB.
Ruggedness: The cartridges are designed to be shockproof, dustproof, and waterproof, making them ideal for use in harsh environments.
Portability: Cartridges are small and lightweight, making them easy to transport and store offsite for disaster recovery.
Compatibility: The QuikStor dock is compatible with multiple interfaces, operating systems, and backup software.
What type of data backup and recovery software is compatible with Overland Tandberg Data RDX QuikStor?
Overland Tandberg Data RDX QuikStor is compatible with most backup and recovery software, including popular programs like Acronis, Veeam, Symantec Backup Exec, and Windows Backup.
How reliable is Overland Tandberg Data RDX QuikStor?
Overland Tandberg Data RDX QuikStor is designed to be a reliable backup and recovery solution. The cartridges are tested to withstand up to 5,000 load/unload cycles and have an estimated shelf life of up to 30 years.
What is the warranty on Overland Tandberg Data RDX QuikStor?
Overland Tandberg Data RDX QuikStor comes with a limited warranty that covers defects in materials and workmanship for one year from the date of purchase.
Is Overland Tandberg Data RDX QuikStor compatible with both Windows and Mac?
Yes, Overland Tandberg Data RDX QuikStor is compatible with both Windows and Mac operating systems.
Can I use Overland Tandberg Data RDX QuikStor for both personal and business use?
Yes, Overland Tandberg Data RDX QuikStor is suitable for both personal and business use.
For more manuals by Overland Tandberg, Visit Manualsdock
[embeddoc url=”https://manualsdock.com/wp-content/uploads/2023/04/Overland-Tandberg-Data-RDX-QuikStor.pdf” download=”all”]

