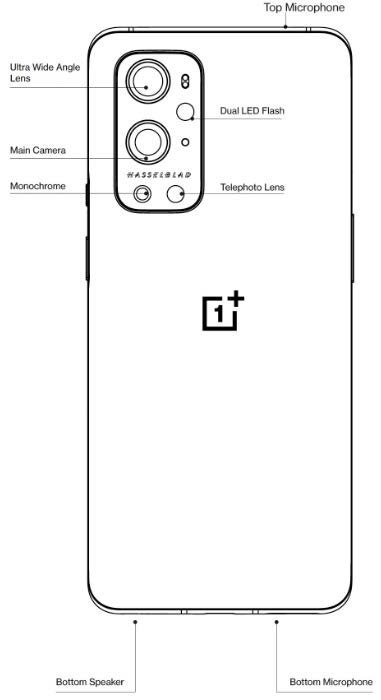
Oneplus 9 Pro Android
About Oneplus
OnePlus gained popularity quickly, especially among tech enthusiasts, for its flagship “Flagship Killer” devices that boasted high-end specifications at a competitive price point. The company’s devices were known for their “Never Settle” philosophy, aiming to deliver exceptional user experiences and actively listening to customer feedback for product improvements.
OnePlus devices typically run on a customized version of Android called OxygenOS, which provides a near-stock Android experience with some added features and optimizations.
In addition to smartphones, OnePlus also ventured into other product categories, such as wireless earbuds (OnePlus Buds), smart TVs (OnePlus TV), and accessories.
Getting started
Learn more about your device and start using it.


Setting up your device
Insert SIM card
- Insert the SIM Tray Ejector into the small hole on the SIM card holder. Press the ejector firmly into the hole to push the SIM card tray out.
- Slowly pull the SIM card tray out of the tray slot.
- Place the SIM card into the SIM card tray.
- Plug the SIM card tray back into your device.
* Use the original Nano-SIM card. Non-original cards may cause damage.
Booting up your Oneplus 9 Pro
Press and hold the power button for a few seconds to boot up the phone. If your phone does not power on, you may need to charge it.
Setup Wizard
When you first boot up the phone (or after a factory reset), the Setup Wizard lets you customize all features, including language, software buttons, gestures, fingerprint unlock, and other features. If you want to change these later, you can do so after setting up the phone in the Settings app.
Battery and charging
You will need to charge the phone when you first get it or if you have not used it for a long time.
Safety Information:
- To ensure your safety and avoid damaging the device, only use the official charger and USB cable.
- Oneplus 9 Pro supports the USB Type-C cable.
- Unplug the charger after you finish charging to avoid wasting electricity.
- Do not place anything on your phone while it
Charge the battery
- Connect the USB cable to the adapter;
- Plug the USB cable into the phone’s USB port.
- Plug the adapter into a power socket.
- After charging, unplug the USB cable from the phone and unplug the adapter from the socket.
Save power and extend battery life
Reduce power consumption by doing the following:
- Turn off the screen when the device is not in use.
- Turn on Battery Saver mode when the battery is low.
- Disable Bluetooth and Wi-Fi when you are not using them.
- Dim screen brightness and shorten sleep time in Settings.
- Delete apps that you do not use.
Physical buttons
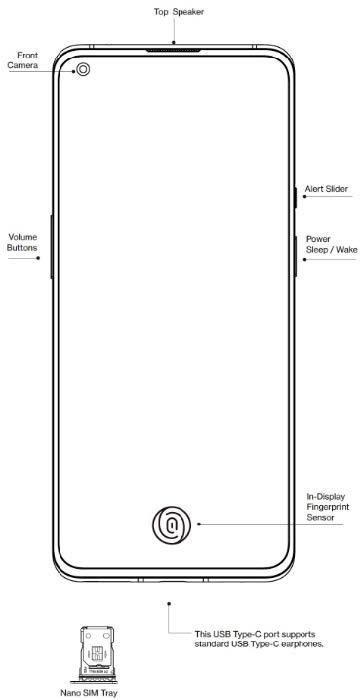
Power button
The power button is located on the right side of the phone.
- Press and hold the power button to turn on the device when the device is off.
- Press and hold the power button for Voice Assistant when the device is on.
- Press the power button and volume up button simultaneously to power off.
- Click the power button to turn on/off the screen.
Volume button
The volume button is located on the left side of the phone.
- When playing music or video, press the volume button to adjust the media volume.
- Press the volume button during a call to adjust the call volume.
- Press the volume button to silence the ringtone when you get an incoming call.
Shortcut keys
You can perform quick actions using the shortcut keys.
- Press and hold the power button and volume up button simultaneously to turn off the device.
- Press and hold the power button and volume down button simultaneously to take a screenshot.
- Press and hold the power button and volume down button simultaneously to access recovery mode when the device is powered off.
- Long press the power button and volume up for 10 seconds to force a power off.
Transfer data to Oneplus 9 Pro
OnePlus Switch can quickly transfer all your data, including contacts, messages, and photos, from your old device to your new OnePlus device.
If the old device is OnePlus or other Android devices:
- Open the OnePlus Switch app. Select I’m a new phone, then select your old phone’s type.
- Follow the prompts on the new phone screen. Download and install OnePlus Switch on your old phone.
- Tap Continue on your new phone.
- Open OnePlus Switch on your old phone, select I’m an old phone, and scan the QR code on your new phone to connect the two phones.
- After connecting the two phones, select the data you want to migrate from your old phone. Tap to start. Then wait until the transfer is completed.
If the old device is iPhone:
- Sync the data of your iOS device to iCloud.
- Open the OnePlus Switch app.
- Choose I’m a new phone and then tap on “iPhone”.
- Sign in to your iCloud account and start importing data.
- It’s recommended to complete the whole data transfer process while connected to a Wi-Fi network, and OnePlus Switch should always stay on the screen. If you ever get disconnected from the iCloud server, please try logging into iCloud again and pick up the data transmission. Please note that only certain formats of data can be transferred due to compatibility issues.
Wallpapers
Long press a blank space on the home screen and select WALLPAPERS to set your home screen wallpaper and lock screen wallpaper.
Widgets
- Add widgets: Long press on a blank space from the home screen and select Widgets. Or press and hold the app icon and select the widget. Then press a widget and drag it to the home screen.
Home Settings
Long press the blank space on the home screen and select HOME SETTINGS.
- Add icon to the Home screen: When enabled, it will display an icon on the home screen after installing a new app.
Swipe down to access: Swipe down from the home screen to access Notifications & Quick settings or shelf.
Google: Swipe right from the home screen to show the Google search bar and Discover.
Double tap to lock: Double tap on the blank area of the Home screen to turn the screen off and lock the device.
Launcher layout: Choose between the Home screen only and the Home screen and Drawer. - Quick search gestures: Choose how to access quick search, you can choose between swipe up and hold or swipe up to search apps.
Notification dots: Set the notification settings.
Icon pack: Set up icon styles for preset apps and some third-party apps
Home screen layout: Adjust the number of desktop grids and icon sizes. You can also set whether to hide the app names.
Hidden Space: To access, swipe right in the app drawer or swipe outwards with two fingers on the home screen.
Notification

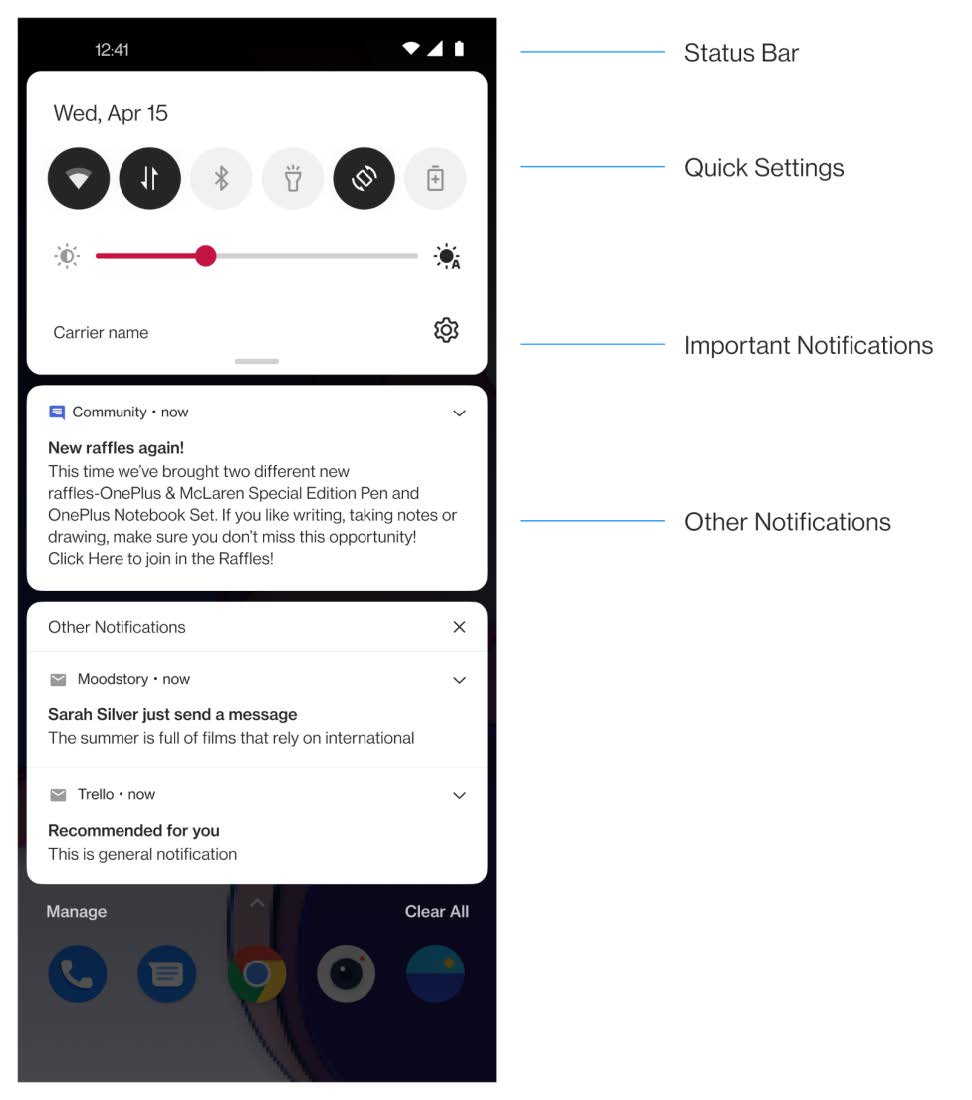
When a new system notification or app notification is received, the status bar will display the corresponding icon. Pull down the notification panel by swiping it down from the top of the application page or anywhere on the home screen.
- You can clear a notification by swiping it right (Some notifications need to be cleared by closing the related app).
- Long press a notification to enter the notification settings for that app.
- There are two categories: “Important” and “Other”, you can choose to move less important notifications to the “Other notifications” category, by pressing the notification and choosing “Other”.
Google Assistant
* When using Google Assistant for the first time, follow the prompts to log in to your Google account.
You can quickly access Google Assistant, by either pressing and holding down your home button, swiping up from the corner of the phone screen (if you have enabled “Navigation gestures”), or by pressing the power button, or simply saying, “Hey Google.”
With Google Assistant, you can:
- Send text messages (e.g., “Text Sara I am running late”)
- Set reminders (e.g., “Remind me to buy a birthday gift for John”)
- Take a selfie (e.g., “Take a selfie”)
- Set calendar events (e.g., “Set a calendar event for dinner with Charlie tomorrow from 7-9”)
- Play music (e.g., “Play jazz music on YouTube”)
- Navigate to places (e.g., “Give me Home directions “)
- Weather information (e.g., “Do I need an umbrella today?”)
Connect to Wi-Fi
- Enter Settings > Wi-Fi & network, and tap Wi-Fi.
- Select a Wi-Fi network from the list.
- You will automatically connect to an unencrypted Wi-Fi network that you have selected. To connect to an encrypted network, enter the password and tap CONNECT.
* You can also manually add a Wi-Fi network by selecting Add Networks.
Wi-Fi preferences
- Turn on Wi-Fi automatically: Enable this to turn Wi-Fi back on near high-quality saved networks, like your home network.
- Intelligently select the best Wi-Fi: Enable this for your phone to select and connect to the best Wi-Fi by analyzing connectivity and signal strength.
- Intelligent network connection: Automatically switch between Wi-Fi and mobile data when network connectivity is poor.
- Scanning always available: Enable this for your phone to allow location services or other apps to scan for networks when Wi-Fi is off.
- Open network notification: Enable this for your phone to notify you when a high-quality public network is available.
SIM & network
Enable or disable mobile data
Go to Settings > Wi-Fi & network > SIM & network, enable/disable Mobile data.
Preferred network type settings
Go to Settings > Wi-Fi & network > SIM & network settings, select Preferred network type
- 2G/3G/4G (Automatic)
- 2G/3G (Automatic)
- 2G only
Hotspot & tethering
Share the internet connection of your phone through Wi-Fi hotspots, USB, Bluetooth, and so on with other devices.
Wi-Fi Hotspot
When Wi-Fi Hotspot is turned on, your mobile data will be shared and other devices can connect to Wi-Fi.
You can set the following options to manage your Wi-Fi Hotspots:
- Wi-Fi Hotspot name: The generated Wi-Fi network signal name.
- Security: There are 3 options: No password, WPA2-Personal encryption, and WPA3-Personal encryption
- AP Band: Select 2.4 GHz or 5 GHz.
- Wi-Fi 6 standard hotspot: Enable to use Wi-Fi 6 standard hotspot.
USB tethering
To share your device’s mobile data or Wi-Fi network with your computer via USB, follow the steps below:
- Connect your phone to your computer with a USB cable
- Select the USB connection method as USB tethering in the control center.
* Some computers may need an Android RNDIS driver to be installed separately.
Bluetooth tethering
To share your device’s mobile data or Wi-Fi network with other devices by BLUETOOTH tethering, follow the steps below.
- Go to Hotspot & Tethering and enable Bluetooth tethering.
- Pair and connect your phone to the Bluetooth settings interface of other devices.
Bluetooth & device connection
Bluetooth
Bluetooth lets you connect to Bluetooth-enabled devices such as headsets and keyboards.
- Pair new device: Go to Settings > Bluetooth & device connection > Bluetooth, choose Pair a new device, select the device you want to connect from the list of available devices and enter the pairing code to complete the pairing.
* When your Bluetooth device is turned on but cannot be found, check the device’s manual and follow the instructions to switch the device to pairing mode to connect. - Previously connected devices: View previously paired devices and tap to reconnect.
- Discoverable: Enable this for your phone to be visible to all nearby Bluetooth devices.
- Files received via Bluetooth: You can check Bluetooth transfer history here.
Display
Go to Settings > Display to customize the screen display settings.
- Adaptive brightness: When enabled, the phone will optimize the screen brightness setting according to ambient light conditions. You can also manually adjust the slider bar below to set your preferences.
- Comfort tone: Automatically adapt screen color based on ambient light to ensure a comfortable display effect in different environments.
- Sleep: After the time is set, the screen will turn off automatically when the device is not in use.
- Advanced: Advanced settings are available, such as screen calibration, refresh rate, notch display, apps to display in full screen.
- Screen calibration: Selecting a different color mode will give different display results.
- Refresh rate: Set the screen refresh rate. The higher refresh rate offers a smoother experience.
- Front camera display area: Select whether to hide the front camera cutout.
- Apps to display in fullscreen: Set how Apps are displayed. Include Fullscreen mode and default. If Apps’ content is covered by the notch area, please switch to the default mode.
- Reading Mode: You can set the mono effect and chromatic effect to fit more reading scenario. Mono is for purely words and chromatic is for comfortable color reading.
- Dark mode: By enabling Dark mode, the system will use black as the main background color.
- Vibrant color effect: Enhance the color and contrast for a more vivid effect while playing videos.
- Ultra-high video resolution: Improved video clarity by enhancing algorithm with AI and the power consumption will be slightly increased when turned on.
Digital Well-being & parental
Controls
- Screen time: Show today’s screen wake-up times.
Unlocks: Show today’s device unlock times. - Notifications: Show today’s notifications received times.
Ways to disconnect:
- Dashboard: Manage the dashboard by screen time, Notifications received and App times opened. Click the icons on the right of the Apps name to set the app timer, once ran out, the app will be paused for the rest of the day, it will pop-up a window shows” App paused, your App timer ran out. It’ll start again tomorrow.”. You can click “SETTINGS” on the pop-up window to delete the timer.
- Bedtime mode: Use Bedtime mode to disconnect from your phone and avoid interruptions while you sleep. When it starts, Grayscale removes the screen’s color, does not disturb, and mutes sounds so you aren’t woken up by calls or notifications. When it ends, your phone changes back to its usual settings.
- Focus mode: Set to pause distracting apps when you need time to focus.
- Reduce interruptions:
- Manage notifications: Disable or enable the app’s notifications.
- Do Not Disturb: Please refer to Do Not Disturb for settings.
- Parental controls: Add content restrictions and set other limits to help children balance their screen time.
Send message
- Open the Messages application.
- Tap the floating button in the lower right corner.
- Select recipient.
- Enter SMS content.
- Tap the send icon in the lower right corner to send a message.
Driving Safety
- Do not use the device and safety should take priority when you are operating a vehicle. Be sure to obey related regulations in the area or country in which you drive.
- Do not place your phone or accessories near safety airbags.
- Compass and GPS information are only used for reference purposes.
- If you do not wish to disclose your location, be sure not to use applications that can record your location.
FCC Statement
This device complies with part 15 of the FCC rules.
Operation is subject to the following two conditions:
- This device may not cause harmful interference;
- This device must accept any interference received, including interference that may cause undesired operation.
NOTE: The manufacturer is not responsible for any radio or TV interference caused by unauthorized modifications or changes to this equipment. Such modifications or changes could void the user’s authority to operate the equipment.
NOTE: This equipment has been tested and found to comply with the limits for a Class B digital device, pursuant to part 15 of the FCC Rules. These limits are designed to provide reasonable protection against harmful to part interference in a residential installation. This equipment generates uses and can radiate radio frequency energy and, if not installed and used in accordance with the instructions, may cause harmful interference to radio communications.
However, there is no guarantee that interference will not occur in a particular installation. If this equipment does cause harmful interference to radio or television reception, which can be determined by turning the equipment off and on, the user is encouraged to try to correct the interference by one or more of the following measures:
- Reorient or relocate the receiving antenna.
- Increase the separation between the equipment and the receiver.
- Connect the equipment to an outlet on a circuit different from that to which the receiver is connected.
- Consult the dealer or an experienced radio/TV technician for help.
FAQs Oneplus 9 Pro Android
Has the OnePlus 9 Android 13?
A version of the software: Android 13 The software is now accessible after receiving launch approval.
OnePlus 9 will receive Android 14?
OxygenOS 14 (Android 14) for OnePlus Eligible Equipment: OnePlus Pro 10. 10T by OnePlus. OnePlus 10R with 5G. “OnePlus 9”
OnePlus or Samsung, which is better?
While Samsung still has an advantage at a distance due to a stronger zoom lens, OnePlus has made significant improvements in terms of color reproduction. Samsung’s picture processing is still of the highest caliber, with significant improvements in low light.
Is OnePlus using Android 13?
In August 2022, OnePlus released OxygenOS 13, the upcoming significant software update for its smartphones. The most recent iteration of OnePlus’ OxygenOS adds a layer of new “Aquamorphic” UI on top of Android 13 and a few useful features.
How frequently will the OnePlus 9 Pro be updated?
OnePlus 9 Pro’s history of updates The phone will eventually receive Android 14, according to OnePlus. This is the last and final Android update for the device. Android 13 has been officially released and is stable for the OnePlus 9 Pro. Android 12 has been officially released and is stable for the OnePlus 9 Pro.
What is the name of Android 14?
The announcement of Android 14 (internally known as Upside Down Cake) took place on February 8, 2023. Both a roadmap with the release dates of upgrades and a developer preview were made available right away. This featured four monthly beta versions in addition to a different developer preview that was released on March 8.
When will Android 14 release?
In August 2023, Android 14 will be made available to the public. As of February 2023, Android 14 is available as a preview for developers only, not for general consumer use.
Is OS 13 of oxygen superior to OS 12?
OxygenOS 13 resolves this problem by relying entirely on Oppo’s design system. The aptly named anamorphic UI, though a full 180 from the pure Android-inspired look that OnePlus phones used to launch with, is still a vast improvement over OxygenOS 12, which was a confusing jumble.
OnePlus 9 will receive OxygenOS 13?
OxygenOS 13 Open Beta 2 Update for the OnePlus 9, 9 Pro, and 9RT (October 25, 2022) For its line of devices, OnePlus has begun rolling out a new Open Beta Update based on Android 13.
How does the OnePlus 9 Pro download Android 12?
Users can back up their personal data and download the OTA update file for the OnePlus 9 or OnePlus 9 Pro if they wish to update to OxygenOS 12 straight away. Once the package has been downloaded, select Local Upgrade by tapping the top-right button under Settings > System > System Updates.
[embeddoc url=”https://manualsdock.com/wp-content/uploads/2023/08/Oneplus-9-Pro-Android.pdf” download=”all”]


