
Ninja PB051 Pod and Grounds Coffee Maker
IMPORTANT SAFEGUARD
General Precautions
- To eliminate a choking hazard for young children, discard all packaging materials immediately upon unpacking.
- This appliance can be used by persons with reduced physical, sensory or mental capabilities or lack of experience and knowledge if they have been given supervision or instruction concerning use of the appliance in a safe way and understand the hazards involved.
- To reduce the risk of electric shock, this appliance has a polarized plug (one blade is wider than the other). As a safety feature, this plug will fit into a polarized outlet only one way. If the plug does not fit fully into the outlet, reverse the plug. If it still does not fit, contact a qualified electrician. DO NOT force into outlet or try to modify to fit.
- Keep the appliance and its cord out of reach of children. DO NOT allow the appliance to be played with or used by children. Close supervision is necessary when used near children.
- To protect against fire, electric shock, and injury to persons, DO NOT immerse cord, plugs, or body of machine in water or other liquid.
- NEVER carry the appliance by the power cord or pull it to disconnect from electrical socket; instead grasp the plug and pull to disconnect.
- DO NOT operate any appliance with a damaged cord or plug, or after the appliance malfunctions, or has been dropped or damaged in any manner. Contact SharkNinja Operating LLC for service.
- For household and countertop use only. DO NOT let the power cord hang over the edge or touch hot surfaces such as the stove
- NEVER use socket below counter.
- To avoid risk of fire, electrical shock, or damage to the coffee maker, DO NOT use coffee maker in an appliance garage.
- Unplug from outlet when either the appliance or display clock is not in use, and before cleaning.
- Turn off and allow to cool before putting on or taking off parts, and before cleaning the appliance.
- To disconnect, turn any control to “OFF,” then remove plug from wall outlet.
- The use of an accessory not recommended by the manufacturer may create an overflow condition and scalding hazard, or result in fire, electric shock, or personal injury.
- ALWAYS use appliance on a clean, dry, level surface.
- DO NOT place on or near a hot gas or electric burner or in a heated oven.
- DO NOT use this appliance for anything other than its intended use.
- DO NOT use outdoors.
- DO NOT touch hot surfaces. Use handles or knobs.
- To avoid contact with steam and hot surfaces, DO NOT reach across top of coffee maker to froth.
- ALWAYS place a vessel or cup beneath the nozzle to receive the brewed coffee.
- DO NOT open brew chamber during brew cycle and cleaning cycle. Scalding may occur.
- DO NOT remove the vessel or cup while the appliance is running.
- DO NOT fill water reservoir with anything other than water, as other liquids may damage your coffee maker. Vinegar can be used, but ONLY for running a clean cycle.
- DO NOT overfill the water reservoir. Fill water only to the MAX line.
- Keep lid on water reservoir when brewing.
- DO NOT run the appliance without water.
- DO NOT brew ground coffee without a permanent filter installed in the brew basket.
- Exceeding maximum Coffee Measurement Chart capacity may cause overflow. DO NOT use fine or espresso ground coffee.
Ninja’ Pod Adapter - Only use capsules/pods intended for this appliance. If the capsule/pod does not fit, do not force it into the appliance.
- Ensure the pod is not damaged, torn, or expired.
Care & Maintenance - Unplug the coffee maker from outlet when not in use and before cleaning.
- To prevent illness from bacterial growth in the appliance, follow all cleaning instructions in the Care & Maintenance section of this Owner’s Guide.
- Clean the system on a weekly basis.
- If the product is not operating properly, visit ninjakitchen.com or contact SharkNinja Operating LLC for examination, repair, or adjustment.
- Cleaning and user maintenance shall not be done by children. Cord Statement
- A short power-supply cord is provided to reduce the risks resulting from becoming entangled in or tripping over a longer cord.
PARTS & ACCESSORIES
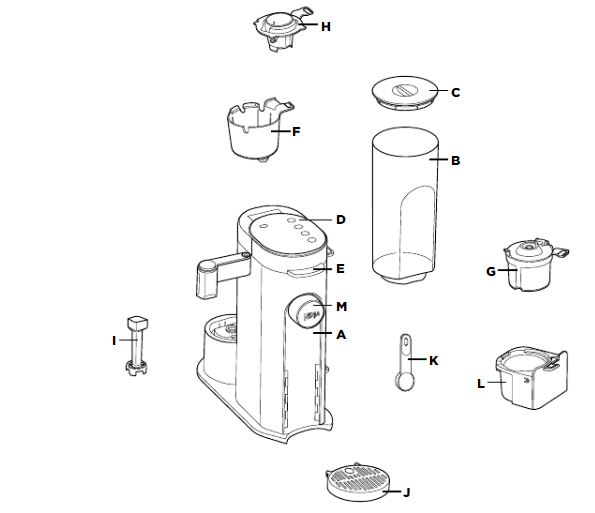
- A. Coffee Maker (Power cord not shown)
- B. 56 oz. Removable Water Reservoir
- C. Removable Water Reservoir Lid
- D. Control Panel
- E. Coffee Maker Lid
- F. Brew Basket
- G. Permanent Filter
- H. Ninja Pod Adapter
- I. Frother Whisk®
- J. Adjustable Cup Tray
- K. Ninja Smart Scoop
- L. Adapter Storage Bin
- M. Removable Nozzle
USING THE CONTROL PANEL
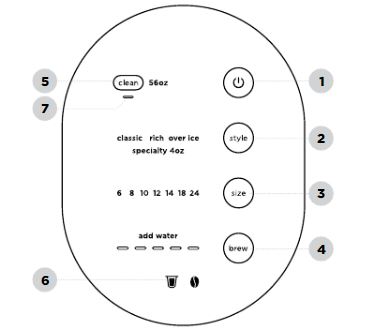
- Power Button
- Brew Style Button
- Brew Size Button
- Start/Cancel Brew Button
- Intelligent Clean Cycle Button
- Smart Sensing Mode Indicators
- Intelligent Clean Cycle Indicator(Orange)
HIGH-ALTITUDE CALIBRATION BREW
Required for users in high-altitude areas. Not running the high-altitude calibration brew in a highaltitude area will result in excessive steaming during brewing.
Because water boils at a lower temperature at higher altitudes, running a calibration cycle before your first brew allows the coffee maker to detect the boiling point of water at your location. Running a calibration cycle will help deliver a consistent brew each time.
- Fill the water reservoir up to, but not exceeding, the MAX line.
- Insert the brew basket and close the coffee maker lid, then place a 24 oz. cup or travel mug underneath the nozzle.
- Power on the unit and press and hold the BREW and CLEAN buttons until you hear a confirmation sound.
- A calibration cycle will begin, and the progress bar will advance until the altitude calibration is complete. The coffee maker will beep when completed. Discard the water in the 24 oz. cup or travel mug.
NOTE: This calibration is permanently saved and will not be reset if power is lost or unit is unplugged. The coffee maker can be recalibrated at any time.
USING THE NINJA POD ADAPTER AND PERMANENT FILTER
The coffee maker comes with the unique Ninja Pod Adapter already installed in the brew basket, and
the Permanent Filter located in the Adapter Storage Bin on the bottom right side of the coffee maker.
Always ensure the Ninja Pod Adapter or Permanent Filter is installed over the brew basket.
INSTALLING THE NINJA POD ADAPTER
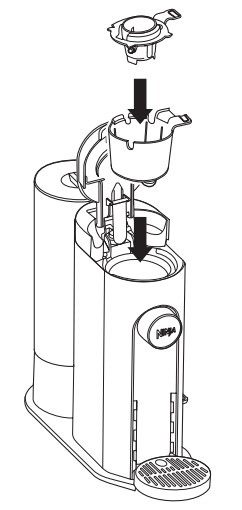
Place the Ninja Pod Adapter in the brew basket, ensure the handle is aligned with the brew basket handle, and press down on the Ninja Pod Adapter firmly until it clicks into place.
INSTALLING THE PERMANENT FILTER
Place the Permanent Filter in the brew basket and ensure the handle is aligned with the brew basket handle.

SMART SENSING MODE INDICATORS
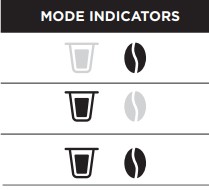
- Grounds: The Permanent Filter is inserted; shut the coffee maker lid and the coffee maker is ready to brew grounds.
- Pods: The Ninja® Pod Adapter is inserted; shut the coffee maker lid and the coffee maker is ready to brew pods.
- No State: One of the above criteria has not been met.
PRIMING YOUR NINJA SINGLE SERVE SPECIALTY COFFEE MAKER
IMPORTANT: Ensure you prime your coffee maker before your first brew.
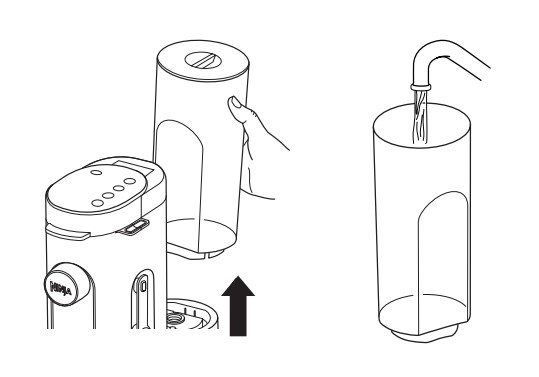
- Clean all accessories before your first brew.
- Plug in the power cord and the coffee maker will turn on automatically.
- Lift the water reservoir off its base. Remove the reservoir lid. Fill the reservoir up to at least the 24 oz. line with fresh water and place it on the base
NOTE: We recommend using cool or room temperature water in the reservoir. DO NOT fill with hot or boiling water. - Insert the brew basket and Permanent Filter and close the lid. Do not add coffee.
- Place a 24 oz. cup or travel mug under the nozzle and prime the system by running a 24 oz. Classic brew with water only. After the brew is complete, discard the water. You are now ready to brew coffee
USING THE NINJA SINGLE SERVE SPECIALTY COFFEE MAKER
BREW VOLUMES AND MEASUREMENTS
Each size and brew style produces a different amount of coffee to optimize strength and flavor
NOTE: The coffee grounds will absorb some of the water that is brewed; this will cause slight variability in brew volumes. Brew volumes may be slightly larger or smaller than what is stated due to various factors in the system.
APPROXIMATE BREW VOLUMES
| GROUNDS | |||
|
Size |
Classic |
Rich |
Over Ice (filled with ice) |
| 6 oz. | 6 oz. | 5 oz. | 6 oz. |
| 8 oz. | 8 oz. | 7 oz. | 8 oz. |
| 10 oz. | 10 oz. | 8 oz. | 10 oz. |
| 12 oz. | 12 oz. | 10 oz. | 12 oz. |
| 14 oz. | 14 oz. | 12 oz. | 14 oz. |
| 18 oz. | 18 oz. | 16 oz. | 18 oz. |
| 24 oz. | 24 oz. | 22 oz. | 24 oz. |
NOTE: There may be some water left in the reservoir after your brew. This is normal and keeps the coffee maker from running out of water.
| PODS | |||
|
Size |
Classic |
Rich |
Over Ice (filled with ice) |
| 6 oz. | 6 oz. | 6 oz. | 6 oz. |
| 8 oz. | 8 oz. | 8 oz. | 8 oz. |
| 10 oz. | 10 oz. | 9 oz. | 10 oz. |
| 12 oz. | 12 oz. | 11 oz. | 12 oz. |
NOTE: You do not need to adjust the size for Specialty brew; it always yields approximately 4 oz.
BREWING STYLES

- Smooth, well-balanced flavor.
- Specially designed to brew hot over ice for freshly brewed iced coffee that is not watered down.
Always fill your vessel to the top with ice cubes before brewing Over Ice.

- More intense flavor that stands up to milk, cream, or flavoring.
- A super-rich concentrate that allows you to make coffee-based drinks like cappuccinos and lattes. Will only brew 4 oz. (not included on all models).
NOTE: Over Ice brew is designed to produce a concentrated brew into a vessel filled with ice. It is normal for some ice in the vessel to melt as the coffee is brewed, and this will produce a cold beverage with the ideal strength and flavor.
NOTE: Rich brew will use slightly less water and yield slightly less brewed coffee than Classic brew. See Approximate Brew Volumes chart for additional information.
BREWING PODS
- To prepare for brewing using pods, open the coffee maker lid and ensure the brew basket and Ninja Pod Adapter are installed and handles are aligned.

IMPORTANT: Ensure the pod is not damaged, torn, or expired. DO NOT remove the top of the K-Cup Pod. - Place the pod in the Ninja Pod Adapter.
NOTE: Reusable K-Cup Coffee Filters are not compatible with the Ninja Pod Adapter.
HIGH-ALTITUDE BREWING: Before closing the coffee maker lid to start a brew, using your fingers, carefully apply pressure on the K-Cup Pod until the bottom of the K-Cup Pod is punctured by the exit needle, and the pod is fully seated in the pod holder. This releases excessive gas built up from the high altitude and prevents pod blowout. - Press the coffee maker lid down firmly to pierce the pod and ensure that it is completely closed. There will be an audible click and some resistance when closing the handle as the needle punctures the pod.

- Place an empty vessel under the nozzle.
NOTE: Set the Adjustable Cup Tray to desired height by pulling the cup tray up and out for smaller vessels and to help prevent coffee splatter. The cup tray may be removed for brewing into taller and wider vessels.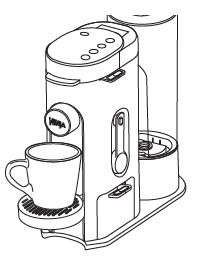
- Press the Style Button and select either Classic, Rich, Over Ice, or Specialty brew (not available on all models).
- Press the Size Button to toggle through and choose your desired size.
- Press the Brew Button to start brewing. A confirmation beep will sound and the progress bar on the control panel will illuminate to indicate the status of the brew. When finished, the coffee maker will beep three times.
- To cancel the brew at any time, press the Brew Button again or press the Power Button.
MEASURING YOUR COFFEE GROUNDS
For best results, use the measurements on the Ninja Smart Scoop™ or in the chart to determine how much ground coffee to use for each brew size. The amount of ground coffee for each size will remain the same for any brew type you select. For example, if you select 10 oz. and Classic, you will use the same amount of coffee grounds as if you were to select 10 oz. Rich and 10 oz. Over Ice.
NOTE: Adjust to your preferred taste. More scoops result in stronger coffee but slightly lower volumes, fewer scoops result in weaker coffee and slightly higher volumes. Decaf and finer grind coffees drain slower and may cause coffee to overflow the filter. If overflow occurs, we recommend one less scoop. We also recommend one less scoop for decaf. With some brands of coffee, the amount of grounds may need to be reduced to prevent overflow.
| COFFEE MEASUREMENT CHART | ||
| Serving Size | Ninja Smart Scoop | Tablespoons |
| 6 oz. |
2–3 Scoops |
2–3 Tablespoons |
| 8 oz. | ||
| 10 oz. | ||
| 12 oz. | ||
| 14 oz. |
3–5 Scoops |
3–5 Tablespoons |
| 18 oz. | ||
| 24 oz. | 5–7 Scoops | 5–7 Tablespoons |
| Specialty (4 oz.) | 4 Scoops | 4 Tablespoons |
BREWING GROUND COFFEE
- To prepare for brewing using ground coffee, open the coffee maker lid and ensure the brew basket is installed.

- Place the Permanent Filter in the brew basket; the Permanent Filter is located in the Adapter Storage Bin on the right side of the coffee maker.
NOTE: DO NOT use a paper filter in this coffee maker.
NOTE: Ensure that the Ninja Pod Adapter is removed from brew basket before inserting the Permanent Filter.
NOTE: The adapter storage bin can be used for both Permanent Filter and Ninja Pod Adapter.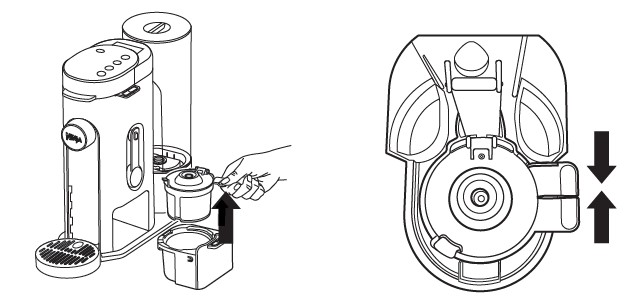
- Follow the measurements on the Ninja Smart Scoop or in the Coffee Measurement Chart to fill the Permanent Filter.

NOTE: DO NOT place ground coffee directly in the brew basket without the Permanent Filter installed. - Close the Permanent Filter lid and the coffee maker lid.
- Place an empty vessel under the nozzle.

NOTE: Set the Adjustable Cup Tray to desired height for smaller vessels and to help prevent coffee splatter. - Press the Style Button and select either Classic, Rich, Over Ice, or Specialty brew (not available on all models).
- Press the Size Button to toggle through sizes.
- Press the Brew Button to start brewing. A confirmation beep will sound and the progress bar on the control panel will illuminate to indicate the status of the brew. When finished, the coffee maker will beep three times.
- To cancel the brew at any time, press the Brew Button again or press the Power Button.
NOTE: The brewing cycle will begin then pause for a short period before resuming. This process is used to evenly saturate the coffee grounds. This applies to all brew styles. The progress bar is an indication of the total time remaining until the end of the brew.


