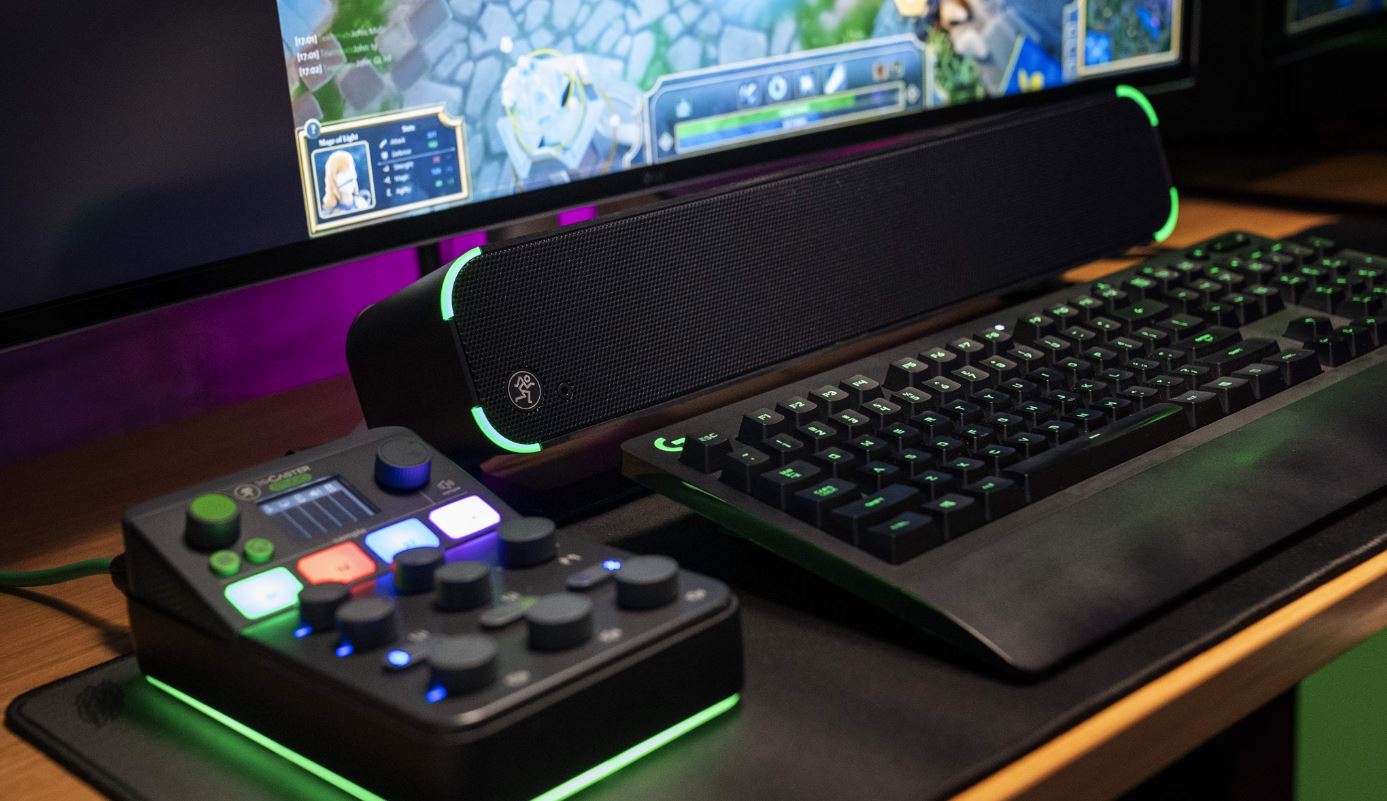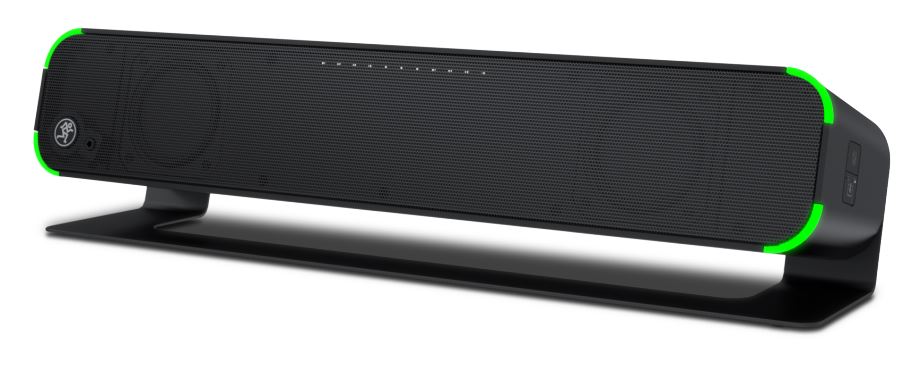
Mackie CR2-X BAR PRO Soundbar With Bluetooth
About Mackie
The history of Mackie reveals a business that is everything but typical. It is the tale of a young man who has a dream. a desire to create a world with superior audio. (Yes, he was an adult and he was primarily considering music, but it’s still cool.) It is the tale of a business that began with a modest PA mixer and expanded to become the industry standard for podcasting, professional audio, live sound, and content creation. And as we used to say in the beginning, after reading it, you’ll have to pull your socks up because the story is that gripping and uplifting.
Important Safety Instructions
- Read these instructions.
- Keep these instructions.
- Heed all warnings.
- Follow all instructions.
- Do not use this apparatus near water.
- Clean only with a dry cloth.
- Do not block any ventilation openings.
Install in accordance with the manufacturer’s instructions. - Minimum distance (5 cm) around the apparatus for sufficient ventilation.
- Do not install near any heat sources such as radiators, heat registers, stoves, or other apparatus (including amplifiers) that produce heat.
- No naked flame sources, such as lighted candles, should be placed on the apparatus.
- This device should be installed and operated with a minimum distance of 20cm between the radiator & your body.
- Protect the power cord from being walked on or pinched particularly at plugs, convenience receptacles, and the point where they exit from the apparatus.
- Only use attachments/accessories specified by the manufacturer.
- Use only with a cart, stand, tripod, bracket, or table specified by the manufacturer, or sold with the apparatus. When a cart is used, use caution when moving the cart/apparatus combination to avoid injury from tip-over.
- Unplug this apparatus during lightning storms or when unused for long periods of time.
- Refer all servicing to qualified service personnel. Servicing is required when the apparatus has been damaged in any way, such as power-supply cord or plug is damaged, liquid has been spilled or objects have fallen into the apparatus, the apparatus has been exposed to rain or moisture, does not operate normally, or has been dropped.
- This apparatus shall not be exposed to dripping or splashing, and no object filled with liquids, such as vases or beer glasses, shall be placed on the apparatus.
- Do not overload wall outlets and extension cords as this can result in a risk of fire or electric shock.
- Explanation of symbol, marking, signal lamp, or similar means indicates that the apparatus is completely disconnected from the mains.
- WARNING: Please refer to the information on the exterior bottom enclosure
for electrical and safety information before installing or operating the apparatus. - NOTE: This equipment has been tested and found to comply with the limits for a Class B digital device, pursuant to part 15 of the FCC Rules. These limits are designed to provide reasonable protection against harmful interference in a residential installation. This equipment generates, uses, and can radiate radio frequency energy and, if not installed and used in accordance with the instructions, may cause harmful interference to radio communications. However, there is no guarantee that interference will not occur in a particular installation. If this equipment does cause harmful interference to radio or television reception, which can be determined by turning the equipment off and on, the user is encouraged to try to correct the interference by one or more of the following measures:
- Reorient or relocate the receiving antenna.
- Increase the separation between the equipment and the receiver.
- Connect the equipment to an outlet on a circuit different from that to which the receiver is connected.
- Consult the dealer or an experienced radio/TV technician for help.
CAUTION: Changes or modifications to this device not expressly approved by LOUD Audio, LLC. could void the user’s authority to operate the equipment under FCC rules.
Getting Started
We realize that you can’t wait to hook up your CR2-X Bar Pro and try it out. Nevertheless, please take the time to read this page NOW, and the rest can wait until you’re good and ready.
- Connect one end of the external power supply to the CR2-X Bar Pro and plug the other end
into an AC outlet. - Push the included line cord securely into the CR2-X Bar Pro’s power connector and plug the other end into an AC outlet.
- Connect the line-level monitor signal from your computer or other line-level signal source to the input jacks (USB-C or 1/8″).
…AND / OR…
…Connect your device via Bluetooth - Power up the CR2-X Bar Pro.
- Confirm that the input selector switch has the correct input selected.
- Play an audio file and slowly raise the input and output volumes to a comfortable listening level.
If you desire a more thorough walk-through of the CR2-X Bar Pro, there is a wealth of information in the following pages!
Hookup Diagrams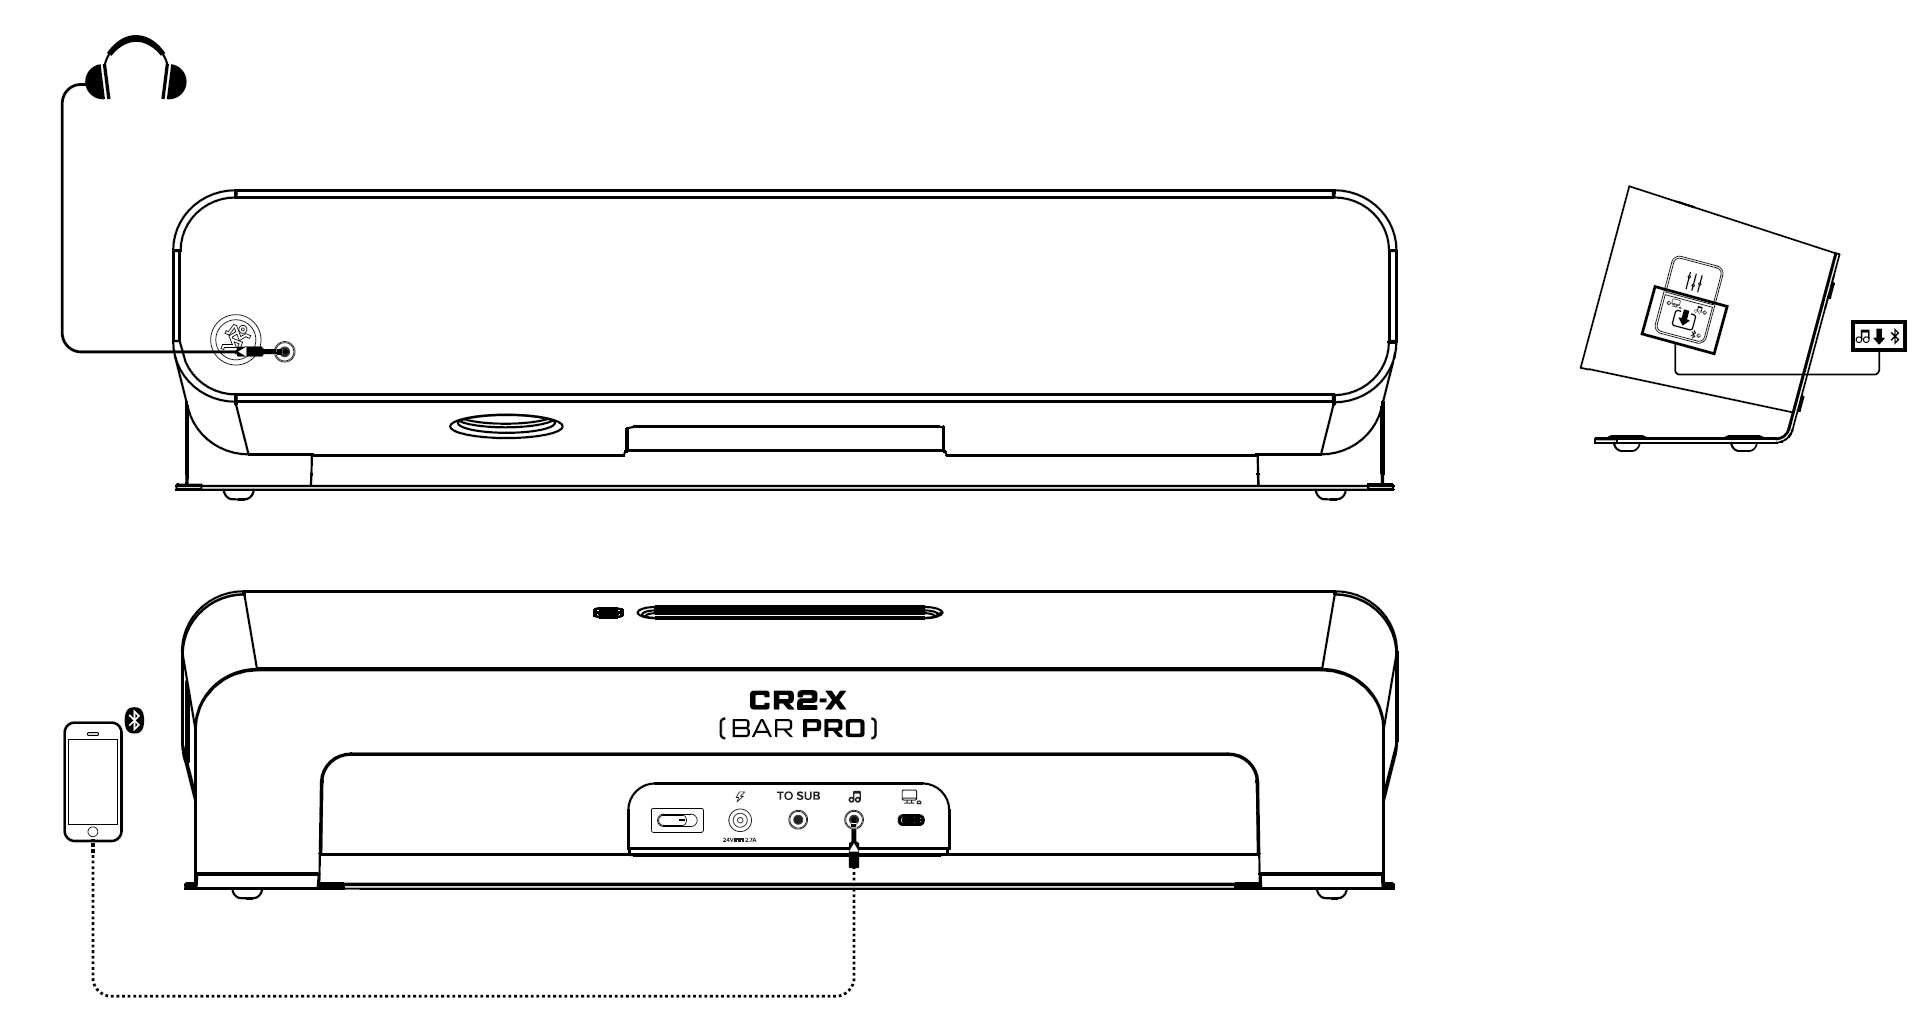
This is a typical use for CR2-X Bar Pro. This would be a prime example of utilizing it to play music.
First, make sure the CR2-X Bar Pro is positioned for your setup.
Here a phone is connected to CR2-X Bar Pro via Bluetooth, although it can also be “hardwired” into the 1/8″ stereo input jack using a 1/8” to 1/8” cable. Both options are on display here.
Next, make sure that the input selector switch is set to either Bluetooth or 1/8″ / Aux, depending on how the phone is connected, of course. Additionally, we would suggest setting the EQ preset switch to music.
Now play audio through the phone, making sure that the volume of the phone and CR2-X Bar Pro are above “0”. Once you hear the audio, simply adjust the volume to taste!
Optional: Is there someone who doesn’t like what you’re listening to? Well, first off, they’re wrong. That’s a given. There is a solution, though. Plugging a pair of Mackie headphones into the 1/8″ headphones jack auto-defeats the speaker output. The top panel volume slider then controls the level going to the phones.
The illustration above shows another typical use for CR2-X Bar Pro. This would be a prime example of utilizing it for gaming. First, make sure the CR2-X Bar Pro is positioned for your setup.
A gaming computer is connected to CR2-X Bar Pro utilizing a USB-C to USB-A cable.
Next, make sure that the input selector switch is set to USB. Additionally, we would suggest setting the EQ preset switch to… <drum roll>… game, of course! You’re gaming… or will be quite soon!
Don’t forget to change the output to ‘CR2-X Bar Pro’ via Settings on your computer
Now play audio through the computer, making sure that the volume of the computer and CR2-X Bar Pro are above “0”. Once you hear the audio, simply adjust the volume to taste!
Optional: As shown above, a CR6S-X subwoofer is connected to the CR2-X Bar Pro’s 1/8″ TO SUB output jack. Just imagine what your games and movies would sound like with one of these setups. Now stop imagining and go dial it up!
Optional: Plugging a pair of Mackie headphones into the 1/8″ headphones jack auto-defeats the speaker output. The top panel volume slider then controls the level going to the phones.
CR2-X BAR PRO: Rear Panel Features
Power Connector (1)
CR2-X Bar Pro has a universal external power supply that accepts any AC voltage ranging from 100 VAC to 240 VAC. No need for voltage select switches.
It will work virtually anywhere in the world.
That’s why we call it a “Planet Earth” power supply!
It is less susceptible to voltage sags or spikes compared to conventional power supplies and provides greater electromagnetic isolation and better protection against AC line noise.
Attach the AC connector (the smaller, shorter cable that plugs into the wall) to the power supply adapter (the bigger, longer cable that plugs into
the CR2-X Bar Pro).
The power supply adapter may be connected to the CR2-X Bar Pro by pushing it into the power receptacle on the rear panel and plugging the other end into a live AC outlet. The LED on the power supply will illuminate blue to indicate that it is receiving power.
Power Switch (2)
Press the right side of this rocker switch inwards to turn on the CR2-X Bar Pro. The corner pieces on the front panel will illuminate green, confirming success. Additionally, it will state, “Power on. Bluetooth pairing mode.” Press the left side of this rocker switch inwards to turn it off.
To Sub (3)
Not much of a surprise here, as we would like you to connect this output to the input of a subwoofer using a 1/8″ connector.
Of course, we would highly recommend the CR6S-X or CR8S-XBT subwoofer; see the hookup diagram on page 6 and check the Mackie website for more information!
1/8″ Stereo Input Jack (4)
Connect a line-level signal from a smartphone, MP3 player, or other signal source to this input jack using an unbalanced 1/8″ connector.
It is wired as follows, according to standards specified by the AES (Audio Engineering Society):
Stereo 1/8″ TRS
Sleeve = Shield (Ground)
Tip = Left
Channel Ring = Right Channel
USB I/O (5)
Since the CR2-X Bar Pro is a “Premium Desktop PC Soundbar with Bluetooth®,” the USB connection will (most likely) be one of the most widely used features. In short, it works as an interface that allows audio to stream from the CR2-X Bar Pro via computer.
This is the connection that will be used for gaming, watching movies and fun cat videos, playing music, or just about any other sound that is emitted from your computer.
Connect the USB-C side of a USB cable to the CR2-X Bar Pro and the USB-A side to the computer’s USB port.
Don’t forget to change the output to ‘CR2-X Bar Pro’ via Settings on your computer.
CR2-X BAR PRO: Front Panel Features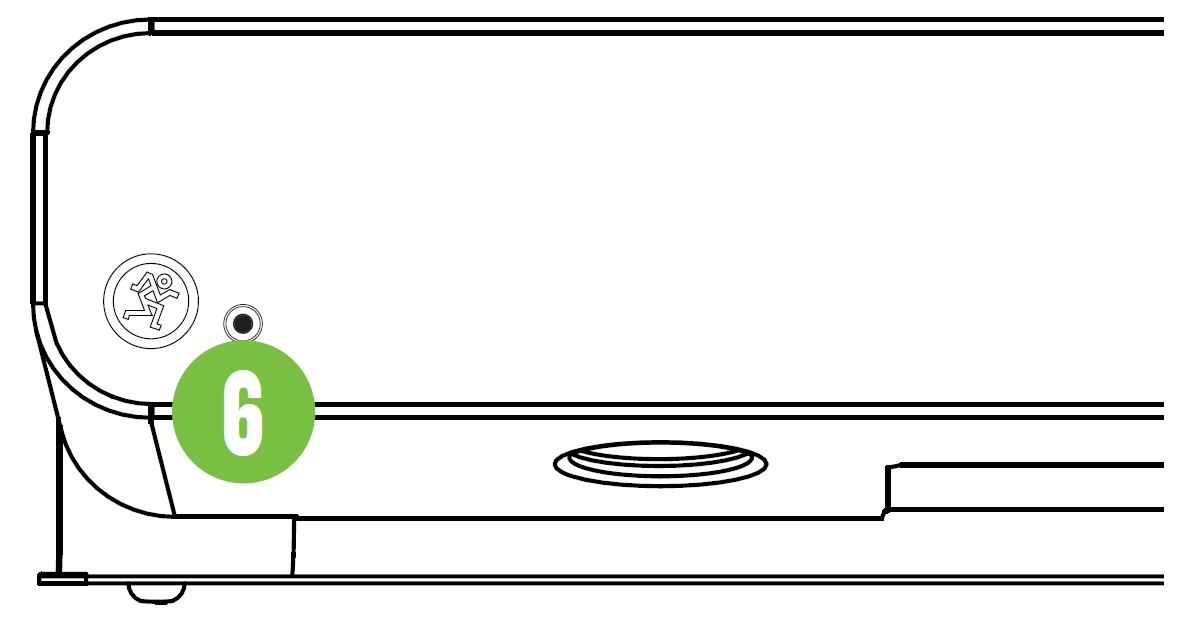
Phones Output (6)
This 1/8″ TRS connector supplies the output to stereo headphones. The volume is controlled with the volume slider on the top of the CR2-X Bar Pro.
The signal to the power amp is killed when headphones are connected.
The phone output is wired as follows, according to standards specified by the AES (Audio Engineering Society):
Stereo 1/8″ TRS
Sleeve = Shield (Ground)
Tip = Left
Channel Ring = Right Channel
Always turn the volume knob all the way down before connecting headphones. Then turn it up slowly as you listen carefully.
CR2-X BAR PRO: Right Side Panel Features
EQ Preset Switch (7)
This is a momentary switch that cycles between unique EQ modes: Music, Voice, and Game.
Simply press this switch to cycle between the EQ presets. A voice prompt announces which EQ is currently selected.
- MUSIC EQ MODE – This mode features an upper bass parametric scoop to reduce unwanted low-frequency color and adds a boost to upper mid-range and high frequencies.
- VOICE EQ MODE – This mode is perfect for applications where the desired output is increased clarity and detail of intelligible speech at low volumes. This is the setting for listening to audiobooks, watching TED talks, and other motivational speeches.
- GAME EQ MODE – This mode is full range,
but focuses on increased bass and brilliant high frequencies. This is the setting that gamers will want to select when saving the world from the zombie apocalypse. - À LA MODE – This mode features any of the aforementioned EQ preset modes, but with a scoop of ice cream.
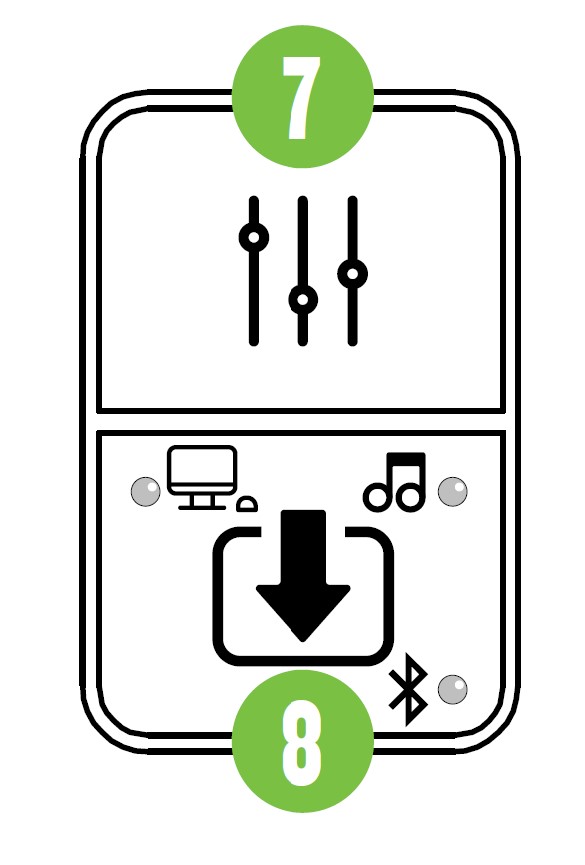 Input Selector Switch and LEDs (8)
This is a momentary switch that cycles between the three input choices: USB, 1/8″, and Bluetooth.
Simply press this switch to cycle between the input selections. Each input selection is accompanied by a different colored LED. A voice prompt announces which input is currently selected.
- USB [Purple]
- 1/8″ / Aux [Amber]
- Bluetooth [Cyan]
This includes a device connected via Bluetooth. Switching the source selection away from a connected device (Bluetooth) to USB or 1/8″ / Aux and back again will not disrupt the Bluetooth connection, for example.
CR2-X BAR PRO: Top Panel Features
Volume (9)
Tap or slide your finger in this indented volume bar to adjust the overall output level. The left side is quieter and the right side is louder. The accompanying LEDs centered underneath the front panel grille will illuminate white to display the volume level. Tapping (or sliding to) the far left side will mute the output. The front panel LED would then be a single red LED.
LED Color Selector (10)
The four corner pieces on the front of the CR2-X Bar Pro illuminate to add a nice accent to your surroundings. This momentary switch cycles between the eight color choices. Simply press this switch to cycle between the color selections.
Bluetooth Connection
Upon powering up the CR2-X Bar Pro, the Bluetooth function is either:
- In sleep mode. See ‘Pairing and connecting for the first time’ or…
- …Paired and connected. See ‘Previously paired and connected devices’.
Pairing and connecting for the first time:
Start by changing the input selector switch to Bluetooth. The accompanying LED will illuminate and flash cyan while in pairing mode. Additionally, a voice prompt announces “Bluetooth pairing mode”. [The LED will continue to flash until it has successfully paired and connected].
While CR2-X Bar Pro is in pairing mode, simultaneously scan for Bluetooth devices on the device. You should see ‘CR2-X Bar Pro’ appear in the list of “available devices”. Select it by tapping it. From there, your Bluetooth device should indicate that it is successfully connected, a confirmation voice prompt announces, “connected” and the Bluetooth button will stop flashing and remain solid cyan.
If it does not, start the pairing process again, and make sure that the CR2-X Bar Pro and the device are both in pairing mode at the same time.
Previously paired and connected devices:
The Bluetooth connection will disconnect if it’s out of range. Previously paired and connected devices will automatically reconnect when back within range. Additionally, it will automatically search and connect to remembered devices in range upon powering up.
Technical Information
CR2-X BAR PRO Specifications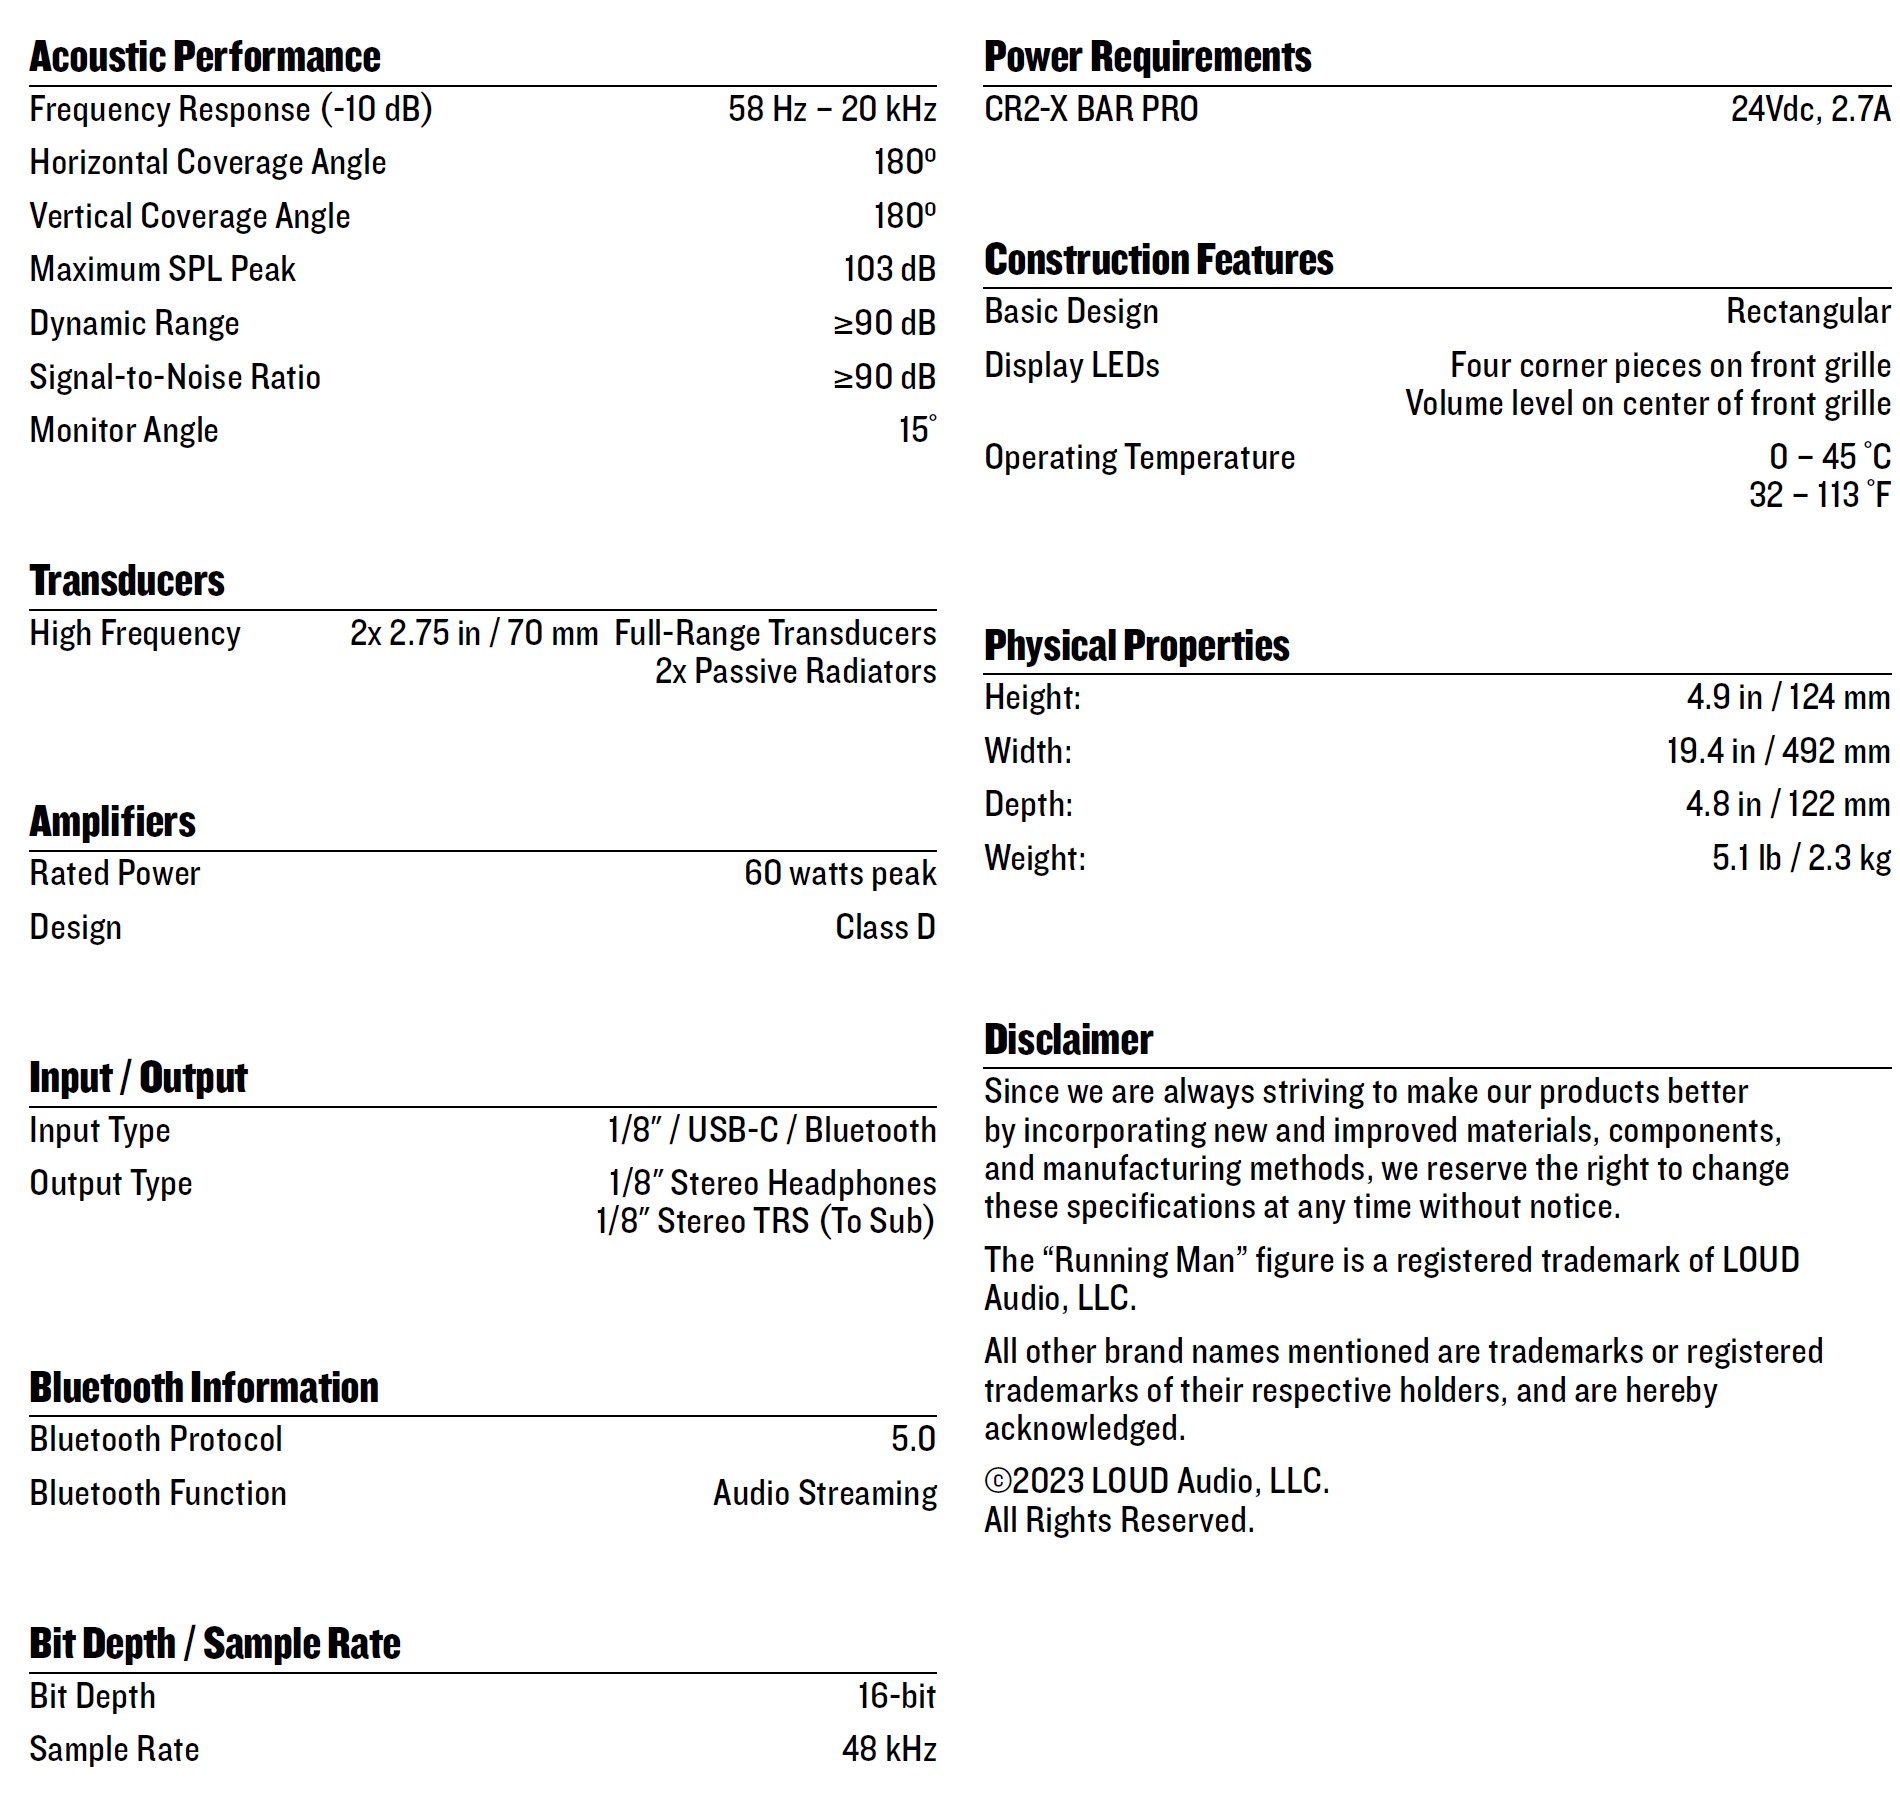
CR2-X Bar Pro Dimensions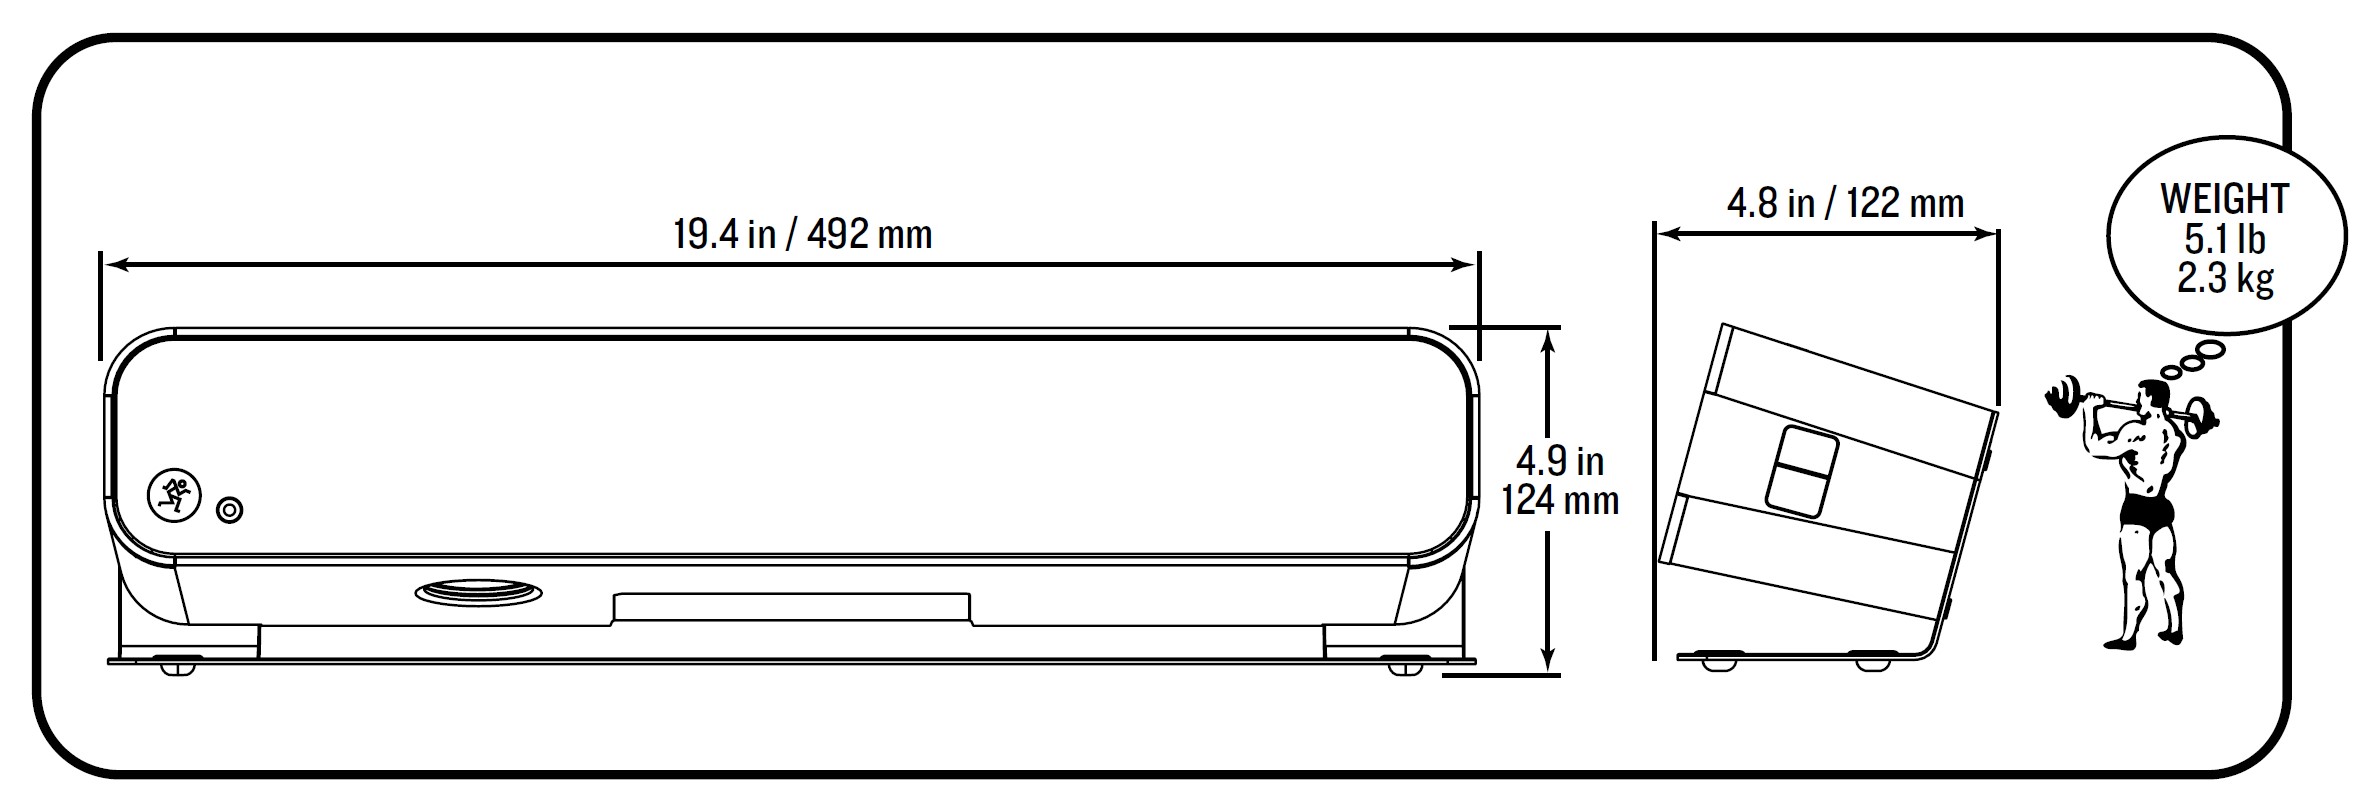
CR2-X Bar Pro Magnitude Response Legend
MUSIC EQ Mode – This mode features an upper bass parametric scoop to reduce unwanted low-frequency color and adds a boost to upper mid-range and high frequencies.
VOICE EQ Mode – This mode is perfect for applications where the desired output is increased clarity and detail of intelligible speech at low volumes.
GAME EQ Mode – This mode is full range, but focuses on increased bass and brilliant high frequencies. This is the setting that gamers will want to select when saving the world from the zombie apocalypse.
CR2-X Bar Pro Magnitude Response Graph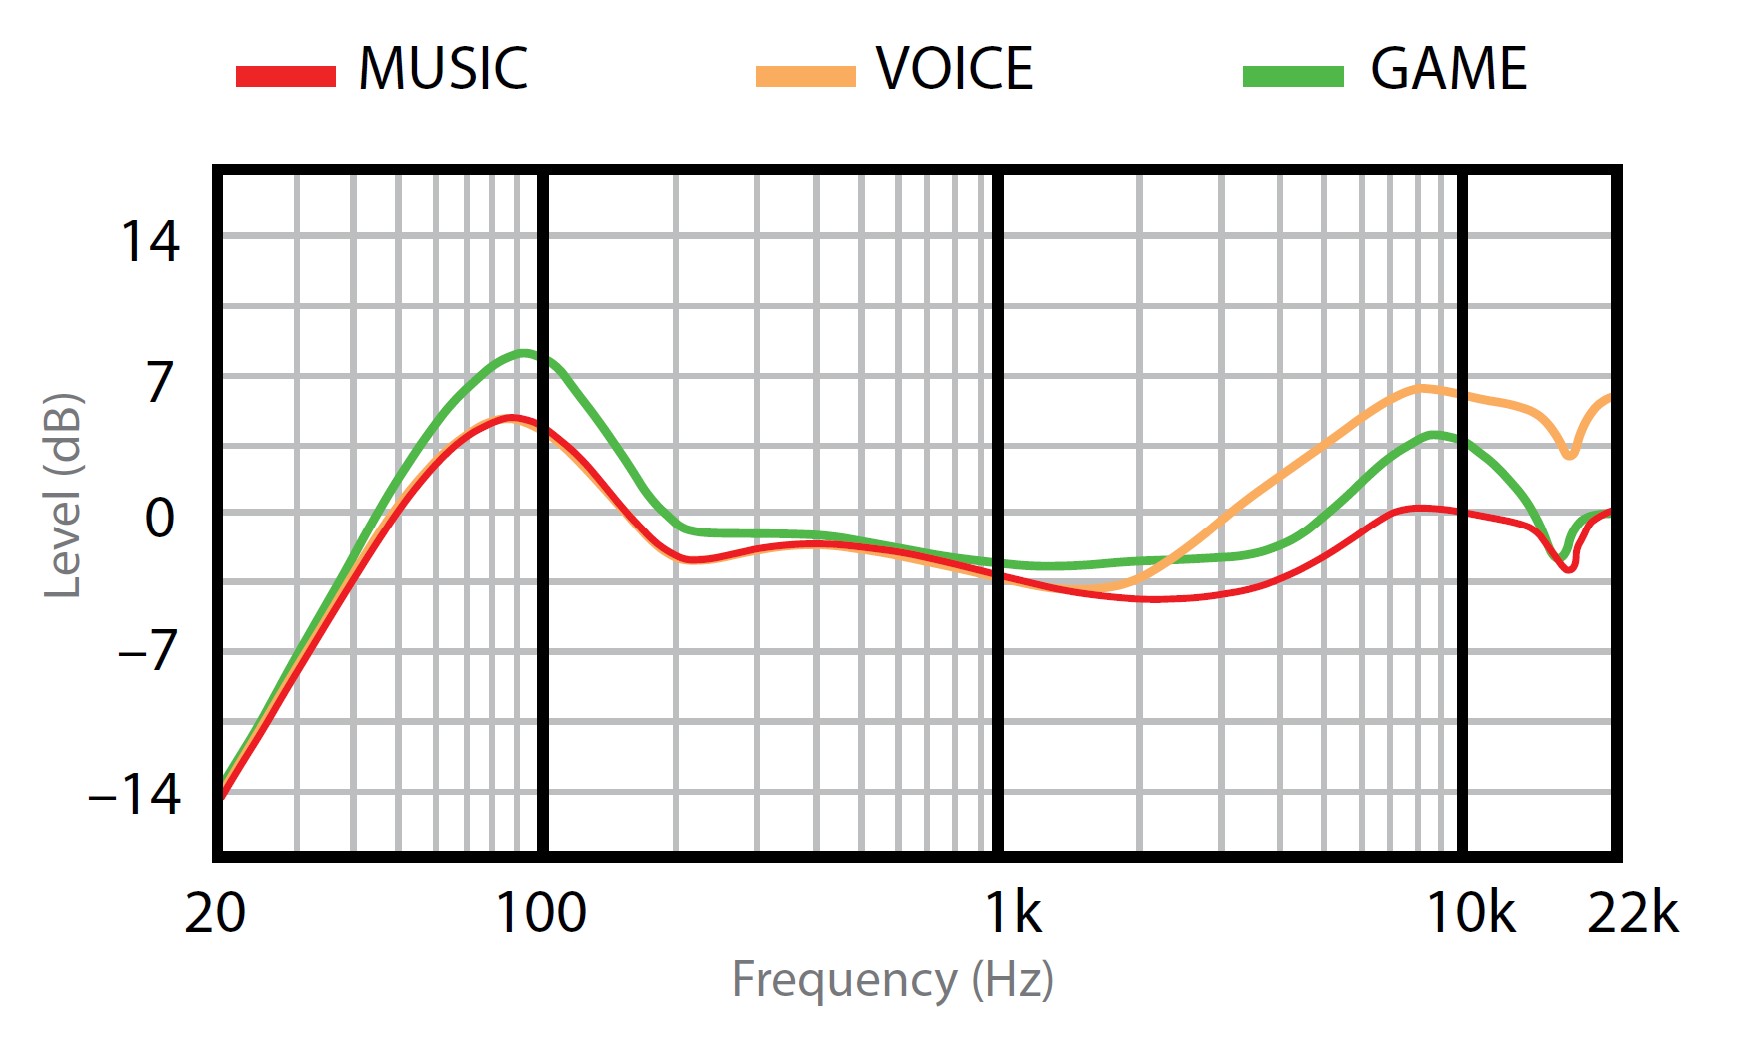
Limited Warranty
Please keep your sales receipt in a safe place.
This Limited Product Warranty (“Product Warranty”) is provided by LOUD Audio, LLC (“LOUD”) and is applicable to products purchased in the United States or Canada through a LOUD-authorized reseller or dealer. The Product Warranty will not extend to anyone other than the original purchaser of the product (hereinafter, “Customer,” “you” or “your”).
For products purchased outside the U.S. or Canada, please visit www.mackie.com to find contact information for your local distributor and information on any warranty coverage provided by the distributor in your local market.
LOUD warrants to Customer that the product will be free from defects in materials and workmanship under normal use during the Warranty Period.
If the product fails to conform to the warranty then LOUD or its authorized service representative will at its option, either repair or replace any such nonconforming product, provided that Customer gives notice of the noncompliance within the Warranty Period to the Company at: www.mackie.com or by calling LOUD technical support at 1.800.898.3211 (toll-free in the U.S. and Canada) during normal business hours Pacific Time, excluding weekends or LOUD holidays. Please retain the original dated sales receipt as evidence of the date of purchase. You will need it to obtain any warranty service.
For full terms and conditions, as well as the specific duration of the Warranty for this product, please visit www.mackie.com.
The Product Warranty, together with your invoice or receipt, and the terms and conditions located at www.mackie.com constitutes the entire agreement and supersedes any and all prior agreements between LOUD and Customer related to the subject matter hereof. No amendment, modification, or waiver of any of the provisions of this Product Warranty will be valid unless set forth in a written instrument signed by the party to be bound thereby.
Support
Need help with the CR2-X BAR PRO?
- Visit www.mackie.com/support to find: FAQs, manuals, addendums, and other documents.
- Email us at: www.mackie.com/support-contact
- Telephone 1-800-898-3211 to speak with one of our splendid technical support chaps (Monday through Friday, normal business hours, Pacific Time).
FAQS About Mackie CR2-X BAR PRO Soundbar With Bluetooth
How durable are soundbars?
6-16 years
Do soundbars have an impact?
Your TV speakers may need to be replaced with soundbars.
Do soundbars work well with music?
When you don’t have enough room for a full home theater setup, soundbars are an excellent and portable method to improve your music listening experience.
Why is a sound bar necessary for my TV?
delivers a rich audio experience.
Does the soundbar always remain on?
If Auto Standby is turned on, the soundbar will automatically turn off or enter standby mode after around 15 minutes.
How is a soundbar maintained?
Regularly dust and clean.
What effects does a soundbar have?
offers sound effects and music additional depth and enhances the cinematic experience.
A soundbar’s power is how much?
Many inexpensive soundbars can draw 100W of power.
Are soundbars simple to operate?
It’s shockingly simple and effective.
The power source for sound bars.
The majority of them have an integrated amplifier that can power the speakers on its own.
For more manuals by Mackie, Visit Manualsdock
[embeddoc url=”https://manualsdock.com/wp-content/uploads/2023/10/Mackie-CR2-X-BAR-PRO-Soundbar-With-Bluetooth-Owner-Manual.pdf” download=”all”]

