
JVC KW-V940BW Monitor With DVD Receiver
About JVC
JVC (JVCKENWOOD Europe B.V.) is JVCKENWOOD Corporation’s wholly owned subsidiary. JVC is a renowned creator and manufacturer of sophisticated audio and video products that employ cutting-edge technologies to produce high-quality sound and visuals.
JVC provides high-definition displays and home theater projectors, digital video camcorders, home theater systems, audio components and systems, portable audio products, digital storage devices, audio and video accessories, and automobile audio/video products in its consumer products.
Basic Operations
Functions of the Buttons on the Front Panel
Turning on the Unit
The method of turning on is different depending on the model.
- Press the FNC button. The unit is turned on.
NOTE: If it is your first time to turn the unit on after installation, it will be necessary to perform Initial setup
To turn off the unit:
- Press the FNC button. A popup menu appears.
- Touch
 . The HOME screen appears.
 - Touch
 .
. - Touch Power Off.
Initial Settings
Initial setup
Perform this setup when you use this unit first time.
- Set each item as follows.
- Language: Select the language used for the control screen and setting items. The default is “British English (en)”.
-
Touch [Language].
-
Touch [Language Select].
-
Select the desired language.
-
Touch
 .
.
For details of operation, see User Interface Setup
-
-
Clock: Sets the synchronization of the clock and adjusts it.
-
Display: Set the button illumination color.
If it is hard to see the image on the screen, adjust the viewing angle.-
Touch Display.
-
Touch Viewing Angle.
-
Select an angle
-
Touch
 .
.
For details, see Display Setup.
-
-
Camera: Set the parameters for the camera.
-
Touch [Camera].
-
Set each item and touch
 .
.
For detailed operation, see Camera Setup.
-
-
DEMO: Set the demonstration mode. The default is “ON”.
-
Touch [DEMO] and select ON or OFF.
-
-
3way X’over: Displays the message screen.
For detailed operation, see the 3-way speaker system setup.
- Language: Select the language used for the control screen and setting items. The default is “British English (en)”.
-
Touch Finish.
NOTE: These settings can be made from the SETUP menu. See Setup (P.53).
Security Code Setup
You can set up a security code to protect your receiver system against theft.
When the Security Code function is activated, the code cannot be changed and the function cannot be deactivated. Note that the Security Code can be set with a 4 to 8-digit number of your choice.
- Press the FNC button. A popup menu appears.
- Touch
 . The HOME screen appears.
 - Touch
 .
. - Touch [Security].
- Touch [Security Code Set] on the Security screen. Security Code Set screen appears.
- Enter a security code with 4 to 8 digits and touch Enter.
- Enter the same code again and touch Enter.
Now, your security code is registered.
NOTE:
- Touch [BS] to delete the last entry.
- If you enter a different security code, the procedure returns to step 6 (for the first code entry).
- If you have disconnected the Receiver from the battery, enter the correct security code that you have entered in step 6 and touch [Enter]. You can use your receiver.
To change the security code:
- Touch Security Code Change on the Security screen, then repeat steps 6 and 7.
To clear the security code:
- Touch [Security Code Cancellation] on the Security screen, then repeat step 6.
Calendar/clock settings
- Press the FNC button. A popup menu appears.
- Touch
 . The HOME screen appears.
 - Touch
 .
. - Touch User Interface. User Interface screen appears.
- Touch Time Zone.
- Select the time zone.
- Set each item as follows. Scroll the page to show hidden items.
- [Time Format]: Select the time display format. [12-Hour] (Default)/ [24-Hour]
- [Clock]: [GPS-SYNC ](Default): Synchronizes the clock time with the GPS.
- [Manual]: Set the clock manually.
- Time Zone: Select the time zone.
- Clock Adjust: If you select [Manual] for Clock, adjust the date and time manually. (P.54)
NOTE: Please set the date and time. If they are not set, some functions may not work.
Adjusting the volume
To adjust the volume (0 to 40), Press [+] to increase, and press [–] to decrease. Holding [+] increases the volume continuously to level 15.
Touch screen operations
To perform operations on the screen, you need to touch, touch, hold, flick, or swipe to select an item, display a setting menu screen, or change pages.
- Touch
Touch the screen gently to select an item on the screen. - Touch and hold
Touch the screen and keep your finger in place until the display changes or a message is displayed. - Flick
Slide your finger quickly to the left or right on the screen to change the page. You can scroll a list screen by flicking up/ down on the screen. - Swipe
Slide your finger up or down on the screen to scroll the screen.
Monitor Touch Control:
You can also control playback by moving your finger on the touch panel as follows (for some sources, the gesture control function is not available).
- Sliding the finger upward/downward: Equivalent to the operation of pressing
 /
/ (Media). Tuner Preset broadcast stations are switched.
 - Sliding the finger leftward/rightward: Equivalent to the operation of pressing
 /
/ .
. - Moving your finger clockwise or counter-clockwise: Increases/decreases the volume.
Popup menu
- Press the FNC button. A popup menu appears.
- Touch to display the popup menu. The contents of the menu are as follows.
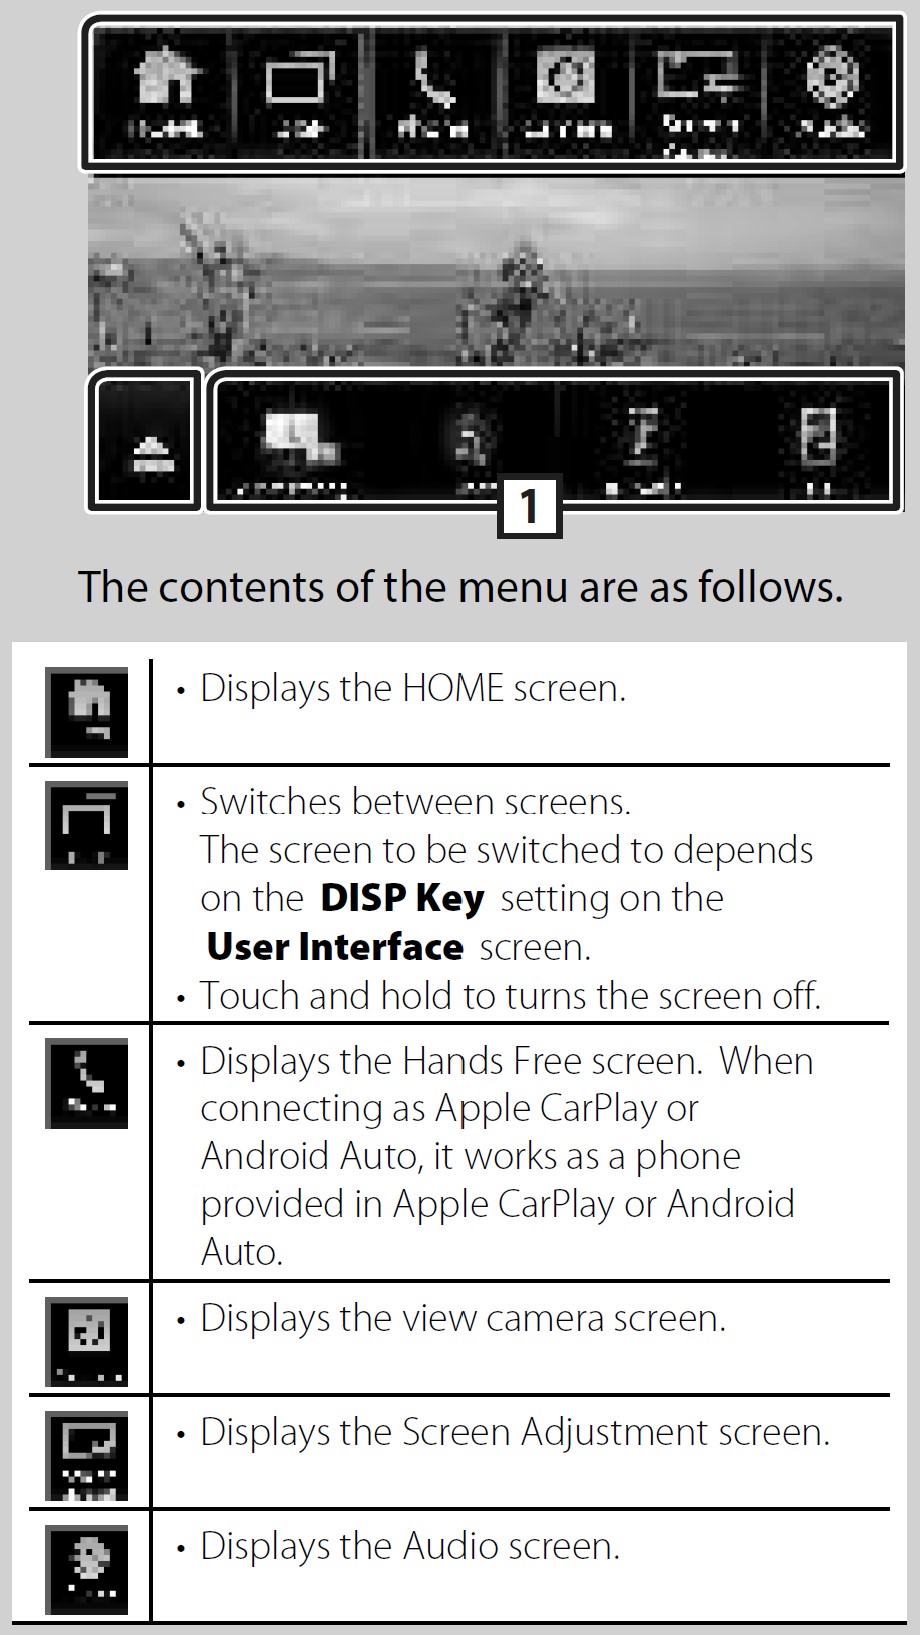

Turn off the screen
- Touch and hold DISP on the popup menu.
HOME screen descriptions
Most functions can be performed from the HOME screen.
Display the HOME screen
- Press the [FNC] button. A popup menu appears.
- Touch
 . The HOME screen appears.
Source selection screen description
You can display icons of all playback sources and options on the source selection screen.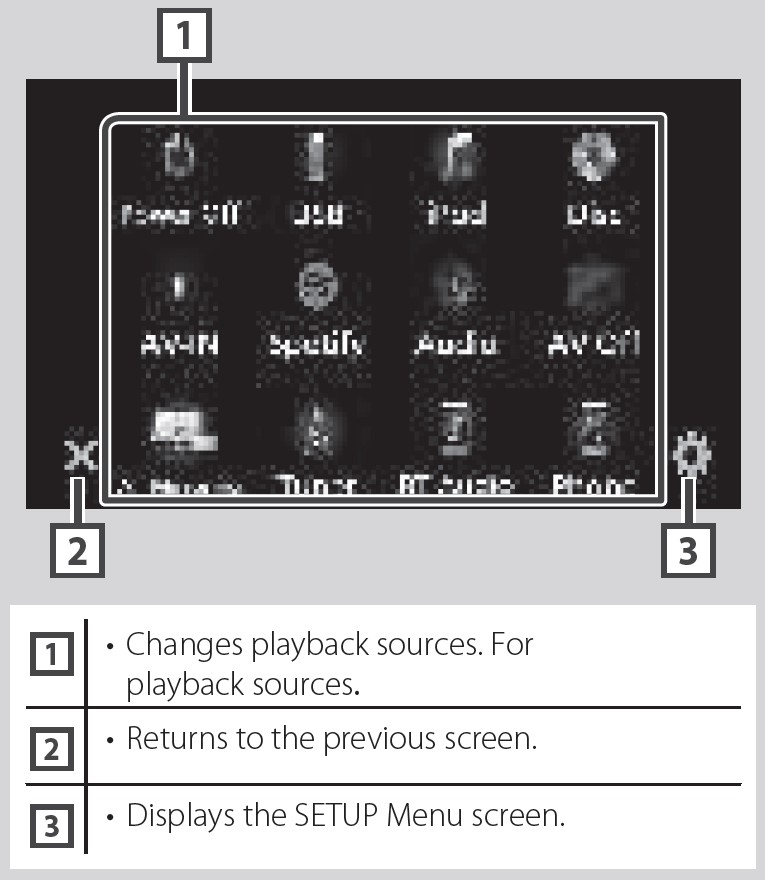
Select the playback source
- Press the [FNC] button. A popup menu appears.
- Touch
 . The HOME screen appears.
 - Touch
 . From the screen, you can select the following sources and functions.
*1 When iPhone compatible with CarPlay is connected, [Apple CarPlay] is displayed. When an Android device compatible with Android Auto is connected, [Android Auto] is displayed.
To turn off the AV source
- Press the FNC button. A popup menu appears.
- Touch
 . The HOME screen appears.
 - Touch
 .
. - Touch AV Off.
Customize Short-cut buttons on the HOME screen
You can arrange the positions of the source icons as you like.
- Press the FNC button. A popup menu appears.
- Touch
 . The HOME screen appears.
 - Touch
 .
. - Touch and hold the icon which you want to move in the customizing mode.
- Drag the icon to the desired position.

Source control screen descriptions
There are some functions that can be performed from most screens.

List screen
There are some common function keys in the list screens of most sources.
NOTE: Buttons that cannot be activated from the list screen are not displayed.
Setup
Monitor Screen Setup
You can adjust the image quality of the video, menu screen, etc.
- Press the [FNC] button. A popup menu appears.
- Touch [Screen Adjust]. Screen Control screen appears.
- Adjust each setting as follows.
- [Backlight] / [Contrast] / [Black] / [Brightness] / [Color] / [Tint]. Adjust each setting.
- [Aspect]
Select a screen mode.
-
Full: Changes the aspect ratio of the video and displays the video fully on the screen.
-
Normal: Displays video at the ratio of 4:3.[Auto]: DVD, VCD, and disc media: 16:9 video is displayed in the Full mode and 4:3 video is displayed in the Regular mode.
-
USB device: Displays video fully (vertically or horizontally) with no ratio change.
-
NOTE: Settings to adjust vary depending on the current source.
System Setup
- Press the [FNC] button. A popup menu appears.
- Touch
 . The HOME screen appears.
 - Touch
 .
.
User Interface Setup
You can set up user interface parameters.
- Press the FNC button. A popup menu appears.
- Touch
 . The HOME screen appears.
 - Touch
 . SETUP screen appears.
 - Touch User Interface. User Interface screen appears.
- Set each parameter as follows.
- Steering Remote Controller: Sets the desired function in the steering remote controller. See Learning function of steering remote (P.55).
- Beep: Turn the key touch tone on or off. The default is “ON”.
- Information Window SETUP: Set up the Information window displayed on the Home screen.
- Monitor Touch Control Effect: Determine whether to show the trace of the finger under monitor touch control. (P.10) “ON”/ “OFF” (Default)
- Language Select: Select a language.
- Touch Panel Adjusts: Adjust the sensing position of the touch panel.
- Time Format: Select the time display format. “12-Hour” (Default)/ “24-Hour”
- Clock: [GPS-SYNC ](Default): Synchronizes the clock time with the GPS.[Manual]: Set the clock manually.
- Time Zone: Select the time zone.
- Clock Adjust: If you select [Manual] for Clock, adjust the date and time manually.
- DISP Key: Select the source screen displayed when the popup menu screen is pressed.
- OFF: Displays the control screen of the current source.
- Mirroring (Default): Switches to the App screen from the connected iPhone/Android device or to the Apple CarPlay screen from the connected iPhone when the button is pressed.
- NAV: Switch to the navigation screen from the connected navigation unit by pressing the button.
(outside the Oceania area)
Adjust the date and time manually.
- Touch Clock on the User Interface screen.
- Select Manual.
- Touch Time Zone on the User Interface screen.
- Select the time zone.
- Touch Clock Adjust on the User Interface screen.
- Adjust the date, then adjust the time.
- Touch Set.
Touch panel adjustment
- Touch Touch Panel Adjust on the User Interface screen. Touch Panel Adjust screen appears.
- Follow the instructions on the screen and long touch the center of each
 .
.
NOTE:
- To cancel the touch panel adjustment, touch Cancel.
- To reset it to the default, touch Reset.
Learning function of steering remote
This function is available only when your vehicle is equipped with the electrical steering remote controller.
If your steering remote controller is not compliant, learning may not be completed and an error message may appear.
- Touch the Steering Remote Controller in the User Interface screen. The Steering Remote Controller Setting screen appears.
- Press and hold the steering remote controller button. NOTE: You can have the unit learn all buttons at a time. In that case, press the all buttons one at a time and after pressing all of them, touch [Learning completed] in the Steering Remote Controller Setting screen. However, new functions cannot be learned after this operation.
- Touch the function you want to set.
- Repeat steps 2 and 3 as necessary.
- Touch Learning completed.
NOTE:
- When changing the function already learned, press and hold the button you want to change in step 2 and then click to select the changed function from the function list.
- Confirm the contents of the settable function on the function list. You cannot edit the function list.
- To initialize the contents, touch [Learning initialization] of [Steering Remote Controller] in the User Interface screen. After you touch [Initialise], a confirmation message appears. Follow the message and complete the operation.
Special Setup
You can set up special parameters.
- Press the FNC button. A popup menu appears.
- Touch
 . The HOME screen appears.
 - Touch
 . SETUP screen appears.
 - Touch Special. The special screen appears.
- Set each parameter as follows.
- DEMO: Select the demonstration mode. The default is “ON”.
- Software Information: Confirm the software version of this unit.
- Open Source Licenses: Display the open source licenses.
- Initialise: Touch [Initialise] and then touch [Yes] to set all the settings to the initial default settings. Audio SETUP Memory is not initialized.
Software Information
You can confirm the software version of this unit.
- Touch Software Information on the Special screen.
- Confirm the software version.
NOTE: For how to update the software, see the relevant update procedure manual which comes with the software.
Display Setup
- Press the FNC button. A popup menu appears.
- Touch
 . The HOME screen appears.
 - Touch
 . SETUP screen appears.
 - Touch Display. Display screen appears.
- Set each parameter as follows.
- Dimmer: Select the dimmer mode.
- OFF: Do not dim the display and buttons.
- ON: Dims the display and buttons.
- SYNC (Default): Turns the dimmer function on or off when the vehicle light control switch is turned on or off.
- OSD Clock: Select if you want to display the clock while watching DVD video, etc. “ON” (Default)/ “OFF”
- Wallpaper Customize: You can change the wallpaper image or color.
- Viewing Angle: If it is hard to see the image on the screen evenly, adjust the viewing angle. The smaller the (negative) value, the more whitish the image on the screen looks. “0” (Default)/ “-1″/ “-2″/ “-3”
- Dimmer: Select the dimmer mode.
Change the wallpaper image
- Touch Wallpaper Customize on the Display screen.
- Select an image.
* 1 Select a wallpaper color in advance.
* 2 Select an original image in advance.
To select wallpaper color
- Touch [Wallpaper Colour] on the Background screen.
- Select a wallpaper color.
- Touch

To register an original color
You can register your original color.
- Touch the User on the Wallpaper Color screen.
- Touch Adjust.
- Use [-] and [+] to adjust each color value.
- Touch

To register an original image
You can load an image from the connected USB device and set it as the wallpaper image. Before starting this procedure, it is necessary to connect the device which has the image to load.
- Touch User1 Select on the Wallpaper Customize screen.
- Select the image to load.
- Touch Enter. The selected image is loaded and the display returns to the Wallpaper Customize screen.
AV Setup
You can set AV parameters.
- Press the [FNC] button. A popup menu appears.
- Touch
 . The HOME screen appears.
 - Touch
 . SETUP screen appears.
 - Touch [AV]. hhAV screen appears.
- Set each parameter as follows.
- TV Tuner Control: Sets when connecting the TV tuner to AV INPUT.
- ON: Set to ON when connecting the 3rd party TV tuner. AV-IN Name is set to TV. If you connect the TV tuner made by DOS and watch TV, you can perform some simple operations by touching the screen of this unit.
- OFF (Default): Set to OFF when not connecting the 3rd party TV tuner.
- AV-OUT: You can select an AV source to be output from the AV OUTPUT port. OFF, AV-IN, DISC, USB, or iPod
- You cannot select an iPod if it is connected via Bluetooth.
- If you select USB, iPod, Disc, Spotify, or Bluetooth audio as the main source, you cannot select USB or iPod as the AV output source.
- If you select Air Mirroring, Apple CarPlay, or Android Auto as the main source, you cannot select DISC (Music CD/ Disc media), USB, or iPod as the AV output source.
- Driving Position: Select the driving position (left or right). “Left”/ “Right” (Default)
- Wi-Fi SETUP: You can change the device name and display the device address, and password. See Change the device name (P.26).
- TV Tuner Control: Sets when connecting the TV tuner to AV INPUT.
Controlling Audio
You can adjust various settings such as audio balance or subwoofer level.
- Press the FNC button. A popup menu appears.
- Touch Audio.
3-way speaker system setup
Select the appropriate crossover network mode for the speaker system used (2-way or 3-way speaker system).
- Press the FNC button. A popup menu appears.
- Touch
 . The HOME screen appears.
 - Touch
 . The source selection screen appears.
 - Touch AV Off.
- Press the FNC (1) button and the [–] (2) button for 1 second at the same time. Speaker system select screen appears.
- Select the crossover network mode. A confirmation screen appears.
- Touch Yes.
NOTE:
- When the 3-way speaker system is selected, the following functions are disabled.
- Zone Control
- Fader for Controlling General Audio
- The front focus of Listening Position/ DTA
- Selection of the speakers to output sound from the cell phone of Bluetooth HF/Audio
- Beep for User Interface Setup
- Connecting 3-way speakers with the 2-way mode selected can break the speakers.
Speaker/ X’over setup
- Press the FNC button. A popup menu appears.
- Touch Audio. The audio screen appears.
- Touch Speaker/Xʼover.
- Select a car type. You can select the car type speaker network, etc. When you select your car type, the Delay Time Alignment is activated automatically (for timing adjustment of sound output for each channel) to have the highest surround effects.
- Touch the speaker (1) you wish to adjust and set each parameter (2) as follows.
- Speaker: You can select a speaker type and its size to get the best sound effects. When the speaker type and size are selected, the speaker crossover network is set automatically.
- Location: (Only for Front, Rear) Select the speaker position you have installed.
- Tweeter (Only for Front): You can set up the tweeter when you are selecting front speakers. None, Small, Medium, Large
- Xʼover: Display the speaker crossover setup screen. You can adjust the crossover frequency that was set automatically when you selected the speaker type.
For details, see Crossover network setup
Crossover network setup
You can set the crossover frequency of speakers.
- Touch Xʼover.
- Touch the speaker to set it up.
- Set each parameter as follows.
- HPF FREQ: High Pass Filter adjustment. (When Front or Rear is selected on the Speaker Select screen)
- LPF FREQ: Low Pass Filter adjustment. (When Subwoofer is selected on the Speaker Select screen
- Slope*1: Set a crossover slope.
- Gain: Adjust the gain of the front speaker, rear speaker, or subwoofer.
- TW Gain*2:Adjust the tweeter level. (When Front is selected on the Speaker Select screen)
- Phase Inversion*3: Set the phase of subwoofer output.
Check [Phase Inversion] to shift the phase 180 degrees. (When Subwoofer is selected on the Speaker Select screen)
* 1 Only when “LPF FREQ”/“HPF FREQ” is set to a mode other than “Through” in [Xʼover].
* 2 Only when “Tweeter” is set to “Small”, “Medium”, or “Large” in [Speaker Setup].
*3 Only when “Subwoofer” is set to a mode other than “None” in [Speaker Setup].
When the Speaker network is set to 3 ways:
- FREQ (High Pass): High Pass Filter adjustment.
- HPF FRE], [LPF FREQ] (Band Pass) Band Pass Filter adjustment. (When Mid Range Speaker is selected on the Speaker Select screen
- FREQ (Low Pass: Low Pass Filter adjustment. (When Woofer is selected on the Speaker Select screen)
- Slope*1 *2: Set a crossover slope.
- Gain: Set the gain of each speaker.
- Phase Inversion: Set the phase of the tweeter, mid-range, and woofer output.
Check Phase Inversion to shift the phase 180 degrees.
1 Only when “LPF FREQ”/“HPF FREQ” (Band Pass) is set to a mode other than “Through” in [Xʼover].
*2 Only when “FREQ” (Low Pass) is set to a mode other than “Through” in [Xʼover].
NOTE: For how to switch to the 3-way speaker system, see 3-way speaker system setup (P.59). Connecting 3-way speakers with the 2-way mode selected can break the speakers.
Controlling General Audio
- Press the [FNC] button. A popup menu appears.
- Touch [Audio]. The audio screen appears.
- Touch [Fader / Balance].
- Set each parameter as follows.
- Fader / Balance: Adjust the volume balance around the touched area.
 and
and adjust the right and left volume balance.
 and
and adjust the front and rear volume balance.
- Center: Clear the adjustment.
- Fader / Balance: Adjust the volume balance around the touched area.
Equalizer Control
You can adjust the equalizer by selecting the optimized setting for each category.
- Press the FNC button. A popup menu appears.
- Touch Audio. The audio screen appears.
- Touch Equalizer.
- Touch the screen and set the Graphic Equalizer as desired.
- Gain level (area in dotted frame): Adjust the gain level by touching each frequency bar. You can select a frequency bar and adjust its level by
 ,
,  .
. - Preset Select: Display the screen for selecting the preset equalizer curve.
- Memory
- Initialise: Initialize (flatten) the current EQ curve.
- ALL SRC: Apply the adjusted equalizer curve to all sources. Touch [ALL SRC] and then touch [OK] on the confirmation screen.
- Bass EXT(Bass Extend Settings): When turned on, the frequencies lower than 62.5 Hz are set to the same gain level (62.5 Hz).
- SW Level: Adjust the subwoofer volume. This setting is not available when Subwoofer is set to “None”. See Speaker/ X’over setup (P.60).
- Gain level (area in dotted frame): Adjust the gain level by touching each frequency bar. You can select a frequency bar and adjust its level by
Recall the EQ curve
- Touch Preset Select.
- Select an EQ curve.
NOTE: [iPod] is available only for the iPod source.
Save the EQ curve 1
- Adjust the EQ curve.
- Touch Memory.
- Select where to save.
Volume Offset
Finely adjust the volume of the current source to minimize the difference in volume between different sources.
- Press the FNC button. A popup menu appears.
- Touch Audio. An audio screen appears.
- Touch Volume Offset.
- Touch [+] or [-] to adjust the level.
- [Initialise] Returns to the initial settings
NOTE: If you have increased the volume first, then reduce the volume using “Volume Offset”. Switching the current source to another source suddenly may output extremely loud sound.
Zone Control
You can select different sources for front and rear positions in the vehicle.
- Press the FNC button. A popup menu appears.
- Touch [Audio]. hhAudio screen appears.
- Touch Zone Control. Zone Control screen appears.
- Touch Zone Select.
- Touch Dual Zone.
- Set each source as follows.
- Zone Select Touch [Single Zone] to turn off the dual zone function.
- Front Source and Rear Source: Select an audio source for each.
- Rear VOL: Adjust the rear source volume.
NOTE
- When the rear speaker sound is switched, the audio source that is output at the AV OUTPUT terminal is also switched to the same source.
- When the dual zone function is set to on, the following functions are not available.
- Output from the subwoofer
- Subwoofer Level/ Bass Boost
- Equalizer Control/ Sound Effect/ Listening Position
- Speaker Setup
- High-resolution Sound Source File Playback
- You cannot select an iPod if it is connected via Bluetooth.
- If you select USB, iPod, Disc, Spotify, or Bluetooth audio as the Front Source, you cannot select USB or iPod as the Rear Source.
- If you select Air Mirroring, Apple CarPlay, or Android Auto as the Front Source, you cannot select DISC (Music CD/ Disc media), USB or iPod as the Rear Source.
Connection/Installation
Before Installation
Before installation of this unit, please note the following precautions.
WARNINGS:
- If you connect the ignition wire (red) and the battery wire (yellow) to the car chassis (ground), You may cause a short circuit, that in turn may start a fire. Always connect those wires to the power source running through the fuse box.
- Do not cut out the fuse from the ignition wire (red) and the battery wire (yellow). The power supply must be connected to the wires via the fuse.
CAUTION: Install this unit in the console of your vehicle. Do not touch the metal part of this unit during and shortly after the use of the unit. Metal parts such as the heat sink and enclosure become hot.
NOTE:
- Mounting and wiring this product requires skills and experience. For best safety, leave the mounting and wiring work to professionals.
- Make sure to ground the unit to a negative 12V DC power supply.
- Do not install the unit in a spot exposed to direct sunlight or excessive heat or humidity. Also, avoid places with too much dust or the possibility of water splashing.
- Do not use your own screws. Use only the screws provided. If you use the wrong screws, you could damage the unit.
- If the power is not turned ON (“There is an error in the speaker wiring. Please check the connections.” is displayed), the speaker wire may have a short-circuit or touch the chassis of the vehicle and the protection function may have been activated. Therefore, the speaker wire should be checked.
- If your car’s ignition does not have an ACC position, connect the ignition wires to a power source that can be turned on and off with the ignition key. If you connect the ignition wire to a power source with a constant voltage supply, such as with battery wires, the battery may be drained.
- If the console has a lid, make sure to install the unit so that the front panel will not hit the lid when closing and opening.
- If the fuse blows, first make sure the wires aren’t touching to cause a short circuit, then replace the old fuse with one with the same rating.
- Insulate unconnected wires with vinyl tape or other similar material. To prevent a short circuit, do not remove the caps on the ends of the unconnected wires or the terminals.
- Connect the speaker wires correctly to the terminals to which they correspond. The unit may be damaged or fail to work if you share the
 wires or ground them to any metal part in the car.
 - When only two speakers are being connected to the system, connect the connectors either to both the front output terminals or to both the rear output terminals (do not mix front and rear). For example, if you connect the
 connector of the left speaker to a front output terminal, do not connect the
 connector to a rear output terminal.
 - After the unit is installed, check whether the brake lamps, blinkers, wipers, etc. on the car are working properly.
- Mount the unit so that the mounting angle is 30° or less.
- This unit has a cooling fan to decrease the internal temperature. Do not mount the unit in a place where the cooling fan of the unit is blocked. Blocking these openings will inhibit the cooling of the internal temperature and result in malfunction.

- Do not press hard on the panel surface when installing the unit to the vehicle. Otherwise, scars, damage, or failure may result.
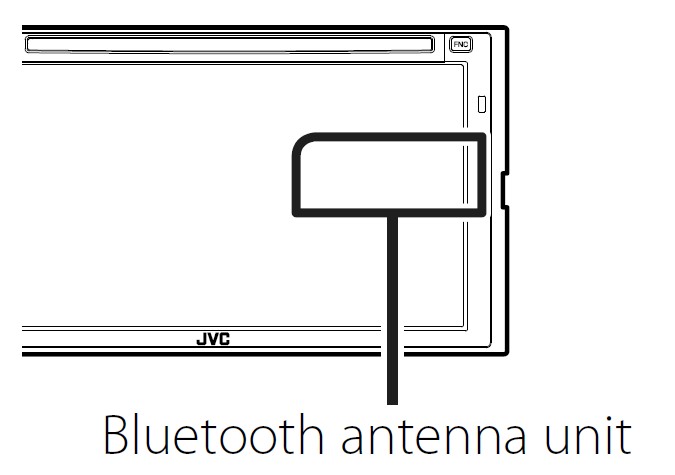
- Reception may drop if there are metal objects near the Bluetooth antenna.
Supplied accessories for installation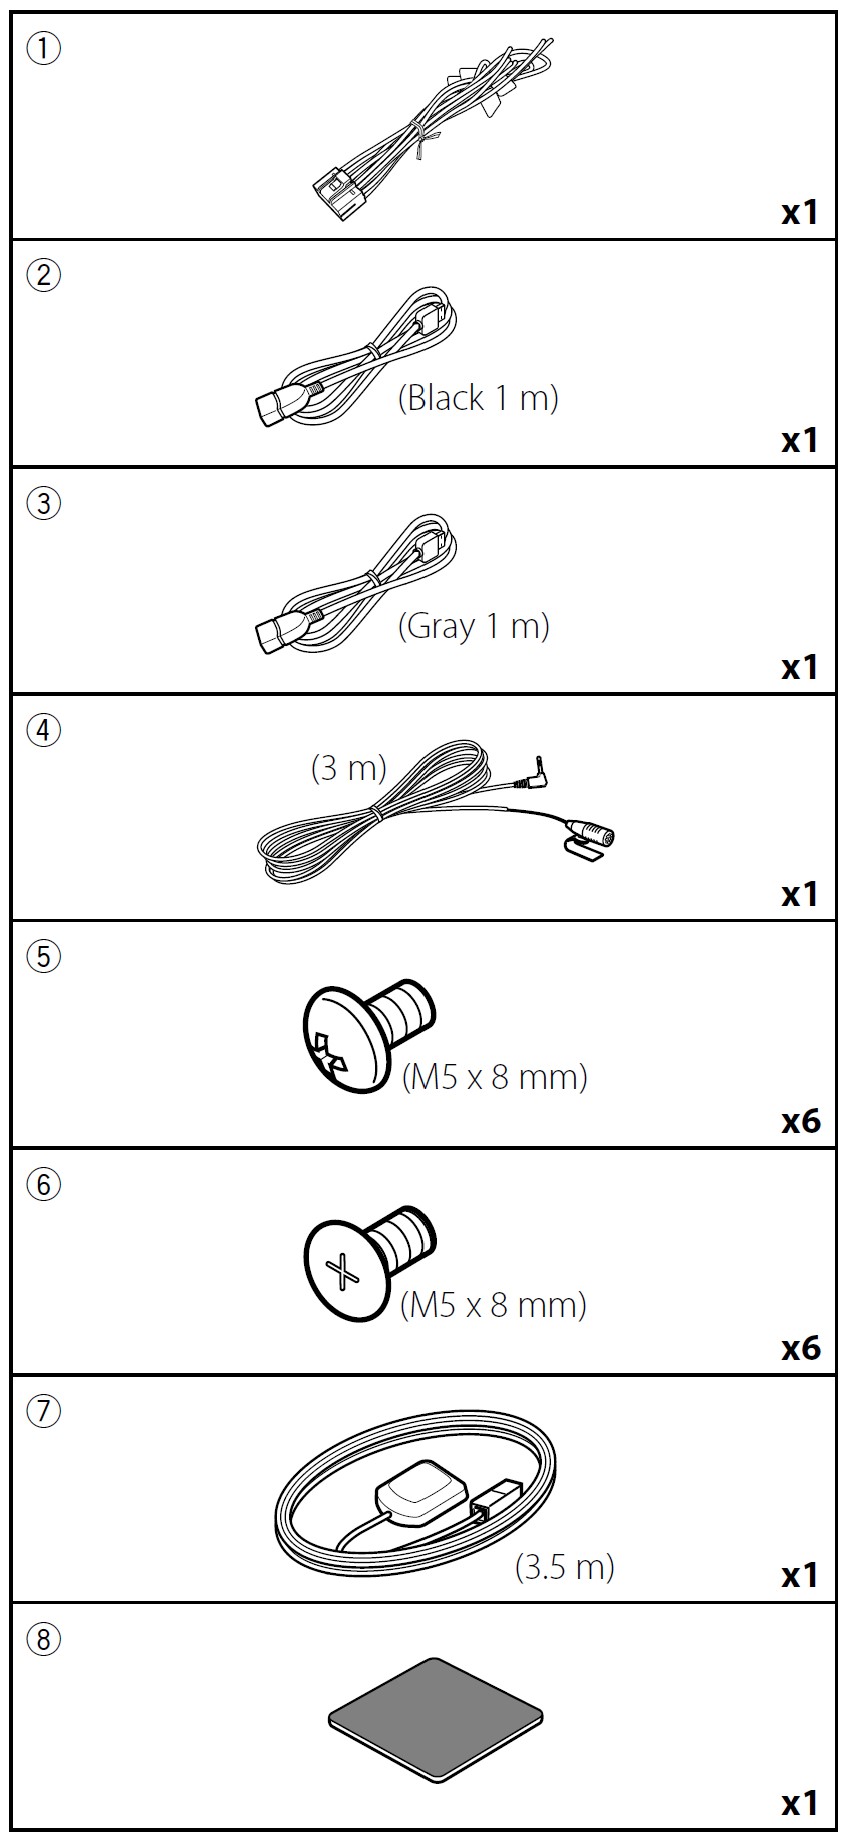

Installation procedure
- To prevent a short circuit, remove the key from the ignition and disconnect the terminal of the battery.
- Make the proper input and output wire connections for each unit.
- Connect the speaker wires of the wiring harness.
- Connect the wiring harness wires in the following order; ground, battery, ignition.
- Connect the wiring harness connector to the unit.
- Install the unit in your car.
- Reconnect the
 terminal of the battery.
 - Perform the Initial Setup.
Installing the unit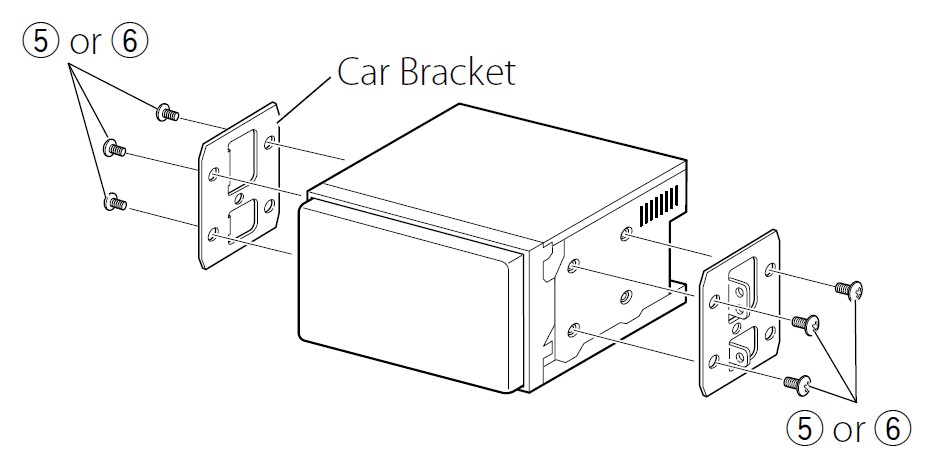
NOTE: Make sure that the unit is installed securely in place. If the unit is unstable, it may malfunction (e.g., the sound may skip).
GPS antenna
GPS antenna is installed inside of the car. It should be installed as horizontally as possible to allow easy reception of the GPS satellite signals.
To mount the GPS antenna inside your vehicle:
- Clean your dashboard or other surface.
- Remove the separator of the metal plate (accessory 8).
- Press the metal plate (accessory 8) down firmly on your dashboard or other mounting surface. You can bend the metal plate
(accessory 8) to conform to a curved surface, if necessary. - Remove the separator of the GPS antenna (accessory 7), and stick the antenna to the metal plate (accessory 8).
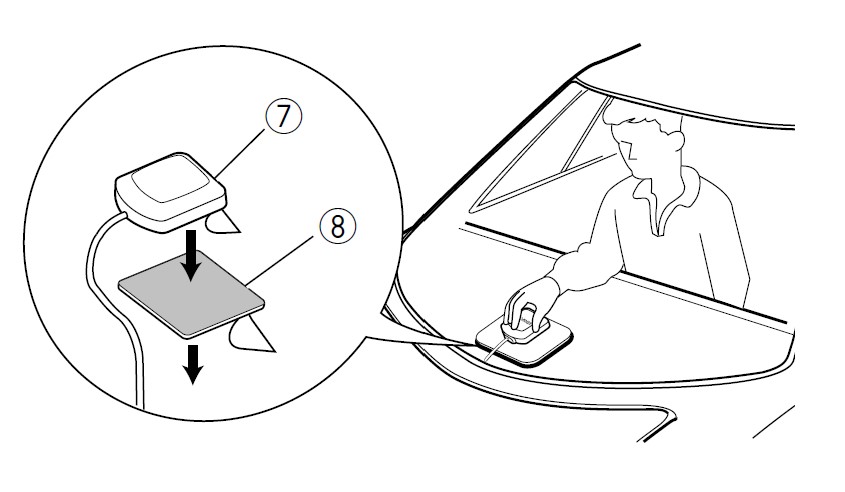
- Depending on the type of car, reception of the GPS satellite signals might not be possible with an inside installation.
- Please install this GPS antenna in an area away from any antennas that are used with CB radios
 or satellite televisions.
 - The GPS antenna should be installed at a position that is spaced at least 12 inches (30 cm) from cellular phone or other transmitting antennas. Signals from the GPS satellite may be interfered with by these types of communication.
- Painting the GPS antenna with (metallic) paint may cause a drop in performance.
Microphone unit
- Check the installation position of the microphone (accessory 4).
- Clean the installation surface.
- Remove the separator of the microphone (accessory 4), and stick the microphone to the place shown below.
- Wire the microphone cable up to the unit with it secured at several positions using tape or other desired method.
- Adjust the direction of the microphone (accessory 4) to the driver.


3-way speaker system setup
Connecting a USB device
Connecting an iPod/iPhone
- Lightning connector

Connecting an Android smartphone
Securing the USB extension cable
Secure the USB extension cable with insulating tape or the like so that its connectors are not disconnected.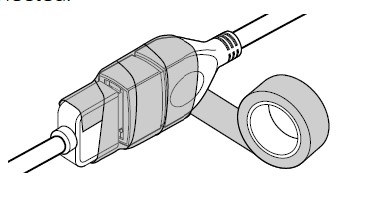
Specifications


Declaration of Conformity with regard to the RE Directive 2014/53/EU
Declaration of Conformity with regard to the RoHS Directive 2011/65/EU
Manufacturer:
JVC KENWOOD Corporation
3-12, Moriyacho, Kanagawa-ku, Yokohama-shi, Kanagawa 221-0022, JAPAN
EU Representative:
JVCKENWOOD Deutschland GmbH
Konrad-Adenauer-Allee 1-11, 61118 Bad Vilbel, GERMANY
For more manuals by JVC, Visit Manualsdock
[embeddoc url=”https://manualsdock.com/wp-content/uploads/2023/08/JVC-KW-V940BW-Monitor-With-DVD-Receiver-Manual.pdf” download=”all”]


