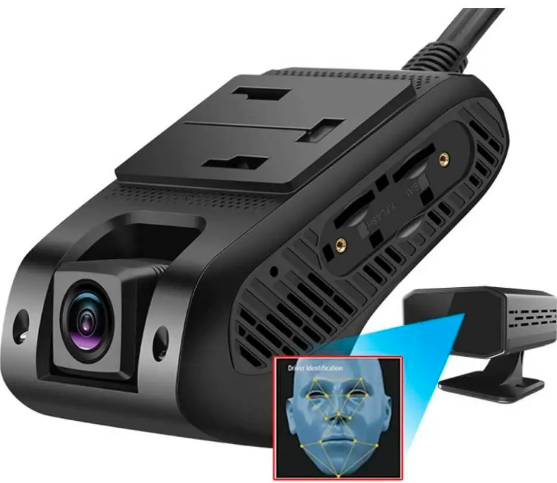
Jimi IoT JC261 Series 4G Dash Camera
About Jimi Lo T
For many years, Jimi loT has been firmly established in location-based software and hardware solutions. Our primary hardware consists of smart terminals for field workers, cars, e-scooters, assets, and cargo, among other things. Additionally, we have platforms in place to manage hardware (AMS), connections (CMP), and accesses to the loT Hub.
In terms of technology, product quality, and financial gains, we lead the competition and have an advantage over comparable products globally. Our unwavering pursuit of growth, active promotion of innovation, and optimistic approach to every issue are all part of our unwavering commitment to generating long-term benefits for society.
Introduction
Standard
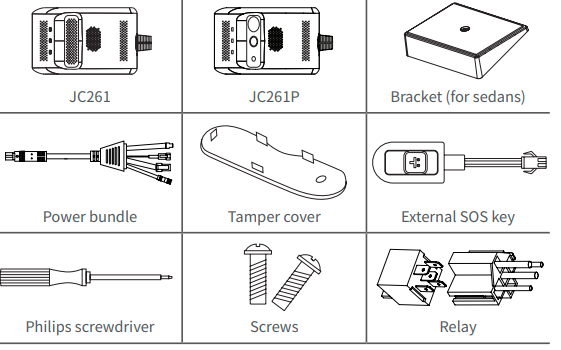
Opcional
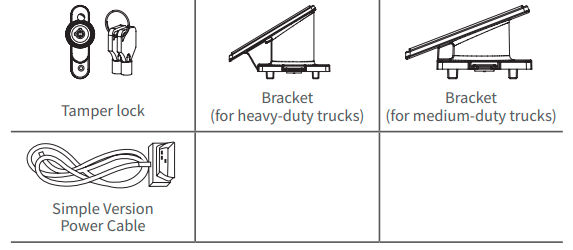
Please check the product model you purchased carefully as the packing list varies with the model.
Overview
JC261 series uses a 4G network for communication. For these dual-channel digital video recorders (DVRs), except to be able to record simultaneously, the two cameras can also record locally and live stream remotely at the same time. Several safety features are included in the system, including DMS, ADAS, exception alerts, and more.
Appearance·and·LEDs
Main·Unit
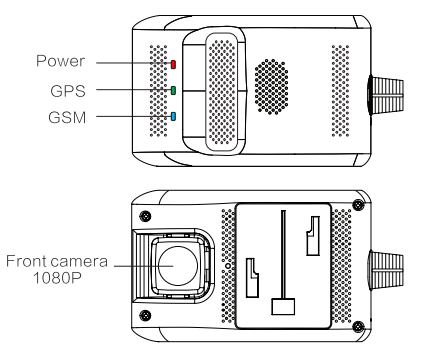
- Product Model JC261 main unit
- Camera 1920×1080/25FPS/F 2.2/Full color
Subcamera·Options
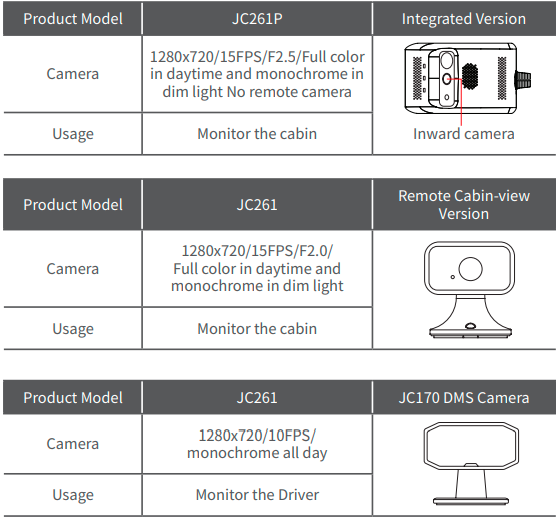
Refer to the specifications and features of the product model you purchased. If you have any questions, please contact your supplier.
LEDs
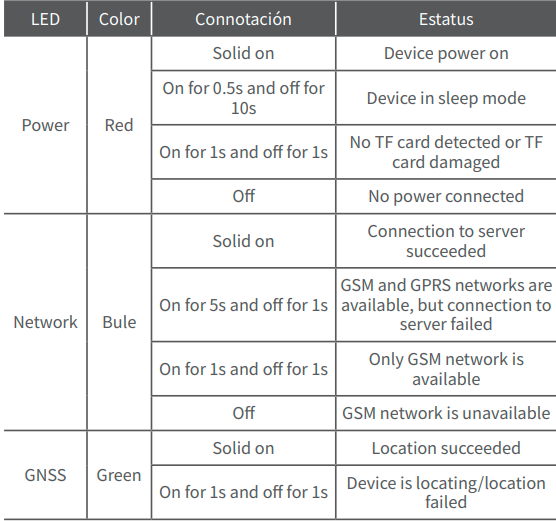
Wirings
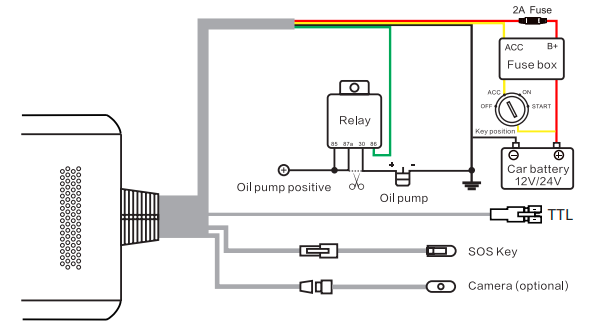
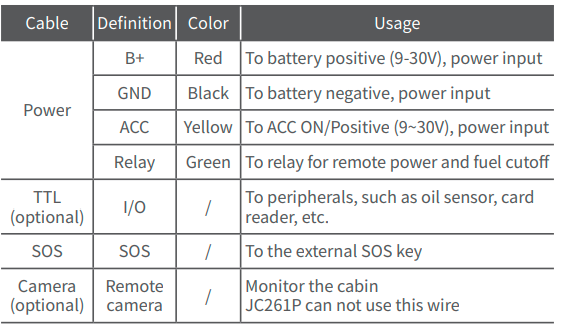
Specifications and Features
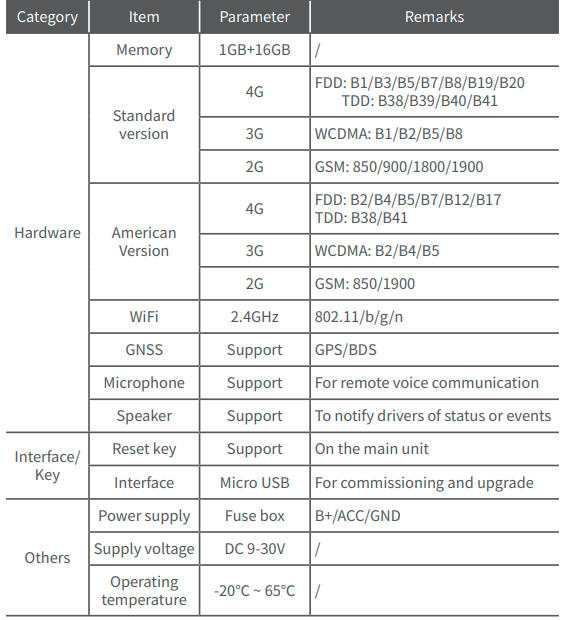

Installation
Precautions:
- This device is not suitable for battery electric vehicles (BEVs) and hybrid electric vehicles (HEVs).
- Use accessories specified by the manufacturer only.
- The standard supply for the device is DC9-30V, please use the original power cable and ensure that the positive and negative ends are correctly wired.
- Remove the protective film on the remote camera before installation.
- It is recommended to ask a distributor, a designated business, or an expert to do the installation and commissioning.
Preparation
Device check
- Check visually whether the device is in good condition and whether the relevant accessories are complete.
SIM·Card·Attachment
- Ensure that the device is ACC OFF before attaching a proper SIM card. In addition, the SIM should have data service activated and not in arrears.
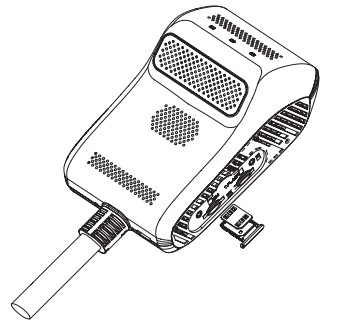
Note:
Fit the Nano-SIM into the tray and insert them into the SIM slot. To remove the card tray, use the ejector tool.
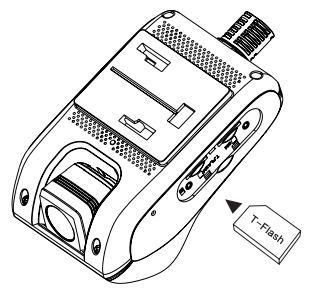
TF·Card·Attachment·
- Ensure that the device is ACC OFF before attaching a proper TF card.
Main·Unit·Installation
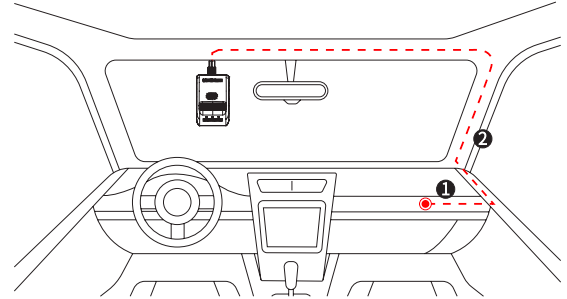
- Connect the power cable of the device to B+, ACC, and GND of the fuse box on the vehicle. ① is a reference position.
- Route the power cable along the A pillar of the vehicle to the upper center of the front windshield. The red dashed line ( ② ) in the figure is for reference.
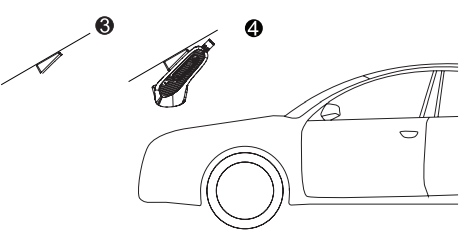
- Select a proper installation position and wipe the position clean. Remove the protective film from the 3M tape of the mounting base and attach it to the position. Wait for 2 hours before proceeding to the next step. See ③ for reference.
- Mount the device to the base and connect its power cable correctly (see ④ for reference). Then fasten the cable securely.
Installation·of·Accessories
- You can select a proper position to install the remote camera according to actual conditions.
Remote·AHD·Camera
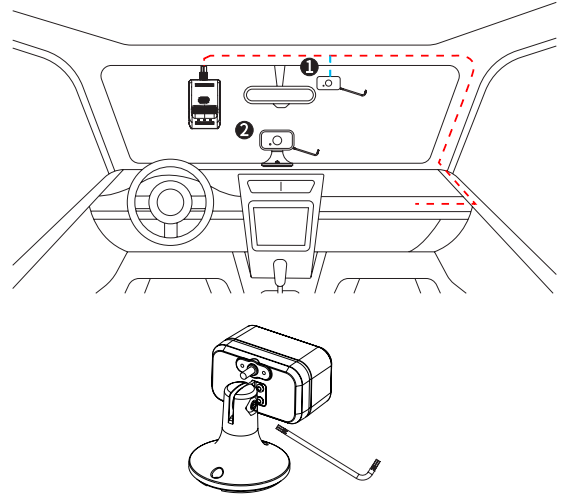
- Face the camera inward and install it on the windshield behind the rearview mirror (as shown in ① ) or in the middle of the dashboard (as shown in ② ). Wipe a selected position clean, remove the protective film from the 3M tape, and attach the device.
- Use the supplied screwdriver to tighten the screw of the camera, so it keeps at the best angle. Connect the cables correctly and fasten them securely.
JC170·DMS·Camera
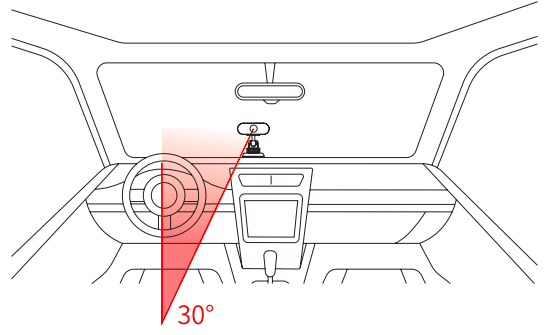
- The DMS camera is mainly used for monitoring the driver. Fixate the camera at an angle of about 30° to the steering wheel directly facing the driver’s head, as the following figure shows.
Other·Accessories
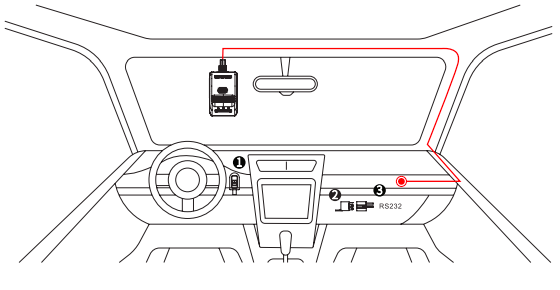
- SOS key
It is used to seek help in emergencies. Connect the SOS key to the corresponding interface on the device, remove the protective film from the 3M tape, and then attach it to a proper position (such as ① in the above figure). - Relay
It is used to cut off the power and fuel of the vehicle remotely to force it to stop. Connect it to the corresponding interface on the device and place it in a proper position, such as ② in the above figure. For wiring details, see 1.4. - TTL
It is used to connect to an external device for function expansion when a scenario requires a feature that cannot be offered by the device. ③ is a reference installation position.
Commissioning
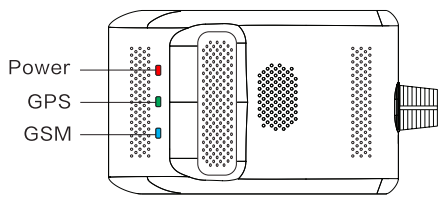
- Check the LED, see 1.3.3 for reference.
- Check the camera: The camera works correctly if you can view the live video of the camera and switch between the two cameras after logging in to the platform. You can also manually adjust the camera according to your needs.

Platform Operations
Platform
- Scan the QR code on the right with the browser of your mobile phone to download and install the app.
Configuration·Tool
- Scan the QR code on the right with the browser of your mobile phone to download and install the Configuration Tool. This app is used for feature calibration ADAS & DMS and is only compatible with mobiles with Android OS.
Operation·Guide
- Scan the QR code on the right with the browser of your mobile phone to view relevant operations.
FCC STATEMENT
This equipment complies with FCC radiation exposure limits set forth for an uncontrolled environment. This equipment should be installed and operated with a minimum distance of 20cm between the radiator and your body. This transmitter must not be co-located or operating in conjunction with any other antenna or transmitter.
changes or modifications not expressly approved by the party responsible for compliance could void the user’s authority to operate the equipment. This equipment has been tested and found to comply with the limits for a Class B digital device, under Part 15 of the FCC Rules.
These limits are designed to provide reasonable protection against harmful interference in a residential installation.
This equipment generates, uses, and can radiate radio frequency energy and, if not installed and used by the instructions, may cause harmful interference to radio communications. However, there is no guarantee that interference will not occur in a particular installation.
If this equipment does cause harmful interference to radio or television reception, which can be determined by turning the equipment off and on, the user is encouraged to try to correct the interference by one or more of the following measures:
- Reorient or relocate the receiving antenna.
- Increase the separation between the equipment and the receiver.
- Connect the equipment to an outlet on a circuit different from that to which the receiver is connected.
- Consult the dealer or an experienced radio/TV technician for help.
RF Exposure Compliance
This equipment complies with FCC radiation exposure limits set forth for an uncontrolled environment. The end user must follow the specific operating instructions to satisfy RF exposure compliance.
This transmitter must not be co-located or operated in conjunction with any other antenna or transmitter. This equipment should be installed and operated with a minimum distance of 220cm between the radiator and your body.
FAQs About Jimi IoT JC261 Series 4G Dash Camera
How is the Garmin Dashcam operated?
Video is stored on the camera memory card by the dash cam (Installing a Memory Card). When the gadget comes on by default, it begins capturing video right away and doesn’t stop until it is switched off.
How do dash cams maintain their charge?
While you drive, the battery pack is charged and the dash cam is powered by the engine’s alternator. In this manner, the dash cam can be powered by the battery pack instead of the vehicle’s battery while you’re parked.
Does a car’s off-road use affect the Garmin Dash Cam?
The camera records automatically whenever it detects motion after you switch off your car. It then goes into parked recording mode.
In what way are dash cams mounted?
The most typical location is directly below the rearview mirror. The mounting of the camera follows next. Every dash cam model has a unique mounting mechanism, either an adhesive mount or a suction cup. In any case, to provide a solid hold, make sure the windscreen is clean before applying the mount.
Do Dashcams have built-in storage?
They begin automatically recording when you drive once they’re attached. Nexar dash cams are equipped with motion sensors and clever technology that enable them to identify parking incidents, forceful brakes, and crashes. After that, a clip of the occurrence will be immediately saved by your dash cam.
How much energy is used by the dashcam?
According to a dash cam website we recently came across, dash cams with dynamic feature sets often take 0.25 to 0.45 amps to power up. They continued by explaining that this draw is roughly half of what a standard 100-watt bulb in your home would consume, making the implication that it is insignificant in comparison.
Is location recorded via dash cam?
This is because they may offer information like time, location, date, and speed, depending on the model you select. the insurance claim may benefit from having clear video of the crash as proof in your case. When your car is parked, your dash cam can record video if it has an integrated sensor.
What is the voltage required for a dash cam?
The Hardwire Kit (separately available) or the 12V cable (included with the Dash Cam) can supply this power source. If you wish to use Parking Mode, you must have a permanent power source (one that is powered on all the time) since if the dash cam is not receiving power while in this mode, the battery will run out.
Does a dash cam work without WiFi?
Indeed, you may utilize a dash cam without Wi-Fi by using Bluetooth as a backup connection.
What is the dashcam’s parking mode?
When your car is parked and the engine is not operating, Parking Mode keeps an eye on its surroundings. As soon as the external-facing camera senses motion—either physically or visually thanks to its built-in motion detector—it automatically starts storing data to the microSD memory card.
For more Manuals by Jimi IoT, Visit Manualsdock


