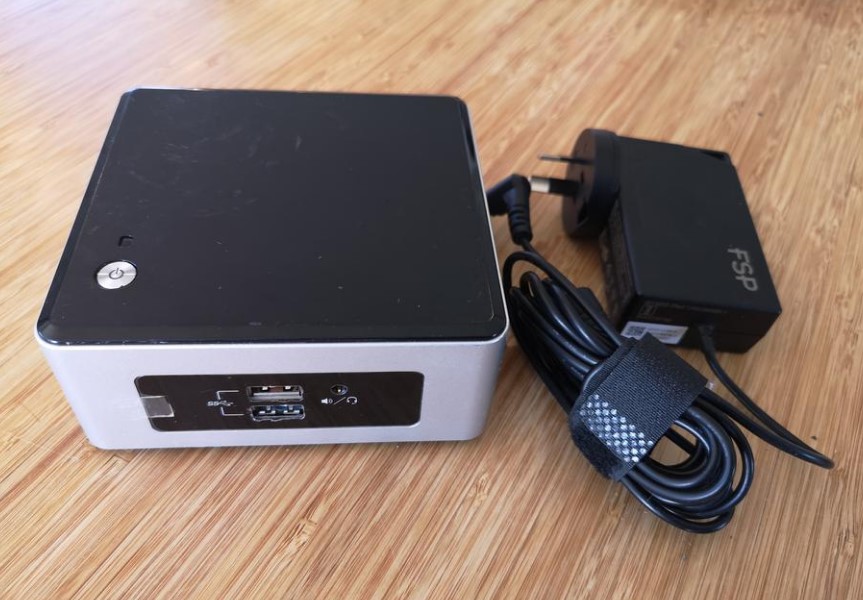
Intel NUC5PPYH Mini PC NUC Kit
About Intel
Intel is an American multinational technology company that is best known for its microprocessors, which power the majority of the world’s personal computers. The company was founded in 1968 and is headquartered in Santa Clara, California.
Intel produces a wide range of products, including processors, chipsets, motherboards, network interface controllers, solid-state drives, and software. The company’s processors are used in a variety of applications, including personal computers, servers, embedded systems, and mobile devices.
Instructions
Before You Begin
CAUTIONS The procedures in this user guide assume familiarity with the general terminology associated with personal computers and with the safety practices and regulatory compliance required for using and modifying electronic equipment. Disconnect the computer from its power source and from any telecommunications link or network before performing any of the procedures described in this guide. Failure to disconnect power, telecommunications links, or networks before you open the computer or perform any procedures can result in personal injury or equipment damage. Some circuitry on the board can continue to operate even though the front panel power button is off.
Follow these guidelines before you begin:
- Always follow the steps in each procedure in the correct order.
- Set up a log to record information about your computer, such as model, serial numbers, installed options, and configuration information.
- Electrostatic discharge (ESD) can damage components. Perform the procedures described in this chapter only at an ESD workstation using an antistatic wrist strap and a conductive foam pad. If such a station is not available, you can provide some ESD protection by wearing an antistatic wrist strap and attaching it to a metal part of the computer chassis.
Installation Precautions
When you install and test the Intel NUC, observe all warnings and cautions in the installation instructions.
To avoid injury, be careful of:
- Sharp pins on connectors
- Sharp pins on circuit boards
- Rough edges and sharp corners on the chassis
- Hot components (such as SSDs, processors, voltage regulators, and heat sinks)
- Damage to wires that could cause a short circuit Observe all warnings and cautions that instruct you to refer computer servicing to qualified technical personnel.
Observe Safety and Regulatory Requirements If you do not follow these instructions, you increase your safety risk and the possibility of noncompliance with regional laws and regulations.
This guide tells you how to:
- Install and remove memory
- Install a 2.5” drive
- Install a VESA mount bracket
- Install an operating system
- Install the latest device drivers and software
Open the Intel NUC Chassis
To open the Intel NUC chassis, follow these steps:
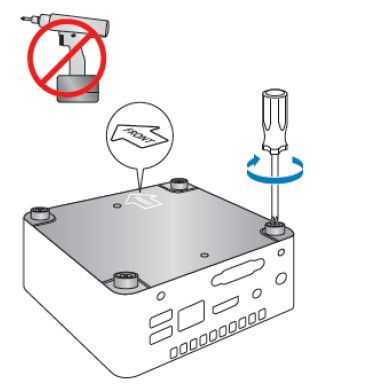
- Unscrew the four corner screws on the bottom cover of the chassis and lift the cover.

Installing and Removing Memory
Intel NUC Kits NUC5CPYH and NUC5PPYH have one 204-pin DDR3L SO-DIMM socket. Memory requirements:
- 1.35V low voltage memory
- 1333 MHz or 1600 MHz SO-DIMMs
- Non-ECC
For a list of tested memory, go to the System Memory page on the Support site:
Install SO-DIMMs
To install the SO-DIMMs, follow these steps:
- Observe the precautions in “Before You Begin” on page 2.
- Turn off all peripheral devices connected to the computer. Turn off the computer and disconnect the AC power cord.

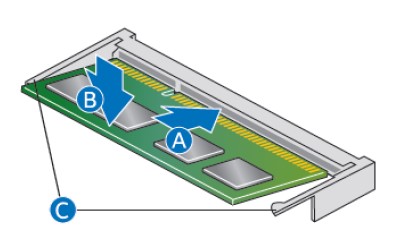
- Align the small notch at the bottom edge of the SO-DIMM with the key in the socket.
- Insert the bottom edge of the SO-DIMM into the socket.
- When the SO-DIMM is inserted, push down on the outer edge of the SO-DIMM until the retaining clips snap into place. Make sure the clips are firmly in place.
Removing SO-DIMMs
To remove a SO-DIMM, follow these steps:
- Observe the precautions in “Before You Begin” on page 2.
- Turn off all peripheral devices connected to the computer. Turn off the computer.
- Remove the AC power cord from the computer.
- Remove the computer’s cover.
- Gently spread the retaining clips at each end of the SO-DIMM socket. The SO-DIMM pops out of the socket.
- Hold the SO-DIMM by the edges, lift it away from the socket, and store it in an anti-static package.
- Reinstall and reconnect any parts you removed or disconnected to reach the SO-DIMM sockets.
- Replace the computer’s cover and reconnect the AC power cord.
Install a 2.5” SSD or Hard Drive For a list of tested 2.5” hard drives, go to the Intel® Product Compatibility Tool:
- NUC5CPYH
- NUC5PPYH
Follow these instructions to install a 2.5” Solid State Drive (SSD) or Hard Disk Drive (HDD):
- Observe the precautions in “Before You Begin” on page 2.
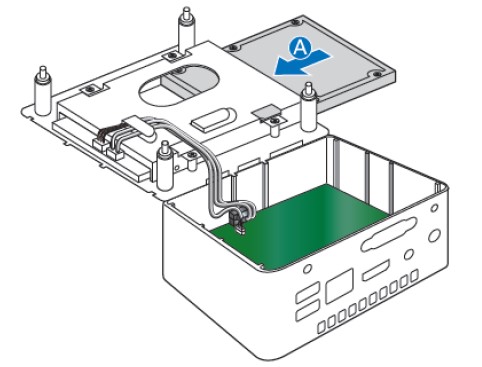
- Slide the 2.5” drive into the drive bay, ensuring the SATA connectors are fully seated into the connectors of the SATA daughter card (A).

- Secure the drive into the drive bay with the two small silver screws that were included in the box (B).

- Set the drive bay bracket down inside the chassis (C), taking care not to pinch the SATA cables along 5
Close the Chassis
After all components have been installed, close the Intel NUC chassis. Intel recommends this be done by hand with a screwdriver to avoid over-tightening and possibly damaging the screws.

Attach and Use the VESA Bracket (Optional)
Follow these instructions to attach and use the VESA mount bracket:
- Using the four small black screws that were included in the box, attach the VESA bracket to the back of the monitor or TV.

- Attach the two slightly larger black screws to the bottom chassis cover of the Intel NUC.

- Slide the Intel NUC onto the VESA mount bracket.

Install an Operating System
Refer to Supported Operating Systems for a list of Intel-validated Windows* operating systems, as well as versions of Linux that have been reported as compatible by Intel NUC owners. Refer to Operating System Installation for system requirements and installation steps.
Install the Latest Device Drivers and Software
Here are the options for keeping device drivers current:
- Allow the Intel® Driver & Support Assistant (Intel® DSA) to detect out-of-date drivers
- Manually download drivers, BIOS, and software from Download Center.
- NUC5CPYH
- NUC5PPYH
The following device drivers and software are available.
- Intel® Chipset Device Software
- Intel® HD Graphics
- Intel® Trusted Execution Technology
- Intel® Serial I/O
- Intel® USB 3.0 (needed for Windows 7* only)
- Realtek* High Definition Audio
- Realtek* Gigabit Ethernet
- ITE Tech* Consumer Infrared
- Near Field Communication (NFC)
FAQs Intel NUC5CPYH Mini PC NUC Kit
What comes with the Intel NUC kit?
The Intel® CoreTM i5-10210U processor is soldered down to the Intel® NUC Board NUC10i5FNB. Module for Intel® Wi-Fi 6 AX201 (soldered down) a pair of wireless antennas. VESA bracket with two chassis screws and four wall screws (not included in models that have an operating system pre-installed)
What may a NUC computer be used for?
The 4×4″ motherboard, power supply, and casing are all included with the NUC. It is frequently used as a home theatre PC (HTPC) or for gaming, and it is tiny enough to be concealed behind the TV. An entire computer is created by the user by adding Memory, storage, and peripherals.
What amount of RAM does the Intel NUC have?
One 2 GB DDR3L 1600 MHz SDRAM SO-DIMM is pre-installed in the Intel® NUC Kit NUC6CAYS (1.35V). Modules that satisfy these specifications can be used to upgrade the RAM.
How much Memory is required by a NUC?
Memory: 16GB RAM (there are two SO-DIMM type slots, so RAM is expandable up to 64GB DDR4-2666) Storage: One 2.5-inch, 500GB Samsung 860 EVO SSD; it is a SATA disc that can be swapped out. A slot for an ultra-compact M. 2 type SSD is also present.
A NUC’s processor type?
The most recent Intel® CoreTM CPUs are used in Intel® NUCs, which are designed to fit together in a very tiny space and are available with integrated or discrete graphics, solid-state drive (SSD), or hard disc drive (HDD) configurations. The Intel® NUC Tiny PCs come pre-configured and are ready to use.
A NUC’s power capacity?
About Its Huge Power, Sleek Design: With up to a 13th Gen Intel® CoreTM i9 desktop processor with eight Performance-cores (P-cores) and 16 Efficient-cores (E-cores), 32 threads, and up to an astounding 5.8 GHz max turbo frequency, the modular Intel NUC 13 Extreme delivers amazing speed.
NUC has WiFi, right?
i3-10110U 2-Core, 8GB RAM, 512GB PCIe SSD, UHD, WiFi, Bluetooth, 2xUSB 3.2, 1xHDMI, SD Card, Win 10 Pro with Hub; Intel NUC 10 NUC10i3FNHN Home & Business Small Desktop Black.
How many monitors can be supported by an Intel NUC?
Three 4K displays You may divide your work across many screens by connecting up to three 4K monitors with the Intel NUC Kit NUC7i5BNHX1. The kits also include ThunderboltTM 3, which offers built-in 10 GbE for networking with other ThunderboltTM 3 systems and provides up to 40 Gbps transfer speeds for your demanding data needs.
Does the Intel NUC have memory?
The NUC 12 Pro is available from Intel in numerous variations. With Windows 11 Home, a 500GB SSD, and 16GB of DDR4 RAM, our Mini version is prebuilt and ready to use. The operating system, storage, and RAM are absent from the Kit version.
How is a NUC cleaned?
I used compressed air to clean the fan and the heatsink of dust. After that, I cleaned the board and the top of the case completely with isopropyl alcohol and cotton swabs. I next removed the old thermal paste.
For more manuals by Intel, visit ManualsDock
[embeddoc url=”https://manualsdock.com/wp-content/uploads/2023/03/Intel-NUC5CPYH-Mini-PC-NUC-Kit.pdf” download=”all”]


