![]()
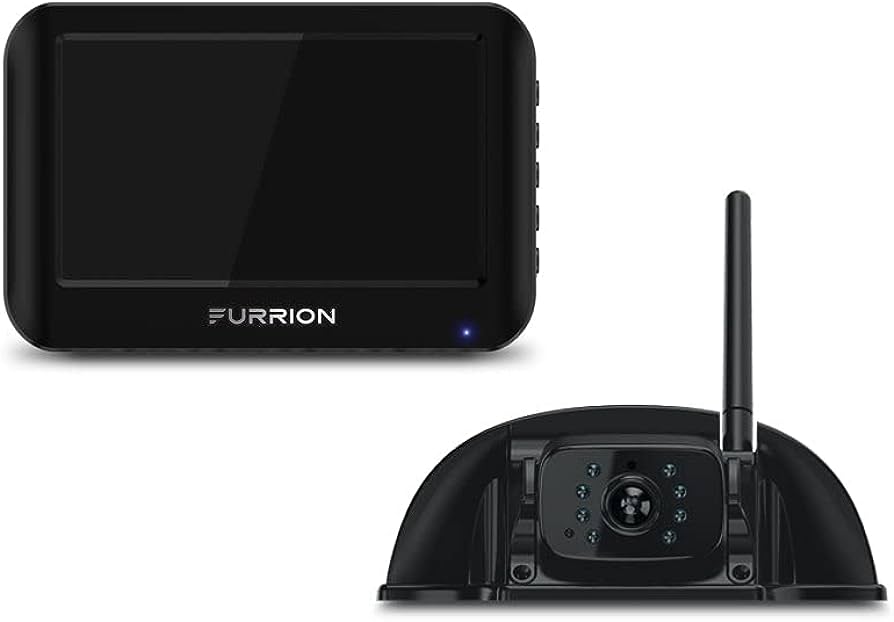
Furrion Vision S Wireless RV Backup Camera
About Furrion
Furrion is a company that specializes in designing and manufacturing a wide range of products and technologies for various industries, including the marine, RV, and residential markets. The company is known for its high-end and innovative solutions in the fields of luxury recreational vehicles (RVs), yachts, and smart home technologies.
Welcome
Thank you for purchasing the Furrion® Vision S Camera System. Before operating your new product, please read these instructions carefully. This will ensure safe use and reduce the risk of injury. This instruction manual contains information for installation, maintenance of the product, and safe use.
Please keep this instruction manual in a safe place for future reference. Be sure to pass on this manual to any new owners of this product. The manufacturer does not accept responsibility for any damages due to not observing these instructions. If you have any questions regarding our products,
- please contact us at: support@furrion.com
Generic safety instructions
READ THESE INSTRUCTIONS CAREFULLY BEFORE INSTALLING OR USING THE SYSTEM
- When used as an observation system, this product is intended to assist in safe driving and to allow the driver to have a broader view.
- Do not back up your vehicle while watching the monitor screen. Always look in the direction the vehicle is traveling.
- Use the monitor as an aid to ensure there are no children or obstructions. The image on the monitor is not designed to show distance and may be misleading. The actual distance is less than what appears on the monitor. The range of the image is limited. Be aware of blind spots.
- You, as the driver, are solely responsible for the safe operation of your vehicle and the safety of your passengers according to your local traffic regulations.
- Do not use any features of this system to the extent it distracts you from safe driving.
- Your priority while driving should always be the safe operation of your vehicle. Furrion cannot accept any responsibility for accidents resulting from failure to observe these precautions or safety instructions.
-
- This product utilizes high voltage. Any unauthorized modifications or damage to the product may result in electrical shock. Handle all components with care. Inspect regularly for damage to components and cabling.
- You are responsible for ensuring the installation of this product does not void or affect the vehicle manufacturer’s warranty. Furrion is not liable in full or in part for improper installation resulting in loss or damage to your property, or for voiding all or part of the vehicle manufacturer’s warranty.
- Do not apply excessive force to any of the components contained within this kit. Excessive force used before, during, or after installation that results in a damaged or nonfunctional part will void all warranties.
- Please follow the procedures in this instruction manual. Improper installation or modification of this product will void all warranties.
Many jurisdictions have laws and regulations relating to the use of cameras and some do not allow for the obstruction of information contained on a license plate. Before using this product, the buyer must be aware of and comply with any applicable laws and regulations that apply to license plates or prohibit or limit the use of cameras.
Electrical Safety
- Ensure all power sources are isolated before installation.
- Insulate unconnected wires with vinyl tape or similar.
- Use insulated tools when working with a power supply.
- For EU countries:
- − The Vision S product shall be powered by a 12V or 24V external power supply, with a properly sized fuse or breaker (5A for 12V or 3A for 24V) mounted between the product and power supply.
- − The external power supply used with this product shall comply with the LPS (Limited Power Source) requirements or shall be a Power Source Class 2 (PS2) with less than 100W.
Caution
- There are no serviceable parts in the Furrion® Vision S Camera System. Do not disassemble or attempt any repairs.
- Install external fuses/breakers as required.
Installation
- Installation and wiring of this product require specialist skills. To ensure proper and safe installation, please seek a specialist technician.
- Only use supplied or recommended parts.
- Use watertight connectors for the camera power supply cable to a power source.
- Connect the camera to a 12-24V DC circuit using 18AWG or larger cables.
- Ensure the correct polarity of the DC power supply to the camera.
- To reduce the risk of fire, connect the camera only to a circuit provided with a maximum branch circuit over the current protection device.
- Do not route wiring in areas that may get hot.
- Take necessary precautions when working at elevated levels.
Use
- Electrical appliances and overhead power lines can affect the wireless signal.
- Do not place the monitor in a location where it might hinder the field of vision while driving.
- Consideration should be given to any airbags when installing the monitor. Do not place the monitor where it might hinder the airbag or become hazardous if the airbag is deployed.
Care
- Do not wash the vehicle with an automatic car wash or high-pressure water. This may damage the camera.
- Clean the LCD screen with a microfiber cloth. Do not use coarse or abrasive materials.
- Do not use alcohol or ammonia-based products to clean the LCD screen. Only use specialist screen cleaning products.
- Use a wet cloth to clean the camera lens.
FCC Statement
The equipment complies with RF exposure limits. This module is limited to installation in mobile or fixed applications. The antenna used for this transmitter must not be co-located or operating in conjunction with any other antenna or transmitter.
This device complies with Part 15 of the FCC Rules. Operation is subject to the following two conditions:
- This device may not cause harmful interference.
- This device must accept any interference received, including interference that may cause undesired operation.
NOTE: This equipment has been tested and found to comply with the limits for a Class B digital device, under part 15 of the FCC Rules. These limits are designed to provide reasonable protection against harmful interference in a residential installation. This equipment generates, uses, and can radiate radio frequency energy and, if not installed and used by the instructions, may cause harmful interference to radio communications. However, there is no guarantee that interference will not occur in a particular installation. Suppose this equipment does cause harmful interference to radio or television reception, which can be determined by turning the equipment off and on. In that case, the user is encouraged to try to correct the interference by one or more of the following measures:
- − Reorient or relocate the receiving antenna.
- − Increase the separation between the equipment and receiver.
- − Connect the equipment to an outlet on a circuit different from that to which the receiver is connected.
- − Consult the dealer or an experienced radio/TV technician for help.
RF Exposure
The device has been evaluated to meet general RF exposure requirements. To maintain compliance with FCC’s RF exposure guidelines, this equipment should be installed and operated with a minimum distance of 20cm between the radiator and your body.
IC Statement
This device complies with Industry Canada license-exempt RSS standard(s). Operation is subject to the following two conditions:
- this device may not cause interference, and
- this device must accept any interference, including interference that may cause undesired operation of the device.
Maintenance
Care and Cleaning
Though your monitor requires little care, you will still need to maintain its condition and performance by following the guidelines below.
- Keep the unit away from excessive moisture, extreme heat, or cold.
- Keep liquids away from the monitor.
- Occasionally clean the surface of the monitor with a soft cloth moistened with water or glass cleaner.
Only clean the monitor with a dry cloth. Do not clean it with strong chemical agents or abrasive cleaners. Never spill liquid of any kind on the product. Do not allow residue or liquids to enter any part of the monitor as this may cause a risk of electrocution. Always disconnect the power before cleaning.
CAUTION: Never use solvents such as benzene, thinner, or cleaners available commercially to clean the monitor.
Product Overview
Furrion offers you abundant options to set up an observation/security system for your vehicle. You can mount Furrion Vision S products onto various types of RVs such as trailers and Class A/B/C motorhomes. The full range of Vision S wireless monitor and camera products available for your selection are listed below, which are sold either separately or as part of a system. Check all items in your package against the ‘What’s in the box’ section on the packaging box to ensure you have all the items. You can click an icon below to jump to the corresponding section for a detailed description.
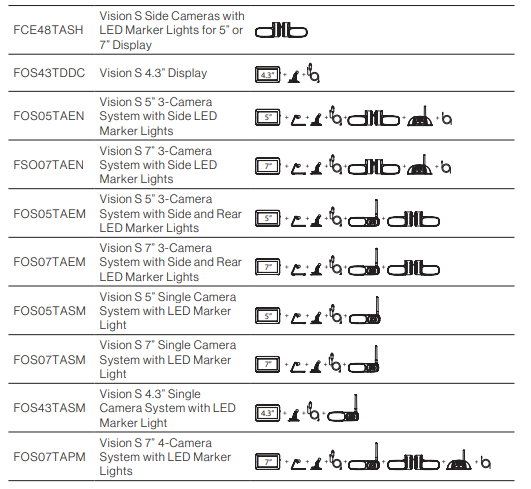
Note: Product specifications are subject to change without prior notice.
Specification
Vision S Family Monitor Specification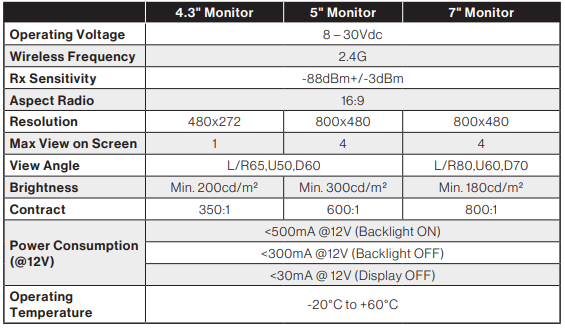
Vision S Family Camera Specification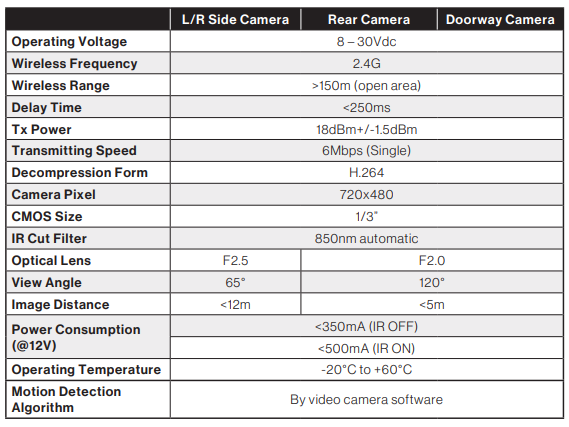 Vision S Family Camera Bracket Specification
Install and Use 4.3” Monitor
The Furrion Vision S 4.3” monitor is typically cab-mounted and used as a rear observation system together with a Furrion rear camera.
Product Overview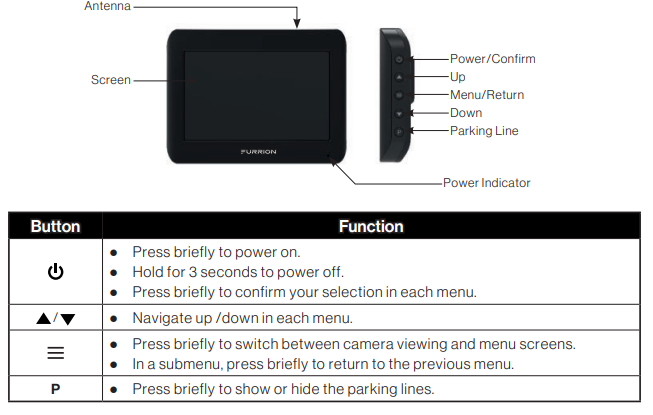
Install the monitor
IMPORTANT: Choose a monitor location in your vehicle that does not block your view and complies with local laws for safe driving. Do not place it in an area where it might interfere with driving.
- Clean the mounting area and remove the protective film from the suction cup of the windshield stand. Then place the suction cup onto the appropriate location and push the locking arm downwards to stick securely.

- Align the ball on the bracket with the opening on the back of the monitor and push firmly to lock it into place.

- Connect the cigarette lighter connector of the monitor power cable to a cigarette lighter socket.
- Connect the DC connector to the power socket on the monitor.
- Rotate the monitor to adjust the visual Rotate the monitor to adjust the visual
To remove the suction cup:
- Lift the locking arm.

- Pull the tab on the suction cup away from the windshield to allow air in then you can remove the suction cup easily.
- Detach the monitor from the windshield mount.
Pair with a rear camera
If this monitor comes in a bundle with a Furrion Vision S rear camera, it is paired with the camera by default. If you cannot find the video from the camera on the monitor screen or you have a standalone camera, follow the procedures below for pairing.
- Ensure you have turned on the monitor and camera to be paired (see the installation and wiring section of the camera for details).
- Press the MENU button on the right of the monitor to enter the setup menu.
- Tap PAIRING to enter pairing mode
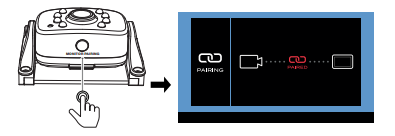
- Press the MONITOR PAIRING button on the camera (rear camera shown) to pair it with the monitor.
Activate the Monitor
- When the monitor is off: Press the button on the right of the monitor to turn it on.
- When the monitor is on Press and hold the button to activate the monitor.
NOTES:- − The camera transmits a clear and wide image with audio from the area behind the vehicle to the monitor inside. To avoid unnecessary noise when the vehicle
is moving, you can mute your vehicle speaker system. - − When the monitor is off, it can turn on again automatically and display camera images after receiving a video signal on the 2.4GHz frequency band from the camera.
- − The monitor adjusts color, brightness, and contrast automatically for either daytime or nighttime viewing. At night the picture will appear black and white. This is due to the low light level and is normal.
- The monitor in a wireless system always watches for a video signal when it is off. Signals from other wireless camera systems may cause interference For example, security cameras, baby monitors, and even other backup camera systems can also trigger the monitor to briefly light up. This is normal for wireless products.
- − The camera transmits a clear and wide image with audio from the area behind the vehicle to the monitor inside. To avoid unnecessary noise when the vehicle
Install and Use 5”/7” Monitor
When mounted in the cab, the Furrion Vision S 5”/7” monitor typically works as an observation system together with a Furrion rear-mounted camera (for rear observation) and two side cameras (for traffic observation). When mounted in the coach, the Furrion Vision S 5”/7” monitor typically works as a security system together with a Furrion doorway camera.
Product Overview
Prepare
- Prepare tools you may need, including a #2 Phillips head screwdriver, insulation tape, pencil, and/or a 5/8” drill bit (needed only when drilling a new hole).
Install the monitor
Mount in the cab for observation
IMPORTANT: Choose a monitor location in your vehicle that does not block your view and complies with local laws for safe driving. Do not place it in an area where it might interfere with driving.
- Choose a mounting method.
- When using the windshield stand: Clean the mounting area and remove the protective film from the suction cup. Then place the suction cup onto the appropriate location and push the locking arm downwards to stick securely.

- When using the table stand: Place the table stand designed with four non-slip pads on a stable surface, and route the monitor power cable as shown.

- When using the windshield stand: Clean the mounting area and remove the protective film from the suction cup. Then place the suction cup onto the appropriate location and push the locking arm downwards to stick securely.
- Align the ball on the bracket with the opening on the back of the monitor and push firmly to lock it into place.
- Connect the cigarette lighter connector of the monitor power cable to a cigarette lighter socket.
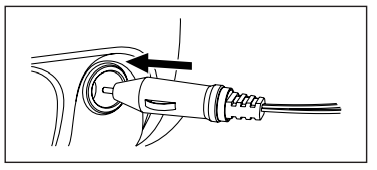
NOTE: There is a 12V 1A inline fuse under the plunger of the cigarette lighter plug. - Connect the DC connector to the power socket on the monitor.
- Rotate the monitor to adjust the visual angle as needed.
Pair with a camera
If this monitor comes in a bundle with one or more Furrion Vision S cameras, it is paired with the camera(s) by default. If you cannot find the video from the camera on the monitor screen or you have a standalone camera, follow the procedures below for pairing.
Note: For bundles with a sharkfin camera but no rear camera (such as FOS05TASF / FOS07TASF), the sharkfin camera is paired to the REAR CAM channel instead of the DOOR CAM channel by default.
- Ensure you have turned on the monitor and camera(s) to be paired (see the installation and wiring section of each camera for details).
- Press the MENU button on the right of the monitor to enter the setup menu.

- Tap PAIRING and then select the camera to be paired with the monitor.
- Press the MONITOR PAIRING button on the camera (doorway security/rear camera shown) to pair it with the monitor.
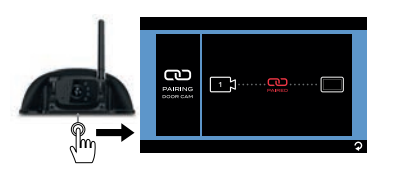
- Repeat the steps to pair the other available cameras. Erect antennas (if available) on both the monitor and camera(s). Ensure the signal strength is OK.
Activate the Monitor
- When the monitor is off: Press the Menu button on the right of the monitor to turn it on and enter the menu setting page.
- When the monitor is on: Press and hold the Menu button to activate the menu setting page.
NOTES:
- − The rear or doorway camera transmits a clear and wide image with audio from the area behind the vehicle or at the vehicle door to the monitor inside. To avoid unnecessary noise when the vehicle is moving, you can mute your vehicle speaker system.
- − The side cameras transmit clear images at both sides of your vehicle to the monitor.
- − When the monitor is off, it can turn on again automatically and display camera images after receiving a video signal on the 2.4GHz frequency band from a camera.
- − The monitor adjusts color, brightness, and contrast automatically for either daytime or nighttime viewing. At night the picture will appear black and white. This is due to the low light level and is normal.
- − The monitor in a wireless system always watches for a video signal when installed and when using the monitor it is off. Signals from other wireless camera systems may cause interference.
Touchscreen operation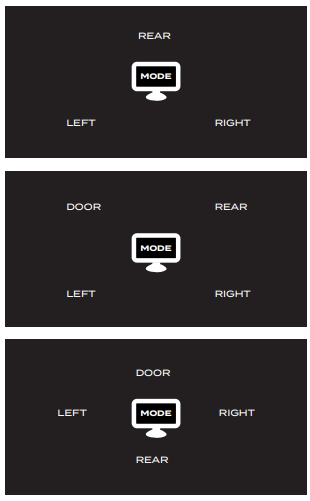
When in single-channel mode:
Tap once on the monitor screen to bring up the camera selection interface.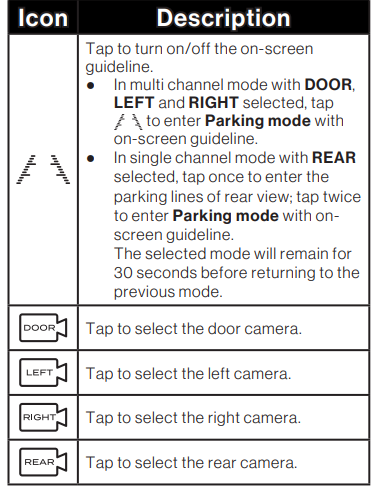
Install Doorway Security/Rear Camera
Product Overview
Prepare
- Prepare tools you may need, including a #2 Phillips head screwdriver, sealant, insulation tape, pencil, and/or a 5/8” drill bit (needed only when drilling a new hole).
Mount bracket
Note: Skip this section if your RV is pre-installed with a bracket for camera installation.
IMPORTANT: Before any installation and wiring operation, remove the key from the ignition and isolate the 12V / 24V power source.
Always seek professional assistance if you are unsure about the installation and wiring operation.
- Determine the mounting location on your RV. Ensure that there is no obstacle blocking the camera view. The recommended mounting location is shown below:
-
- − For rear camera position:
- At the top center on the rear of your RV and as high as practicable (2” below the red marker light if available).
- − For doorway camera position: Above the top of the door.
Note: The RV shown here is for reference only. You can mount Furrion Vision S products onto various types of RVs such as trailers and Class A/B/C motorhomes.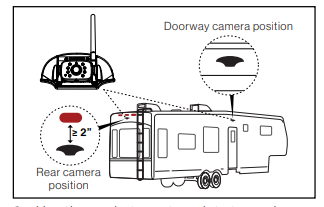
- Use the gasket as a template to mark a basic outline on the chosen location with a pencil. Drill a 5/8” center hole. Then route the female connector of the camera power cable through the hole and leave 2 inches of slack.
- Connect the bare ends of the camera power cable to the nearest 12V / 24V power supply.
-
- − For rear camera position: You are suggested to share the same power line from the nearest marker light (such as the red marker light at the top center on the rear if available).
- − For doorway camera position: You are suggested to share the power line from your RV porch light (or the nearest light source from the RV/trailer battery).
Note: Ensure that the fuse on the connected power line provides an additional 1A fusing current for the camera. Ensure proper cable isolation for all bare ends (e.g., by using insulation tape).
- Fix the gasket and bracket with four #6×3/4“ flat self-tapping screws. If the mounting surface is uneven, apply sealant between the gasket and RV surface, and around the 5/8” holes at the screw locations for better sealing.

Mount camera
If this camera comes in a bundle with a Furrion Vision S monitor, it is paired with the monitor by default. You can connect it to the female connector on the Y-type power cable of the monitor and resume power temporarily to check the pairing status before installation. If you cannot find the video of the camera on the monitor screen or you have an unbundled camera, see the monitor installation and usage section for the pairing procedures.
- Mount the antenna onto the camera securely and keep the antenna straight.
- If there is a cover on the bracket housing, remove it first. Connect the female connector of the camera power cable to the male connector on the back of the camera, and put the redundant cables inside the bracket housing. Then attach the camera to the bracket with four #4×1/4” self-tapping screws.

- Adjust the view angle of the camera by rotating it upwards and downwards (0~50°) so that you can see: (For rear camera position): the bottom edge of your vehicle and the road conditions behind; (For doorway camera position): the bottom edge of the door.
Install Side Cameras and rear Camera with Marker Light
Product Overview
- Side (Left/Right) cameras with marker light
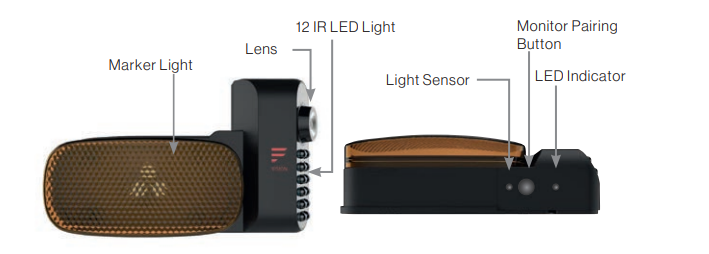
- Rear camera

Prepare
- Prepare tools you may need, including # 1 and #2 Phillips head screwdrivers, sealant, insulation tape, pencil, and/or a 5/8” drill bit (needed only when drilling a new hole).
Mount bracket
Note: Skip this section if your RV is pre-installed with a bracket for camera installation.
IMPORTANT: Before any installation and wiring operation, remove the key from the ignition and isolate the 12V / 24V power source.
Always seek professional assistance if you are unsure about the installation and wiring operation.
- Determine the mounting location on your RV. Ensure that there is no obstacle blocking the camera view. To avoid drilling new holes, you are recommended to replace the original marker lights with Furrion products directly as shown below:
-
- − For rear camera position: Location of the original rear marker light at the top center on the rear of your RV. To accommodate the camera, ensure that there is at least 7.5” space between the central points of the two adjacent marker lights.
- − For side camera position: Location of the original side marker lights (as front as possible).
Note: The RV shown here is for reference only. You can mount Furrion Vision S products onto various types of RVs such as trailers and Class A/B/C motorhomes.
- Remove the original marker light from the corresponding location.
- Connect the bare ends of the power cable on the back of the bracket to the nearest 12V / 24V power supply: red_camera/ brown_marker light: +; black_grounding: –
-
- − For rear camera position: You are suggested to use the power line for the original rear marker light directly.
- − For left/right side camera position: You are suggested to use the power line for the original side marker lights directly.
Note: Ensure that the fuse on the connected power line provides an additional 1A fusing current for the camera. Ensure proper cable isolation for all bare ends (e.g., by using insulation tape).
- Secure the gasket and marker light bracket onto your vehicle using four flat head #6 x 3/4” self-drilling screws. If the mounting surface is uneven, apply sealant between the gasket and RV surface, and around the 5/8’’ holes at the screw locations for better sealing.
Mount cameras (right side shown)
- Reattach the camera to the marker light bracket. Before fixing the camera, check its pairing status with the monitor by resuming power temporarily. If you cannot find the video from the camera on the monitor screen or you have an unbundled camera, see the monitor installation and usage section for pairing procedures. For the rear camera, mount the antenna onto the camera securely and keep the antenna straight.
- For the left/right side camera, ensure that the lens on the camera faces backward after installation, with the MONITOR PAIRING button at the bottom.
For the rear camera, adjust the view angle of the camera by rotating it upwards and downwards (0~50°) so that you can see the bottom edge of your vehicle and the road conditions behind it.
Troubleshooting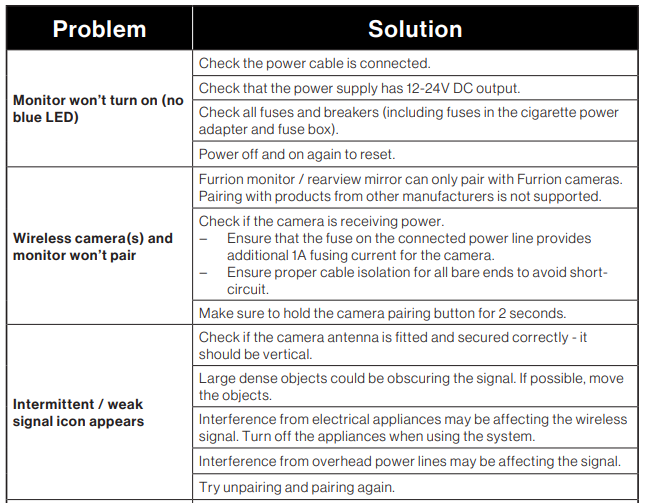


FAQS About Furrion Vision S Wireless RV Backup Camera
What comes in the Furrion Vision S Wireless RV Backup Camera package?
The package typically includes a monitor, camera, mounting hardware, and a user manual. Make sure to check the specific product listing for details.
How does the wireless connection work on the Furrion Vision S Backup Camera?
The Furrion Vision S uses a reliable wireless signal to transmit video from the camera to the monitor. This ensures a seamless and interference-free connection within the specified range.
What is the range of the wireless signal for the Furrion Vision S Camera?
The wireless signal range is typically designed to cover the length of most RVs, but it’s essential to check the product specifications for the exact range.
Is the Furrion Vision S Camera easy to install?
Yes, the Furrion Vision S is designed for easy installation. It usually comes with straightforward instructions, and many users find it can be installed without professional help.
Can I use the Furrion Vision S Wireless RV Backup Camera in different weather conditions?
Yes, the Furrion Vision S is generally built to withstand various weather conditions. However, it’s always recommended to review the product specifications for specific details on weather resistance.
Is the camera angle adjustable on the Furrion Vision S?
Yes, the Furrion Vision S Wireless RV Backup Camera typically comes with an adjustable camera angle feature, allowing users to customize the view according to their preferences.
What kind of power source does the Furrion Vision S Camera require?
The Furrion Vision S is usually designed to be powered by the RV’s 12V system. It’s important to confirm the power requirements in the product documentation.
Can I use the Furrion Vision S Camera as a continuous rearview monitoring system?
Yes, the Furrion Vision S is often designed to function as a continuous rearview monitoring system, providing real-time video feed while driving and serving as a backup camera when needed.
Is the Furrion Vision S compatible with all RV models?
While the Furrion Vision S is compatible with many RVs, it’s advisable to check the product specifications and ensure compatibility with your specific RV model.
What should I do if I experience issues with my Furrion Vision S Wireless RV Backup Camera?
If you encounter any issues, refer to the user manual for troubleshooting steps. Additionally, you may contact Furrion’s customer support for further assistance.


