Flashforge Finder 3D Printer
About Flashforge
One of the first established businesses in China specializing in the R&D and production of 3D printing tools and materials is Zhejiang Flashforge 3D Technology Co., LTD. The subsidiary of Flashforge is Jinhua Zhucheng Electronic Commerce Co., Ltd. Currently, it is the domestic leader and the third-largest manufacturer of consumer-level 3D printing brands worldwide. 3D Hubs is the data source. Additionally, in 2017 the title of “Famous brand in Zhejiang Province” was given to Flashforge.
Flashforge, an R&D and manufacturing company that offers products and solutions for the entire industrial chain, currently owns 10 product categories, ranging from 3D printer, 3D printing filament, and 3D designing software, to 3D printing services, offering dozens of different types of products that span the entire industrial chain. Products are separated into three categories based on the needs of various user types: industrial, commercial, and civil levels. In the meantime, Flashforge is at the top in its field in terms of technical R&D, channel development, after-sales service, and other areas.
Preface
Note: Each device must be tested before leaving the factory. If there are some residues in an extruder or some tiny scratches on the build tape, it is normal and won’t affect the printing quality. On the completion of this User Guide, thanks to all FlashForge engineers andtheFlashForge 3D printer users for their unremitting efforts and sincere assistance.
The FlashForge Finder User Guide is designed for the Finder users to start their printing journey with FlashForge Finder. Even if you are familiar with earlier FlashForge machines or 3D printing technology, we still recommend that please read this guide, as there is lots of important information about the Finder for you to get a better 3D experience.
Introduction
Notes:
- Please read FlashForge Finder 3D Printer User Guide carefully before use.
- The User Guide is written based on Windows 7 OS.
- The version of the FlashPrint is latest
The FlashForge Finder 3D Printer User Guide contains the information needed for you to set up and use this
This User Guide includes the following parts:
Preface, Introduction, and After-sale service. The Preface section includes the resource acquisition channel, the overall framework of
the manual, and the problems that should be paid attention to while printing. The introduction section contains an overview of 3D printing technology, equipment introduction, unpacking and installation of equipment, software installation, and use. After-sale section contains the user how to get support and help.
Safety Notice
Notices: Read all the instructions in the manual and familiarize yourself withtheFlashForge Finder User Guide before setting up and using. Failure to comply with the warning and instructions may result in individual injury, fire, equipment damage, or property damage.
PLEASE STRICTLY FOLLOW ALL THE SAFETY WARNINGS AND NOTICES BELOW AT ALL THE TIMES.
Work Environment Safety
- Keep your workplace tidy.
- Do not operate Finder in the presence of flammable liquids, gases, or dust.
- Keep Finder out of children and untrained people’s reach.
Electrical Safety
- Always use the Finder with a properly grounded outlet. Do not refit Finder plug.
- Do not use Finder in damp or wet locations. Do not expose Finder to the burning sun.
- In case of device damage, please use the power supply provided by FlashForge.
- Avoid using the device during a thunderstorm.
- In case of an uncertain accident, please unplug the device if you do not use it for long.
Personal
- Do not touch the nozzle and build plate during printing.
- Do not touch the nozzle after finishing printing.
- Dress properly. Do not wear loose clothing or jewelry. Keep your hair, clothing, and gloves away from moving parts.
- Do not operate the device while you are tired or under the influence of drugs, alcohol, or medication.
Cautions
- Do not leave the device unattended for long.
- Do not make any modifications to the device.
- Lower the build plate before loading/unloading the filament. (The distance between the nozzle and the build plate should be kept for at least 50mm)
- Operate the device in a well-ventilated environment.
- Never use the device for illegal activities.
- Never use the device to make any food storage vessels.
- Never use the device to make any electrical appliance.
- Never put the model into your mouth.
- Do not remove the models with force.
3D Printing Technology
3D printing refers to transforming three-dimensional models into physical objects that you can hold and touch. It is also called additive manufacturing because the 3D model is created by “adding” layers upon layers of material until the object is fully formed.
Fused Filament Fabrication(FFF) is the most common method of 3D printing. It is another method that the Finder uses. It works by melting plastic material called filament onto a print surface at high temperatures. The filament solidifies after it cools down, which happens instantaneously after it is extruded from the nozzle. 3D objects are formed with the filament laying down multiple layers.
Process
3D printing involves three steps:
- Make or download a 3D model
- Slice and export the 3D model
- Build the 3D model
About Finder
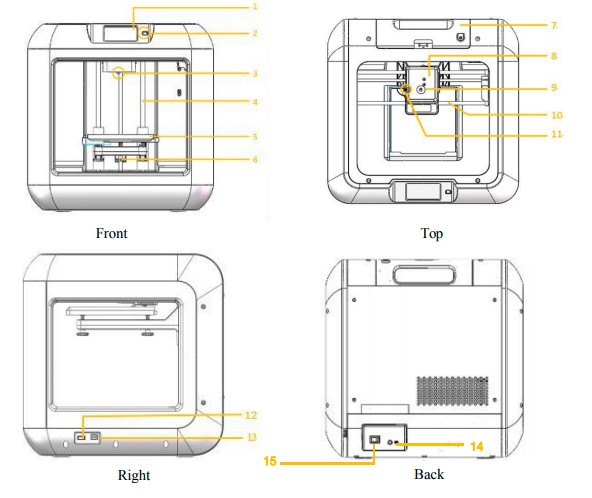
Views

- Touch screen
- Touch screen button
- Nozzle
- Z-axis guide rod
- Build plate
- Leveling nut
- Filament cartridge
- Extruder
- Filament intake
- X-axis guide rod
- Spring presser
- USB stick input
- USB cable input
- Power input
- Power switch
Terms
| Build Plate | The surface on which the Finder builds an object. |
|
Build Tape |
The blue tape that covers Finder’s build plate so that the object can stick to the build plate well. |
|
Build Volume |
The three dimensional amount of space that an object
will use once it is completed. The largest build volume of Finder is 140*140*140mm. |
|
Leveling Nuts |
Nuts under the build platform that are used for
adjusting the distance between the nozzle and build plate. |
|
Extruder |
The device that draws the filament from the spool, melts it and pushes it through a nozzle into the build plate. |
|
Nozzle |
Also called “print head”, which located at the bottom of the extruder where heated filament is squeezed out. |
|
Cooling Fan |
To cool the outer assembly of the extruder and gear motor. |
| Filament Intake | An opening located at the top of the extruder. |
|
Filament Guide Tube |
A black plastic piece that guides the filament from the filament cartridge to the filament intake. |
|
Filament Cartridge |
A specific box for placing FlashForge filament. |
|
Solid Glue Stick |
A solid adhesive used for making the model stick to the build plate firmly. |
|
Unclogging Pin Tool |
A tool that used for cleaning and unclogging the
extruder. |
|
Stamping Wrench |
A tool that used for seizing the nozzle’s metal cube or
throat tube. |
Reference
| Name | Finder |
| Number of Extruder | 1 |
| Print Technology | Fused Filament Fabrication(FFF) |
| Screen Size | 3.5’’ color IPS Touch Screen |
| Build Volume | 140×140×140mm |
| Layer Resolution | 0.05 – 0.4mm |
| Build Accuracy | ±0.2mm |
| Positioning Accuracy | Z axis 0.0025mm; XY axis 0.011mm |
| Filament Diameter | 1.75mm(±0.1) |
| Nozzle Diameter | 0.4mm |
| Build Speed | 30-150 mm/s |
| Software | FlashPrint、Support Simplify3D |
|
Support Formats |
Input:GX/G |
| OS | Win xp/Vista/7/8/10、Mac OS、Linux |
| Device Size | 420*420*420mm |
| Net Weight | 9Kg |
| AC Input | Input:DC24V 2.71A 65W |
|
Connectivity |
USB cable, USB stick, WiFi,
FlashForge Cloud, Polar Cloud |
Accessories

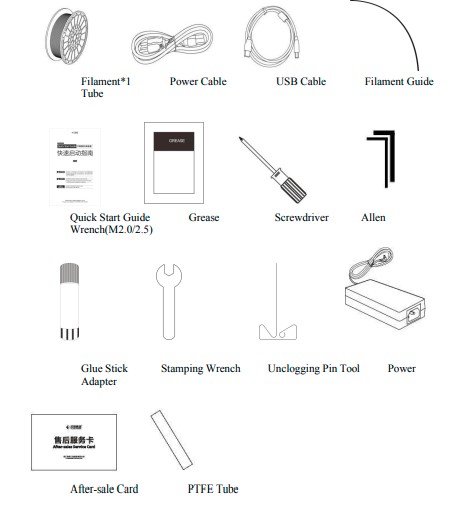
- Filament*1 Used for printing, detailed instruction in unpacking, and hardware assembly chapter of the user manual.
- Power Cable Used to power on the printer, detailed instructions in the unpacking chapter of the user manual.
- USB Cable is Used to connect the computer to the printer, then print files can be transferred and printed out, detailed instructions in unpacking and 7.2print methods of the user manual.
- Filament Guide Tube Used to guide the filament from the filament spool(after the filament detector) to extruder filament intake, detailed instructions in unpacking, and 4.3 Loading Filament chapter of the user manual.
- Quick Start Guide Used for first print instruction, help you finish your successful first print quickly.
- Grease is Used to lubricate the X, Y, and Z axis or other parts, please refer to the Flash Forge support team before you take maintenance steps, for printer and user goods.
- Screwdriver Used to tighten or untighten the screws and nuts when maintenance, please refer to the flash forge support team before you take maintenance steps, for printer and user goods.
- Allen Wrench (M2.0/2.5) Used to tighten or untighten the screws when maintenance, please refer to the flash forge support team before you take maintenance steps, for printer and user goods.
- Glue Stick Used to fasten the model to the build plate when printing, apply the glue to the build plate for a thin layer and make sure the model’s bottom layers are fingerprinted and fastened.
- Stamping Wrench Used to tighten or untighten the nozzle or Teflon tube or other parts when maintenance, please refer to the flash forge support team before you take maintenance steps, for printer and user goods.
- Unclogging Pin Tool Used to unclog extruder parts (filament intake, filament feeding wheel, Teflon tube, nozzle) when extruder maintenance, please refer to the flash forge support team before you take maintenance steps, for printer and user goods.
- Power Adapter Used to power on the printer, detailed instructions in the unpacking chapter of the user manual
After-sales service card Used when maintenance, please keep it well and provide it to the flash forge support team when maintenance. - PTFE Tube Used in the extruder and can be replaced after use for a long time, please refer to the flash forge support team before you take maintenance steps, for printer and user goods.
Maintenance and solutions
Problems and actions
| Problem | Cause | Corrective Action |
| Extruder head building off center. | Finder has lost track of the extruder head‘s exact location and is failing to build | Sending the extruder head to the home position will recalibrate the Creator3.Cancel your object, clear build plateform, send the extruder head to the
home position, and restart the object. |
| PLA is not extruding or sticking to the build tape properly. | This can be caused by the build plateform not being leveling with the extruder head. | Leveling the build platform will align the extruder head and ensure a better object quality. Cancel your object, clear build platform, level the build platform, and
restart the object. |
| Finder froze before
my object started. |
Finder may have received con
icting commands. |
Turn power switch off, wait 30 seconds,
and turn power switch on. |
| Spaghetti mess at end of build. | A layer of your object did not stick properly, model was saved with minimal surface area contacting the build platform, or object was built oating above the build platform
with no support selected. |
Use the preview feature in your slicing software to see the first layer height and position. Build with supports when necessary.
Contact customer service on how to calibrate the Z-Gap Offset. |
| Part only built halfway. | Filament ran out.
Filament clogged during build. |
Replace filament and resume build. See “No filament coming out”. |
| No filament coming out. | Clogged extruder.
Filament not properly loaded. |
Contact customer service.
Try running a lament change again to ensure the extruder gears have properly caught the lament. |
| Extruder will not
home. |
/ | Contact customer service. |
| Stringy or fraying
plastic layers on steep overhangs. |
Object overhangs are too far
apart or too steep (<45 degree angle). |
Build with supports. |
Unlogging the extruder
Use the unclogging tool to clean the extruder and unclog built-up filament
- Click on the filament change button on the screen and wait for the extruder to heat up. As the filament starts to purge, insert the unclog tool into the extruder intake (top).
- Clogged debris will be pushed down and will extrude from the extruder nozzle. You should push the unclog too all the way down to ensure all filament is purged. You do not need to push with excessive force, as this may damage the extruder.
Daily maintenance and use suggestion
- Please cover the top and close the front door to prevent the device from falling into dust when not using the device. If the device has not been used for a long time, it is recommended to use the original packaging.
- Grease moving parts regularly. For frequent users, add grease at least once every three months; For long-term nonusers, add grease at least every six months.
- Please clean residue and other sundries in time after printing is completed, to avoid sundries falling and affecting device use.
- As consumable, build tape may be damaged when adhesive force declines; Please change build tape in time to avoid affecting the print effect.
- Whenever possible, it is best to locate your object in the center of the build platform. Using the best orientation for your object is critical. Ensure that your object is located on the build platform and that you are using the best orientation for the building.
- For steep overhangs (Less than 45-degree angle) it is recommended to build with support.
For more maintenance and solutions, please visit Flashforgewebsite: www.flashforge.com
Supports and Service
FlashForge team is on standby and ready to help you with any challenges you may have with your Finder. If the issues or questions are not covered in this User Guide, you can seek solutions on our official website or contact us via telephone.
There are solutions and instructions to common issues that can be found in our knowledge base. Have a look first as most basic questions are answered there. http://www.FlashForge.com
The FlashForge support team can be reached by e-mail or phone between the working hours of 8:00 a.m. to 5:00 p.m. PST Monday through Saturday. In case you contact us during the off-duty time, your inquiry will be answered the following business day.
Note: Because of changing different filaments the extruder may be blockaded. It’s not owing to quality issues and is outside the scope of 400 hours of life. If encounter this problem, please contact our after-sale department and finish the cleaning work according to their instruction.
- Email:support@ff3dp.com
- ADD:No. 518, Xianyuan Road, Jinhua, Zhejiang
*When contacting support, please have your serial number ready. The serial number is a bar code on the back of your Finder.”
FCC Notice
This device complies with part 15 of the FCC Rules.
Operation is subject to the following two conditions:
- This device may not cause harmful interference, and
- this device must accept any interference received, including interference that may cause undesired operation.
FlashForge shall not be liable for errors contained herein for incidental consequential damages in connection with the furnishing, performance, or use of this material.
FAQs Flashforge Finder 3D Printer
What is the Flashforge Finder 3D Printer?
The Flashforge Finder is a user-friendly 3D printer designed for beginners and educational purposes. It offers a simple and intuitive interface, making it easy for users to start 3D printing without prior experience.
What are the key features of the Flashforge Finder 3D Printer?
Some of the key features include a compact and enclosed design, a color touchscreen for easy operation, assisted bed leveling for better print bed calibration, a built-in camera for remote monitoring, and compatibility with various 3D printing filaments.
What type of filament does the Flashforge Finder 3D Printer use?
The Flashforge Finder supports 1.75mm PLA filament, which is one of the most common and beginner-friendly 3D printing materials available.
What is the maximum build volume of the Flashforge Finder 3D Printer?
The maximum build volume of the Flashforge Finder is approximately 140 x 140 x 140 mm (5.5 x 5.5 x 5.5 inches), providing a relatively small printing space suitable for small to medium-sized objects.
Does the Flashforge Finder require assembly?
The Flashforge Finder comes almost fully assembled from the factory. Users will need to perform some basic setup tasks, like attaching the build plate and loading the filament, before they can start printing.
What software can I use with the Flashforge Finder 3D Printer?
The Flashforge Finder is compatible with a variety of slicing software options. FlashPrint, the proprietary slicing software developed by Flashforge, is recommended for use with this printer. It offers pre-configured settings optimized for the Finder.
Can I print wirelessly with the Flashforge Finder?
Yes, the Flashforge Finder has built-in Wi-Fi connectivity, allowing you to transfer 3D models wirelessly from your computer or smartphone to the printer for printing.
What is the print resolution of the Flashforge Finder 3D Printer?
The Flashforge Finder offers a layer resolution ranging from 100 to 500 microns, allowing you to choose between higher resolution for detailed prints or faster printing for less detailed objects.
Is the Flashforge Finder suitable for kids and educational use?
Yes, the Flashforge Finder is often recommended for educational purposes and is suitable for kids and beginners due to its simple and safe design.
Can I use third-party filaments with the Flashforge Finder?
While the Finder is designed to work well with Flashforge’s own PLA filament, many users have reported success with third-party 1.75mm PLA filaments. However, it’s essential to ensure that the filament diameter matches the printer’s specifications and to adjust print settings accordingly.
[embeddoc url=”https://manualsdock.com/wp-content/uploads/2023/07/Flashforge-Finder-3D-Printer.pdf” download=”all”]


