Ekids JJ-615 Digital Recording Studio

About Ekids
The leading producer of cutting-edge interactive electronic toys, educational tools, and actual electronics for children of all ages is eKids. Our extensive product selection, which includes toys licensed by Disney, Marvel, Nickelodeon, DreamWorks, Universal, Warner Brothers, Netflix, and other leading brands, is based on recognizable characters from a wide range of well-known films, television shows, and streaming services.
KIDdesigns, the parent company of eKids, was founded in 1988 and has won some of the most prestigious accolades in the business. Highlights include Mattel’s Licence of the Decade, The Toy Insider’s Top Holiday Toy, The Great American Toy Test’s “Top Toy” award, Family Fun’s “Toy of the Year” award, and the “Best New Product Innovation” award.
Important Message to Customers
Thank you for purchasing one of our many top-quality electronic products. Please take a moment to read through these instructions to help you understand the safe and proper way to use this toy to extend its usability. Keep these instructions for future reference as they contain important information.
Installing the Batteries
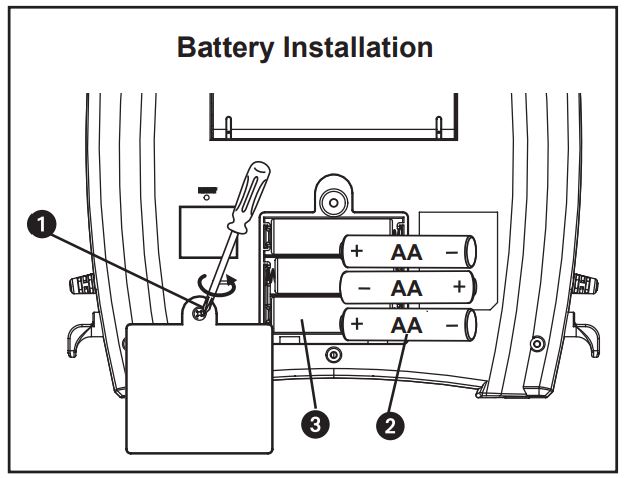
- Using a Phillips screwdriver, open the battery compartment door located on the back of the unit.
- Insert 3 new AA (R6) batteries in the battery compartment. Make sure batteries match the + and – as indicated in the battery compartment diagram.
- Replace battery compartment door. Do not overtighten screw.

Battery Use Cautions and Tips for Safety & Best Performance
- Only use the recommended/supplied batteries or equivalent.
- Use alkaline batteries for longer life.
- Do not mix old and new batteries, and do not mix alkaline, carbon-zinc or rechargeable nickel-cadmium batteries.
- Insert batteries with proper polarity (+/–) as indicated.
- Remove exhausted batteries from the product.
- Recharge rechargeable batteries under adult supervision.
- Do not attempt to recharge non-rechargeable batteries.
- Do not open batteries or heat them beyond normal ambient temperatures.
- To prevent battery leakage or damage remove batteries from a product if it will not be used for a month or longer.
- Use extreme caution handling leaking batteries (avoid direct contact with eyes and skin). If battery leakage comes in contact with eyes, IMMEDIATELY flush the eye with lukewarm and gently flowing water for at least 30 minutes. If skin contact occurs, wash the skin with clear water for at least 15 minutes. Seek medical attention if any symptoms occur.
- Store in cool, dry, ventilated area away from hazardous or combustible material.
- Do not dispose of batteries in the household trash or fire.
- Follow applicable laws and local regulations for the disposal and transportation of batteries.
Remove Demo Tab
The Boombox has a demo tab for in-store demonstration purposes. Make sure to remove this tab. To do so, gently pull on tab. Dispose of tab properly.
OVERVIEW

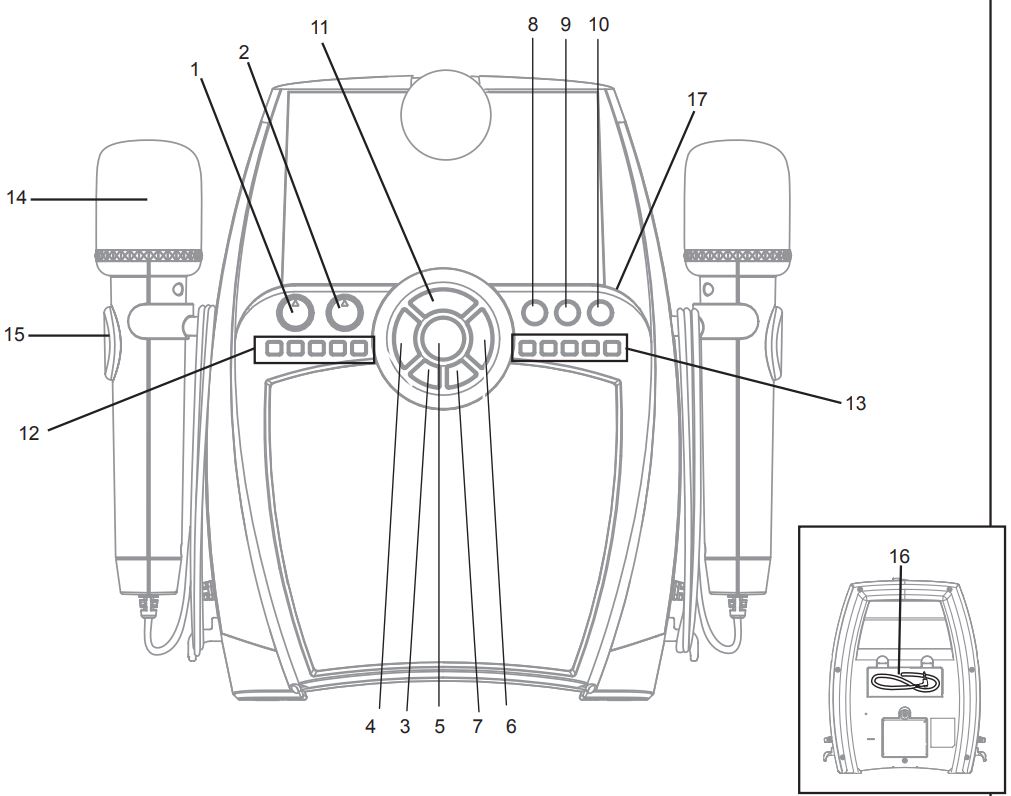
- Microphone Volume
- Music Volume
- Power On/Off Button
- Previous Track Button
- Play/Pause Button
- Next Track Button
- Repeat On/Off Button
- FX 1/ Help 1
- FX 2/ Help 2
- FX 3/ Help 3
- Built In Song
- Song Recording Buttons
- Sing Along Recording Buttons
- (2) Microphones
- (2) MIC Buttons
- AUX Line-in Cable
- Smartphone Cradle
Power On/Power Off
When the unit is off, press the Power On/Off Button to turn the unit on. You can turn off the unit at any time by pressing the Power On/Off Button.
Help Buttons – Press and hold the FX1, FX2, or FX3 Button to hear voice prompts on how to store songs, save your performance, and make layered recordings!
Using the Microphone
Pull UP on either mic to release it from the post on the side of the unit. Be relaxed and ready to sing! Press the button on the microphone while singing or speaking. Release the button to mute the microphone.
TIP:
To avoid feedback (unpleasant squealing or howling sound), do not point the mic toward the speaker.
Recording From Your Music Device
Use an AUX Line-in Cable to connect an audio device such as a smartphone, MP3 player, CD player, etc., to the Boombox. Now you can record your own favorite music!
- Connect the AUX Line-in Cable on the Boombox to the line out or headphone jack of your audio device.
- Turn on your audio device and put it in Play mode. The Play/Pause (5), Previous (4), and Next (6) buttons on the boombox will function with your connected device.
- After you have selected a song, use the Play/Pause Button to pause the song. Press and hold any of the 5 Song Recording Buttons (12) until it starts to blink. The boombox is now recording. Press the Play/Pause Button again to start the music and record the song from your device.
Note: Any Song Recording Button that is lit up already has a recording stored. Any Song Recording Button that is not lit up is empty and ready to record. Each Song Recording Button contains 4 minutes of memory. To stop recording, press and release the Recording Button that is currently in use. (Please note, any input from the microphones during recording will be recorded along with the song.)
Recording Your Voice
Once a song is recorded from your device onto the boombox, you can record as you sing along! Press and hold any of the 5 Sing-Along Recording Buttons (13) until it starts to blink. Once recording begins, press a song button (11-13) to start the music and then hold the MIC Button (15) to sing and record your voice over the music. (Please note: any input from the boombox or the AUX-in during recording will be recorded along with the input from the microphone.)
Recording Multiple Songs
We recommend that you use the Song Recording Buttons (12) to record and store your favorite songs and Sing Along Recording Buttons (13) for storing sing-along recordings. Feel free to record anything, anywhere!
Vocal Effects
You can add three different vocal effects as you sing through the Microphones. Press and release FX1, FX2, or FX3 (8-10) to try them all!
Layered Recordings
Once a new recording is started, any input (AUX line-in, microphone, built-in music) and any other previous recordings that are played will be part of the new recording. Try singing along with yourself as back-up!
Playing Built-In Music
- You can play the pre-recorded song you want to sing along to by pressing the Built-In Song Button (11).
- Use the Microphone to sing along (press the MIC Button).
Troubleshooting
If the boombox is experiencing a fuzzy or distorted sound, check the batteries. They are most likely weak and need to be replaced with 3 brand new “AA” batteries. In the event of interrupted operation, use the extended wire of a paperclip or other thin tool to press in the Reset button located on the back of the unit.
Questions or Comments
For questions or comments regarding this or other eKids products, please call our toll-free number: 1-888-TOP-TOYS
Please also visit our website: www.ekids.com
FCC Information
This device complies with Part 15 of the FCC rules. Operation is subject to the following two conditions: (1) this device may not cause harmful interference, and (2) this device must accept any interference received, including interference that may cause undesired operation.
NOTE:
This equipment has been tested and found to comply with the limits for a Class B digital device, pursuant to Part 15 of the FCC rules. These limits are designed to provide reasonable protection against harmful interference in a residential installation. This equipment generates, uses, and can radiate radio frequency energy and, if not installed and used in accordance with the instructions, may cause harmful interference to radio communications. However, there is no guarantee that interference will not occur in a particular installation. If this equipment does cause harmful interference to radio or television reception, which can be determined by turning the equipment off and on, the user is encouraged to try to correct the interference by one or more of the following measures:
- Reorient or relocate the receiving antenna.
- Increase the separation between the equipment and the receiver.
- Connect the equipment to an outlet on a circuit different from that to which the receiver is connected.
- Consult the dealer or an experienced radio/TV technician for help.
WARNING: Changes or modifications to this unit not expressly approved by the party responsible for compliance could void the user’s authority to operate the equipment.
CAN ICES-3 (B)/NMB-3(B)
Limited One Year Warranty
eKids warrants this product to be free from defects in workmanship and materials, under normal use and conditions, for a period of one (1) year from the date of original purchase. Should this product fail to function in a satisfactory manner, it is best to first return it to the store where it was originally purchased. Should this fail to resolve the matter and service still be required by reason of any defect or malfunction during the warranty period, eKids will repair or, at its discretion, replace this product without charge. This decision is subject to verification of the defect or malfunction upon delivery of this product to the Factory Service Center authorized by Customer Service. If service is required, please call Customer Service at 1-888-TOP-TOYS (867-8697) to obtain a Return Authorization Number and shipping instructions. A copy of the sales receipt is required to validate in-warranty coverage.
Disclaimer of Warranty
NOTE:
This warranty is valid only if the product is used for the purpose for which it was designed. It does not cover (i) products that have been damaged by negligence or willful actions, misuse or accident, or which have been modified or repaired by unauthorized persons; (ii) cracked or broken cabinets, or units damaged by excessive heat; (iii) damage to digital media players, CD’s or tape cassettes (if applicable); (iv) the cost of shipping this product to the Factory Service Center and its return to the owner.
This warranty is valid only in the United States of America and does not extend to owners of the product other than to the original purchaser. In no event will eKids or any of its affiliates, contractors, resellers, their officers, directors, shareholders, members or agents be liable to you or any third party for any consequential or incidental damages, any lost profits, actual, exemplary or punitive damages. (Some states do not allow limitations on implied warranties or exclusion of consequential damages, so these restrictions may not apply to you.) This warranty gives you specific legal rights, and you may also have other rights which vary from state to state. Your acknowledgment and agreement to fully and completely abide by the above-mentioned disclaimer of warranty is contractually binding to you upon your transfer of currency (money order, cashier’s check, or credit card) for the purchase of your eKids product.
© 2016 eKids LLC.
Questions? Visit www.ekids.com
or call 1-888-TOP-TOYS
1299 Main Street Rahway NJ 07065
FAQS About Ekids JJ-615 Digital Recording Studio
What is a digital recording studio?
A digital recording studio is a setup that allows musicians, producers, and audio enthusiasts to record, edit, mix, and produce music or audio using digital technology. It typically includes hardware components like audio interfaces, microphones, headphones, and MIDI controllers, as well as software for recording, editing, and mixing audio.
How does a digital recording studio differ from an analog studio?
The main difference is in the technology used. Analog studios use traditional analog equipment, such as tape machines and analog consoles, while digital studios rely on computers and software to process and manipulate audio data. Digital studios offer greater flexibility, ease of editing, and the ability to store large amounts of audio data.
What features should I look for in a digital recording studio?
Features to consider may include the number and type of audio inputs/outputs, the quality of preamps, compatibility with your computer operating system, recording resolution, bundled software, MIDI capabilities, and overall build quality.
Can I record vocals and instruments with a digital recording studio?
Yes, digital recording studios are designed to record vocals and various instruments. Depending on the model, they may offer multiple audio inputs to accommodate various recording scenarios.
What kind of computer do I need for a digital recording studio?
Most digital recording studios require a computer with sufficient processing power and memory to handle the demands of audio processing software. Check the system requirements of the specific recording studio you are considering for compatibility.
Can I use virtual instruments and plugins with a digital recording studio?
Yes, virtual instruments and plugins are an essential part of digital recording studios. They allow you to add realistic instrument sounds and various audio effects to your recordings.
Is the Ekids JJ-615 suitable for professional use?
I cannot provide specific information about the Ekids JJ-615 as it is beyond my last update. However, the suitability of any digital recording studio for professional use depends on its features, audio quality, and performance capabilities. It’s best to research reviews and seek professional opinions to assess its suitability for your needs.
For more manuals for Ekids, Visit Manualsdock
[embeddoc url=”https://manualsdock.com/wp-content/uploads/2023/07/Ekids-JJ-615-Digital-Recording-Studio-User-Manual.pdf” download=”all”]


